
There are several good open source video editors. Some provide basic editing. Others provide all sorts of effects and transitions. The OpenShot editor provides a nice balance between features and usability.
In this chapter, you will learn the following:
How to convert video files from one format to another
How to combine short video clips into a full-length video
How to create stills
How to add transitions
You can download OpenShot from http://openshot.org/ . Run the file and accept the defaults.
Converting Video Files
When we started writing this chapter, we tried directly editing the video files (MOD files) produced by our camera. However, OpenShot was prone to random freezes. So, we went to the Internet and scanned the forums to see whether anyone else had seen this problem. It turns out that they had. OpenShot on Windows doesn’t work well with the MOD file format we were using. We needed to convert the files to another format for the problem to go away.
The program HandBrake has only one job, video conversion. And it does it pretty well; it can handle all the common video formats and most of the uncommon ones. You can download the program from https://handbrake.fr/ . Installation consists of running the downloaded file and selecting all the defaults.
Say you want to convert every video that you shot and downloaded to your computer; in other words, you want to do a batch conversion. Open the Preferences dialog by selecting Tools ➤ Preferences, as shown in Figure 13-1.
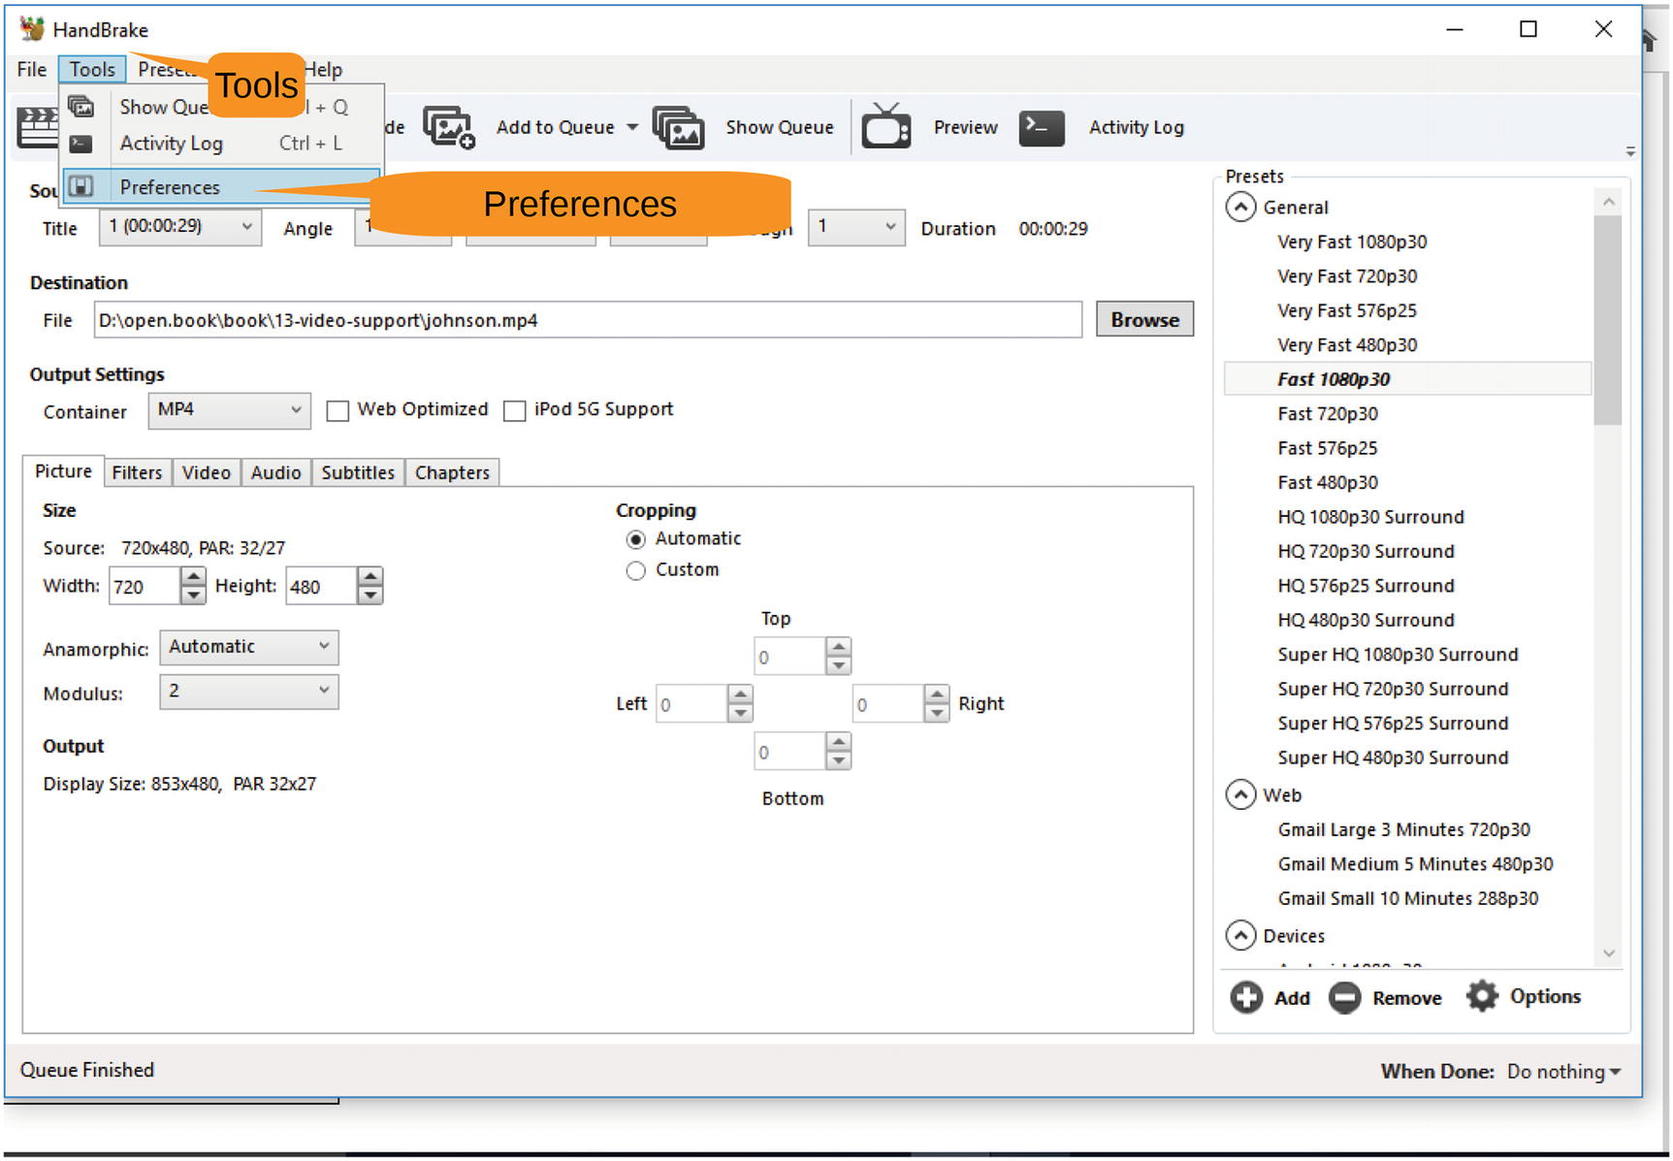
Figure 13-1 Opening the Preferences dialog
Figure 13-2 shows the Preferences dialog . Click Output Files in the first column to select the Output Files section and then use the Browse button to select the output directory. This directory should be different from the one containing the input files. In this example, we’ve created a directory named hand.out to receive the files.
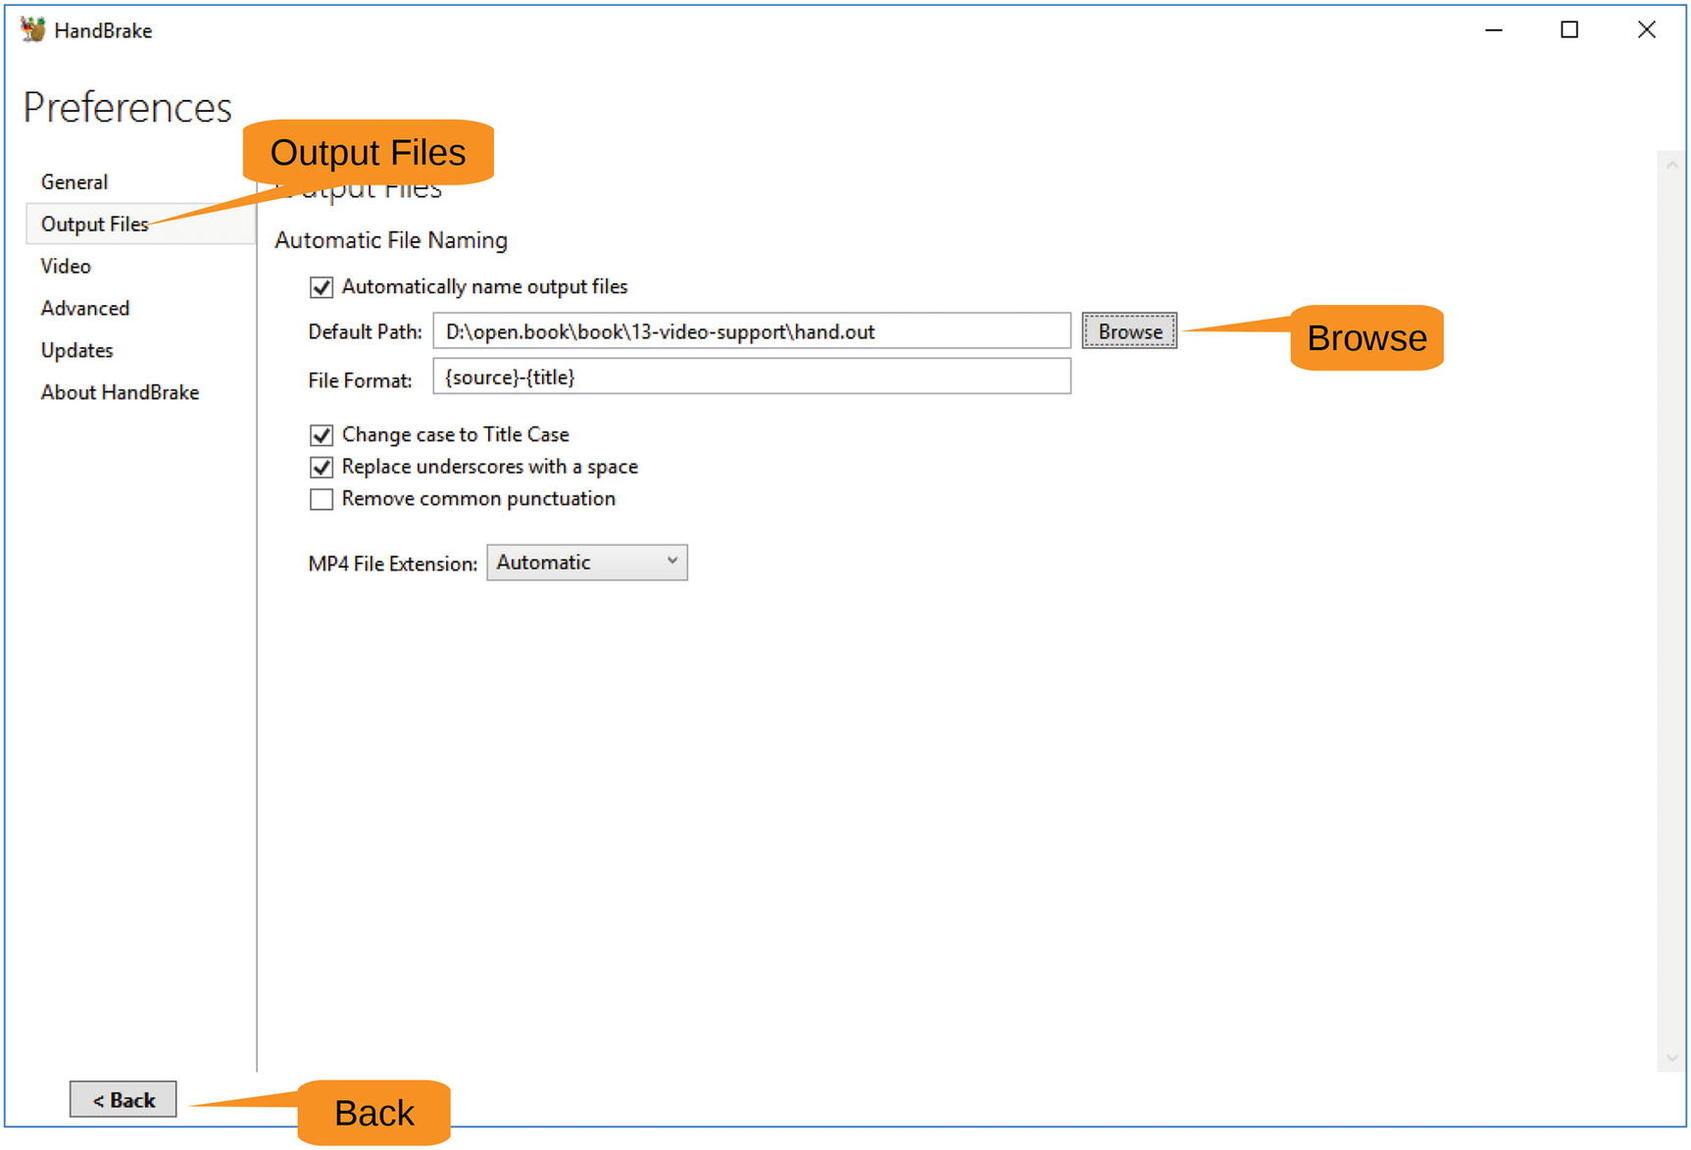
Figure 13-2 Setting the default path for output
Clicking Back returns you to the main window, as shown in Figure 13-3. Let’s start the process of converting the files by clicking Open Source.
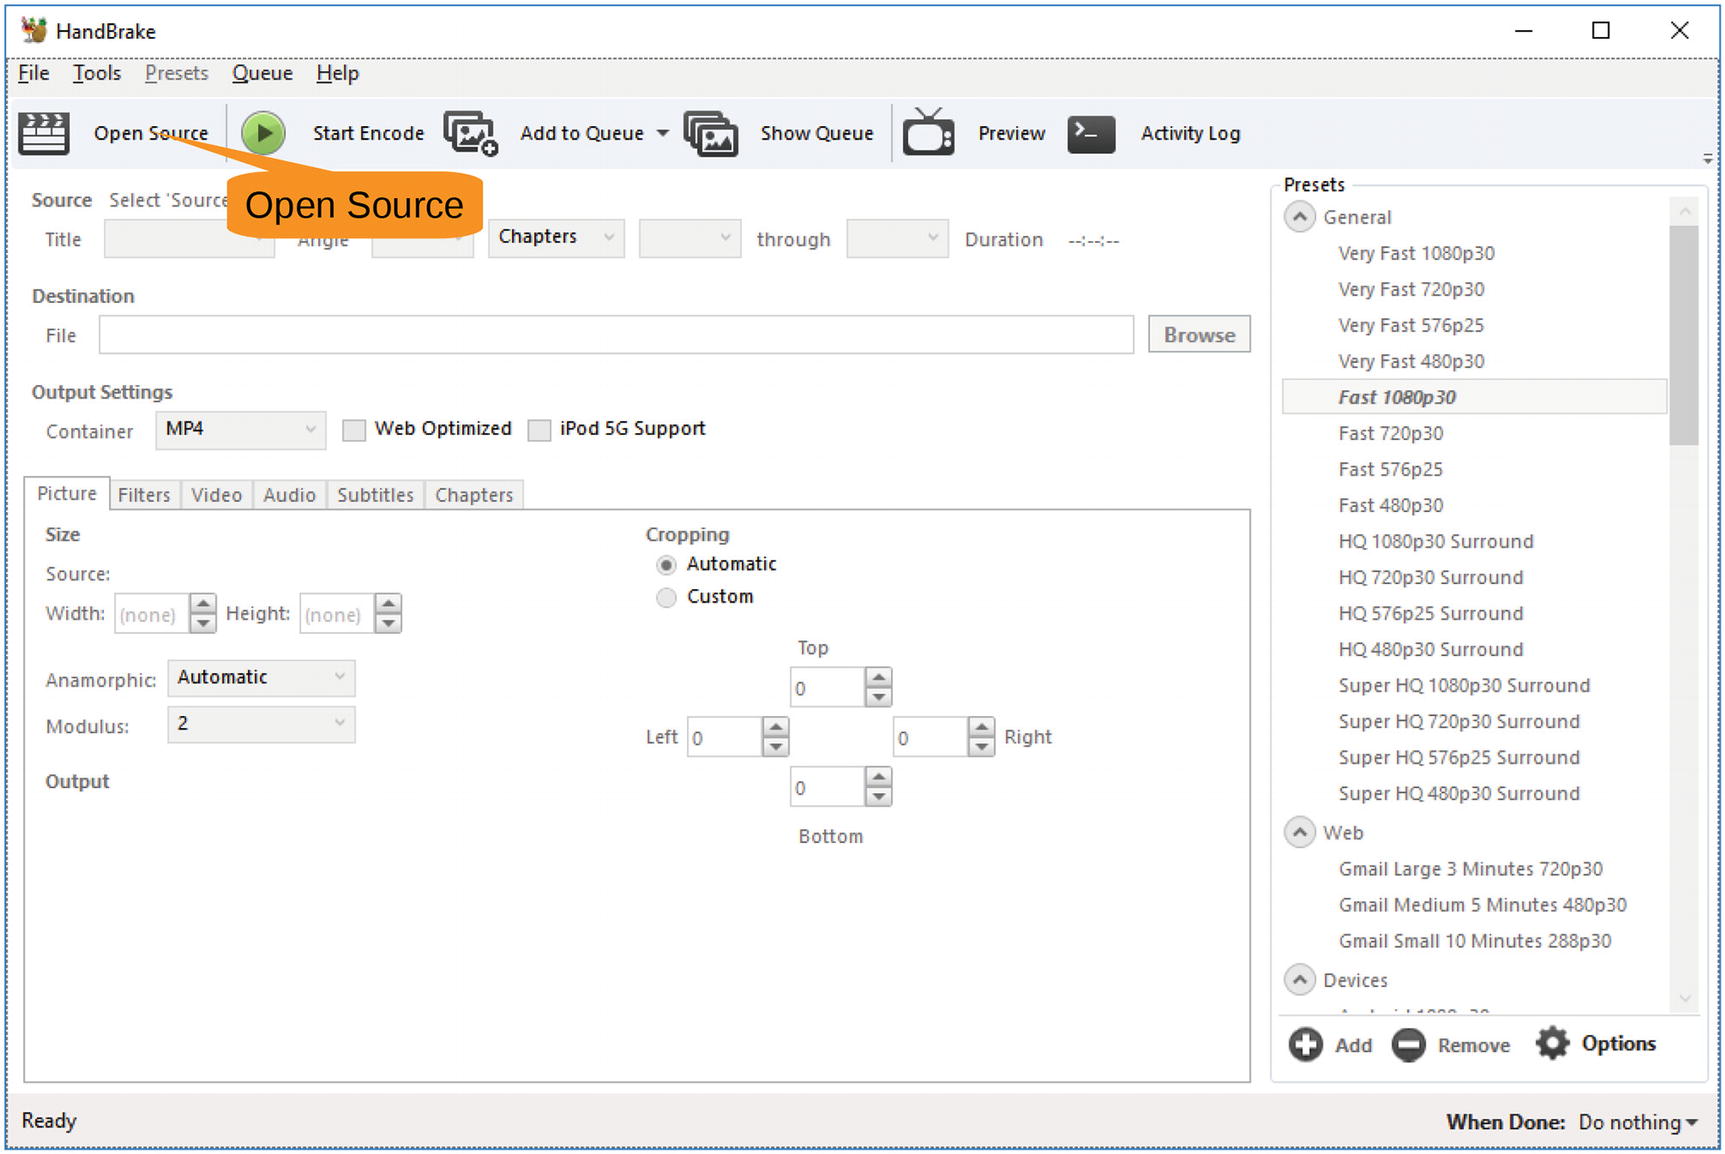
Figure 13-3 Starting the conversion process
The program can process a single file or an entire directory with multiple files. In this example, you want every file you downloaded from your camera, so select Folder (Batch Scans), as shown in Figure 13-4.
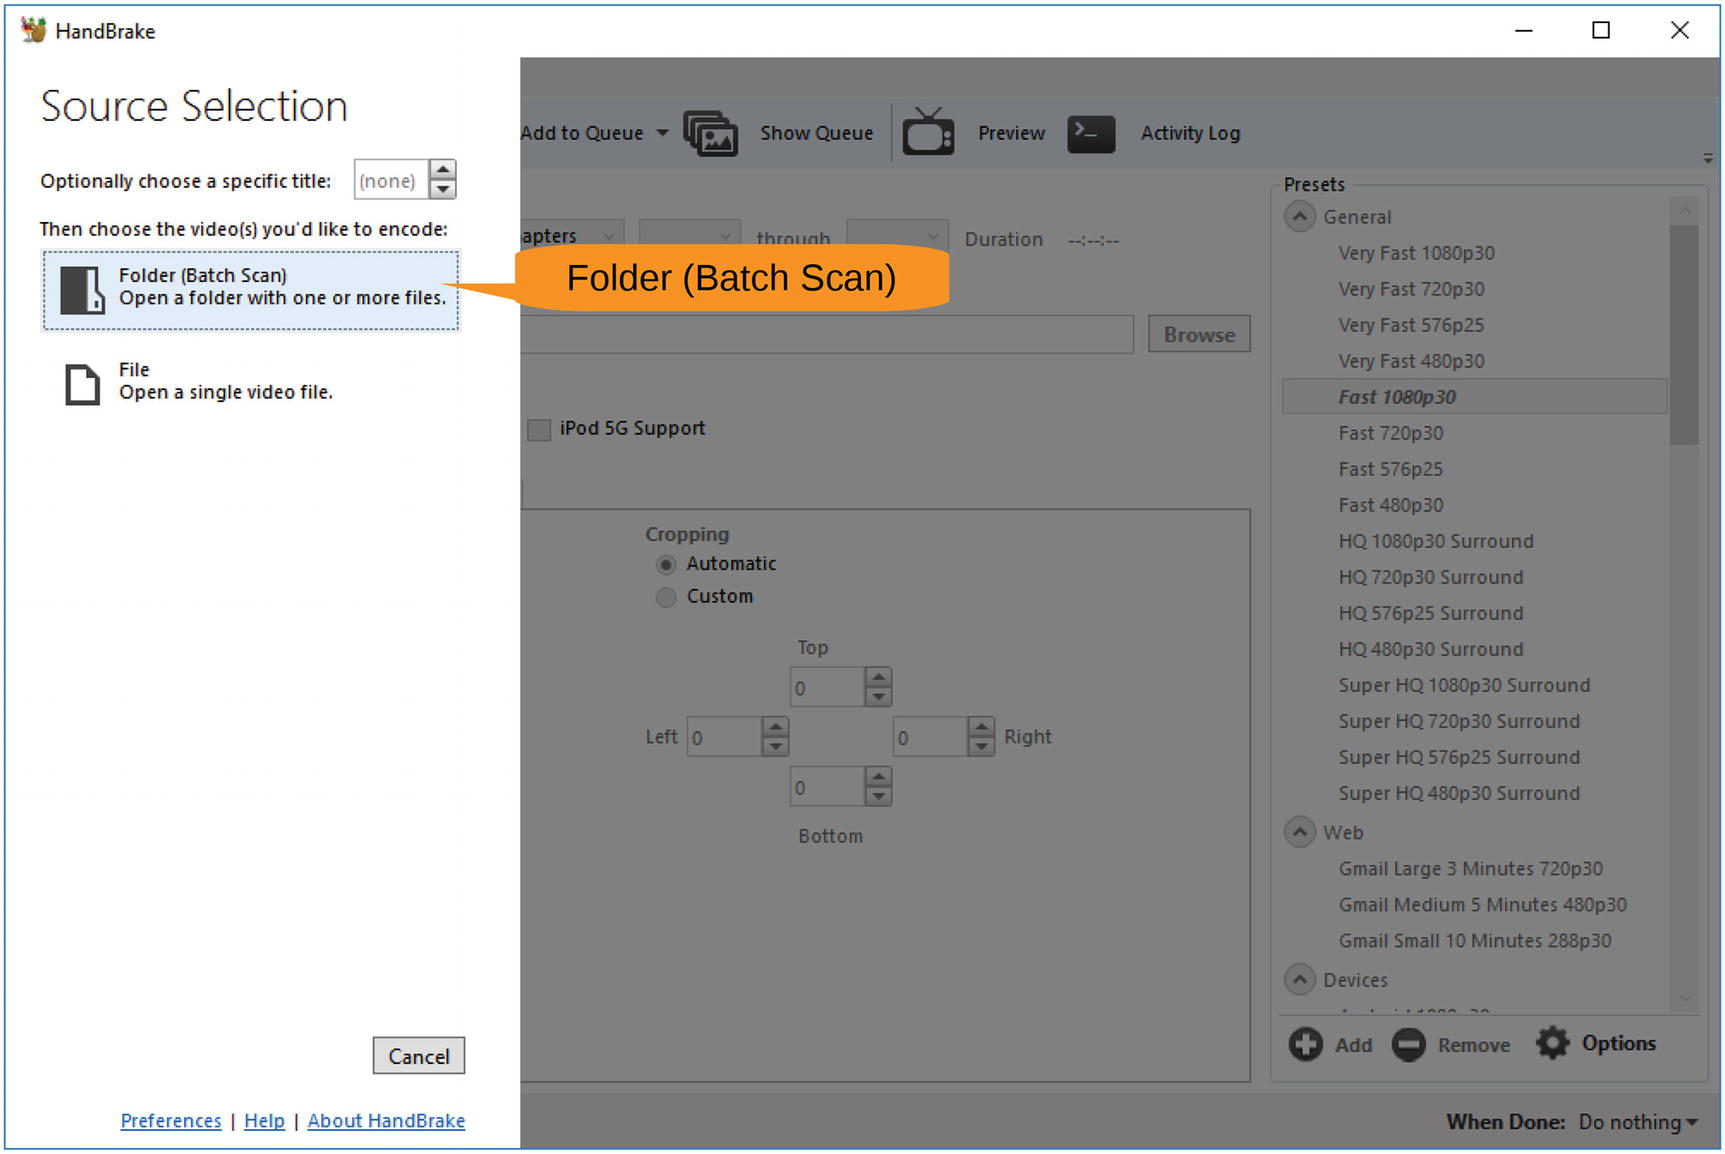
Figure 13-4 Starting a batch scan
The program will display a selection dialog allowing you to select the folder with the files in it. When you click Select Folder, a progress dialog (Figure 13-5) appears.
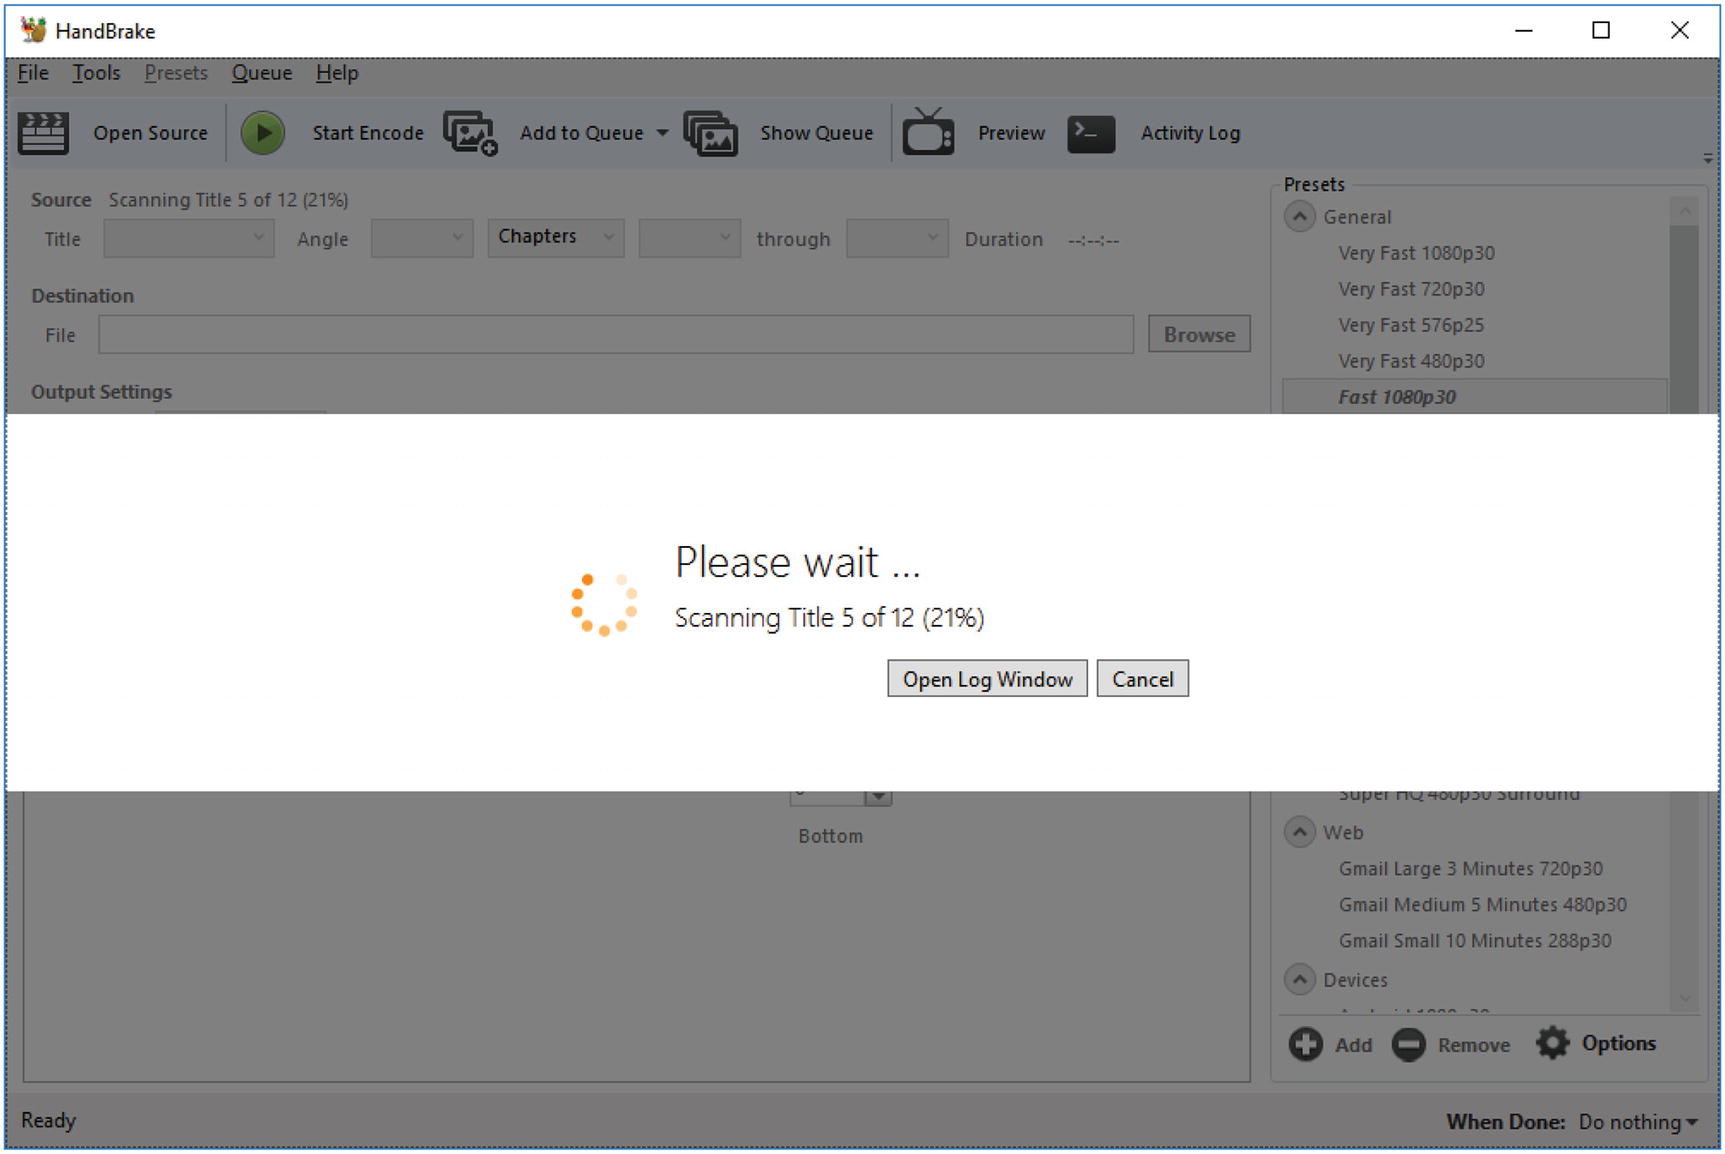
Figure 13-5 Progress dialog
There’s one more step needed to get the files into the system. When you get back to the main window, you need to click the triangle next to Add to Queue and select Add All, as illustrated in Figure 13-6.
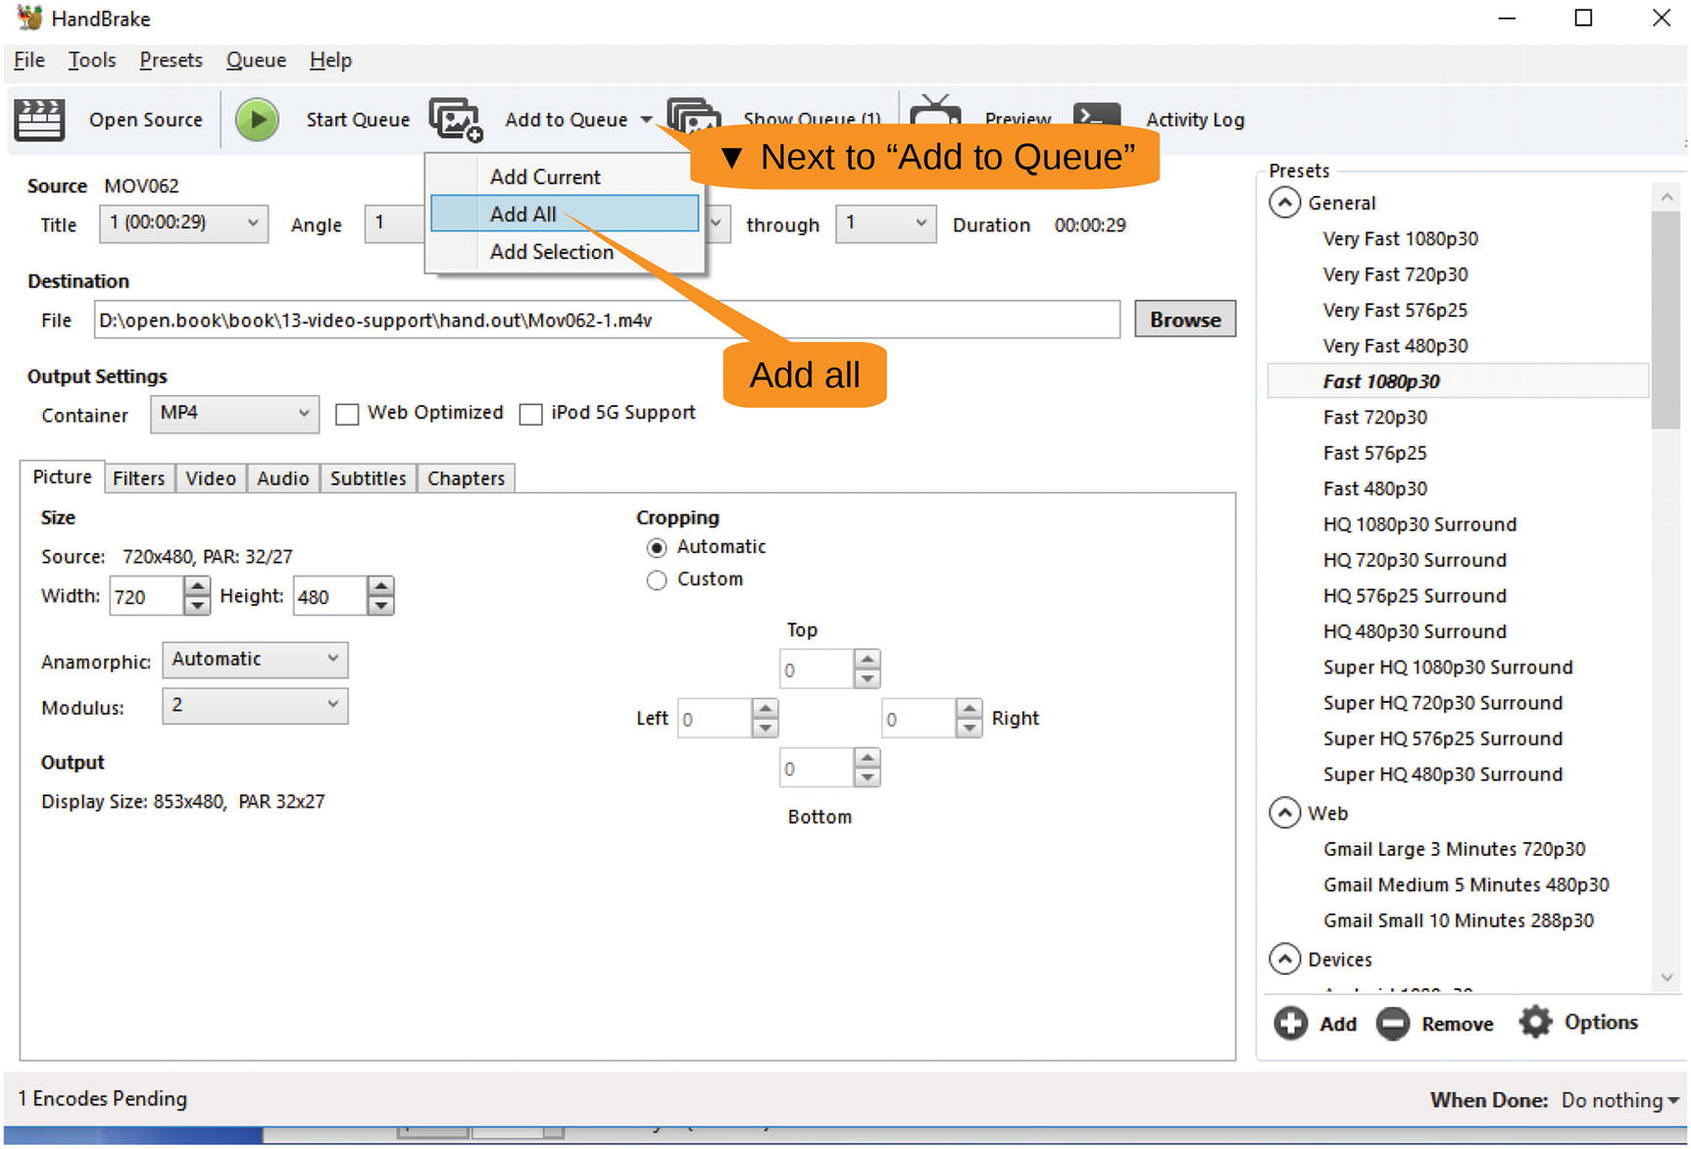
Figure 13-6 Adding all the files
The program now displays a warning concerning the addition of subtitles, as shown in Figure 13-7. In this example, we have no subtitles, but if you do, they could be added in OpenShot; click Yes to continue.
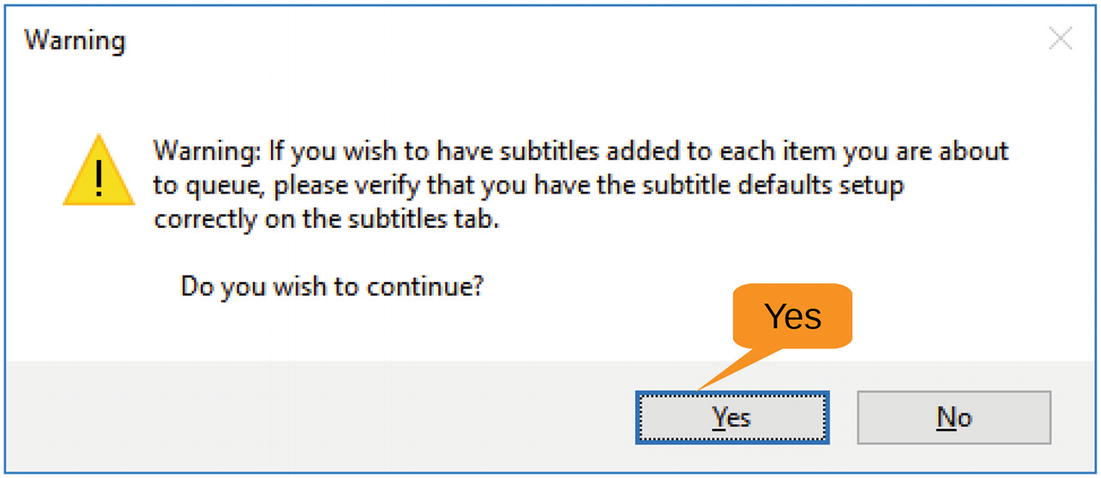
Figure 13-7 Subtitle warning dialog
We have added eight jobs to the queue to do a direct conversion. In other words, we want the resulting video to have the same resolution and frame rate as the original. For that reason, you leave the output settings alone. The only reason you would want to play with these settings is if you were reducing the resolution or frames per second so as to make the video smaller. For example, if you were e-mailing the videos or displaying them on the Web, you would want a small file size.
Let’s do a quick check to make sure you have everything by clicking Show Queue in the main window. The Queue dialog will pop up, as shown in Figure 13-8. Everything looks in place, so let’s close the window.
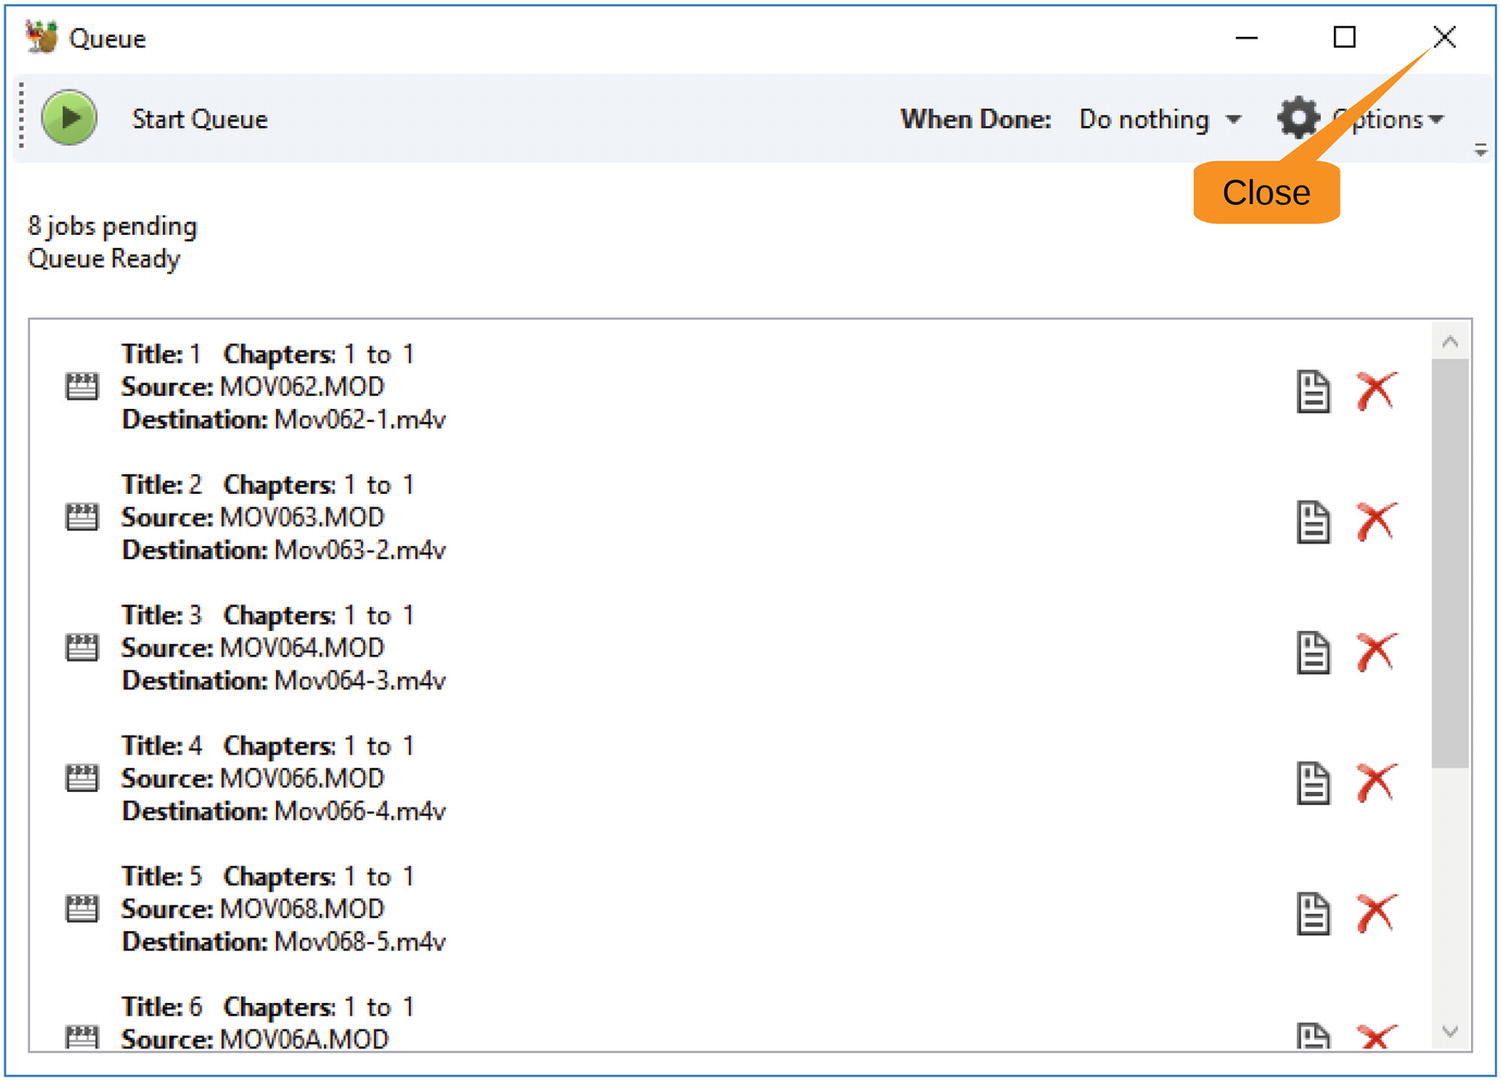
Figure 13-8 Job queue
It’s time to do the conversion, so click Start Queue, and the conversion begins, as shown in Figure 13-9.
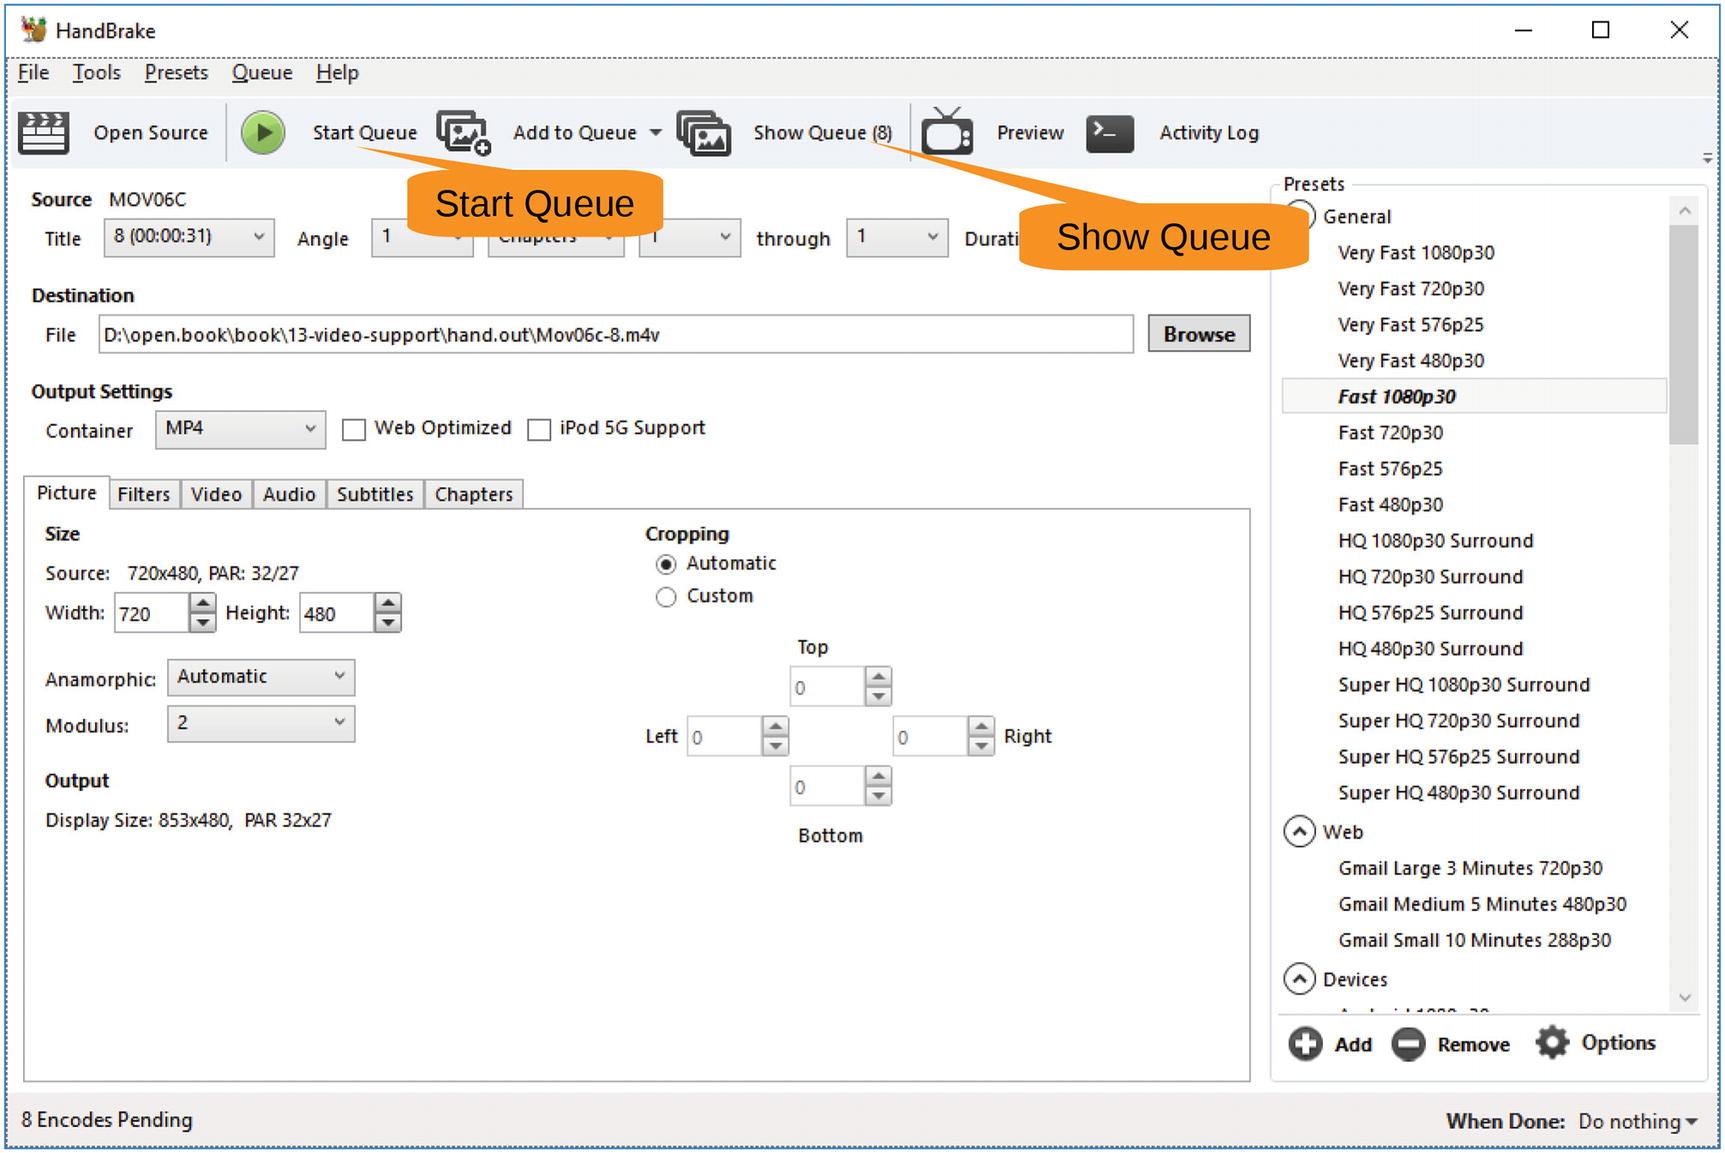
Figure 13-9 Showing and starting the queue
The encoding begins. This takes quite a bit of processing, so feel free to go for coffee. Actually, it wouldn’t hurt to have a quick lunch too.
Figure 13-10 shows HandBrake working on the files.
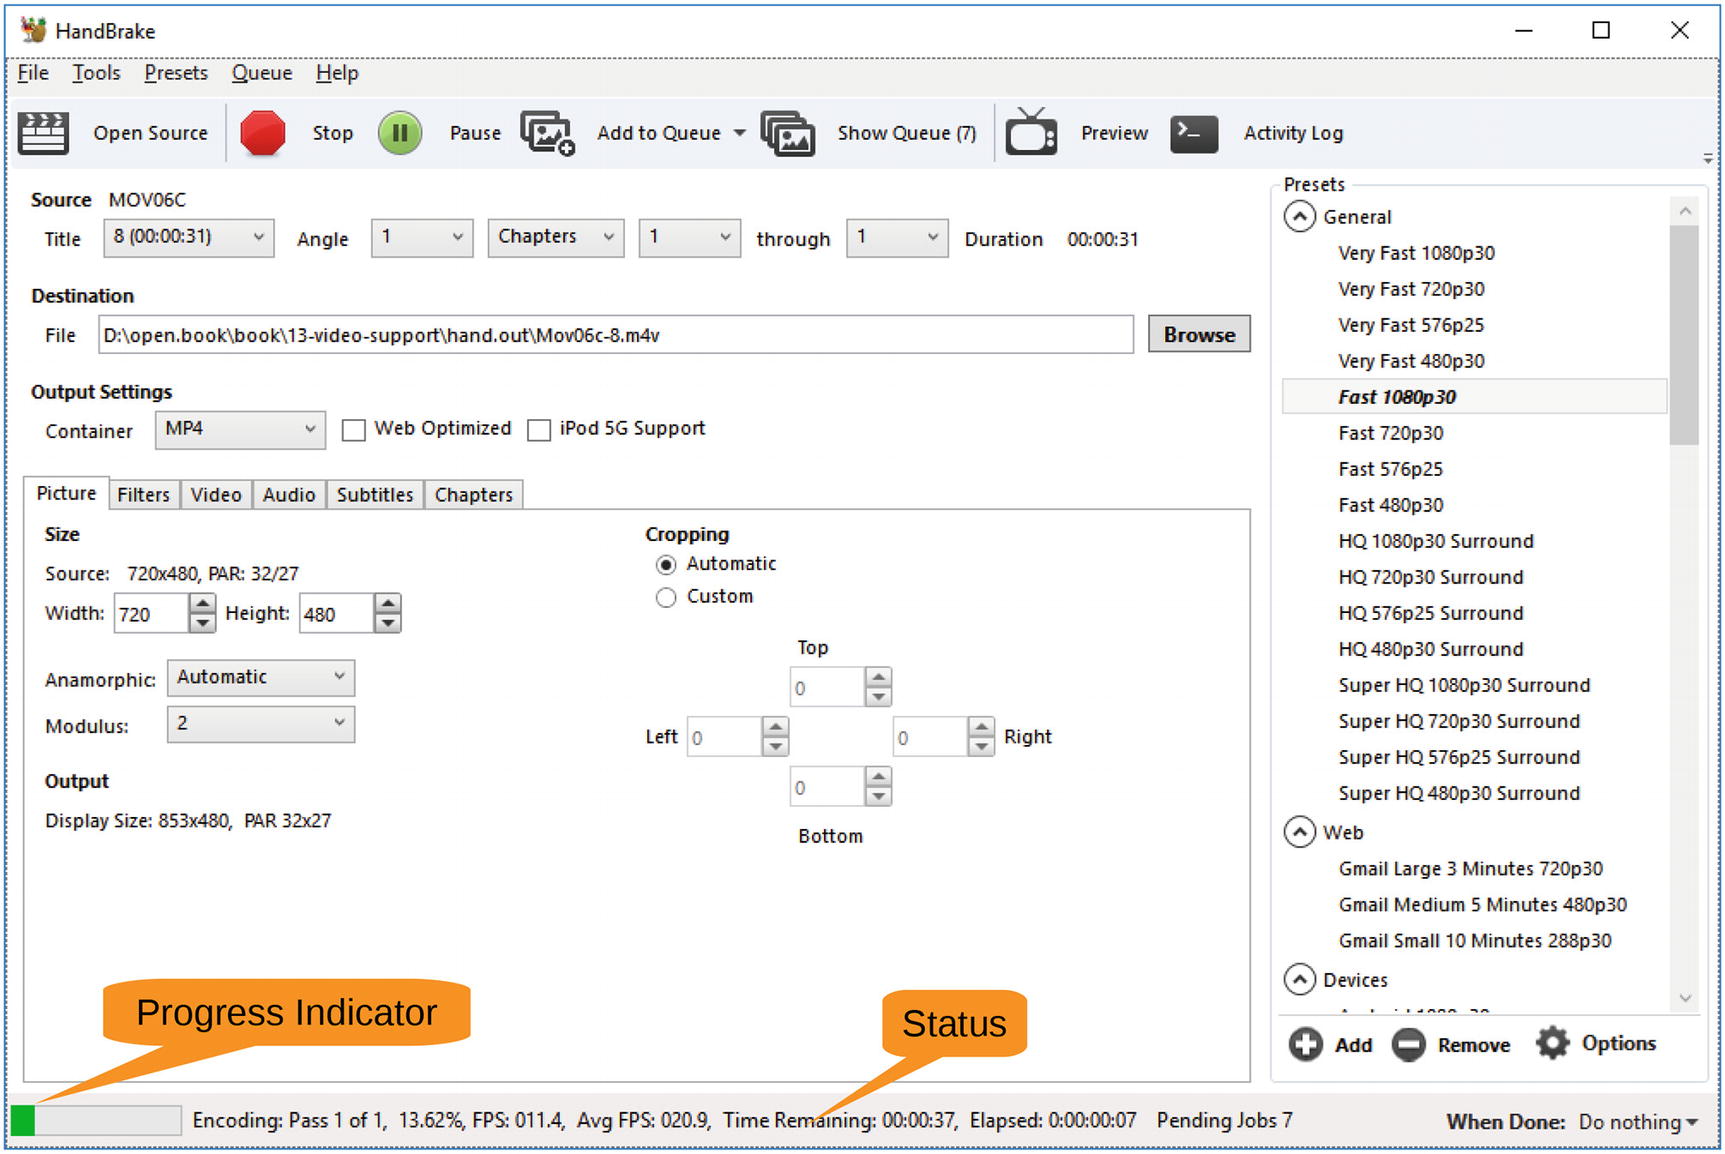
Figure 13-10 The encoding in progress
When the system is finished, the resulting files will all be in the hand.out directory ready for use with OpenShot.
Importing the Media
When OpenShot starts, it displays a pop-up window asking if you want to go through the tutorial. Let’s dismiss the tutorial by clicking Hide Tutorial, as shown in Figure 13-11. You can always go back and view it by selecting Help ➤ Tutorial.
The layout of the panels needs work. The tracks are difficult to see. So, grab the handle between the tracks at the top of the screen and drag it up.
Now you need some media, so click the Import Media icon (the plus sign).
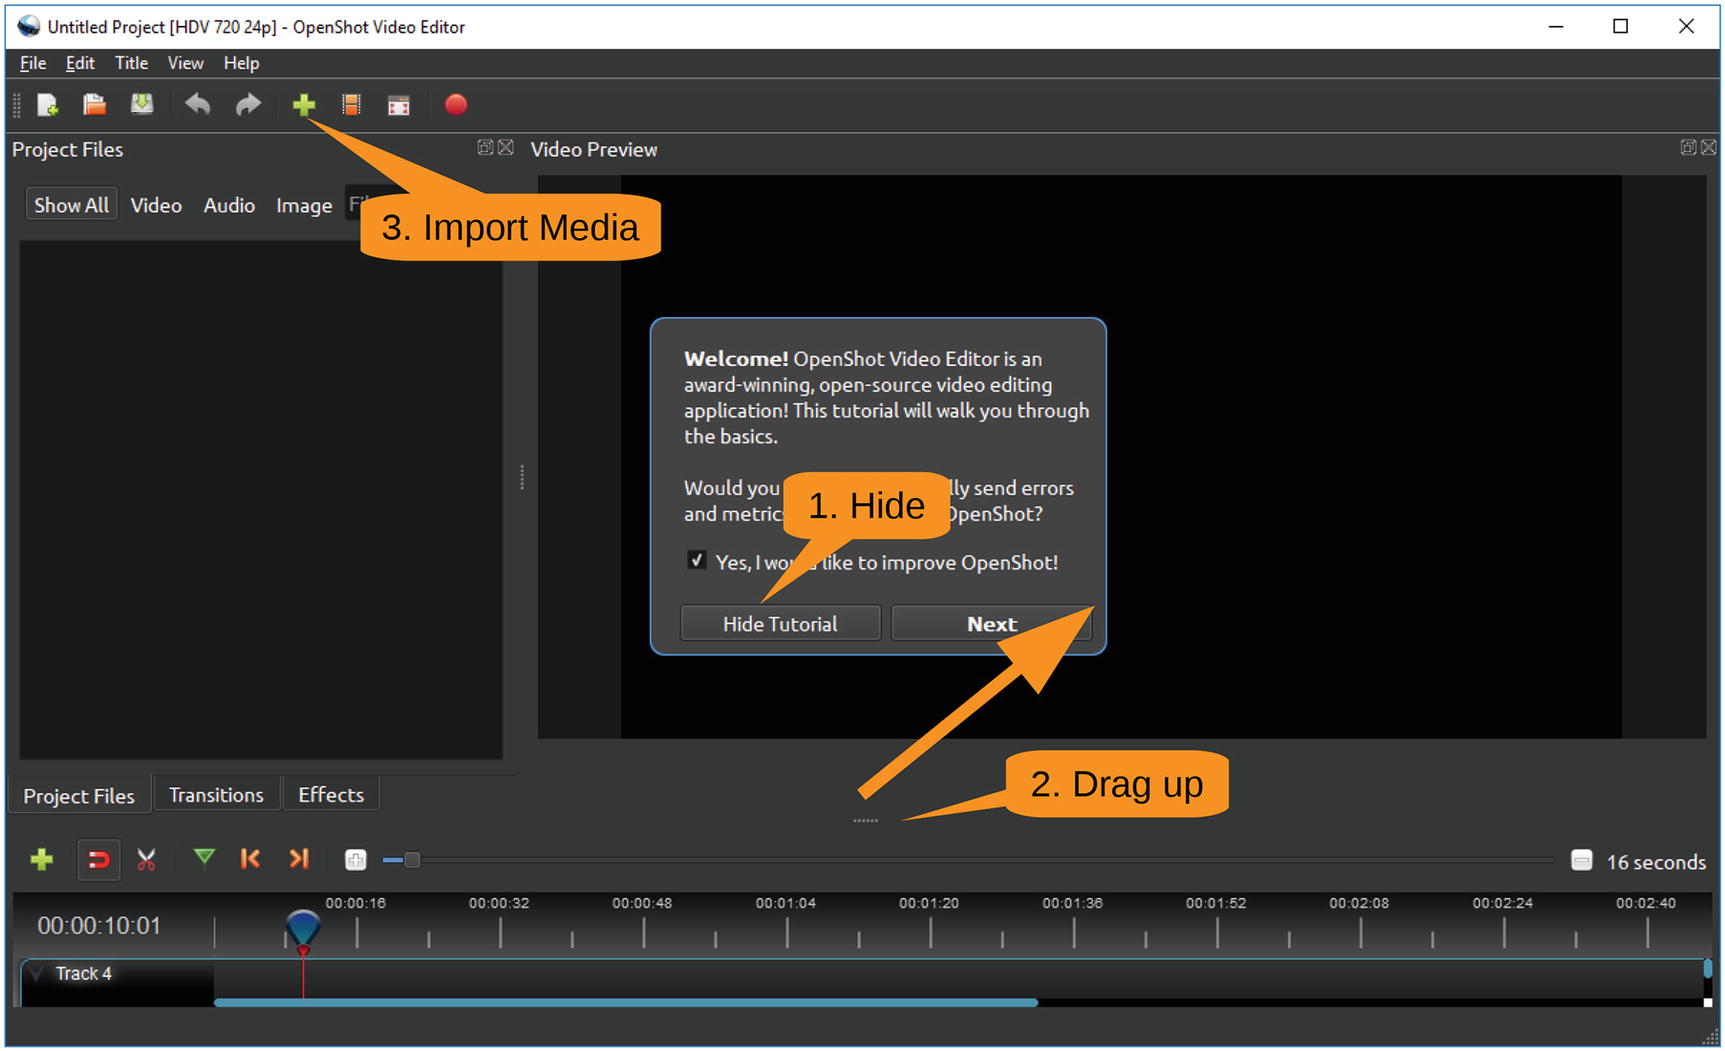
Figure 13-11 OpenShot initial screen
A file selection dialog appears. You want all your video files, so click the first file, Shift+click the last one, and select Open. Figure 13-12 illustrates these steps.
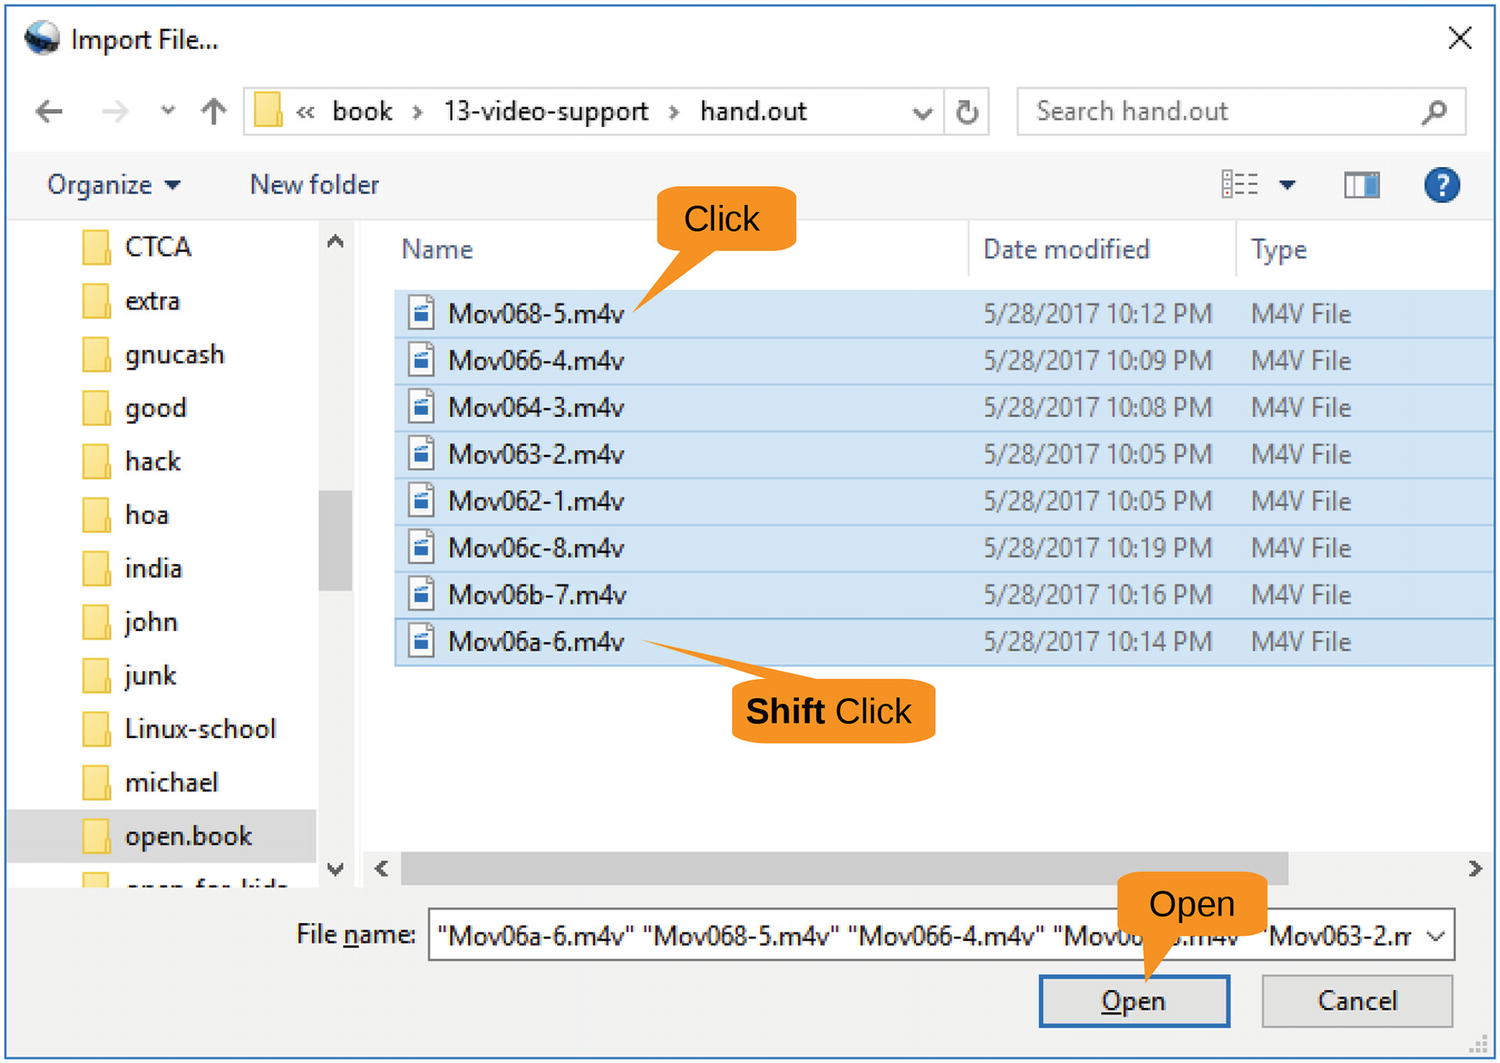
Figure 13-12 Opening video files
The following examples use some video files that we shot to explain how an antique Johnson farebox works. You can download these files from https://www.apress.com/us/book/9781484230749 to follow along with the steps.
The files are now loaded into the Project Files panel, as shown in Figure 13-13. However, they are shown as thumbnails. It’s going to be easier to work with them if you display them as a list, so right-click inside the Project Files panel and select Details View.
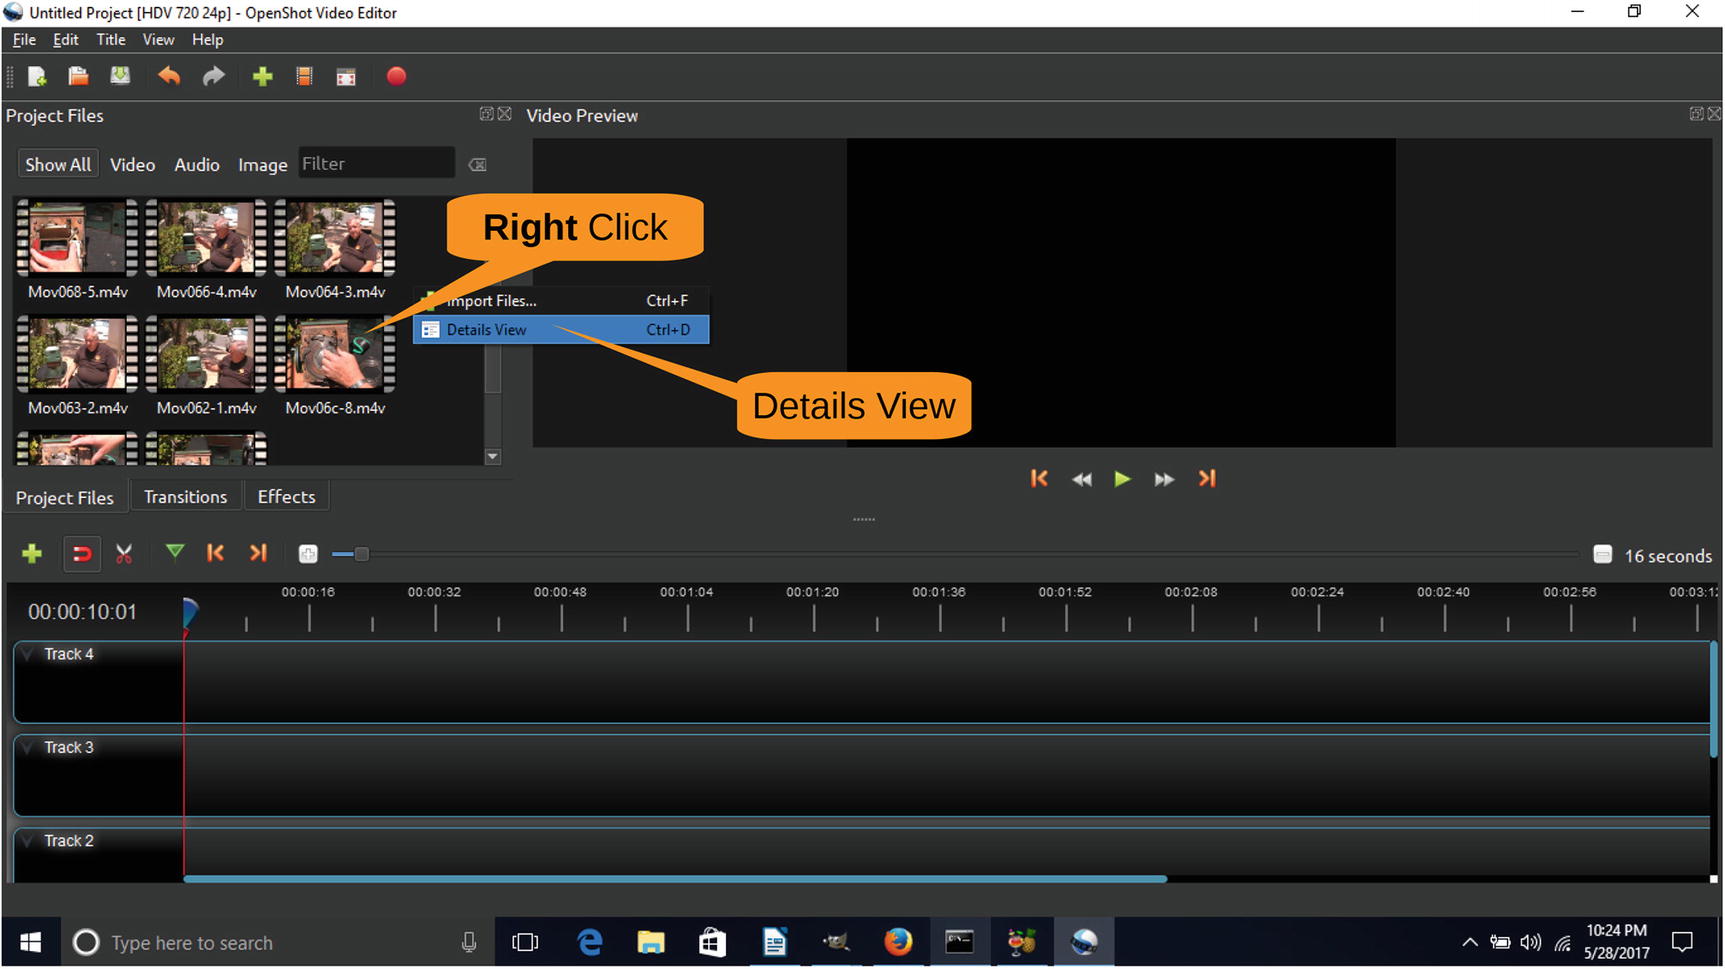
Figure 13-13 Video files imported
At the bottom of the screen are the video tracks, as shown in Figure 13-14. This is a new project, so OpenShot gives you five blank tracks. Two is all you need, so let’s simplify things. Right-click Track 4 and select Remove Track. Do the same thing for Track 3 and Track 2 as well.
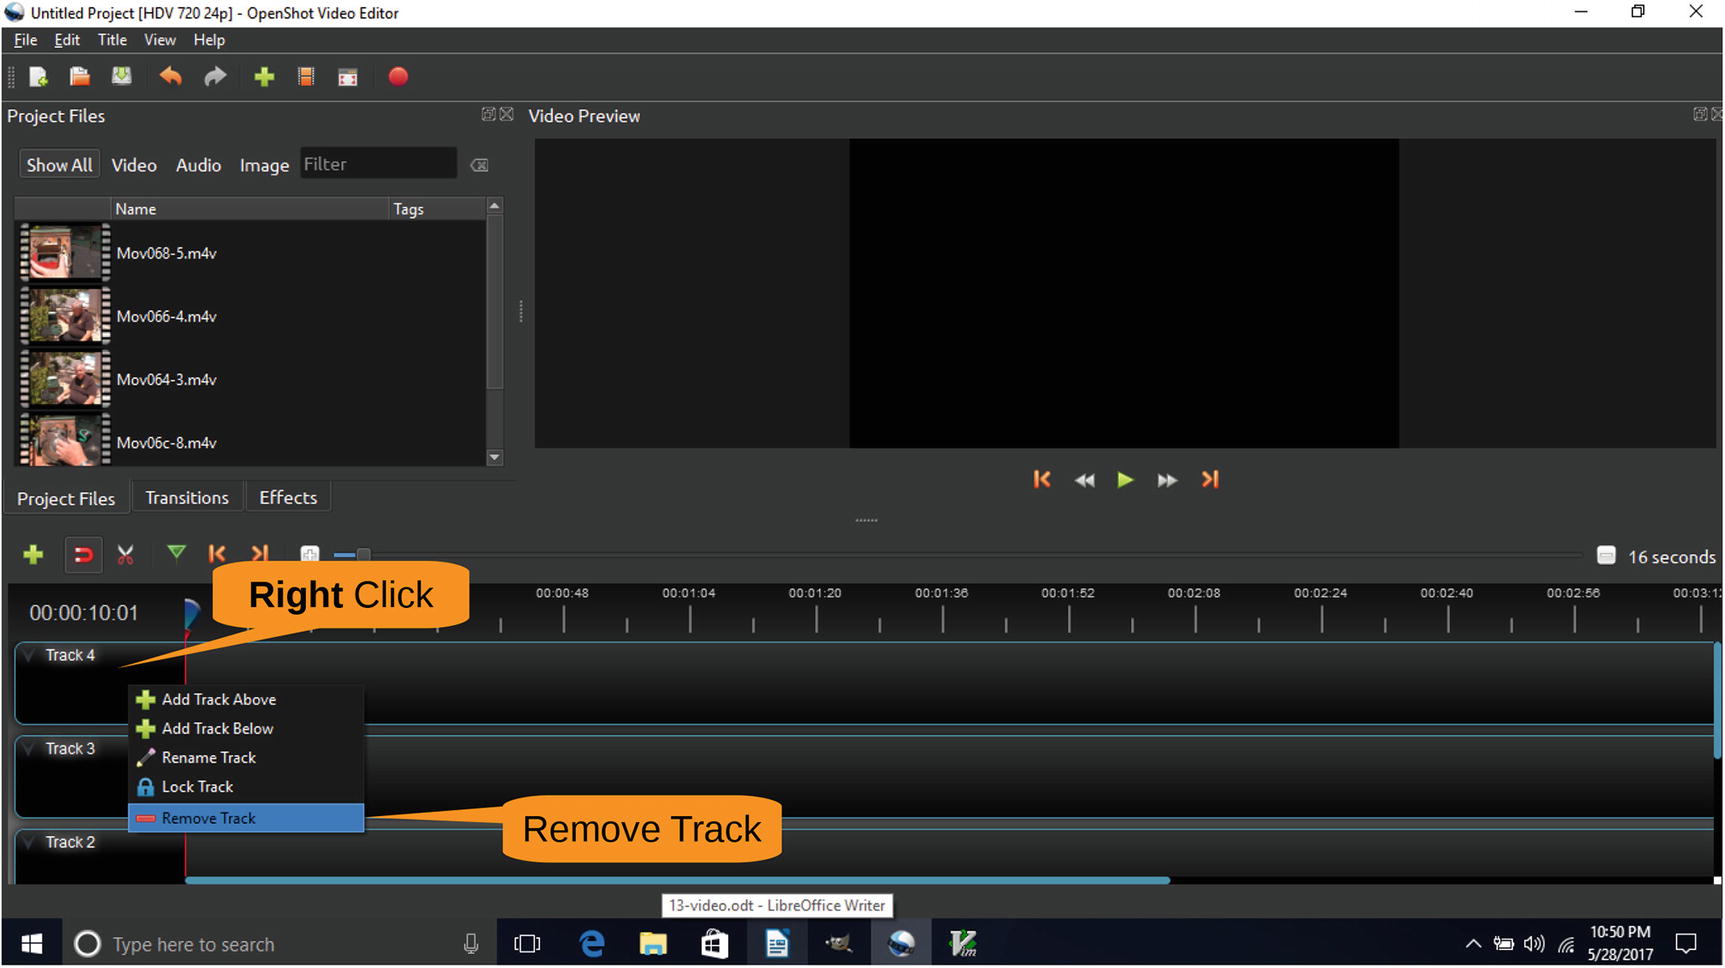
Figure 13-14 Removing excess tracks
In our example, the Project Files list contains every clip we brought in, including a huge number of flubs. You now want to get rid of the ones you don’t need, so right-click each clip and select Preview File, as shown in Figure 13-15.
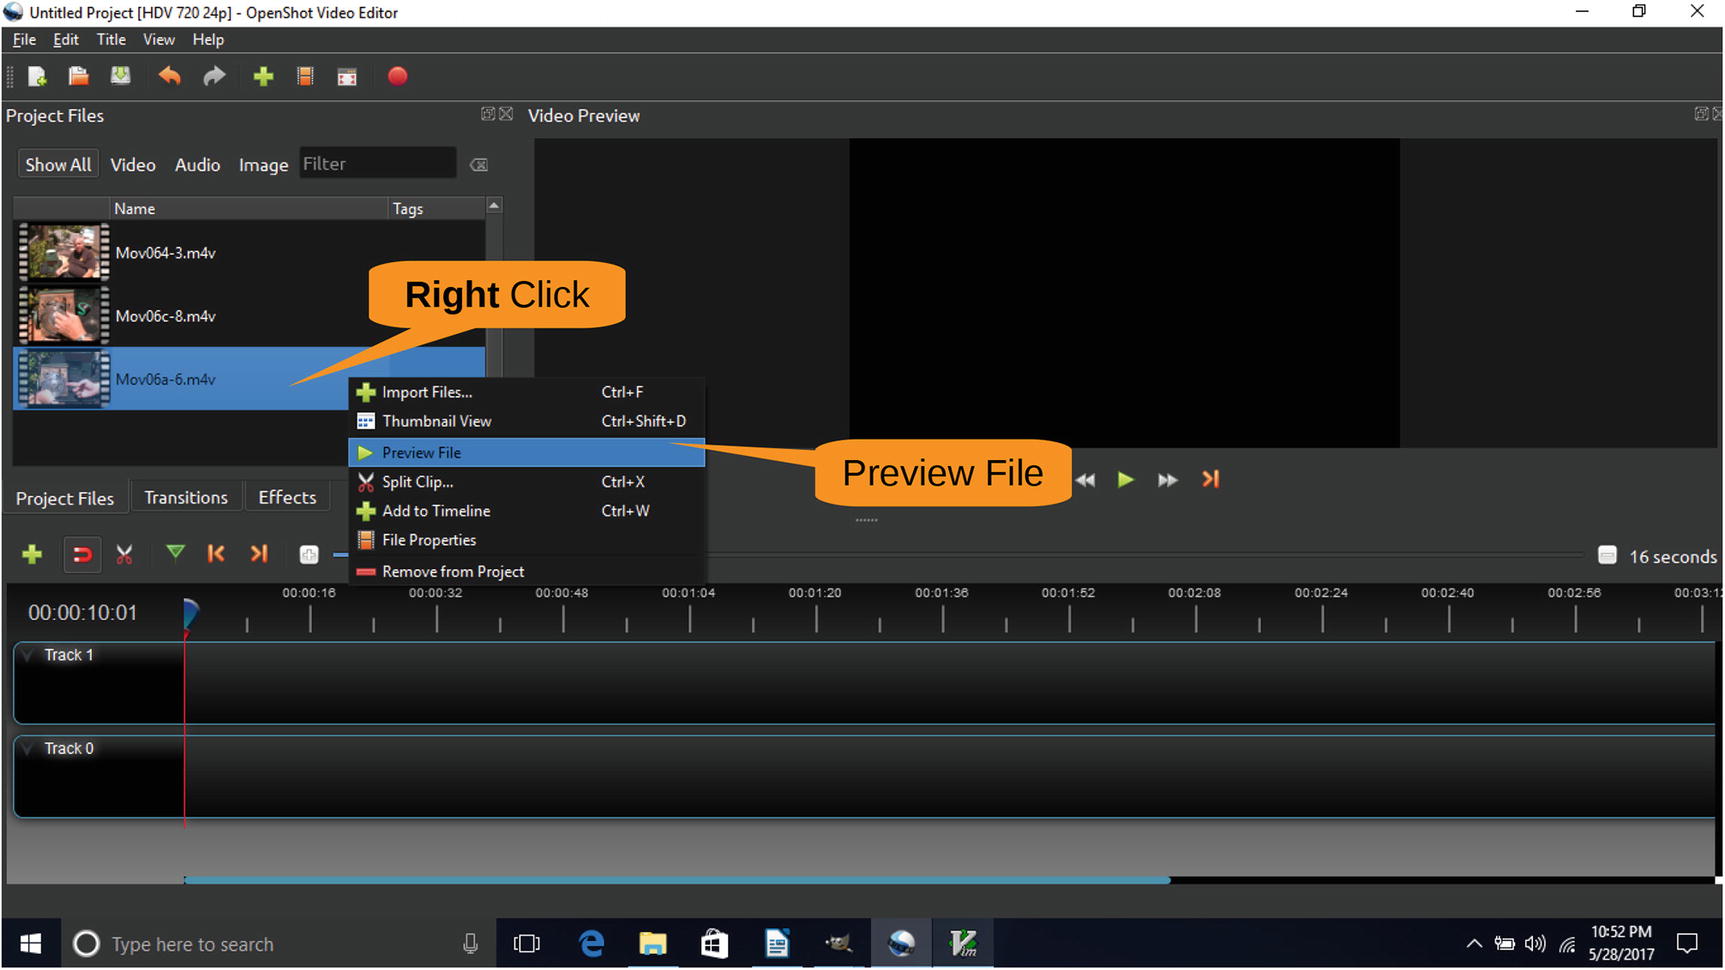
Figure 13-15 Starting a preview
The Preview window appears, letting you see what’s in the clip, as shown in Figure 13-16.
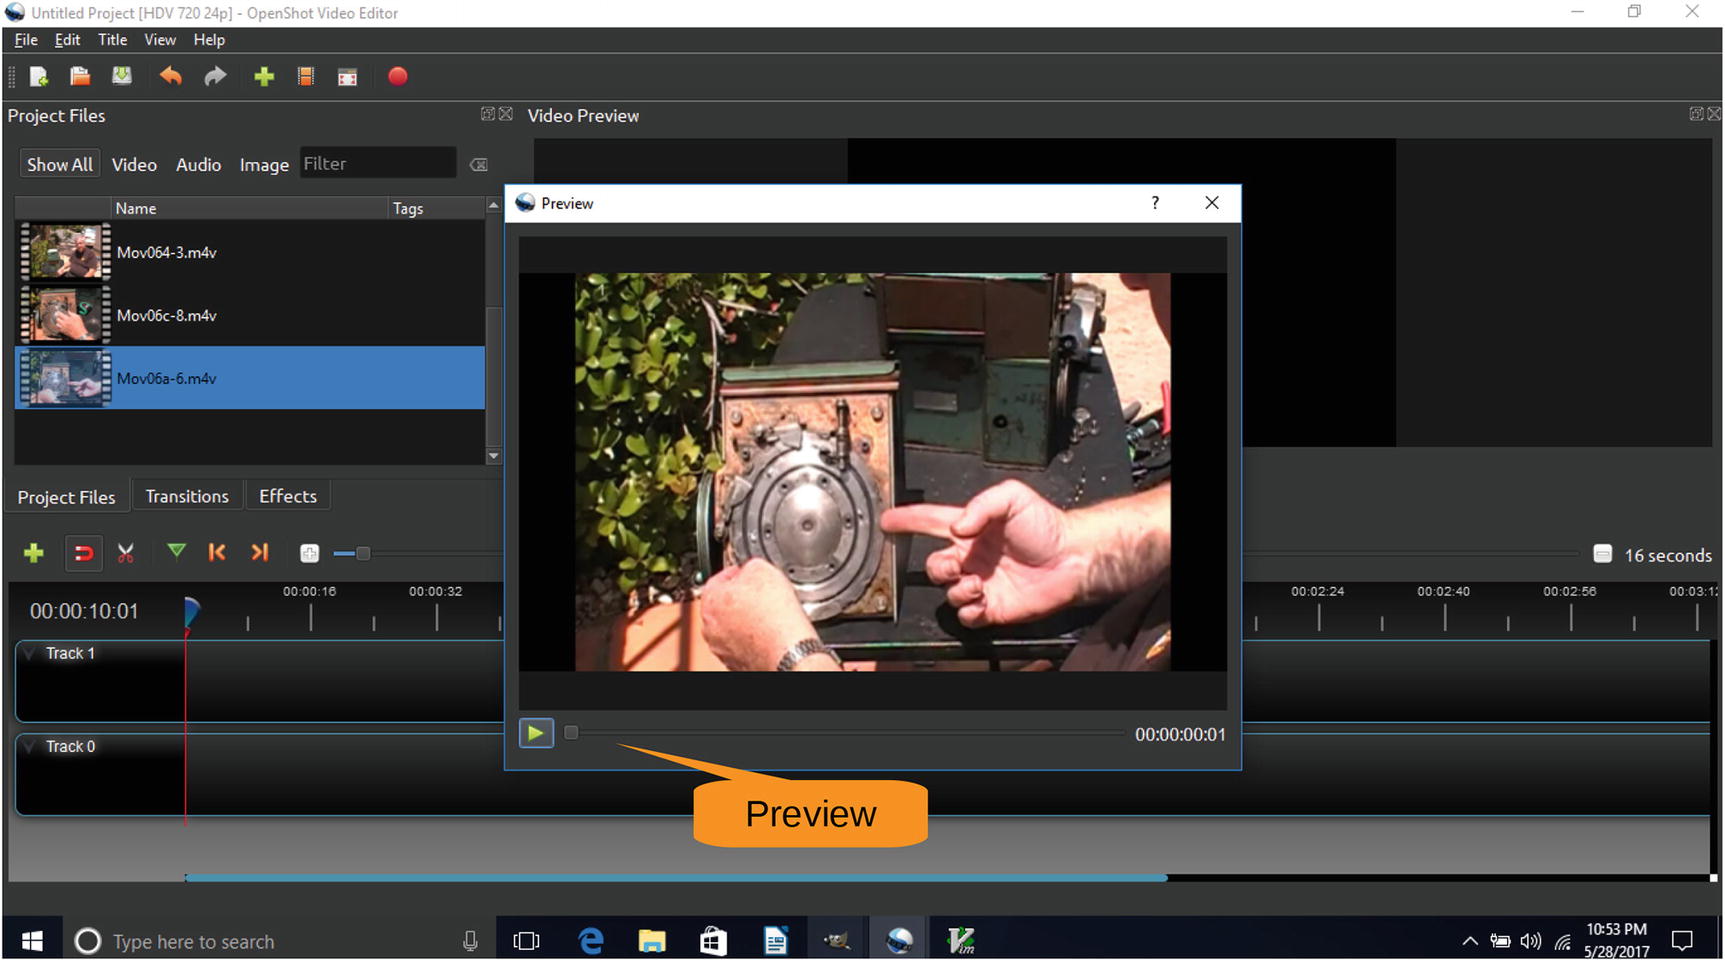
Figure 13-16 Preview window
In our example, we want to remove the clip Mov6a-6.m4v because this clip is not going to make it into the final production.
Right-click and select Remove from Project , as you can see in Figure 13-17.
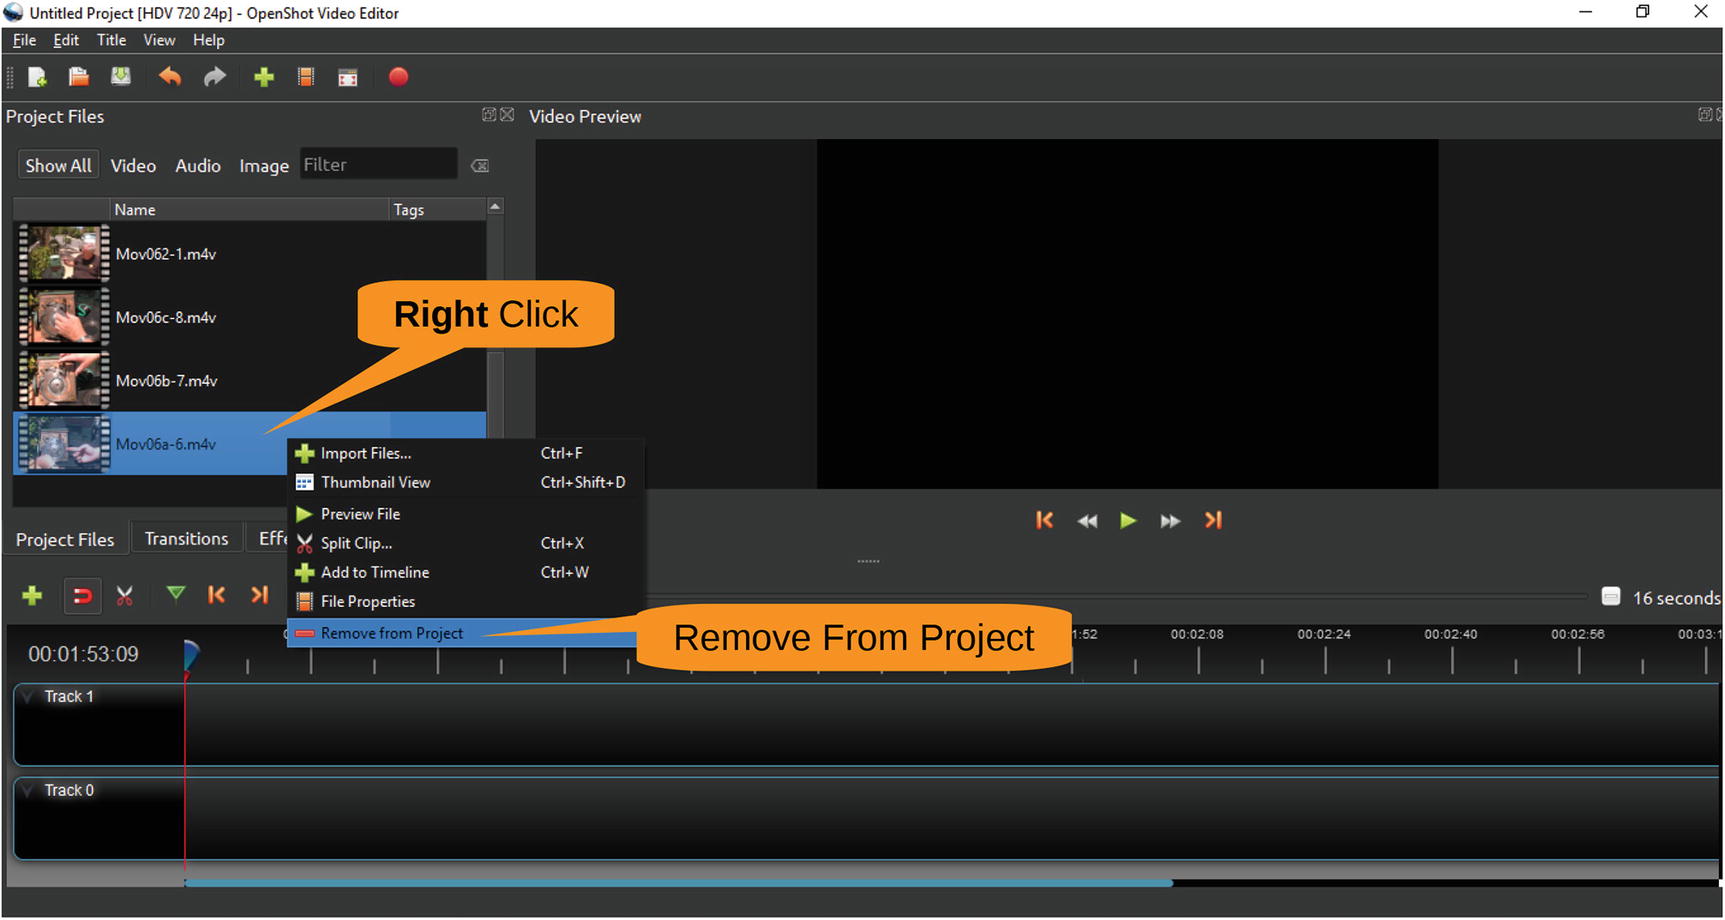
Figure 13-17 Removing a file from the project
That’s not the only bad file, so we’ve previewed each one and decided if we want to keep it or remove it. Here is the list of files:
Mov062-1.m4v | Remove |
Mov063-2.m4v | Remove |
Mov064-3.m4v | Keep (first good scene) |
Mov066-4.m4v | Keep (second good scene) |
Mov068-5.m4v | Keep (third good scene) |
Mov06a-6.m4v | Remove |
Mov06b-7.m4v | Remove |
Mov06c-8.m4v | Keep (fourth good scene) |
During the preview process, we kept track of which file is first, second, third, and fourth. Now we will show how to build the video. The first piece is the file Mov63-3.m4k, so let’s drag it from the media list down to Track 0, as shown in Figure 13-18.
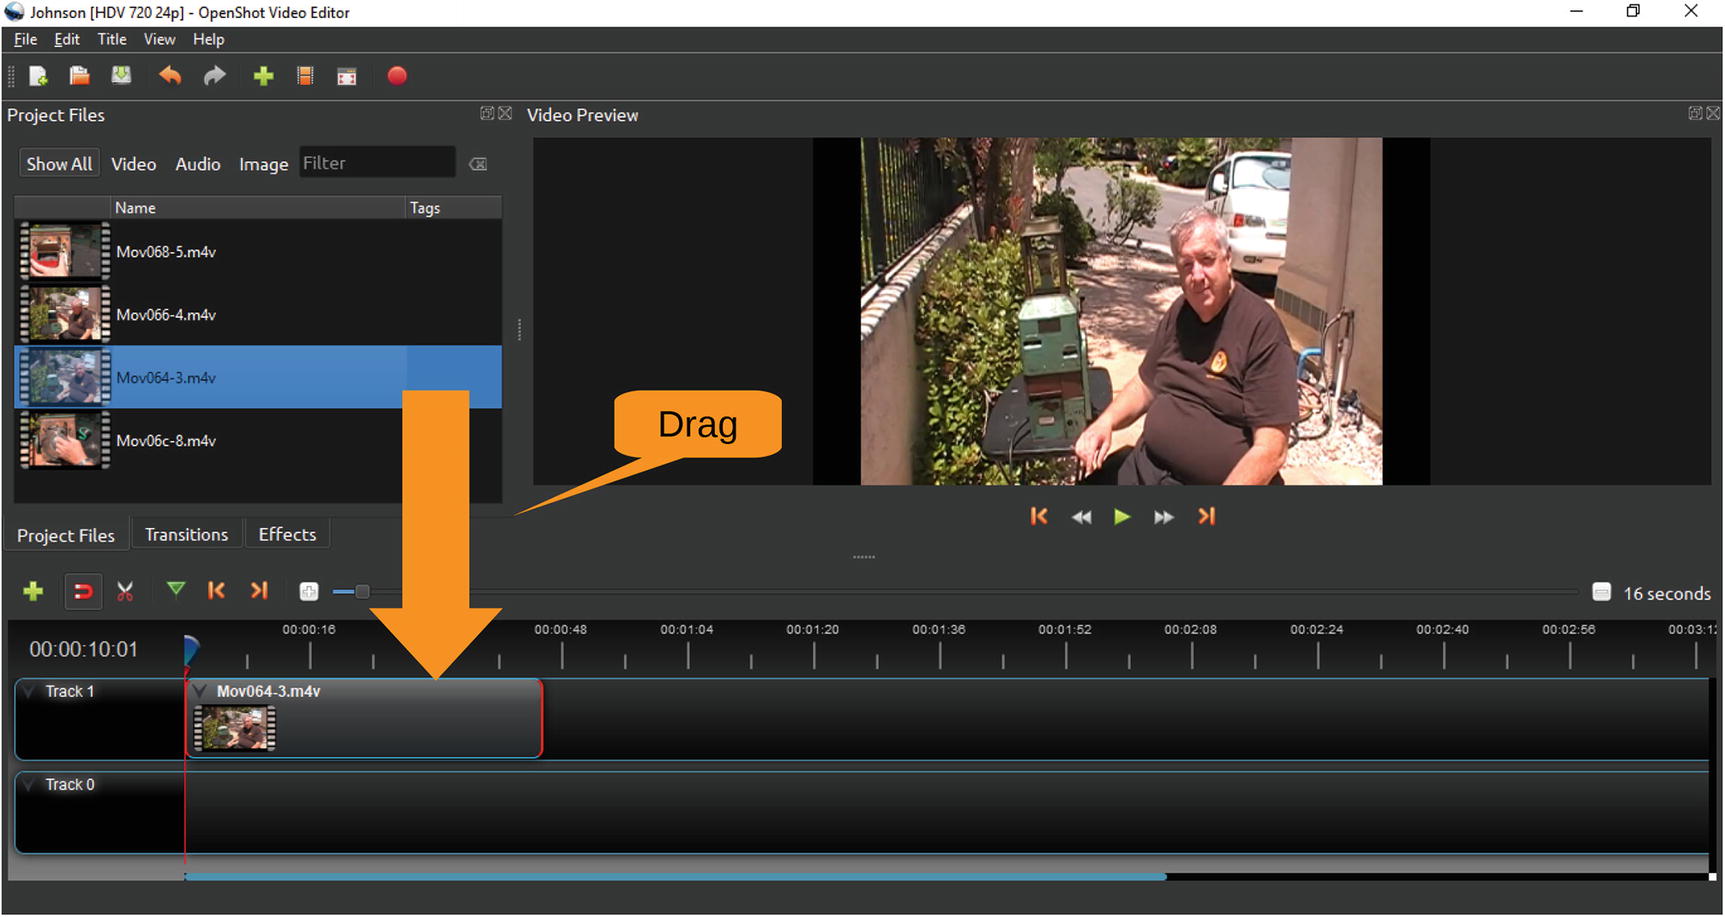
Figure 13-18 Putting the first video on the track
This track needs some precise editing. You aren’t going to be able to make subsecond edits at this level of zoom, so click the + icon on the zoom until you see 5 seconds for the time scale. Figure 13-19 shows the results. Now you can see what’s in the video by clicking Play on the main video window. The timeline will move across the track indicating where you are.
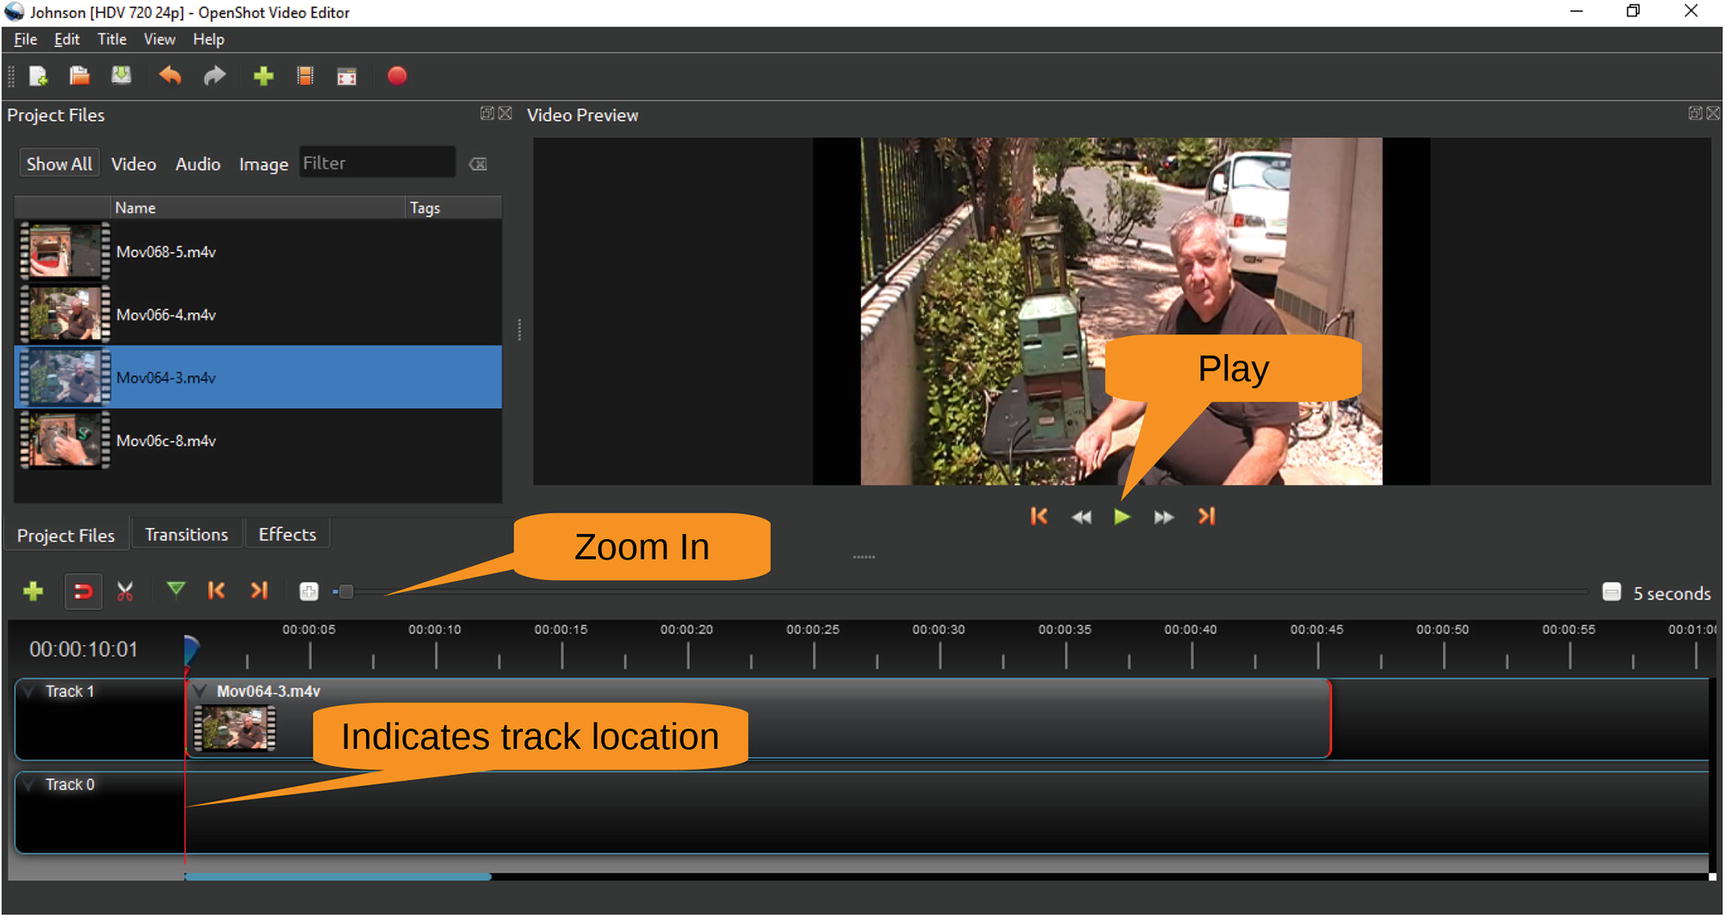
Figure 13-19 Zoom and play
In our example, we want to position the marker just after I finish talking and just before telling the cameraman “Stop.” To get things exact, you may have to play around with the marker. If you move it back, say to the 00:00:40 mark, and hit Play, the video will start from that location. Through trial and error, you should be able to locate the precise location you want around the 00:00:43 mark in this clip, as shown in Figure 13-20.
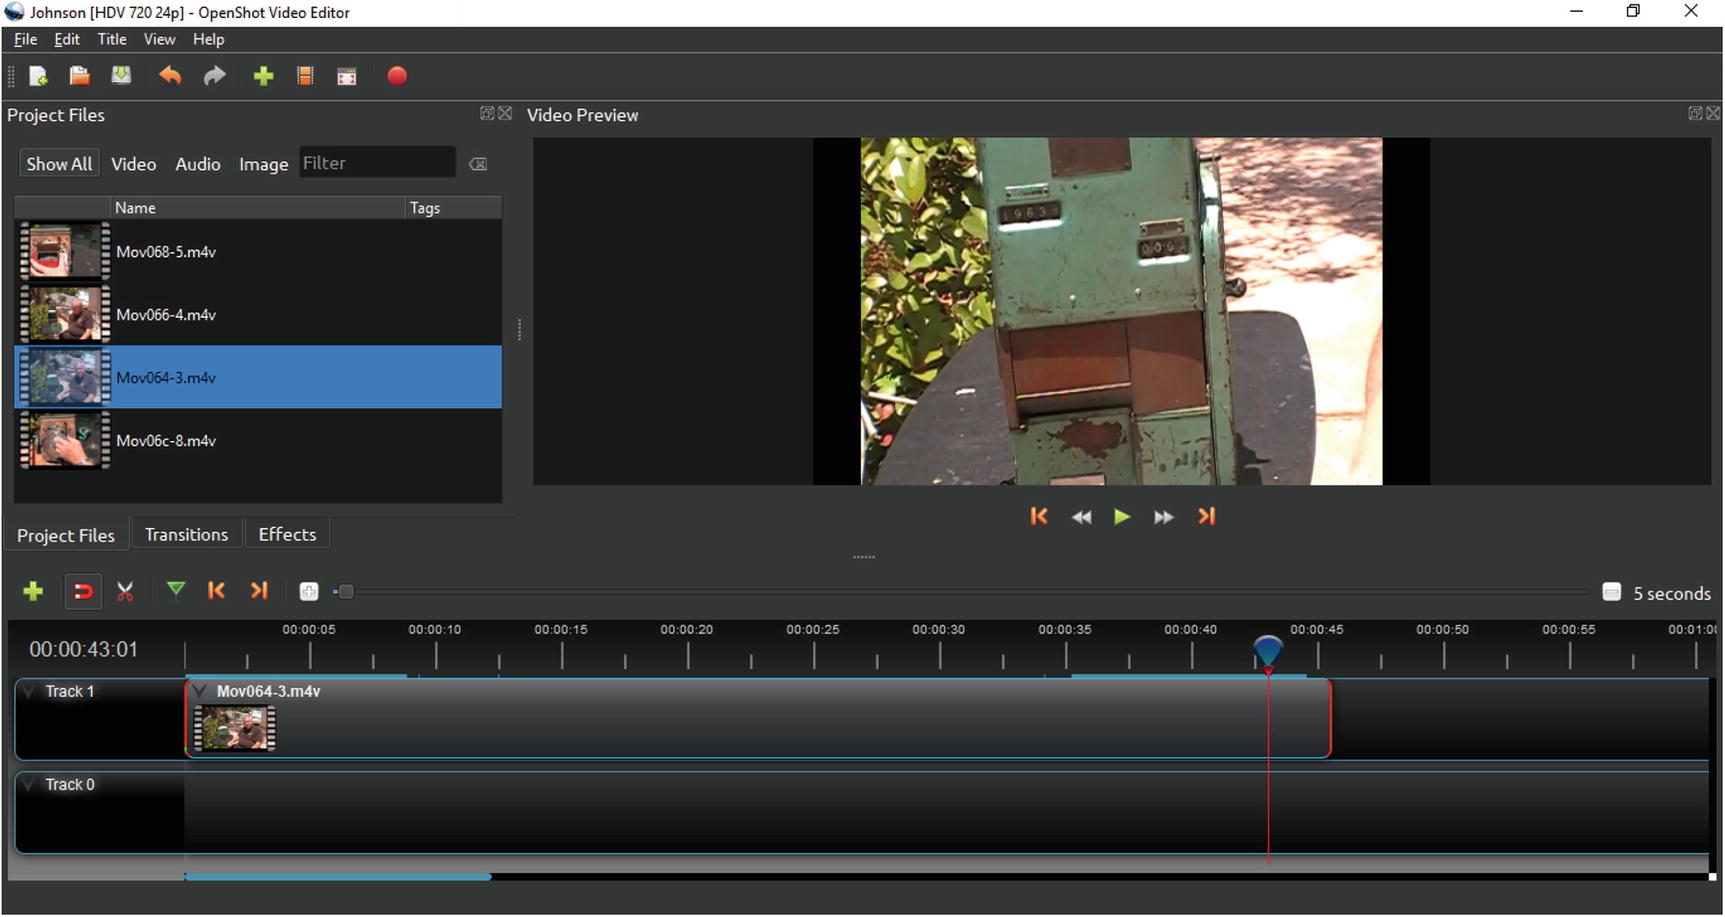
Figure 13-20 The dividing line between good and bad
At this point, the good stuff is to the left of the marker, and the bad stuff is to the right. As Figure 13-21 shows, to drop the bad stuff, right-click the marker and select Slice All ➤ Keep Left Side.
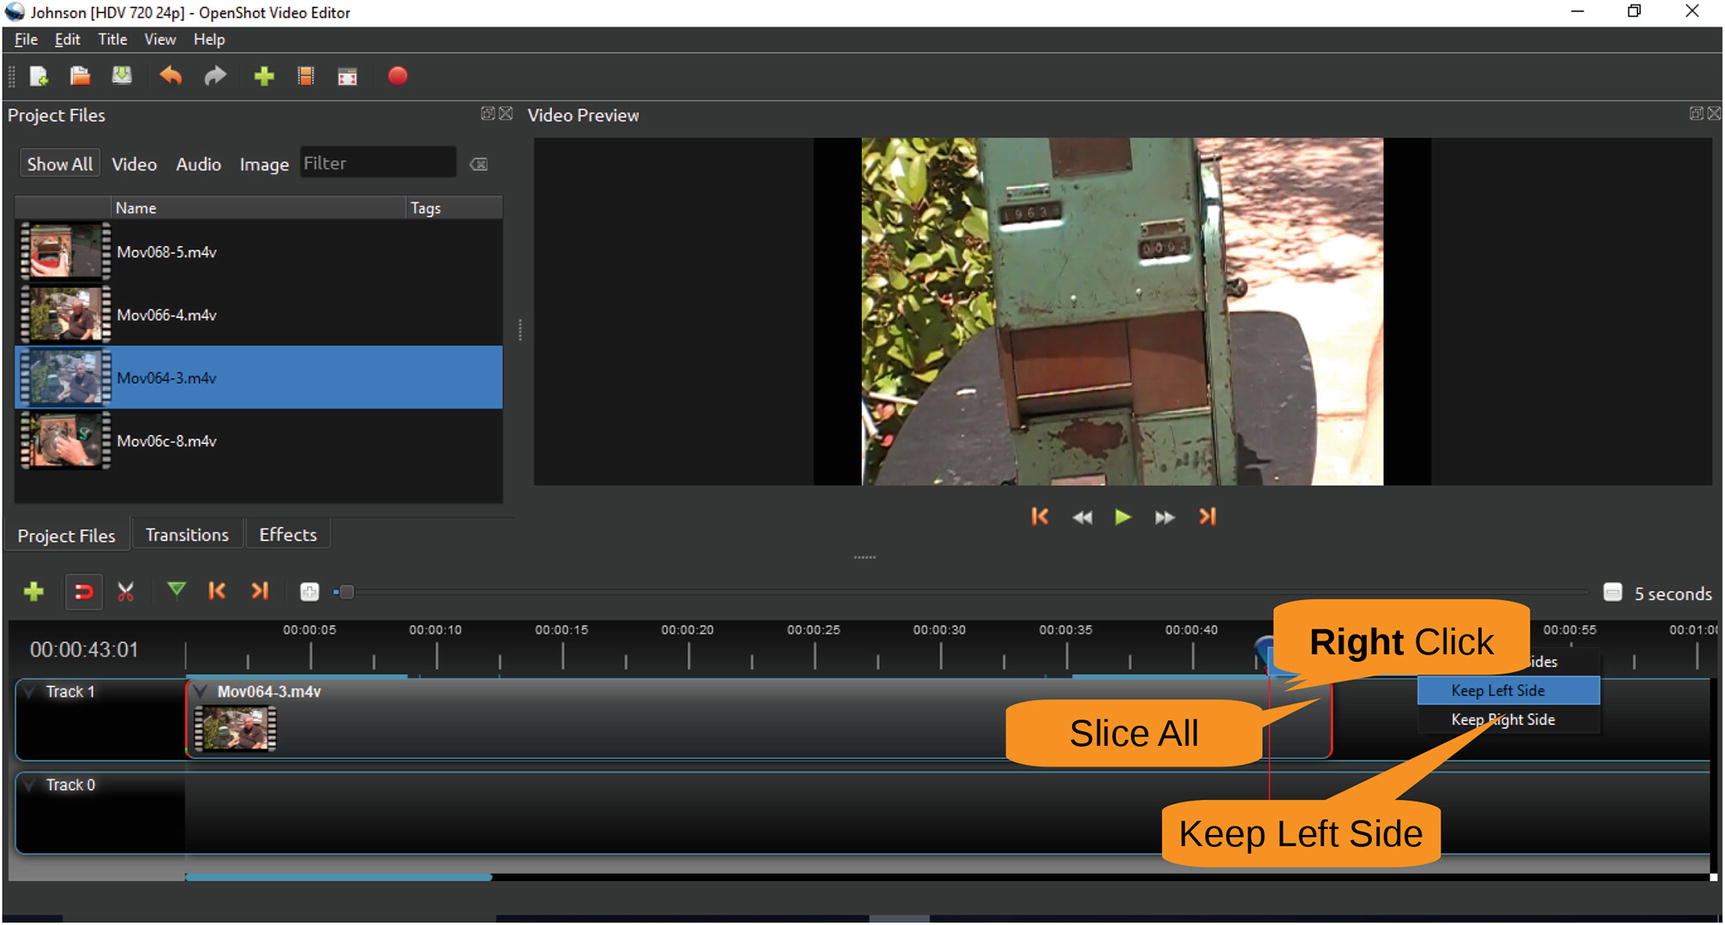
Figure 13-21 Getting rid of the bad stuff
As you can see in Figure 13-22, the right side has disappeared.
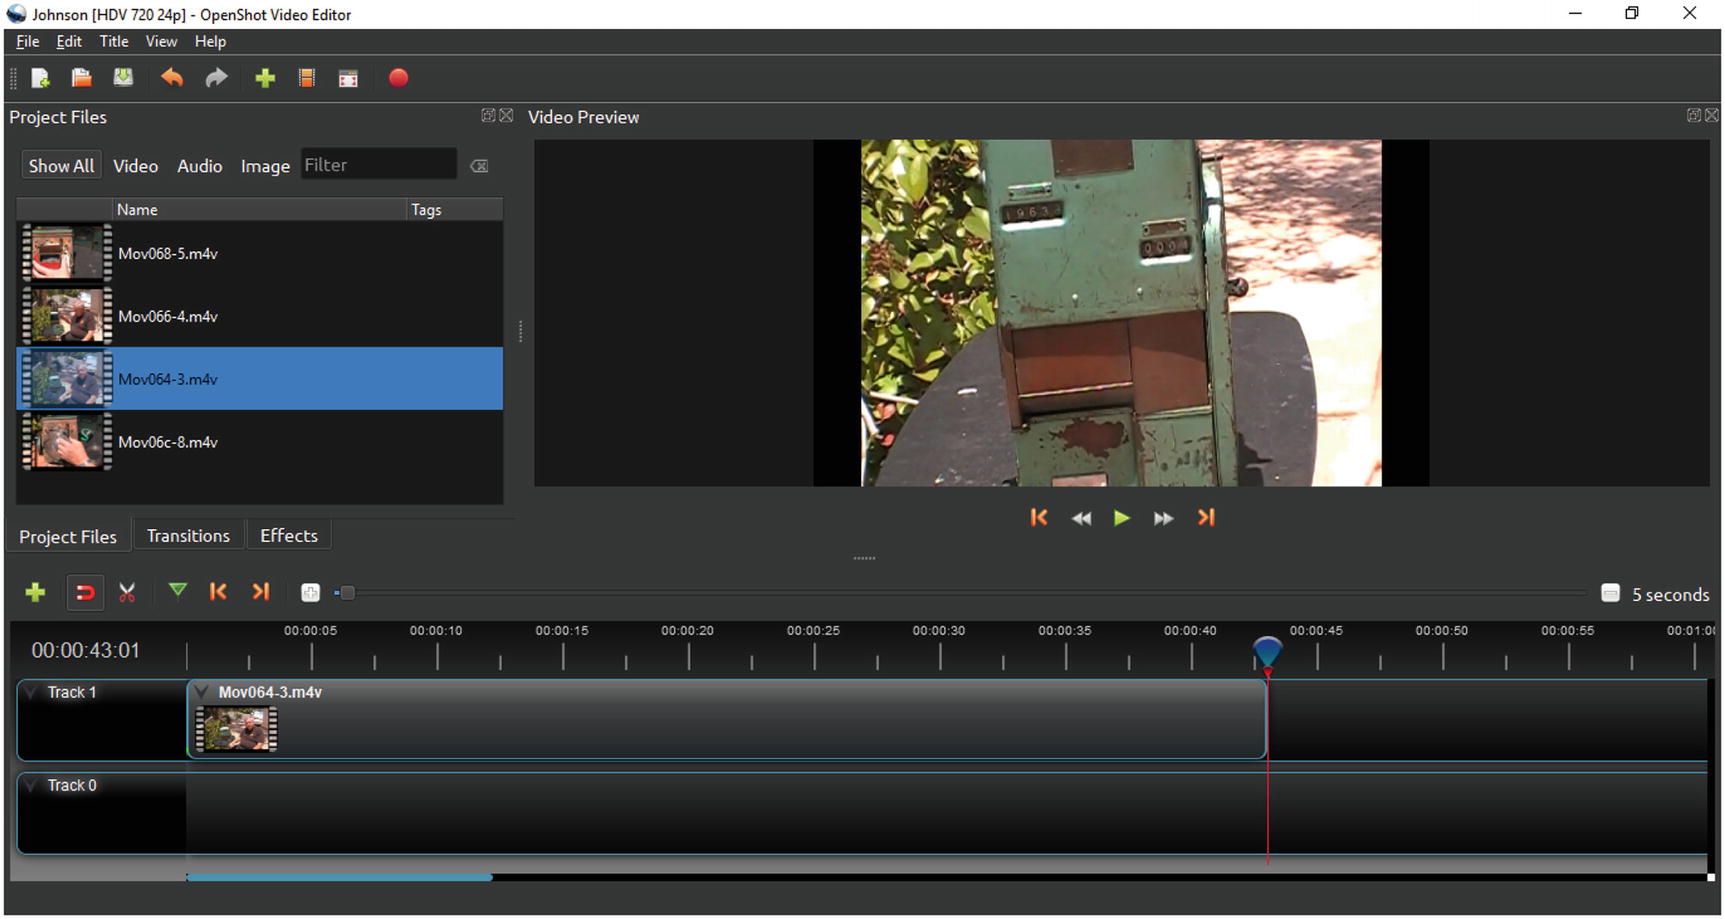
Figure 13-22 Bad stuff trimmed
Now let’s drag the second clip, Moc66-4.m4k, and bump it up against the right side of the previous clip. Again, you need to trim off the tail end. Repeat this for the clips Mov068-5.m4v and Mov06c-8.m4v, giving this project the appearance of Figure 13-23.

Figure 13-23 All four clips put together
Now you need to turn this project into a video, so select File ➤ Export Video, as shown in Figure 13-24.
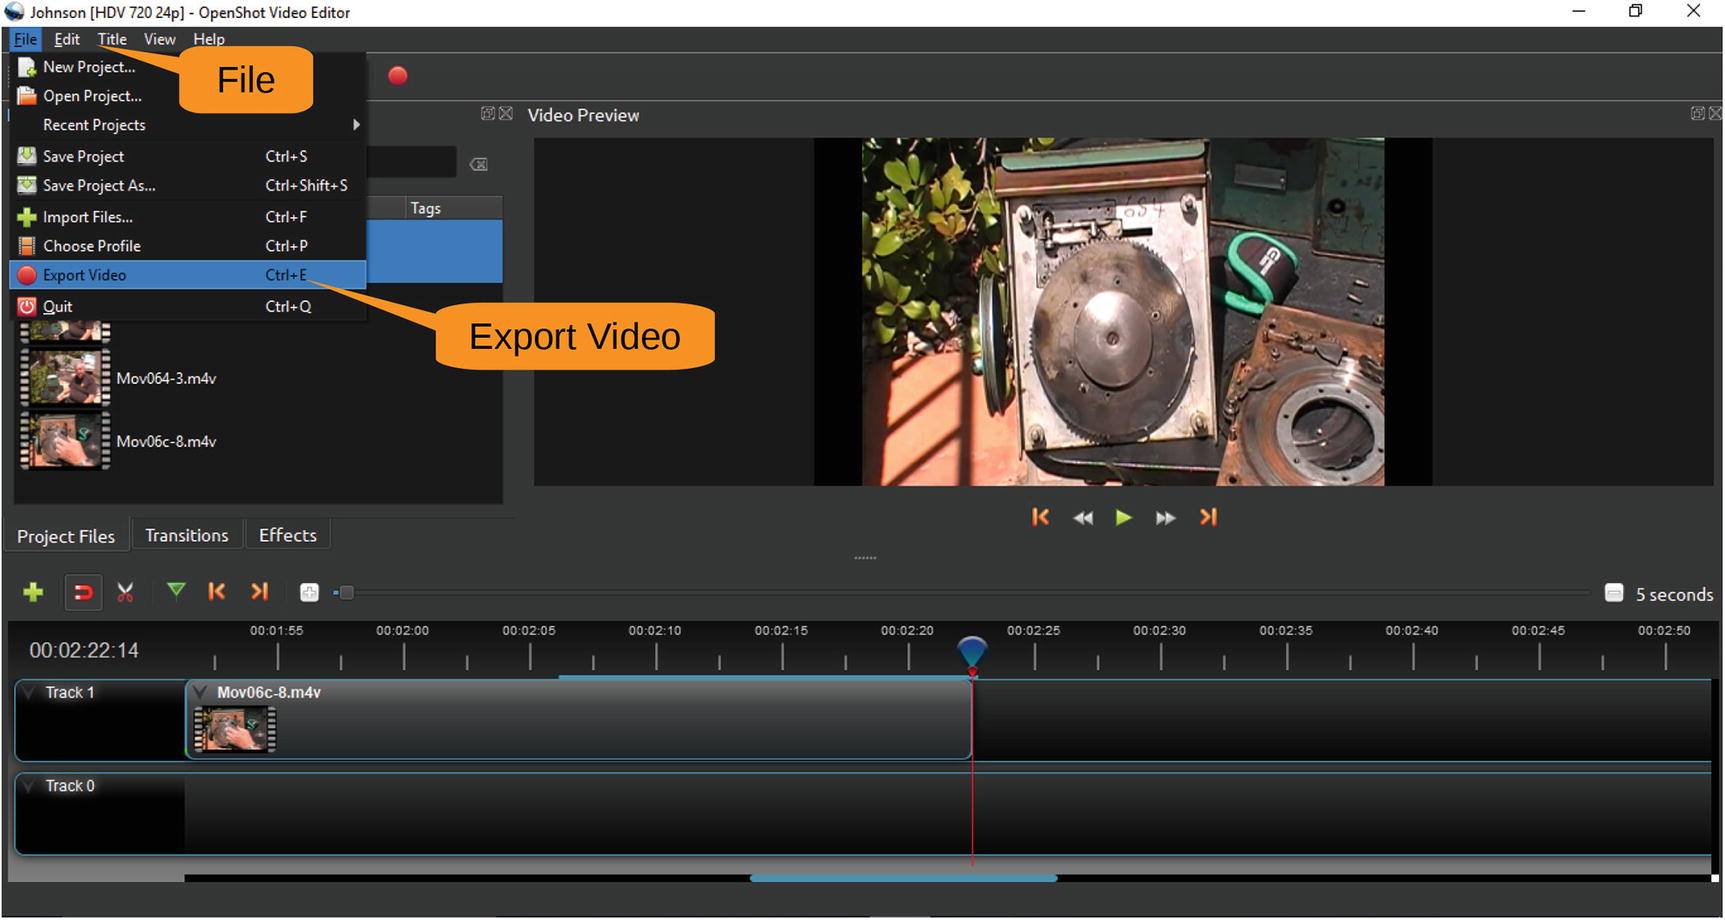
Figure 13-24 Exporting the video
The Export Video dialog appears. The original video was shot at 720×480 at 30 frames per second. (You can right-click any clip and select Properties to verify this.) You want the output to have the same quality, so select DV/DVD NTSC (720×480) for the video profile and then click Export Video, as shown in Figure 13-25.
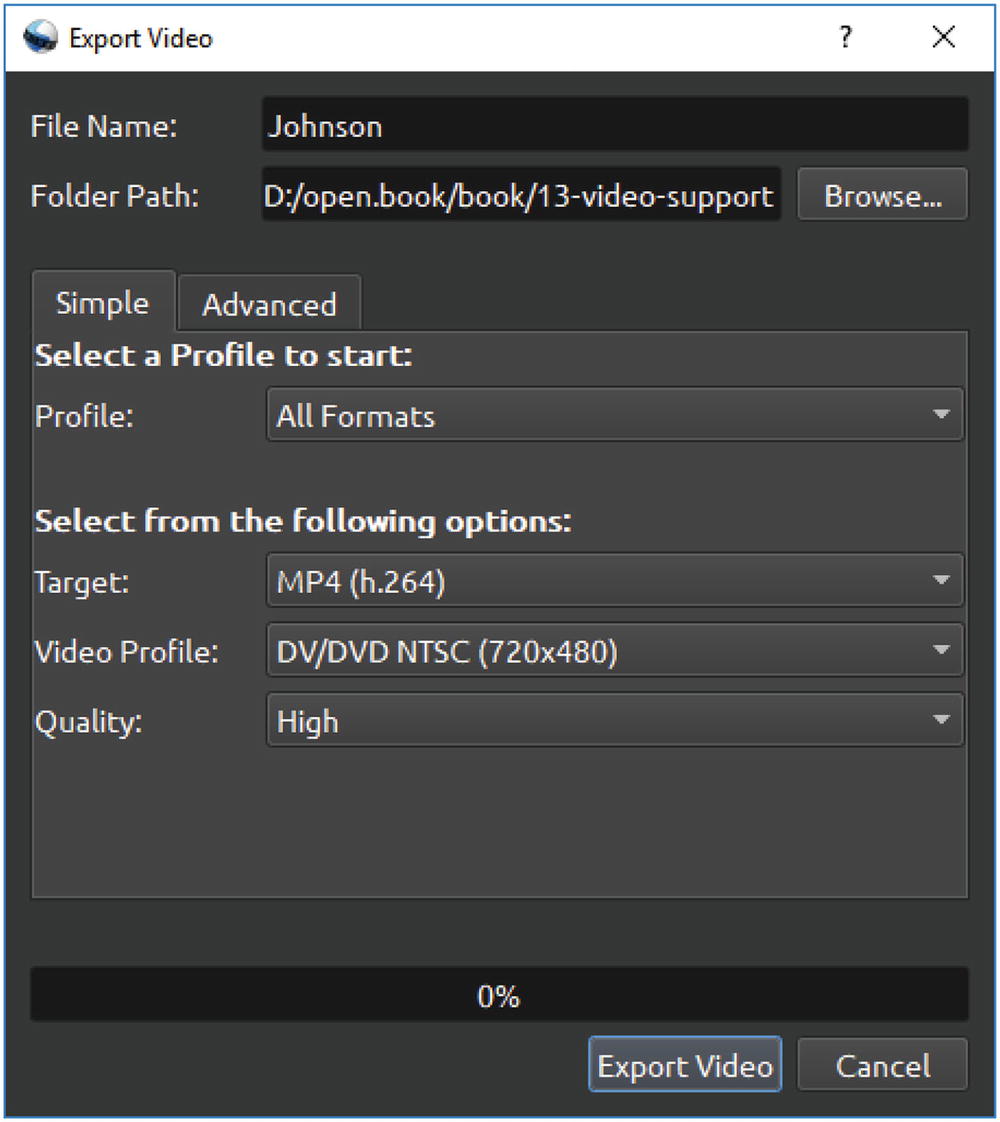
Figure 13-25 Export settings
The program puts all the video clips together and writes the result to the file Johnson.m4k. The speed leaves much to be desired, especially on our cheap laptop, so this is another time when you can go for coffee.
Lessons Learned
During the shooting of this video, we learned a few lessons that don’t have to do with video editing but are useful when you are creating a video. Here are some tips when shooting video:
If you have a high-definition video camera and a low-resolution video camera, don’t put the low resolution on top of the video camera box. It will be the first one you grab when you start filming.
If your subject is green, it’s not a good idea to stick it in front of a green bush. This makes it hard to see.
A good microphone is key. That’s why we bought an expensive HD video camera; it had a connection for a wireless microphone. Without it, you hear a lot of wind, noise, and background sounds.
Consider recording the sound separately. If you don’t need to see a speaker in this video, OpenShot lets you put a video clip on Track 0 and mute it. Then you put an audio track on Track 1, and they will be combined. (See Chapter 12 for how to make a good audio clip.)
There’s a reason Hollywood uses marker boards (the thing they “clap” at the beginning of shots). Consider using something similar to identify the beginning and end of each clip. The sound does not show up in the Video Preview window (especially if you’re stopped). Pictures do.
Adding a Title
Now let’s play with the more advanced features of OpenShot. First, let’s use the Files ➤ Save Project As menu item to save the project under Johnson_play.
Now let’s create a title sequence by selecting Title ➤ Titles from the menu bar, as shown Figure 13-26.
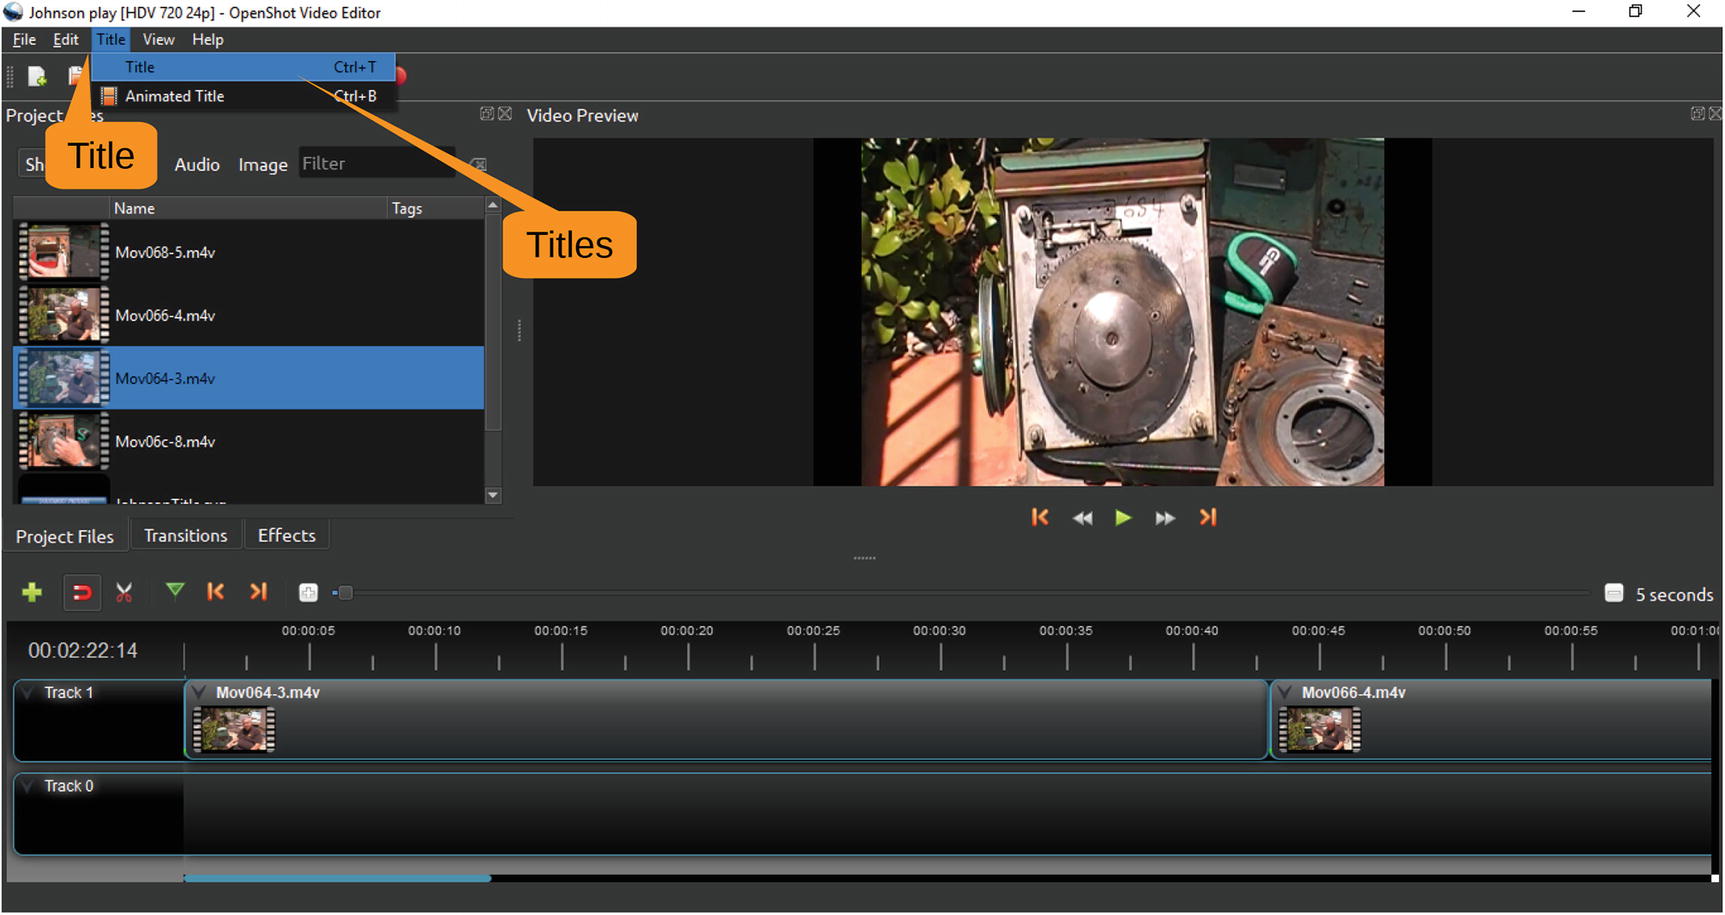
Figure 13-26 Creating a title
The Titles dialog appears, as shown in Figure 13-27. Let’s select a good template to use for the title .
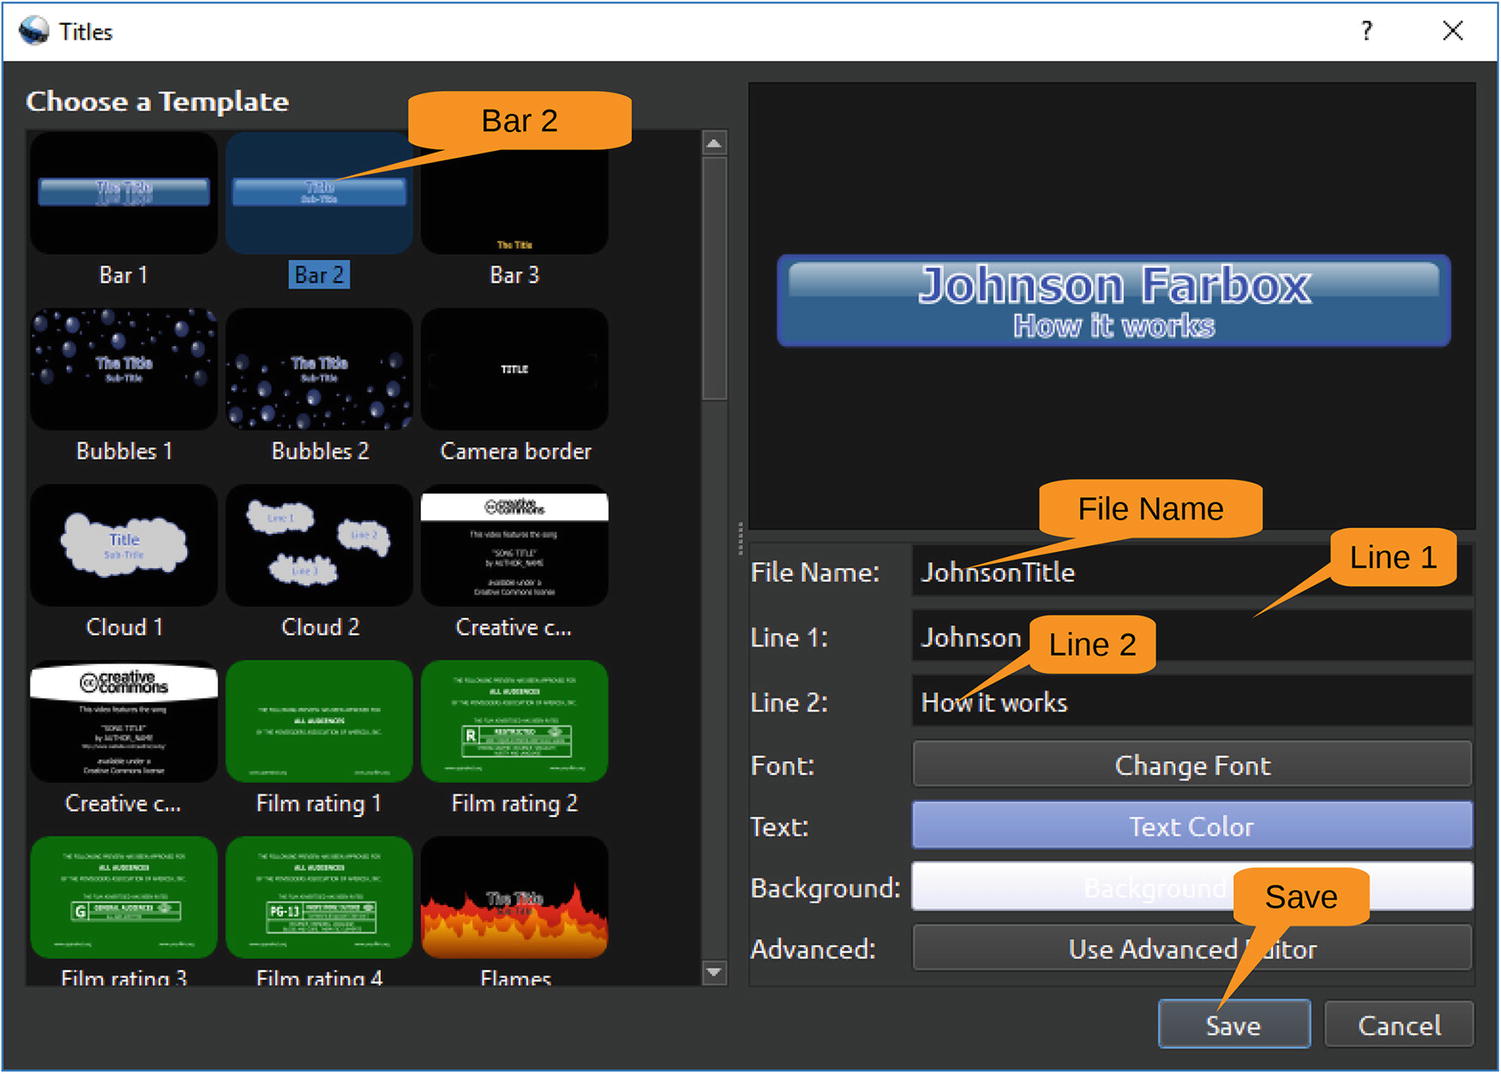
Figure 13-27 Titles dialog
Use the Bar 2 template. For the empty fields, use these values:
File Name: | JohnsonTitle |
Line 1: | Johnson Farebox |
Line 2: | How it works |
Click Save to finish. You’ll notice that a new item, the title, has been added to the Project Files list, as shown in Figure 13-28.
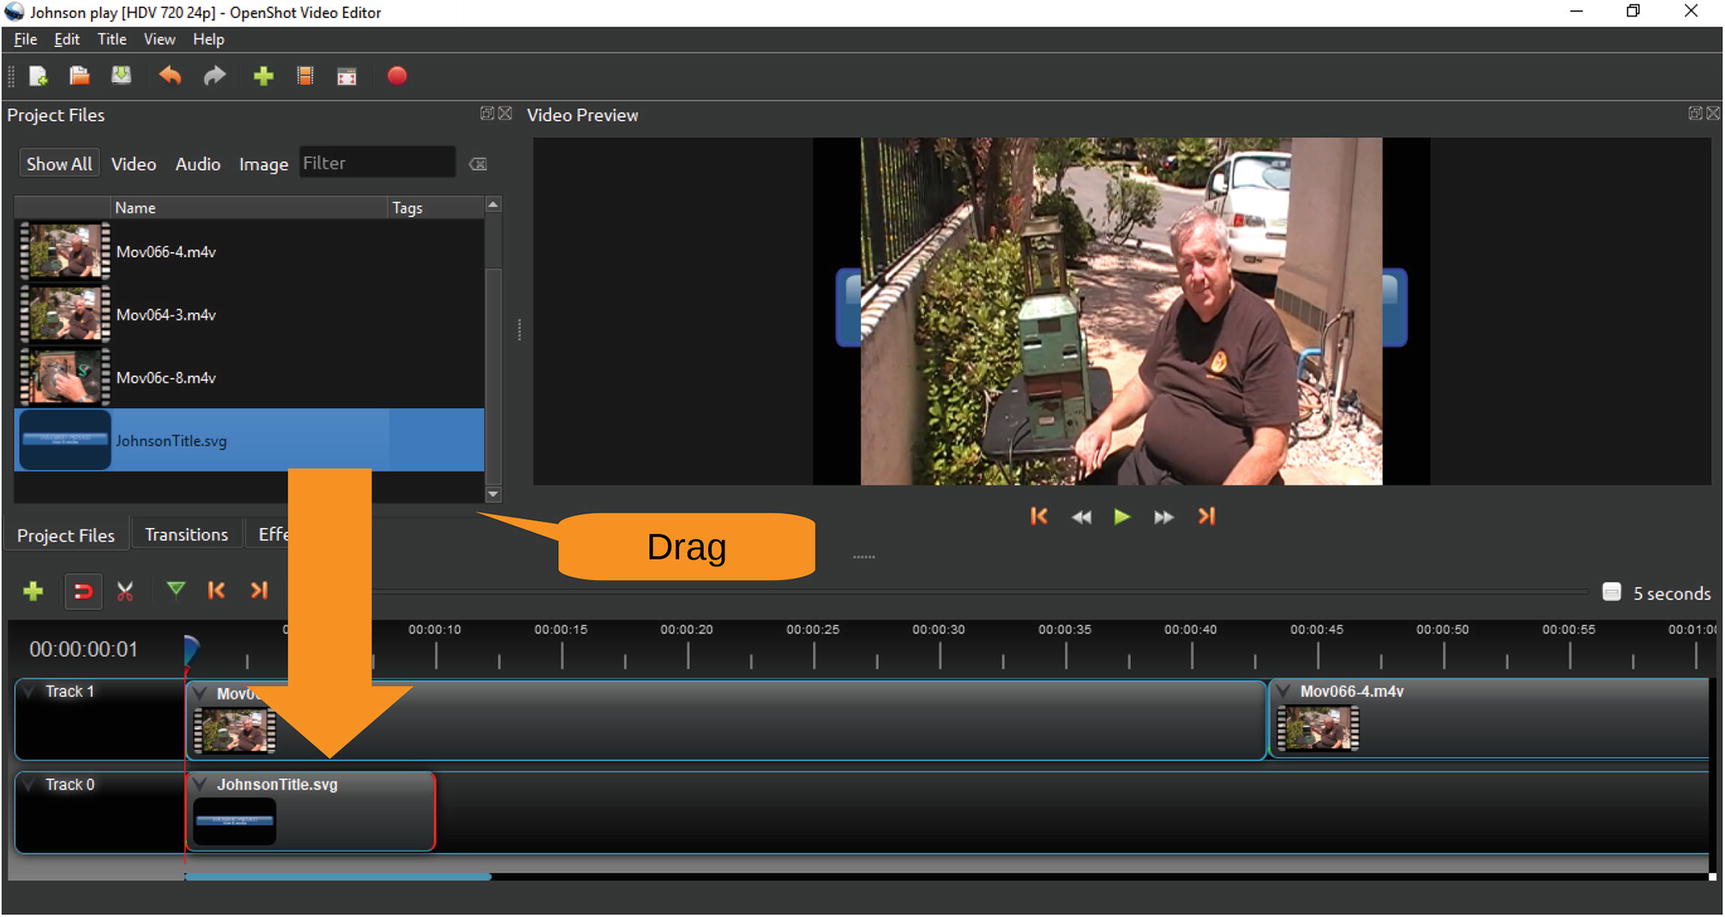
Figure 13-28 New project file
Drag the title down to the beginning of Track 0. You can drag the end of the image to the left or right to make the selection longer or short.
It would be nice if there was a way of moving all the clips on a track to the right. In fact, several people have requested this feature in the OpenShot forums, but it’s not available yet.
So, we will show how to do this the hard way. Drag the first clip down from Track 1 to Track 0 and position it just after the title. Do the same thing for the other three tracks. The result, shown in Figure 13-29, is a new video clip with a title.
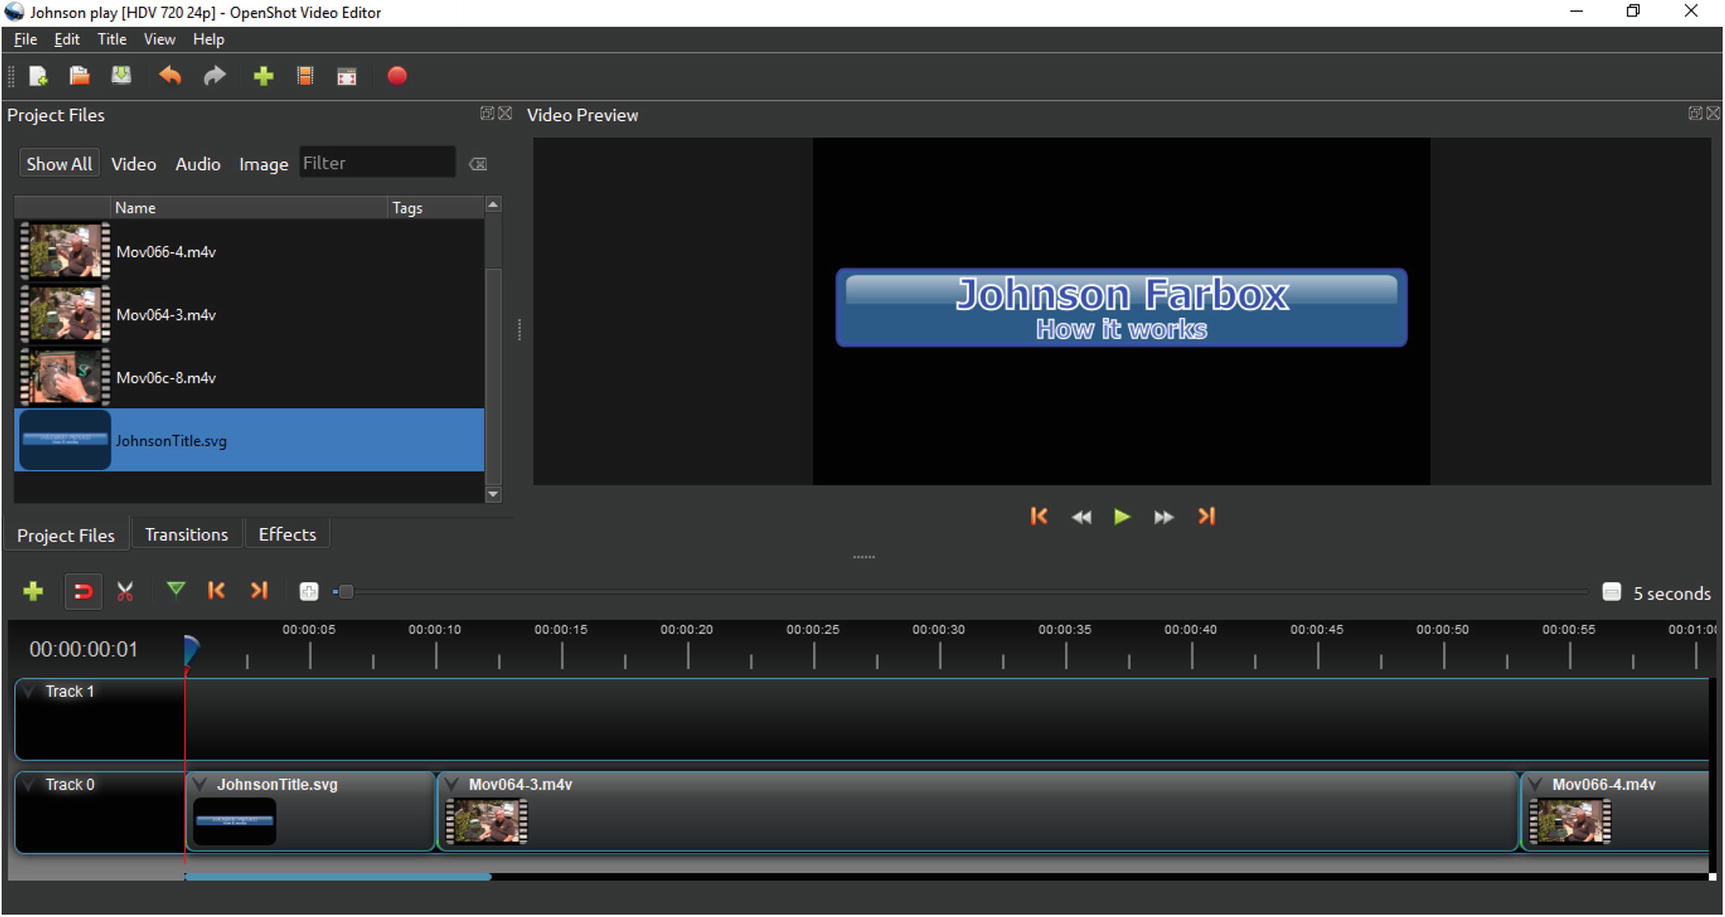
Figure 13-29 Video clip with title
Creating Titles
OpenShot has the ability to let you do quite a bit of editing with your titles by using Inkscape. (See Chapter 9.) However, you have to configure the system so that it knows how to start this program. This task is a little beyond the scope of this book. If you want, you can point Inkscape at the image itself and edit it directly.
There is also the ability to generate animated titles with a 3D animation system called Bender . Again, the installation and configuration of this software are beyond the scope of this book.
Creating Stills and Transitions
Now you’ll add a still picture to a video. First, import a photograph to the Project Files panel. Next, drag it down to your timeline between the last two clips. Also, let’s adjust it for time so it’s about eight seconds long.
Figure 13-30 shows the results.
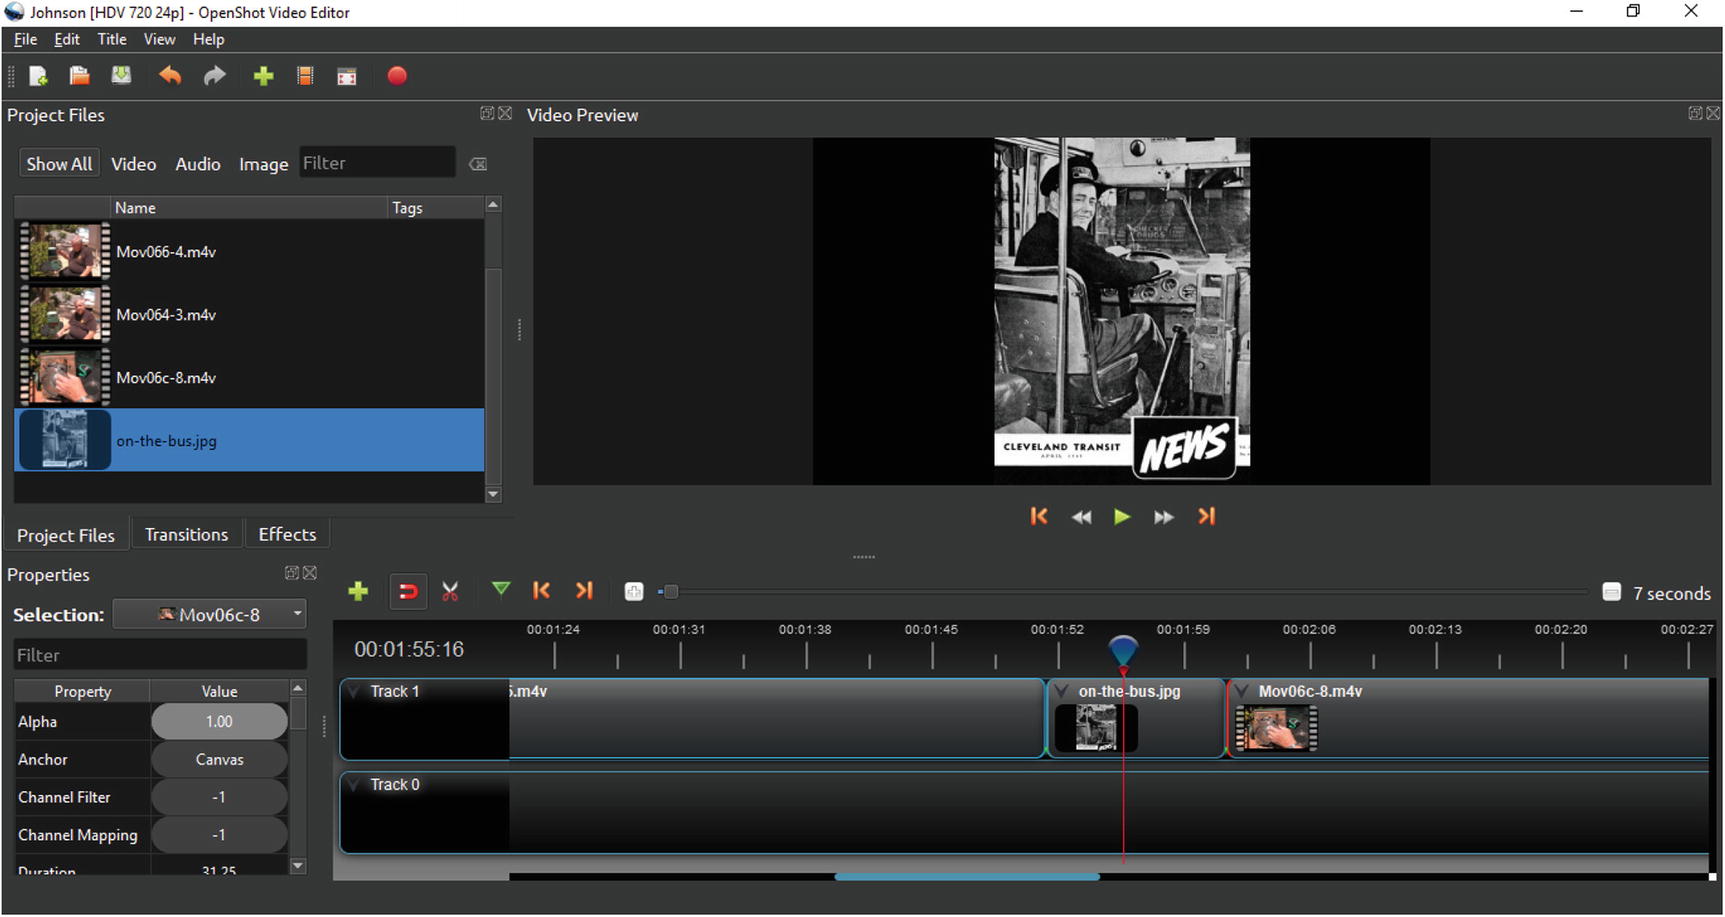
Figure 13-30 Video with still added
Now when you play the video, the still you just added will be shown between clips. This is boring, so let’s add some more exciting stuff.
Click the Transitions tab and drag the Circle Out to In transition over the still. You’ll notice that if you put the preview timer right in the middle of the transition , there’s a dark spot in the middle of the picture, as shown in Figure 13-31. This starts out large and gets smaller until it disappears.
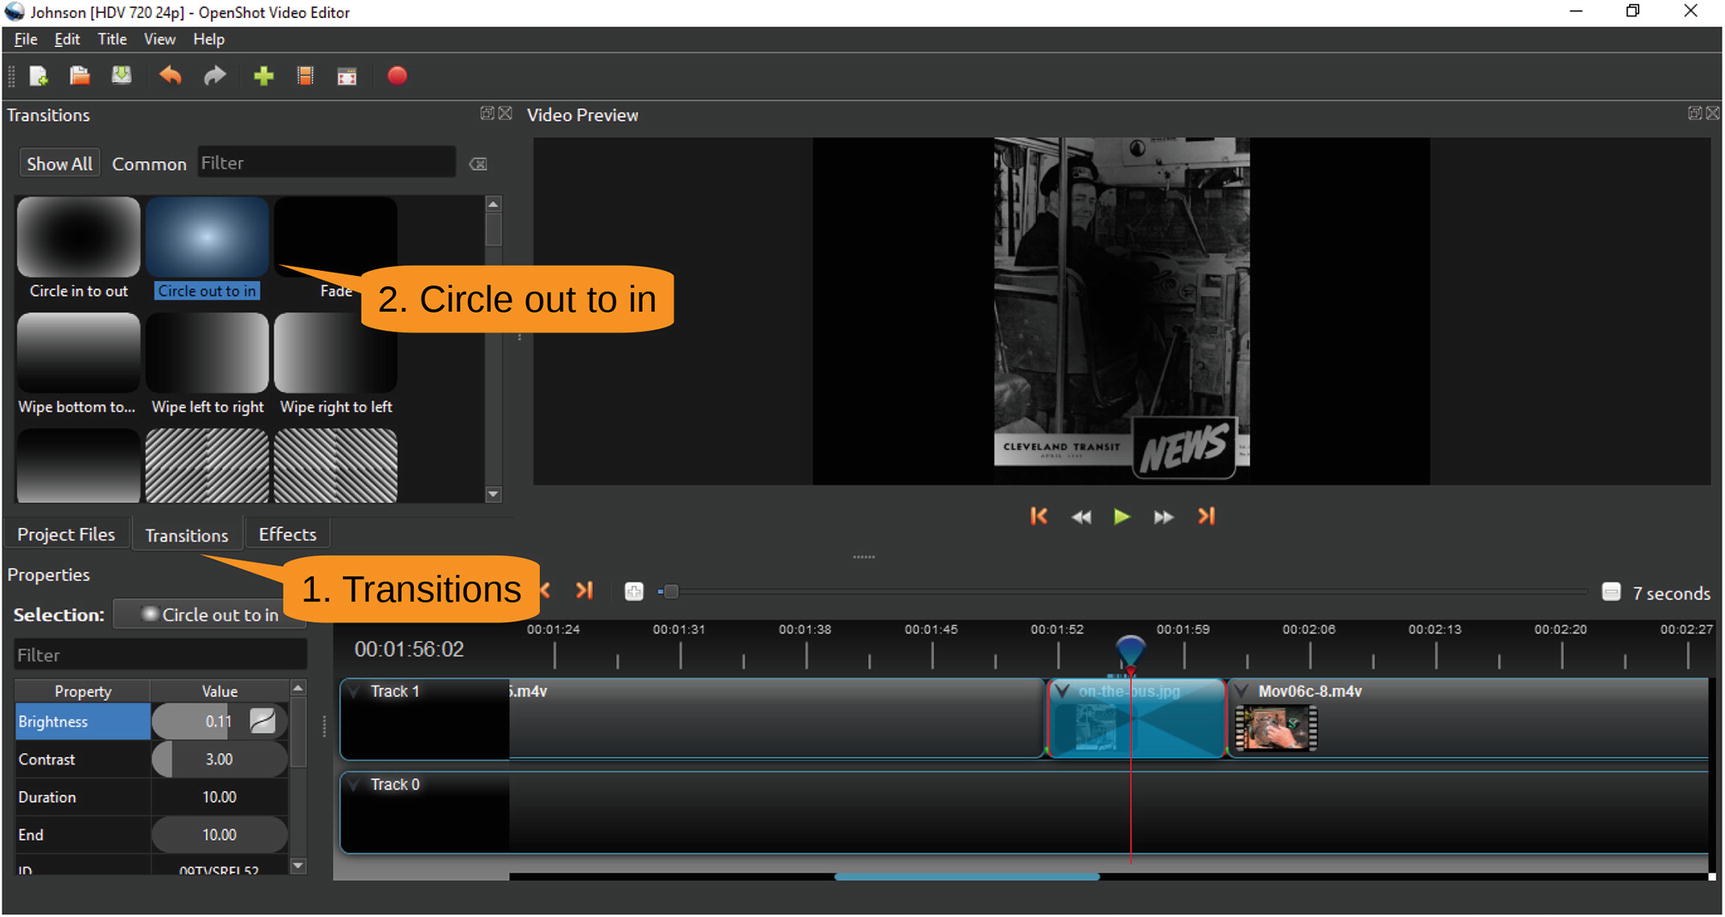
Figure 13-31 Adding a transition
Looking at Advanced Features
There are lots of more advanced features that we don’t have space to cover here. Here are just a few:
Picture in picture
Subtitles
Graphic overlays
Adding a voice track
For us, we’ve produced only one YouTube video and it has received a total of nine views. We’ve got a long way to go before we become Internet stars.
Summary
OpenShot is a good basic video editor. It has enough features to make interesting videos yet not so many that you spend a tremendous amount of time trying to figure out where the feature you want is located.