
Cascading Style Sheets
CSS is the method used to centrally manage all of the style attributes in SharePoint. There are many benefits to using CSS. One of these benefits is that instead of adding inline style properties to elements within the HTML, you can link off to external CSS files. Another benefit is if you need to make global changes to all sites and pages, you can simply edit the styles of the CSS and it automatically updates all areas where that CSS file is referenced and the class or ID is used. For example, if you remove all CSS references in SharePoint, then the site branding is stripped down to just text and icons, as shown in Figure 1-2.
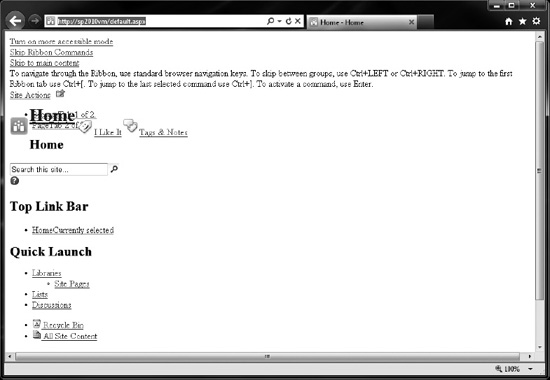
Figure 1-2. SharePoint 2010 with no style sheets applied
Within the HTML of your content or page you can add a class or an ID to any element:
- Classes: For a Class you would use the following on a table.
<TABLE class="custom-class”> - IDs: For an ID you would use specify it like this on a DIV tag.
<DIV id=“custom-id”>
That class or ID can then be referenced in your CSS file:
- Classes Reference: To reference classes you use a period in front of the name.
.custom-class - ID Reference: for an ID you would use a pound symbol
#custom-id
Once you have referenced the classes in your CSS, you can add properties like fonts, colors, or background treatment.
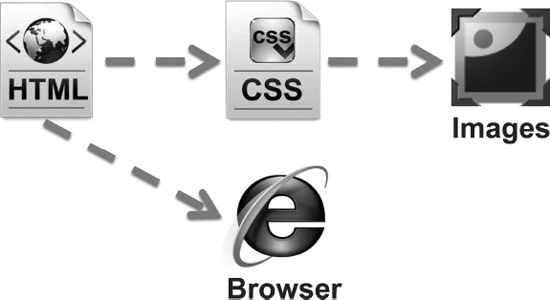
In the head of your HTML you specify and point to your custom CSS file. As the page loads it identifies that an element has a class or ID, checks for that in all of the CSS files referenced, and then styles the element according to the properties that you have included in the CSS file (Figure 1-3).
There are three different ways to specify CSS within your master page, page layout, or content on your page:
- Internal. When using internal styles, style attributes are added within the head of your page. This is commonly used in page layouts when you want a unique look and feel or padding for your page.
<head><style type=”text/css”>CSS Content Goes Here</style></head> - External. This is the most common and best practice for specifying your CSS style sheets in your master page. The CSS class names and properties are stored in a separate file with a file extension of “.CSS”. This file is located in the SharePoint Styles library within the SharePoint database or in a custom folder on the server.
<link rel=”stylesheet” type=”text/css” href=“stylesheet.css” /> - Inline. When using inline styles you are adding unique attributes to a particular HTML element or control on the page.
<p style=”color: #ff0000;”>Some red text</p>
The CSS syntax is the way that CSS rules are structured. The CSS class or ID is called a “selector,” which can be an HTML element like a DIV. Each selector can have multiple properties. Each property has its own unique value. The structure is formed like this: selector {property:value;}. Using the following example, .s4-search{color: red;}, the selector would be “s4-search,” the property would be “color,” and the value would be “red.” The curly brackets are used to contain all of the properties and values for each selector. Although the last property value can be left open, it is good practice to make sure that all property values end with a semicolon.
You can have multiple selectors for each set of properties as shown in Listing 1-1. The benefit to this approach is that you can share a set of CSS properties across all class names, and if a change is made, it is updated for all selectors specified.
![]() Note Each of the preceding selectors is separated by a comma. Make sure you do not have a comma between the last selector and the opening curly bracket or your style will not be rendered within the browser.
Note Each of the preceding selectors is separated by a comma. Make sure you do not have a comma between the last selector and the opening curly bracket or your style will not be rendered within the browser.
Within your custom CSS document it is recommended that you provide detailed comments to describe similar sets of selector class names. Comments can also be used to explain why you added certain selectors within your CSS file. This helps others who may see your file for the first time, or helps you remember an idea or updates to the file. For comments to be ignored by the browser they need to be structured such that they open with /* and close with */, as shown in Listing 1-2.
Listing 1-2. CSS Comment Example
/* This is the body class */

body {
  color: #000;

  background: #eee;

}
Color Formats
There are multiple ways of specifying color values within your CSS. The most common way is to use hex colors. Hex colors use a combination of red, green, and blue. Hex codes use 16 digits for shades of those colors: 0 1 2 3 4 5 6 7 8 9 A B C D E F. “0” is full color and “F” is no color. Hex colors use 6 or 3 digits and start with a (#) symbol. Examples: #000000, #FFFFFF, #0DC5B2, #330099 (Figure 1-4).
![]() Note The first two digits are (Red), second (Green), last (Blue)
Note The first two digits are (Red), second (Green), last (Blue)

Figure 1-4. Hex color structure
To simplify the preceding 6-digit hex color #330099, you can use shorthand to reduce the code to a three-digit number by simply removing the repeat value for each color. The three-digit code would be #309. It is important to note that three-digit hex codes only work where there are three pairs of repeating characters; these codes do not work with colors like #0DC5B2, where red is both 0 and D and not 00 or DD.
CSS Property Tags
Following are just a few of the basic CSS properties that you should learn and understand. As you become more familiar with these classes you can start to include more advanced CSS techniques for your designs.
Text Properties
The following are some example properties and styles that you can use to stylize the placement and form of the text on your page. Figure 1-5 shows a number of different text properties that can be used to stylize text on the page.
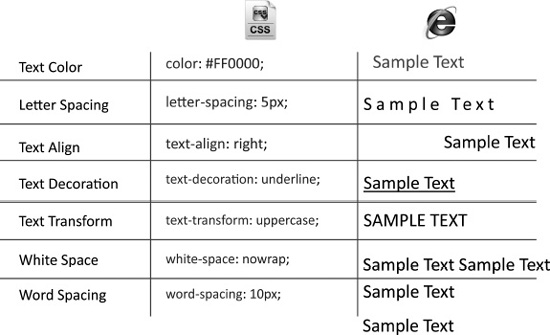
Figure 1-5. Text properties
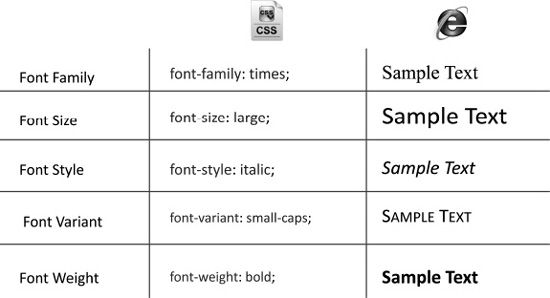
Font Properties
Font properties are values that you set to make the font, size, style, and weight of text unique. As you can see in Figure 1-6 there are a variety of ways that you can enhance font styles just using CSS.
Background Properties
When using background properties you can specify HTML elements to have a specific background color or image, as shown in Figure 1-7.

Figure 1-7. Background properties
Width/Height Properties
If you need to specify the height or width of an element or image, use the properties shown in Figure 1-8 to customize those values.
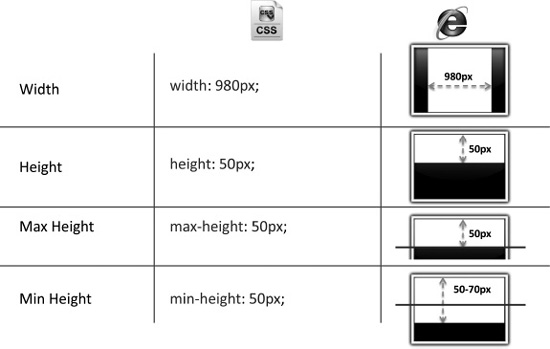
Figure 1-8. Height/width properties
Boxed Model
The CSS boxed model is the basic way that you specify margins, borders, and padding. All content can use a combination of these properties to enhance the look and placement of your content elements. In Figure 1-9 the margin is used to space content away from something that has a specified border. Borders can range in style from a single solid-pixel black line to more complex borders that have multiple colors, widths, and styles. Padding is used to separate content from other elements. It is also used to add spacing from the content to its own border.
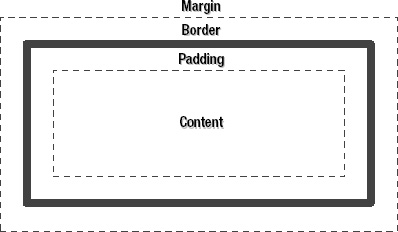
For more information about the boxed model, check out the following link: http://www.w3schools.com/css/css_boxmodel.asp.
Margins
The margin property declares the margin between an HTML element and the elements around it, as shown in Figure 1-10. The margin property can be set for the top, left, right, and bottom of an element. Margins can be individually specified or combined.

Figure 1-10. Margin structure
Border Properties
Borders are used to add colored lines around elements. Figure 1-11 shows that borders come with a variety of properties and values that you can specify.

Figure 1-11. Border properties
Padding
The padding property is the distance between the border of an HTML element and the content within it. Most of the rules for margins also apply to padding, except there is no “auto” value, and negative values cannot be declared for padding. In Figure 1-12 the border property can be specified in multiple ways that allow you to get the exact border style that you need.
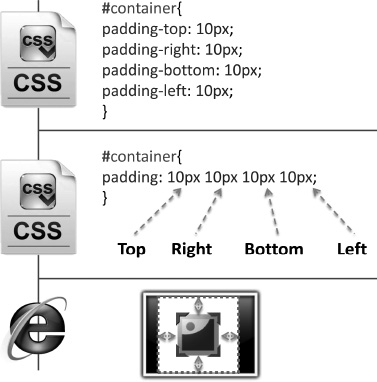
Figure 1-12. Padding structure
Pseudo Properties
Pseudo codes are used to specify alternate attributes for a specific property. As shown in Figure 1-13 you can use pseudo codes to provide hover states on elements, images, text, and any other attribute that you want.

Figure 1-13. Pseudo properties
With the knowledge and understanding of the preceding CSS definitions and concepts you should have enough background information to get started on your design. You can find more information about CSS at http://www.w3.org/Style/CSS/. Tutorials can be found at http://www.w3schools.com/css/.