
Photoshop Tips
Adobe Photoshop is a very useful tool for creating the visual design composition, as described in Chapter 4. However, it is very complex and takes some time to get used to. In this section you learn some quick techniques for speeding up the creation of the visual design.
Layer Mask
You use a layer mask if you need to blend an image with the background or section off an area to not be affected by an effect or color change. To blend an image into the background you click on the layer that you want blended. Then you make a selection around the area where you want your image appear. In this example, we want to add a large image to the header section within the design, as shown in Figure 8-2.
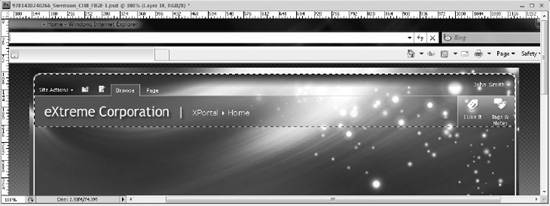
Figure 8-2. Header area selected where image should be shown
Once the area is selected you click on the layer mask icon shown in Figure 8-3.
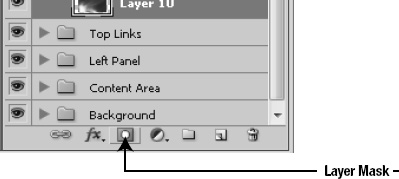
Once the icon is clicked it automatically crops out the entire image except for the elements inside of the selected area. The great thing about using masks is that you are not modifying the image at all. In fact, you can actually resize, move, and adjust the image by just clicking on the link icon in between the mask and the layer thumbnail, as shown in Figure 8-4.
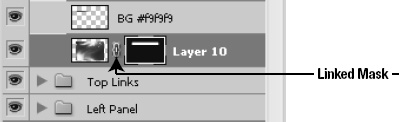
Figure 8-4. Linked layer mask icon
The mask itself uses the black areas to hide the image and the white areas to show the image. You can modify the mask by transforming or even painting it with black or white to hide specific areas that are not needed. You can also use the gradient tool to create a fading effect from black to white, as shown in Figure 8-5, where the image on the right is full opacity and then fades to nothing on the left.
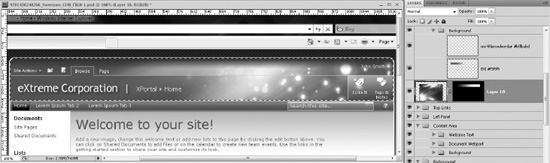
Figure 8-5. Using the gradient tool within a layer mask
Another useful tip when working with Photoshop is to use layer styles to create unique effects.
Layer Styles
Layer styles are used to stylize the selected layer with shadows, borders, and other effects. These types of styles can come in handy when you want to stylize multiple layers with the same effect such as a drop shadow. To create a drop shadow on a layer, simply click on the layer that you want to style, and then click on the layer style icon, as shown in Figure 8-6.
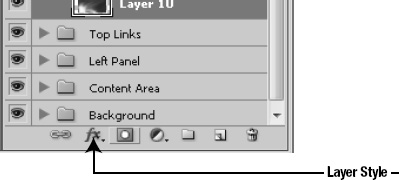
Figure 8-6. Layer style icon
Once you click on the icon it will present you with the following layer styles. See Figure 8-7 for an example of what some of these could look like applied to a simple gray box.
- Blending Options: The blending options allow you to configure and customize the blending features of the selected layer. As you choose different options it will change how the layer below it will look.
- Drop Shadow: The drop shadow style will allow you to configure the drop shadows color, opacity, angle, distance, spread, and size.
- Inner Shadow: You have the same amount of options as the drop shadow but the shadow is directed within the objects inner boundaries.
- Outer Glow: The outer glow is similar to a drop shadow but it does not allow you to have the glow displaced on an angle. The glow is displayed equally on all sides.
- Inner Glow: Same as outer glow but the direction of the glow is towards the center of the object.
- Bevel and Emboss: You can customize an object to look like it has some depth.
- Satin: The satin is not used very often but allows you to overlay a grid like pattern on top of the layer.
- Color Overlay: This allows you to place a color over the selected area of a layer. You can set the transparencies and the specific color to be used.
- Gradient Overlay: This helpful style allows you to add a gradient on top of the selected area within a layer.
- Pattern Overlay: This style is used for when you want to apply a patter on top of an existing image layer. You could use patterns that come with Photoshop or create your own.
- Stroke: The stroke style allows you to add a border around the layer. You can choose the stroke size, position, opacity, color, width, and style. You can even create strokes that have a gradient fill.
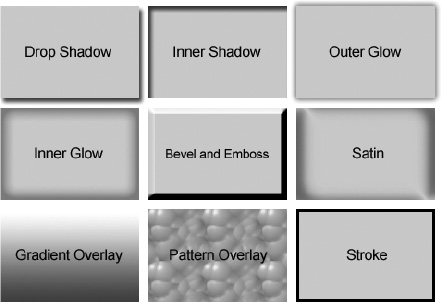
Figure 8-7. Photoshop layer styles
As you start working with stylizing the layers using filters and effects, you might also want to set the layers opacity or fill. In the next section you will learn the difference between them.
Opacity vs. Fill
Some design effects require that a layer be somewhat transparent. There are two layer options that you can use. The first option is to use Opacity, and the second option is to use Fill (both shown in Figure 8-8). They are very similar but based on the type of layer selected they can provide a variety of different effects.

Figure 8-8. Opacity and fill layer options
For example, if you wanted to make a layer 50% transparent, all you would have to do is click on the layer and change the opacity to 50%. Opacity basically takes the whole layer and all of the layer styles and makes it transparent to the layer below it. However, fill does not change the transparencies of the layer styles. For example, in Figure 8-9 the text is black with a white outer glow layer style applied. There is also an image in the background one layer down.

Figure 8-9. Text over image with 100% opacity and fill
If you were to change the opacity of the text layer to 30%, it would look something like what is shown in Figure 8-10. As you can tell, the text looks washed out and does not give you the result that you want.

Figure 8-10. Text over image with 30% opacity and 100% fill
Instead of using opacity to change the transparency, if you set the fill to 0%, the layer style will still be visible at 100%, and you get a nice ghosting effect on the text layer, as shown in Figure 8-11. The great thing is that this text layer did not have to be flattened and is still editable.

Figure 8-11. Text over image with 100% opacity and 0% fill
The next Photoshop tip is a simple way of using hue and saturation to colorize elements within your design.
Hue and Saturation
The hue and saturation image adjustment settings allow you to colorize or change the hue, saturation and brightness of a layer by using the shortcut CTRL + U or by clicking on Image ![]() Adjustments
Adjustments ![]() Hue and Saturation. This brings up a dialog window, as shown in Figure 8-12.
Hue and Saturation. This brings up a dialog window, as shown in Figure 8-12.
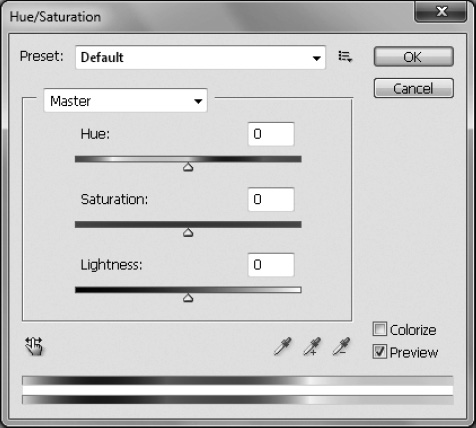
Figure 8-12. Hue and Saturation dialog window
This window allows you to configure the following settings for a single layer. If used properly you can effectively change the look of layers to help match the overall color palette and theme of the design.
- Hue: Use this slider to change the color of the selected layer by sliding the arrow back and forth through the color spectrum.
- Saturation: This slider allows you to increase the amount of selected color to the layer. If you move the slider all the way to the right, no color will be included, and it will be grayscale.
- Lightness: With this slider, you can slide the arrow to the right to make the image brighter and moved it to the left to make it darker. You can control the brightness and contrast better by clicking on Image
 Adjustments Brightness and Contrast.
 - Colorize: If you click on the colorize option checkbox it will take the foreground color and adjust the hue and saturation to match it. This can be very useful if you want to change the look of a background image to a mono-type color that will match your color palette.
- Preview: If unchecked, this box allows you to see what the original layer looks like before the hue and saturation updates are applied. Checking the box displays a preview of the changes.
The next Photoshop design tip comes from a design trend that is still popular. This trend is to apply rounded corners to elements to give them a soft and attractive look and feel.
Rounded Corners
The following sections describe the different techniques you can use to create rounded corners in Photoshop. For all of these techniques the end result is shown in Figure 8-13. Some of the challenges with this example are the checkered pattern in the background and the 2px wide border. Both of these add to the complexity of the design build. As described later in this chapter, browsers compatible with CSS3 can get rounded corners on elements with borders with just a few lines of CSS. This section focuses on how to create them in Photoshop.

Figure 8-13. Example of Photoshop rounded corner
Elliptical Marquee Tool
Let's assume that you are starting out with a corner that is squared off, as in Figure 8-14. You would like to add a corner radius of about 12 pixels.
Figure 8-14. Example of Photoshop squared-off corner
The first step is to select the elliptical marquee tool by typing “M” or choosing the marquee tool from the Tools panel. Once you have selected it, move your mouse to the top-left side of the square corner. Click and then press the Shift key to make a selection that is perfectly round. Use your info bar to get the selection to 25 pixels, double the size of the radius that you want. Create a new layer and fill it with white. Use the arrows on your keyboard and move the selection down 2px and to the right 2px. Then press the Delete key, and it will remove part of the white circle. Hide the layer with the 2px solid border, and then select the outer edges of the circle to remove the excess, as shown in Figure 8-15.
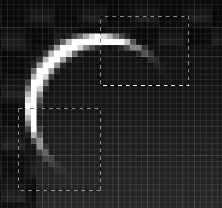
Figure 8-15. Selected areas to remove excess white
Next you should use the rectangular marquee tool and draw a box around the remainder of the circle shown in Figure 8-16. Unhide the 2px border layer and delete the corner area with the selection that you just made.
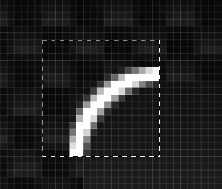
Figure 8-16. Selected area to remove 2px line
The final result should look like the model example shown earlier in Figure 8-13. The next technique shows how to create rounded corners in Photoshop by using the rounded rectangle tool.
Rounded Rectangle Tool
Another technique is to use the rounded rectangle tool. To get the rectangle tool, type “U” on your keyboard within Photoshop, or choose it from the Tools panel, as shown in Figure 8-17.
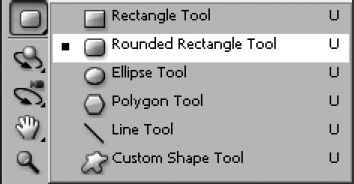
Figure 8-17. Rounded rectangle tool
Once you have the tool selected in the top options window, change the radius to 12px. Change your foreground color to the color that you want the background of the box to be. You can then draw the box to the size that you want it. To add a border, click on the newly created button later and add a stroke layer style. Choose the stroke size of 2px and color of white, as shown in Figure 8-18.
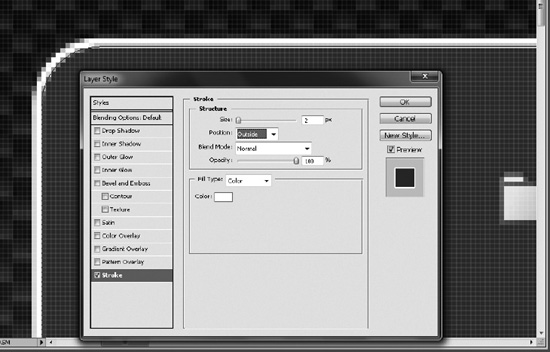
Figure 8-18. Stroke layer style options
These are just a couple of ways that you can create rounded corners in Photoshop. The next few tips focus on the build aspect of the visual design, which includes CSS, web-part zones, themes, and CSS3 properties.