Eventually, you’ll have to move virtual machines (VMs) from one Hyper-V host to another. With stand-alone hosts, this could be owing to the physical server requiring an upgrade or even being retired. If your Hyper-V hosts are clustered, you may have to move the VMs, so that you can reboot a server that’s been patched, or you must balance the workloads on the servers.
In this chapter, we’ll introduce you to the various options you have for moving a VM between hosts, show you how the techniques work, and make recommendations as to when it’s best to use each approach.
Introduction to Virtual Machine Mobility
Hyper-V Migration Approaches
Migration Type | Requires Cluster | Downtime | Perform With |
|---|---|---|---|
Cold migration | No | Yes | Hyper-V Manager |
Quick migration | Yes | Short | Failover Cluster Manager |
Live migration | Yes | None | Failover Cluster Manager |
Shared nothing migration | No | None | Hyper-V Manager |
Storage migration | No | None | Hyper-V Manager or Failover Cluster Manager |
The slowest option is a cold migration, which is performed with the VM switched off and can require significant downtime, depending on the speed at which you can copy files across your network. A quick migration requires a small amount of downtime (usually about one minute), while a live migration can be performed safely with the VM running. Users attached to the VM won’t notice any impact to their service.
A shared nothing migration also doesn’t require downtime and can be performed between non-clustered hosts. The final migration type is a storage migration, which moves the VM’s files from one location to another on the same host and can be performed with the VM running.
We’ll work through the migration types, show you how to use them, and explain when each should be used. Before we get to that topic, we must consider the configuration version of the VMs in your environment.
Configuration Version
Summary of Hyper-V Configuration Versions
Configuration Version | Introduced With |
|---|---|
8.3 | Windows Server 2019 previews Windows Server 1803 Windows 10 1803 (April 2018 Update) |
8.2 | Windows Server 1709 Windows 10 1709 (Fall Creators Update) |
8.1 | Windows 10 1703 (Creators Update) |
8.0 | Windows Server 2016 |
7.1 | Windows Server 2016 Technical Preview |
7.0 | Windows 10 builds 10565 or later |
6.2 | Windows 10 builds prior to 10565 |
5.0 | Windows Server 2012 R2 Windows 8.1 |
A given version of Hyper-V can run a VM with a configuration version that is equal to or less than the configuration version associated with that version of Hyper-V. For example, Windows Server 2016 can run any VM with a configuration version of 8.0 or less. Windows Server 1803 can run a VM with a configuration version of 8.3 or less. You can think of the configuration versions given in Table 14-2 as the maximum configuration versions that the host can support.
Note
When Windows Server 2019 is finally released, it may well have a configuration version of 8.4 (or higher).
If you upgrade the Hyper-V host or migrate the VM to a host running a later version of Hyper-V, your VM won’t get the benefit of any new features associated with the later version of Hyper-V until you upgrade the VM’s configuration version. The features available with each configuration version can be viewed at https://docs.microsoft.com/en-gb/windows-server/virtualization/hyper-v/deploy/Upgrade-virtual-machine-version-in-Hyper-V-on-Windows-or-Windows-Server . The configuration version doesn’t upgrade automatically; you must explicitly perform the upgrade action.
Note
You can upgrade (increase) the configuration version of a VM. You can’t downgrade (decrease) the configuration value.
Some examples may help you to understand configuration versions. If you create a VM on a Windows Server 2016 version of Hyper-V, its configuration version is 8.0. This VM can be moved to a host with a higher configuration version number, and it will run, but it won’t be able to access any new features.
If you leave the configuration version at 8.0, you can move the VM back to a Windows Server 2016 Hyper-V host, but you can’t move it to a Windows Server 2012 R2 Hyper-V host, as that can’t support a VM with a configuration version higher than 5.0.
If you move the VM from Windows Server 2016 to a Windows Server 1803 Hyper-V host and upgrade the configuration version to 8.3, you won’t be able to move it back to the Windows Server 2016 host or any host that can’t support a configuration version of 8.3.
This creates a VM with a configuration version of 8.0, meaning you could run it on Windows Server 2016.
In the Virtual Machines pane, the configuration version is in the left-hand column.
The configuration version for a VM you’ve selected is visible in the Summary pane.
- 1.
Stop the VM to be upgraded, if it’s running.
- 2.
Right-click the VM to be upgraded.
- 3.
Select Upgrade Configuration Version…
- 4.
Click Upgrade in the Confirmation dialog.
You can’t choose the configuration version you’re going to upgrade to. It’s automatically the default configuration version of the host. You can also perform the upgrade from the VM’s action pane.
Get the VMs on your host and only accept those that have a version that is less than the default configuration version. Pass those into Update-VMVersion . Once you’ve performed the upgrade, remember that you can’t downgrade, and you can’t move the VM to a Hyper-V host that only supports lower configuration versions.
Now that you understand configuration versions, we can move on to migration techniques. We’ll start with the slowest migration option: a cold migration.
Cold VM Migrations
A cold migration involves moving a VM’s files from one host to another. The hosts don’t have to be on the same network, as files can be migrated via removable storage.
Export VM
You can cold migrate a VM that’s running or stopped. A running VM could be exported as a rough backup. For a migration, you’d want the VM to be stopped, so you can guarantee the state of the VM.
- 1.
To export the VM, right-click the VM in Hyper-V Manager and select Export…
- 2.
Confirm the location for export files.
- 3.
Click Export.
Snapshots: Contains any current snapshots of the VM
Virtual Hard Disks: Contains the VHD or VHDX files for the VM
Virtual Machines: Contains the VM configuration information
Note
Exporting a VM does not delete the VM on the original host. If you’re going to move the VM to another host, we recommend you complete the move, verify the VM is working correctly, and only then delete the original instance of the VM.
Try it Yourself
Export a VM and copy the files to another Hyper-V host.
After the export is complete, move the exported files to the new host. It’s recommended that you put the files on the new host directly into the correct location, to save further copying during the import process.
Note
If you don’t have a second host available, delete the VM you’ve exported.
Now you can import the VM into its new host.
Import VM
- 1.
In Hyper-V Manager, click Import Virtual Machine… in the Actions menu.
- 2.
Click Next, to bypass the Before You Begin page.
- 3.
On the Locate Folder page, use the Browse button to locate the folder with VM export files.
- 4.
Click Next.
- 5.
Select VM to import—usually, only one is available. Click Next.
- 6.Choose Import Type, as follows:
- a.
Register VM in place (use existing ID)—the default
- b.
Restore VM (use existing ID)
- c.
Copy VM (create new ID)
- a.
- 7.
In this case, use the Rdefault. Click Next.
- 8.
If the virtual switches on the new host are different from the original host’s, you’ll have to connect the VM’s virtual NIC to the correct switch. Click Next.
- 9.
On the Summary page, click Finish, and the import will be performed.
Once the import has completed, you can start the VM and let your users connect to the workload.
Virtual Machine Configuration Files
In Windows Server 2016 Hyper-V and later versions, the .vmcx file stores the VM configuration, and the .vmrs file stores the VM state. In earlier versions of Hyper-V, there would be an .xml file for the configuration plus .bin and .vsv files for the state.
Note
The output has been truncated to fit the display.
If you place the files in the correct location for the VM, the import will be easier and less error-prone.
Try it Yourself
Import the VM you exported earlier either to its current host (after deleting the original VM) or a new host.
Cold migrations should only be used when moving VMs between hosts, and you can’t use shared nothing migrations. They are also useful if you are migrating to a different infrastructure, for example, a third-party hosting company.
Let’s move on to quick migrations, which drastically reduce downtime.
Quick VM Migrations
Quick migrations enable you to move a running VM from one host to another with minimal downtime. You will have downtime. If you can’t afford downtime, perform live migration. Quick migrations have been available since the first version of Hyper-V (Windows Server 2008).
The VM is put into a saved state.
Information in the VM’s memory is transferred to the new host.
The VM is started on the new host.
The Hyper-V hosts involved in a quick migration must be clustered, and the storage on which the VM is hosted must be visible to both nodes involved in the migration.
- 1.
Open Failover Cluster Manager and connect to your Hyper-V cluster.
- 2.
Select Roles within your cluster.
- 3.
Select the VM to migrate in the Roles pane.
- 4.
Click Move in the Actions pane.
- 5.
Click Quick Migration.
- 6.
Click Select Node… The dialog shown in Figure 14-1 appears.
- 7.
Select the cluster node to which you’ll move the VM. Click OK.
- 8.
VM status changes to Saved. Information shows the migration progress.
- 9.
After migration, the VM will restart.
- 10.
Notice the VM uptime is reset, as the machine was effectively restarted.
Try it Yourself
Use the Failover Cluster Manager to perform a quick migration of a VM between nodes on your Hyper-V cluster.
Quick migrations work, but a better solution is to use live migrations.
Live VM Migrations
Live migrations were introduced with Windows Server 2008 R2. The advantage of a live migration is that there is no downtime for the VM. Your users can keep working while the migration occurs.
- 1.
Open Failover Cluster Manager and connect to your Hyper-V cluster.
- 2.
Select Roles within your cluster.
- 3.
Select the VM to migrate in the Roles pane.
- 4.
Click Move in the Actions pane.
- 5.
Click Live Migration.
- 6.
Click Select Node… The dialog shown in Figure 14-1 appears.

Performing a quick migration. The VM to migrate and the node to which it will migrate are indicated by the arrows.
- 7.
Select the cluster node to which you’ll move the VM. Click OK.
- 8.
VM status changes to Live Migrating. Information shows the migration progress.
- 9.
Post-migration VM status changes back to Running.
- 10.
Users may have to log back in, but their session and work will be preserved during the migration.
Try it Yourself
Use the Failover Cluster Manager to perform a live migration of a VM. Note the difference from when performing a quick migration.
Performing a live migration is the preferred option, whenever possible, as there is no downtime for your users. If you have to move VMs between nodes that aren’t in the same cluster, a new option is a shared nothing migration.
Shared Nothing Migrations
Shared nothing migrations were introduced to Hyper-V in Windows Server 2012. The advantage of using a shared nothing migration over a cold (export/import) migration is that the VM keeps running. The disadvantage is that the procedure is a lot more complicated.
Note
Using shared nothing migrations isn’t a replacement for clustering, as it doesn’t supply high availability, only mobility.
Two or more Hyper-V hosts running Windows Server 2012 or later versions that are in the same Active Directory (AD) domain and have network connectivity
Each host has its own storage configured.
Hyper-V hosts should have the same processor type and should be configured with the same Hyper-V switches.
VMs to be migrated don’t use pass through storage.
The Hyper-V hosts must be configured for Live Migrations (see Figure 14-2). Ensure the Enable incoming and outgoing live migration check box is checked and that the IP range for migrations is configured, if required.

Configuring a Hyper-V host for live migration
One last problem remains—authentication.
Authentication for Shared Nothing Migrations
When you perform a live migration on a cluster, you’re using the cluster account to perform the migration under the covers. In a shared nothing environment, you are using your own administrator account. During a shared nothing migration, actions are performed on the original and new hosts. These actions require authentication. If you log on to either the source or target hosts and perform a shared nothing migration, your credentials are delegated to the other host by Kerberos—the AD authentication protocol. If you access one of the hosts remotely through the administration tools and attempt to perform the migration, it will fail, because Kerberos won’t delegate your credentials in this scenario.
Note
This is the “double hop” problem you hear so much about in PowerShell remoting.
This is probably clearer with an example. You’re logged on to your administration machine. Your instance of Hyper-V Manager connects to ServerA. You can perform administrative tasks on ServerA perfectly well. In a shared nothing migration, you must also perform tasks on ServerB. ServerA attempts to do this on your behalf, and the attempt fails, because ServerA isn’t allowed to delegate your credentials.
The way to solve this is to create a delegation. The appropriate credentials for each host are delegated to the other hosts. This can get very messy if you have a number of hosts, which is one of the reasons that clustering is the recommended solution.
- 1.
Open Active Directory Users and Computers.
- 2.
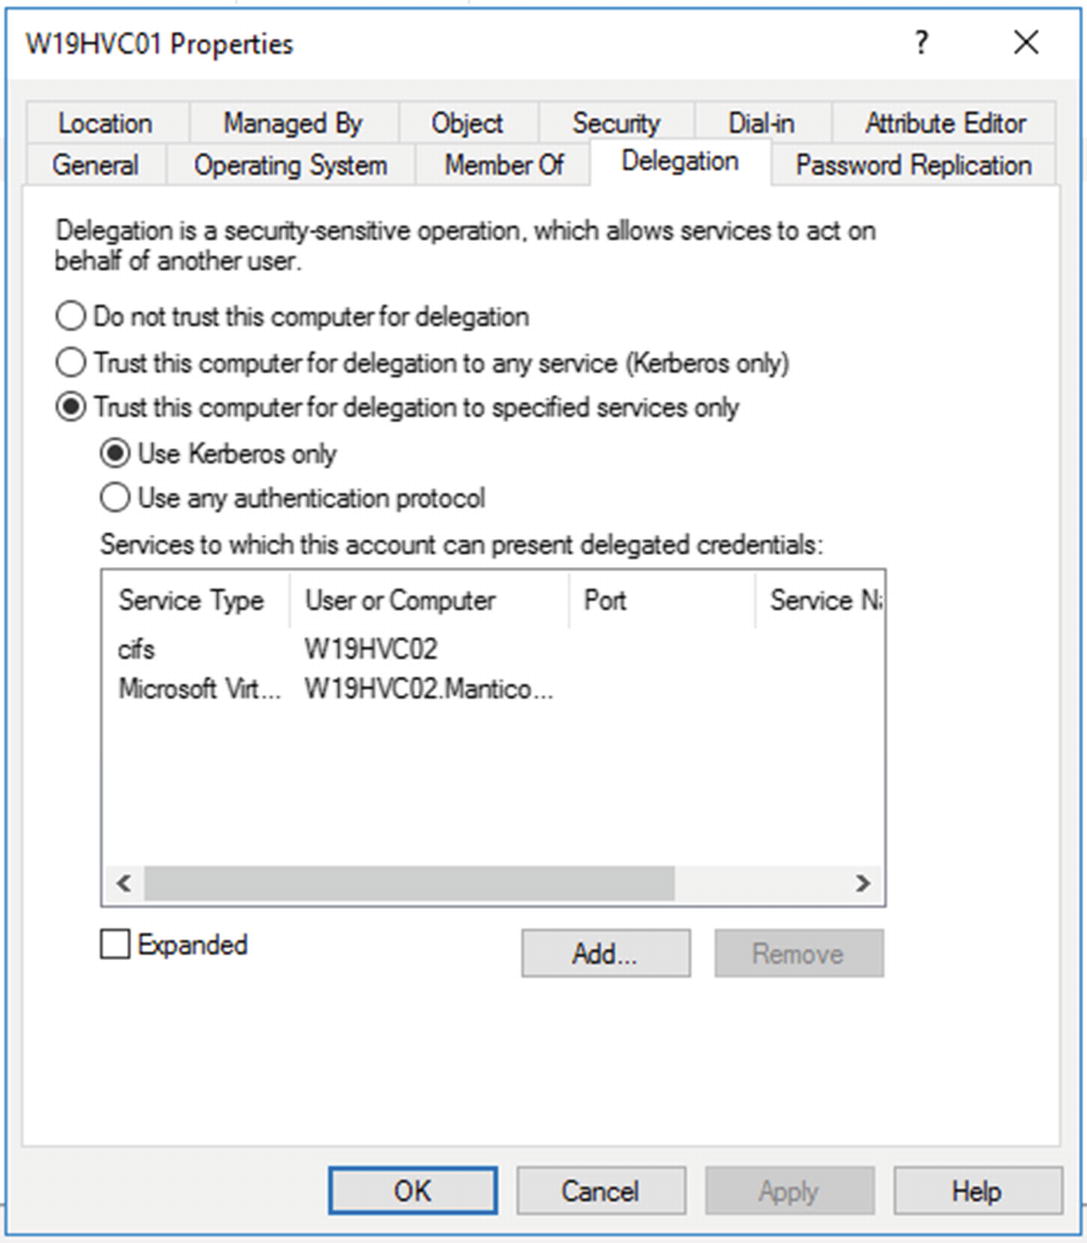
Right-click the Hyper-V host. Select Properties.
- 3.
Select the Delegation tab.
- 4.
Configure the tab as shown in Figure 14-3.
Configuring the Kerberos delegation
You’re constraining the delegation by specifying the exact services for which you want authentication to be delegated. Selecting Use Kerberos only ensures that you’re secure. The Add button on the Delegation tab is used to specify the computer (standard AD computer picker dialog) and the services to delegate. If you don’t recognize CIFS, it’s the filesystem.
In Figure 14-3, you’ve delegated your credentials from the server to W19HV02 for CIFS and Microsoft Virtual System Migration Service only. No other services are delegated.
You must repeat the delegation on the other host, so that it works both ways—on host A delegate to host B and on host B delegate to host A.
You’re now in a position to migrate VMs between the two hosts.
Try it Yourself
Configure two stand-alone Hyper-V hosts for shared nothing migrations. Perform a migration.
Performing a Shared Nothing Migration
- 1.
Open Hyper-V Manager and connect to the server currently hosting the VM.
- 2.
Select the VM.
- 3.
In the Actions pane for the VM select Move…
- 4.
Click Next, to bypass the Before You begin page.
- 5.
Select Move the virtual machine.
- 6.
Click Next.
- 7.
Supply the name of the destination host.
- 8.
Click Next.
- 9.
Select Move the virtual machine’s data to a single location.
- 10.
Click Next.
- 11.
Select the folder on the destination host to which the VM will be moved.
- 12.
Click Finish.
- 13.
A progress bar will be displayed, and the Status field in Hyper-V Manager will display a message with a percentage completion.
The speed of a shared nothing migration is constrained by the network links between the Hyper-V hosts. We recommend that clustering is used whenever possible, as it provides more protection for the VM.
Try it Yourself
Perform a shared nothing migration for a VM between the two hosts you configured in the previous section.
If you want to try a shared nothing migration without building two new Hyper-V hosts, use the two cluster nodes you created in Chapter 10 and also used for the quick and live migrations in this chapter.
Create the VM you want to migrate on storage that isn’t seen by the cluster, for example, the C: drive.
The last migration option we want to consider is storage migration.
VM Storage Migrations
So far, you’ve seen how to move a VM between hosts. An export/import or shared nothing migration implies that you’re changing the storage on which the VM resides. A live migration or a quick migration on a Hyper-V cluster may or may not change the VM’s storage location.
It’s also possible just to migrate the VM to another storage location. You may need to do this if your storage is filling up, or if you add storage and have to balance the load across the sets of storage.
Note
A pure storage migration is performed live. The VM keeps on running during the migration, with no impact to your users.
- 1.
In Hyper-V Manager, select the VM to move.
- 2.
Click Move in the Actions pane.
- 3.
Click Next, to bypass the wizard’s opening page.
- 4.
Select Move the virtual machine’s storage.
- 5.
Click Next.
- 6.
Select the movement option (see Figure 14-4), in this case, move all data to a single location. Click Next.

Options for moving storage
Move all data to a single new location.
Move the VM’s data to different locations. Virtual disks, configuration, checkpoints, and smart paging can all be moved independently.
Move only the virtual disks. The disks can be moved independently.
We normally recommend keeping all of the VM’s data together. It makes administration and troubleshooting easier, if you have everything available in one place. Spreading a VM’s data across multiple storage locations increases the risk of a storage failure affecting your VM.
- 1.
Specify the new location for the VM.
- 2.
Click Next.
- 3.
Inspect the information and click Finish.
- 4.
Watch the move information in the Status column of Hyper-V Manager.
- 5.
A success message will flash in the Status column of Hyper-V Manager.
Note
The folder the VM used to occupy will still be present. It’ll be empty. You’ll have to delete it manually, if required.
Specify the name of the machine and the new storage location. The Move-VMStorage cmdlet also has the option of moving individual components, as discussed previously.
Try it Yourself
Select a test VM in Hyper-V Manager and move all of its data to a new location. Use PowerShell to move it back. Has anything changed in the way the data is organized?
It’s your responsibility to ensure that the target storage location when using Hyper-V Manager or PowerShell has sufficient space for the VM.
- 1.
Open Failover Cluster Manager.
- 2.
Expand your cluster.
- 3.
Select Roles.
- 4.
Select the VM that will have its storage migrated.
- 5.
Click Move in the VM’s Action pane.
- 6.
Click Virtual Machine Storage.
- 7.
Select the disk to move.
- 8.
Drag and drop the selected disk into the destination folder in the lower pane, as shown in Figure 14-5.
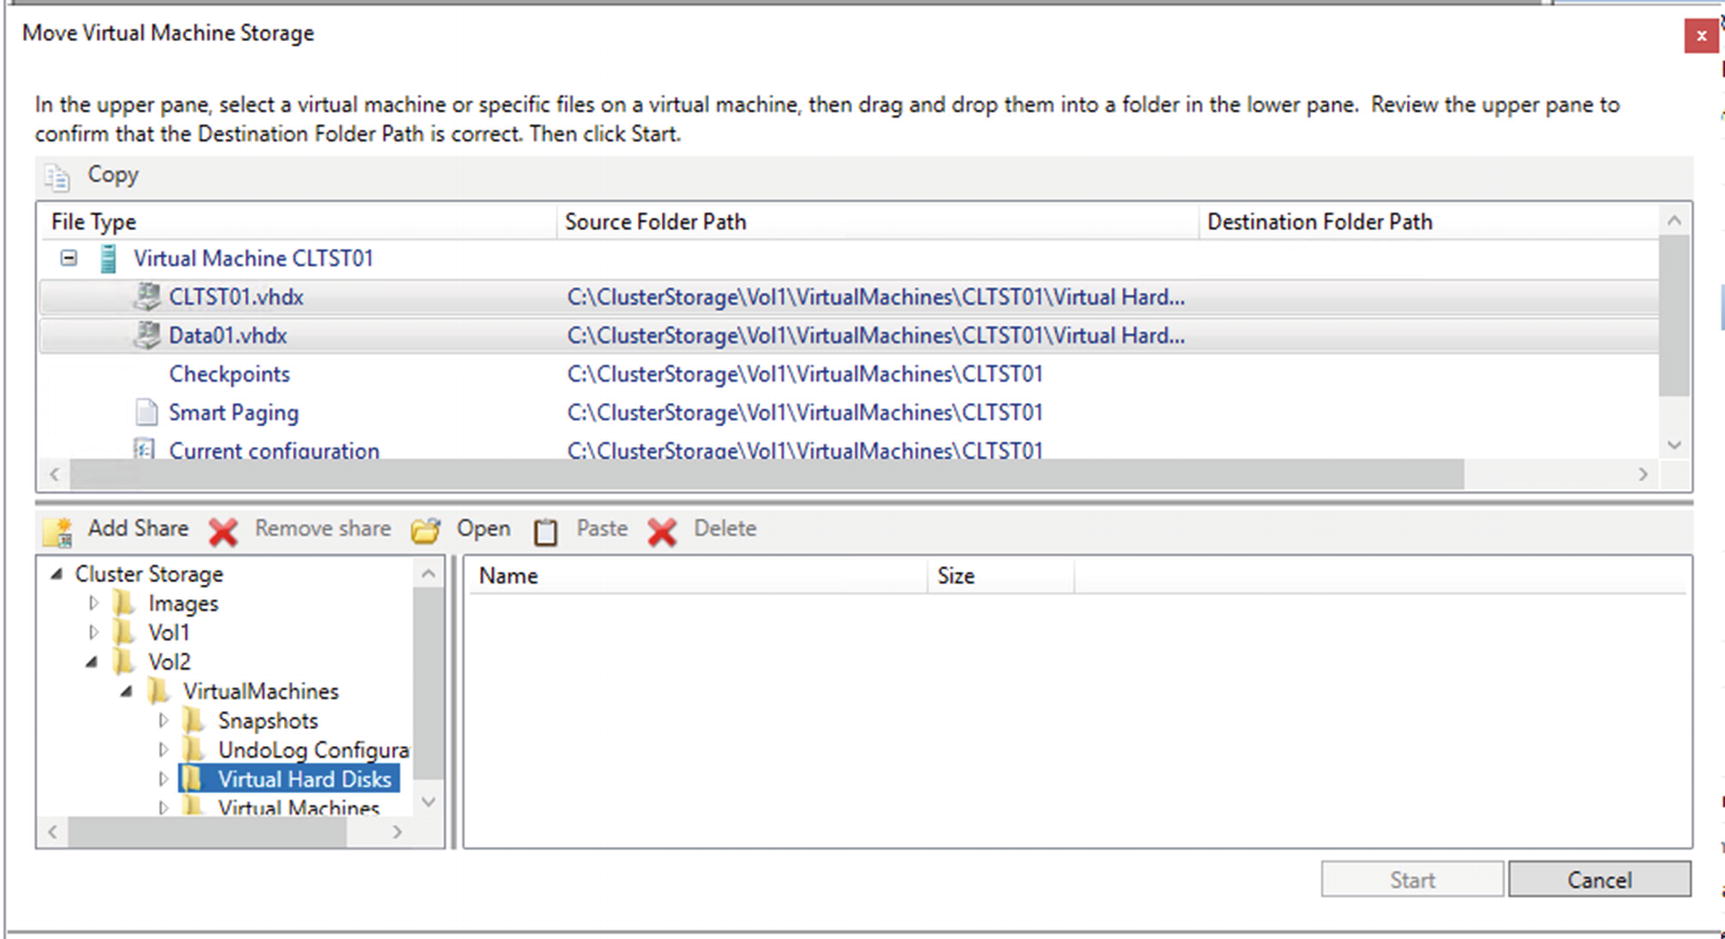
Performing a storage migration with Failover Cluster Manager
- 9.
Repeat for any other disks or VM components to be migrated.
- 10.
Click Start.
- 11.
The Information field in Failover Cluster Manager changes to show that the VM storage migration has started.
- 12.
There is no message to state that the migration has completed. The Information field will go blank.
Try it Yourself
Use Failover Cluster Manager to perform a storage migration on the disks attached to your test VM.
Let’s close the chapter with lab work.
Lab Work
- 1.
Complete the Try It Yourself sections, if you haven’t done so.
- 2.
Perform a cold migration where the Hyper-V switches don’t match on the hosts. What happens? How can you repair the VM?
- 3.
Take down one of the nodes in your Hyper-V cluster while VMs are running. What happens to the VMs?
- 4.
Start a live migration and crash the target node while it’s happening. Can you repair the VM?
- 5.Perform a storage migration. In each case, examine the VM properties.
- a.
Move just the disk or disks.
- b.
Move each component to a different location.
- a.
- 6.
Automate moving all your VMs to a new storage location.