In Chapter 3, you learned how to create a virtual machine (VM) from scratch, and configure resources attached to the VM. However, what was accomplished in Chapter 3 isn’t a complete view of the settings and configuration of a VM. Nor are you stuck with the configuration defined in Chapter 3, which would be counterproductive and break one of the primary benefits of virtualization: flexibility! No, there is far more that can be done with a VM, once it is established. The goal of this chapter is to review the options and settings that aren’t available through the New Virtual Machine Wizard.
In This Chapter and Beyond
CPU resources
Memory resources
Storage resources
This is important material, because you’ll be modifying existing VMs quite often as the needs of your business change. Without this knowledge, your IT operations lose flexibility.
At the end of this chapter, you’ll know how to modify a VM’s resources. Additionally, you’ll become familiar with the core underlying functionality provided by Hyper-V, on a VM-by-VM basis. You’ll once again notice that virtual networking is missing from this chapter. Virtualized networking is complicated, so it receives an entire chapter later in the book.
Note
In this chapter, we’ll cover the most commonly used settings. Some of the items will be covered in more detail later in the book. When we do refer to a later section of the book, we’ll specifically call it out.
Configuring Virtual Machine CPU Resources
If you were paying close attention to Chapter 3, you may have noticed one very critical resource missing from the wizard used to provision the VM, namely CPU! By default, the New Virtual Machine Wizard will assign a single Virtual CPU (vCPU) to the target VM. If you require any additional vCPUs, you do so after the VM has been created.
Note
The changes we are about to make require that the target VM be in a powered off state. Anytime you make fundamental changes to the CPU settings of a VM, it is recommended (and a requirement for some settings) to power down the VM. For the purposes of the following exercise, it is recommended that you use one of the VMs created in the previous chapter. If they are still powered on, you must power them off.
- 1.
In Hyper-V Manager, select the target host that hosts the VM.
- 2.
If the target VM is still powered on, shut it down, by selecting the VM in the VM list in the center pane and then clicking Shut Down in the action pane on the right.
- 3.
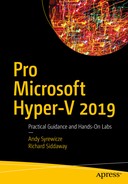
Select the VM in the VM list in the center pane and click Settings, in the action pane on the right. You will be greeted with the VM settings page for the selected VM, as shown in Figure 4-1.

VM settings dialog
- 4.
Wait for the VM to enter a powered down mode, which will be indicated by a state of Off in the VM list in the center pane.
- 5.
In the left-hand pane of the VM settings utility, expand the Processor section and then click the root of the Processor section (see Figure 4-2).
VM vCPU settings
- 6.
Change the field labeled “Number of virtual processors,” so that it reads as 2.
- 7.
Click OK.
POWERSHELL CMDLET
The preceding exercise increased the number of virtual CPUs the VM has assigned to it. The Hyper-V was told to assign more CPU resources to this particular workload, and it will adjust things accordingly under the hood.
TRY IT YOURSELF—INCREASE CPU RESOURCES ASSIGNED TO A VIRTUAL MACHINE
Use Hyper-V Manager to increase the number of virtual CPUs on your VM. Repeat using PowerShell. Is there a number beyond which you can’t increase the number of vCPUs for a VM?
The inevitable question at this point is, how do virtual processors (or vCPUs) correlate to physical CPUs? Remember that Hyper-V manages all available resources and delegates them to the guest OSs, as needed. This is no different for processing threads. The hypervisor doesn’t take a physical core and forever tie it to a VM, as most processing threads spend the majority of their time idle.
You should think of CPU in Hyper-V as a pool of CPU resources. This metric gives a particular VM more of the available processing time with the physical host CPU, which removes computing resources from the pool. This is the primary function of the CPU scheduler. The CPU scheduler determines that process A from VM B will use physical CPU core 3. Once a computation is completed or paused, the core is freed, so the hypervisor can assign another process to it for the same or perhaps a different VM.
ABOVE AND BEYOND
Hyper-V process scheduling is a complex topic. For most purposes, you only have to know that increasing the vCPU count increases the amount of processing time the VM gets at the hypervisor level. If you’d like to learn more about how this process works, Eric Siron has an excellent article on this topic, available at www.altaro.com/hyper-v/hyper-v-virtual-cpus-explained/ .
Another item you’ll see in Figure 4-2 is resource control. These options control how the CPU scheduler treats CPU allocation for this VM and determine how that VM should consume CPU resources. We’ve found over the years that it’s often best to just let the CPU scheduler do its job and handle all CPU allocation. There are certain situations in which you may require finer grain control over virtual CPU behavior, for example, in the case of resource contention. If a host system is ever starved for resources, you could ensure that one VM gets more access to CPU resources than another. This is very useful when you have a mission-critical workload that you want to make sure never gets starved for resources. Let’s look at each potential setting and review how each affects CPU utilization.
Virtual Machine Reserve (Percentage)
This allows you to reserve a percentage of the assigned vCPUs to a VM. For example, a physical host that has two quad core CPUs have eight logical processors, meaning they have eight available threads for computations to be completed. If you assign two vCPUs to a VM, you’re giving that VM access to two CPU threads. Changing this setting to 100% would then ensure that those two threads are dedicated to that VM. In that same situation, if the setting was 50%, the hypervisor would ensure that one of those threads is always available for the VM. This isn’t something you want to do with ordinary VMs, as the more you use this, the less VMs you’ll be able to place on a particular host, owing to increased CPU demand. However, it is useful for high CPU workloads.
Percent of Total System Resources
This field is associated with both the reserve and limit fields. This field updates automatically to reflect the total amount of host CPU resources this VM has in reserve or in limitation.
Virtual Machine Limit (Percentage)
This field limits the amount of CPUs a VM can consume, based on the allocated number of CPUs. As an example, if a physical host has two quad core CPUs adding up to eight logical processors, setting the limit to 50% will only allow the VM to access one of the processing threads. This is rarely used. The only time that this particular setting is of use is when you have a virtualized workload that can periodically consume all of its assigned resources and raise the resource usage on the host above acceptable levels. Another way around this issue is to simply reduce the number of assigned CPUs, thus removing CPU contention on the host.
We’d like to reinforce the idea that you should only use these items when you absolutely have to. It’s best that the CPU scheduler take care of everything itself, but these controls are here if needed.
Virtual Machine CPU Compatibility
In the VM CPU settings, you’ll notice a subtree item under Processor labeled “Compatibility” that contains only some text and a single check box. This is used mainly in situations in which you have different CPU families across your Hyper-V hosts.
When a VM is booted, it is presented with the host system’s underlying instruction sets. Think of an instruction set as an advanced function or feature of the CPU. The guest OS will take advantage of these instruction sets when available. However, if you attempt to live migrate the VM to another host with a different processor type, you’ll get an error message stating that the VM is not compatible with the processor that is present in the destination host machine.
In this situation, the VM is utilizing the available instruction sets of the new CPU presented by the current host. The destination host’s CPU may be missing some of the newer instruction sets. If it is older, the OS of the guest VM can’t simply stop using those instruction sets. The VM will have to be powered off to be moved to the older host.
Powering off VMs to enable migration to a different physical host isn’t the preferred method of doing things. Enabling the Processor Compatibility check box disables the extra CPU instruction sets for that particular VM, ensuring that live migration between hosts with different processor generations occurs without issues.
SET CPU COMPATABILITY WITH POWERSHELL
What About NUMA?
Another item that you’ll see mentioned throughout this chapter is non-uniform memory access (NUMA). The topic of NUMA could consume many pages. For the purposes of this book, it’s only required to know that it provides NUMA-aware applications, such as SQL Server or SharePoint, more efficient access to memory. If you’re interested in learning more about NUMA , the TechNet article available at https://technet.microsoft.com/en-us/library/dn282282.aspx will provide all the information and background that you could want.
Configuring Virtual Machine Memory Resources
Next on our list of configurable items are VM memory resources. Memory is one of those resources that has to be modified while workloads are live. Hyper-V 2012 R2 (and later versions) enables this with advanced features, such as Dynamic Memory, but first, let’s see what increasing memory looks like without having Dynamic Memory enabled.
During our exercises in Chapter 3, we set the Startup RAM for our VMs. Let’s modify that value.
- 1.
In Hyper-V Manager, select the target host that hosts the VMs you created in Chapter 3.
- 2.
If the target VM is still powered on, shut it down by selecting the VM in the VM list in the center pane, then click Shut Down in the action pane on the right.
- 3.
Select the target VM in the center pane. Click the settings link in the action pane.
- 4.
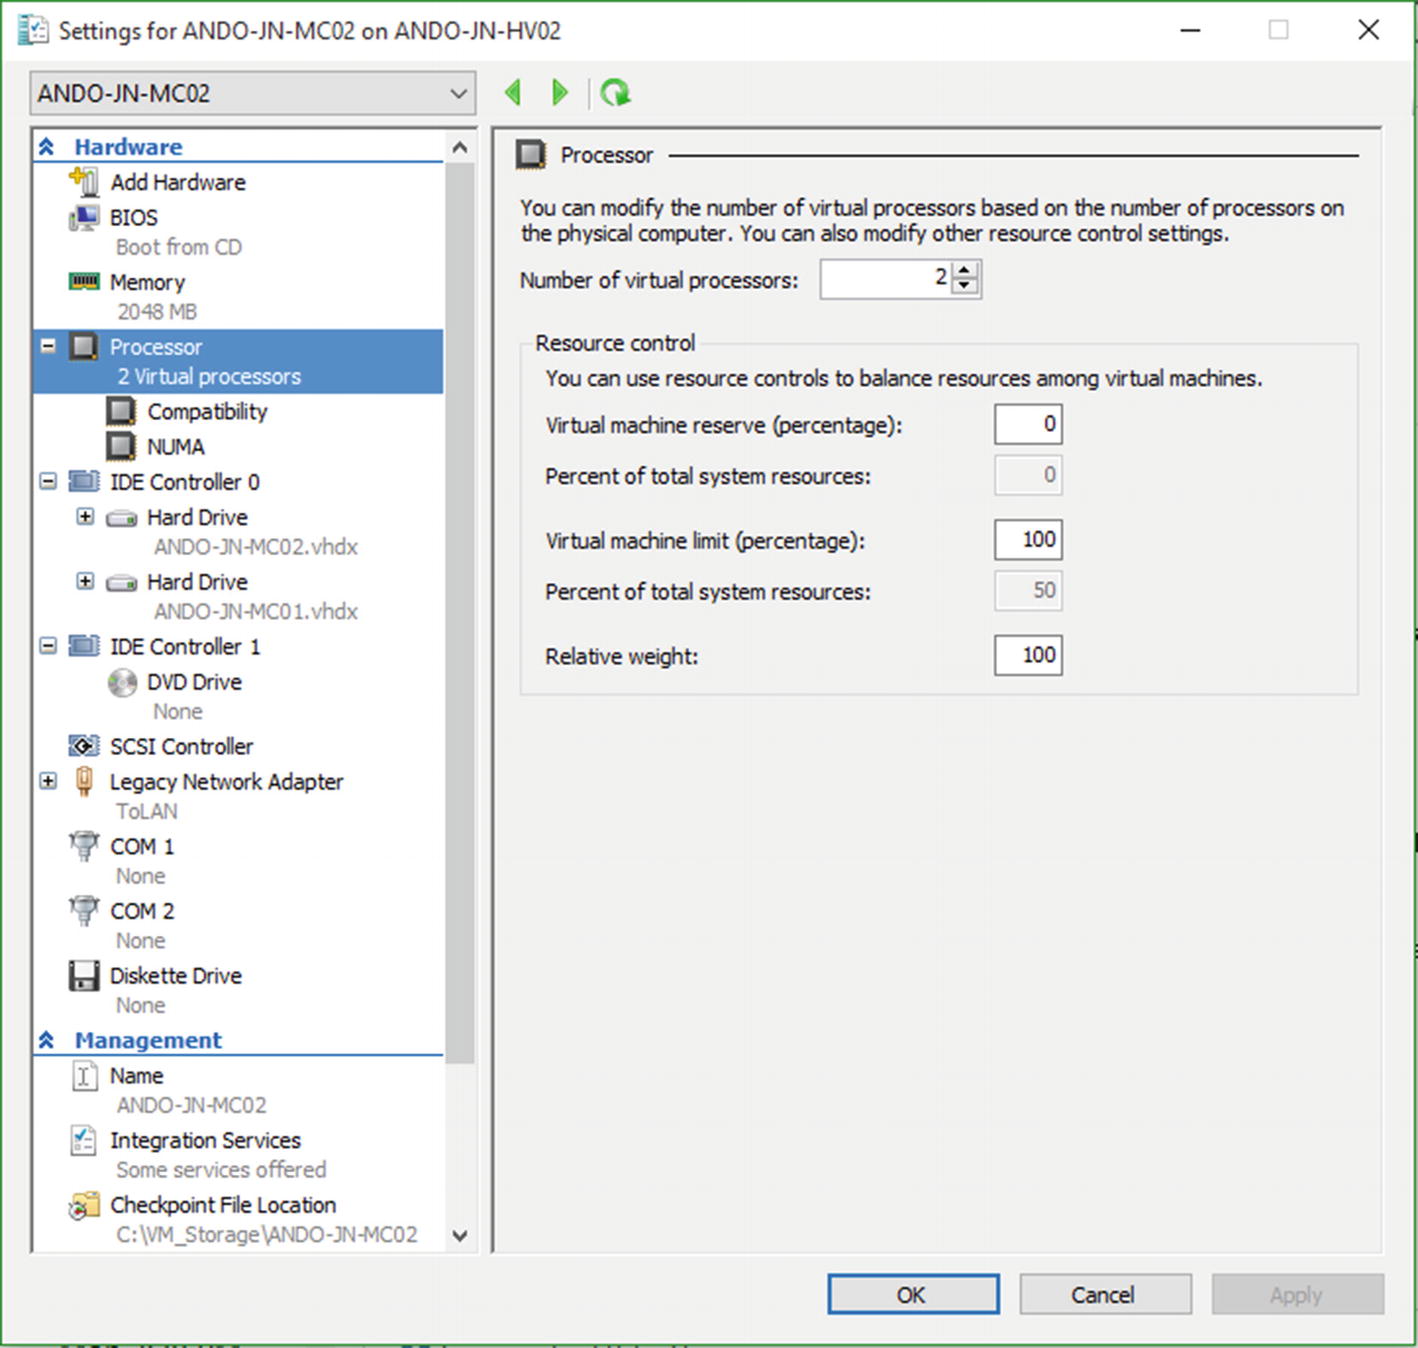
In the Virtual Machine Settings UI, select the memory section in the left-hand pane. You’ll see a screen such as that shown in Figure 4-3.
- 5.
Click in the Startup RAM field and add another 512MB of memory to the selected VM.
- 6.
Click Apply and then click OK, to apply the changes.
- 7.
Select the VM in the center pane of Hyper-V Manager and then click Start in the action pane on the right, to boot the guest OS back up.
- 8.
Wait for the VM to boot and then click Connect in the action pane. Log in to the system and verify that the additional memory has been added.
VM memory settings. Note that Startup RAM is grayed out because VM is running.
You’ve now successfully increased the amount of memory allocated to this VM. The host system will now provide more RAM to this particular VM for future needs. Additionally, if you want to, you can configure the Memory weight, which controls the priority that this VM has in relation to physical memory, in the event the host runs into issues with memory contention.
TRY IT YOURSELF—INCREASE MEMORY RESOURCES ASSIGNED TO A VIRTUAL MACHINE
Use Hyper-V Manager to increase the amount of memory assigned to a VM. What happens if you assign more memory than is available to the host?
One problem with this procedure is that we had to power the VM off, in order to conduct the change. This isn’t always feasible. So, how do we increase the amount of memory allocated to a VM without having to power the machine down? This is where Dynamic Memory comes into its own.
Dynamic Memory
Dynamic Memory provides a number of benefits for Hyper-V administrators. Its primary function is to enable the dynamic allocation of memory from the host system, based on the workload needs of the guest OS. The host system monitors the current memory demand inside the guest and adjusts the memory assigned to the VM, based on the VM’s properties. This feature provides more efficient memory use across the host system.
In Figure 4-3, you probably noticed the check box to Enable Dynamic Memory. Checking this box enables the two fields below it labeled “Minimum RAM” and “Maximum RAM.” With the Startup RAM field, they control how automated memory resourcing occurs.
Startup RAM
This is the amount of memory that the VM starts with. It doesn’t change when Dynamic Memory has been enabled. The VM starts with the configured amount of memory, and the amount of memory used by the VM will be adjusted up or down from there.
Minimum RAM
This is smallest amount of memory that you want this VM to consume. If the workload inside the VM doesn’t have a demand higher than this value, the VM will consume only this amount of memory.
Maximum RAM
This is the VM’s memory ceiling. Dynamic Memory will incrementally increase the amount of memory a VM has assigned to it, until it hits this amount and no further.
Memory Buffer
When a VM receives a request to increase the memory during a Dynamic Memory operation, it will do so in increments defined by this value. By default, this is 20%, meaning that when a VM configured with 1024GB of startup memory starts to exceed that amount, Hyper-V will add additional memory to the VM, first starting with an amount of 204MB. A 20% increment is acceptable for nearly all use cases.
Note
Dynamic Memory is not compatible with NUMA. It’s one or the other, which can be defined on a per-VM basis. The questions you must ask yourself, though, when determining NUMA vs. Dynamic Memory for a VM are: Am I running a NUMA-aware workload inside this VM? and Will the VM consume more resources, processors, or memory than are available on a single NUMA node? The first question can be answered by the software vendor. As for the second question, you can determine the size of a NUMA node on a host via the processor section in the Virtual Machine Settings UI we reviewed earlier in the chapter.
- 1.
In Hyper-V manager, select the target host.
- 2.
If the target VM is still powered on, shut it down, by selecting the VM in the VM list in the center pane and then clicking Shut Down in the action pane on the right.
- 3.
Select the target VM in the center pane and then click the settings link in the action pane.
- 4.
Set the Startup Memory field to 1024MB.
- 5.
Click Enable Dynamic Memory check box.
- 6.
Set the Minimum Memory to 512MB and set the Maximum Memory to 2048MB.
- 7.
Click Apply, then click OK to apply the changes.
- 8.
Select the VM in the center pane of Hyper-V Manager and click Start in the action pane on the right, to boot the guest OS backup.
- 9.
Wait for the VM to boot and then click Connect in the action pane. Log in to the system and verify and start some applications.
- 10.
In Hyper-V Manager, select the VM that was modified and monitor the assigned memory in the Memory tab, as you launch and close applications inside of the VM.
CONFIGURE DYNAMIC MEMORY WITH POWERSHELL
TRY IT YOURSELF—ENABLING DYNAMIC MEMORY FOR A VIRTUAL MACHINE
Use Hyper-V Manager or PowerShell to configure Dynamic Memory for a VM.
Configuring Additional Virtual Machine Storage Resources
In Chapter 3, we created a basic virtual hard disk for our VMs using the New Virtual Machine Wizard. How do we go about adding more virtual hard disks to a VM? Let’s go ahead and create a new virtual hard disk and attach it to one of our VMs, to get a feel for the procedure.
- 1.
In Hyper-V Manager, select the target host.
- 2.
Select the target VM in the center pane and then click Settings in the action pane to open the Virtual Machine Settings UI.
- 3.
Depending on the generation level of the VM, select either an IDE controller or an SCSI controller in the left-hand list.
- 4.
Select type Hard Drive in the right-hand list and click Add, to open the add Hard Drive dialog, as seen in Figure 4-4.

VM Add Hard Drive dialog
- 5.
Click New, to open the New Virtual Hard Disk Wizard.
- 6.
Click Next, select the VHDX type disk format, and click Next again.
- 7.
Select the Fixed size disk type and click Next.
- 8.
Store the disk in a location that has 10GB of free space. Note the defined path.
- 9.
Make sure that the “Create a new blank virtual hard disk” radio button is selected and then modify the Size to 10GB. Click Next.
- 10.
Verify that the settings are correct on the summary screen and click Finish.
- 11.
Back on the Virtual Machine Settings UI Add Hard Drive Dialog, verify that the path under the virtual hard disk radio button is correct, then click Apply.
- 12.
Click OK.
- 13.
Log in to the VM via the NM console, format the disk, and attach it as a volume, using Windows Disk Management.
This is the most common scenario when working with a VM’s storage settings. We’ll be covering more VM storage-related topics in Chapter 9.
TRY IT YOURSELF—ADDING A NEW VIRTUAL HARD DISK TO A VIRTUAL MACHINE
Add a virtual disk to your VM.
Other Notable Settings
- 1.
In Hyper-V Manager, select the target host.
- 2.
Select the target VM in the center pane and then click Settings in the action pane, to open the Virtual Machine Settings UI.
- 3.
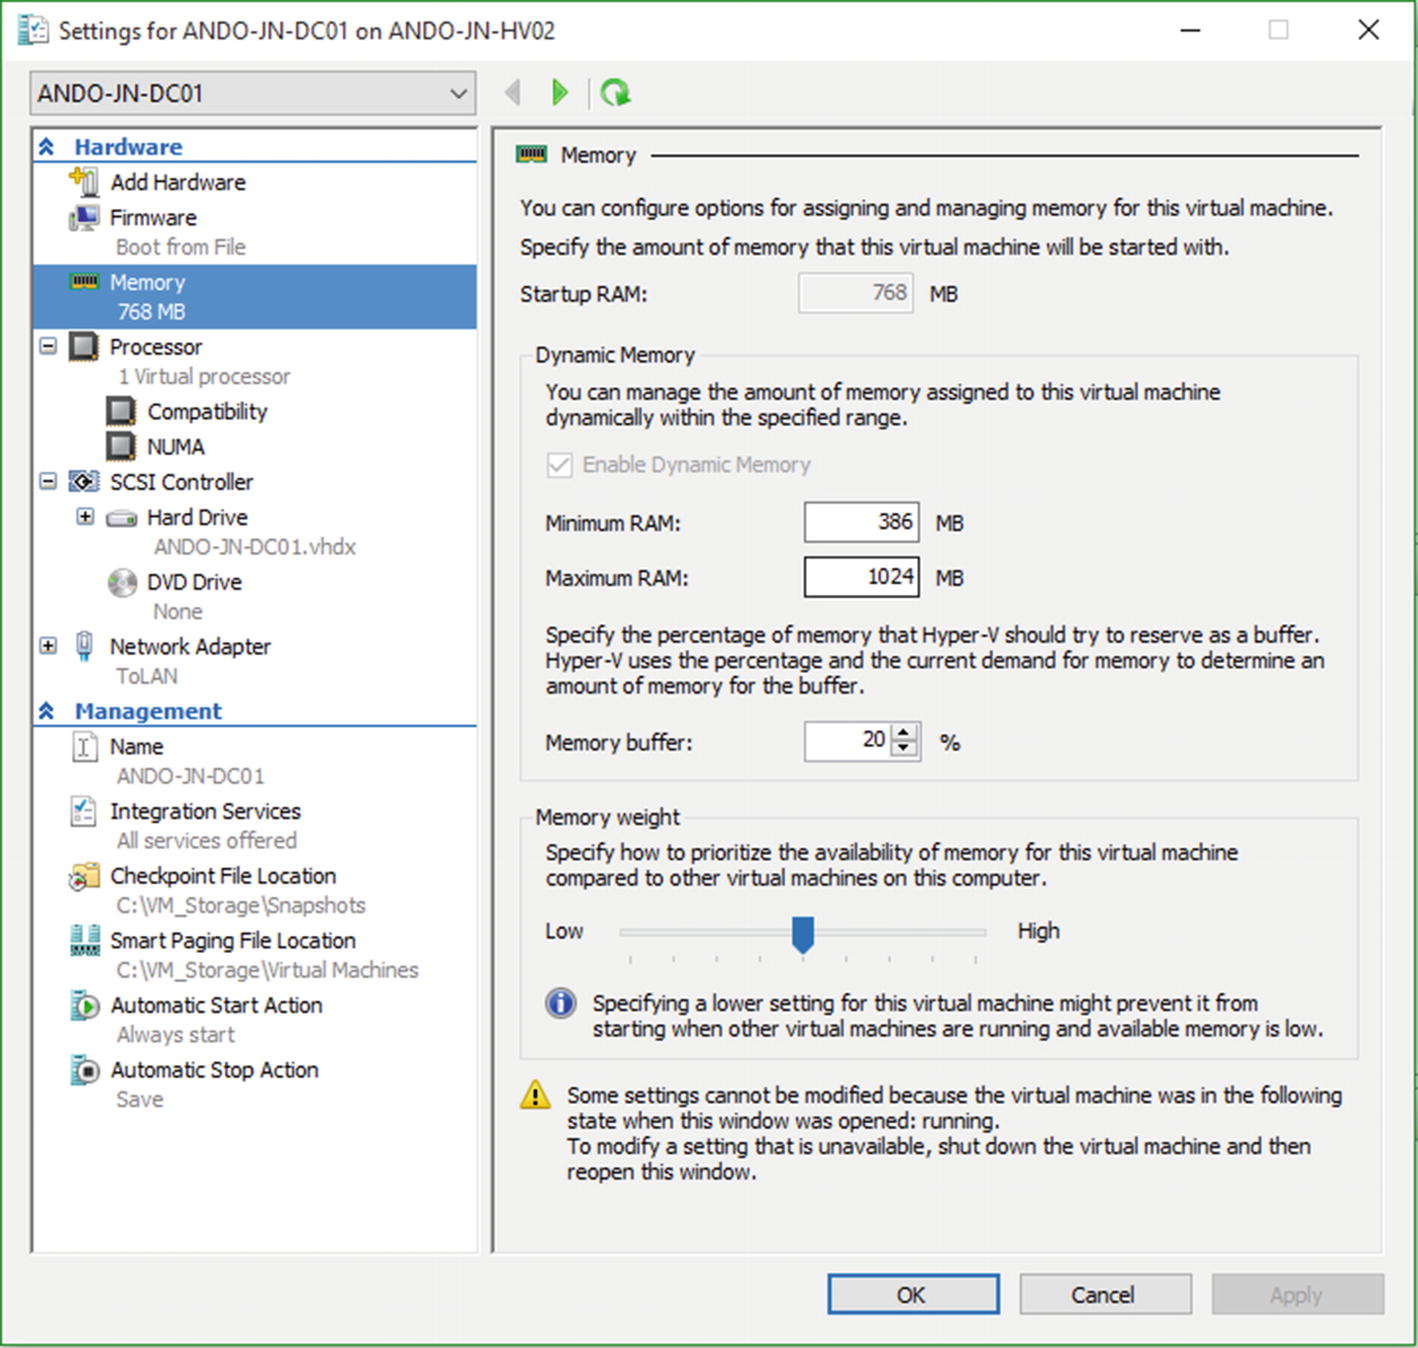
In the left-hand pane, click on Automatic Start Action near the bottom of the list, to open the Automatic Start Action dialog, as seen in Figure 4-5.
Automatic Start Action dialog
- 4.
Click the “Always start this virtual machine automatically” radio button.
- 5.
Set the Startup Delay field to 300 seconds.
- 6.
Click Apply and then click OK, to exit the Virtual Machine Settings UI.
TRY IT YOURSELF—ENABLING VIRTUAL MACHINE AUTOSTART
Enable autostart for your VM.
CONFIGURE AUTOSTART WITH POWERSHELL
The Autostart setting is exceptionally important for critical VMs, such as domain controllers and SQL servers. It ensures that when the host system boots, there’s a 300-second delay the VMs are powered on. The same can occur when the Hyper-V service is requested to go into a stopped status, such as before a reboot. You select “Automatic Stop Action” in the left-hand menu, while the Virtual Machine Settings UI is open instead.
Now that you’ve seen how to modify various settings of a VM, feel free to continue to experiment with your existing VMs. Please note, however, do not to delete them yet, because we will be using them in upcoming chapters and for the following lab.
Lab Work
- 1.
Complete the Try It Yourself sections, if you have not already done so.
- 2.Choose one of your two VMs as the target and perform the following modifications:
If the VM is powered on, use the UI to shut it down.
Open the Virtual Machine Settings UI.
Increase the CPU count for the selected VM by 1 vCPU.
Enable Dynamic Memory on the machine and set the startup memory to 1024MB, the maximum to 2048MB, and the minimum to 512MB.
Add an additional virtual hard disk to the VM.
Log in to the VM console.
Verify that the additional CPU is showing in taskmgr.
With Task Manager open, launch a number of applications and watch the amount of reported memory closely.
Using Disk Manager, format and assign a drive letter to the new vDisk.
- 3.
Can you repeat these actions using PowerShell?