Over the last several chapters, you’ve learned about creating and working with virtual machines (VMs). You’ve also learned that in order to facilitate some of the advanced functionality that Hyper-V provides, the guest operating system (inside a VM) must pass information to the hypervisor. Owing to the separation that virtualization provides, how does this process occur?
This function is performed by a component called Guest Integration Services. These services conduct a number of tasks, ranging from time synchronization and performance metric sharing to providing the ability to copy files from host to guest over the VMBus, without requiring a network connection between the two. Let’s review these services in more detail.
In This Chapter and Beyond
We’re going to switch gears a bit in this chapter. In Chapters 3 and 4, you learned how to create new VMs and how to modify the virtual hardware settings. Both of these topics are very important common tasks that are performed regularly, so it’s important that you’re proficient in them.
This chapter, however, will cover integration services and their functions. Then you’ll learn how to manage them, using the UI and PowerShell, and how to go about keeping them up to date, which ensures that your VMs get the latest functionality and bug fixes. Keep in mind that on most newer Windows versions, the integration services will be preinstalled, but there will be certain situations, such as working with older Windows versions, in which the services may have to be installed or enabled/disabled.
The information covered in this chapter helps round out the knowledge you’ve gained in the last couple of chapters regarding VMs, their components, and how to manage and maintain them. Let’s start by defining the different integration services and their functions.
What Are Integration Services?
There’s a symbiotic relationship between the guest OS running in a VM and the virtualization host running that VM. Some form of information exchange has to occur, so that the host OS can be aware of conditions inside the VM. That relationship is managed and facilitated by the Hyper-V Integration Services.
The Hyper-V Integration Services are the unsung heroes of the Hyper-V world. They can very easily be taken for granted, as most virtualization administrators just come to expect them to be running and available. It is certainly noticed when they aren’t running. There are a number of different integration services that make up the entire suite, and they are presented within the guest OS as running services.
- 1.
With Hyper-V Manager open, select the Hyper-V host containing one of the VMs you created in Chapter 3.
- 2.
In the center pane, select a VM and click Settings in the action pane on the bottom right.
- 3.
In the left-hand pane of the VM Settings dialog, scroll down and click Integration Services. You should see a list of the integration services similar to that shown in Figure 5-1.
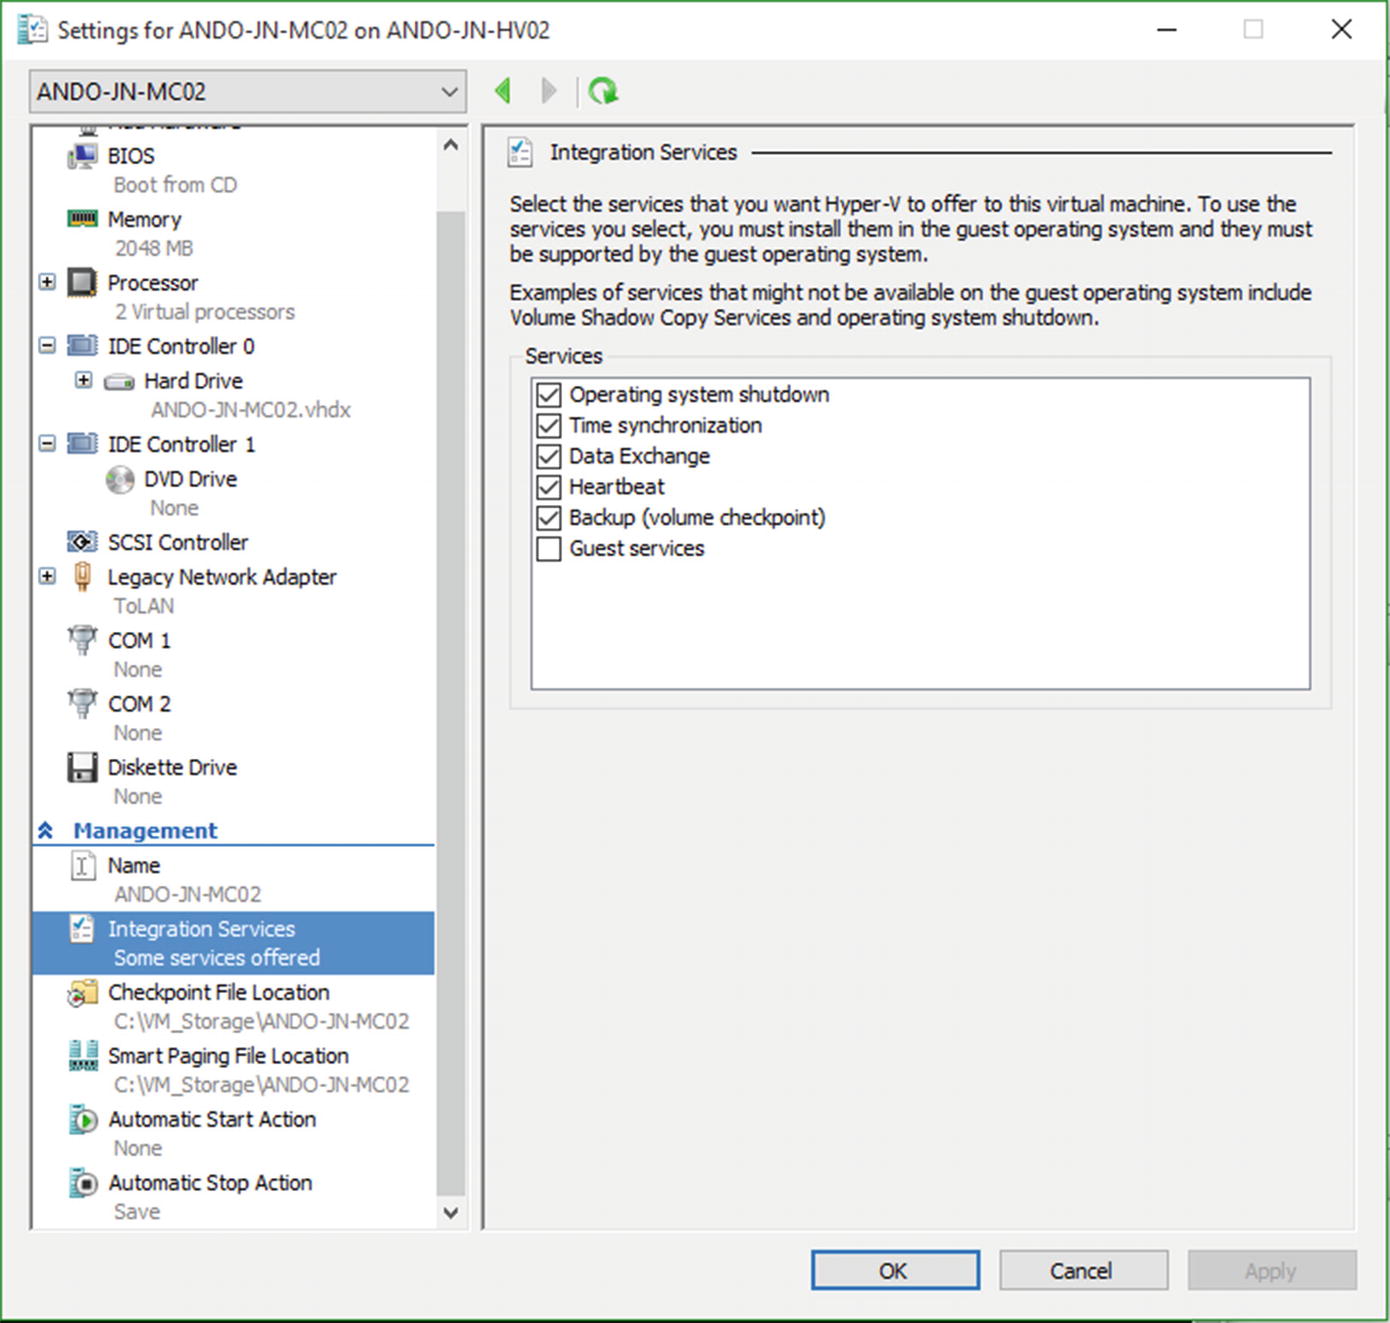
Hyper-V Integration Services
- 4.
Click the check box to enable Guest services.
- 5.
Click Apply, then click OK, to exit the Settings screen.
TRY IT YOURSELF—ENABLING HYPER-V INTEGRATION SERVICES WITH THE GUI
Follow the preceding instructions, to enable the Guest Services on a VM in your environment.
If you did this with one of the newly created VMs from Chapter 3, you’ll notice that all services are enabled, with the exception of the guest services. If we wanted to disable all integration services, we could do so by un-checking the box next to each service, but once you know the function each of these services performs, you’ll understand that there are ramifications for doing so.
Integration Services Defined
Before we start tinkering with them, let’s identify each integration service and talk a bit about the function of each one in turn.
Operating System Shutdown (Service Name: vmicshutdown)
This may appear to be one of the less important integration services, but it’s greatly appreciated by most administrators. This service allows administrator to shut down the guest OS of a VM, without having to interact with the VM via the VM console window or some type of remote access, such as the Remote Desktop Protocol (RDP). In this case, the administrator sends shutdown commands from the host system using Windows Management Instrumentation (WMI). This is very useful when working with lots of VMs (especially good when you want to shut down all the VMs in your lab at the end of a night’s writing).
Time Synchronization (Service Name: vmictimesync)
This service simply keeps the system time within the guest OS synchronized with the system time of the OS of the host system. This is useful for keeping time in sync between systems and during checkpoint rollback operations.
Note
Even though the time synchronization service is enabled by default, it is recommended that it be disabled in the case of virtualized domain controllers. It is still recommended that domain controllers update their system time from a certified external source and not be synchronized with the system time of the hypervisor.
Data Exchange (Service Name: vmickvpexchange)
Major and minor version numbers of the installed guest OS
Build number of the guest OS
Reported processor architecture
Fully qualified DNS name of the guest OS
Heartbeat (Service Name: vmicheartbeat)
This service provides a means for the host system to monitor the status of the OS contained within the guest VM. The host will send periodic heartbeat requests that essentially say “Everything OK?” to which the guest OS should respond saying “Yes, I’m fine.”
If the guest OS stops responding, the host will log the event until it is able to reestablish contact with the guest OS. This service allows administrators to act on such events with scripted actions and third-party utilities, as needed. You could create scripts to react to events by performing tasks such as automatically power cycling the VM, attempting a graceful reboot, or running a script.
Backup (Volume Checkpoint) (Service Name: vmicvss)
Assuming the OS running within the guest VM has support for Volume Shadow Service (VSS), this service allows the Hyper-V host system to make VSS requests of the guest VM, to aid in backup operations. This enables software from third-party vendors to back up these workloads at the hypervisor layer, instead of having to install backup agents into the VM.
Guest Services (Service Name: vmicguestinterface)
This service is relatively new. It was added as a post-release patch in Windows Server 2012 R2 Hyper-V. Despite its name, it is this service that creates a secure method for file transfers to occur between the host and guest. This is particularly useful in high-security environments in which you must get a file to a newly created VM, but you do not want to send it over the network. This service allows the host to utilize the VMBus to get the needed file from the host to the guest OS. We’ll be covering this process shortly.
Supported Windows Server Guest Operating Systems
Windows Server Operating Systems Supported by Hyper-V Integration Services
Operating System | Installation Notes |
|---|---|
Windows Server 2019 | Built-in |
Windows Server 2016, including the SAC releases Server 1709 and Server 1803 | Built-in |
Windows Server 2012 R2 | Built-in |
Windows Server 2012 | Built-in |
Windows Server 2008 R2 with Service Pack 1 | Install the integration services after you’ve set up the OS inside the VM. |
Windows Server 2008 with Service Pack 2 | Install the integration services after you’ve set up the OS inside the VM. |
Windows Home Server 2011 | Install the integration services after you’ve set up the OS inside the VM. |
Windows Small Business Server 2011 | Install the integration services after you’ve set up the OS inside the VM. |
Windows Server 2003 R2 with Service Pack 2 | Install the integration services after you’ve setup the OS inside the VM. |
Windows Server 2003 with Service Pack 2 | Install the integration services after you’ve set up the OS inside the VM. |
CentOS 5.x, RHEL 5.x, SLES 11, OpenSUSE 12.1, Ubuntu 12.04 OSs and later | Built-in, via the Linux Integration Services package contained in the newer versions of the Linux Kernel. |
Windows Client Operating Systems Supported by Hyper-V Integration Services
Operating System | Installation Notes |
|---|---|
Windows 10 | Built-in |
Windows 8.1 | Built-in |
Windows 8 | Install the integration services after you’ve set up the OS inside the VM. |
Windows 7 with Service Pack 1 | Install the integration services after you’ve set up the OS inside the VM. |
Windows 7 *Home Editions not supported | Install the integration services after you’ve set up the OS inside the VM. |
Windows Vista with Service Pack 2 *Home Editions not supported | Install the integration services after you’ve set up the OS inside the VM. |
Windows XP with Service Pack 3 *Pro Edition Only | Install the integration services after you’ve set up the OS inside the VM. |
Windows XP x64 Edition with Service Pack 3 *Pro Edition Only | Install the integration services after you’ve set up the OS inside the VM. |
We’ve deliberately included Windows XP and the Windows Server 2003 families in the table, even though these products are regarded as end-of-life and are no longer supported by Microsoft. In our experience, many organizations retain systems, usually because of a “special application that can’t be upgraded,” well past their official end of life.
Note
OSs that have the integration services built in receive updates to the integration services through Windows Update, so you don’t have to do anything beyond patching to keep those machines up to date.
Now that you have an appreciation for the tasks that Hyper-V Integration Services provides, it’s time to see how these services are managed.
Managing Hyper-V Integration Services
Installing integration services
Enabling and disabling integration services
Transferring files with integration services
Updating integration services
First up is installation.
Installing Integration Services
Most modern OSs automatically install the integration service components, as shown in Tables 5-1 and 5-2. So, how do we get these services installed into the older OSs?
ABOVE AND BEYOND—INTEGRATION SERVICES ISO FILE
In this section, we’re discussing installing the integration services. Remember: This is only necessary for older OSs that don’t have the services built in.
If your Hyper-V host is Windows Server 2016 (or a later version) or Windows 10 (and later versions), you won’t find the option to install the integration services via the Action menu. You also won’t find the required ISO file on these platforms. This is because Microsoft has assumed that you won’t be running the older OSs that require you to install integration services on these platforms.
If you have to run an older OS on a modern Hyper-V host, you’ll have to acquire a copy of the integration services ISO file. If you have a Windows Server 2012 R2 or earlier version, Hyper-V host, you can find the integration services ISO—VMGUEST.ISO—in the C:WindowsSystem32 folder.
Otherwise, it is easiest to download a copy of Hyper-V Server 2012 R2 from the Microsoft evaluation center at www.microsoft.com/en-us/download/details.aspx?id=3512 . Mount the downloaded ISO file. Open the sourcesinstall.wim file (use 7-Zip or another utility that can read WIM files) and extract VMGUEST.ISO from the WindowsSystem32 folder.
Put the VMGUEST.ISO somewhere safe on your Hyper-V host and use the Media option on the menu bar to open vmguest.iso in the VM’s DVD drive, if the option to load the integration services disk isn’t available on the Action item of the menu bar.
You can use the VM console window for the VM to perform the installation, or you can use PowerShell. Let’s start with the GUI approach.
- 1.
With Hyper-V Manager open, select the Hyper-V host containing the VM you created in Chapter 3.
- 2.
Start a VM, if necessary. Right-click one of the running VMs in the center pane and click Connect.
- 3.
Once the VM console window is open, click the Action menu in the Action bar, and click “Insert Integration Services Setup Disk.”
- 4.
Inside the VM, you will notice that an ISO image has been mounted to the virtual DVD-ROM drive. If the setup file does not start automatically, you can run it by executing the setup.exe file located at D:supportx86setup.exe.
- 5.
Run through the installation wizard and reboot once complete.
- 6.
Verify that the services mentioned earlier in this chapter exist, by using the services MMC snap-in on the target virtual machine.
TRY IT YOURSELF—INSTALLING HYPER-V INTEGRATION SERVICES
If you have a suitable VM, install the integration services. If not, create a VM, using a suitable system, and install the integration services.
Installing integration services is performed on a machine-by-machine basis, but if you have to enable or disable some, or all, of the integration services, you want to be able to automate the task.
Enabling and Disabling Integration Services
So far, you’ve seen how we can use the Hyper-V Manager UI to enable and disable the various integration services for a VM. This is fine when you’re only working with one or two VMs at a time, but as you know, things in IT have a way of scaling much larger than we originally planned, and there may be times when we need to work with ten, twenty, or even a hundred different VMs simultaneously.
How do we enable and disable integration services at a large scale? If you’ve been working in the Microsoft ecosystem in recent years, the answer is quite simple: PowerShell.
- 1.
Open PowerShell directly from your Hyper-V host. If this is a Windows Server Core box, from the command line, simply type “PowerShell” (without the quotes) and press Enter. Make sure that you run PowerShell with elevated privileges (Run as Administrator option). Server Core systems will automatically run PowerShell with elevated privileges.
- 2.
Type
Get-Command –Module Hyper-V –Name *Integration*
to get a list of available commands with ties to Hyper-V Integration Services.
- 3.
Type
Get-VM
to get a list of VMs and their running state.
- 4.
Type
Get-VMIntegrationService –VMName <VM Names in comma separated list>

Output of the Get-VMIntegrationService cmdlet
- 5.
To enable the Guest Services integration service on a VM, run the following:
Enable-VMIntegrationService –Name 'Guest Service Interface' `
–VMName <VM names in comma separated list>
- 6.
Type
Get-VMIntegrationService –VMName <VM names in comma separated list>
to verify that the Guest Service integration service now has an enabled state of true.
TRY IT YOURSELF—ENABLING/DISABLING HYPER-V INTEGRATION SERVICES WITH POWERSHELL
Use the PowerShell cmdlets to enable and disable integration services for a VM.
ABOVE AND BEYOND
There may be times when you run into a VM that returns a PrimaryStatusDescription of “No Contact” even though the service is enabled. This is most likely owing to the service within the VM being in a hung or stopped state.
Simply start the service, and you’ll be good to go again. Additionally, in Linux VMs, not all capabilities are available, depending on the distribution of Linux contained within the NM. So, you may always have some services returning this status when Linux VMs are in play.
There are times when you’ll need to copy files to a VM. Integration services provide one way of performing this task.
Transferring Files with Integration Services
There are certain high-security environments in which you don’t want to risk moving sensitive information over the network via file transfers and potentially risk someone grabbing it in transit. Another potential use case for file transfer using integration services would be during the initial setup phase of a VM.
You may have to install a software package inside the VM, but guest networking may not be set up yet. This is especially true if your IT department is siloed, with different teams being responsible for parts of the environment, like many are today in corporate environments. It could be your network team is unavailable at the time. Using integration services gives you a way to move forward on your own.
Other potential use cases include perimeter networks and isolated security zones in which you may not have direct access to the VM. Nothing is more frustrating when attempting to get an application installed than when you have to fight tooth and nail just to get the setup file where you need it.
Hyper-V Integration Services, as of Server 2012 R2 (and later versions), allows administrators the option of pushing files from the Hyper-V host to guest VMs via PowerShell. The transfer occurs over the VMBus, rather than the network. Remember that the VMBus allows the host and guest VM to pass information to each other directly.
- 1.
Using Notepad, create a blank text document and save to a location on your Hyper-V host, naming it IntegrationServicesTest.txt.
- 2.
Open PowerShell directly from your Hyper-V host. If this is a Windows Server Core box, from the command line, simply type “PowerShell” (without the quotes) and press Enter. PowerShell must be running with elevated privileges.
- 3.Create a variable called $targetvms by running$targetvms = Get-VM –Name <VM Names in comma separated list>
- 4.Verify that the Guest Services integration service is in an enabled state on the target VMs, by running$targetvms | Get-VMIntegrationService
- 5.If enabled, proceed with the file copy by running$targetvms | Copy-VMFile –SourcePath <path to IntegrationServicesTest.txt> –DestinationPath <Target Path on target VMs> -CreateFullPath –FileSource Host
- 6.
Navigate to the targeted destination path on each VM and verify that the file exists.
TRY IT YOURSELF—MOVING FILES BETWEEN HOST AND GUEST WITH INTEGRATION SERVICES
Use PowerShell to copy a file to one or more VMs, using integration services.
Congratulations! You’ve successfully moved a file from one machine to another without requiring the use of a network in any way! This is just one additional way that Hyper-V can add flexibility to your IT operations and facilitate more secure solutions for your business.
Note
It’s not currently possible to pull files from the guest VM to the host. Many VMs are hosted in third-party datacenters, and businesses want to be sure that the hosting company isn’t able to pull files out of the running VMs.
ABOVE AND BEYOND—COPYING FILES WITH POWERSHELL
You can create a PowerShell remoting session to your VM and copy files to, and from, the VM across the remoting session. You can use a standard WSMAN-based remoting session or PowerShell Direct.
PowerShell Direct is available on Windows Server 2016 and Windows 10 (or later versions) Hyper-V hosts with PowerShell v5.1. You can create a PowerShell remoting session from the Hyper-V host to the VM over the VMBus, rather than using a network.
If anything is guaranteed in IT, it’s that you’ll need to keep things up to date to get the maximum from your environment.
Updating Integration Services
This may seem obvious, but it’s immensely important that the integration services package be kept up to date at all times. This ensures that the latest bug fixes and feature sets are available and also verifies that these critical services stay in a running state.
The only time you may want to keep the integration services version down-level is if you temporarily move a VM to a Hyper-V host with a newer host OS and then move it back shortly thereafter. For example, if you moved a VM host on a Windows Server 2008 R2 Hyper-V host to a Windows Server 2012 R2 Hyper-V host, things would continue to run. If you intended to keep that VM in that location, you would want to upgrade the integration services. However, if you ever intend to move the VM back to the 2008 R2 Hyper-V host, you may want to retain the old version. The newer installed integration services package will dumb itself down to the 2008 R2 level, but this may not be clean enough for all administrators. It will depend on your environment and your situation.
As far as applying updates goes, Microsoft has made that quite simple for us. They already have a great update mechanism in place in the Windows Update service and WSUS. Integration services updates will be pushed as part of that process for all VMs running the Windows OS. For those of us running Linux OSs, you’ll have to review the update procedure with your individual distribution’s documentation. Additionally, another option for pushing upgrades is by using System Center Virtual Machine Manager (SCVMM).
ABOVE AND BEYOND
In the event you are curious about using SCVMM to conduct these updates, there is a great article by Ben Armstrong, of the Hyper-V product group, on how to do this. It is available here:
Managing integration services may seem like a trivial task, but they are important for the proper functioning of your virtual environment.
Let’s finish this chapter with some lab work that reinforces what you’ve just learned.
Lab Work
- 1.
Complete the Try It Yourself sections.
- 2.
Choose a VM to act as the target for rest of the exercises.
- 3.
Using Hyper-V Manager, disable all the integration services for that VM.
- 4.
Using PowerShell, start all of them once again and verify that they are in a running state.
- 5.
Using the services MMC snap-in inside the target VM, stop one of the integration services.
- 6.
Use the Get-VMIntegrationService cmdlet to review the status. Take note of how the stopped services change the status of the output of this cmdlet.
- 7.
Restart the service and test it, using Get-VMIntegrationService.
- 8.
Using the Copy-VMFile cmdlet, move a large file, such as a movie file or an ISO image, from the host to the guest OS, using the VMBus.