You’ve had introductions to Hyper-V’s architecture, and you’ve learned how to configure the core Hyper-V host settings. In this chapter, you’ll be setting up a new virtual machine (VM), which will contain an operating system (OS) and its own virtual hardware. Remember that a VM is its own isolated entity that functions much the same as a physical server. As you complete the exercises in this chapter, you’ll find that working with a VM is no different than interacting with a remote physical server.
In This Chapter
Specifying name, generation, and location of the VM
Configuring basic hardware settings for memory and networking
Configuring and connecting storage to the VM
Defining how the guest OS will be installed inside the VM
By the end of this chapter, you’ll have a working VM whose settings you’ll modify further in the next chapter. Building new VMs is a task that you’ll be doing often when working with Hyper-V. Workloads change frequently, and new servers must be provisioned all the time. Learning how to properly establish a new VM will prepare you for this new, fast-changing IT landscape.
What Components Make a Virtual Machine?
Before you create a new VM, it’s best to understand all of the components that enable a VM to work. A virtualized OS functions in much the same manner as a physical server. It must have the same components that modern OSs depend on, just in an intangible state. This includes device drivers, BIOS, and core system devices. As there is no actual physical hardware in your VMs, virtual devices are created. The hypervisor layer provides the VM access to CPU and memory, while the parent partition provides access to networking and storage.
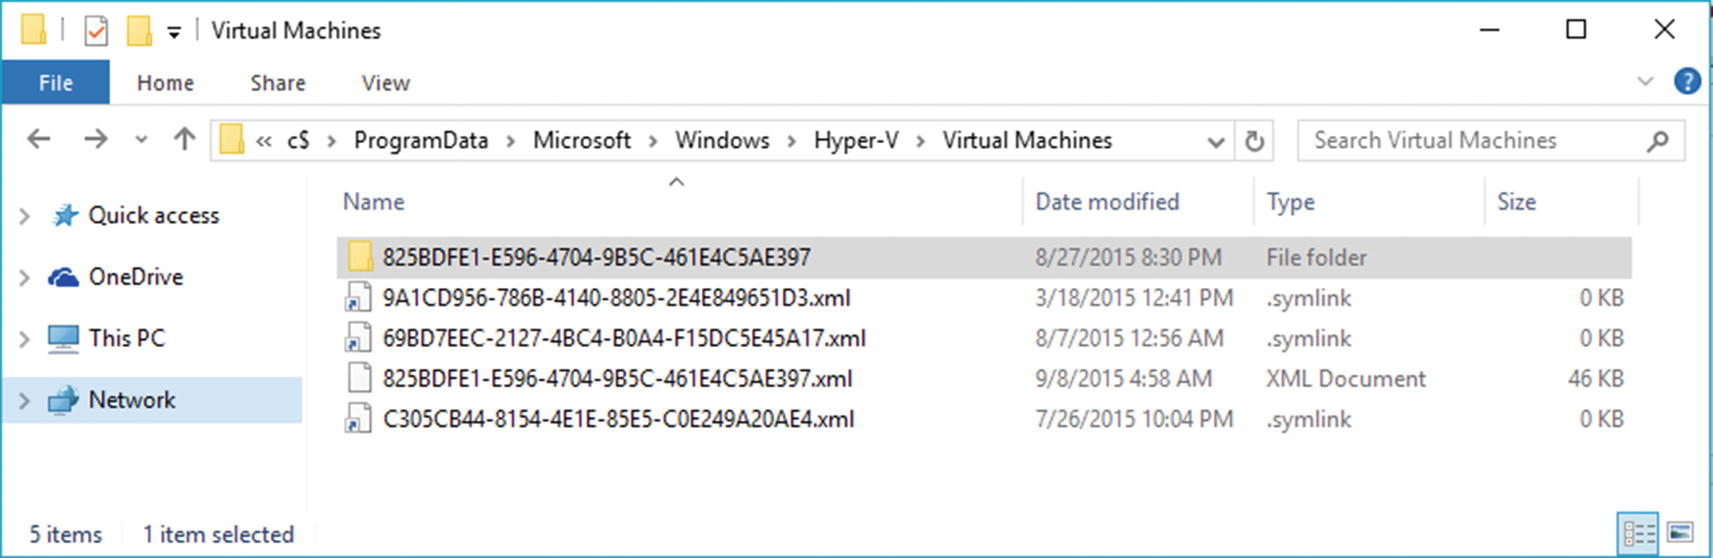
Static items, such as the VM configuration, and file-storage related items must reside on a file system. There are several file types that exist at the VM configuration path configured in the Hyper-V host settings, as discussed in Chapter 2.
Virtual Machine Config File
Directory containing VM config files
The files shown in Figure 3-1 are the config files for the VM. You’ll also see that there are subfolders in this location as well. These folders contain the supporting files required for a VM.
FINDING THE GUID FOR 2012 R2 AND OLDER HOSTED VMS
Looking at the XML file for a VM will provide more information about the VM than you likely ever wanted to know, including a list of any checkpoint files associated with the VM. Think of a checkpoint as a picture in time that can be used to revert to how the VM was when the checkpoint was taken. We’ll be talking about checkpoints in a later chapter in this book.
Virtual Machine Config Files in Windows Server 2016 and 2019
Increased performance at scale
Protection from the end user making a bad change in the config file
More resilient and reliable storage of the VM configuration
Parsing XML files in environments with a large number of VMs (some large enterprises will have many thousands of VMs, and Microsoft Azure even more) can be very CPU-intensive. At larger scales, keeping track of the VM configurations takes resources away from hosting the VMs. This is not a good thing!
Additionally, a number of administrators have found themselves in bad situations after making incorrect or unintentional changes to a VM config file. This is a prime reason to leave this file alone, unless you’re in the direst of circumstances, as you can quickly break your VM, if this file is edited incorrectly.
This new file type has the added benefit of not allowing administrators to manually edit the config file and potentially shoot themselves in the foot. Plus, the new file format is more resilient to environmental factors, such as storage outages or power failures. The file type has protections baked in, to help prevent any type of corruption to the config file.
MORE TO LEARN
As Windows Server 2016 has matured, it is now possible to modify a .VMCX VM config file, if you REALLY need to. For more information on doing this, please see this link: https://blogs.msdn.microsoft.com/virtual_pc_guy/2017/04/18/editing-a-vmcx-file/
This really does fall into just-because-you-can-doesn’t-mean-you-should territory. Directly editing the .VMCX file should be your ultimate last resort. You have been warned!
Virtual Machine BIN and VSV Files in 2012 and 2012 R2
Now, going back to the folder containing the VM config files, remember the subfolder that is named after the GUID of the VM? There are a couple of relevant files stored in this folder, and the BIN file is one of them. You’ll find that this particular file can get quite large, because it will always be the same size as the memory assigned to the associated VM. If you assign 4GB of memory to a VM, it’s BIN file will also be 4GB in size.
The BIN file is used to store a copy of the VM’s memory to disk, in the event that the VM receives a stop command from the hypervisor. The default action is to “save” the VM state and is most common in sudden and unexpected host reboot situations. Hyper-V will save the contents of the VM’s memory to disk, in the BIN file, and will retrieve it when the VM comes out of the stop state. At this point, the VM will be in the same state it was in before the host reboot.
This function is not always needed, so in the event you need to save some disk space, you can change the behavior of a VM to “Shut Down” on host reboot, instead of “Save.” When a VM is configured in this manner, you will no longer see the BIN file. This setting can be modified in the properties section of a VM. We’ll look at it in Chapter 4.
The VSV file is responsible for keeping track of all the device information associated with the VM.
Note
In Windows Server 2016 and 2019 Hyper-V, the BIN and VSV files have been replaced by the .VMRS file type for storage of the VM’s runtime state data.
VHD and VHDX Files
The storage devices attached to the VM, such as a hard drive, are virtualized also. This information is stored on physical disk via VHD or VHDX files . These files are stored at the path you defined for virtual hard disk storage in Chapter 2.
Note
VHD is the older format introduced in Hyper-V 2008. It has a size limitation of 2TB. The VHDX format was introduced in Windows Server 2012, increasing the maximum size to 64TB and adding protection against storage connectivity issues and power outages. VHDX is the default format for every version of Hyper-V since 2012 R2.
Virtualized hard disks are stored at the location defined when a VM is created and are attached to the VM, to be presented as a block device, such as the C: volume. There are options as to how these files consume the assigned space. The default is “dynamically expanding,” meaning the disk will only consume physical storage as it’s used within the VM.
The other option is referred to as a “fixed disk.” If you create a 500GB fixed disk and attach it to the VM, that 500GB is immediately consumed in the physical storage. This is useful in situations in which you want to make sure you don’t over-provision your storage. Generally speaking, if you have very little oversight on your storage and/or you don’t have a dedicated storage administrator, stick to fixed disks to prevent over-provisioning.
AVHD Files
AVHD files are very similar to VHD and VHDX files, in that they store the data contained within the VM. By default, there will be no AVHD files associated with a VM. When a checkpoint is taken, an AHVD file is created, and the VM config file is modified to redirect all incoming disk writes to it. We’ll be covering checkpoints in more detail in Chapter 7.
Creating a New Virtual Machine
Now that you understand the underlying architecture and the files associated with a VM, you are ready to create one.
- 1.
With Hyper-V Manager open, select the target host that will run the new VM.
- 2.
In the right-hand action pane, click New, then select Virtual Machine, as shown in Figure 3-2.

Click New ➤ Virtual Machine to start the VM creation wizard
VM CREATION WIZARD
The New Virtual Machine Wizard guides you step by step through the process of assigning resources to a VM. You can set the resources that you want the VM to have and how the hypervisor should treat this specific VM.
The first page of the wizard contains a Next button and a Finish button. Both are clickable. This can be confusing. How can we finish the wizard before we’ve even configured anything? Clicking the Finish button, in this situation, will create a VM with a default configuration that contains incorrect memory for most workloads and a 127GB dynamically expanding disk.
Over the years, we’ve found that being able to configure each option through the wizard is far more helpful than having to go back and change it later. Most items configured with the wizard can be modified at a later time, if required. Flexibility is one of the primary benefits of virtualization, and it wouldn’t be helpful to lock you into the choices made through the wizard.
- 3.
Click the check box “Do not show this page again,” to prevent the starting page from displaying again.
- 4.
Click Next.
- 5.
On the “specify name and location” section of the wizard, you first must define a name. This will be the VM name, as displayed inside of the Hyper-V management tools. Additionally, you can define a different location in which to store the VM. By default, this field will be populated with the paths that we defined in the Hyper-V host settings in Chapter 2.
- 6.
Click Next.
Note
The VM name is not the hostname of the running VM. Remember, you’re creating the shell of the VM, and later on you’ll install an OS within that shell.
- 7.
You’ll now be on the Specify Generation screen, shown in Figure 3-3.
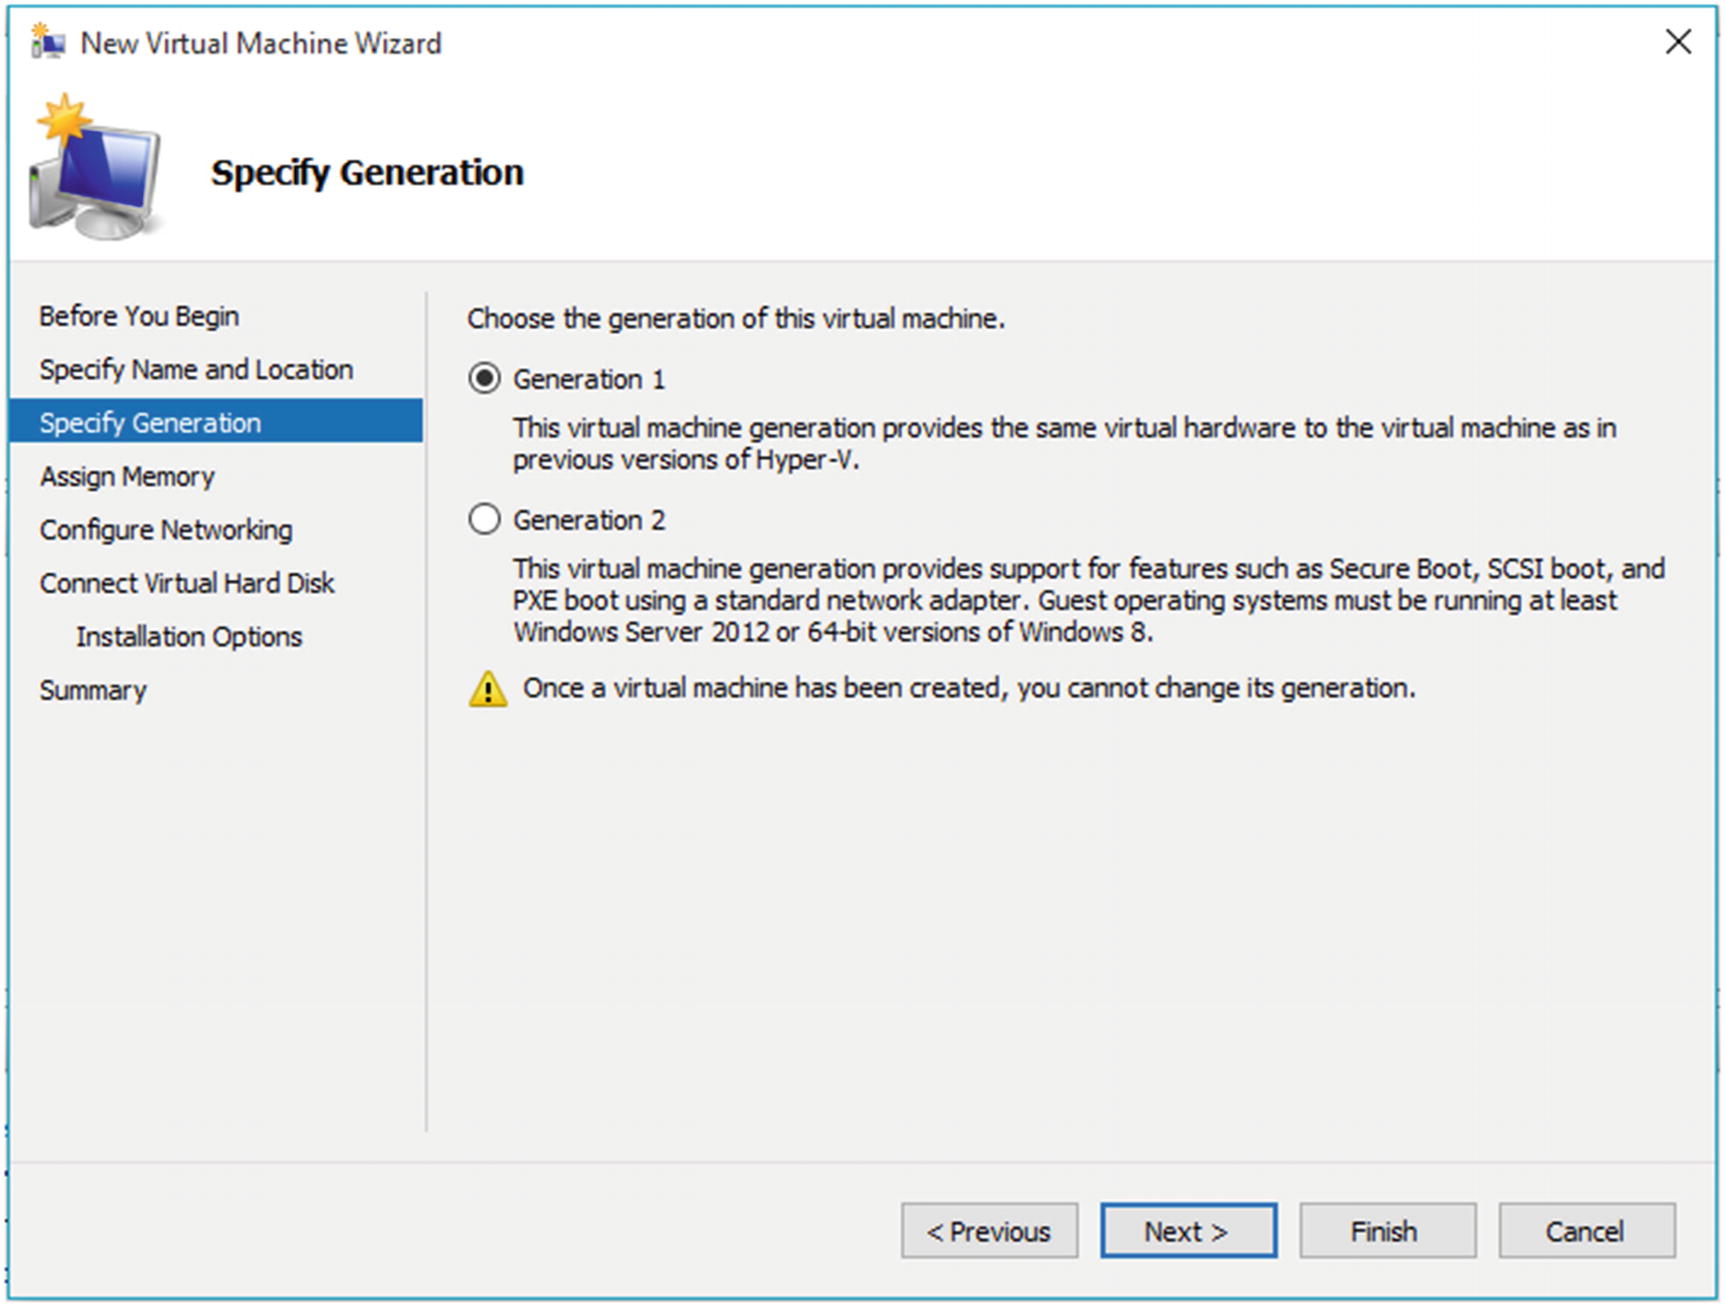
Selecting the generation of the VM
MORE TO LEARN
Windows Server 2012 Hyper-V introduced the concept of VM generation. As new advances in virtualization technology were introduced, some older features would have to be phased out in favor of those advancements. However, this had to be done in a way that would not alienate or hinder those organizations that were still running older technologies. Thus, the concept of a VM generation was created.
The VMs hosted on Hyper-V hosts prior to Server 2012 were given the designation “Generation 1” VMs. All new VMs with modern OSs running within them would be created as “Generation 2” VMs, although users still would have the option of building a VM with the older Generation 1 type, for environments that might still have some of the older Windows Server 2008/2008 R2 Hyper-V hosts in production.
Windows Server 2019
Windows Server, version 1803
Windows Server, version 1709
Windows Server 2016
Windows Server 2012 R2
Windows Server 2012
64-bit versions of Windows 10
64-bit versions of Windows 8.1
64-bit versions of Windows 8
We would expect future SAC releases of Windows Server to be Generation 2, until a Generation 3 is created at some future time.
For a list of supported Linux distributions that are able to run as Generation 2 VMs, refer to https://docs.microsoft.com/en-us/windows-server/virtualization/hyper-v/Supported-Linux-and-FreeBSD-virtual-machines-for-Hyper-V-on-Windows .
- 8.
Select Generation 2.
- 9.
Click Next.
Caution
Be very careful and sure of your decision when selecting the VM generation, because once it’s configured, it remains for the life of the VM. This is one of the very few items that cannot be modified once the machine is created!

Defining the startup memory and Dynamic Memory feature state
- 10.
Define the needed amount of memory; the default is 512MB. A minimum of 1024MB is required to install Windows Server.
- 11.
Leave Dynamic Memory disabled at this time.
- 12.
Click Next.
- 13.
Leave the Connection drop-down set to “Not Connected.”
- 14.
Click Next.
- 15.
The many storage options are shown in Figure 3-5.

Connect Virtual Hard Disk
- 16.
Keep the default location for the VHDX file.
- 17.
Define the size of the virtual disk you want to create (make sure you have enough space!).
- 18.
Click Next.
MORE TO LEARN
It is possible to pre-create a virtual hard disk with some of the advanced preferences mentioned earlier, such as fixed disks or specifying the older VHD file type. This can be done by launching the New Virtual Hard Disk wizard, by clicking New ➤ Hard Disk in the action pane in Hyper-V Manager. Once the new virtual disk is created, you simply select the “Use existing virtual hard disk” option in Figure 3-5 and navigate to the path where the file is stored.
- 19.
Choose installation options (see Figure 3-6).
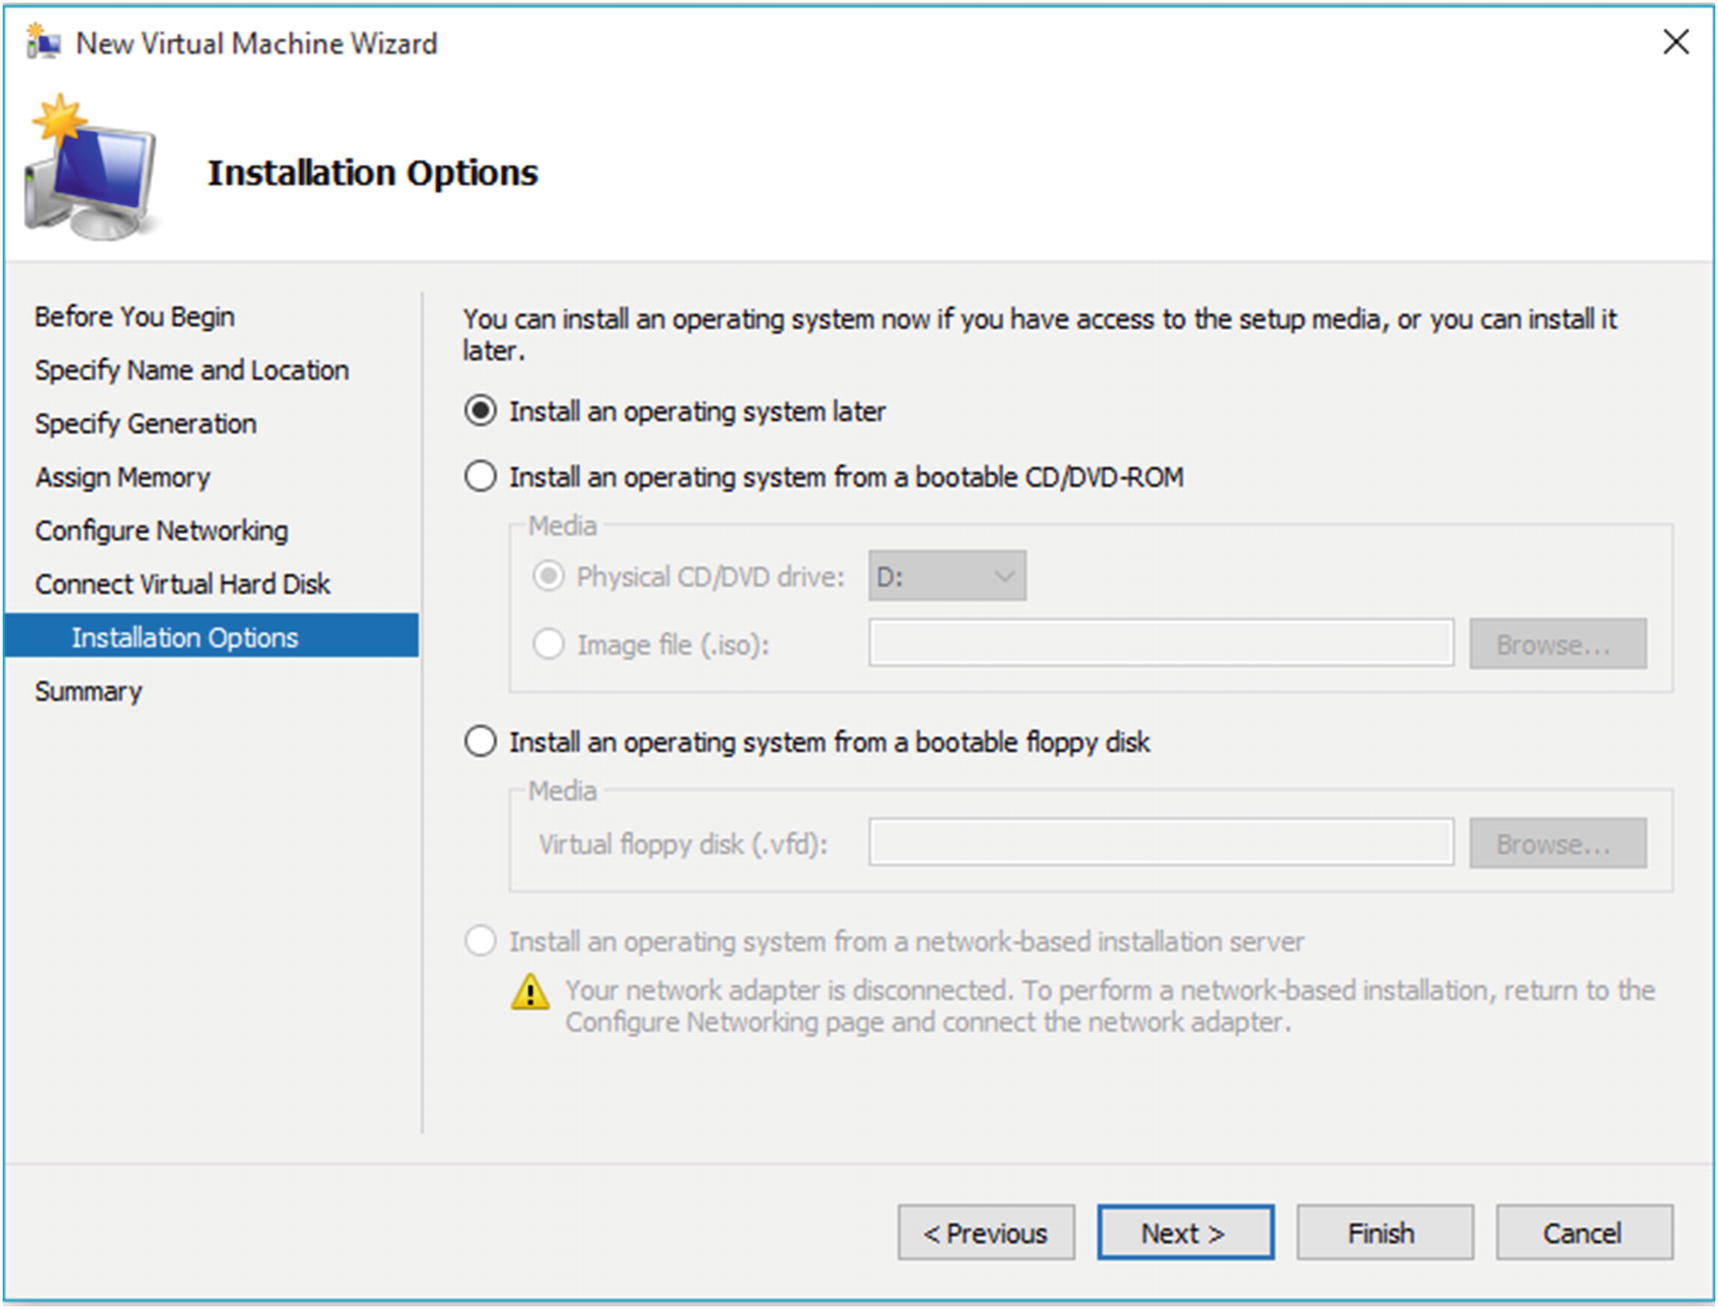
Installation Options
- 20.
Select Install an OS from a bootable CD/DVD-ROM.
- 21.
Select Image file (.iso) and navigate to your Windows Server 2016 or 2019 ISO location.
- 22.
Click OK. Click Next.
Note
Attaching this ISO doesn’t allow Hyper-V Manager to install the OS on your behalf. You still must boot the VM and run through the installation procedure for the intended OS.
- 23.
On the last screen of the wizard, review and confirm your settings, then click Finish.
Hyper-V Manager will create the VM with the settings you defined in the New Virtual Machine Wizard. Congrats! You’ve just created your first VM on Hyper-V!
TRY IT YOURSELF—CREATE A VIRTUAL MACHINE
Use the instructions in this section to create a new VM, if you have not already done so.
Connecting to Virtual Machines
The entire point of a Hyper-V host is to serve up virtualized workloads. How do we connect to and work with these virtualized workloads? If the VM has a Windows OS and is available and reachable on the network, you could use the Remote Desktop Protocol (RDP), if the protocol is enabled. In addition, you could connect to a Linux VM, if SSH is installed and enabled.
- 1.
In Hyper-V Manager, click the target host in the left-hand pane.
- 2.
Select the VM you just created from the center pane.
- 3.
Click “Connect” in the action pane located on the right.
- 4.
You should see a window that looks similar that shown in Figure 3-7.

VM console window
The view in Figure 3-7 is the same as you would see from a physical monitor attached to a physical server. When all attempts fail to connect to a VM hosted on Hyper-V remotely, this view is your next stop. Hyper-V Manager connects to the VM via the VMBus, so network connectivity is not a requirement. You can now work normally with your virtualized OS. Using the console is a common approach for the initial configuration of the guest OS, until the remote access protocols are configured.
Note
If you connect to the console of a VM to find nothing but a black screen, remember that the VM console is the same as a physical monitor. The screen saver rules of the guest OS still apply, so click in the console window and shake the mouse, to wake the screen. Also, should your mouse ever appear to be stuck in the console window, holding Ctrl+Alt while pressing the left arrow will free the mouse, assuming the default keyboard controls were not changed during the configuration of the host.
TRY IT YOURSELF—CONNECTING TO A VM CONSOLE WINDOW
Connect to a VM in your environment using the console. Set the screen saver on the machine and leave the console for a while. Use the mouse to stop the screen saver.
Windows Server 2012 R2 and later versions have an enhanced session mode. This must be enabled in the Hyper-V host settings and selected for the individual VM console (View ➤ Enhanced Session). You’ll gain access to a number of local resources, including audio, clipboard, printers, and USB devices. With Windows Server 2016 and later versions, you can resize the VM console, by dragging the corners (as with any other Windows application), once you’ve logged on to the VM.
Managing the Virtual Machine Console
Now that you have the console window open, you’ll have noticed that there are additional controls along the top of the console window, such as Ctrl+Alt+Del and power state controls.
Note
Turn Off and Shut Down are two separate buttons. When clicked, the Shut Down button will perform a graceful OS shutdown. Clicking the Turn Off button is the same as pressing the power button on a physical server. Down it goes, with no graceful closure of any of the running processes. Be mindful of this when working with the power state of your guest VMs.
Pause will save the workload’s state and keep a hold on its assigned memory, while stopping its use of host CPU.
Save will save the VM’s state to disk and release all uses of both CPU and memory.
Coming out of a paused state will be quicker than coming out of a saved state, as no disk operations will be required to determine the last known state of the VM.
Media allows the administrator to attach media, such as an ISO file or floppy disk image.
Clipboard provides clipboard functionality from the machine running Hyper-V Manager into the VM; however, copy and paste for files isn’t available.
View modifies the view of the console, including the ability to go to full screen and enter enhanced session mode.
TRY IT YOURSELF—CONTROLLING THE POWER STATE OF A VM
- 1.
Click the Shut Down button at the top of the console screen. What happens?
- 2.
Click the Start button. Observe the boot process. How is it different from a physical server?
- 3.
Click the Pause button on the control panel and review the VM’s status in Hyper-V Manager.
- 4.
Click Resume. Can you now access the machine?
Installing the Guest OS
- 1.
In Hyper-V Manager, select the target host on which you created the new VM.
- 2.
Right-click the newly created VM in the center pane and then click Connect.
- 3.
In the VM console window, click the Start button, to boot the VM.
- 4.
Click into the console window and press any key to start the Windows installation.
- 5.
Walk through the OS installation process.
Note
Before the installation process is complete and the integration components are running inside the VM after the OS installation, the mouse curser may be unable to move in and out of the VM freely. To release the console’s hold over the input controls, press Ctrl+Alt+left arrow.
Once the OS is installed, you’ll have a fully virtualized workload running on Hyper-V, though it will be unable to talk to the physical network at present (see Chapter 8).
Navigate around the VM to get a feel for its behavior. It functions no differently than a physical server. Keep this VM aside, as we will continue to use it throughout the course of the book. You can either shut it down from within the OS, or you can use the shutdown option on the VM console control panel.
TRY IT YOURSELF—INSTALLING A GUEST OPERATING SYSTEM INSIDE A VM
Install an OS in your new VM, if you have not done so already.
Creating a New VM with PowerShell
- 1.
Open PowerShell directly on the Hyper-V host by right-clicking the PowerShell icon and clicking Run as Administrator.
- 2.Execute the following command:New-VM –Name TESTMACHINE –MemoryStartupBytes 1GB –NewVHDSizeBytes 25GB `–NewVHDPath C:TESTMACHINE.VHDX
- 3.
Wait for the command to complete. Open Hyper-V Manager. You’ll see the new VM.
- 4.
In the right-hand pane, click Inspect Disk. Select the VHDX that was just created.
- 5.
Verify that the maximum size is set to 25GB.
- 6.
Right-click the new VM and click Delete.
- 7.
Click Delete again on the confirmation screen.
- 8.
Open File Explorer. Navigate to the root of the C: drive. Select the TESTMACHINE.VHDX file and delete it.
Creating a VM using PowerShell is quite simple. First, name the machine with the –Name parameter, then define the startup memory with the –MemoryStartupBytes parameter. Finally, define the VHD size and path with the –NewVHDPath and –NewVHDSizeBytes parameters. When you create a new VM in Hyper-V Manager, the GUI is simply calling this command and a collection of parameters under the hood.
When deleting a VM, Hyper-V Manager will not delete its VHD/VHDX files. This is a safety measure. You must perform a manual deletion.
Note
For more Hyper-V-related PowerShell cmdlets, run Get-Command -Module Hyper-V, to get a complete list of available cmdlets. You can then use the Get-Help cmdlet to get more information on any of them.
TRY IT YOURSELF—CREATING A NEW VM WITH POWERSHELL
Use the New-VM cmdlet to create a VM. Can you delete a VM with PowerShell?
Let’s wrap up this chapter with a lab, to tie everything together.
Lab Work
Complete all of the Try It Yourself exercises. If you have not already done so, then
- 1.Create a new VM with the following requirements:
Generation 2 VM type
1024MB of memory
Dynamic Memory disabled
Disk size of 20GB
Installed OS of your choice
- 2.
Delete the VM and any associated virtual disks.
- 3.
Repeat the process, using PowerShell. If you need assistance with the syntax, don’t forget to use the Get-Help command!
- 4.
Delete the VM and any associated virtual disks.