
If you’ve been in IT world for any length of time, you know that software upgrades are a part of life. Every month, you get a list of patches from Microsoft that must be applied to both the operating system (OS) and all of the Windows Server roles and features inside your environment. Eventually, something breaks as a result of applying a patch. If only there were a way to quickly roll back a failed patch. Or maybe you have a testing routine in place in your organization that would be made easier if you could simply click a go-back button. Well, we’re going to talk about one such technology throughout this chapter: Hyper-V Checkpoints.
In This Chapter and Beyond
We’ve spent the last several chapters talking about how virtual machines (VMs) are built and how they work. In this chapter, we’re going to build on top of that knowledge, with Hyper-V Checkpoints. This chapter is the last part of the text focusing on the creation and use of VMs. After this chapter, we’ll concentrate more on host concepts and configuration.
It’s important to know how to use checkpoints, because you’ll be using them on a regular basis. Checkpoints are normally used prior to such things as software upgrades and patch testing, but they are really useful anytime you’re making a fundamental change within the guest OS of the VM, such as a file relocation or a large settings change within an application.
Note
Richard regularly uses checkpoints to roll back changes when testing demonstrations for presentations at conferences.
You should train yourself to think about a checkpoint anytime you get ready to do some sort of software change within a VM.
Note
Simply taking a checkpoint could save you a ton of time, and possibly your job, by allowing you to undo a change relatively quickly.
This technology is able to save you huge amounts of time, and effort, if utilized properly. The ability to hit an undo button on everything that’s occurred to a VM since the last checkpoint is immensely powerful. However, there are pitfalls. Checkpoints can be dangerous, if used improperly. We’ll be covering the proper use cases and how not to use them as well, so you can use this technology without potentially causing data loss within your organization. Yes, you read correctly. Misuse of checkpoints can, and does, cause data loss. So, let’s start working through the chapter, to help you utilize this technology properly.
What Are Hyper-V Checkpoints
The simplest explanation is to think of a checkpoint as a snapshot in time for a VM. You’re taking a copy of a VM at a point in time and then setting it aside for later use. The checkpoint can be taken while the machine is live. The guest OS inside the VM doesn’t even know that is being done. If you decide a day or two later that you want to revert the VM configuration to when the checkpoint was created, you apply the checkpoint, and the VM reverts to the state it was in when you originally took the checkpoint. This is one of those things that is easier to understand by seeing it in action, so let’s do so now.
Using Hyper-V Checkpoints via Hyper-V Manager
- 1.
In Hyper-V Manager, select your Hyper-V host.
- 2.
Choose one of the VMs and open the machine’s console window.
- 3.
Log in to the VM with an account that has administrator privileges. Using Notepad, create a new text file and save it as PRE-CHECKPOINTSTATE.txt onto the desktop of the guest OS.
- 4.
At the top of the VM console window, click the Action drop-down, then click Checkpoint.
- 5.
On the Checkpoint Name dialog screen, type “Pre-Software Installation” and click Yes.
- 6.
Monitor the checkpoint status using the Status column next to the target VM in Hyper-V Manager and wait for completion.
- 7.
To verify that the checkpoint was taken successfully, review the Checkpoint section in Hyper-V Manager, with the target VM selected. It should look like Figure 7-1.
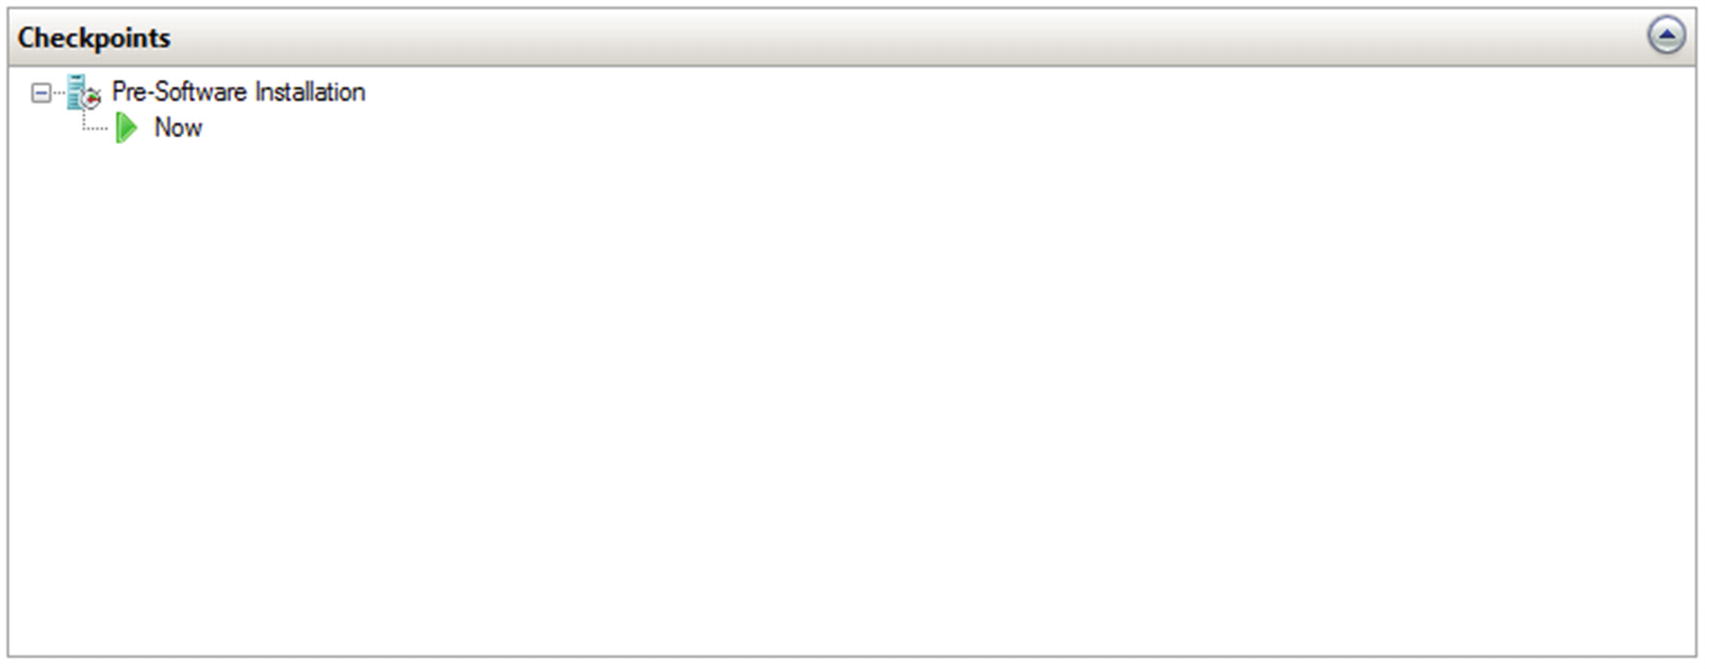
Hyper-V Manager Checkpoints view
- 8.
Delete the CHECKPOINTSTATE.txt file that we placed on the desktop earlier.
- 9.
Open a PowerShell console with elevated privileges within the VM.
- 10.
Type Install-WindowsFeature –Name 'WDS'
and press Enter, to install the Windows Deployment Services Role.
- 11.
Type Get-WindowsFeature –Name 'WDS' | Select InstallState and verify that the InstallState is “Installed.”
- 12.
In the VM console window, click the Action drop-down and then click Revert.
- 13.
Monitor the state of the VM with Hyper-V Manager while the machine turns off and the checkpoint that was taken earlier is restored.
- 14.
Once the checkpoint is restored, verify that the PRE-CHECKPOINTSTATE.txt file exists on the desktop.
- 15.
Open a PowerShell prompt with an account that has administrative privileges.
- 16.
Type: Get-WindowsFeature –Name 'WDS' | Select InstallState and note that the InstallState now shows as “Available,” meaning that the role is no longer installed.
- 17.
Leave the checkpoint in place. We will be using it later in the chapter.
TRY IT YOURSELF
Take a checkpoint using Hyper-V Manager.
Revert the checkpoint.
Is there any difference between the original configuration and after reverting the checkpoint?
We took the checkpoint, made file changes, installed additional software, and then we told Hyper-V to forget those changes and take us back to where we started.
How many times have you, or a colleague, installed a piece of software or a patch that caused some kind of failure and you had to spend hours fixing it? In this case, that breakage would be fixed in minutes, instead of hours. This is the power of Hyper-V Checkpoints.
Managing Multiple Checkpoints with Hyper-V Manager
- 1.
In Hyper-V Manager, select your Hyper-V host.
- 2.
Select the VM that was used in the previous exercise and that contains the Pre-Software Installation checkpoint.
- 3.
Using PowerShell within the guest VM, install the WDS role once again.
- 4.
Rename the PRE-CHECKPOINTSTATE.txt file on the desktop to CONTAINSWDS.txt.
- 5.
In the Checkpoints section for the VM in Hyper-V Manager, right-click the Pre-Software Installation Checkpoint and then click Apply.
- 6.
The Apply Checkpoint dialog appears, as shown in Figure 7-2. Click Create Checkpoint and Apply.
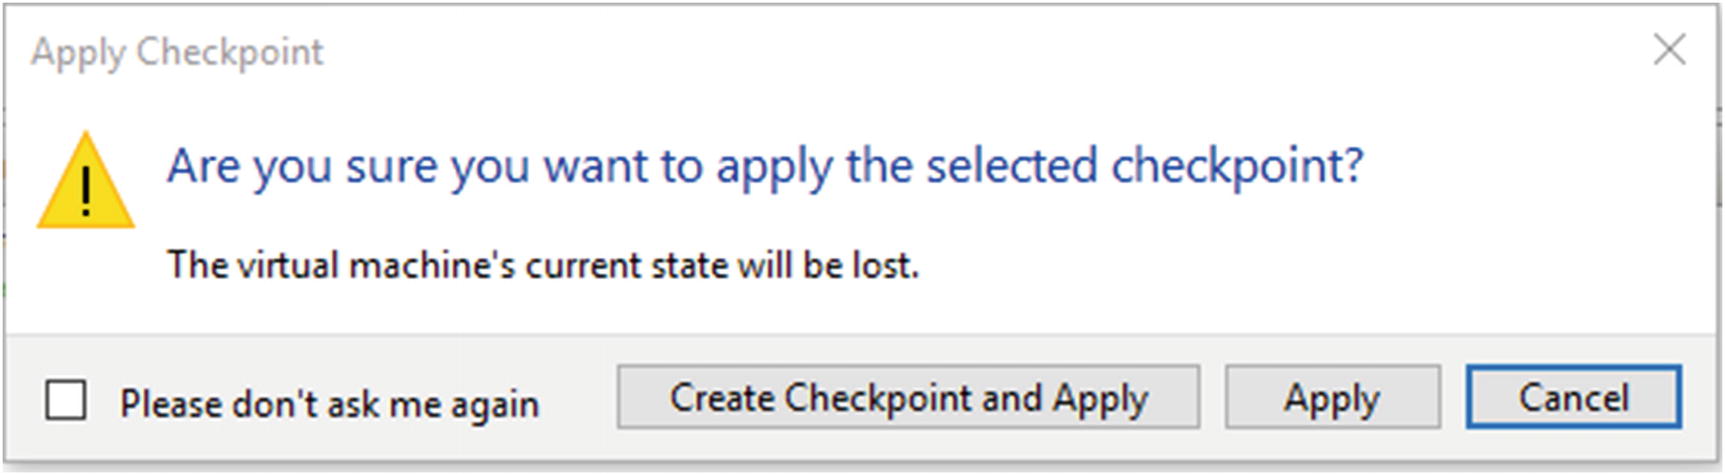
Apply Checkpoint dialog
- 7.
Monitor the creation of the new Checkpoint in Hyper-V Manager.
- 8.
Note the new checkpoint in the checkpoints tree for the VM. The default format of “VMNAME – Date” will have been used for the new checkpoint.
- 9.
Right-click the new checkpoint and click Rename. Rename the checkpoint “Contains Windows Deployment Services.”
- 10.
Verify that the VM is back to its original state and then open PowerShell with a user with administrative privileges.
- 11.
Type Install-WindowsFeature –Name 'DHCP' and press Enter to install the Windows DHCP service inside the VM.
- 12.
Type: Get-WindowsFeature –Name 'DHCP' | Select InstallState and verify the InstallState is “Installed.”
- 13.
Rename the PRE-CHECKPOINTSTATE.txt file on the desktop to CONTAINSDHCP.txt.
- 14.
Using Hyper-V Manager, apply the “Pre-Software Installation” checkpoint. Select Create Checkpoint and Apply on the Apply Checkpoint dialog UI.
- 15.
Monitor the creation of the new checkpoint in Hyper-V Manager.
- 16.
Rename the checkpoint to “Contains DHCP Service.”
- 17.
Note that your snapshot tree should now look very similar to the one found in Figure 7-3.
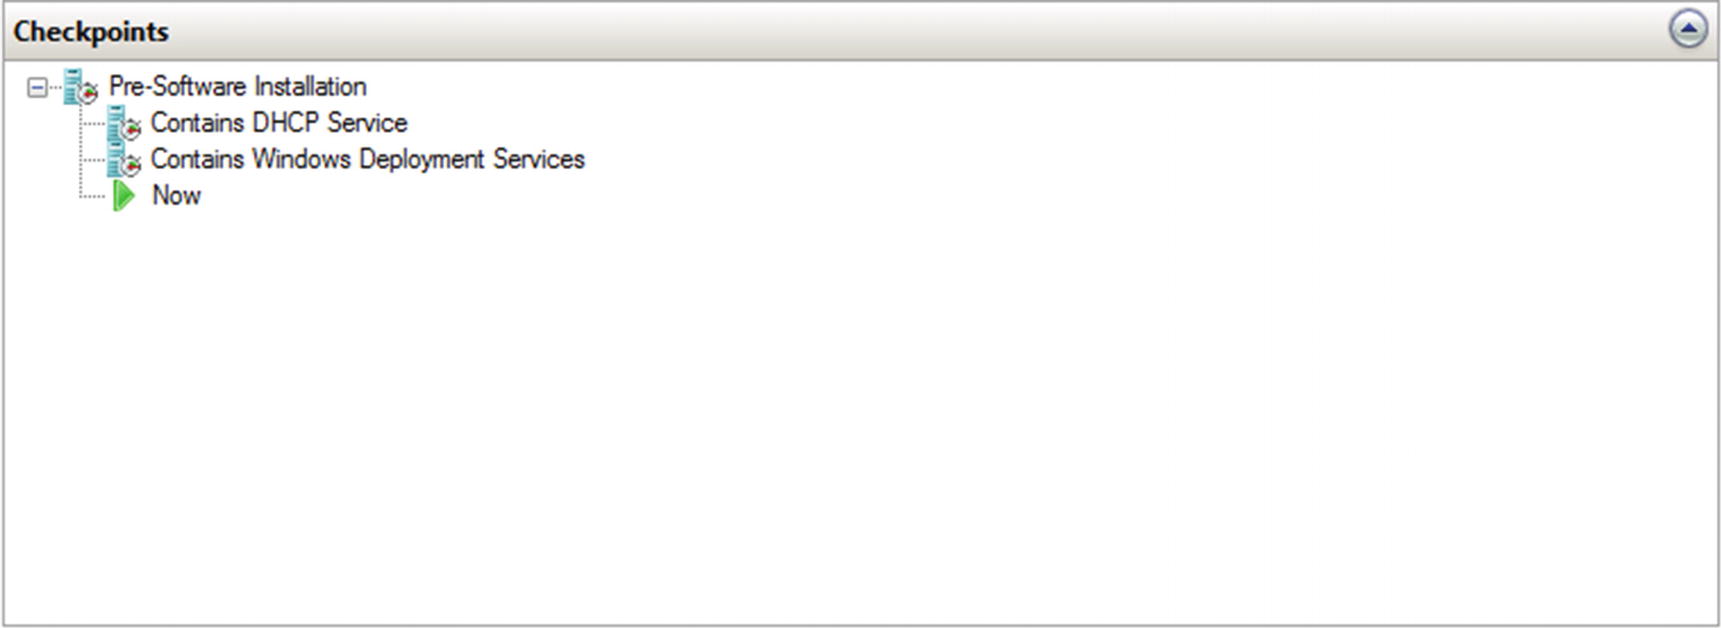
More complex checkpoint tree in Hyper-V Manager
- 18.
Right-click the Contains Windows Deployment Services checkpoint and click Apply.
- 19.
Click Apply on the Apply Checkpoint Dialog UI. There is no need to create another new Pre-Software Installation Checkpoint at this time.
- 20.
Verify that the file on the desktop is named “CONTAINSWDS.txt” and that the WDS role is showing installed, using the Get-WindowsFeature PowerShell cmdlet.
- 21.
Using Hyper-V Manager, apply the Contains DHCP Service checkpoint and repeat the previous step, to verify that the DHCP checkpoint is now in use.
- 22.
Note how the checkpoint tree in Hyper-V Manager changes with each modification.
- 23.
Apply the Pre-Software Installation checkpoint again, without creating an additional checkpoint in the Apply Checkpoint dialog UI.
- 24.
Leave the checkpoints in place. We will be using them later in the chapter.
TRY IT YOURSELF
Follow the instructions in this section to create and use multiple checkpoints.
Managing and utilizing Hyper-V Checkpoints in this manner allows for very agile software testing and verification. Gone are the days of having to maintain multiple servers to be able to effectively test software procedures. Checkpoints make this process easy and safe.
Deleting and Merging Checkpoints with Hyper-V Manager
It’s best practice to remove checkpoints as soon as you’re done with them. If you leave them in place, all new incoming writes get written to the checkpoint and will eventually fill your storage. So, what happens to the changes contained inside the checkpoint? Well, there are two possibilities. The first option is to retain all the changes in a checkpoint and roll them into the next upstream object in the tree, regardless of whether that is the base virtual disk or another checkpoint. Option 2 is to delete the changes outright, without retaining them. This is performed by using the delete action.
If you delete the currently active snapshot, Hyper-V will conduct a merge operation and roll all of the changes contained in the checkpoint into the next upstream object. If you delete a checkpoint that is not currently active, the changes within that checkpoint will be purged and lost forever.
Note
Remember: If you want to retain the changes you’ve made, you’ll want to merge the checkpoint. If you don’t want them saved, you’ll simply delete it.
- 1.
In Hyper-V Manager, select your Hyper-V host.
- 2.
Select the VM that was used in the previous exercise with the Pre-Software Installation, Contains DHCP Service, and Contains Windows Deployment Services checkpoints.
- 3.
Verify that the Pre-Software Installation checkpoint is currently active. Your checkpoint tree should look like the one in Figure 7-3.
- 4.
In the Checkpoints tree view for the selected VM, right-click the Contains Windows Deployment Services checkpoint and click Delete Checkpoint.
- 5.
Click Delete when the Delete Checkpoint Verification UI shows up.
- 6.
Monitor the deletion progress in the VM status column in Hyper-V Manager and wait for completion. Notice the merge process occurring?
- 7.
Apply the Contains DHCP Service checkpoint. Do not create another checkpoint during the application process.
- 8.
Right-click the Contains DHCP Service checkpoint and click Delete Checkpoint.
- 9.
Click Delete when the Delete Checkpoint Verification UI shows up.
- 10.
Monitor the deletion progress in the VM status column in Hyper-V Manager and wait for completion. Also, note that an extra merge process executes as well.
- 11.
Right-click the Pre-Software Installation checkpoint and click Delete Checkpoint.
- 12.
Click Delete when the Delete Checkpoint Verification UI shows up.
- 13.
Monitor the deletion progress in the VM status column in Hyper-V Manager and wait for completion. Also, note that another merge operation occurs.
- 14.
Verify that no further checkpoints are displayed in the Checkpoints tree for the selected VM. All changes have now been merged back into the VM’s virtual disk.
TRY IT YOURSELF
Delete the checkpoints you created in the section “Using Hyper-V Checkpoints via Hyper-V Manager,” by following the procedure in this section.
You’ve decided the intended changes are safe, and you’ve merged them back into the base virtual disk that will continue running the production workload. Clicking delete on a checkpoint may seem counterintuitive if you want to keep it, but that is how the merge process is called when the checkpoint is being deleted.
Alternatively, you could have used the Delete Checkpoint Subtree option to delete more than one checkpoint at a time. If you simply wanted to omit any of the changes, you would apply the previous checkpoint and then delete the checkpoint containing the changes you no longer want.
You’ve just walked through the entire checkpoint testing process. Using this method when testing and applying software updates again can save you a lot of time and heartache, and it can be a very powerful tool in your toolbox.
IMPORTANT WARNING
It is very important that upon successful testing and verification of the changes contained within a checkpoint, it’s deleted and merged back into the base virtual disk as soon as possible.
When a checkpoint is created, an AVHDX file is created and associated with the VM’s virtual hard disk. While the checkpoint and its associated AVHDX file exist, all incoming disk writes are occurring within the AVHDX file and not the virtual hard disk. So, if you write 200GB of data when a checkpoint is present on a 300GB large virtual machine, you’re potentially consuming 500GB of storage, depending on how the VM’s virtual hard disk has been provisioned.
With this in mind, it’s best to remove checkpoints as soon as you’re done with them. Otherwise, you risk consuming all the storage in your Hyper-V environment, if the checkpoint is left for an extended period of time.
Using Hyper-V Checkpoints with PowerShell
So far, you’ve seen how to manage checkpoints with Hyper-V Manager. PowerShell cmdlets for managing checkpoints are present in Hyper-V PowerShell Module in Windows Server 2012 R2 and later versions. Managing this process with PowerShell opens up a long list of potential automation opportunities, such as automating a checkpoint procedure prior to a scripted application installation. There also may be situations in which you don’t have the GUI available to you, and PowerShell may be your only option. Not to worry! Managing checkpoints with PowerShell is as simple as doing it with Hyper-V Manager. As you now have a firm grasp of how the checkpoint process works, we’ll be condensing the procedure into one exercise instead of several.
- 1.
Open PowerShell as an administrator on your Hyper-V host.
- 2.
Type Get-Command -Module Hyper-V -Name *checkpoint* and press Enter, to return a list of checkpoint cmdlets.
- 3.
Type Get-Command –Module Hyper-V –Name *snapshot* and press Enter, to return a list of additional checkpoint cmdlets.
- 4.
Type Get-VM and press Enter. Choose one of the VMs you created in Chapter 3, to act as the target of this exercise.
- 5.
Type Checkpoint-VM –Name <VM Name> –SnapshotName 'Pre-Software Installation' and press Enter, to take a checkpoint of the VM.
- 6.
Monitor the checkpoint’s progress in the PowerShell window or Hyper-V Manager until completed.
- 7.
Type Get-VMSnapshot –VMName <VM Name>
and press Enter to return a list of checkpoints for the VM.
- 8.
Verify the Pre-Software Installation checkpoint is displayed in the list.
- 9.
Using Hyper-V Manager, open the console window of the target VM.
- 10.
Open PowerShell within the guest OS with an account that has administrative privileges.
- 11.
Type Install-WindowsFeature –Name FS-FileServer and press Enter, to install the Windows File Server role inside of the guest OS.
- 12.
Using Notepad, place a text file on the desktop named POWERSHELL-CONTAINSFSROLE.txt.
- 13.
Switch back to the PowerShell prompt on the Hyper-V host.
- 14.
Type: Checkpoint-VM –Name <VM Name> –SnapshotName 'Contains File Server Role' and press Enter, to create another checkpoint.
- 15.
Monitor the checkpoint’s progress in the PowerShell window or Hyper-V Manager.
- 16.
Type: Get-VMSnapshot –VMName <VM Name>
and press Enter, to return a list of checkpoints for the VM.
- 17.
Verify that the Contains File Server Role checkpoint is displayed in the list and take note of the ParentSnapshotName field.
- 18.
Type: Restore-VMSnapshot –Name 'Pre-Software Installation' –VMName <VM Name> and press Enter, then Y, for “yes.” Pressing Y confirms that you want to change the state of the VM and return it to its state prior to having file services installed.
- 19.
Inside the guest VM, verify that the File Services role is not installed using the Get-WindowsFeature cmdlet, as used in previous exercises.
- 20.
Switch back to the PowerShell prompt on the Hyper-V host.
- 21.
Type: Remove-VMSnapshot –Name * –VMName <VM Name>
and press Enter to remove all checkpoints associated with the VM. With the Pre-Software Installation checkpoint as the active checkpoint, the file-services installation will be purged and not rolled into the main virtual disk of the VM.
TRY IT YOURSELF
Use PowerShell to create, manage, and delete checkpoints.
Managing checkpoints via PowerShell is just as easy as via the GUI. Remember that there is no equivalent to the Take Checkpoint and Apply option in Hyper-V Manager. With PowerShell, you have to take each step individually to get the same effect.
ABOVE AND BEYOND
The under-the-hood details of the checkpoint process are not within the scope of this book. We’re focused on learning by doing, rather than theory and processes. If you’re interested in learning more about what is happening under the hood when a checkpoint is taken, refer to this TechNet article: https://technet.microsoft.com/en-us/library/dn818483.aspx . It will tell you all you ever wanted to know about the checkpoint process.
What Not to Do with Hyper-V Checkpoints
You’re now a pro at handling checkpoints in Hyper-V, and you’re ready to start using them in production! However, you’ll remember that earlier in the chapter, we mentioned that there are some situations in which you could cause harm to your environment by using checkpoints. To be clear, it’s not the checkpoint technology itself that creates these types of situations, it’s checkpoints being used incorrectly that creates them. You know when to use checkpoints. Now, let’s cover when not to use them, so that you can employ this technology safely.
Hyper-V Checkpoints Are Not a Replacement for a Backup
It’s usually at this point in the conversation that people look at checkpoints and say “Gee, that looks an awful lot like a backup. I can replace my backup solution with this technology, can’t I?” The answer is a firm “No, you can’t.” While, it may look like a backup, Hyper-V Checkpoints provides no retention and is still located with the NM on production storage, by default. Even if the checkpoint location is modified, only the most current writes are located in the checkpoint. The remaining data is still located in the VM’s virtual hard disk. Therefore, if the virtual hard disk gets corrupted, you have no recovery method. Plan accordingly!
Hyper-V Checkpoints Are Not Suitable for Domain Controllers
There has been some logic added to Active Directory in Windows Server 2012 R2 and later versions that makes it more checkpoint-friendly, but it’s still not best practice to use checkpoints with DCs. This is owing to the fact that you could inadvertently apply a checkpoint that is older than the tombstone lifetime of the DC, thus creating a major headache for yourself and your users. Your best bet is just to keep multiple DCs, and don’t use checkpoints on them.
Hyper-V Checkpoints Are Not Suitable for Live Multitiered Applications
Many applications today rely on multiple services and servers to get their job done. For example, many web servers depend on an SQL Server back end. If you’re getting ready to upgrade these workloads, and you plan on taking checkpoints prior to the upgrade, it is recommended that the VMs be powered off prior to the checkpoint. The reason is that you can’t guarantee that the checkpoints will be done in an application-consistent way. Your checkpoint of the web server may not match up exactly with the checkpoint of the back-end SQL Server database, and if you have to revert, you could suffer data loss, if something in the transaction logs doesn’t match up perfectly.
Do Not Modify Virtual Disk Layout While It Has Active Checkpoints
This is a bad one that could cause data loss. Hyper-V Manager will not let you modify a virtual hard disk that has active associated checkpoints, but it’s still possible to do so with PowerShell. As all the recent writes are contained within the checkpoint and not the VM’s virtual hard disk, any change to the virtual disk’s size and layout will render the disk unusable. Hyper-V will no longer be able to match up the storage blocks contained in the checkpoint with the applicable blocks in the virtual hard disk. Avoid this at all cost. We’ve seen numerous situations in which modifying virtual disks while checkpoints exist has meant that recovery from backup was the only option available.
Following these directions and use cases is in your best interest. Remember: While checkpoints are an extremely useful technology, they can be harmful if used improperly. With that said, let’s wrap up this chapter with a hands-on lab.
Lab Work
- 1.
Choose one of the two VMs created in Chapter 3 to act as the target VM for this exercise.
- 2.
Take a Pre-Modification checkpoint, using your preferred method, as covered in this chapter.
- 3.
Within the guest OS, change the file’s owner to administrator, then change the NTFS permissions on the Notepad executable (C:WindowsSystem32 otepad.exe), to give full access to the administrators group.
- 4.
Once completed, delete the notepad.exe file.
- 5.
Attempt to run Notepad from the run prompt of the start menu.
- 6.
Using your preferred method, use Hyper-V Checkpoints to resolve this issue.
- 7.
Once recovered, test Notepad’s functionality once again.