© Andy Syrewicze, Richard Siddaway 2018
Andy Syrewicze and Richard SiddawayPro Microsoft Hyper-V 2019https://doi.org/10.1007/978-1-4842-4116-5_17

17. Containers

Andy Syrewicze1  and Richard Siddaway2
(1)
Jenison, MI, USA
(2)
Baston, Lincolnshire, UK
 

Containers have been available in the Linux world for a number of years. They are a way to virtualize and isolate applications. Windows Server 2016 introduced the technology to the Windows world. Containers are also available on Windows 10 builds post RTM. The container functionality in Windows Server was further enhanced in Windows Server 1709, Windows Server 1803, and Windows Server 2019.

In this chapter, we’ll explain what this exciting new technology is and what you can do with it. This includes how to install the containers feature and the configuration steps you must take before you can use containers. We’ll look at the networking implications of containers and how you can overcome those issues.

Before you can use a container, you need to know how to create one—and manage its life cycle. Containers are an excellent way to deliver applications and, in a DevOps environment, could be a way to simplify your delivery processes. You use container images to move containers and, therefore, application functionality from one machine to another, as we’ll show you toward the end of the chapter.

CHANGES TO CONTAINER TECHNOLOGY ON WINDOWS

Windows Server 2016 Technical Preview 3 (TP3) gave us our first view of containers on the Windows platform. Containers behaved, and were treated, as mini-virtual machines in TP3 through TP5, and you could use Docker or Windows PowerShell to manage your containers.

This suddenly, and surprisingly, changed without warning in Windows Server 2016 RTM, when containers became application isolation objects that matched their implementation on the Linux platform. Docker became the recommended and only practical management technology.

There is a PowerShell module for managing containers— https://github.com/Microsoft/Docker-PowerShell —but the only release (August 2016) is rated as an alpha release, and so it can’t be recommended for use. The module has been deprecated and archived recently, with no further development planned.

Docker is the only practical administration mechanism, unless you want to create your own functionality using Docker.Dotnet— https://github.com/Microsoft/Docker.DotNet .

First, though, just what are these containers that you’ve heard so much about?

Containers Explained

Containers are lightweight virtualized isolation objects for running applications without impacting the rest of your system. The isolation ensures the container has no knowledge of, and no interaction with, other applications or processes that exist on the same host machine.

Note

The Microsoft documentation for containers is available at https://docs.microsoft.com/en-us/virtualization/windowscontainers/about/ . At the time of writing, this documentation isn’t complete and is contradictory in places. Be aware and double-check.

Containers can be easily ported between hosts, as the application in the container has all of the dependencies and configuration data required for its execution.

Container hosts can be physical or virtual machines (VMs). Container portability means that you can create a container for your application on your Windows 10 machine and, when you’re sure its performing as required, port the container to a production host or VM.

Containers in the Windows environment are available in two distinct flavors:
  • Windows Server containers

  • Hyper-V isolation containers

All Windows Server containers share the kernel of their host’s operating system (OS) but still provide process and namespace isolation. Windows Server containers aren’t a security boundary, so they can’t guarantee to isolate untrusted code. The same kernel version and configuration are required for the host and its Windows Server containers.

Hyper-V isolation containers run in a highly optimized “virtual machine.” You can’t see or interact with this VM; it’s a background object to support only the containers. Each Hyper-V container on a host has its own kernel OS. These containers provide the same security assurances as a VM. Different kernel versions and configurations can be run on the host, for example a Windows 10 container host uses Hyper-V isolation to run containers, based on the Windows Server kernel.

The main differences between Windows Server and Hyper-V containers are summarized in Table 17-1.
Table 17-1

Windows Server and Hyper-V Container Comparison

Windows Server Containers

Hyper-V Containers

Share Windows kernel

Own Windows kernel

Memory shared through host

Memory assigned directly

OS trusts applications

Applications not trusted by OS

Applications trust each other

Applications don’t trust each other

Faster startup

Slightly slower startup

LESS ISOLATION

MORE ISOLATION

The important point to note is that Hyper-V containers provide more isolation at the OS and application level than Windows Server containers.

Before moving on to installing the containers feature, we must spend a moment discussing container management.

Managing Containers

In the Linux world, the de facto standard for managing containers is Docker— www.docker.com/ . Containers are often referred to as Docker containers when, in fact, Docker is a management API for containers. Docker itself refers to Docker as a container platform ( www.docker.com/what-docker ).

Irrespective of its actual definition, Docker is what you will require in order to manage containers in a Windows platform. The documentation for the Docker command-line interface (CLI) is available online at https://docs.docker.com/engine/reference/commandline/docker/ .

Note

There isn’t a GUI option, from Microsoft or Docker, for managing containers in a Windows environment. You have to use the command line. Kitematic is an open source version of a legacy GUI for Windows (and Mac), if you want to try a GUI option. Most Docker-related documentation assumes management via the command line.

The advantage of using Docker is that it is a standard, and there are many books and articles written on the subject. Unfortunately, most of those are written for Linux users and will require some work to “translate” into Windows. You can use Docker from a Linux machine to administer containers on a Windows machine and vice versa.

The disadvantage to using Docker is that it has an arcane syntax typical of traditional Linux or Windows command-line utilities. If you’ve become accustomed to the (usually) consistent and logical syntax of PowerShell, you’ll have to modify your expectations, unfortunately. The Docker-PowerShell module we mentioned earlier could become an alternative, but it’ll need a lot of work. Alternatively, you could create a number of functions to wrap Docker functionality that would provide, at least, a basic level of PowerShell functionality. We’ll show you some examples of such functions later in the chapter.

So, how do you get containers up and running?

Installing the Containers Feature

The container functionality isn’t available on Windows by default. You need to install the feature. The installation steps have some slight variations, depending on the version of Windows with which you’re working. We’re going to show you how to install containers on the following platforms:
  • Windows Server

  • Windows Server Insider Previews

  • Windows 10

Note

At the time of writing, Windows Server is taken to include Windows Server 2016, Windows Server 1709, and Windows Server 1803. Windows Server Insider Previews is taken to mean the Windows Server 2019 Previews and all future preview releases. Once Windows Server 2019, or future SAC versions, have been officially released, we expect the container feature installation instructions for Windows Server will apply to them as well.

The one option we won’t cover is installation of containers on a Nano server machine. Nano server was introduced with Windows Server 2016 as an ultra-low footprint installation option that could perform a number of infrastructure roles, including being a container host. As of Windows Server 1709, Nano server has been relegated to being a container OS only. All of the infrastructure roles have been removed, and you can only use Nano server as the basis of a container. We don’t recommend using Nano server as a container host, owing to the change in emphasis from Microsoft. The Nano server documentation is available online at https://docs.microsoft.com/en-us/windows-server/get-started/getting-started-with-nano-server , but the container-related documentation has been removed.

Warning

Microsoft is expending a lot of development effort on container-based technology. The installation details have changed a number of times over the last few years. Before starting an installation on a new machine, double-check the documentation, to ensure that things haven’t changed. Prime candidates for change include the provider modules and Docker installation package names.

Let’s start by discovering how to install the containers feature on Windows Server.

Installing Containers Feature on Windows Server

The procedure for installing and using containers on a Windows Server system consists of the following:
  • Install the Docker provider.

  • Download and install Docker.

  • Download container images.

  • Create containers.

You’ll learn about the first two parts of the procedure in this section. Finding, downloading, and using container images will be addressed in later sections.

Note

We’re going to use the Server Core option for all of our Windows Server container hosts. Containers don’t have an administration GUI, and we want to keep the overhead of using containers as low as possible, making Server Core the ideal option. Windows Server 1709 and Windows Server 1803 are only available as Server Core, which is also a powerful driver for using this option.

Usually, you’d just install the appropriate Windows feature to get access to a feature’s functionality, but containers are a bit different. The following commands are executed in a PowerShell console running with elevated privileges. First, find the available Microsoft Docker providers in the PowerShell gallery. You should see something like this:
PS> Find-Module -Name Docker*prov* -Repository PSgallery
Version Name                        Repository Description
------- ----                        ---------- -----------
1.0.0.4 DockerMsftProvider          PSGallery  PowerShell module…
0.0.0.3 DockerProvider              PSGallery  PowerShell module…
1.0.0.2 DockerMsftProviderInsider   PSGallery  PowerShell module…

The version numbers may be different. Even the names may be different, given the rate of change Microsoft is imposing, which is why we urge you to check the documentation.

FIRST-TIME GALLERY USER

If this is the first time you’ve used the PowerShell gallery from a machine, you’ll see a message like this:
NuGet provider is required to continue
PowerShellGet requires NuGet provider version '2.8.5.201' or newer to interact with NuGet-based repositories. The NuGet provider must be available in
'C:Program FilesPackageManagementProviderAssemblies' or
'C:Users ichardAppDataLocalPackageManagementProviderAssemblies'. You can also install the NuGet provider by running 'Install-PackageProvider -Name NuGet -MinimumVersion 2.8.5.201 -Force'. Do you want PowerShellGet to install and import the NuGet provider now?
[Y] Yes  [N] No  [S] Suspend  [?] Help (default is "Y"):

Answer with Y and press Enter, for the install to proceed.

You’ll then get your results. Future access to the gallery won’t show the message about the NuGet provider, as it’s already installed.

The three provider modules should be used as follows:
  • DockerMsftProvider: Use for production versions of Windows Server—Windows Server 2016, Windows Server 1709, Windows Server 1803, etc.

  • DockerProvider: Use for Windows Server Insider Previews.

  • DockerMsftProviderInsider: Ignore. This was the provider to use for Windows Server Insider Previews but has been superseded by DockerProvider. We expect that this provider will be removed eventually.

Install the provider.
PS>  Install-Module -Name DockerMsftProvider -Repository PSGallery -Force
Use -Force to override the messages about the PSGallery being an untrusted source. Then download and install Docker.
PS>  Install-Package -Name docker -ProviderName DockerMsftProvider
The package(s) come(s) from a package source that is not marked as trusted.
Are you sure you want to install software from 'DockerDefault'?
[Y] Yes  [A] Yes to All  [N] No  [L] No to All  [S] Suspend  [?] Help (default is "N"): Y
WARNING: A restart is required to enable the containers feature. Please restart your machine.
Name    Version       Source         Summary
----    -------       ------         -------
Docker  18.03.1-ee-2  DockerDefault  Contains Docker EE for use with
                                     Windows Server.

You must accept the message to install from an untrusted source and press Enter to continue or use the -Force parameter to bypass the message.

Note

If you hit any problems in the download and install of the Docker package, follow the instructions in the “Troubleshooting the Installation Process” section.

You’ll have downloaded and installed the latest version of Docker and installed the containers feature. Your machine needs to be rebooted, to finish the installation.
PS>  Restart-Computer

The containers feature and Docker are now installed on your server. Let’s turn to the Windows Server previews for a moment.

Installing Containers Feature on Windows Server Insider Previews

Installing the containers feature on a Windows Server Preview instance is very similar to the installation on Windows Server, except you use the preview provider.

To install the provider, use the following code:
PS>  Install-Module -Name DockerProvider -Repository PSGallery -Force
Then install the Docker package.
PS>  Install-Package -Name docker -ProviderName Dockerprovider -RequiredVersion Preview
The package(s) come(s) from a package source that is not marked as trusted.
Are you sure you want to install software from 'Docker'?
[Y] Yes  [A] Yes to All  [N] No  [L] No to All  [S] Suspend  [?] Help (default is "N"): Y
WARNING: A restart is required to enable the one or more features. Please restart your machine.
Next, restart your machine.
PS>  Restart-Computer

You should be able to install containers on any of the Windows Server versions now. The last installation option to consider is Windows 10.

Installing Containers Feature on Windows 10

The installation procedure on Windows 10 is completely different—isn’t consistency a jewel. You’ll need to have the Hyper-V feature installed and working on your Windows 10 system before installing Docker.

First, you must download the Docker for Windows installer from https://download.docker.com/win/stable/InstallDocker.msi . Installation instructions are available from Docker at https://docs.docker.com/docker-for-windows/install/ , but they aren’t totally consistent with those in the Microsoft documentation at https://docs.microsoft.com/en-us/virtualization/windowscontainers/quick-start/quick-start-windows-10 .

Our install experience can only be described as awful. Once you’ve started it, you’ll get no feedback—not even when it finishes! You’ll have to add your user account into the Docker-users local group. (The installation creates the group but doesn’t add you to it!) If you’re not in the group, Docker for Windows won’t start. Once you’ve added yourself to the group, either log off and log on or restart the machine. We recommend restarting.

The Docker installation procedure will create a VM switch called DockerNAT with a switch type of Internal.

You’ll have to start Docker for Windows manually, the first time you use it. Docker should start automatically on subsequent machine restarts.

Docker for Windows is configured to run Linux containers by default! To switch the default to Windows containers, run this command:
PS> & 'C:Program FilesDockerDockerDockerCli.exe' -SwitchDaemon
If you then click on the Docker icon (whale shape) in the notification area, you’ll see something like Figure 17-1. You can use the switching option on the menu, to switch between Windows and Linux containers, if you don’t want to use the command line.
../images/470351_1_En_17_Chapter/470351_1_En_17_Fig1_HTML.jpg
Figure 17-1

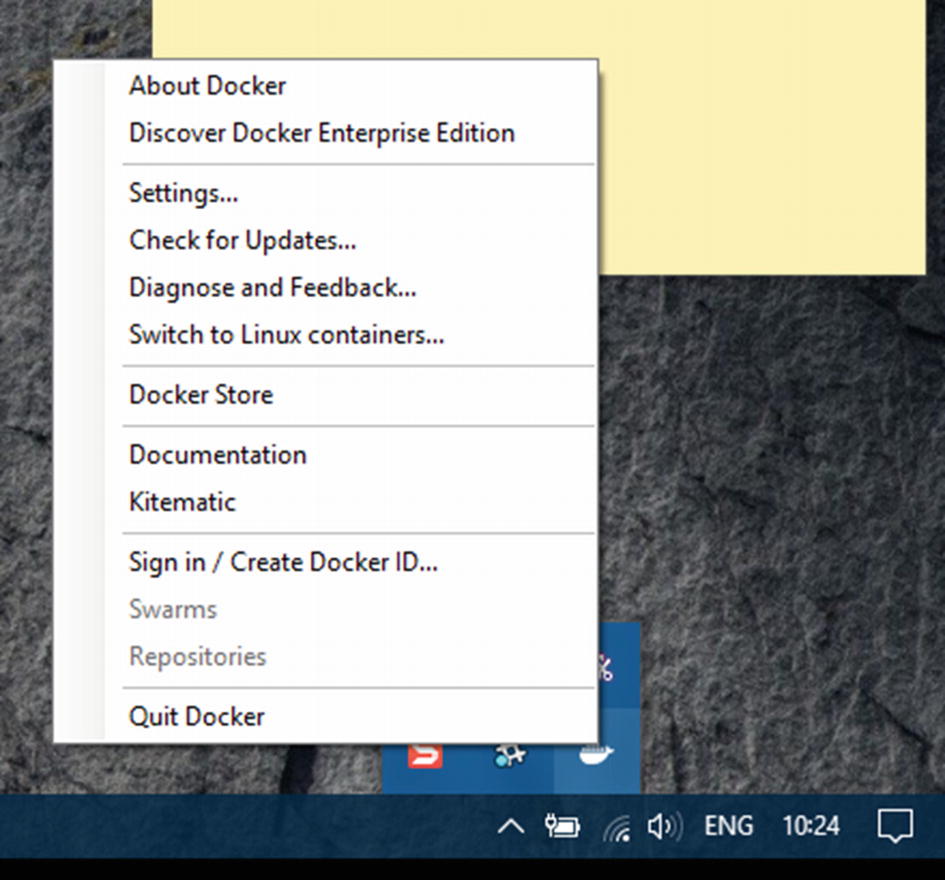
Docker for Windows pop-up from notification area

Sometimes things go wrong and you may have to become more involved in the installation process .

Troubleshooting the Installation Process

You may experience problems when installing the Docker packages. In our case, we saw the following index download:
VERBOSE: Downloading https://dockermsft.blob.core.windows.net/dockercontainer/DockerMsftIndex.json
Then we hit a warning.
WARNING: Cannot verify the file SHA256. Deleting the file.
The install then terminated with an object not found error.
Install-Package : Cannot find path
 'C:UsersRichardAppDataLocalTemp2DockerMsftProviderInsiderDocker-17-06-0-ce.zip' because it does not exist.

You could try to use Save-Package, but we got a similar error. This seems to a be a common issue discussed in the following thread: https://github.com/OneGet/MicrosoftDockerProvider/issues/15 .

A modified version of the workaround from that thread resolves the issue. First, download the index file.
PS>  Start-BitsTransfer -Source https://dockermsft.blob.core.windows.net/dockercontainer/DockerMsftIndex.json -Destination c:source
Then convert to a PowerShell object.
PS>  $dv = Get-Content -Path  c:sourceDockerMsftIndex.json |
ConvertFrom-Json
You can see the versions available.
PS>  $dv.versions
Extract the required version.
PS>  $dv.versions.'17.06.0-ce'
date   : 2017-07-10T16:35:52
url    : https://dockermsft.blob.core.windows.net/dockercontainer/docker-17-06-0-ce.zip
size   : 16277800
notes  : This is the latest CE version of docker
sha256 : 3D27360A11A3A627AAC9C6D73EB32D4A9B6DCCA6BCB4B2C7A5FCD9D2E0EC6C82
Now you can download the zip file.
PS>  Start-BitsTransfer -Source "https://dockermsft.blob.core.windows.net/dockercontainer/docker-17-06-0-ce.zip" -Destination C:sourcedocker.zip
Unblock the file, just in case.
PS>  Unblock-File -Path C:Sourcedocker.zip
Check the file hash.
PS>  $dv.versions.'17.06.0-ce'.sha256
3D27360A11A3A627AAC9C6D73EB32D4A9B6DCCA6BCB4B2C7A5FCD9D2E0EC6C82
PS>  Get-FileHash -Path C:Sourcedocker.zip | Format-List
Algorithm : SHA256
Hash      : 3D27360A11A3A627AAC9C6D73EB32D4A9B6DCCA6BCB4B2C7A5FCD9D2E0EC6C82
Path      : C:Sourcedocker.zip
They look to be the same, but to save wear and tear on your eyeballs, use the following:
PS>  $dv.versions.'17.06.0-ce'.sha256 -eq (Get-FileHash -Path C:Sourcedocker.zip).hash
True
Now copy docker.zip to the folder Install-Package was trying to use.
PS>  Copy-Item -Path C:sourcedocker.zip -Destination C:UsersRichardAppDataLocalTemp2DockerMsftprovider -Force
Notice the 2 in the path. Not sure why that’s there, but it seems to be necessary. Move into the folder.
PS>  Push-Location -Path C:UsersRichardAppDataLocalTemp2DockerMsftProvider
Rename it.
PS>  Copy-Item -Path .docker.zip -Destination .Docker-17-06-0-ce.zip
The instructions say to rename the zip file, but use Copy-Item instead of Rename-Item. It’s because Install-package will delete the zip file when it’s completed. This way, you have the original available, if you need it. You can now install the package.
PS>  Install-Package -Name docker -ProviderName DockerMsftProviderInsider -Verbose -RequiredVersion 17.06.0-ce
Because the download file exists, the save is skipped. The hash verification works, and Docker is installed. The installation of Docker also enables the containers feature. The installation output is shown in Figure 17-2.
../images/470351_1_En_17_Chapter/470351_1_En_17_Fig2_HTML.jpg
Figure 17-2

Installing the Docker package

Restart the VM to finish the installation and start the Docker service.

You’ve spent a lot of time covering the installation options, but given the differences in procedure between the various options, it’s important that you get the installation correct. Now that installation is out of the way, it’s time to create your first container.

Your First Container

To create your first container, you need to do three things:
  • Find a container image.

  • Download a container image.

  • Create the container.

First things first. How do you find a container image?

Finding Container Images

Earlier in the chapter, we said that the same OS kernel version and configuration are required for the host and its Windows Server containers. If you try to run a container with a kernel that doesn’t match the host, you’ll get an error. For example, trying to run a Windows Server 1709 Nano server container on a Windows Server 2019 host will result in the following error:
PS>  docker run microsoft/nanoserver:1709 cmd /C echo Hello World
C:Program FilesDockerdocker.exe: Error response from daemon: container 8f405dd893a7a06420211e81ca011f320da852b8d703057f4b933e7bf988fb2a encountered an error during CreateContainer: failure in a Windows system call: The container operating system does not match the host operating system. (0xc0370101) extra info: {"SystemType":"Container","Name":"8f405dd893a7a06420211e81ca011f320da852b8d703057f4b933e7bf988fb2a","Owner":"docker","VolumePath":"\\?\Volume{fa5bd6a2-697d-4869-bbd1-029b09c1212f}","IgnoreFlushesDuringBoot":true,"LayerFolderPath":"C:\ProgramData\docker\windowsfilter\8f405dd893a7a06420211e81ca011f320da852b8d703057f4b933e7bf988fb2a","Layers":[{"ID":"14866e0f-664e-5cf2-addd-f72ac965a324","Path":"C:\ProgramData\docker\windowsfilter\7f8cc761ef5db9475434bfd16b1e15bbcc6d5c703240de8520c9414ea00009eb"},{"ID":"f70855d9-c01f-5743-a674-12b1f1b85d27","Path":"C:\ProgramData\docker\windowsfilter\8d5844dd3bcde0ca32bd65f79c7359508a338f15950d8bfe3773b56e7fc2fabf"}],"HostName":"8f405dd893a7","HvPartition":false,"EndpointList":["ABCA108E-710A-4ECF-8634-1D51DC3D9FBC"],"AllowUnqualifiedDNSQuery":true}.
If you need to run a container that doesn’t match the host, you must use Hyper-V isolation. There is an additional restriction that the host must be a later version of the kernel than the container. You can’t run a container based on a Windows Server 1709 kernel on a Windows Server 2016 host, even in Hyper-V isolation mode. Windows 10 can run any flavor of the container OS image as Hyper-V containers. Tables 17-2 and 17-3 list the supported container OS versions on the various host OSs that are available.
Table 17-2

Supported Host and Container Operating System versions—Windows Server Host

Container Operating System

Host Operating System

Windows Server 2016

Windows Server 1709

Windows Server 1803

Windows Server 2019

Windows Server 2016

Supported

Windows Server or Hyper-V isolation

Supported

Hyper-V isolation only

Supported

Hyper-V isolation only

Supported

Hyper-V isolation only

Windows Server 1709

Not supported

Supported.

Windows Server or Hyper-V isolation

Not supported

Not supported

Windows Server 1803

Not supported

Not supported

Supported

Windows Server or Hyper-V isolation

Supported

Hyper-V isolation only

Windows Server 2019

Not supported

Not supported

Not supported

Supported

Windows Server or Hyper-V isolation

Table 17-3

Supported Host and Container OS Versions—Windows 10 Host

Container Operating System

Host Operating System

Windows 10 1609 or 1703

Windows 10 1709

Windows 10 1803

Windows Server 2016

Supported

Hyper-V isolation only

Supported

Hyper-V isolation only

Supported

Hyper-V isolation only

Windows Server 1709

Not supported

Supported

Hyper-V isolation only

Supported

Hyper-V isolation only

Windows Server 1803

Not supported

Not supported

Supported

Hyper-V isolation only

Windows Server 2019

Not supported

Not supported

Not supported

The matrices presented in Tables 17-2 and 17-3 will continue to change for two reasons:
  • New versions of Windows 10 and Windows Server are released approximately every six months. This will add an additional column to the tables.

  • SAC releases have an 18-month life cycle. As older versions are withdrawn, columns will be removed from the tables.

You must remember the following rules regarding host and container OS versions:
  • Windows Server can run a container as a Windows container if, and only if, the container OS image version matches the host version. As an example, Windows Server 1803 can only run container images with a Windows Server 1803 OS as Windows containers.

  • Windows server can run earlier versions of a container OS image as Hyper-V containers. Windows Server 1803 can run Windows Server 1709 and Windows Server 2016 container images as Hyper-V containers, for example.

  • A Windows Server host can’t run a container using an OS image from a later version container OS image, for example, Windows Server 1709 can’t run a Windows 1803 container image.

  • Windows 10 can only run Hyper-V containers that match or predate the Windows 10 version number. For example, Windows 10 1709 can run Windows Server 2016 and Windows Server 1709 containers but not Windows Server 1803.

In addition, there are some restrictions on the types of containers that can be used, depending on the host OS. These are detailed in Table 17-4.
Table 17-4

Type Container Available, Based on Host Operating System

Host Operating System

Windows Server Container

Hyper-V Container

Windows Server 2016

(Standard or Datacenter)

Server Core or

Nano server

Server Core or

Nano server

Windows Server 1709

(Standard or Datacenter)

Server Core or

Nano server

Server Core or

Nano server

Windows Server 1709

(Standard or Datacenter)

Server Core or

Nano server

Server Core or

Nano server

Windows Server 2019

(Standard or Datacenter)

Server Core or

Nano server

Server Core or

Nano server

Nano server

(Windows 2016 ONLY)

Nano server

Server Core or

Nano server

Windows 10 Pro or Enterprise

Not available

Server Core or

Nano server

Note

We expect that these rules will continue to work beyond Windows Server 2019.

With the background information out of the way, you’ll need to know where to look to find your container OS images.

The answer is the Docker Hub. Microsoft has embraced the Docker ecosystem and made their container images available through Docker’s portal: https://hub.docker.com/ . The Docker Hub directs you to the Docker Store as the new place to find container images, but at the time of writing, the Docker Hub was still the primary point for finding container images.

Note

You’ll need to create an account on the Docker Hub to get the most from it.

If you click on Explore of the Docker Hub home page, you’ll find a list of vendor repositories to browse through. The URL for the Microsoft repository is https://hub.docker.com/r/microsoft/ , if you want to shortcut the process. On the first page of the Microsoft repository, you’ll find the nanoserver and windowsservercore images. The Server Core images are shown in Figure 17-3.
../images/470351_1_En_17_Chapter/470351_1_En_17_Fig3_HTML.jpg
Figure 17-3

Microsoft Server Core repository on the Docker Hub

The page shown in Figure 17-3 lists versions of the Server Core container images for Windows Server 2016, Windows Server 1709, and Windows Server 1803. The Windows Insider Preview images are treated separately. The command to download the images is supplied at the right-hand side of the page. The required container image is stated as
<container repository>:<tag>
As examples, the following commands will pull different versions of the Server Core container images:
PS>  docker pull microsoft/windowsservercore
PS>  docker pull microsoft/windowsservercore:1709
PS>  docker pull microsoft/windowsservercore:1803

The commands will pull a Windows Server 2016, Windows Server 1709, and Windows Server 1803 image respectively. The repository is Microsoft/windowsservercore and the optional tags are 1709 and 1803. You can view the available options for a container image in the Docker Hub. Navigate to the appropriate repository and click Tags.

If you want to use the Insider Preview images, use the following command:
PS>  docker pull microsoft/windowsservercore-insider

You’re pulling the previews from a different repository.

Note

The Insider images should be used only for development and testing. They are part of the Insider program and, therefore, subject to change.

One thing to think carefully about when pulling base images is the purpose of the container. Nano server images are smaller but have less functionality than a Server Core image. The following have been removed from Nano server images:
  • Servicing stack

  • .NET core

  • PowerShell and WMI

  • Administrator accounts

Windows Server Core will provide the full .NET framework. The size of the images is shown in Table 17-5.
Table 17-5

Indicative Sizes of Container Operating System Images

Operating System

Nano Server Container Image

Server Core Container Image

Windows Server 2019

236MB

3.42GB

Windows Server 1803

337MB

4.76GB

Windows Server 1709

329MB

5.58GB

Windows 2016

1.1GB

10.4GB

As you can see from Table 17-5, Microsoft is working to decrease the size of the base OS container image with each release.

ABOVE AND BEYOND

Microsoft has stated that a new type of container image will be introduced with Windows Server 2019: https://blogs.technet.microsoft.com/virtualization/2018/06/27/insider-preview-windows-container-image/ .

The new image option will contain API dependencies that aren’t in the Server Core or Nano server images. This means the option will have more functionality, including proofing support and graphics support, but will be bigger.

We’ll be using the Server Core and Nano server images in the rest of the book.

You can also search for images from the command line, as follows:
PS>  docker search microsoft/nanoserver
NAME                                   DESCRIPTIONmicrosoft/dotnet                       Official images for .NET Coremicrosoft/mssql-server-linux           Official images forMicrosoft microsoft/aspnet             ASP.NET is an open sourcemicrosoft/aspnetcore                   Official images for runningmicrosoft/windowsservercore            Windows Server Core base OSmicrosoft/nanoserver                   Windows Server Nano Server basemono                                   Mono is an open sourcemicrosoft/iis                          Internet Information Servicesmicrosoft/aspnetcore-build             Official images for building
<output truncated>
You get 25 images returned by default. If you need more, or less, images try the limit parameter (we’re not going to show the output of every search to conserve space in the book).
PS> docker search microsoft/nanoserver --limit 100

The number of images you ask for must be in the range 1–100. Some of the images returned will be from Microsoft, and others from individuals.

Note

Trust is an issue when using images from the Docker Hub, as with any online repository. Any container image you use from the Docker Hub should be rigorously tested in your environment before use.

You could filter for “official” images.
PS> docker search --filter "is-official=true" microsoft/nanoserver

In reality, the search option in the Docker command-line utility doesn’t appear to have evolved to match the growth of the Docker ecosystem. In reality, it’s not useful for any practical searches, and you’re better off using the browser.

Now that you know how to find your container images, it’s time to download them.

Downloading Container Images

You saw examples of the commands used to pull container images from the Docker Hub in the previous section. When you issue the command, you’ll see progress bars as the download proceeds. When the download completes, you should see a message something like this:
PS>  docker pull microsoft/nanoserver-insider
Using default tag: latest
latest: Pulling from microsoft/nanoserver-insider
4a33601959f6: Pull complete
Digest: sha256:4218849128c348b5f5aebcc615c9081fb0b05bc349cdcbdb8ef2267d0ba516fa
Status: Downloaded newer image for microsoft/nanoserver-insider:latest
Based on what you’ve learned so far, you’ll see that the following commands pull three images, based on Windows Server 1803:
PS>  docker pull microsoft/nanoserver:1803
PS>  docker pull microsoft/windowsservercore:1803
PS>  docker pull microsoft/iis: windowsservercore-1803

Note

The preceding 1803 tagged images will be used in the rest of the book. If you’re using Windows Server 2016 or Windows Server 1709, substitute the appropriate image names.

When your downloads are complete, you can inspect the images you have installed on the host.
PS>  docker images
REPOSITORY                    TAG                      SIZE
microsoft/iis                 windowsservercore-1803   4.98GB
microsoft/windowsservercore   1803                     4.76GB
microsoft/nanoserver          1803                     337MB
<Image Id and Created columns removed for brevity>
Note the tag for the microsoft/iis image. When you download the IIS image, you’ll only download about 94MB, if you have the Server Core image already downloaded.
PS>  docker pull microsoft/iis:windowsservercore-1803
windowsservercore-1803: Pulling from microsoft/iis
d9e8b01179bf: Already exists
e30fefc566f7: Already exists
e35a364bea7e: Downloading [===========================>  ]  76.09MB/93.8MB
e3f2dc22a332: Download complete
e94ecb3c49e7: Download complete

The IIS specifics will be merged with the base image, to produce the final image.

When downloading, if you get an error such as Error response from daemon: Get https://registry-1.docker.io/v2/: dial tcp: lookup registry-1.docker.io: no such host or an indication of a time-out, then try stopping and restarting the Docker service. Attempt the download again in a new instance of PowerShell or cmd.

You’ve found your images and downloaded them. It’s time to create a container.

Creating a Container

One thing that confuses many people when they start using containers is that when running a container, if the application in the container stops, so does the container. That also means that you can’t just start a container as you would a VM. The container has to do something! So, let’s fall back on a developer favorite—Hello World.
PS>  docker run microsoft/nanoserver:1803 cmd /C echo Hello World!
Hello World!
PS>  docker run microsoft/nanoserver-insider cmd /C echo Hello World!
Hello World!

In both cases, you’re starting a container, based on the stated image, and telling the container to run cmd.exe and echo Hello World! The output is automatically returned to your console, and the container stops. These containers are running as Windows Server containers.

Note

On Windows Server 2019 Insider Preview, we had to install Hyper-V, after enabling nested virtualization on the VM, to enable containers to run.

You’ll be using the docker run command extensively. It’s worth reading the full documentation at https://docs.docker.com/engine/reference/commandline/run/ .

You can view the existing containers on your system (the -a is needed to view stopped containers).
PS>  docker ps -a
CONTAINER ID   IMAGE                              COMMAND                CREATED             STATUS                              PORTS    NAMES
d1f85fa76eff   microsoft/windowsservercore:1803  "cmd /C echo Hello W..."
5 minutes ago       Exited (0) 4 minutes ago            sharp_booth
3424ae74d52e   microsoft/nanoserver:1803         "cmd /C echo Hello W..."
6 minutes ago       Exited (0) 5 minutes ago            eager_tesla

The display is wrapped, unfortunately, but you should be able to follow it. Docker will automatically assign the container ID and the name. The container ID is the shortened version, as you’ll see later. The name is random!

There isn’t an easy way to rerun a container that specifically runs a command and stops. You’ll have to manually remove the containers.
PS>  docker rm d1f85fa76eff
d1f85fa76eff
PS>  docker rm 3424ae74d52e
3424ae74d52e

Later in the chapter, you’ll be running containers that don’t automatically exit. You’ll learn then how to stop and restart them.

If your container will just run a command and then exit, it’ll save you time, if you automatically clean up the container by using the –rm flag.
PS>  docker run --rm  microsoft/nanoserver:1803 cmd /C echo Hello World
Hello World

The containers you’ve run so far have all been Windows containers. It’s time to investigate Hyper-V containers.

Running Hyper-V Containers

You learned earlier that you could run containers as Windows containers (share OS kernels with host) or Hyper-V containers (have their own isolated kernel). There are three practical reasons for running Hyper-V containers.
  • They ensure application and OS isolation.

  • They can run a container image version that predates the host OS version.

  • The host is Windows 10.

You might think that using Windows 10 as a host isn’t a good idea, but in reality, you can develop and test the container on your workstation and then move the container to a production host, where it could run as a Windows or Hyper-V container, depending on the scenario.

A container is run in Hyper-V isolation mode by using the --isolation=hyperv parameter.
PS> docker run --rm  --isolation=hyperv  microsoft/nanoserver:1803 cmd /C echo Hello World!
Hello World!
PS> docker run --rm  --isolation=hyperv  microsoft/windowsservercore:1803 cmd /C echo Hello World!
Hello World!
Note that in these examples, you’re also removing the container after execution. One way to illustrate the difference between running a container as a Windows Server container and a Hyper-V isolation container is to view the processes at work when a container is run. Let’s start by running a long-running process in a Windows Server container.
PS>  docker run -d microsoft/windowsservercore:1803 ping localhost -t
b04fc7cdfe98a34f6687e0b4cf65a0013aa170e074b98093a5e088542057969c

This starts a continuous ping process. The -d (-detach) parameter runs the container in the background and prints the container ID to the screen. Note that you get the long version of the container id.

You can view the processes in the container.
PS>  docker top b04fc7cdfe98a34f6687e0b4cf65a0013aa170e074b98093a5e088542057969c
Name                PID                 CPU                 Private Working Set
smss.exe            3268                00:00:00.125        274.4kB
csrss.exe           3892                00:00:00.265        1.008MB
wininit.exe         1404                00:00:00.109        1.04MB
services.exe        1280                00:00:00.421        1.987MB
lsass.exe           2592                00:00:00.234        2.359MB
fontdrvhost.exe     3264                00:00:00.046        942.1kB
svchost.exe         3584                00:00:00.078        1.184MB
svchost.exe         3384                00:00:00.140        1.372MB
svchost.exe         3220                00:00:00.093        1.032MB
svchost.exe         2764                00:00:00.343        4.854MB
svchost.exe         3672                00:00:00.843        3.002MB
svchost.exe         1980                00:00:00.031        1.745MB
svchost.exe         3692                00:00:02.671        2.142MB
svchost.exe         3404                00:00:00.015        385kB
CExecSvc.exe        3980                00:00:00.015        782.3kB
svchost.exe         3480                00:00:00.453        4.465MB
PING.EXE            2844                00:00:00.015        565.2kB
Note PING.EXE with a PID of 2844. You can also see that from the host.
PS>  Get-Process pi*
Handles  NPM(K)    PM(K)      WS(K)     CPU(s)     Id  SI ProcessName
-------  ------    -----      -----     ------     --  -- -----------
     79       6      852       3560       0.02   2844   3 PING
If you’ve got this far, you’ll notice that there is nothing visible to indicate that a container is running on the host. To view your container, use the following code:
PS>  docker container ls
CONTAINER ID IMAGE                   COMMAND             NAMES
b04fc7cdfe98 microsoft/wind…ore:1803 "ping localhost -t" admiring_bohr
We’ve removed the middle part of the output, so that the display fits on the page. The name is created, at random, by Docker. You can stop a running container by using its ID.
PS>  docker container stop b04fc7cdfe98
b04fc7cdfe98
Now let’s repeat this exercise with a Hyper-V isolation container.
PS> docker run -d  --isolation=hyperv  microsoft/windowsservercore:1803 ping localhost -t
09195cc8ed2ecb27abe68228cad2e013e4ddb41d127393c3ff1074dbfa61678a
Let’s view the container processes.
PS> docker top 09195cc8ed2ecb27abe68228cad2e013e4ddb41d127393c3ff1074dbfa61678a
Name                PID          CPU                 Private Working Set
smss.exe            904          00:00:02.375        270.3kB
csrss.exe           940          00:00:00.640        1.061MB
wininit.exe         996          00:00:00.187        1.09MB
services.exe        244          00:00:00.593        2.068MB
lsass.exe           300          00:00:00.578        3.379MB
svchost.exe         620          00:00:06.468        1.442MB
svchost.exe         1040         00:00:00.156        1.155MB
fontdrvhost.exe     1060         00:00:00.109        946.2kB
svchost.exe         1176         00:00:00.359        1.049MB
svchost.exe         1200         00:00:00.531        4.989MB
svchost.exe         1248         00:00:01.046        3.117MB
svchost.exe         1268         00:00:00.109        1.753MB
svchost.exe         1356         00:00:00.468        1.954MB
svchost.exe         1488         00:00:00.953        6.111MB
CExecSvc.exe        1516         00:00:00.046        774.1kB
svchost.exe         1572         00:00:00.078        401.4kB
PING.EXE            1872         00:00:00.031        593.9kB
The ping process is visible inside the container but isn’t visible to the host.
PS> Get-Process PI*
PS>
What you will find is that an instance of the virtual machine worker process (VMWP) is started for the container. Before the container started, this was the situation:
PS> Get-Process vmwp | select Id, Starttime
   Id StartTime
   -- ---------
 7420 24/07/2018 14:30:38
 7548 24/07/2018 20:53:38
 7604 24/07/2018 14:21:37
 7832 24/07/2018 20:54:06
 8340 24/07/2018 14:27:38
12944 24/07/2018 14:24:37
After the container started, a new instance—Id 10648—is visible.
PS> Get-Process vmwp | select Id, Starttime
   Id StartTime
   -- ---------
 7420 24/07/2018 14:30:38
 7548 24/07/2018 20:53:38
 7604 24/07/2018 14:21:37
 7832 24/07/2018 20:54:06
 8340 24/07/2018 14:27:38
10648 24/07/2018 21:17:11
12944 24/07/2018 14:24:37

There’ll be one instance of VMWP per running VM on your Hyper-V host. Starting a container in Hyper-V isolation mode will also spawn a new instance of the VMWP.

You started the containers in this section in detached mode. You must explicitly stop and then remove them.
PS> docker stop 09195cc8ed2e
09195cc8ed2e
PS> docker rm 09195cc8ed2e
09195cc8ed2e

You’ve learned how to create containers, but you’ve only connected to them from the host. You must learn how to attach a container to your network, so that the application can be accessed from any client.

Container Networking

Docker makes changes to your networking configuration when you install it on a Windows machine (physical or VM) that’ll become a container host. We’ll start by explaining those changes, what they mean, and how to use and then examine the options you have for networking containers.

Default Container Network

Docker adds a virtual network adapter (NIC) to the machine on which its installed.
PS>  Get-NetAdapter | select Name, InterfaceDescription, ifIndex, LinkSpeed
Name            InterfaceDescription                 ifIndex LinkSpeed
----            --------------------                 ------- ---------
Wifi            Microsoft Hyper-V Network Adapter #2       9 130 Mbps
vEthernet (nat) Hyper-V Virtual Ethernet Adapter           7 10 Gbps
LAN             Microsoft Hyper-V Network Adapter          4 100 Mbps
In this case, the adapter vEthernet (nat) is added to the machine. Note the description of the interface and the Link Speed compared to the standard NICs. An address is assigned.
PS>  Get-NetIPAddress -InterfaceIndex 7
IPAddress         : 172.21.128.1
InterfaceIndex    : 7
InterfaceAlias    : vEthernet (nat)
AddressFamily     : IPv4
Type              : Unicast
PrefixLength      : 20
PrefixOrigin      : Manual
SuffixOrigin      : Manual
AddressState      : Preferred
ValidLifetime     : Infinite ([TimeSpan]::MaxValue)
PreferredLifetime : Infinite ([TimeSpan]::MaxValue)
SkipAsSource      : False
PolicyStore       : ActiveStore
We’re only showing the IPv4 data, for brevity. An IPv6 address and configuration is also assigned. The prefix length of 20 translates to a subnet mask of 255.255.240.0, if you prefer that approach. Table 17-6 lists the prefixes you’ll be likely to see and the number of containers you could theoretically run on the resultant network.
Table 17-6

Network Prefix, Subnet Mask, and Number of Containers per Network

Prefix

Subnet Mask

IP Addresses

Containers

20

255.255.240.0

4096

4094

21

255.255.248.0

2048

2046

22

255.255.252.0

1024

1022

23

255.255.254.0

512

510

24

255.255.255.0

256

254

The address 172.22.80.1 is part of the 172.16.0.0/12 private address space (see https://technet.microsoft.com/en-us/library/cc958825.aspx ).

You can also use view the container-related network information, by using the following PowerShell commands. On Windows Server 2016 or Windows 10 (1603 or 1703), they are
PS>  Get-ContainerNetwork | Format-List *
Name               : nat
SubnetPrefix       : {172.24.240.0/20}
Gateways           : {172.24.240.1}
Id                 : a1a1084c-3de6-4cd3-ab9a-f2cc8852866a
Mode               : NAT
NetworkAdapterName :
SourceMac          :
DNSServers         :
DNSSuffix          :
IsDeleted          : False

Get-ContainerNetwork is in the Containers module, which has four cmdlets for working with container networks.

On Windows Server 1709 and Windows 10 (1709) or later versions, use the HostNetworkingService module:
PS>  Get-HnsNetwork
ActivityId             : cde5c3a5-9554-4c0a-ab33-c6559bb7f158
AutomaticDNS           : True
CurrentEndpointCount   : 0
Extensions             : {@{Id=e7c3b2f0-f3c5-48df-af2b-10fed6d72e7a;
                         IsEnabled=False;
                         Name=Microsoft Windows Filtering Platform},
                         @{Id=e9b59cfa-2be1-4b21-828f-b6fbdbddc017;
                         IsEnabled=False; Name=Microsoft Azure
                         VFP Switch Extension},
                         @{Id=ea24cd6c-d17a-4348-9190-09f0d5be83dd;
                         IsEnabled=False;
                         Name=Microsoft NDIS Capture}}
ID                     : a1e00523-7cff-4522-b3a5-03d17aecbd47
LayeredOn              : e449a1e3-e658-4edc-81c2-97945a97f52b
MacPools               : {@{EndMacAddress=00-15-5D-E2-DF-FF;
                          StartMacAddress=00-15-5D-E2-D0-00}}
MaxConcurrentEndpoints : 1
Name                   : nat
Policies               : {}
Resources              : @{AllocationOrder=2; Allocators=System.Object[];
                         ID=cde5c3a5-9554-4c0a-ab33-c6559bb7f158;
                         PortOperationTime=0; State=1;
                         SwitchOperationTime=0; VfpOperationTime=0;
                         parentId=40037bd3-3e8d-4384-89ef-ccbccf47482a}
State                  : 1
Subnets                : {@{AddressPrefix=172.21.128.0/20;
                         GatewayAddress=172.21.128.1}}
TotalEndpoints         : 8
Type                   : nat
Version                : 30064771074

Before we go any further, we’d better explain the term NAT, which is used in the name of the adapter and as the network type or mode. NAT stands for “Network Address Translation.” It’s a technique in networking wherein an internal address, in this case, in the 172.22.80.0/20 range, is mapped to an address and port on the machine’s network adapter, so that the container can communicate with machines external to the host. We’ll explain this further with an example.

When you run a container, an IP address is automatically assigned from the range defined in the container network.
PS>  docker run --rm microsoft/nanoserver:1803 ipconfig
Windows IP Configuration
Ethernet adapter vEthernet (Ethernet):
   Connection-specific DNS Suffix  . : manticore.org
   Link-local IPv6 Address . . . . . : fe80::c1c6:9e8a:d547:5d89%21
   IPv4 Address. . . . . . . . . . . : 172.21.134.91
   Subnet Mask . . . . . . . . . . . : 255.255.240.0
   Default Gateway . . . . . . . . . : 172.21.128.1

You’ll recognize that the IP address of the default gateway is the same as the network adapter Docker automatically installs.

Now let’s investigate inside the container, using the IIS container, for a change:
PS>  $cid = docker run -d microsoft/iis:windowsservercore-1803
You’ve captured the container ID in a PowerShell variable, to make life easier. You can use the variable to complete Docker commands, for example:
PS>  docker top $cid
Name                 PID      CPU                 Private Working Set
smss.exe             2400     00:00:00.296        266.2kB
csrss.exe            2308     00:00:00.328        1.008MB
wininit.exe          2860     00:00:00.078        1.016MB
services.exe         2616     00:00:00.421        2.142MB
lsass.exe            2548     00:00:00.234        2.511MB
svchost.exe          2068     00:00:00.203        2.183MB
fontdrvhost.exe      2848     00:00:00.031        942.1kB
CExecSvc.exe         3156     00:00:00.031        794.6kB
svchost.exe          3212     00:00:02.421        3.654MB
ServiceMonitor.exe   3588     00:00:00.031        626.7kB
<truncated for bevity>
You can create a PowerShell remoting session in the container (we’ll cover using PowerShell with containers in more detail later in the chapter).
PS>  $s = New-PSSession -ContainerId $cid
PS>  $s | Format-List
ComputerType           : Container
ComputerName           : 592448b31023dbcbd1abcfd8dc97a9e3aa402661c8455a7bf077cb4d10ebebfe
ContainerId            : 592448b31023dbcbd1abcfd8dc97a9e3aa402661c8455a7bf077cb4d10ebebfe
VMName                 :
VMId                   :
ConfigurationName      :
InstanceId             : 9c600ec8-9d48-4fa6-9533-4cf9a8ecd993
Id                     : 1
Name                   : WinRM1
Availability           : Available
ApplicationPrivateData : {DebugMode, DebugStop, UnhandledBreakpointMode, PSVersionTable...}
Runspace               : System.Management.Automation.RemoteRunspace
State                  : Opened
IdleTimeout            : -1
OutputBufferingMode    :
DisconnectedOn         :
ExpiresOn              :

The computer name is set to the container ID. Note that the computer type is set to Container.

You’ll notice that we haven’t given any credentials when creating the PowerShell remoting session. Don’t let that fool you into thinking that the container is part of your AD. It isn’t. Containers don’t create AD objects and aren’t part of your AD.

Once you have a remoting session, you can find the container’s IP address.
PS>  Invoke-Command -Session $s -ScriptBlock {Get-NetIPAddress -AddressFamily IPv4}
IPAddress         : 172.21.142.23
InterfaceIndex    : 21
InterfaceAlias    : vEthernet (Ethernet)
AddressFamily     : IPv4
Type              : Unicast
PrefixLength      : 20
PrefixOrigin      : Manual
SuffixOrigin      : Manual
AddressState      : Preferred
ValidLifetime     : Infinite ([TimeSpan]::MaxValue)
PreferredLifetime : Infinite ([TimeSpan]::MaxValue)
SkipAsSource      : False
PolicyStore       : ActiveStore
PSComputerName    : 592448b31023dbcbd1abcfd8dc97a9e3aa402661c8455a7bf077cb4d10ebebfe

There is also a loop back adapter: 127.0.0.1.

You can test that the container’s IP address is reachable from the container host.
PS>  Test-Connection -ComputerName 172.21.142.23 -Count 1
Source     Destination    IPV4Address   IPV6Address  Bytes    Time(ms)
------     -----------    -----------   -----------  -----    --------
W1803CN01  172.21.142.23  92.242.132.16              32       0
The container’s C: drive shows the presence of the inetpub folder—home of the web site information.
PS>  Invoke-Command -Session $s -ScriptBlock {Get-ChildItem -Path c:}
    Directory: C:
Mode                LastWriteTime         Length Name                                ----                -------------         ----------                                d-----       10/07/2018     23:49                inetpub
d-r---       07/07/2018     23:49                Program Files
d-----       07/07/2018     23:42                Program Files (x86)
d-r---       07/07/2018     23:50                Users
d-----       10/07/2018     23:49                Windows
-a----       12/04/2018     11:27           1894 License.txt
-a----       10/07/2018     23:49         171712 ServiceMonitor.exe
The IIS service is running.
PS>  Invoke-Command -Session $s -ScriptBlock {Get-Service -Name w3*}
Status   Name               DisplayName
------   ----               -----------
Stopped  W32Time            Windows Time
Stopped  w3logsvc           W3C Logging Service
Running  W3SVC              World Wide Web Publishing Service
You can also view information about the container IP address configuration, using
PS>  Get-HnsEndpoint
ActivityId                : b0d098d0-d2c7-4ad2-af5e-2e25b860892e
CreateProcessingStartTime : 131769865993844250
DNSServerList             : 172.21.128.1,10.10.54.10
DNSSuffix                 : manticore.org
EnableInternalDNS         : True
EnableLowInterfaceMetric  : True
GatewayAddress            : 172.21.128.1
ID                        : 0cd8966f-b161-4930-ba2f-f1be37afcd1d
IPAddress                 : 172.21.142.23
MacAddress                : 00-15-5D-E2-DF-F0
Name                      : Ethernet
Policies                  : {}
PrefixLength              : 20
Resources                 : @{AllocationOrder=2;
                            Allocators=System.Object[];
                            ID=b0d098d0-d2c7-4ad2-af5e-2e25b860892e;
                            PortOperationTime=0; State=1;
                            SwitchOperationTime=0; VfpOperationTime=0;
                            parentId=cde5c3a5-9554-4c0a-ab33-c6559bb7f158}
SharedContainers          : {592448b31023dbcbd1abcfd8dc97a9e3aa402661c8455a7bf077cb4d10ebebfe}
StartTime                 : 131769866001296692
State                     : 2
Type                      : nat
Version                   : 30064771074
VirtualNetwork            : a1e00523-7cff-4522-b3a5-03d17aecbd47
VirtualNetworkName        : nat

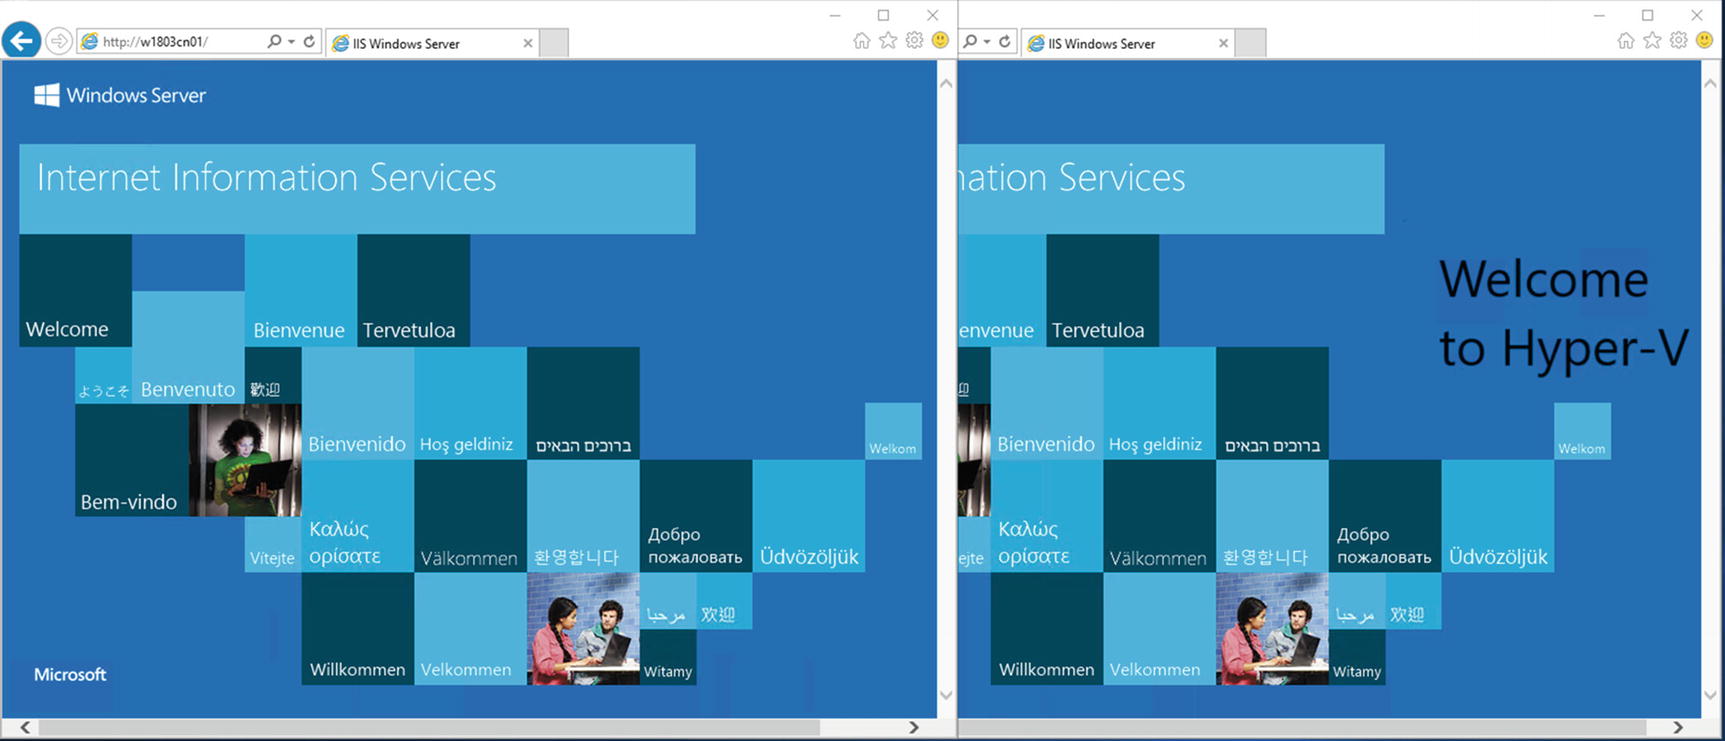
If your container host has a GUI and, therefore, a browser, you’ll be able to connect to http:// 172.21.142.23/ and view the default web site. You won’t be able to ping the container or connect to the web site from another host, as the 172.21.142.23 address is only visible on the container host. You must create a mapping from the 172.21.142.23 address to the external IP address of the host, to make the web site visible on the external network.

Creating an NAT Mapping

The easiest way to create an NAT mapping is to do it when you create the container.
PS>  docker run -d -p 80:80  microsoft/iis:windowsservercore-1803
2bafcd69907cbd31cd1c05b8e1cc6a1ae0b9b24161d4681fbf6e2a2bd2b265fe
This maps port 80 (HTTP) on the container to port 80 on the external NIC. If you have to define multiple mappings, you can repeat the use of the -p parameter.
PS>  docker run -d -p 80:80  -p 443:443 microsoft/iis:windowsservercore-1803
810515cb1bc3956fda66e5e496b8cd69a9526076e9d8ca4fdaeabcbf9e238142

In this case, you’re mapping port 80 (HTTP) and port 443 (HTTPS) to the corresponding port number on the external NIC. The order in which you define the ports is important. It should be -p <external port>:<container port>.

You can access the container as you would any web site, because you’ve mapped the HHTP port from the container directly to the external NIC. Figure 17-4 shows the container’s web site being accessed from an external machine.
../images/470351_1_En_17_Chapter/470351_1_En_17_Fig4_HTML.jpg
Figure 17-4

Accessing a container-based web site from an external machine

The instance of the browser on the left accesses the web site, using the server name http://W1803CN01, and that on the right uses the IP address http://10.10.54.60, which is the IP address of the container host.

You can view the NAT policy from the container host.
PS>  Get-HnsEndpoint
ActivityId                : 2ec1667d-2bd1-4007-aa6c-b08df5dfc696
CreateProcessingStartTime : 131770025712630306
DNSServerList             : 172.21.128.1,10.10.54.10
DNSSuffix                 : manticore.org
EnableInternalDNS         : True
EnableLowInterfaceMetric  : True
GatewayAddress            : 172.21.128.1
ID                        : 77921f2b-2e1c-4cfc-89ef-0be7481380d8
IPAddress                 : 172.21.129.185
MacAddress                : 00-15-5D-E2-D5-A8
Name                      : Ethernet
Policies                  : {@{ExternalPort=443; InternalPort=443;
                            Protocol=tcp; Type=NAT}, @{ExternalPort=80;
                            InternalPort=80; Protocol=tcp; Type=NAT}}
PrefixLength              : 20
Resources                 : @{AllocationOrder=3; Allocators=System.Object[]; ID=2ec1667d-2bd1-4007-aa6c-b08df5dfc696;
                            PortOperationTime=0; State=1;
                            SwitchOperationTime=0; VfpOperationTime=0;
                            parentId=cde5c3a5-9554-4c0a-ab33-c6559bb7f158}
SharedContainers          : {810515cb1bc3956fda66e5e496b8cd69a9526076e9d8ca4fdaeabcbf9e238142}
StartTime                 : 131770025717124293
State                     : 2
Type                      : nat
Version                   : 30064771074
VirtualNetwork            : a1e00523-7cff-4522-b3a5-03d17aecbd47
VirtualNetworkName        : nat

The Policies parameter shows the port mappings between the container and the external NIC.

An alternative is to use
PS>  docker container ls
CONTAINER ID                     IMAGE
COMMAND        CREATED                               STATUS
                    PORTS               NAMES
810515cb1bc3   microsoft/iis:windowsservercore-1803  "C:\ServiceMonitor.e..."16 minutes ago      Up 16 minutes       0.0.0.0:80->80/tcp, 0.0.0.0:443->443/tcp   agitated_wright

The display is wrapped, because of the width of the page, but you can see the PORTS information at the beginning of the last line.

But what if you have multiple containers on the host for which you must map the same port on the external NIC, for instance, multiple containers running IIS. The answer is that you’ll have to use a different port on the external NIC.
PS>  docker run -d -p 8080:80  -p 8043:443 microsoft/iis:windowsservercore-1803
b4e2046f85eba987a92e1b47919f176c1b7251573cf8408802e64270b0b1061b

In this case, you’re mapping port 80 on the container to port 8080 on the external NIC. You can connect to the web site in the container, from an external machine, by using http://W1803CN01:8080/ or http://10.10.54.60:8080/. You can use the same techniques as earlier to view the port mappings.

Using NAT works for a small number of containers—ideal for a development environment. NAT breaks down when you have to run many containers on a host, especially if you have to remember the port mappings to connect to the container from an external machine.

Other Network Options

By default, containers use the NAT network that’s created when you install the containers feature. Other network options are available, as shown in Table 17-7.

The latest information on container networking is available at https://docs.microsoft.com/en-us/virtualization/windowscontainers/container-networking/architecture and subsequent pages. Surprisingly, it doesn’t contain clear instructions on setting up container networks.
Table 17-7

Container Networking Options

Network Type

Description

Network AddressTranslation (NAT)

(default)

Containers receive an IP address from the range defined when the NAT network is created.

Multiple NAT networks per host are support in Windows 1709 and later versions.

Port mapping is supported.

Transparent

Containers are directly connected to the physical network. IP addresses are assigned statically or via DHCP.

Overlay

For use with Docker Swarm. Containers can communicate with other containers on the same network, across multiple hosts.

L2Bridge

Container is on same IP subnet as host. Container IP addresses are assigned statically. All container end points have the same Mac address (layer-2 address translation [Mac rewrite occurs]).

L2Tunnel

This is for the Microsoft cloud stack only.

Transparent Networks

As an example of another network option, we’ll show how to create a transparent network for your containers.

The first step is to identify the network adapter you’ll use as the link from the host to the outside world. Then you can create the network, as follows:
PS>  docker network create -d transparent
-o com.docker.network.windowsshim.interface="LAN"
--subnet=10.10.54.0/24 --gateway=10.10.54.1 Transparent1803
48d9c40457e0e1c64f3537b77d3076d79a0a563fdbb5ec6d914b8e1828d601c5

This command creates a transparent container network attached to the network adapter, named LAN. The subnet and default gateway are set. This is required if you’re going to set IP addresses transparently. The final argument is the network name.

A new virtual adapter is created.
PS>  Get-NetAdapter | Format-List Name, InterfaceDescription, ifIndex, MacAddress, LinkSpeed
Name                 : Wifi
InterfaceDescription : Microsoft Hyper-V Network Adapter #2
ifIndex              : 9
MacAddress           : 00-15-5D-36-C9-70
LinkSpeed            : 144.5 Mbps
Name                 : vEthernet (nat)
InterfaceDescription : Hyper-V Virtual Ethernet Adapter
ifIndex              : 7
MacAddress           : 00-15-5D-E2-D6-80
LinkSpeed            : 10 Gbps
Name                 : LAN
InterfaceDescription : Microsoft Hyper-V Network Adapter
ifIndex              : 4
MacAddress           : 00-15-5D-36-C9-6F
LinkSpeed            : 100 Mbps
Name                 : vEthernet (LAN)
InterfaceDescription : Hyper-V Virtual Ethernet Adapter #4
ifIndex              : 15
MacAddress           : 00-15-5D-36-C9-6F
LinkSpeed            : 100 Mbps
Notice that it has the same Mac Address as the LAN adapter from which it was created. You’ll have to enable Mac spoofing on the adapter in the container host. Run this on the Hyper-V host.
PS> Get-VMNetworkAdapter -VMName W1803CN01 |
where SwitchName -eq 'LAN' |
Set-VMNetworkAdapter -MacAddressSpoofing On
Now let’s create a container on the new network.
PS>  docker run -d --network Transparent1803
--ip 10.10.54.200  microsoft/iis:windowsservercore-1803
de9fc9c9c8e3b8aa5bf2b057af4e567aa6656c9c136986250a49319b932efb54

Your container is now on the external network with a pingable IP address. You’ll be able to connect to your container from an external host using http://10.10.54.200. If you create a static DNS entry, you could connect using that name too.

Working with Containers

So far, you’ve learned to install the containers feature, download base images, and configure networking for containers. In this section, you’ll discover how to manage containers in practice. Containers, as all objects in IT, have a defined life cycle. The ephemeral nature of containers means that they have a limited life cycle. You don’t do much to modify containers, once they’re running, so the life cycle becomes
  • Create container.

  • Run container—possibly stop and start a container.

  • Remove container.

This doesn’t cover all the options, though. You also must be able to modify your container images. You saw how to use PowerShell remoting to connect to a container, earlier in the chapter.

Let’s start by looking a bit more at how to create and connect to your container.

Creating Containers

So far, you’ve created and run containers using commands such as this:
PS>  docker run microsoft/nanoserver:1803 cmd /C echo Hello World!
Hello World!

This will create the container, run the command, return the results, and shut down the container.

The docker run command has the following syntax:
docker run [OPTIONS] IMAGE [COMMAND] [ARG...]

You can view the full syntax and options at https://docs.docker.com/engine/reference/commandline/run/ .

You’ll usually run in the background, but you can run containers interactively.

Interactive Containers

If you run a container interactively (by using the -it option), you are immediately connected to the container, as shown in Figure 17-5.

The first line in Figure 17-5 shows the process ID (PID) of the current PowerShell session as 2928. A Windows Server Core container is started. The container is started in an interactive mode by using the -it parameter.
../images/470351_1_En_17_Chapter/470351_1_En_17_Fig5_HTML.jpg
Figure 17-5

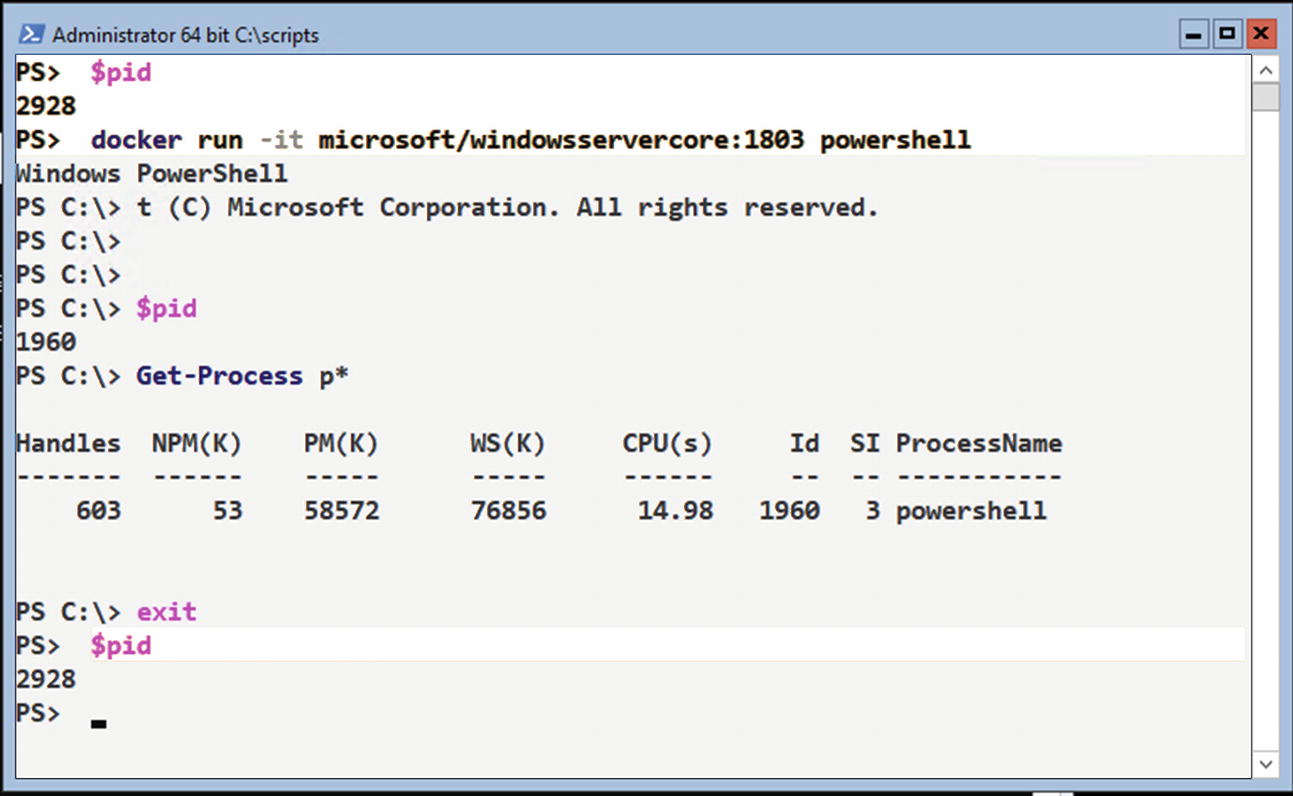
Running a container interactively

A new PowerShell session is generated within the container, and your current session is connected to it. You’ll see the PowerShell start banner and a new (and different) prompt, as in Figure 17-5. The console overwriting itself seems to be a console artifact.

If you repeat the exercise of retrieving the PowerShell PID, you’ll get a different result—1960, in this case. You can run PowerShell commands, and they execute within the container. Getting the PowerShell process only shows the process within the container—isolated environment—though there are four instances of PowerShell running on the host at that time, including the one in the container.

You can use the exit command to close the container instance of PowerShell, which will also shut down the container. Check the PID, and you’ll see that you’re back in your original PowerShell session.

TRY IT YOURSELF

Experiment with running containers interactively. What would stop you from accessing a container interactively?

This approach works when you want to work interactively with a container, but what about a situation in which you have multiple containers on a host? You must be able to pick and choose which containers to work with, meaning you must be able to identify your containers.

Container Identification

There are three ways you can identify a container using Docker:
  • Short (truncated) ID

  • Full ID

  • Name

Many Docker commands use the short ID. It’s what’s displayed by Docker.
PS>  docker ps --format "{{.ID}} {{.Names}}"
6e788f4d6876 IIS2
If you need the full ID, use
PS>  docker ps --format "{{.ID}} {{.Names}}" --no-trunc
6e788f4d68764c03b25827ff550bd67dc5a94bb00cd3c7455a4fb119f6ff9118 IIS2

The short ID is the first 12 characters of the full ID.

You can use the name parameter to give the container a meaningful name, rather than the random (and sometimes rather silly) name that Docker generates.
PS>  docker run -d  microsoft/iis:windowsservercore-1803
661d48c6acd417ed89af8ee11f394a0ed99f5a771cb907e5143aca128aef8016
PS>  docker run -d --name IIStest microsoft/iis:windowsservercore-1803
31278e91cdc05901d3ada053d74be868ddfb1df742af0dbf7ad6be9b0816053e
PS>  docker ps --format "{{.ID}} {{.Names}}"
661d48c6acd4 inspiring_hoover
31278e91cdc0 IIStest

It’s worth assigning names to your containers, even though some Docker commands expect to work with IDs (usually the short ID), rather than container names. Container names must be unique.

TRY IT YOURSELF

Identify the containers on your machine. Which containers are stopped and which are running?

The commands you’ve seen so far have been to create and immediately run a container. You have the option of creating the container and running it as two separate actions.

Pre-creating Containers

The docker run command is used to create and run a container. If your container may be stopped and started a number of times, you’d be better off by pre-creating the container.
PS>  docker create  --name IIStestC  microsoft/iis:windowsservercore-1803
88e5a2a9a3ac358fcb6c0d1583b46c7f92cd67fc22dab0a102bde28325738f6a
PS>  docker ps -a --format "table {{.ID}} {{.Names}} {{.Status}}"
CONTAINER ID        NAMES               STATUS
88e5a2a9a3ac        IIStestC            Created
661d48c6acd4        inspiring_hoover    Up 45 minutes
31278e91cdc0        IIStest             Up 45 minutes

In this example, you’re creating another instance of the IIS container but not starting it. The docker ps command uses the table option to display a header for each column. The columns are spaces using tabs ( ). Note that the long ID is supplied when the container is created, but the short ID is usually used in subsequent commands.

The newly created container can be started.
PS>  docker start 88e5a2a9a3ac
88e5a2a9a3ac
PS>  docker ps -a --format "table {{.ID}} {{.Names}} {{.Status}}"
CONTAINER ID        NAMES               STATUS
88e5a2a9a3ac        IIStestC            Up About a minute
661d48c6acd4        inspiring_hoover    Up About an hour
31278e91cdc0        IIStest             Up About an hour

TRY IT YOURSELF

Pre-create a container and then start it.

You now have three instances of your container running. The next step is to stop the containers or remove them from the host.

Stopping and Removing Containers

You can stop an individual container.
PS>  docker stop 88e5a2a9a3ac
88e5a2a9a3ac
If you need to stop all running containers, use the following:
PS>  docker stop $(docker ps -q)
661d48c6acd4
31278e91cdc0

This is the type of scenario in which PowerShell, with its ability to filter and pipe objects, would be of real benefit. Use the Docker commands you need, to quietly get the running containers to use as the input to docker stop.

Once you’ve stopped the containers, you can remove them.

Note

Attempting to remove a running container will generate an error.

Removing a single container relies on the container ID or name.
PS>  docker rm IIStestC
IIStestC
You can also clean up all containers.
PS>  docker rm $(docker ps -a -q)
661d48c6acd4
31278e91cdc0

You need the -a parameter on docker ps, to view non-running containers.

TRY IT YOURSELF

Stop the running containers on your system. Remove all existing containers on your system.

You’ve installed the container feature, downloaded container images, and created containers from those images. At some stage, you’ll have to modify a container image and roll that changed image into production.

Modifying and Using Container Images

Containers are very lightweight objects and, therefore, easy to move around your environment. They are a great component to include in your DevOps procedures. In earlier sessions, you’ve seen containers running IIS. Modifying the web site is a common occurrence in application development.

The process we’re going to follow is
  • Create an IIS container on a development machine.

  • Modify the web site.

  • Create a container image from the modified container.

  • Move the new image to our production system.

  • Create a container in production from the new image.

The first step is to create the container.

Create Development Container

You can use a Windows 10 system as your development machine (using Hyper-V isolation to run your containers) or a Windows Server instance. We’ll use microsoft/iis image as our starting point. The first step is to create a container.
PS>  docker run --name IISdev -d -p 80:80 microsoft/iis:windowsservercore-1803
b2585f81aa6e8585ac9f16df13605eaf6046477c55655543efb0d0c5152c5480

Ensure that you can connect to the web site.

Note

In reality, at this stage, you’d complete a test sequence on your web site or application.

Now that you have a working container, it’s time to modify the web site.

Modify Web Site

As a quick change to your web site (we’re just demonstrating concepts), modify the iisstart.png file (the default web site start page) to look like Figure 17-6.
../images/470351_1_En_17_Chapter/470351_1_En_17_Fig6_HTML.jpg
Figure 17-6

New iisstart.png file

Copy the replacement iisstart.png file into the container, using a PowerShell remoting session.
PS>  $sc = New-PSSession -ContainerId ` b2585f81aa6e8585ac9f16df13605eaf6046477c55655543efb0d0c5152c5480 `
-RunAsAdministrator
PS>  Copy-Item -Path C:Sourceiisstart.png `
-Destination c:inetpubwwwroot -ToSession $sc -Force
PS>  Remove-PSSession $sc
Create a remoting session to the container, copy the file, and then remove the session. You’ll have to restart IIS in the container, so the new file is used.
PS>  docker restart IISdev
IISdev
Connect to the container’s web site, and you should see the changed page, as shown in Figure 17-7.
../images/470351_1_En_17_Chapter/470351_1_En_17_Fig7_HTML.jpg
Figure 17-7

Changed web site running in container

The change in file survives stopping and starting the container. After the web site changes have been tested, it’s time to move the change into production.

Create Container Image

Changes to containers are propagated through the organization by the use of container images. You’ve already seen a number of container images in use that you downloaded from the Docker Hub. In this section, you’ll create an image from the IISdev container you used in the previous section.

Note

Windows doesn’t support the commit of a running container. If you try, you’ll get an error message!

You must to stop the container before creating an image.
PS>  docker stop IISdev
IISdev
Create the image.
PS>  docker commit IISdev prohyperv/iis:version1
sha256:c1f924e4e43435546f7e0c443d9425d71929ff0037062b3c84fbc47a5b10b0bd
Then check the images.
PS>  docker images
REPOSITORY            TAG            IMAGE ID      CREATED        SIZE
prohyperv/iis         version1       c1f924e4e434  6 minutes ago  5.16GB
microsoft/iis         win..ore-1803  248afbbe0fd1  4 weeks ago    4.98GB
microsoft/win..ore    1803           fc9cd8b52f1a  4 weeks ago    4.76GB
microsoft/nanoserver  1803           3ba4e30fed90  4 weeks ago    337MB

Note

Windowsservercore is abbreviated to win..ore, to make the text fit the page.

One last step is required. You have to export the image, so that it can be copied to other machines.
PS>  docker save prohyperv/iis:version1 --output c:sourceprohyperv_iis_version1.tar

You can then copy the image to one or more production hosts. One of the easiest ways to perform the copy is to use a PowerShell remoting session, as you’ve seen earlier.

Once your container image has been copied, you can use it to create new containers.

Using the New Container Image

Before you can use the new image, you must import the image.
PS>  docker load --input c:sourceprohyperv_iis_version1.tar
b88f82691d05: Loading layer [==================================================>]  184.4MB/184.4MB
Loaded image: prohyperv/iis:version1
Once the image is imported, you can create containers. Create a container from the original IIS image and the new one.
PS>  docker run --name IIS1 -d -p 80:80 microsoft/iis:windowsservercore-1803
8b18255fc3150068a25e999e3a29c284348d2dc7d8a0cb1a886574e690b88592
PS>  docker run --name IIS2 -d -p 81:80 prohyperv/iis:version1
f455230201acd26a3153d191c9bda8bcc0265ccb577224acc4dfce230a564ac1
The container using the original image is mapped to external port 80, and the container from the new image is mapped using port 81. This means that you can view both the original web site and the new web site, as shown in Figure 17-8.
../images/470351_1_En_17_Chapter/470351_1_En_17_Fig8_HTML.jpg
Figure 17-8

Original and new versions of the web site

The ability to modify running containers and create an image from that container that can be exported to other machines gives you a very fast, safe way to deploy applications in your environment. If your organization is embracing the DevOps principles, you’ll find that containers can play a significant role in your application deployment strategies.

TRY IT YOURSELF

Follow the steps in this section to modify a container, create a new image, copy the image to a new machine, and create a container from the new image.

The steps involved in modifying a container and creating an image that can be used throughout the organization are manually intensive. The container images can be several gigabytes in size, leading to slow copy times. It would be useful if there were a way to automate the production of new images and reduce the size of data that had to be copied around the environment.

Automating Image Creation

The tasks you used in the previous section involved a lot of manual effort. You can use Docker files to automate the image creation process, including
  • Effectively storing images as code

  • Easily and accurately creating and re-creating container images

  • Enabling continuous integration between container images and the development cycle

A Docker file is a text file that contains the instructions to create a new container image—using an existing base image—the commands to be run when the image is created, and the commands to be run when containers are created from the image. The Microsoft documentation for Docker files is located at https://docs.microsoft.com/en-us/virtualization/windowscontainers/manage-docker/manage-windows-dockerfile .

As an example, let’s rework the modification of the web site that was performed manually in the previous section.

First, we must create a new IIS start image (Figure 17-9).
../images/470351_1_En_17_Chapter/470351_1_En_17_Fig9_HTML.jpg
Figure 17-9

New start image for use with Docker file

In this version, we’ve added the fact that we’re using a Docker file to make the differences obvious. The next task is to create a Docker file. Visual Studio Code (the recommended editor for PowerShell v6 and later versions— https://code.visualstudio.com/ ) works with PowerShell and many other languages, including Docker files.

The Docker file looks like this:
## docker file to change IIS start page
##
##  base image
FROM microsoft/iis:windowsservercore-1803
COPY iisstart.png C:/inetpub/wwwroot

The FROM directive instructs Docker to use the microsoft/iis:windowsservercore-1803 image as the basis of the build. The COPY command instructs the build process to copy the new version of iisstart.png into the image.

Many other tasks can be accomplished using Docker files. The Docker file reference can be found at https://docs.docker.com/engine/reference/builder/#usage .

VSCode automatically adds a .dockerfile extension to the file when you save it. The file is used to build the new image.
PS>  docker build -f IIS2.dockerfile -t prohyperv/iis:version2.
Sending build context to Docker daemon  107.5kB
Step 1/2 : FROM  microsoft/iis:windowsservercore-1803
 ---> 248afbbe0fd1
Step 2/2 : COPY iisstart.png C:/inetpub/wwwroot
 ---> 1cb8593fb79f
Successfully built 1cb8593fb79f
Successfully tagged prohyperv/iis:version2

In this case, you’re using a Docker file IIS2.dockerfile to build a new image called prohyperv/iis:version2. The dot at the end of the command line instructs Docker that all of the required files are in the current directory. It’s recommended that you keep the Docker file and other required files together, for simplicity.

The build process is verbose, so you can see what happens. It’s also quick. We recommend that you view the images as a check. The last test is to create a container from the new image.
PS>  docker run --name IIS3 -d -p 82:80 prohyperv/iis:version2
e38a44d34b324e6c43c54f3d28f3fa434f6b3f5ac26d298d11ccffaed66ce3f9        
Figure 17-10 shows the latest version of the web site, with the original and the version you created in the previous section.
../images/470351_1_En_17_Chapter/470351_1_En_17_Fig10_HTML.jpg
Figure 17-10

Three generations of the containerized web site

Once you’ve tested the new web site, you can copy the Docker file and any other required files to your production machine(s). This is much less data than a full image, so it is much quicker. Re-create the image, using the same docker build command. You can then create containers from the new image.

Using Docker files is a quicker and easier way to modify your container images and get the new image into production.

TRY IT YOURSELF

Follow the steps in this section to create a new image using a Docker file. Create a container from the new image. Copy the Docker file and data to another system and re-create the image and container.

The containers you’ve been working with throughout the book use the Windows OS. You can also run containers based on Linux.

Linux Containers on Windows

The Windows 10 Fall Creators Update and Windows Server 1709 introduced the capability of running Linux containers on Windows (see https://docs.microsoft.com/en-us/virtualization/windowscontainers/deploy-containers/linux-containers ).

The posts in various online forums indicate that this is still an experimental technology. People are experiencing varying degrees of success. You should also note that the documentation is very poor at the time of writing. The tutorials are contradictory, and a number of them have broken links.

If you want to experiment with Linux containers on Windows, you’ll have to
  • Run Windows 10 Fall Creators Update or Windows Server 1709, as a minimum. We used Windows 10 1803. We recommend that you use the latest version possible of the Windows OS, as Linux containers on Windows are still an experimental feature.

  • Use the latest version of Docker—18.03 or later versions.

  • Enable experimental features. Open Docker Settings ➤ Daemon and check the Experimental features box.

  • Switch Docker to running Linux containers (see installation section earlier in this chapter) or use PS> & $env:ProgramFilesDockerDockerdockercli.exe -SwitchDaemon.

  • Have Hyper-V installed. You’ll be running the containers in Hyper-V isolation mode. If you check Hyper-V Manager, you’ll find that a VM called MobyLinuxVM is running. It’s used to support the containers.

There are some Linux-based containers available from Microsoft on the Docker Hub. You should be able to use mcr.microsoft.com/powershell or microsoft/mssql-server-linux. You can pull the container image as normal (see Figure 17-11).
PS>  docker pull mcr.microsoft.com/powershell
../images/470351_1_En_17_Chapter/470351_1_En_17_Fig11_HTML.jpg
Figure 17-11

Downloading a Linux container to Windows

Check the image.
PS> docker images
REPOSITORY                     TAG                 IMAGE ID            CREATED                    SIZE
mcr.microsoft.com/powershell   latest              b761a4b9aa92
            6 days ago                 320MB
Note the size of the image. Let’s create an interactive container from the image.
PS> docker run --name PSTest -it mcr.microsoft.com/powershell pwsh
PowerShell v6.0.3
Copyright (c) Microsoft Corporation. All rights reserved.
https://aka.ms/pscore6-docs
Type 'help' to get help.

You’re running the latest version of PowerShell 6.0 in a Linux container on Windows 10!

Note

If you start a Linux container, then switch back to Windows containers, your Linux container will continue to run but you won’t be able to manage it until you switch back to Linux containers. The same is true for running Windows containers, if you switch to Linux containers. You can run Linux and Windows containers side by side, but you can only manage one or the other at a time, if you use the switching mechanism. See later in the section for an alternative approach.

View the PowerShell version information.
PS /> $PSVersionTable
Name                           Value
----                           -----
PSVersion                      6.0.3
PSEdition                      Core
GitCommitId                    v6.0.3
OS                             Linux 4.9.93-linuxkit-aufs #1 SMP Wed Jun 6 16:55:56 UTC 2018
Platform                       Unix
PSCompatibleVersions           {1.0, 2.0, 3.0, 4.0...}
PSRemotingProtocolVersion      2.3
SerializationVersion           1.1.0.1
WSManStackVersion              3.0
Check the Linux information.
PS /> uname -a
Linux 2054dae884f4 4.9.93-linuxkit-aufs #1 SMP Wed Jun 6 16:55:56 UTC 2018 x86_64 x86_64 x86_64 GNU/Linux
One last point with the Linux container: you can install other Linux functionality into the container.
PS /> apt-get install net-tools
PS /> ifconfig
eth0      Link encap:Ethernet  HWaddr 02:42:ac:11:00:02
          inet addr:172.17.0.2  Bcast:172.17.255.255  Mask:255.255.0.0
          UP BROADCAST RUNNING MULTICAST  MTU:1500  Metric:1
          RX packets:20256 errors:0 dropped:0 overruns:0 frame:0
          TX packets:10389 errors:0 dropped:0 overruns:0 carrier:0
          collisions:0 txqueuelen:0
          RX bytes:26717565 (26.7 MB)  TX bytes:571826 (571.8 KB)
lo        Link encap:Local Loopback
          inet addr:127.0.0.1  Mask:255.0.0.0
          UP LOOPBACK RUNNING  MTU:65536  Metric:1
          RX packets:0 errors:0 dropped:0 overruns:0 frame:0
          TX packets:0 errors:0 dropped:0 overruns:0 carrier:0
          collisions:0 txqueuelen:1
          RX bytes:0 (0.0 B)  TX bytes:0 (0.0 B)

Once the container is shut down, you’ll lose these changes, so remember to create an image from the container, so that you can still access the tools you’ve downloaded.

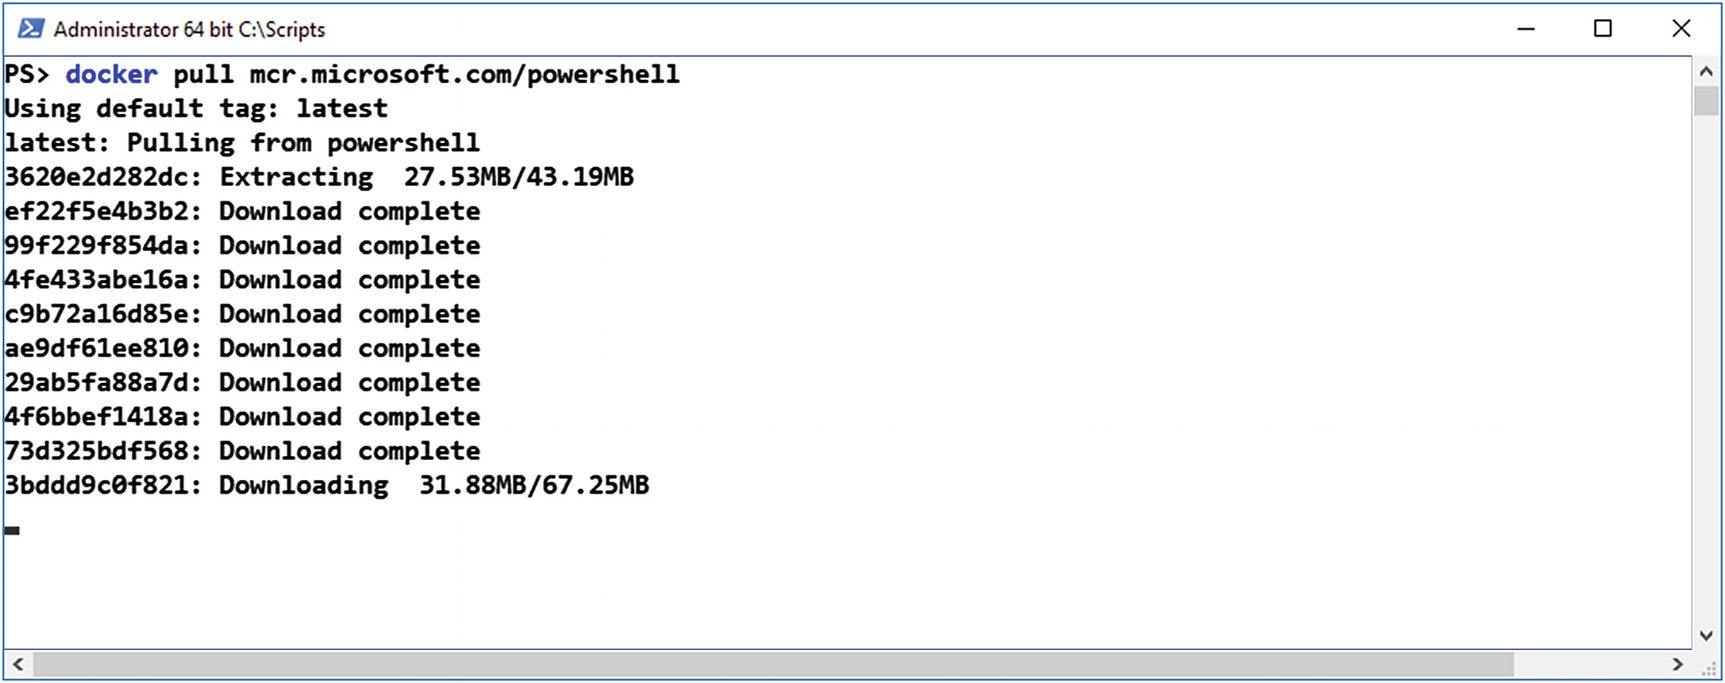
If you want to experiment with the latest PowerShell preview versions, or with other Linux distributions, you’ll find them available as containers at https://hub.docker.com/r/microsoft/powershell/ .

We stated earlier that the switching mechanism allows you to manage Windows or Linux containers but not both simultaneously. The latest versions of Docker for Windows enable you to run and manage both Windows and Linux containers simultaneously, without using the switching mechanism. You set Docker for Windows to run Windows containers and then start Linux containers, using the platform parameter.
PS> docker run –platform=linux --name PSTest -it mcr.microsoft.com/powershell pwsh

You’ll also have to use the platform parameter when pulling the container image from Docker Hub.

To run containers in this manner, you’ll have to use Docker 18.03-ce-win59 as a minimum version and have the experimental features enabled.

TRY IT YOURSELF

Experiment with Linux containers on your Windows system. Can you find other Linux-based containers that will run on Windows?

Our recommendation, for now, is to experiment, if this is a feature you require, but be very aware that it’s a rapidly changing technology. Keep a close watch on future Windows and Docker releases, for further advances and enhancements.

Recommendations

We currently make the following recommendations regarding the use of containers:
  • Use containers, where appropriate. They’re not suitable for all scenarios but do provide a valuable option for virtualizing applications.

  • Pick a version of Windows Server and stick with it, but be aware that the SAC releases only have an 18-month life cycle. If you do decide to upgrade, remember that your existing containers can be run on newer versions of the OS, using Hyper-V isolation. You can upgrade the hosts and containers as a two-step process.

  • We recommend Windows Server 1803, as a minimum, for your container host, because it has the latest enhancements to run containers on Windows.

  • Use Docker files for building images. They are much smaller and quicker to move between machines than full images.

  • Learn Docker syntax. PowerShell is the automation tool of choice, but there isn’t a module for managing containers. Wrapping Docker commands in PowerShell functions could be a viable alternative, if you’re going to be heavily invested in using containers.

Before the chapter closes, we’d like to offer you a few ideas for some next steps in learning about containers.

Next Steps

We haven’t space in this book to cover all aspects of containers. It’s a rapidly changing field, and you’ll have to keep checking the links in this chapter for changes. As next steps, we recommend that you investigate which applications in your organization would benefit from using containers. Remember that big-bang projects generally fail, so plan a gradual introduction.

In this chapter, we’ve shown you how to perform manual actions to manage your container environment. When you get to the point of having a large number of containers, you should start to think about orchestration.

An orchestrator is used to perform a number of tasks, including scheduling, health monitoring, failover, scaling, networking, and application upgrades. There are two orchestrators you should investigate first.

The first is Docker Swarm, which provides orchestration capabilities, native clustering of Docker hosts, and scheduling of container workloads. An introduction is available at https://docs.microsoft.com/en-us/virtualization/windowscontainers/manage-containers/swarm-mode . It has the advantage of being from Docker and has been the leading orchestrator.

Kubernetes can be used with Windows Server 1709 and later versions. Kubernetes is used to manage containerized workloads and services, including declarative configuration, load balancing, and automation. Kubernetes has taken over from Docker Swarm as the de facto orchestrator https://docs.microsoft.com/en-us/virtualization/windowscontainers/kubernetes/getting-started-kubernetes-windows and https://kubernetes.io/docs/home/?path=users&persona=app-developer&level=foundational .

One drawback to both orchestrators is that they use a Linux system as the control server.

Lab Work

This has been a very long chapter. Rather than supply specific exercises, we recommend that you complete all of the Try It Yourself sections. The preceding “Next Steps” section provides some ideas for further investigation of containers.

..................Content has been hidden....................

You can't read the all page of ebook, please click here login for view all page.
Reset
3.128.204.140