In previous chapters, you’ve learned to use Hyper-V Manager and PowerShell to create and modify virtual machines (VMs). VMs can be considered to be a collection of files, at their most basic level. There are some management and operational tasks around the VM files that you need to be aware of and consider when managing Hyper-V environments. These tasks include locating and managing the underlying VM files, determining their default locations, and extending virtual hard disks. This is what you’ll learn in this chapter.
In This Chapter and Beyond
You have a strong foundation now in creating and managing VMs. In this chapter, we’ll cover moving VM files manually and how to modify a virtual hard disk. While not common, these actions usually have to be done in a time-sensitive-manner, as projects are often dependent on these types of changes.
The task of extending the size of a virtual hard disk is a very common one that you’ll be expected to perform if you are responsible for managing a Hyper-V solution. Additionally, you can’t modify these underlying VM files if you don’t know where to locate them. We’ll start this chapter by locating the VM files in their folder structure, and then we’ll make some modifications to them. Overall, this will round out your administration skills when it comes to working with VMs.
By the end of this chapter, you’ll have a firm understanding of how to work with VM objects in a Hyper-V environment, including the setup of new VMs and the modification of existing VMs and their components. Subsequent chapters will look at Hyper-V checkpoints and then focus on the configuration of resources and settings on the host.
File Types and Their Default Locations
List of Hyper-V Default File Locations
File Type | Purpose | Default Location |
|---|---|---|
VM Config File (XML) VMCX in 2016 and later versions | Holds the master configuration for a VM | C:ProgramDataMicrosoftWindowsHyper-VVirtual Machines |
BIN File | Save State location for Virtual Machine Memory | C:ProgramDataMicrosoftWindowsHyper-VVirtual Machines{UUID} |
VSV File | Save State Device Information Storage | C:ProgramDataMicrosoftWindowsHyper-VVirtual Machines{UUID} |
VHD/VHDX | Primary Storage for a VM | C:UsersPublicDocumentsHyper-VVirtual Hard Disks |
AVHD/AVHDX | Checkpoint File | Same Location as Parent VHD/VHDX files |
Table 6-1 lists the default locations. If you’re looking at an already established environment, other locations may have been used. So, how do we verify whether the files in your environment are stored at the default paths or not? Well, that is going to be next on the agenda.
It’s important to know how to discover VM file locations, especially when troubleshooting. Many of the common problems in configuring and operating a Hyper-V environment are related to folder paths and permissions issues. Symptoms of this could be a VM that doesn’t start or a VM that can’t see the secondary hard drive you’ve configured. Troubleshooting that type of issue requires you to know how to locate the files.
The two best tools to verify VM file locations are Hyper-V Manager and PowerShell. In Hyper-V Manager, you can leverage the VM settings and host settings sections. Keep in mind that this is the default location. Someone could have saved an individual VM in a different location during creation or moved the relevant files at a later time. You’ll have to look at the relevant paths inside each individual VM’s configuration for confirmation. PowerShell is a bit quicker, but you must know the syntax going in. Let’s try using both methods, first starting with Hyper-V Manager.
Locating Virtual Machine Files Using Hyper-V Manager

Default VHD/VHDX storage path located in Hyper-V Manager
- 4.
Take note of the default folder location for virtual hard disks.
- 5.
In the Hyper-V Settings UI, click Virtual Machines in the left-hand pane.
- 6.
Take note of the default location for Virtual Machines.
- 7.
Close the Hyper-V Settings UI.
- 8.
Open the Virtual Machines Settings UI for one of the two VMs that we’ve created thus far.
- 9.
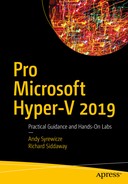
Select the virtual hard disk associated with the target VM in the left-hand pane. It will look very similar to Figure 6-2.
Virtual hard disk location for an individual VM
- 10.
Take note of the virtual hard disk location shown in the right-hand pane. Is it located in the same path as the default location recorded earlier?
- 11.
Click Checkpoint File Location in the left-hand pane.
- 12.
Take note of the defined location for checkpoints.
- 13.
Do the same for the Smart Paging File Location, also located in the left-hand pane.
- 14.
Close the Virtual Machine Settings UI.
TRY IT YOURSELF—VIEW VM FILE LOCATIONS
Confirm the locations of the VMs in your test lab using Hyper-V Manager.
When using the Hyper-V Manager UI for this task, there are several areas that you must view, to verify you’re looking in the correct location. You start with the host-level defaults for the whole system, but because the paths are changeable at the time of VM creation, you have to verify the paths on a per-VM basis as well. There is a quicker way to gather this information, using PowerShell, which we’ll get to in a second, but first, we must discuss the Smart Paging File.
Smart Paging File
If you’ve been paying attention, you likely saw the Smart Paging File section and said, “Hey, we haven’t discussed this yet.” You’re correct. We haven’t, and the main reason is that if all is going well, you shouldn’t have reason to even think of the Smart Paging File. Its sole purpose is in situations in which a host is having resource contention issues. Imagine a scenario in which you have Dynamic Memory enabled on a VM. For example, the VM has a startup memory value of 2048MB and a minimum memory value of 512MB. Then, let’s assume that the VM is operating at about the minimum value of 512MB of memory. If a reboot of the VM is needed, 2048MB of memory will be required to start the VM. What happens if the host doesn’t have that much to spare?
This is where the Smart Paging File comes into play. The Hyper-V host will use the Smart Paging File as a temporary location for memory storage. This will allow the VM to boot. Then, over a short period of time, usually not lasting longer than five or ten minutes, the memory usage of the VM should drop back down to the lower amount, as the startup processes finish, and the Smart Paging File will be removed and purged.
Really, you shouldn’t be running that tight on memory. You always want to leave, at a minimum, 20% to 30% for spare resources, as it takes time to order and install hardware, if you need to scale up the host. Also, in the event you have to use the Smart Paging File, Microsoft has provided the ability to manually define its location. This allows you to choose a storage location that is seeing little or no traffic for increased performance. Again, the best course of action is to avoid the need for the feature, but you should know it’s there, if needed.
Locating Virtual Machine Files Using PowerShell
- 1.
Open PowerShell as an administrator on your Hyper-V host. If this is Windows Server Core box, simply type PowerShell and press Enter.
- 2.TypeGet-VMHost | Select VirtualHardDiskPath,VirtualMachinePath
and press Enter to return the default storage paths for the selected host.
Note
If you’re working interactively, you can use PowerShell’s ability to understand wildcards to use Get-VMHost | select *path, instead of typing full property names. If you’re using a script, you should always use the full property names, for ease of understanding and maintenance.
- 3.
Type Get-VM and press Enter to return a list of VMs being hosted by the Hyper-V host.
- 4.Run Get-VM |Select Name, ConfigurationLocation,SnapshotFileLocation,SmartPagingFilePath
- 5.
Press Enter to return the location of VM configurations and Snapshot and Smart Paging File paths.
Note
If the output from the previous command is too wide for your console, you could change the code to Get-VM | select Name, ConfigurationLocation,SnapshotFileLocation,SmartPagingFilePath | Format-List, which will present the output in a list format rather than a table.
- 6.On the same Hyper-V host, typeGet-VM | Get-VMHardDiskDrive | Select VMName,Path
- 7.
Press Enter to return the location of any virtual hard disks associated with the VM.
- 8.
Take note of the existing paths, as you’ll be using this information shortly.
PowerShell enables you to find the information much quicker than looking through multiple locations in the UI. When troubleshooting an issue with paths or permissions, if you’re not sure where a VM is stored, this will be one of the first steps you take in troubleshooting the issue. Remember: The most likely scenarios will be a VM that can’t boot, or one that is complaining about not being able to read all of its virtual hard disks. The preceding method will allow you to verify this information quickly, so you can start the troubleshooting process.
TRY IT YOURSELF—VIEW VM FILE LOCATIONS
Confirm the locations of the VMs in your test lab, using PowerShell.
Simply gathering this information isn’t the only thing we can do here. We can also change the default locations for these files at the host level, as discussed in Chapter 2. The main reason you would change this from the default is that you have storage set aside specifically for VMs. This could be a secondary volume on the host or network storage. Changing the VM default storage path can be performed with either the Hyper-V Settings UI or the Set-VM Host cmdlet in PowerShell.
Moving Virtual Machine Files
Now that you know how to locate the various files associated with a VM, what types of things can we do with them? Well, generally, you’re going to be leaving them alone. One of the rare cases where you may actually have to do something with these files is when you must move them.
Some of these files can be moved manually, but it’s best not to move things manually, as breakage can occur, unless you know exactly what you’re doing. VM config, BIN, VSV, and Smart Paging Files should not be moved manually, and in most cases, you will not be allowed to move them, owing to the files being in use. It’s best to let the management utilities do the moving for you, as it is much less error-prone. We’ll be talking more about VM migration between locations and between Hyper-V hosts in a later chapter. Moving VM files other than the VHDs will be covered in that chapter.
Moving the virtual hard disks associated with a VM is possible to do manually. There are storage migration functions built into Hyper-V, but if you want to copy a VM’s virtual hard disk somewhere else, you would create a new blank VM, and instead of configuring a new virtual hard disk during provisioning, you would attach an existing disk and point it at the newly copied VHD/VHDX file. This is useful in many situations, for example, you could make a copy of a VHD for testing purposes, or you could attach a problematic OS disk to another VM, for troubleshooting.
Virtual Machine Configuration File
We would say a VM’s VHD and VHDX files rank number one in importance, with the VM config file being a close second. The virtual hard disks are responsible for holding data, while the configuration file tells Hyper-V how a VM is pieced together, for example, how much memory it’s supposed to have, how many vCPUs should be assigned, and the locations of virtual hard disks.
Caution
Anytime you are making changes, or even viewing a VM configuration file, you should proceed with the utmost caution.
Many an administrator has found VMs unstartable, after making some unintended modification to the configuration of a VM. In some cases, the fix may be relatively easy to identify; other times, an entirely new blank VM will have to be created, with the older virtual disk attached. So, again, caution is heavily advised when working with VM config files.
The VM configuration file is an XML file, so any text editor supporting XML can be used to view and modify it (with caution!). You may have to make a copy of the configuration file to another location, owing to the file being in use by the hypervisor. Just keep this in mind moving forward.
Note
In Windows Server 2016 and later versions, the VM configuration file will no longer be in XML format. The new file format will be a binary format that will require you to use PowerShell to perform modifications.
- 1.
Take the VM you selected earlier and review the path information.
- 2.
Using File Explorer, navigate to the VM path.
- 3.
Once in that directory, copy the XML file that is named with the corresponding GUID of the target virtual machine.
Note
Just a reminder from Chapter 3. You can find the GUID of the target VM by running Get-VM "<VM NAME HERE>" | select Name, Id.
- 4.
Paste the XML file on a machine with an XML-friendly text editor, such as WordPad, and open it.
- 5.
Review the file and take note of the XML attributes and elements. You will notice that many of these correspond with the settings contained within the Virtual Machine Settings UI in Hyper-V Manager.
- 6.
Close the file and save it in a safe location for now.
TRY IT YOURSELF—VIEW VM CONFIG FILE
View the contents of the configuration files for the VMs on your system.
In Windows Server 2016 and later versions, you must use PowerShell to retrieve the configuration information.
Note
As a best practice, PowerShell scripts should output objects. We know that the following script breaks that rule. It’s a deliberate decision, as the script is meant as a demonstration of the various cmdlets and as a report on the configuration of a VM. We cite Get-ComputerInfo in PowerShell v5.1 and later versions as an example. If it’s good enough for the PowerShell team, it’s good enough for us.
The script works through the settings you’ll see in the Hyper-V Manager settings dialog for a VM and displays the relevant information. You could use a script such as this to find all of the required information or use just the individual cmdlets, to get specific information for one or all cmdlets.
TRY IT YOURSELF—VIEW VM CONFIGURATION WITH POWERSHELL
View the configuration of a VM using the PowerShell cmdlets.
The virtual disks you have attached to the VM are probably its most important components.
Virtual Hard Disks—VHDs and VHDXs
The last file types that we’re going to discuss are the virtual hard disk file formats. Pre-Windows Server 2012, we had the VHD file format, which had a number of limitations, such as a 2TB maximum file size and slow operational times when provisioning fixed type VHDs.
In Windows Server 2012, Microsoft introduced the VHDX file format, which enables a maximum file size of 64TB. It also provides advanced functionality, such as data corruption prevention and better alignment of block storage on large sector disks. This file format is the default virtual hard disk format on Windows Server 2012 R2 hosts and later versions. You can select the older VHD type during virtual hard disk creation. When in doubt, use VHDX.
Note
The only time you should be using the older VHD file format is in situations in which you have a Windows Server 2008 R2 host that might have to host the VM, or if you ever intend on moving the VM into Microsoft’s pre-ARM (Azure Resource Manager) Azure public cloud service, as the older Azure portal does not utilize the new VHDX file format.
Converting Virtual Hard Disks
In most cases, you’ll build your virtual hard disk, defined as either VHD or VHDX, attach it, and you’ll be done. You’ll likely never give it a second thought, unless you’re extending the disk. However, there may be times when you have to modify the disk files. For example, you may have a VHD file that requires the benefits that the VHDX file format provides. Then, on the other hand, you may have a VHDX file that must be attached to a VM running on an older Windows Server 2008 R2 Hyper-V host during a migration or cutover. Is it possible to change the type after creation? The answer is yes, and it’s what we’ll be doing in our next Try It Yourself.
Note
In the following exercise, we’ll walk you through the creation of two small 2GB virtual hard disks. These virtual hard disks are not connected to any virtual machine. They are simply there for you to practice on.
- 1.
Open PowerShell as an administrator on your Hyper-V host.
- 2.
Type: New-VHD –Path C:TestConversionTest.vhdx –SizeBytes 2GB and press Enter, to create a 2GB virtual hard disk at the root of C:.
- 3.
Type dir C:Test and press Enter to verify the file’s existence and file extension.
- 4.
Type Convert-VHD –Path C:TestConversionTest.vhdx –DestinationPath C: TestConversionTest.vhd –DeleteSource and press Enter, to create a new VHD file. Copy the contents of the VHDX and delete the source file, once completed.
- 5.
Open Hyper-V Manager and select the same Hyper-V host in the left-hand pane and click Edit Disk in the right-hand pane.
- 6.
Click Next at the opening screen of the wizard and then browse to the ConversionTest.vhd, located at the root of C:Test on the host, and click Next.
- 7.
Select the “Convert” radio button and then click Next.
- 8.
Select disk format VHDX and click Next.
- 9.
On the disk type screen, keep the default of Dynamically Expanding and click Next.
- 10.
Select C:TestConversionTest.vhdx as the destination path and click Next and then Finish.
- 11.
Verify the existence of the file and then run Get-ChildItem C:TestConversion* | Remove-Item.
TRY IT YOURSELF
Create a new virtual hard disk in VHDX format and convert it to VHD and back to VHDX.
Converting the file after creation is quite simple in both Hyper-V Manager and PowerShell. If you don’t specify the –DeleteSource parameter, the old file will still be present. Microsoft will always err on the side of caution to make sure the source file is still there, if needed. However, you need twice the amount of space to convert a virtual disk. For example, if you have a 200GB VHD file and you want to convert it to a VHDX, you need 400GB of hard disk space available—200GB for the source file, and 200GB for the new virtual hard disk.
Virtual Hard Disk Types
VHD and VHDX are the file formats associated with virtual hard disks. There are a number of types of virtual hard disks, with different functions and use cases. Each type consumes physical hard disk space differently, and without knowing how the virtual disk is meant to work, you could wind up running out of storage.
In Windows Server 2012 R2 and later versions, the default is dynamically expanding disks, which is perfect for the vast majority of use cases, but let’s review the other options briefly.
Fixed Disk
A fixed disk is the easiest to understand, because it has a 1:1 ratio of physical to virtual storage. If you provision a 200GB fixed VHDX, 200GB of disk space will instantly be consumed on the physical storage. This is the safest way to provision virtual storage, because all space is accounted for, and it’s impossible to provision more storage than is available. However, you’ll have a lot of wasted space, as most VMs do not consume all of the disk space available to them. This is where dynamically expanding disks come into play.
Dynamically Expanding Disks
Dynamically expanding VHDs and VHDX files are very similar to fixed disks but consume physical disk space differently. A fixed disk will consume the full amount immediately, but dynamically expanding disks will only consume physical disk space as required, providing a more efficient use of physical disk space.
Note
Dynamically expanding disks are also referred to as thin-provisioned disks. If you’re using a SAN for your underlying storage, you may find that the disk space is also thin-provisioned. A scenario with thin-provisioned storage supporting thin-provisioned virtual disks means that you must monitor your storage very carefully, to ensure you don’t run out of disk space.
Using dynamically expanding disks, you could provision more disk space than you actually have. For example, let’s say your Hyper-V host has a maximum of 100GB for VM storage. If you provision two VMs with a 100GB VHD each, and the guest OSs inside those VMs grows to 50GB each, your VMs will stop functioning. Even though the guest OSs inside the VMs think they have 100GB of total space, once the host is out of disk space, there is no way for the guest VMs to consume any more.
When using dynamically expanding disks, you must keep track of total storage consumption, so you don’t run into this situation. Additionally, there is a slight disk performance overhead for running in this mode, as additional disk writes have to be performed to increase the VHD/VHDX size before the data payload can be committed to disk.
Note
When creating a new VM using Hyper-V Manager, the default virtual disk type is dynamically expanding. If you want to create a fixed or differencing disk, you will have to create the disk manually first and then attach it to the target VM.
Differencing Disks
You won’t run into this type of disk very often, as it is primarily utilized for virtual desktop infrastructure (VDI) workloads or testing and experimental environments. Picture the following situation. You have ten Windows 10 virtual machines. Each virtual machine has a portion of disk space that is identical between all ten, so you are storing ten copies of the same OS information. This is very wasteful on disk space.
Differencing disks allow you to define a master VHD file that contains the vast majority of the static (common) data (the Windows 10 OS, in this case). A differencing disk is created for each VM that keeps track of the data that is different between instances. This reduces the amount of disk space required in VDI deployments significantly. Like the dynamically expanding disk type, there is a disk performance overhead associated with running differencing disks.
Extending and Shrinking Virtual Hard Disks
Another common operation when working with VHDs and VHDXs is the need to extend them as workload sizes increase. Conversely, you may have to shrink a virtual hard disk, if you’re running out of disk space elsewhere in your environment. Growing virtual hard disks is quite straightforward. Shrinking them is another matter, as there are some limitations.
Note
Remember this when you’re sizing out a virtual machine. It’s very easy to scale up. It’s more difficult to scale down.
- 1.
Open PowerShell as an administrator on your Hyper-V host.
- 2.
Type New-VHD -Path C:TestGrowShrinkTest01.vhdx -SizeBytes 2GB and press Enter, to create a 2GB virtual hard disk.
- 3.
Type New-VHD -Path C:TestGrowShrinkTest02.vhdx -SizeBytes 2GB and press Enter, to create a 2GB virtual hard disk.
- 4.
Type dir C:Test and press Enter, to verify that both files exist.
- 5.
Type Get-VHD –Path C:TestGrowShrinkTest01.vhdx | select size and press Enter. Take note of this value.
- 6.
Type Resize-VHD –Path C:TestGrowShrinkTest01.vhdx –SizeBytes 10GB and press Enter, to increase the maximum size of the VHDX to 10GB.
- 7.
Type: Get-VHD –Path C:TestGrowShrinkTest01.vhdx | select size and press Enter. The value has changed, indicating that you’ve grown this virtual disk.
TRY IT YOURSELF
Create a test virtual hard disk and then increase its size.
Extending a disk with PowerShell is very simple. You’ve turned a 2GB hard drive into a 10GB hard drive, as far as the VM is concerned. If this were a production environment, your next step would be to log in to the disk management utility inside the guest OS and modify the file system to consume the new space.

Virtual Hard Disk Properties view
- 5.
Click Close and then Edit Disk, in the right-hand pane of Hyper-V Manager.
- 6.
Click Next and then Browse.
- 7.
Browse to C:TestGrowShrinkTest02.vhdx and click Open. Then click Next.
- 8.
Select the Expand radio button and then click Next.
- 9.
Place a 10 in the New Size field, to grow the disk to 10GB, then click Next.
- 10.
Verify the settings and then click Finish.
- 11.
Using the Inspect Disk Wizard, verify that the virtual hard disk has a 10GB maximum size.
TRY IT YOURSELF
Use Hyper-V Manager to increase the size of a virtual hard disk connected to a running VM.
In a production situation, you would log in to your guest OS and tell the filesystem to consume the additional disk space. Over time, new data would get written to the additional sections of the VHD/VHDX file.
Now let’s say that after a while, you found that you provisioned too much space. The file didn’t need to be 10GB, but 5GB. Is it possible to go back? The answer is, it depends, the reason being that the NTFS filesystem has to be shrunk first, and the amount of that shrinkage depends on the data layout on disk.
If data was written fairly deep into the newly allocated disk space, you may only be able to shrink the NTFS filesystem to 8GB, and so only shrink the size of the VHD or VHDX to 8GB as well.
ABOVE AND BEYOND
As this book focuses on Hyper-V related items, we won’t be covering the intricacies of shrinking an NTFS filesystem. But a good how-to can be found on TechNethere: https://technet.microsoft.com/en-us/library/cc772210.aspx .
It’s much easier to scale up disks than scale down, so it’s certainly worth asking yourself when growing a virtual hard disk, “Do I really need to add this much additional space?”
Note
Our recommendation is to scale up small increments, 5GB or 10GB at a time, to reduce the chances of you having to shrink a volume.
Let’s now assume that you’ve shrunk the NTFS filesystem within the guest OS on one of these two virtual hard disks you’ve created. How do we shrink the size of the VHD to reclaim physical hard disk space on the host?
This task can be performed via Hyper-V Manager or PowerShell. Let’s shrink both of our test files. First, you’ll have to write a filesystem to the virtual disk; otherwise, the shrink commands will error out, as they won’t be able to determine the minimum safe file size contained within the filesystem on the virtual disk.
- 1.
Open PowerShell as an administrator on your Hyper-V host.
- 2.
Type Mount-VHD –Path C:TestGrowShrinkTest01.vhdx and press Enter, to mount the VHD as a disk on the host OS.
- 3.
Use either Disk Management or DiskPart to create a small 4GB partition on the disk. Don’t assign a drive letter. You’ll have a 4GB partition and 6GB of unallocated space.
Caution
Make sure you’re working with the 10GB disk when working with either of these tools! Making changes to the wrong disk could damage your running host, so proceed with caution.
- 4.
Complete the previous steps for the C:TestGrowShrinkTest02.vhdx file.
- 5.
In Hyper-V Manager, select your Hyper-V host.
- 6.
Click Edit Disk in the right-hand pane.
- 7.
Browse to and select C:TestGrowShrinkTest01.vhdx and click Open, then click Next.
- 8.
Select the Compact radio button and then click Next.
- 9.
Click Finish, to compact the file to its smallest possible size.
- 10.
Using Inspect Disk Wizard, browse to and select C:GrowShrinkTest01.vhdx and take note of the new size.
- 11.
Back in PowerShell, type Resize-VHD –Path C:TestGrowShrinkTest02.vhdx -ToMinimumSize and press Enter, to shrink the virtual disk.
- 12.
Type: Get-VHD –Path C:TestGrowShrinkTest02.vhdx | Select Size, press Enter, and take note of the new size. Notice how it knew there was only a 4GB partition?
- 13.
Type Dismount-VHD –Path C:GrowShrinkTest01.vhdx and press Enter, to dismount the virtual disk from the system.
- 14.
Repeat the command with the C:GrowShrinkTest01.vhdx virtual disk.
Shrinking a disk is more complicated than expanding it. The shrinking process looked at the filesystem in the VHDX and determined that there was only a 4GB partition out of 10GB of raw space on the virtual disk. Thus, the shrink operation was able to shrink the virtual disk by 6GB. The amount you can shrink a virtual disk depends on how small you can make the NTFS filesystem.
COMPACTING VIRTUAL DISKS
The virtual disks attached to your VM, especially the system disk, will grow in time. When you first create the VM, the virtual disk may only occupy 5GB of physical disk space. As you add and remove features or software, copy files to and from the VM, and perform patching, the size can increase significantly.
You could even create a script to loop through your VMs and compact the disks on all VMs.
Alternatively, you can compact the disk through the Hyper-V Manager, as described previously.
You should now have a firm understanding of how to locate all the various pieces of a VM in the host’s storage. This should be one of the first steps in troubleshooting anything at the VM layer. Additionally, we discussed changing the virtual hard disks. Remember: This is a very common operation, and you will be doing it a lot as data sizes change inside of your organization. In the next chapter, we will spend a little more time working with VM objects. Specifically, we will be working with Hyper-V checkpoints, and then we’ll be moving onto host-specific resources.
Lab Work
- 1.
Using PowerShell, determine the location of the VM’s config file, VHD, BIN, and VSV files.
- 2.
Review the VM configuration file and take note of any configuration items that may coincide with settings from within the Virtual Machines Settings dialog.
- 3.
Using PowerShell, grow the virtual disk by 10GB; create a new 2GB partition; and then shrink the virtual disk down to its minimum size.
- 4.
Repeat the exercise using Hyper-V Manager.