CHAPTER 16
![]()
Backups and Restores Using Availability Groups
With the release of Microsoft SQL Server 2012, a whole new mechanism for ensuring continuous availability of databases in your system was introduced: AlwaysOn Availability Groups. Availability Groups provide a mechanism for failing over a database, or a group of databases, from a primary replica onto between one and four secondary replicas. This ability to keep a database online with little to no data loss and without the requirements of the old Failover Cluster shared disks and matching hardware makes for a great way to help ensure the continuity of access to data in your systems. Further, secondary replicas can be set up as read-only replicas, allowing you to offload some of the data access from your production system, hosting the primary replica, to one or more of the secondary replicas. If all this isn’t enough, you also get the ability to remove the server load required for running part of the backup process and put that into the secondary replicas as well. The ability to change where and how you back up your databases without negatively affecting your ability to recover a database is a major improvement in the capabilities available for disaster recovery, and it provides performance improvements.
This chapter provides a very basic overview of how Availability Groups are set up and configured to allow you to get your own Availability Group going. From there, we’ll explore how you can configure your Availability Group to support different mechanisms of backing up a SQL Server instance. Finally, because your backup is only as good as your last restore, we’ll cover how you can restore your databases from these backups. All this will help you provide a more versatile disaster-recovery setup in your environment. You’ll also receive some performance benefits when you remove things like backup compression overhead from your primary replica on your production servers.
One point is worth noting right away. You can’t run a FULL BACKUP on the Availability Group. You can run only log backups and a COPY_ONLY backup. You also don’t get DIFFERENTIAL backups either. So while we’ll look at saving the cost of some backup processing, we’re not talking about saving the cost of all backup processing.
Setting Up an Availability Group
It’s a fairly straight forward task to get an Availability Group up and running. But that’s only for a simple setup. If you have a complex network topology, this task becomes more involved. I’ll assume a simple setup in order to outline this process and move on to the backups.
You have to configure your Windows servers to take part in the Availability Group first. You also have to configure the SQL Server instance to support Availability Groups. Once these tasks are complete, you’ll be able to add one or more databases to an Availability Group. First, you have to set up the Windows server.
Configuring the Windows Server
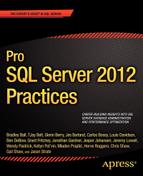
Availability Groups require that you have a Failover Clustering service running and all the replicas are nodes within that group. Installing this is pretty simple. You just have to use the Features Wizard from the Server Manager as shown in Figure 16-1.
Getting the service onto the server is about the easiest step in the whole process. You are not required to have matching machines or a shared hard drive. You just need the service installed on each of the machines. The Windows Failover Clustering Service (WFCS) has a very long list of requirements for exactly how you need to configure your servers for it to work properly. You can access that list online here: http://technet.microsoft.com/en-us/library/cc732035. The good news is that you don’t have to go through this list and validate that your systems are ready for clustering. Instead, you can take advantage of the built-in tools that are installed as part of the clustering service.
Before proceeding to attempting to set up a cluster, you need to install the service on all the machines you’re going to use to manage replicas within your Availability Group. You can create the cluster and then add machines to it, but that can be confusing. Further, if you already configured a cluster and put it into your production environment, you’re risking downtime by choosing to add servers at a later date. It’s better to install and configure what you need up front.
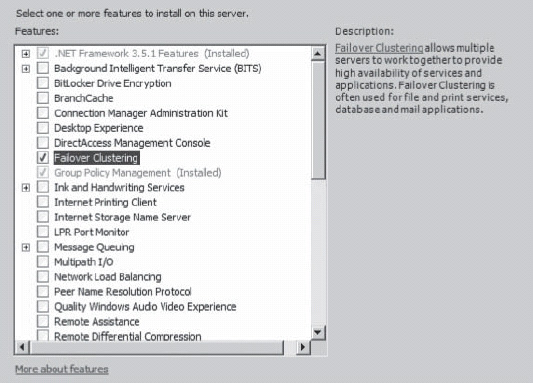
Figure 16-1. Installing the Failover Clustering service.
Once you have the clustering service installed on your servers, you can connect to one and use the Failover Clustering Manager software to set up your cluster. But first, you should validate that your servers will support the cluster. You do this by running the Validate A Configuration Wizard. This interface requires you to simply supply the servers that are going to take part in your cluster. The wizard will validate all the requirements for a cluster for you. Errors will prevent the success of your cluster, and by extension, your Availability Group. These must be addressed directly. Warnings are just indications that one or more of the servers taking part in the cluster might have configuration or hardware issues that will preclude it from being always available as a part of the clustering service. You should understand the implications of the warnings, but these will not prevent you from creating a cluster.
After completing the steps in the validation wizard, you can begin creating a cluster. Because you’re not setting up all sorts of shared resources between these machines, you need to supply only the connection information, as you did during the validation process, for each server.
SQL Server Availability Group
With the cluster set up and all the servers that you require made members of it, you need to set up SQL Server to create and support Availability Groups. The first thing you need to do is run the SQL Server Configuration Manager. You need to make one modification to the SQL Server service itself. Open the properties for the service from the Configuration Manager window, and click on the AlwaysOn High Availability tab, which is shown in Figure 16-2.
Select the Enable AlwaysOn Availability Groups check box. This enables this server to take part in Availability Groups. It does require a restart for the machine, so if you are adding this capability to a production server, plan for some downtime. Each server that is going to take part in your Availability Group needs to be configured in the same manner.
Now, with the server designated as a node in a cluster and AlwaysOn High Availability enabled, you’re ready to start creating an Availability Group. You need to open SQL Server Management Studio (SSMS) and connect it to one of the servers in your clustered environment. Availability Groups can be managed through SSMS or through T-SQL. If you’re going to be setting up and maintaining lots of these environments, you’ll want to get very familiar with the T-SQL method of doing things. For simplicity’s sake here, I’ll show you how to use SSMS to accomplish the same thing. There is a complete management interface for creating and maintaining your Availability Groups. Navigate to the AlwaysOn High Availability folder within the Object Explorer. After expanding this, you’ll see a folder for Availability Groups. Within here, if you have Availability Groups already configured, you can see them, see their status, and make modifications to them. But, since at this point, you don’t have one created, I suggest using the Availability Group Wizard to get started.
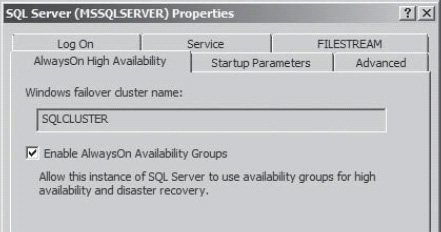
Figure 16-2. Enabling AlwaysOn High Availability.
Right-click on the Availability Group folder, and select New Availability Group Wizard from the context menu. A standard wizard introduction window explaining things will open. Click the Next button and you’ll be required to supply a name for your Availability Group. Select a name that meaningfully defines the group and its purpose. For this set of tests, I’ll use the name “AgBackup” as the name for the group. After you define a name, click the Next button again. You are presented with a list of databases. These databases will be validated and marked as to whether or not they can take partake in an Availability Group. You can see an example of this in Figure 16-3.
There are four databases currently on the server referenced in Figure 16-3. From that list, the AdventureWorks2008R2 .database has its check box grayed out. The status shows that it has 2 required actions. Basically, that database is not currently valid for use in an Availability Group. The possible reasons are varied. You can click on the Status header to get a definition. Some of the possible reasons are that the database is not in Full Recovery mode, which is required for a database to be used in an Availability Group, or because no full backup has been run on this database, which is another requirement. You can see that the AOTest. database doesn’t meet the criteria because it’s already part of a different Availability Group. The database with the name. MirrorMe is being mirrored and therefore can’t be put into an Availability Group. That leaves the MovieManagement database, which has passed all the validation requirements and therefore can be selected for inclusion.
If there are groups of databases you want to treat as a unit for the purposes of High Availability, you can. If they pass validation, add them to the group. With the database, or databases, selected for the group, click the Next button. This brings up the Specify Replicas page of the wizard. This is where you define the primary and secondary replicas for managing the Availability Group. You can specify between one and five different servers to create within the group, as shown in Figure 16-4.
For this example, I included five replicas and maxed out each of the different options: two replicas have automatic failover, and three replicas have synchronous commit. Automatic failover means that when the primary replica is taken offline for any reason, one of the secondary replicas will automatically become the primary replica. Transactions are transferred between the primary replica and the secondaries. When you choose to make these transactions synchronous, it means that the Availability Group management will commit transactions to those replicas before those transactions can be removed from the primary replica. Asynchronous commits will separate the transactions on the secondaries from those on the primary replica and won’t affect the primary’s log. I also made one of the replicas a readable secondary. This means that queries can be run against that secondary even as it gets updated from whichever of the replicas is currently acting as the primary.
Figure 16-3. A list of databases and information about whether or not they meet the criteria for use in an Availability Group.
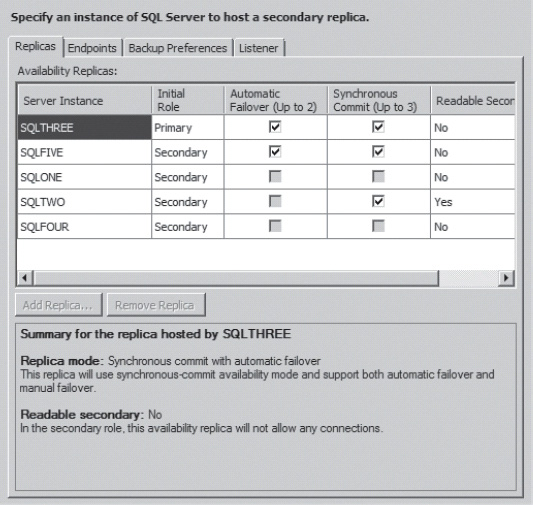
Figure 16-4. Specifying the replicas in the Availability Group..
In addition to the replicas, this page offers three other tabs for setting up pieces of the Availability Group. On the Endpoints tab, you can modify the location information and connection strings for the servers. This is especially useful if you are building an Availability Group with servers in different physical locations requiring special settings in order to make the remote connection. You can click on the Backup Preferences tab to modify the backup preferences for the replicas, but I’ll cover that in some detail later in the chapter. Finally, on the Listener tab, you can set up a listener for the Availability Group. This acts as a standard connection point for applications so that you don’t have to write code that determines which server an application can connect to. Your application code connects to the listener and that directs your code to the appropriate replica.
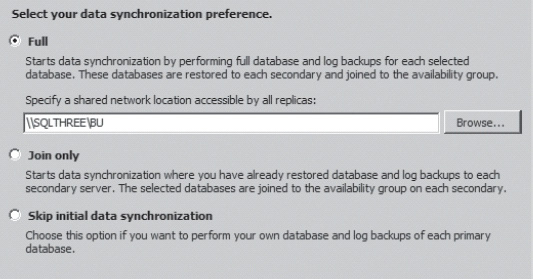
Figure 16-5. Defining how the data-synchronization process will take place..
If you click the Next button, you’ll be taken to the Select Data Synchronization page. You use the options on this page to determine how the database, or databases, in your Availability Group get moved to the replicas in the group. There are three basic options, which are displayed and explained in Figure 16-5.
Your choices boil down to allowing SQL Server to manage the process for you or setting up the databases yourself. If you’re setting up your Availability Groups within a single network without major physical separation, and the bandwidth and latency problems that brings with it, you might want to allow SQL Server to manage the process for you. If not, you need to restore a full backup and the appropriate log backups to ensure that the data and structures for your databases are completely in sync prior to initializing your Availability Group. Once this is done, clicking the Next button runs the next step in the wizard, which deals with validations.
The validations ensure that your servers and databases are all correctly configured and can communicate appropriately to support your Availability Group. If any of the validations fail, you will receive notice on the screen. Clicking on the notice will provide you with a detailed explanation. You can leave this screen in place to address the issues directly. Once they are fixed, you just have to click the Re-Run Validation button that you see on the bottom of Figure 16-6.
As you can see in Figure 16-6, there was a warning from the listener configuration for my Availability Group. This is because I did not define a listener on the previous page. You don’t have to have a listener for Availability Groups to work, although it makes a huge difference in how you connect to the group from your applications. But you can set up and test the Availability Group first, and then add a listener when you’re ready to work with applications.
After you complete the wizard, the next step of the process is to move the database onto each of the replica servers so that it’s available for use. You can check the status of the Availability Group by using the Availability Group dashboard. This can be accessed from any server within the Availability Group. In Object Explorer, right-click on the AlwaysOn High Availability folder. You can then select Dashboard from the menu. Selecting this will show a listing of all Availability Groups on your server. If you select one of the groups, you’ll see its current status. Figure 16-7 shows how my Availability Group, AgBackup, is currently configured.
The information is divided into three basic areas. Across the top is the status of the Availability Group itself. On the left, you can see that the current status of this group is Healthy, that the primary instance is SQLTHREE, and that the failover mode is set to Automatic and the cluster state is a normal quorum, meaning enough servers are available to determine which of them is currently the primary. You also get a few links on the right side of the dashboard. You can click Start Failover Wizard, View AlwaysOn Health Events, or View Cluster Quorum Information. The second section shows more details about the Availability Group replicas. The links for each server allow you to drill down on the appropriate server. The final section shows more detailed information about the servers in the Availability Group. This is how you quickly determine what the status of your Availability Group is. But to manage the settings of the group, you need to go to a different window.
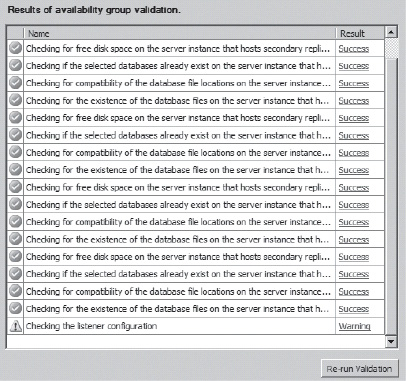
Figure 16-6. A successful set of validations, along with one warning..
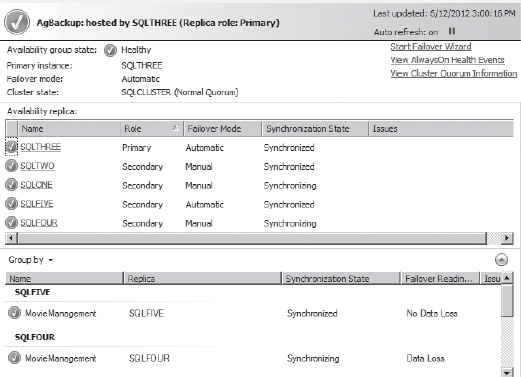
Figure 16-7. The Availability Group dashboard showing the current status of all the replicas..
Right-clicking on the Availability Group in the Object Explorer allows you to access the Properties window in the context menu. This is where you can modify the decisions you’ve made regarding the setup of the Availability Group. The options are similar to those you were offered during the steps through the wizard, but you’ll get quite a bit less guidance. You can adjust the primary replica and the secondary replicas and their roles within the group all as shown in Figure 16-8.
With this last screen, you have the basics for how to set up and manipulate the Availability Group. There are a lot more details on how to configure groups between different physical locations, with varying degrees of security and a number of other things, but now we’re going to move on to setting up backups using the Availability Groups.
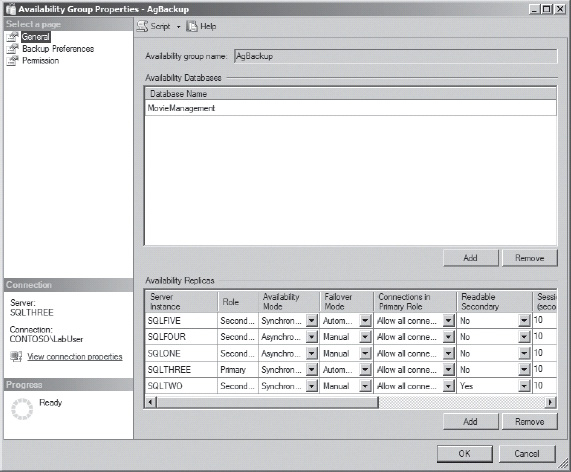
Figure 16-8. Properties for the Availability Group that you can use to take control of the group..
Enabling Backups on Availability Groups
The only backups that are available on your Availability Group are log backups and full-database backups that are set to use COPY_ONLY. Full backups are not allowed nor are differentials. But even with the log backups, you can’t simply run a backup. There are a number of configuration choices you have to make to ensure that you’re going to get a set of backups you can use for recovery. To start with, you need to determine where your backups are going to occur. You can decide to run them only on the primary, only on secondaries, only on some secondaries, or all sorts of variations in between. Finally, you can set the priority value for each of your replicas if there is one in particular where you’d like to see the backups run.
The settings for your backup processes are available in the Properties dialog box for the Availability Group. You can access it exactly as described in the preceding section.
Backup Location
Determining which of the replicas should be used for backup is entirely a part of your system and the requirements there. But the manipulation of where backups occur is done from the Properties dialog box for your Availability Group, as shown in Figure 16-9.
The most resilient mechanism for running the automated backups is to have them use the default option, Prefer Secondary. This ensures that as long as some part of the Availability Group is online and hasn’t been removed from the backups entirely (more on that in the next section), you’ll get a log backup from one of the replicas. This will tend to take the group away from the primary replica, but not eliminate it from consideration. If you really are trying to offload the process of running backups, you can choose the Secondary Only option. This will exclude the primary replica, wherever it might be when the backups are run. Or, if you need to, you can make it so that backups are only ever run from the primary server. Finally, you can just choose the Any Replica option. Choosing this will cause the automated backup simply to fall back on whichever replica is online, included in backups, and currently has the priority.
You can determine programmatically if a server has the backup priority. There’s a system function called sys.fn_hadr_backup_is_preferred_replica. It’s a function that just returns a Boolean. It can be called as part of an IF statement or simply as a SELECT:
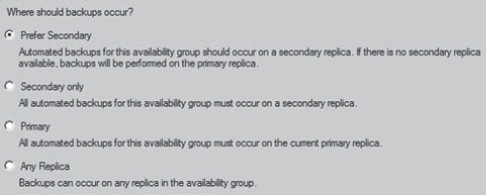
Figure 16-9. Determing where to perform automated backups in an Availability Group.
Figure 16-10. The current server is not the preferred backup replica.
If I ran this on the current primary replica and the backup location was set to the default option, Prefer Secondary, my output would look like Figure 16-10.
We’ll do more with this function later.
Speaking of T-SQL, you can use T-SQL commands to take charge of the Availability Groups, including setting up the backup location. Here’s how you could modify the AgBackup group to use the Secondary Only option for the backups. (Although individual database commands can be run within the database, most of the management commands for Availability Groups must be run from the master database.)
USE master;

GO

ALTER AVAILABILITY GROUP AgBackup

SET (AUTOMATED_BACKUP_PREFERENCE = SECONDARY_ONLY);
Now the primary, regardless of which server is the primary, cannot be used to run automated backups. But simply setting which type of replica you want to be able to control the backups is not the only way to control where the automated backups take place. You can also remove replicas from the list and adjust the priority of the replicas.
Backup Priority
As with modifying which types of replicas can do the backups, backup priority is controlled through both the GUI and T-SQL. We’ll start the GUI approach by looking at Figure 16-11.
You can specify the replicas that you want excluded. When a replica is selected, it cannot run a backup, regardless of what the other settings are. The Backup Priority is a number between 1 and 100. The default is to have all servers set to the same, midrange, priority of 50. You can adjust them up and down to provide a level of control over which of the servers is more likely to run the backup. All of this depends, of course, on the availability of the server. Although a replica might have the lowest priority, if it’s the only server available for a backup, that’s where the backup will occur.
Adjusting the priority level through T-SQL follows some of the mechanisms you saw earlier. To modify the priority level of a replica, you do this:
ALTER AVAILABILITY GROUP AgBackup

MODIFY REPLICA ON 'SQLTWO'

WITH (BACKUP_PRIORITY = 2);
This code will change the Availability Group specified, modifying the replica SQLTWO to make its priority extremely low at 2. Having numbers more than simply 1-5 allows you a more granular level of control over which replica or replicas are likely to receive priority.
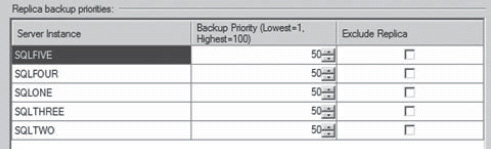
Figure 16-11. Setting the backup priorities and removing replicas from the automated backup process.
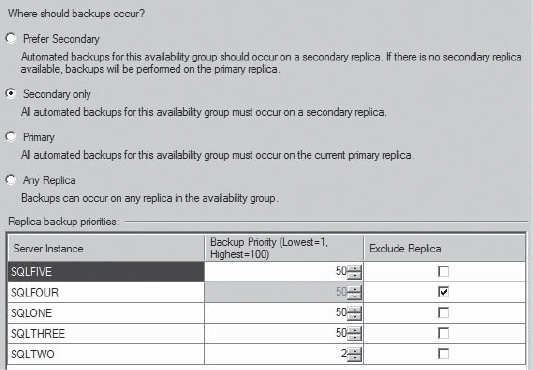
Figure 16-12. The properties showing modifications made to where backups occur and which replicas support them.
To completely remove the replica from the list of available replicas for backups, you adjust the backup priority down to zero using the T-SQL code:
ALTER AVAILABILITY GROUP AgBackup

MODIFY REPLICA ON 'SQLFOUR'

WITH (BACKUP_PRIORITY = 0);
That will change the replica specified and remove it from the Availability Group list of backups entirely. It means that if you ran the preferred backup function, sys.fn_hadr_backup_is_preferred_replica, it could never return a positive value for that server. If you refresh the properties window, you can see the changes made graphically represented, as shown in Figure 16-12.
You can see that the automated backups now would run only on secondary servers, never on the primary. The replica SQLFOUR can’t support automated backups because it has been excluded. Finally, the SQLTWO replica has had its priority changed to 2, making it the least likely replica to support the automated backup.
This is how you can control what kind of replica is performing the backup and where the backup is occurring. But how do you set up the backups themselves? I’ll cover that in the next section. Before we move on though, I’ll reset the Availability Group back to the default values:
ALTER AVAILABILITY GROUP AgBackup

SET (AUTOMATED_BACKUP_PREFERENCE = SECONDARY);


ALTER AVAILABILITY GROUP AgBackup

MODIFY REPLICA ON 'SQLTWO'

WITH (BACKUP_PRIORITY = 50);
ALTER AVAILABILITY GROUP AgBackup

MODIFY REPLICA ON 'SQLFOUR'

WITH (BACKUP_PRIORITY = 50);
Automating Backups on Availability Groups
You can run a backup manually from any of the Availability Group replicas. To automate backups, though, you have to do some extra work because you’ll never know which group is available to perform the backup, although you do get to set a bias as to which of the replicas will perform the action, as I discussed in the previous section. To use Availability Groups for this process, you need to configure a common set of scripts on each of the servers.
The backups themselves can be done using normal T-SQL commands or even using maintenance plans. You just have to make sure of two things. First, make sure that every replica that has not been excluded from the possibility of backups through setting the priority has an automated backup in place. Second, make sure that each of the backups you set up determines first if that server has the current priority through the use of sys.fn_hadr_backup_is_preferred_replica. This is included for you automatically if you’re using maintenance plans.
The most important thing to understand is that the log cleanup that normally occurs with a database in the Full recovery model still occurs with your primary replica. The log backups that take place on a secondary cause the primary’s log to be cleaned up. If the process didn’t work this way, it would be pointless.
Maintenance Plans
To provide you with an example, I chose to set up my automated log backups on the SQLTHREE server using maintenance plans. Figure 16-13 is the basic dialog box showing how the log backups have been configured.
Note that there are no options you can set in the standard dialog box that specify whether or not this backup process is configured for use with an Availability Group. You can select the For Availability Databases, Ignore Replica Priority For Backup And Backup On Primary Settings check box to ignore the replica priority, but this isn’t a good choice for setting up a log backup that is meant to work regardless of which server is online. However, if you click the View T-SQL button at the bottom of the dialog box, you’ll see a script that looks like this:
DECLARE @preferredReplica int


SET @preferredReplica = (SELECT

[master].sys.fn_hadr_backup_is_preferred_replica('MovieManagement'))


IF (@preferredReplica = 1)

BEGIN

    BACKUP LOG [MovieManagement] TO DISK = N'C:Program FilesMicrosoft SQL

ServerMSSQL11.MSSQLSERVERMSSQLBackupMovieManagement_backup_2012_06_25_144225_8512689.trn'

WITH NOFORMAT, NOINIT, NAME = N'MovieManagement_backup_2012_06_25_144225_8512689', SKIP,

REWIND, NOUNLOAD, STATS = 10

END
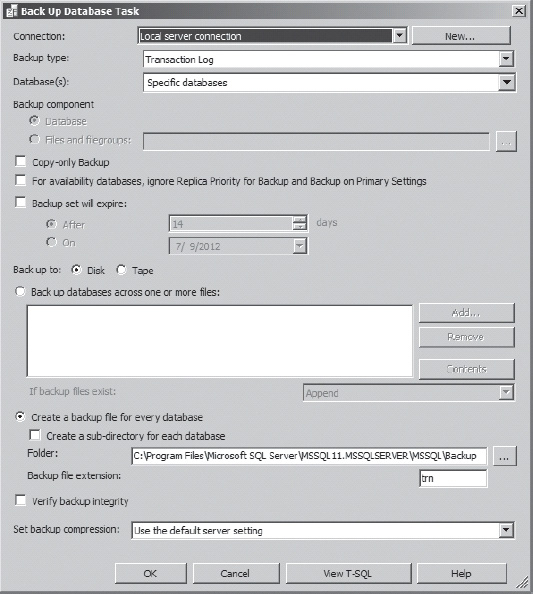
Figure 16-13. The maintenace plan window you use to configure log backups.
The script declares a variable, @preferredReplica, and then uses the sys.fn_hadr_backup_is_preferred_replica function to determine if the server currently calling the backup process is the replica in the Availability Group where the backup will currently run.
To show you this in action, I’m going to set up the maintenance plan on this server, SQLTHREE, so that it runs a log backup every 15 minutes. Currently, none of the other replicas have a backup process and SQLTHREE is the primary. When the job fires, it completes successfully, without error. However, that’s only because it’s getting to the priority check and finding that it’s not currently the server with priority, which causes it to exit gracefully, but it means I don’t have a log backup. I can validate that by going to the location specified to see if a backup file was created. There is none.
To get this to work, I need to perform two tasks. First, I need to create this same maintenance plan on all my other servers. Second, I need to create a schedule that executes the plan on each of the servers. Because only one will be selected by the sys.fn_hadr_back_is_preferred_replica function, I’m placing extremely little load on all the servers because they will only check to see if they are the preferred replica currently. If the server in question is not the preferred replica, the process will close out. If the server is the preferred replica, the log backup will be run.
I’m not a fan of using maintenance plans, because they don’t offer enough granular control over how processes are run. Setting up a similar log-backup process using scripts is extremely easy.
T-SQL Scripts
First, I need to establish the backup script that I want to use on each of the servers. My script will be slightly different than the one created for the maintenance plan:
DECLARE @preferredReplica INT


SET @preferredReplica = (SELECT

[master].sys.fn_hadr_backup_is_preferred_replica('MovieManagement')

                        )


IF (@preferredReplica = 1)

BEGIN

    DECLARE @Location NVARCHAR(50);

    DECLARE @CurrentTime DATETIME = GETUTCDATE();


    SET @Location = 'C:uMovieManagement_log_'

        + CAST(DATEPART(year, @CurrentTime) AS NVARCHAR) + '_'

        + CAST(DATEPART(month, @CurrentTime) AS NVARCHAR) + '_'

        + CAST(DATEPART(day, @CurrentTime) AS NVARCHAR) + '_'

        + CAST(DATEPART(hour, @CurrentTime) AS NVARCHAR) + '_'

        + CAST(DATEPART(minute, @CurrentTime) AS NVARCHAR) + '.bak'


    BACKUP LOG MovieManagement

        TO DISK = @Location

        WITH INIT;

END
I can create a SQL Agent Job with a schedule that runs this backup every three minutes. That’s probably more frequently than you would want to run a backup in a production system, but I’m just setting this up for testing purposes. Then I can easily script that job out and run it on each of my servers. Because I’m using a specific location for the backups, I need to make sure that each server does have that file location available. My finished Agent Job looks like this:
USE [msdb]

GO


/****** Object: Job [LogBackups] Script Date: 7/6/2012 6:05:56 PM ******/

BEGIN TRANSACTION

DECLARE @ReturnCode INT

SELECT @ReturnCode = 0

/****** Object: JobCategory [[Uncategorized (Local)]]] Script Date: 7/6/2012 6:05:56 PM

******/

IF NOT EXISTS (SELECT name FROM msdb.dbo.syscategories WHERE name=N'[Uncategorized (Local)]' AND
category_class=1)

BEGIN

EXEC @ReturnCode = msdb.dbo.sp_add_category @class=N'JOB', @type=N'LOCAL', @name=N'[Uncategorized

(Local)]'

IF (@@ERROR <> 0 OR @ReturnCode <> 0) GOTO QuitWithRollback


END


DECLARE @jobId BINARY(16)

EXEC @ReturnCode = msdb.dbo.sp_add_job @job_name=N'LogBackups',

        @enabled=1,

        @notify_level_eventlog=0,

        @notify_level_email=0,

        @notify_level_netsend=0,

        @notify_level_page=0,

        @delete_level=0,

        @description=N'No description available.',

        @category_name=N'[Uncategorized (Local)]',

        @owner_login_name=N'CONTOSOLabUser', @job_id = @jobId OUTPUT

IF (@@ERROR <> 0 OR @ReturnCode <> 0) GOTO QuitWithRollback

/****** Object: Step [Backup MovieManagement] Script Date: 7/6/2012 6:05:56 PM ******/

EXEC @ReturnCode = msdb.dbo.sp_add_jobstep @job_id=@jobId, @step_name=N'Backup MovieManagement',

        @step_id=1,

        @cmdexec_success_code=0,

        @on_success_action=1,

        @on_success_step_id=0,

        @on_fail_action=2,

        @on_fail_step_id=0,

        @retry_attempts=0,

        @retry_interval=0,

        @os_run_priority=0, @subsystem=N'TSQL',

        @command=N'DECLARE @preferredReplica INT


SET @preferredReplica = (SELECT

[master].sys.fn_hadr_backup_is_preferred_replica(''MovieManagement'')

                        )


IF (@preferredReplica = 1)

BEGIN

    DECLARE @Location NVARCHAR(50);

    DECLARE @CurrentTime DATETIME = GETUTCDATE();


    SET @Location = ''C:uMovieManagement_log_''

        + CAST(DATEPART(year, @CurrentTime) AS NVARCHAR) + ''_''

        + CAST(DATEPART(month, @CurrentTime) AS NVARCHAR) + ''_''

        + CAST(DATEPART(day, @CurrentTime) AS NVARCHAR) + ''_''

        + CAST(DATEPART(hour, @CurrentTime) AS NVARCHAR) + ''_''

        + CAST(DATEPART(minute, @CurrentTime) AS NVARCHAR) + ''.bak''
    BACKUP LOG MovieManagement

    TO DISK = @Location

    WITH INIT;

END',

      @database_name=N'master',

      @flags=0

IF (@@ERROR <> 0 OR @ReturnCode <> 0) GOTO QuitWithRollback

EXEC @ReturnCode = msdb.dbo.sp_update_job @job_id = @jobId, @start_step_id = 1

IF (@@ERROR <> 0 OR @ReturnCode <> 0) GOTO QuitWithRollback

EXEC @ReturnCode = msdb.dbo.sp_add_jobschedule @job_id=@jobId, @name=N'Every Two Minutes',

      @enabled=1,

      @freq_type=4,

      @freq_interval=1,

      @freq_subday_type=4,

      @freq_subday_interval=2,

      @freq_relative_interval=0,

      @freq_recurrence_factor=0,

      @active_start_date=20120706,

      @active_end_date=99991231,

      @active_start_time=0,

      @active_end_time=235959,

      @schedule_uid=N'70996e43-6c73-41f2-be5a-143853fdd5dd'

IF (@@ERROR <> 0 OR @ReturnCode <> 0) GOTO QuitWithRollback

EXEC @ReturnCode = msdb.dbo.sp_add_jobserver @job_id = @jobId, @server_name = N'(local)'

IF (@@ERROR <> 0 OR @ReturnCode <> 0) GOTO QuitWithRollback

COMMIT TRANSACTION

GOTO EndSave

QuitWithRollback:

   IF (@@TRANCOUNT > 0) ROLLBACK TRANSACTION

EndSave:


GO
With that script run on every single server, all that remains to be done is to test the process. To see changes in the database I’ve been using, I’m going to create a table for the database:
CREATE TABLE dbo.ChangingData

    (ID INT IDENTITY(1, 1),

    Val VARCHAR(50)

    );
Then I’m going to add a row, wait until a log backup has been run, and then add another row:
BEGIN TRANSACTION

INSERT INTO dbo.ChangingData

       (Val)

VALUES ('First Row'),

COMMIT TRANSACTION


WAITFOR DELAY '00:04';

Figure 16-14. Log backups completing on one of the replicas
BEGIN TRANSACTION

INSERT INTO dbo.ChangingData

       (Val)

VALUES ('Second Row'),

COMMIT TRANSACTION
With all that in place, I can identify which of the replicas is currently my primary. In my case, it’s SQLFIVE. I can see the log backups that have been running by looking at the drive on that server. as you can see in Figure 16-14.
And that’s all it takes to set up the backups on an Availability Group. You can see the backups occurring, but the only way to know for sure that a backup has worked is to recover the database.
Recovery on Availability Groups
The entire purpose of the Availability Group is to provide a mechanism whereby the databases that have been configured to be a part of the group are always available. This is done primarily through the process of automatic failover from one of the replicas to another. The very concept suggests that you no longer need backups at all. Keep in mind, though, Availability Groups are a means of maintaining high availability. They supplement your disaster recovery (DR) plans, but they cannot completely replace the fundamental beginning of all DR efforts, backups. You’re still need to run your standard sets of backups.
There is one problem with placing a database in an Availability Group. Once that database is a part of the group, you can no longer run a restore on that database. In fact, as far as the Availability Group is concerned, you wouldn’t want to. If a server went offline, a database was corrupted, or some other action caused the loss of connectivity to that replica, your other replicas are there to take up the load. And you can simply recover the system by getting it back online and rejoining the Availability Group. You’ll resynchronize with the Availability Group and continue on happily.
However, what if you do need to go to the full-blown disaster recovery plan. You need to restore that database. Well, your processes haven’t changed much. Let’s walk through this.
I have a full database backup that I took from my primary replica. I also have a series of backups taken against one of my secondaries. In a normal DR scenario, you can move these backups off-site from your primary location to protect them. In this case, I bring together my full backup and my log backups, both taken on different replicas, and combine them to restore a database to a point in time on a different server as a different database.
First, I’ll restore the full backup:
RESTORE DATABASE MMCopy
FROM DISK = 'c:umoviemanagement.bak'

WITH NORECOVERY, MOVE 'MovieManagement' TO 'c:datamoviemanagement.mdf',

MOVE 'MovieManagement_Log' TO 'c:datamoviemanagement_log.ldf';
Now I can use some of the log backups that were created to recover this database to a point in time prior to the insertion of the second row of data:
RESTORE LOG MMCopy

FROM DISK = 'c:uMovieManagement_log_2012_7_6_22_44'

WITH NORECOVERY, STOPAT = '7/6/2012 18:45';


RESTORE LOG MMCopy

FROM DISK = 'c:uMovieManagement_log_2012_7_6_22_46'

WITH NORECOVERY, STOPAT = '7/6/2012 18:45';


RESTORE DATABASE MMCopy

WITH RECOVERY;
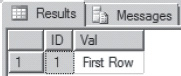
Figure 16-15. The data returned after restoring to a point in time prior to the second insert.
I can verify that I recovered the database to a point prior to the second insert by simply selecting data from the restored database:
USE MMCopy;

SELECT * FROM dbo.ChangingData;
The data returned looks like Figure 16-15.
Restoring to a point in time is no big deal. But you have to remember that the full backup that was used was from one server—specifically, my current primary replica, SQLTHREE. The log backups that were used were from a completely different server, SQLFIVE. I was able to take backups across multiple machines from within the Availability Group and then combine those backups at another location to restore a database.
Conclusion
The advanced capabilities offered by Availability Groups within SQL Server 2012 provide a much wider array of high-availability solutions. But they also create additional opportunities for your disaster-recovery planning. You will be able to move part of your backups off to the secondary replicas without having to worry about which replica is currently the primary or even which of the secondary replicas is available. Just make sure that you always check against the sys.fn_hadr_backup_is_preferred_replica function to be sure that the correct replica is running the backups. Although you can’t restore directly over databases within the Availability Group, you can use these log backups in combination with full backups from a primary replica to restore a database to another location. The best part is that you’re not limited in how you run your backups. You can use maintenance plans or your own custom scripts without impacting how your Availability Group functions or negatively affecting your ability to later restore the databases that take part in that group.