
Chapter 27
Lab Management
What's in this chapter?
- Understanding the lab management capabilities of Visual Studio 2013
- Using lab management to run tests, capture bugs, and share snapshots
- Configuring end-to-end build-deploy-test workflows
As software development projects become more complex, so do the environments in which that software will run. Such an environment could consist of multiple machines, specific firewall (and other security) settings, databases, and a variety of other configurations that could affect the way in which your software behaves.
To effectively test software, teams must create a test environment that simulates the production environment. Traditionally, this could require securing several dedicated physical machines and developing a potentially labor-intensive process for staging those machines on a regular basis with new builds of your software. And, given the variety of possible configurations, it's usually necessary to have multiple test environments in order to find problems that may arise when you ship your software to customers running different environments, each with their own unique configurations.
With the rising popularity and availability of virtualization technology, many testing teams have begun to turn to virtualization to make better use of hardware and to more efficiently stage testing environments. But, despite the advances in virtualization, there are still several challenges related to the process of managing a virtual test lab, which can make this an expensive and time-consuming endeavor.
The lab management capabilities of Visual Studio 2013 address the challenge of working with such virtual test lab environments. Lab management capabilities are built into Team Foundation Server 2013 and provide the following capabilities:
- Creation, management, and teardown of environments consisting of one or more virtual machines (VMs) from templates or stored virtual machines.
- Automated deployment of builds into virtual environments.
- Execution of manual and automated tests across virtual environments.
- Automated collection of rich diagnostics across virtual environments during test runs, allowing for more actionable bugs to be filed as an outcome of failed tests.
- Use of snapshots (also known as checkpoints) to enable environments to be quickly restored to a given state (such as immediately after a new build of software is deployed or when a new bug is discovered). Testers and developers can share snapshots to help diagnose and fix bugs.
- Network isolation of virtualized environments, allowing clones of environments without fear of IP address collisions or naming conflicts with other machines on your network.
To achieve all of these capabilities, you need to be using virtual environments that are running Hyper-V on host machines managed by System Center Virtual Machine Manager (2008 R2, 2012, or 2012 R2). These environments are known as SCVMM environments. You should note that while TFS 2013 supports using SCVMM 2008 R2, it is not recommended, given the number of fixes and enhancements that Microsoft has put in to both SCVMM and its use with TFS. In addition, if you want to use the latest Hyper-V features available with Windows Server 2012 R2 and Hyper-V Server 2012 R2, you'll need to use SCVMM 2012 R2.
Team Foundation Server 2012 introduced improved support for achieving some of these capabilities when using physical (non-virtual) environments, or third-party virtualization technologies other than Hyper-V. These are known as standard environments. Standard environments do not have the same dependency on System Center Virtual Machine Manager that SCVMM environments have, so they are quite a bit easier to get started with if you don't already have System Center deployed. But there are a few limitations of standard environments as compared with SCVMM environments that are discussed in the “Standard Environments” section later in this chapter.
Lab Management Infrastructure
Lab management is a core capability of Team Foundation Server 2013. In order to work with SCVMM environments, your Team Foundation Server needs to be configured to integrate with an SCVMM server. Configuration and administration of lab management is covered extensively in the product documentation and isn't covered in detail in this book, but a few key concepts are introduced here.
SCVMM uses a library server to store saved copies of VMs, which can then later be deployed to a VM host group (made up of one or more VM hosts). A library server is essentially a file server that SCVMM is aware of and has read/write access to. Each library server can contain one or more library shares, which is basically a shared folder.
A library server can contain VM templates that enable you to customize a VM at the time of deployment. This enables you to specify such settings as machine name, domain or workgroup membership, and product key. VM templates are powerful tools for building out your test lab because they provide the most control over how VMs are deployed.
In order to configure and test with lab management environments, users need to be licensed for Microsoft Test Manager (included with Visual Studio Test Professional, Premium, and Ultimate).
Golden Images
While setting up your test lab, you need to consider the VM configurations on which you need to test your software. For example, maybe your software needs to be tested to run in environments containing machines running Windows 7, Windows 8, Windows 8.1, Windows Server 2008, Windows Server 2008 R2, Windows Server 2012, and Windows Server 2012 R2. You should also consider which other prerequisite software must be installed, such as Internet Information Server (IIS) or database engines such as SQL Server.
The product documentation for lab management refers to the concept of using golden images for populating your library server. A golden image is a VM or VM template that contains all of the prerequisites necessary for testing your software. In the previous example, you might configure a golden image for each operating system version that will eventually be involved in your test environments.
Agents
You can install test agents into environments to provide additional capabilities that are helpful in deployment, testing, and network isolation with your virtual environments. The test agent is responsible for the following functions:
- Allowing an environment to participate in Team Foundation Build workflows. This includes the capability to deploy new builds and other deployment artifacts to your environments.
- Enabling manual or automated tests (such as unit tests, coded UI tests, or web performance tests) to be executed in your environments, including the collection of test run information from diagnostic data adapters.
- Network isolation capabilities for an SCVMM environment. With network isolation enabled, you don't have to worry about VMs in your test lab conflicting (computer name or IP address) with other machines on your network. This makes it possible to have multiple virtual environments with the same IP address and/or machine name without needing to set up dedicated networks for each one.
The preceding descriptions should provide you with a basic understanding of what is necessary to configure the infrastructure required for taking advantage of lab management. But it is by no means a substitute for the detailed product documentation. Your test lab administrator should carefully consult the product documentation for instructions on configuring and optimizing your lab management infrastructure. Once configured, you can benefit by using lab management as detailed in the remainder of this chapter.
SCVMM Environments
An SCVMM environment consists of one or more VMs that can be deployed and managed together. An environment usually contains all the VMs necessary to run a set of test cases. For example, an environment could consist of a database server and a web server, each running Windows Server 2012 R2. A separate virtual environment might also contain similarly configured database and web servers, but use Windows Server 2008 R2 to offer expanded test coverage. In addition, you might want specialized versions that have operating system- or product-specific service packs.
The first step in creating an SCVMM environment is to define the VMs or VM templates that will make up your environment. You use Microsoft Test Manager, introduced in Chapter 23, to do this. Before completing this step, you must have one or more golden images (VMs or templates) stored in your SCVMM library.
From the Start screen, select the Microsoft Test Manager 2013 icon or start typing Microsoft Test Manager until the correct icon appears and then click it. If this is your first time launching Microsoft Test Manager, you may need to define which Team Foundation Server instance and team project you are connecting to. When connected, open the Lab Center and click Library ⇒ Virtual Machines and Templates. The Virtual Machines and Templates activity appears, as shown in Figure 27.1.
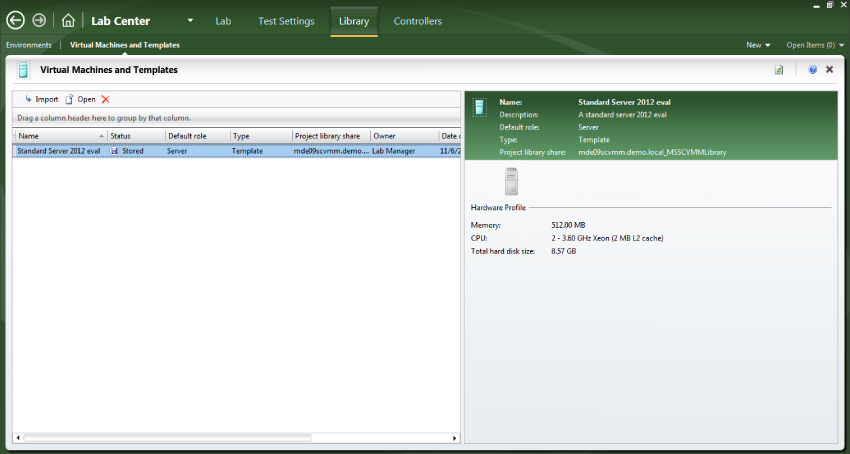
From here, you can manage all the VMs and templates that are available to the team project you are connected to. To add a new VM or template, click the Import button in the upper-left area of the screen.
Begin by defining the path to your new VM or VM template. This path defines the location within the SCVMM library server where your VM or template is stored. Use the Browse button to explore the library server path(s) defined in SCVMM.
Next, provide a name for your VM or template. You can optionally provide a description (useful for describing what's installed on a particular VM or VM template), along with a default role (discussed later in this chapter).
The Machine Properties tab enables you to specify default parameters that will be used when your VM is deployed (such as the amount of RAM that should be assigned to your VM when deployed). If you are using a VM template, then the OS Profile tab is available, enabling you to define additional parameters (such as the machine name, domain or workgroup membership, and product key). You can use the Machine Tags tab to construct advanced deployment workflows.
Clicking Next displays a summary of your actions. Click Finish and your VM or template is listed in the Virtual Machines and Templates activity within Test Manager.
After you have configured one or more VMs or templates, you are ready to define an environment. Click Library ⇒ Environments. From the Environments activity shown in Figure 27.2, you can assemble one or more VMs or templates into an environment that you can later deploy to a VM host group.
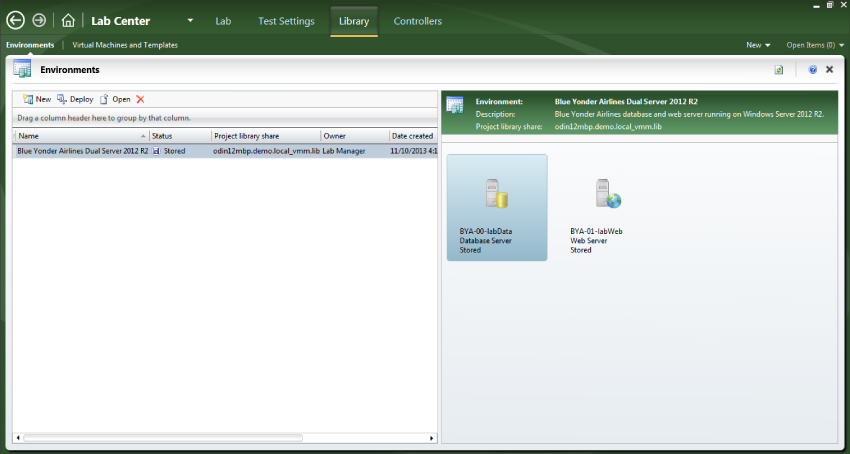
Click New to create a new virtual environment. Start by indicating whether you are configuring an SCVMM environment or a standard environment (described later in this chapter). You can provide a name and description for your environment. You can also specify the location on the SCVMM library server where the environment definition should be stored, along with environment tags that you can use for defining advanced build workflows.
The Machines tab shown in Figure 27.3 is where you can begin constructing your virtual environment based on the VMs or templates you defined earlier. To do this, first select a VM or template from the list of VMs and templates on the right side of the screen. Next, select Add to Environment. This adds the VM to the environment on the left side of the screen. You can add the same template multiple times, if desired. You can even add a VM multiple times. However, if you try to do it with a VM, Microsoft Test Manager will display a warning about possible conflicts. Make sure you fully understand the composition of each VM before you add it.
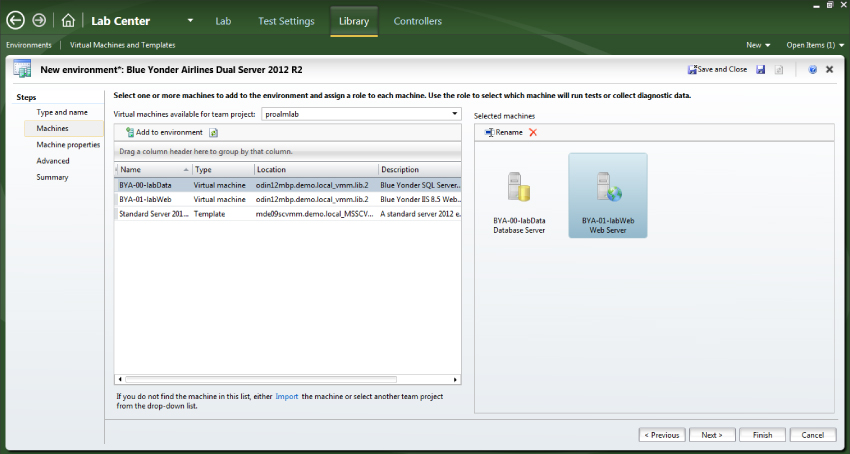
After adding one or more VMs or templates to your environment, you can specify which role these machines play in your environment (such as a web server or database server). Roles are used by test settings and build workflows, as you see later. You can also specify the name that lab management uses to refer to the VM within the environment. Note that this name does not need to be the same as the computer name. If you plan to define several environments, you might want to put some time into a useful naming convention to make it easier for testers and developers to differentiate environments from one another.
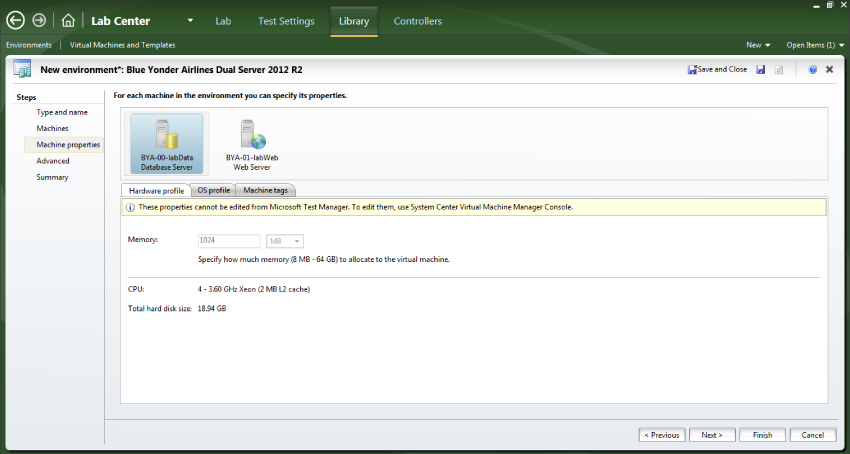
The Machine Properties tab shown in Figure 27.4 allows you to define the parameters that should be assigned to each of the VMs within your environment. This screen looks similar to the Machine Properties tab you encountered when defining a VM or template, except that it also includes the capability for you to select different VMs in your environment by clicking the role icons across the top of the screen. Any machine properties you defined earlier are shown here as default values and you can override them in this step if they were defined via Microsoft Test Manager. However, if you imported a VM or template from SCVMM 2012 or later, you can only change these settings in SCVMM.
The Advanced tab enables you to define how test agents should be configured on the VMs within your environment. This includes the test controller that is used to orchestrate tests and collect diagnostics data; and whether or not you want to utilize network isolation. You'll also find a disabled option that you use if you plan on running coded UI tests in your environment. When enabled, this allows you to set the user account that should execute the Coded UI tests as an interactive process. You configure the Coded UI tests' settings after the environment is created and running.
The Summary tab describes your selections. Click Finish to finalize your environment definition.
After you have defined your virtual environment, it shows up in the list of available environments in your library, as shown in Figure 27.2. When your virtual environment is defined, it is ready to deploy. You select the environment within your library and click the Deploy button in the upper-left of the screen. If you attempt to deploy an environment that you've composed with one or more VMs (as opposed to one with all templates) without using network isolation, Microsoft Test Manager will display a warning dialog that the environment could cause network conflicts and prevent other environments from functioning. This is another reminder that you need to either have a very good understanding of your VMs' configuration or work closely with someone who does. If you don't receive the warning or you choose to continue, Microsoft Test Manager then displays the Deploy Environment dialog shown in Figure 27.5.
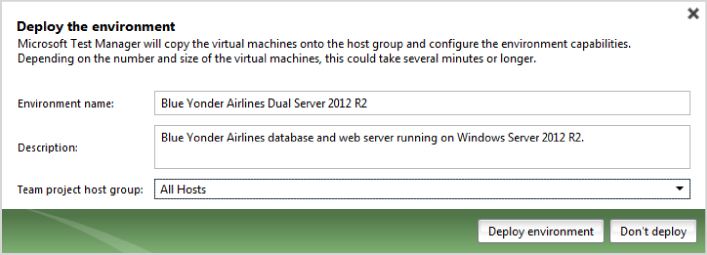
From this dialog, you can provide a name and a description for what will become a running instance of your virtual environment. You can also specify the SCVMM VM host group to where you want to deploy your environment. Click Deploy Environment to begin the virtual environment deployment process.
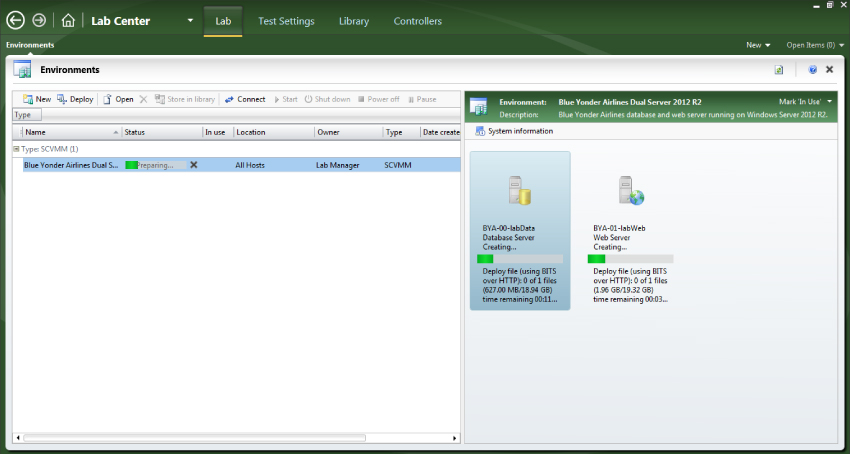
From the Lab ⇒ Environments activity, you can monitor the status of your virtual environment as it is deployed, as shown in Figure 27.6. Deploying a virtual environment can be a long-running operation that can potentially take an hour or more to complete. Various factors (including the size of your VMs, whether or not template customization is required, and the network speed between your SCVMM library server and VM hosts) affect the amount of time it takes to deploy your environment.
After it's deployed, you can manage your virtual environment from the Lab ⇒ Environments activity. This includes starting, stopping, and pausing the virtual environment. Figure 27.7 shows an environment that has been deployed and is currently running. Any errors related to the VMs within your environment are displayed here as well, along with more information describing the error.

You can select a running virtual environment and click Connect to open the Environment Viewer shown in Figure 27.8. The Environment Viewer enables you to interact with the VMs running within your environment.

From the Environment Viewer you can also stop, start, and pause the running environment, and mark an environment as In Use (upper-right corner). This signals to other members of your team that you are using the environment and they should not attempt to connect to it.
The System Information button enables you to view properties of the running VMs (such as the fully qualified machine name). This information can be useful for connecting to the VM from outside of the environment (such as when using a web browser on a client machine to connect to a website running within your virtual environment).
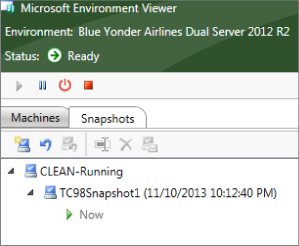
You can also manage snapshots for your environment from here by clicking the Snapshots tab on the left side of the screen, as shown in Figure 27.9. Snapshots enable you to save the state of the entire environment at any point in time, and likewise to restore the state of an environment by restoring a snapshot. If you have multiple machines in your environment, all of the machines in this environment will be snapshotted and restored together as a cohesive unit.
Snapshots have the following useful applications:
- A snapshot can provide a clean “baseline” state that you can use prior to installing or deploying each new build.
- You can create snapshots after installing a new build, providing a way to always restore to a known state prior to any tests being executed that may potentially “dirty” an environment. This includes rolling back to a known good baseline data set used for testing as well.
- Snapshots can be created by testers when they find a bug. These snapshots can then be shared with the development team to help them diagnose the bug and deliver a fix.
You should note that Hyper-V limits the number of snapshots a virtual machine can have. You'll want to refer to the documentation for your particular version of Hyper-V. However, as of this writing, the limit for all compatible versions is 50.
From the Snapshots tab you can create new snapshots, rename them, delete them, or restore your environment to an existing snapshot.
Now that you understand the basics of creating, deploying, and working with running environments, it's time to explore software testing with environments.
Testing with Environments
When you have a running environment, you can use it to run your tests.
Create New Test Settings
In Chapter 24, you configured test settings to define which diagnostics data to collect as you run your tests (such as video, IntelliTrace files, and action logs). But now that you are going to run tests with an environment, you may want to create a new test setting that specifies how the tests should collect data from each machine within your environment. This step is optional, but it can provide valuable diagnostics data to your developers when bugs are discovered.
From within Test Manager, click Testing Center ⇒ Plan ⇒ Properties. Your test plan properties display, as shown in Figure 27.10.

From within your test plan properties, create a new test settings definition (Manual Runs ⇒ Test Settings ⇒ New). Provide a name and (optionally) a description for your new test settings. Click Next.
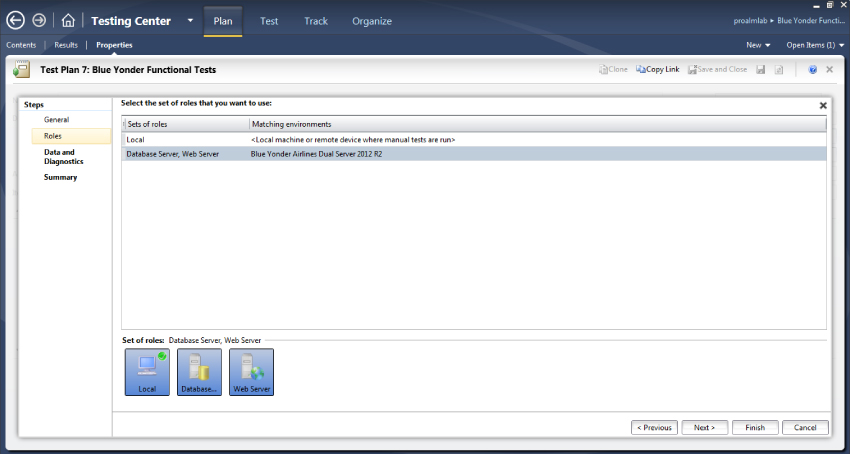
The Roles tab shown in Figure 27.11 enables you to select the environment for which you want to define test settings. When defining test settings for automated tests, you can also select the role from where automated tests are run. When configuring manual tests, the tests are always run from the local machine where Test Manager is running. After selecting your environment, click Next.
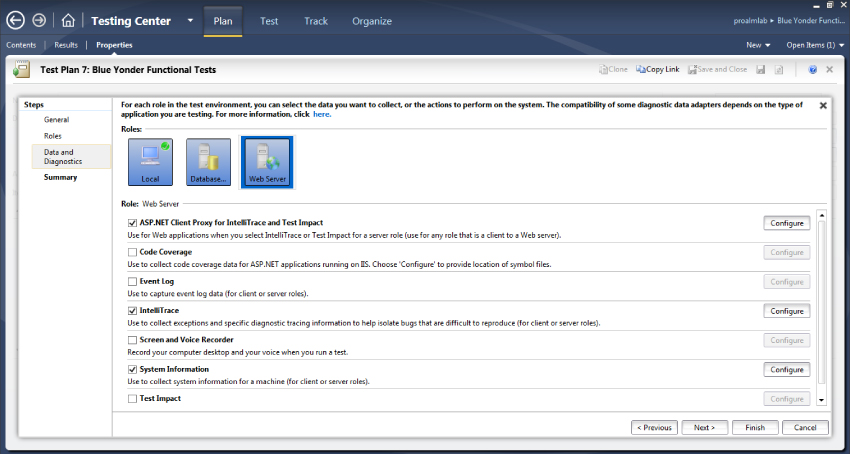
The Data and Diagnostics tab shown in Figure 27.12 enables you to define the individual diagnostics data adapters that are used for each machine within your virtual environment. Data diagnostics adapters were covered in detail in Chapter 23. From here, you can configure the adapters for each machine within your environment. For example, you might want to capture an event log from a database server, IntelliTrace from a web server, and a video recording from a machine which is running coded UI tests.
Run Manual Tests with an Environment
Run a test case as you normally would by clicking Test ⇒ Run Tests activity.
Select a test case that you want to run with your environment and click Run ⇒ Run with Options.
The Run Options dialog shown in Figure 27.13 appears, enabling you to select the test settings and the environment with which you want to run your test. If your manual test has associated automated tests (such as a coded UI test) and your test plan is associated with a build definition, then you can also opt to run this test as an automated test. For now, if your test has associated automated tests, just select the Run All the Tests Manually check box.
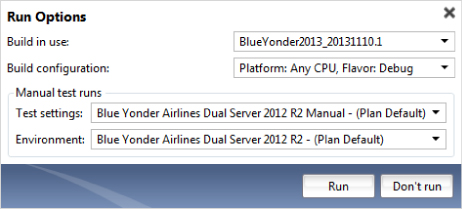
If you defined new test settings for collecting data from your environment, select it here. Also, select your running environment from the Environment drop-down. Click Run to launch your test run and Microsoft Test Runner.
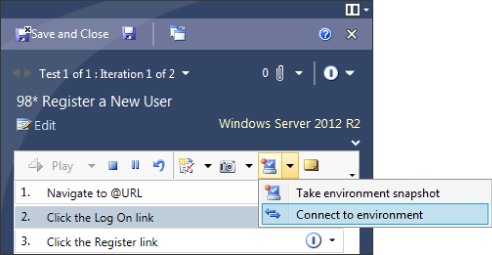
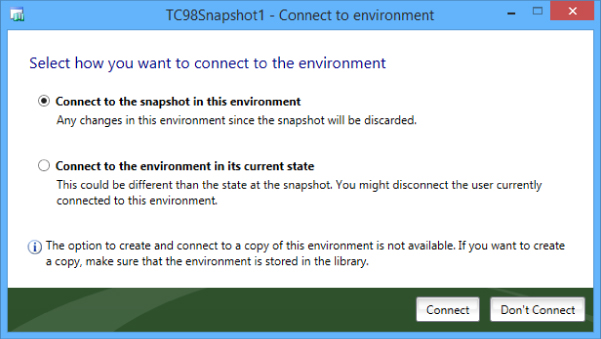
When Microsoft Test Runner is open, you can select the Connect to Environment option (shown in Figure 27.14) to open the Environment Viewer for your environment.
When the Environment Viewer is open, you can then begin running your test just like you would run any other manual test. You might want to use the Snapshots tab to restore the environment to a known state (such as immediately after a given build was deployed). You can even switch among multiple machines within your environment if your test case requires it. Figure 27.15 shows a test case being run with an environment.

If you discover a bug while you are testing, you might want to create an environment snapshot that you can share with the development team to help them diagnose the problem. Even though you could do this directly from within the Environment Viewer, a better way is to do it from within Microsoft Test Runner. This automatically attaches a pointer to the environment snapshot to the test results and any bug reports that are created.
To create an environment snapshot with Microsoft Test Runner, click the rightmost icon along the Microsoft Test Runner toolbar (shown in the upper-right corner of Figure 27.16). This creates a new snapshot of the environment and saves an .lvr.lvr

Click the Create Bug icon within Microsoft Test Runner to create a new bug along with your test results (hover your mouse over the toolbar icons to discover the Create Bug icon). Figure 27.17 shows the new bug creation form, along with a reference to the .lvr
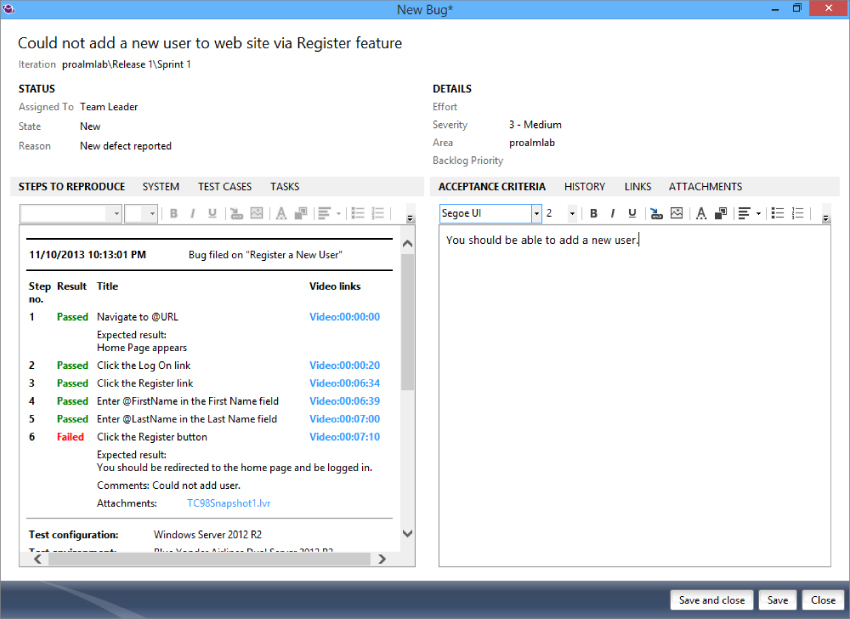
When reviewing this bug later, a developer who has Test Manager installed can open the .lvr.lvr
You have now seen how you can take advantage of an environment when running manual tests. You can use a similar process for running manual tests that have associated automation (such as coded UI tests and unit tests). You can also run such tests as part of an automated end-to-end build-deploy-test workflow. You find out how to configure this next.
Automated Build-Deploy-Test with Environments
The true power of lab management comes to life when combined with the automated build, deployment, and testing capabilities of Team Foundation Server. As the development team produces new builds, they can be automatically deployed into one or more environments. You can create a snapshot from an SCVMM environment, thus providing the testing team with a baseline for running any manual tests against an environment with that build. Then, you can automatically run any automated tests, thus providing valuable data about any possible regressions in your test plan. This entire workflow can take place without any manual intervention.
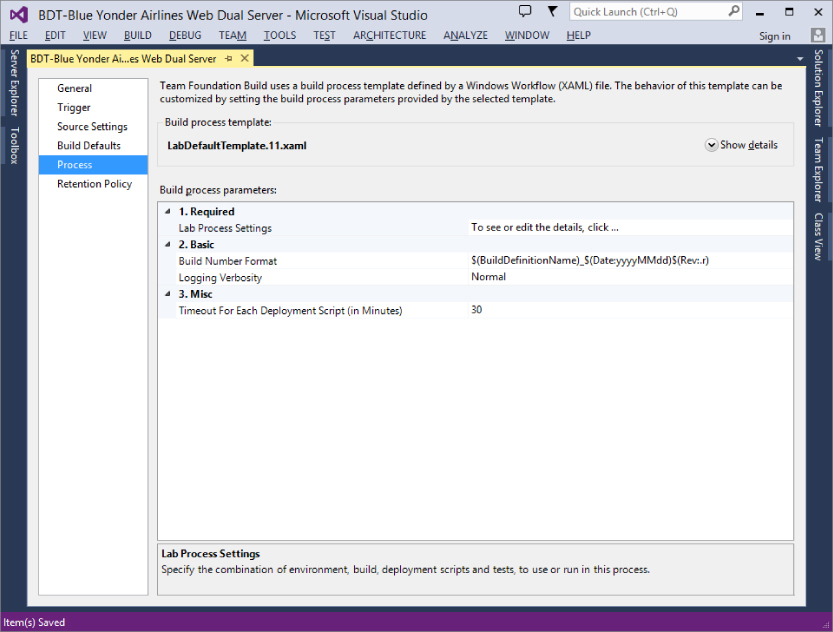
Team Foundation Build is covered in detail in Chapter 5, but this discussion provides an overview of the settings used when configuring Team Foundation Build for use with lab management. Certain steps within the Team Foundation Build configuration are omitted because they are covered in Chapter 5. This example assumes that you have an environment preconfigured.
The first step in creating a build definition for use with lab management is to select Labdefaulttemplate.11.xaml
As shown in Figure 27.20, the first page of the Lab Workflow Parameters wizard enables you to define which environment should be used as part of your build workflow.

If this is an SCVMM environment, you can also choose to restore it to an environment snapshot prior to proceeding with the workflow. This is useful for establishing a clean baseline for your lab environment before attempting to install a new build or run any tests.
The Build page of the Lab Workflow Parameters wizard defines which build of your software should be used. You can rely on another build definition to create a new build, or you can select an existing build that was generated by another build definition. You can also point to a specific location where your software build resides, even if it wasn't created using Team Foundation Build.
As shown in Figure 27.21, the Deploy page of the Lab Workflow Parameters wizard enables you to specify how a build should be deployed within one or more machines running in an environment.
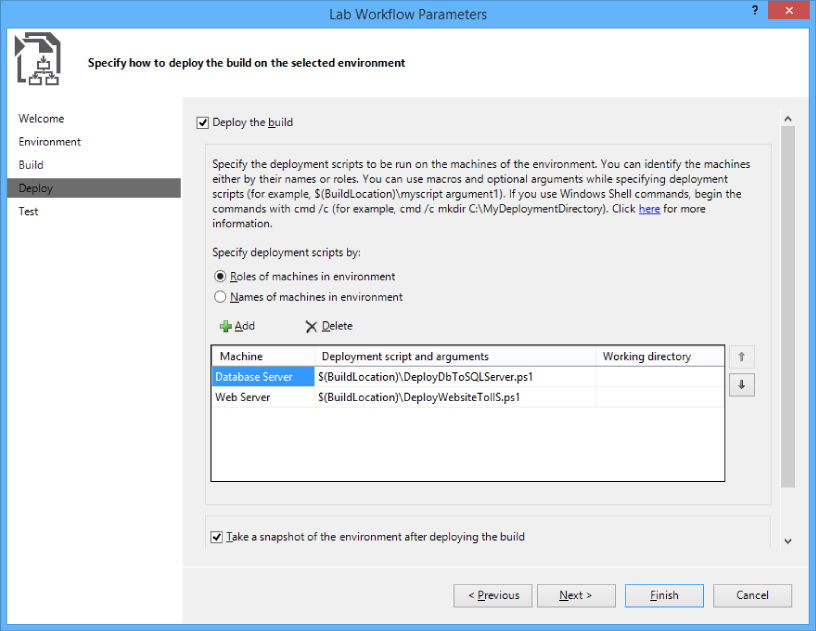
The grid enables you to define a sequence of workflow steps that should be executed in order during the build deployment phase. The first column specifies the name of the machine within the environment that defines where the given deployment step should be run. Note that this is not the computer name; it's the name of the machine that was provided when you configured the environment.
The second column specifies the command that should be run as part of that workflow step. This might include copying files to a web server directory, running an .msi
$(BuildLocation)$(InternalComputerName_MachineName)mywebserverMachineName$(ComputerName_MachineName)MachineNamemywebserver$(InternalComputerName_MachineName)mywebserverVSLM_<uid>.contoso.com<uid>InternalComputerName
Finally, after deploying a build, you can create a new snapshot of an SCVMM environment by enabling the bottom check box and providing a name with which to preface such snapshot names. This then creates new snapshots with names based on the build name and build number, such as those in Figure 27.20.
The Tests page of the Lab Workflow Parameters wizard enables you to run any automated tests that you may have in your test plan. Your test cases need to have associated automation (such as coded UI tests or unit tests). After builds are deployed, these tests run automatically, and the test results are published to your test plan. You also need to specify automated test settings as defined earlier.
Standard Environments
As mentioned earlier, a standard environment is a type of environment (introduced in Team Foundation Server 2012) that enables you to take advantage of lab management capabilities without a dependency on Hyper-V or System Center Virtual Machine Manager. With a standard environment, your machines can be physical machines or virtual machines. The virtualization technology you use is also irrelevant, so although you can use Hyper-V, you can also use any other third-party virtualization technology as well.
The two primary limitations of standard environments are that you are unable to utilize network isolation, and you are unable to access virtualized snapshots (either automatically from build-deploy-test workflows, or manually from within Microsoft Test Manager). If you are using a virtualization technology that supports snapshotting (or an equivalent technique), you can manually work with snapshots using the traditional management interface for that virtualization stack.
The implication of not being able to use snapshots within your build-deploy-test workflows means that, if you utilize a standard environment, you need to design your deployment scripts in such a way that you address situations where you might need to uninstall previous builds in order to install a new one. It may also be possible for you to extend the build-deploy-test workflow to programmatically restore your environment to a baseline snapshot prior to deployment, but this approach varies based on the virtualization technology you are utilizing and may require extensive customizations to the build process template.
You then run tests by specifying an environment like you did earlier in this chapter with an SCVMM environment. You can connect to your physical environments by using the Environment Viewer like you did with tests running in an SCVMM environment, but you can't see icons for functions such as snapshotting and powering the environment on and off.
Standard environments are a great way to get started with the lab management capabilities without the upfront time and effort required to install and configure System Center Virtual Machine Manager. But you can always choose to upgrade to System Center Virtual Machine Manager later if you want to take advantage of the additional capabilities offered by SCVMM environments. Standard environments are also ideal if the software you are testing needs to run in physical (non-virtual) environments, such as when special hardware—which might not be accessible when using virtualization—is required.
Summary
In this chapter, you have seen how you can use lab management to help create and manage environments that you can use to test builds of your software in a variety of configurations. You learned how to create new environments and define which diagnostic data should be collected on various machines as tests are run on those environments. You learned the benefits of snapshots and how to work with them and share them among team members.
You also found out how you can establish an end-to-end workflow to automatically build and deploy your software, and then run automated tests within those environments. You also learned how standard environments, introduced in this release, provide an easy alternative to SCVMM environments.