
Chapter 4
Distributed Version Control with Git and Team Foundation Server
What's in this chapter?
- Understanding the fundamentals of Distributed Version Control with Git
- Getting started with the Visual Studio Tools for Git
- Merging Changes with Git and Visual Studio
Since the first release of Team Foundation Server there's only been one choice when it comes to version control. While other parts of the system—most notably work item tracking—provided choice, version control is a single-choice endeavor. But the world of software development keeps changing, and for some folks, centralized Team Foundation Version Control as it stands today isn't working out.
Yet it turns out even other products weren't cutting it for people out in the larger software development community back when Team Foundation Server was just getting going. Just less than a year before Team Foundation Server 2005's final release, Linus Torvalds, the father of Linux, sprang Git on the software development community. Over the years, Git has become one of the most popular products for managing source code. It's blindingly fast, provides complete local history, and isn't dependent on a centralized server. In fact, Git is known as a distributed version control system.
Fundamentals of Distributed Version Control with Git
Git isn't your traditional version control product. In fact, Linus didn't set out necessarily to write one. Yet Git has become such a force in the software development community that it's mentioned on commercial television news broadcast and convinced Microsoft they were better off embracing it, rather than writing their own.
When you approach Git for the first time, it's important to leave your assumptions at the door. In particular, while you may be very comfortable with other tools, including Team Foundation Version Control, Git has surprises for just about everyone. Search the Internet or popular social services like Twitter for “git hurts” or “git pain” and you'll find no lack of fodder. If it hurts so bad, then why is it so popular?
Git is a part of new generation of distributed version control systems. By not relying upon a central server, they provide immense power and flexibility for the developer. With Git, you start by defining a repository—this can be local or on a server. If it's not local, you bring a copy local through a process known as cloning. From there you work on your source files, making changes as you see fit. When you reach an interesting point, you can commit your changes to your local “repo” including comments. You can do this over and over. If you decide you're ready to share, you can share your changes. How you do this depends upon a number of things but needless to say once you do, someone else can clone the repo. When they do they get all of your commits locally on their system. You never have to worry about something not being there with Git. It's all or nothing. And just like other version control systems, Git supports branches. However, they're much lighter weight and can be private forever to a particular repo—you don't have to share if you don't want to. It's this type of flexibility that has won over the hearts and minds of developers worldwide. And did we mention it's fast? Because there's no network involved when you do a commit, Git doesn't get in your way encouraging you to commit and branch whenever you want.
That said, when you pick a version control technology, you have to consider the team and the organization. The good news is you can mix and match Team Foundation Version Control and Git in the same project collection.
Getting Started with the Visual Studio Tools for Git
If you want to use Git with Visual Studio and Team Foundation Server, you'll want to be on the 2013 release. While Microsoft has released client support for Git in the form of a download package for Visual Studio 2012, they're no longer investing in it and it has limitations. In addition, everything discussed in this chapter works on-premises and in the cloud with Visual Studio Online. That said, while the 2013 features set is very rich, it's not complete relative to the number of things you can do with Git clients. There are times you might need to jump down to the command prompt. Visit http://aka.ms/gitcmd for a nice list of operations and how-to information. That said, Microsoft is promising to update the tooling on both the server and client regularly, quite possibly by the time this book is in print.
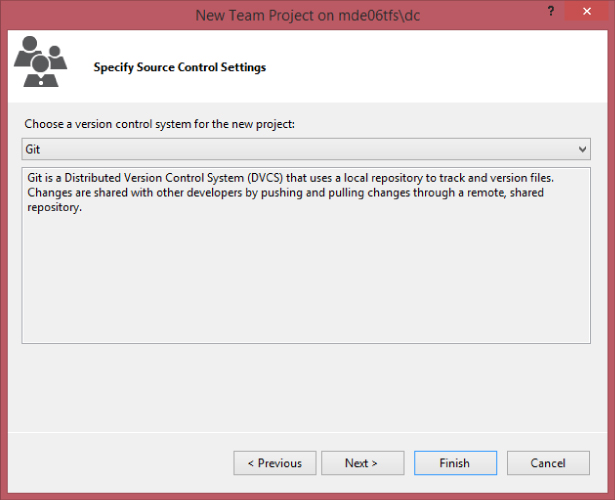
As mentioned earlier, you can get started using Git directly on the client without a server or start with a server-hosted repo. We'll talk about both but start with a remote repository created when you create a Team Project. When you run the New Team Project wizard from Visual Studio 2013, you'll now have an option to specify which version control repository type you want, as shown in Figure 4.1.
Once you complete the wizard and Team Foundation Server has created your Team Project, you'll be ready to start with Git. A common question that comes up is if you can mix Team Foundation Version Control and Git in the same team project. The answer as this chapter is being written is no. However, like other items on Microsoft's backlog, you never know if the answer will remain no. You can vote for this feature and anything else you want by visiting the Visual Studio User Voice site at http://aka.ms/vsuservoice.
Clone
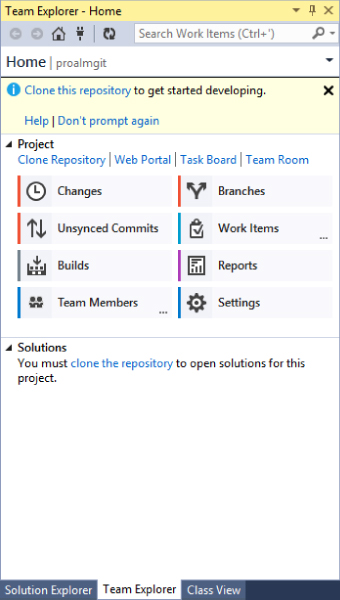
Once you've created the team project from Visual Studio, the Team Explorer window will encourage you to clone your new repository, similar to Figure 4.2.
When you click the link provided, Team Explorer replaces the message with textboxes that are auto-populated with the remote repository location and the location on your local hard drive where it should clone the repository (see Figure 4.3).
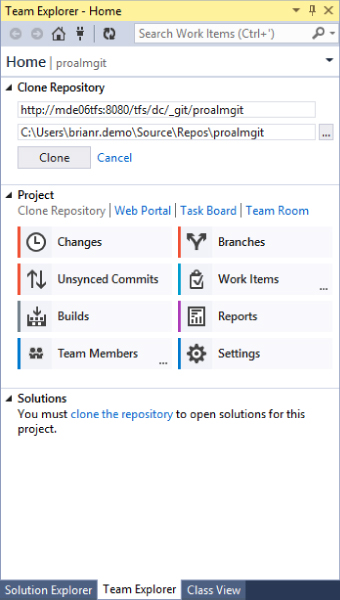
You can accept the path or adjust it as you see fit and then click the Clone button. When you're cloning a remote repo that is empty and new, it's near instantaneous. However, if the remote repository has been in use for a while (it's possible it could be quite large if more than just source files are stored and the repo is in active use), Visual Studio needs to copy down all of the files in the repository as well as all of the changes. This is a significant difference from doing a traditional “get latest” with Team Foundation Version Control. You'll receive a message once the clone process is done in Team Explorer. At this point you're ready to work with your copy of the repository.
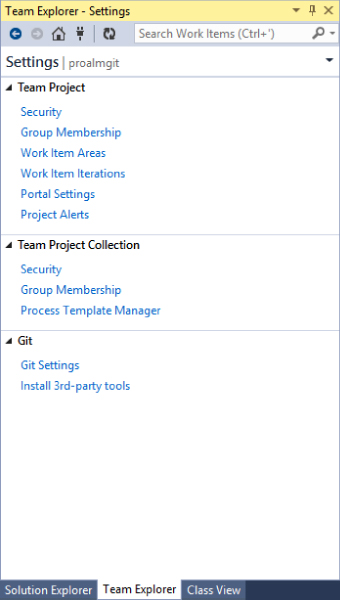
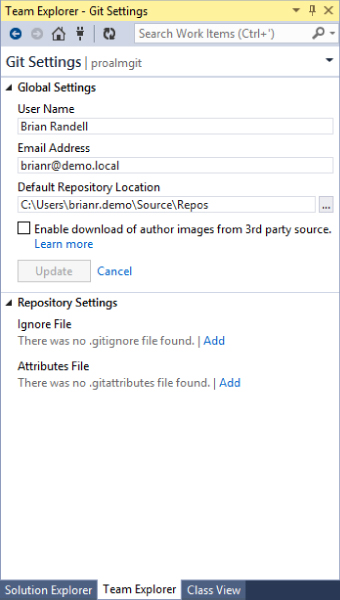
However, if this is your first time using the Git integration, you might want to adjust a couple of settings. Git identifies every commit with information about who did the commit. This identity information is in the form of a display name and an email address. From the Home page of Team Explorer, you'll want to click the Settings button. On the Settings page, near the bottom, you'll find a section entitled Git with two options (see Figure 4.4).
If you select the Git Settings option, you'll get a page to provide your preferred display name, email address, and if desired an author image (see Figure 4.5). If your organization has your email address stored in Active Directory, Team Explorer will use it. You can change it if desired. In addition, you can specify your preferred default local repo location when you clone repositories. In addition, Team Foundation Server supports author images so you more easily see the author of each commit. When using Team Foundation Server-based repositories, your image will be pulled from your profile (adjustable via the Web Portal). The Enable Download option is there in case you're using remote repositories on locations like GitHub.
The other interesting option on the Settings page under the Git section is an option to install third-party tools. This option can also appear at the top of your Team Explorer window with the wording “Install 3rd-Party Git Command Prompt Tools.” If you choose this option, Visual Studio launches the Web Platform Installer to download and run the Git for Windows installer from http://msysgit.github.io/. While this installer is convenient, it silently installs the tools with less than optimal settings at the time this chapter was written. If you download the tools individually, you'll find you have more control over settings like desktop icons. Visit http://aka.ms/gitcmdline for a step-by-step post on how to install the tools. Regardless of how you install them, you'll find these tools are worth having installed as your experience with Git increases.
Commit
Once you've created a Git-enabled team project and cloned the empty repository, you're ready to write some code and start committing. This part starts out in a very familiar fashion. Create a new Visual Studio project, set the location to the directory that you cloned the local repo to, check the Add to Source Control option, and click OK, as shown in Figure 4.6.

Visual Studio creates your project. Just like with a project you've put under Team Foundation Version Control, you'll get glyphs on your items in the Solution Explorer window. At this point, you might do some work like renaming the files or even writing some code. When you're ready, go to Team Explorer and from the Home page click the Changes button. You can also right-click the Solution node in Solution Explorer and select the Commit option from the context menu. Regardless of which option you choose, you're taken to the Changes page in Team Explorer, shown in Figure 4.7.
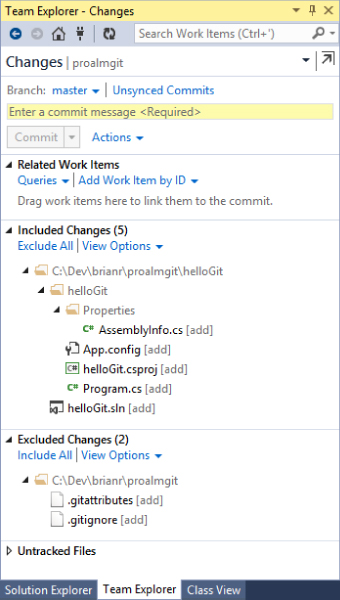
You need to add a comment, known as a commit message. You can associate a work item, and then specify which files are included or not, as well as evaluate any candidate changes, which are listed under the Untracked Files section. They indicate changes that Visual Studio detected but isn't sure should be included.
Currently, the My Work concept that's available when using Team Foundation Version Control from Visual Studio Premium or Ultimate is not available when working with Git-based team projects. Thus to associate a work item with a commit, you need to know the work item's ID. You have the choice of using the Add Work Item by ID option (available only if you have a connection to your Team Foundation Server) or adding a #
The Queries option, which also works only if you have a connection to your Team Foundation Server, will let you run a query stored in your My Queries folder. When you store the work item ID in the commit message, Team Foundation Server can link work items to commits once the changes make their way to your Team Foundation Server's repo. However, at this stage you're just committing to your local repo. Once you have the page adjusted properly, click Commit to save your changes locally. You continue to do this until you're ready to share your work with your team.
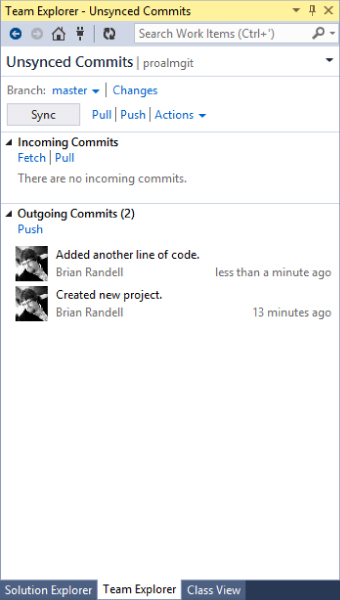
Once the commit is complete, Team Explorer displays a message letting you know your change was saved locally. Git uses object identifiers based on a hash function for your commits. You can click the link and view the details of your commit. You can commit as much as you want and see your changes at any time. You can do this by going to the Unsynced Commits page, which will display your outgoing commits (see Figure 4.8). You can use the View History command from the Actions menu to get a full list of changes. From there, you can access the commit details by double-clicking an item or pressing Enter. In addition, View History is available on the content menu when you right-click an item in the Solution Explorer.
Push, Pull, and Fetch
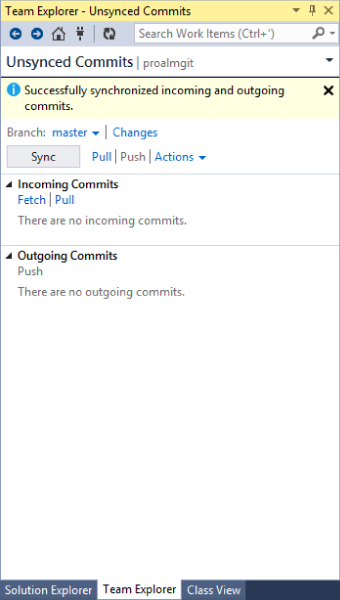
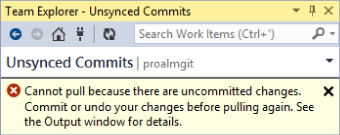
Once you're ready to share with your team, you need to synchronize your repo with Team Foundation Server by pushing your changes from your local repository to the server. From the Unsynced Commits page you have the option of only sending your changes to the server. In addition, you can pull any changes that have been committed to the team project repository by your team. You preview those incoming changes by using the fetch
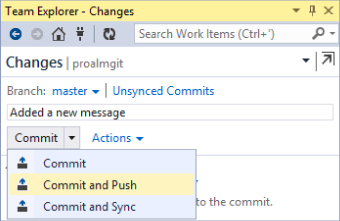
Sometimes you want to make a change and get it pushed up to your team right away. When you're on the Changes page and you've entered a commit message, you can expand the Commit button's menu to see two additional options. As you can see in Figure 4.10, you can commit and push or commit and sync in one step.
Merging Changes with Git and Visual Studio
Working with a distributed version control product means two team members can change the same source file, and then you'll need to merge the changes. As mentioned earlier, you can use the fetch
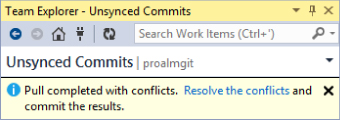
When you perform a pull (or a sync), and there are conflicts, Team Explorer displays a message (see Figure 4.12) letting you know and providing a link to use to resolve the conflict. When you start the resolving process, you get a list of all the conflicts. You then can select a conflict and decide what to do — you can merge using a tool like Visual Studio's built-in merge tool; take the remote file; or keep your local changes (see Figure 4.13).
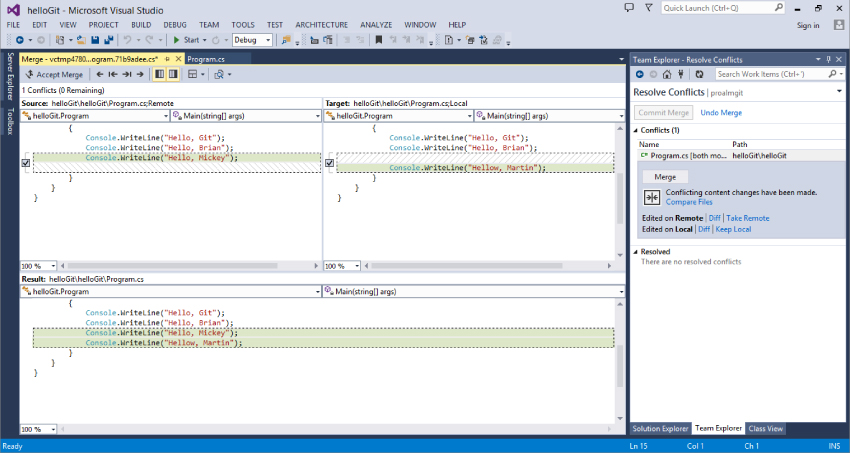
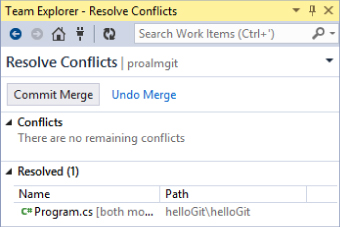
As you resolve the changes, you'll see them added to the list in the Resolve Conflicts page (see Figure 4.14). Once you're done, you need to commit your merge using the Commit Merge button. Once you do that, you'll be taken to the Changes page where you commit the merge to your local repo and, if ready, push the merge to your team.
Branch Creation
Many times you'll want to work on a section of code without having to deal with changes from other team members. Maybe you need to write a new algorithm and you want to try a couple scenarios. Branches provide a way to work in isolation. Unlike Team Foundation Version Control branches, Git branches are lightweight and easy to use locally on their own or shared with your team. Branches have their own commit history, making them very flexible and powerful.
A key concept in working with branches in Git is that you branch in version space, not path space. In other words, in Git, your repo has only one folder structure. When you switch branches, files and folders are manipulated under the covers to match the branch you're working with. In comparison, when you branch in Team Foundation Version Control, each branch is an object that you see relative to other branches and folders.
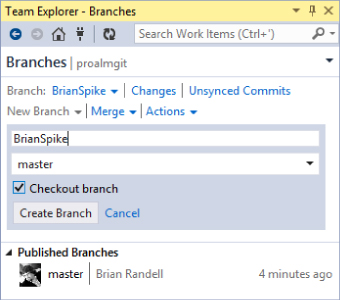
To create a branch, you click the Branches button on the Home page. From there you select the New Branch command, which causes Team Explorer to open up a page, where you provide a name and specify the source branch (see Figure 4.15). If you check out the branch at creation time, Visual Studio will switch to that branch once it has created it.
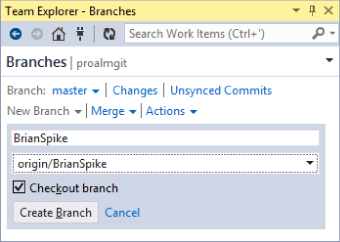
Once the branch is created, you can make changes to your code, and commit as much as you want. You never have to share it if you don't want to. However, sometimes you do want to share your work with others. You can do this by publishing the branch. Once you use the Publish command from the Branches page, other team members can get a copy by using the New Branch command and selecting your branch from the list (see Figure 4.16).
At any point you can merge changes from one branch to another by using the Merge command. This command lets you pick the direction of the merge (see Figure 4.17).
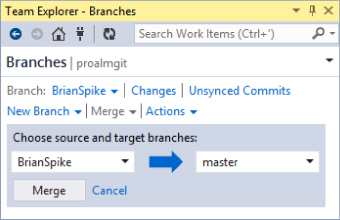
Once you click Merge, your local repo will be updated with the changes. If there are conflicts, you'll need to resolve them and then commit. Finally, just like before, you need to push the changes, if desired, to your team's repo using a push.
Summary
Git brings industry-leading version control features to Team Foundation Server. Microsoft surprised the industry by fully embracing Git rather than creating their own distributed version control system.
This chapter provided an overview of how to use Git with Visual Studio and Team Foundation Server. But it's a very deep and rich product, both on the Git side and in Microsoft's implementation.
In Chapter 5, you'll learn how Team Build helps teams take the pulse of their project to see if they're ready to ship. You'll learn how Team Build works with both Team Foundation Version Control and Git-based repositories and how to customize your build process.