
Chapter 3
Using Centralized Team Foundation Version Control
What's in this chapter?
- Understanding Team Foundation version control
- Setting up version control
- Using Source Control Explorer
- Understanding basic version-control operations
- Understanding check-in policies
- Viewing the history of files and folders
- Understanding labels
- Understanding shelvesets
- Understanding workspaces
- Getting to know the command-line tool
- Understanding branching terminology and concepts
- Getting to know common branching strategies
If you are a developer you live in a world of source code. When you have more than one person working on a project, versioning becomes an issue. If two developers work on the same item, how do you merge their code? How do you prevent accidentally overwriting files? Incredibly, although the practice is rapidly declining, many organizations still just use file shares to store source code. If you are unfamiliar with version control, you can think of it as a file system with an extra dimension—time. You can share the current state of any file or folder with your team members, and you can go back in time to see what other versions have existed and what the source code looked like at any point in the history of the source code repository.
One of the key reasons you are likely to have chosen Visual Studio Team Foundation Server 2013 is its version control management system. It offers a number of features, including the capability to branch, merge, and shelve your source code, and atomic check-ins, policies, and security—all the features you expect from an enterprise version control solution. The core engine for this tool is Microsoft SQL Server. You can rely on the resilience of this proven database engine for the integrity of the data stored in it, the procedures and processes to back it up, and the scalability solutions that it provides.
As well as the built-in integration to Team Foundation Server provided as part of the Visual Studio 2013 installation experience, the Team Foundation Server command line (tf.exe) is also installed to enable you to perform version control operations from a command line if you prefer. There is a Windows Explorer shell extension available as a Team Foundation Server Power Tool. You can also access Team Foundation Server from Eclipse using the free Team Explorer Everywhere plug-in. Team Explorer Everywhere is also where you'll find a version of the Team Foundation Server command-line client for non-Windows systems such as Mac OS X, Linux, Solaris, and other flavors of UNIX.
Team Foundation Server provides a centralized version control system—that is, there is a single master repository on which you back up, manage, maintain, and control permissions. The server has a highly flexible path-based permission system, with access protected by the same Active Directory login used to authenticate with Windows.
Team Foundation Server 2012 introduced a new mode of working—a concept known as local workspaces. In previous versions of TFS, server workspaces (where the state about which files are checked out and so on is stored on the server) were the only option, but the introduction of local workspaces stores the state of the files in the workspace on the local file system, meaning that you do not have to be connected to TFS to edit a file. Local workspaces are the default workspace type in Team Foundation Server 2013, so this chapter begins with the assumption that you are working with a local workspace. Later on the chapter discusses both local and server workspaces, including the differences between them, and which type is suitable for which method of working. In Team Foundation Server 2012, there were many other improvements in version control to make the experience more transparent for developers and to reduce friction for developers doing everyday work. The user experience for version control was dramatically changed from previous versions—making use of a new unified Team Explorer view for the majority of common version control operations. That said, if you're upgrading to Team Foundation Server 2013 with Visual Studio 2013, most of the changes are cosmetic. You'll find refinements in the Team Explorer window, including the ability to “pop out” the window so that it floats separately from the rest of Visual Studio, as well as a new Switch to List View option when viewing pending changes.
In this chapter, you find out about the main features of Team Foundation version control, such as checking in and checking out code, setting check-in policies, and temporarily shelving your code for easy access at a later date. The Team Foundation version control system also supports a number of other features, such as atomic check-ins, workspaces, and changesets, all of which are covered in this chapter. In addition, you'll find coverage of how you work with branches and how you merge code between them.
Team Foundation Version Control and Visual SourceSafe (VSS) 2005
Visual SourceSafe (VSS) 2005 reached the end of mainstream support in 2012 and extended support will end in 2017. No new versions of the product will be released. With the 2012 release of Team Foundation Server, Microsoft made several changes to both the product and its licensing to make it suitable for all sizes of development teams.
Team Foundation version control is part of a greater Software Configuration Management (SCM) solution. Unlike VSS, Team Foundation version control is designed to scale to large development teams and can support distributed and outsourced teams in remote locations. Plus, you can avoid problems such as the occasional corruption of your source code files (because the data is written to a real database, rather than flat files).
Like VSS before it, Team Foundation Server is now available in all MSDN subscriptions, including Visual Studio. Team Foundation Server is available for significantly less than VSS, yet it is a much more modern, full-featured product with a healthy community and significant on-going investment from Microsoft. Therefore, it is now time to move away from any existing VSS databases toward Team Foundation Server. Fortunately, Microsoft has made it even easier to upgrade a VSS repository into Team Foundation Server by providing a new wizard-based solution for performing a VSS migration (with history if required). For more information on using the new Visual SourceSafe upgrade wizard with Team Foundation Server 2013, see http://aka.ms/vssUpgrade.
Setting Up Version Control
Assuming that you've never used a version control system, where do you start? Even if you have used other version control systems, they all work in slightly different ways and have different models for working with files. So how do you effectively set up and use Team Foundation version control? Let's walk through the process step-by-step.
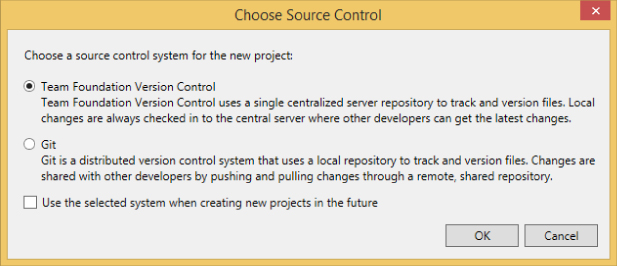
After you have connected to your Team Foundation Server project collection, you can create a new team project by clicking File ⇒ New ⇒ Team Project. This is typically done by your Team Foundation Server administrator, but at this point you are offered a series of options. You no longer get the old option to branch during Team Project creation. Instead you get to choose between Team Foundation version control or Git, as shown in Figure 3.1.
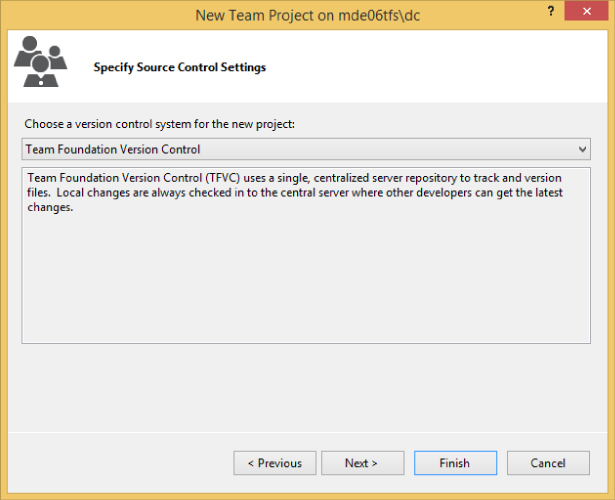
This new page presents a choice that cannot be changed. Once you create a Team Project, the version control repository format you choose—Team Foundation or Git—is there for the life of the Team Project. In addition, it replaces the old version, which allowed you to either create a new trunk or to branch based on an existing team project, something that was generally discouraged. If you miss this old option, you'll need to branch after team project creation.
Using Source Control Explorer
Source Control Explorer is similar to other explorers in Visual Studio. It enables you to browse and manage the entire version control repository, as well as view projects, branches, and individual folders. You can add and delete files; check in, check out, and view any of your pending changes; and view the status of your local code compared to the code in Team Foundation version control and much more. Think of it as your master control area for all tasks related to version management. Following are some of the important tasks it enables you to do:
- Map folders
- Add files
- Get files
- Check in changes
- Rollback
- Create shelvesets
- View historical data
- Branch and merge
- Compare files and folders
- Label your files and folders
- Change security settings for files and folders
Many of these topics are examined later in this chapter. To access the Source Control Explorer, simply click View ⇒ Other Windows ⇒ Source Control Explorer. Alternatively there is a shortcut link to Source Control Explorer on the Team Explorer Home page.
Another way you can open a solution from version control in Visual Studio is by clicking File ⇒ Source Control ⇒ Open from Source Control. Visual Studio prompts you to connect to the Team Foundation Server and select the source code repository of your choice if you are not connected.
Figure 3.2 shows the Source Control Explorer interface. It is divided into three main areas: the source tree view on the left (which enables you to navigate and select source folders from your project), the details view on the right, and the source location bar and version control toolbar at the top.
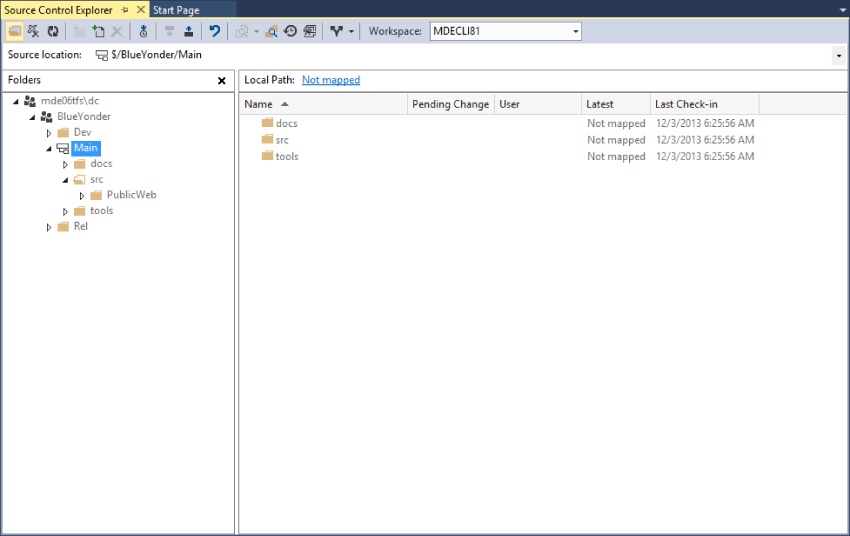
The Source location shows the server path of the currently selected folder in Source Control Explorer. In Team Foundation Server version control, server paths are given in the format $/TeamProjectName/FolderPath/File.txt, where the path separators are a forward slash (/) and the root of the repository is represented by the dollar symbol ($).
Setting Up Your Workspace
Your workspace represents the local working copy of files on your file system. You can think of a workspace as your personal sandbox to work on source code; it is the bridge between code on the server and your client machine. A workspace has one or many folders mapped in Team Foundation version control with your local file system. Whenever you get files, they are downloaded from the repository in Team Foundation Server and placed into your workspace for you to work on them. To get your changes back into the server repository you check in (commit) the changes. Workspaces provide isolation; they enable you to work on your code to make up your application without affecting any changes the rest of your team might be making.
The workspace itself is bound to a machine and owner. If you move to a different machine you have to create a new workspace. Files that you have edited in your workspace live only on the associated machine. This is an important difference to keep in mind with some other version control systems.
In Team Foundation Server 2013, when you first attempt to access version control operations on the server (such as using Source Control Explorer to browse the contents of the server repository), a local workspace is created that is automatically ready for you to begin mapping folders and getting files. By default the workspace name is the same as your computer name. However, you can have multiple workspaces belonging to the same user on the same machine and you can swap between them using the Workspace drop-down in the version control toolbar in Source Control Explorer (refer to Figure 3.2).
Getting Existing Code
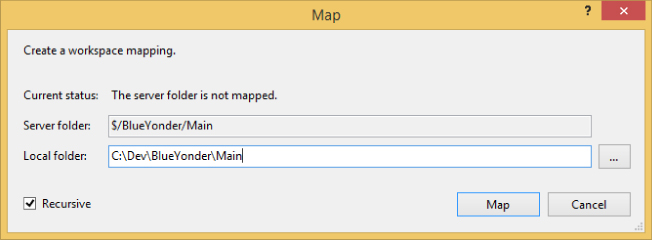
If you are connecting to a repository that already has code in it, the first thing that you probably want to do is map a folder to your local file system and download the code. Browse to the folder that you want to map (such as the $/BlueYonder/Main/ folder shown in Figure 3.2). At the top of the details pane on the right side you can see that the Local Path is Not Mapped, and that Not Mapped is underlined. Click the Not Mapped link to open the Map dialog and point it at a directory on your local file system, as shown in Figure 3.3. Note that the local path (or indeed the server path) does not need to exist. If the local folder entered into the dialog does not exist then Team Foundation Server attempts to create it for you when you download (or get) the files for the first time.
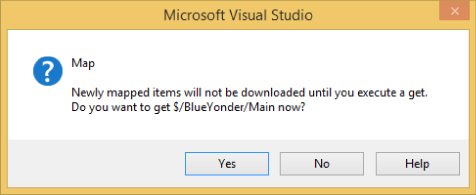
Whenever you create or change your working folder mappings, Team Foundation Server prompts you if you would like to perform a get so that the files on the server are downloaded locally, as shown in Figure 3.4. Select Yes in the dialog, and the latest version of the Main folder is downloaded into the directory specified.
The Local Path in the details pane of Source Control Explorer now shows the path that you are currently viewing, and clicking the path link opens that directory in the local file system. Depending on the theme you've chosen for Visual Studio, the files in Source Control Explorer are shown in different colors or shades to indicate whether you have a local copy. In addition the Latest column reads Yes.
Sharing Projects in Version Control
If you are sharing new code with your team using Team Foundation Server for the first time then you can import the associated source files into the repository in a number of ways. The process of sharing code in Team Foundation Server is called checking in.
Sharing a Solution in Visual Studio
To share a solution in Visual Studio, right-click the solution in Solution Explorer and select Add Solution to Source Control. If you are not already connected to a Team Foundation Server project collection, you select the server and project collection that you want to connect to. Then you select the location in the central version control repository that you want to use for sharing your source code.
If the path you selected is not under a locally mapped folder, you'll be prompted to specify which type of version control you want to use—either Team Foundation version control or Git—as shown in Figure 3.5.
If you are sharing code into a new Team Project then a good practice is to create a folder called Main (with possible additional subfolders like src for source code, docs, tools, and so on) under your Team Project and share the solution into it, as shown in Figure 3.6.
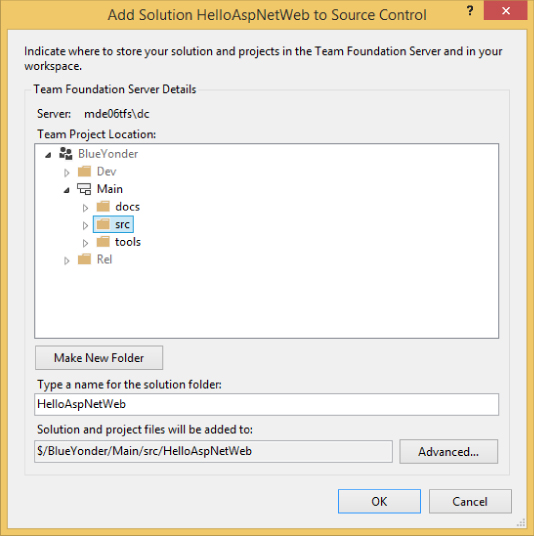
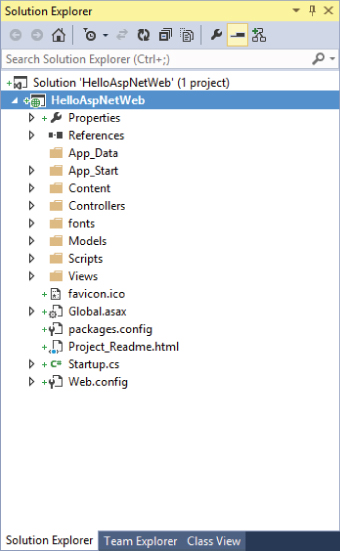
After you have set the location you want to use for sharing your files, click the OK button on the Add Solution to Source Control dialog window. The solution displays in Solution Explorer with a plus symbol to the left of it (see Figure 3.7). The plus sign indicates that the file is pending addition into version control.
In general, you don't want to see the dialog shown in Figure 3.6. This dialog appears when the local path you've selected is not a known folder to version control. If you've already created a workspace mapping for a team project and you pick a folder under one of your mapped folders, Figure 3.6 will not appear. Figure 3.6 typically appears when you create a new Visual Studio project and accept the default folder, which defaults to your profile directory's documents folder.
This solution at this point is not yet shared with Team Foundation Server. TFS version control works using a two-phased process. You first build up a list of changes that you want to make in version control and then you commit the changes in a single transaction called a changeset.
To check the files into version control, go to the Pending Changes page in Team Explorer by right-clicking on the solution in Solution Explorer and selecting Check In. Alternatively you can go to the Team Explorer view and then select the Pending Changes page. A third alternative is to go to View ⇒ Other Windows ⇒ Pending Changes.
The next section reviews the pending changes page. You commit your changes from there.
Sharing a Project in Eclipse
Microsoft provides an Eclipse plug-in as part of Team Explorer Everywhere. After you have the TFS plug-in for Eclipse installed, you may share a project in Eclipse easily. Right-click the project in Package Explorer and select Team ⇒ Share Project. The Share Project wizard shows the installed team providers in your Eclipse instance (see Figure 3.8).
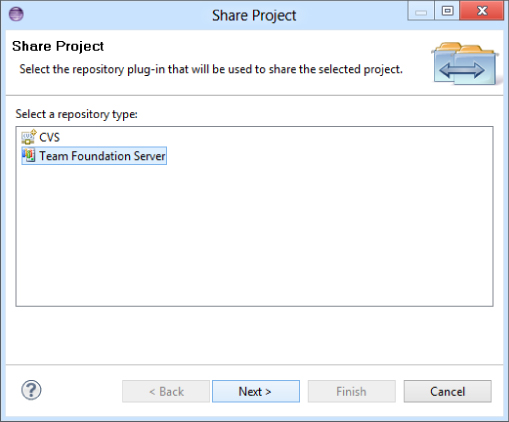
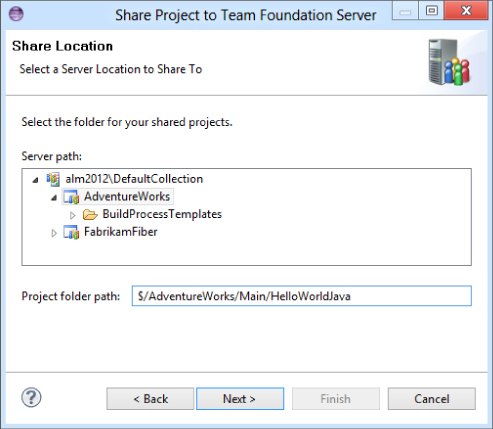
Select Team Foundation Server and then choose the project collection that you want to connect to (if you have not already connected). Then select the desired TFS workspace. (You can also press Next to select the default TFS workspace, which is usually correct.) The Share Location page of the Share Project Wizard displays, as shown in Figure 3.9. From here you select a path in version control to share the files. As previously discussed you want to add your files into a folder called Main, so you simply enter the full server path into the Project folder path textbox that you want to share at. As mentioned earlier in the chapter, it does not matter that the Main folder does not exist yet; it is automatically created on the server when you perform the check-in.
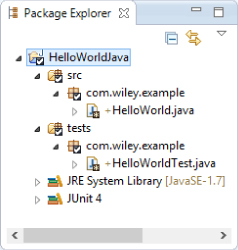
Pressing Finish creates pending adds for all the files in the project into version control. The file icons are annotated in the Package Explorer with a small check mark to indicate that they are pending adds to version control (see Figure 3.10). Note, just as with Visual Studio, these files are not yet stored on the server; you must first check them in. To get the pending changes view in Eclipse, go to Windows ⇒ Show View ⇒ Other Windows ⇒ Team Foundation Server ⇒ Team Explorer and click the Pending Changes page.
In the next section, you find out how to work with the pending changes view to check in code to the source repository. You also find out about changesets and how to configure team check-in policies.
Check-In Pending Changes
Frequent check-ins and gets are an essential part of a developer's workflow. You need to check in the code so that it is shared with the rest of your team, and you need to frequently Get Latest so that you are developing and testing against the very latest version of the source code that makes up your application.
When making changes in your local workspaces, Team Foundation Server maintains a list of the files that are being changed and their change types (that is, add, edit, rename, delete) in the pending changes window.
This is one area where the experience in Team Foundation Server 2012 and 2013 is very different from previous versions. Rather than have another view active in Visual Studio or Eclipse, Microsoft moved the pending changes experience into Team Explorer (see Figure 3.11) to allow more space in the development environment for the code editing window as well as centralize version control operations. The pending changes experience was also changed from a horizontal view to a vertical one as part of the move to the new Team Explorer. This was reflective of the fact that most developers now use monitors with a widescreen aspect ratio, so space on the sides of the code being edited is usually available.

That said, there are two changes that are specific to Visual Studio 2013 that will make it easier for you if you upgrade from a version prior to 2012. The first is the option to “pop out” the Pending Changes page from Team Explorer so you can move it to another monitor or location inside Visual Studio. The other is the new option, called Switch to List View, which you'll find under the View Options drop-down located in the Included Changes and Exclude Changes section of the Pending Changes page. When they're used together, you can make the Pending Changes windows simulate the look of the previous version just a bit (see Figure 3.12).
Checking In an Item
A changeset contains all of the information related to a check-in, such as work item links, file revisions, notes, policies, and owner and date/time details. Team Foundation version control bundles all the information into this logical container. A changeset is created after you check code into the repository, and, as a container, it reflects only the changes you checked in. You can also view it as the state of the repository at a particular moment in time of the repository. The usefulness of a changeset comes from the fact that you can, on a very atomic level, return to any moment of change and troubleshoot your code.
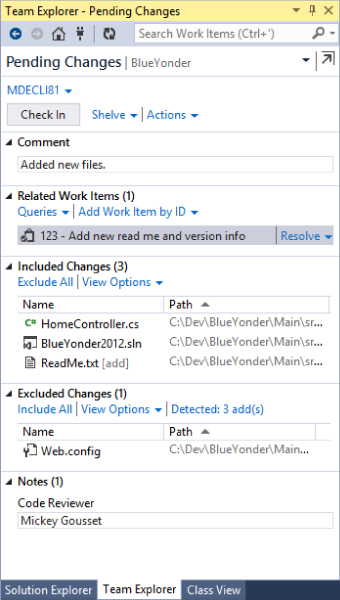
The Pending Changes page, shown in Figure 3.11, enables you to view all of the files in your workspace that Team Foundation Server considers changed from the latest version that you copied into your workspace from the server. You can access this list at any time via Team Explorer or via the View ⇒ Other Windows ⇒ Pending Changes menu option.
The Pending Changes view shown in Figure 3.11 highlights most of the key areas. In addition to the areas shown, there is also a notification area at the top of the page that is used to inform you when you have successfully checked in changes, so that you know that they are stored on the server. It also gives you a quick reference to the changeset ID that was created.
At the top of the page you see any policy warnings that are currently being given. Check-in policies are covered later in this chapter, but in simple terms you can think of them as code that runs on the client to validate whether a check-in is valid.
Next there is an area to provide a comment. Best practice is that you should provide a short but meaningful comment with every check-in, ideally explaining why you made the changes you are making—not what you changed. To see what you changed, any authorized user can simply look at those changeset details and compare (or diff, as it is sometimes called) the files inside the changeset. However, a changeset comment explaining why you changed those files is very useful to help others understand why things happened the way they did.
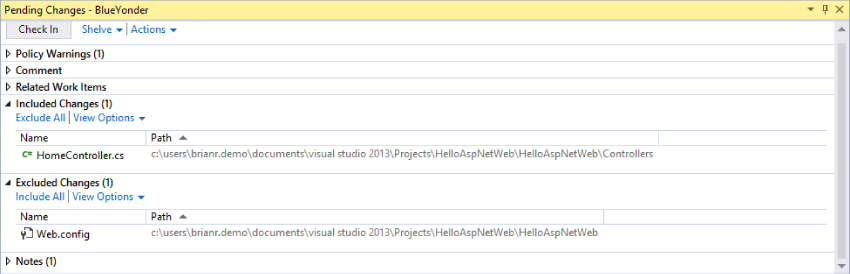
Files listed in the Included Changes section are the files that you want to make up your next changeset. These are the files that you are modifying, creating, or deleting as part of the change. For users of older versions of Team Foundation Server, this is equivalent to checking the box next to the file in the old Pending Changes view, except that the inclusion or exclusion of a file in the Pending Changes list is now persisted. That means you'll no longer accidentally include a file that you thought you had excluded.
Files that are in the Excluded Changes section are those that you have positively modified as part of your changes but you have told Team Foundation Server that you do not want to check them in. Perhaps you have modified a web.config file to enable local debugging or you are still working on some changes and you do not want to check them in yet. If you find that you are frequently having files in the excluded changes window just because you haven't finished working with them then you should consider making use of the shelvesets feature of Team Foundation Server, which is discussed in the “Shelving” section later in this chapter.
Finally, the Notes section lists the check-in notes that have been configured for the team project. Check-in notes are covered in the “Shelving” section later in this chapter. In simple terms, check-in notes are additional string-based metadata that you can configure in your repository. The check-in notes can also optionally be specified as mandatory (such as the Code Reviewer example in Figure 3.11).
In the next section you find out how to associate work items with a particular check-in, which many teams find a good practice to ensure that every change is associated with a particular work item (either a bug or a task). As a result you can have end-to-end requirements traceability (from the initial story, requirement, or product backlog item through to the task to implement it, through to the check-in that provided that feature, and finally to the build in which the feature was included).
Candidate Changes
Before moving from the Pending Changes view, it is worth discussing Candidate Changes, which is a feature unique to a Local Workspace in Team Foundation Server 2012 and later.
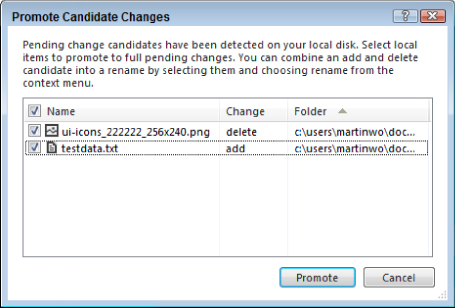
Inside the Excluded Changes section is a Detected Changes link. Clicking it shows any candidate changes that Team Foundation Server has detected (see Figure 3.13). If you have made changes in the file system, such as adding or deleting a file outside of Visual Studio, then these changes are not automatically pended by Team Foundation Server. They are flagged as changes that you might want to add into your pending changeset. The example in Figure 3.13 shows five candidate changes.

In this case, the ui-icons image file was deleted by the developer from Windows Explorer as she realized that the file was no longer needed in the website. The developer renamed bullet.png to wingding.png while she had no network connection to Team Foundation Server and was working offline. The developer added testdata.txt in Windows Explorer as a data file to be used during testing, but she did not specifically add it to the solution, which is why Visual Studio did not explicitly pend an add against it. And finally testrun.dat was automatically created in the source tree as part of a unit test run, and the developer wants to make sure that she and her colleagues never accidentally check in this file.
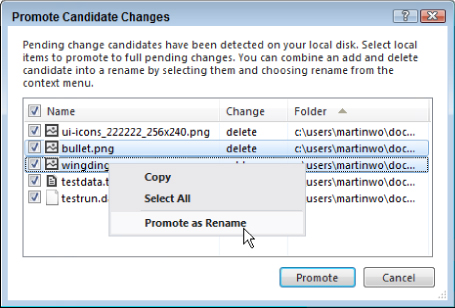
As the developer renamed the bullet.png file inside Windows Explorer, Team Foundation Server has no way to automatically detect that this was a rename operation. It sees the changes as an add and a delete. If the change had been made inside of Visual Studio from Source Control Explorer or Solution Explorer then the rename would have been automatically detected and pended as such, which would have preserved the history of the file under the new name. The developer would like to preserve that this was a rename operation. She selects both bullet.png and wingding.png (by holding down Ctrl while making the selection) and then selects the Promote as Rename option, as shown in Figure 3.14. This creates a new pending change on wingding.png specifying that it was renamed from bullet.png.
Next the developer wants to ensure that no one ever accidentally checks in the file testrun.dat as this is generated as part of a unit test run and doesn't make up the code of the application. She right-clicks the file and selects Ignore This Local Item (see Figure 3.13). This creates a file in the folder called .tfIgnore that tells TFS to ignore this file from ever being added to version control. Note that the developer could have ignored all files with a .dat extension, or files called testrun.dat regardless of where they appear below the folder containing the .tfIgnore file. She even could have ignored the whole HelloWorldMVC.Tests folder. After the .tfIgnore file is checked in to version control, other developers will also ignore that file.
The developer is left with two candidate changes (see Figure 3.15) that are both checked. She clicks the Promote button as she wants to make sure that those candidate changes are included in the next changeset.
Performing the Check-in
Figure 3.16 shows that you now have the changes and how you want them recorded. There is a changeset comment, and a work item associated with the check-in will be marked as resolved when you perform the check-in. Click the Check In button. The changes are then committed to TFS in a single atomic transaction and given a changeset ID.
Note that if TFS could not have performed the check-in for some reason (perhaps another developer had checked in a conflicting change to the HomeController.cs file while you were editing your version) then none of the changes would have been checked in. You would have been notified about the conflict and given options to resolve the conflict before you were allowed to complete the check-in. Only when all the files included in the changeset can be committed to the repository is the changeset created and given the next incremented changeset ID for that project collection.
Note that as well as checking in from the Pending Changes view, there are a number of other actions on the drop-down menus next to the Check In button. You can shelve or unshelve code, find shelvesets, resolve conflicts, undo all changes, and, if you have an appropriate version of Visual Studio, you can request a code review using the Code Review feature.
Creating and Administering Check-In Policies
Check-in policies provide a way for the team and individuals to effectively manage quality and the workflow around version control used by the team. Check-in policies are implemented as plug-ins that are run on the client before each check-in to determine if the check-in should be allowed. Because the code is run on the client, check-in policies are configured separately for the .NET-based clients (such as Visual Studio, the Windows Shell Extensions, or the Team Foundation command line on Windows) and the Java-based clients provided by Team Explorer Everywhere (such as the TFS plug-in for Eclipse or the cross-platform command-line client).
As a team project administrator, to configure the check-in policies for Visual Studio users, select your Team Foundation project in Team Explorer. Then, open the drop-down menu and choose Settings. On the Settings page, select Source Control under the Team Project section. In the Source Control Settings dialog, under the Check-in Policy tab (see Figure 3.17), you find several options for modifying the check-in policies.
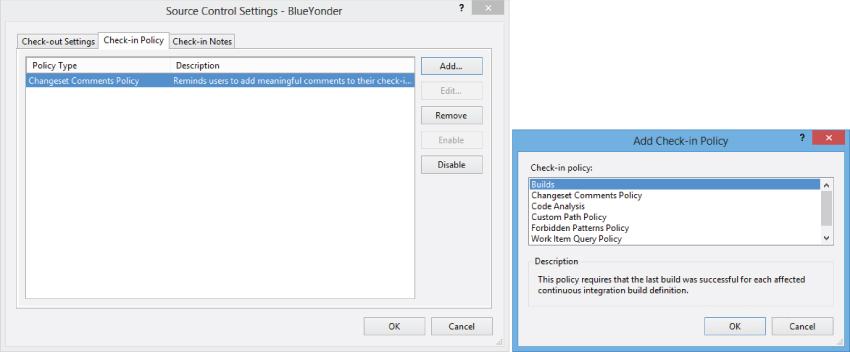
If you click the Add button in the Source Control Settings dialog box (see Figure 3.17), you are prompted to select a check-in policy type. The list in Figure 3.17 shows the types provided out of the box in Visual Studio 2013 (note that the Changesets Comments policy is now in the box as of the 2012 release, but the Testing Policy is no longer shipped by default). More check-in policies are provided by the Team Foundation Server power tools (which you can see in Figure 3.17), and your administrator may have installed further custom check-in policies for your organization. Selecting each of the check-in policies provides more information about it.
After the check-in policy has been created, try checking in code without complying with the new policies. The policy failure warning is displayed in the pending changes view, as shown in Figure 3.11. When you get a check-in policy failure warning, you can override it and perform the check-in anyway.
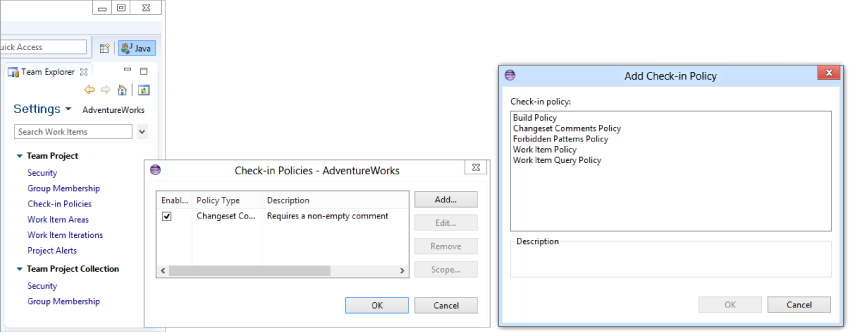
To set the check-in policies for your Team Explorer Everywhere users, a team project administrator should connect to the team project in Eclipse, view the Settings page in Team Explorer, select Check-In Policies, and then enable the desired check-in policies as provided by Team Explorer Everywhere. See Figure 3.18.
Viewing History
To view the history of a file or folder, in Source Control Explorer, right-click the file or folder and select View History from the context menu. The View History menu option is usually available via a context menu from many other places where the file is shown, such as when you right-click the file itself in the code editor, from Solution Explorer, in the Pending Changes view, and more. Viewing history on a file opens a new document tab, as shown in Figure 3.19.
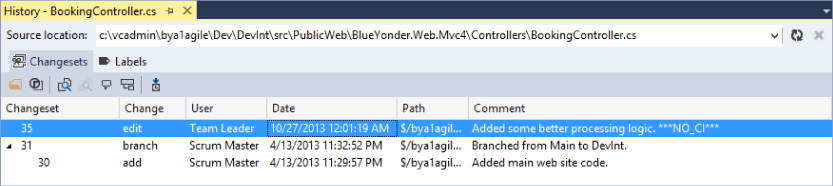
The History window is a tabbed document window in Visual Studio and Eclipse. This enables you to open multiple History windows for research. Notice that the window in Visual Studio has two sub-tabs: Changesets and Labels. The History window now gives you a view of the changesets associated with the file or folder, as well as any labels. Notice that the changeset IDs for a file are not sequential. The changeset IDs are incremented globally to represent a point in time of the entire repository for the project collection. The changeset IDs for the file show the changesets in which that file was modified. This is a different versioning mechanism than with systems such as VSS in which individual files have version numbers; in Team Foundation Server the only version number that matters is the changeset ID.
You have several options from the Changeset sub-tab. You can select a changeset and click the View button to view the file version for that particular changeset. You can click the Changeset Details button to view the details for a particular changeset, including all the files that make up the changeset and any associated work items. You can compare two different versions of a file or folder to see the differences. When viewing the history of a file, clicking the Annotate button enables you to see, line by line, who made what changes to a particular file. Selecting Rollback reverts all the changes made in that particular changeset. You can track the changeset across branches to see if those changes have made it into the other trees of your source code, and you can also request a code review if you have an appropriate version of Visual Studio.
Finally, you can select a changeset and click the Get This Version button. This replaces the current version of this file in your workspace with the selected version, enabling you to easily return to an earlier version of a file.
When viewing the history of a single file, the History window also enables you to expand the history of that file prior to a rename or a merge from another branch.
Labeling Files
A label is a marker or a tag that can be attached to files and folders in Team Foundation version control. This marker allows all the files and folders labeled together to be retrieved as one collective unit. Although labels are often generated by things like an automated build, in Team Foundation Server labels are editable by users with the appropriate security permissions. They are not designed to provide auditable points of reference, for that you should make note of the changeset ID as that represents an exact point in time of the source code repository.
To create a new label, in Source Control Explorer, right-click the file or folder you want to label, and select Advanced ⇒ Apply Label from the context menu. The New Label window displays.
In this window, you can enter the label name and a comment. You can also select the version that you want to label. You can choose to label by changeset, date, label, latest version, or workspace version. Click the Create button to create the label.
Notice next that the Create button is a drop-down arrow. Clicking the arrow provides you with two options. You can create the label as is, or you can create the label and then edit it. If you select Create and Edit, the label is created, and you are presented a new tab, as shown in Figure 3.20.
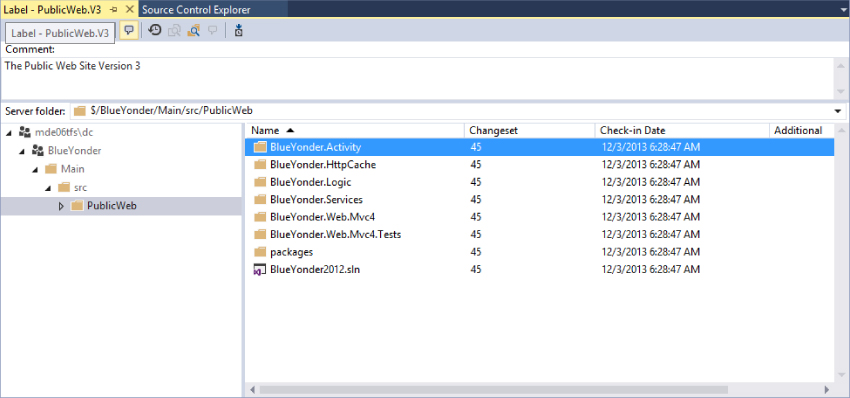
This tab enables you to make multiple changes to the label. You can add new files to the label. You can change the version of a file that the label is currently applied to. And you can remove files from the label. All of this is made easily accessible by using the Tree View control.
Shelving
There are times when you won't be ready to commit your source code into the core repository. For example, maybe you need to go home for the evening but haven't been able to check in and you want to make sure you have a backup of your work. Or say that you are working on solving a bug and you want to share the changes you have made with a colleague to get his assistance on a particular issue. Shelving enables you to quickly and easily store files on the server without committing them to the main code base. The collections of stored pending changes that haven't been committed are called shelvesets.
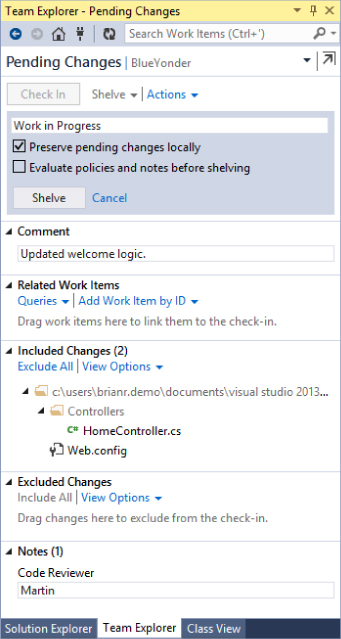
The process of creating a shelveset is fast and easy. From the Pending Changes page in Team Explorer, click the Shelve link. Enter a name for your shelveset in the box that displays (see Figure 3.21) and choose among the options to preserve the pending changes locally as well as to evaluate the check-in policies and check-in notes before shelving.
Shelvesets contain the same level of information as a changeset, including associated work items, comments, and check-in notes. Team Foundation Server can store other metadata alongside a shelveset as properties, which are used by the Code Review functionality detailed in Chapter 18. Keep in mind that, unlike with a changeset, the changes are not versioned. Shelvesets can be permanently deleted (which is something you can't do with changesets). You can't link directly to a shelveset from a work item. You can override the data stored in one of your shelvesets at any time by creating a new one with the same name as one created previously.
Unshelving source files is as easy as shelving them. First, bring up the Pending Changes page of Team Explorer and then, from the Actions drop-down, select Find Shelvesets. By default your own shelvesets are shown as in Figure 3.22; however, you can also search for the shelvesets of a team member by entering her username or display name, or use * as a wild card, and pressing Enter.

From the shelveset results you can view the shelveset details, unshelve those changes into your workspace, delete the shelveset completely from the server, or, in certain versions of Visual Studio, request a code review on the contents of the shelveset.
A feature, originally added in Team Foundation Server 2012, detects and handles conflicts as part of the unshelve process. In previous versions if you had a conflicting change already in your workspace then you would not be able to unshelve the contents of the shelveset. In Visual Studio 2013 and Team Explorer Everywhere 2013, unshelving conflicts are shown in the conflicts editor just like any other merge conflict. In addition, due to the new auto-merge capabilities in this previous release, the likelihood of getting a conflict on unshelve is much lower (for example, two changes to the same file in different places would be automatically merged when you did the unshelve and would not result in a conflict).
Workspaces
As discussed earlier, the majority of this chapter has dealt with using Team Foundation Server version control via a local workspace, which is the default option. However, this is a different workspace type than was available previously with Team Foundation Server. Table 3.1 describes the two workspace types, how they differ, how your use of TFS version control changes, and when you would select one workspace type over another.
Table 3.1 Local and Serv3er Workspaces Compared
| Local | Server | |
| Description | Files are read-write locally on get, no explicit check-out operation required, workspace data stored on the local machine in a hidden $tf folder at the root of the workspace. |
Files are read-only locally on get, explicit check-out operation is required, workspace data stored on the server. |
| Advantages | Easier to work with files outside of Visual Studio or Eclipse. Offline working much improved as no explicit check-out is required and developers can work with files without needing a connection to server. |
Scales to huge (multi-gigabyte) workspace sizes. |
| Advantages | Only files that are different from the original workspace version are shown in the Pending Changes view. More familiar to users of version control systems such as Subversion. |
Optionally allows the ability to specify exclusive check-outs (only one person can work on a file at the same time). Enables optionally setting Visual Studio to automatically get the latest version of a file before a check-out is performed. Notifications presented if you begin editing a file that is currently checked out by another user. More familiar to users of version control systems such as VSS. |
| Disadvantages | Performance of local workspaces degrades with more files in the workspace and the speed of the hard drive also has an important influence. Not recommended for workspaces with more than 100,000 files. | Requires the server to be informed of all changes to the local file system, including deletes, edits, and so on. |
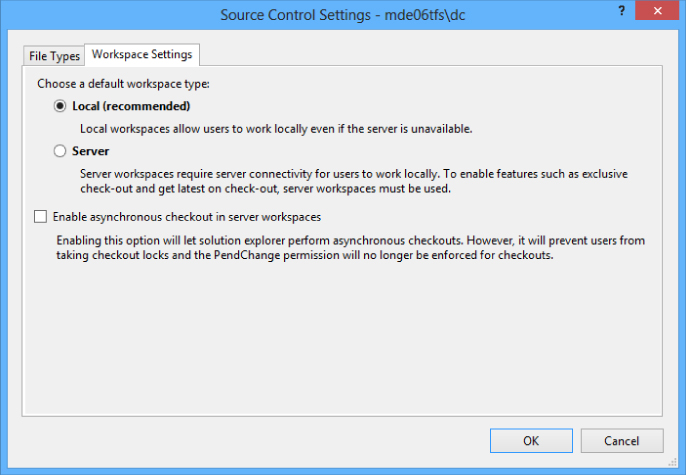
Note that a Team Project Collection administrator can define which workspace type is the default for projects within that collection by using Team ⇒ Team Project Collection Settings ⇒ Source Control and selecting the Workspace Settings tab as shown in Figure 3.23. In addition the server administrator can enable asynchronous check-outs for server workspaces where an explicit check-out operation is required. Checking the option enables Visual Studio to check out the file automatically in the background without blocking the user because enabling that feature disables features that may prevent that check-out from succeeding.
Users can convert their local workspace to a server workspace or vice-versa simply from the Manage Workspaces dialog by going to File ⇒ Source Control ⇒ Advanced ⇒ Workspaces. Select the workspace and press Edit to get to the Edit Workspace dialog. Then press the ![]() Advanced button to see all the properties, as shown in Figure 3.24.
Advanced button to see all the properties, as shown in Figure 3.24.
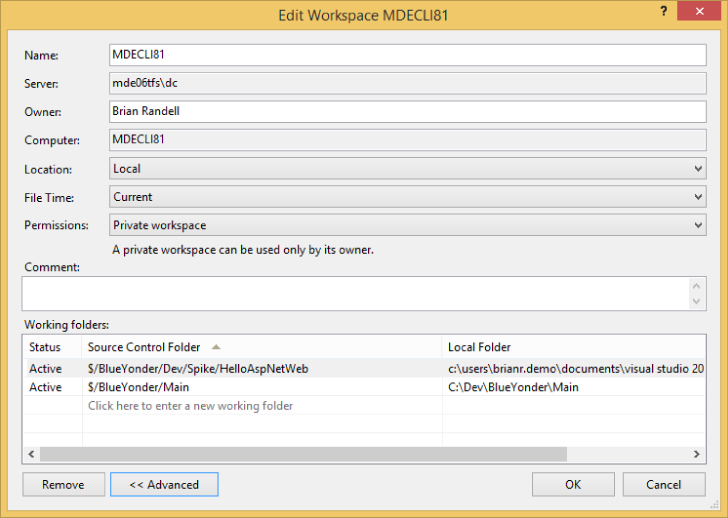
To convert between a local and a server workspace, change the drop-down for the Location property.
There are other advanced options worth noting at this point. As introduced in Team Foundation Server 2010, a user can adjust the permissions on the workspace. Table 3.2 shows the different permission features.
Table 3.2 Permission Features
| Permission | Description |
| Private workspace | A private workspace can be used only by its owner. |
| Public workspace (limited) | A limited public workspace can be used by any valid user, but only the workspace owner can check in or administer the workspace. |
| Public workspace | A fully public workspace can be used, checked in, and administered by any valid user. |
Public workspaces make it easier for teams to collaborate when sharing a single machine. One specific example would be merging bug fixes into a mainline branch. By utilizing a public workspace, multiple team members can work together on a common machine to resolve merge conflicts, thereby making the merge process run faster and smoother.
The File Time setting was added in Team Foundation Server 2012. In previous versions of TFS, the timestamp of the file in the local file system is the time at which that file was downloaded to the local machine (that is, the last time a get was performed on it that involved a modification to the file). If desired, you can set the File Time option to Check In, which means that the timestamp of the file in the local file system is the time at which the file was originally checked in to Team Foundation Server. This makes it easier to work with certain legacy tools or build/deployment processes that rely on the file modification date to determine if an action should be performed on it.
Server Workspaces
In a server workspace, when a get is performed to download the file to the local file system, the server tracks which version of the file is on the local machine and the file is set to read-only. This way the server is aware of exactly which file versions you have locally. Consequently, when you tell the server you would like to Get Latest, the server can simply send you the latest versions of all the files that you don't have yet because it is aware of exactly what you have. When you want to edit the file you must perform an explicit check-out operation (however, this is frequently automated for you by the IDE integration in Visual Studio or Eclipse). If you can check out the file (that is, nobody has an exclusive lock of the file) then the file is set to read-write in the local file system, and you may perform edits.
Files are listed in your Pending Changes view the moment that they are checked out. For example, if you start to edit a file in Visual Studio, undo your changes, and save the file again then it is still shown with an edit pending. However, if you check in a file that has not been modified then the server removes it from the changeset before it is committed.
Because an explicit check-out operation is performed, the server can notify users (via the console window) if they are editing a file that another user has also checked out. This allows for early collaboration between developers when they discover they are working on the same file.
However, the user must inform the server about any operation they are performing to their local files. If the server is not aware that a local file has been modified or deleted (for example if that was done outside of Visual Studio) then it does not know to resend that file when a Get Latest is performed. This is the most frequent source of complaints with older versions of Team Foundation Server that sometimes “get didn't get” when the user was expecting it to. The requirement to force a check-out before editing also made it harder for the user to work with tools outside of the source code management environment.
In addition, as the server needs to be informed explicitly before a file is edited, a server workspace works best when there is a permanent online connection to the server. The offline behavior of server workspaces has been improved with each version of TFS and has been improved further still in the latest release. (For example, many of the tool windows now work asynchronously so that they do not lock up the user experience. If they suddenly find that they are waiting a long time for a server call to return when unknown to the UI, it is because the network connection to the server has been terminated.) However, server workspaces, by design, work best when an online connection is available so the experience for frequently disconnected users is not good.
Local Workspaces
With a local workspace, the metadata about the versions of files in the workspace are stored in a hidden folder at the root of the workspace. This hidden folder is called $tf on Windows file systems and .tf on UNIX file systems. This allows for edit, add, rename, delete, undo, and some compare operations to be carried out locally without any communication with a server. The $tf folder contains a copy of the last version of the file that was downloaded into the workspace along with some additional metadata. This allows for edits to be performed on the local file system without requiring an explicit check-out operation to the server, meaning that the files in the local workspace can be read/write on get.
Making the files read/write on get dramatically reduces the friction when editing with other tools outside the source code management environment (such as Notepad on Windows or Xcode on OS X). The lack of an explicit check-out operation also means that working offline is much improved.
Another advantage of local workspaces is that as changes are detected by the disk scanner, it is easy to determine when you have deleted files on disk and so performing a get on those files allows them to be downloaded again. In addition, a file is only shown as pending edit (that is, checked out) when the contents of it are different than the last version downloaded from the server. Therefore, if you edit a file, save it, and then undo the changes and save it, the file does not show in the Pending Changes list as there are no changes to submit.
However, to enable all these great features, the workspace contents have to be scanned and compared with the last copy downloaded into the workspace. Therefore, the larger the number of files in the workspace, the slower this disk-scan operation can become. That said, modern computers and hard disks are very fast, and users with fewer than 100,000 files in their workspaces should not notice much of a slowdown. Even when they do, it is a linear reduction in performance. The number of files in the local workspace before a slowdown becomes a problem is increased using faster 10K hard drives or is improved even more when using SSD devices and so on.
One concern that is not mitigated by faster hard drives is if you're storing large files in version control that are typically outside the domain of a developer, like image files, videos, and so on. Your local workspace folder can become double the size of your most recent versions for all of the files and folders downloaded due to the use of the hidden tracking folder. If disk space is a concern, you might want to consider a server workspace since only a single copy of each file is downloaded.
Because of the reduced friction to developers in using local workspaces, they are the default option out the box with Team Foundation Server 2013 when using Team Foundation version control. However, some organizations, especially those requiring a high degree of control, may value the features provided by server workspaces, in which case the default can set to Server using the dialog shown in Figure 3.23.
Command-Line Tools
You can manipulate any part of the version control system using the Team Foundation command-line tool. The tool is called tf.exe (short for Team Foundation) and is installed with Visual Studio. For UNIX-based systems (such as Mac OS X, Linux, Solaris, and so on), a cross-platform command-line client (simply tf) is available as part of Team Explorer Everywhere, which is a free download.
For example, to create a new workspace, simply type the following command:
> tf workspace -new MobileExplorerProject
     -collection:http://tfsServer:8080/tfs/
     YourProjectCollection
In the preceding example, a new workspace is created, called MobileExplorerProject. You can exercise a great deal of control over the version control system using the tool. For example, you can manipulate workspaces, add working folders, set permissions, and view changesets, labels, and much more. The command-line tool has the most functionality available of all the version control clients for Team Foundation Server. Features are exposed via the command line that are not available from the user interface in Visual Studio or Eclipse.
You can also use the command-line tool to view the changes in your workspace by simply typing the following inside the workspace:
> tf status
To view a list of all possible commands using the command-line tool, run the following command:
> tf help
To get more help on a particular command, such as checkin, simply type:
> tf help checkin
This provides a list of all options, along with some additional help information. You can also refer to the MSDN online documentation for more information.
Branching and Merging
The use of branching in version control can open up a whole world of possibilities for improving development productivity through parallelization. Yet, for many developers, branching and merging are slightly scary and full of uncertainty. Because of a lack of good tooling in the past, many developers still shy away from branching and merging, despite the good support in Team Foundation Server. At the other extreme, some people—who see the great branch and merge functionality now available—can go a little crazy with their newly found power. Overuse of branches can affect developer productivity and reduce the maintainability of their repository as a result.
No matter which side of the spectrum you find yourself on, the rest of this section explains the fundamental principles behind the important branching and merging strategies and provides some key guiding principles to help you apply them to your organization's needs. This chapter highlights the branching and merging tooling available with Team Foundation Server 2013, and then concludes by walking you through the application of this tooling with some example scenarios.
Branching Demystified
There are lots of terms and concepts peculiar to the world of branching and merging. The following sections provide some definitions and context for those basic terms and concepts.
Branch
A branch is a copy of a set of files in a different part of the repository that allows two or more teams of people to work on the same part of a project in parallel. In Team Foundation Server 2013, branching is a lightweight server-side operation; when you perform the branch, it doesn't actually create new copies of all those files on the server. It just creates a record pointing to them and does not take up any significant extra storage—one of the reasons why creating a new branch containing thousands or even millions of files can be done quickly.
Merge
A merge is the process of taking code in two branches and combining it back into one code base. For example, if you have two teams of developers working on two branches, and you want to bring the changes together, then you merge them. If the changes consist simply of edits to different files in the branches, then the merge is simple—but it can get more complicated, depending on what was edited in both branches.
For example, if the same line of the same file has been edited in both branches, the person performing the merge must make a decision as to which change should take precedence. In some circumstances, this results in a hybrid merge, where the combination of the intent behind the two changes requires a different result than simply the text in those versions being combined. When you branch, Team Foundation Server keeps track of the relationship between branches, as shown in Figure 3.25.
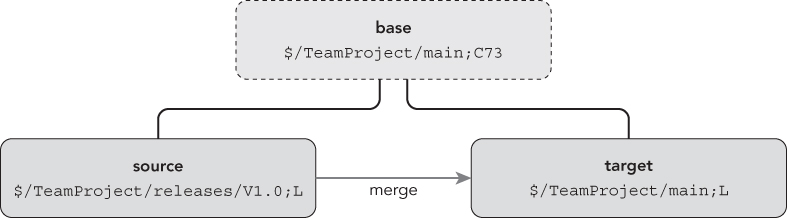
The branch containing the changes that you want to merge is called the source branch. The branch that you want to push the changes into is the target branch. The common ancestor, that is to say the changeset that indicates the version from which these branches are derived, is called the base version. When you merge, you can select a range of changes in the source branch to merge into the target branch.
Conflict
If the same file has been edited in both the source and target branches and the conflict can't be resolved automatically, Team Foundation Server will flag this as a conflict. For certain changes (such as a file that was edited in two different places), Team Foundation Server can make a good guess about what should happen (that is, you want to see a file containing the changes from both places). This is called an auto merge. Team Foundation Server 2012 introduced significant improvements to the auto merge capabilities and the occasions in which they are available. A best practice is to let the tool perform an auto merge, but you should then validate the merge results afterward to ensure the correct intent of the two changes has occurred. For example, if two different bugs were fixed, you probably want both changes. However, if the two changes were just fixing the same bug in two different ways, perhaps a different solution is in order. In most cases, where the development team has good communication, the changes are a result of different changes being made to the file. Auto merge usually does a great job of merging them together, making it easy for the developer to simply validate the changes.
There can also be many cases where the actual outcome is unclear, so auto merging is not available. For example, if you deleted the file in one branch and edited it in another, do you want to keep the file with the changes or remove it? The person performing the merge is responsible for deciding the correct conflict resolution based on an understanding of the code, and communicating with the team members who made the conflicting changes to understand their intent.
As with life in general, conflict is never good in version control. Making the decision about the correct conflict resolution in version control can be a complex and time-consuming process. Therefore, it is best to adopt a branching strategy that minimizes the likelihood of conflicts occurring. However, conflicts will occur, and Team Foundation Server provides the tooling to deal with them, so conflicts should not be feared.
Branch Relationships
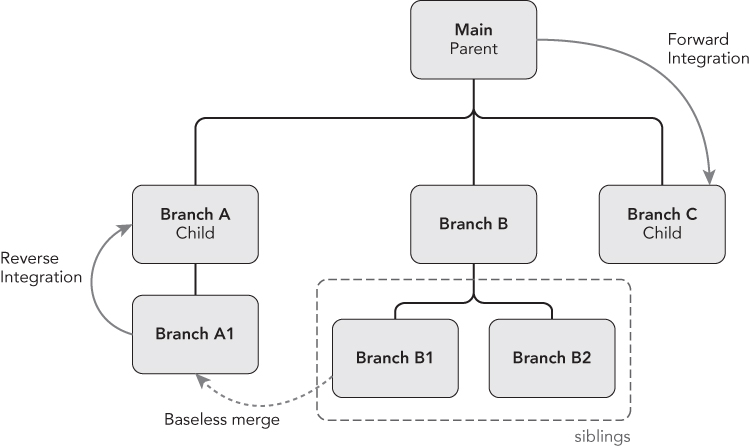
When you branch a folder, the connections between those branches form a standard hierarchical relationship. The source of the branch is the parent, and the target of the branch is the child, as shown in Figure 3.26. Children who have the same parent are called sibling branches.
Baseless Merge
A baseless merge is a merging of two arbitrary branches in version control without reference to a base version. This is sometimes necessary if the source code was originally imported in a flat structure without the branch relationship being in place, or if you want to merge between one branch and another that is not a direct parent or child (for example, Branch A1 and Branch B1 in Figure 3.26).
Because no base version is being used to compare against, the probability of the server detecting conflicts occurring between the two branches is much higher. For example, if a file is renamed in one branch and edited in the other, it shows up as a file delete conflicting with the file edit, and then a file add that gives no hint as to which file it is related to, or that there is an edit intended for this file in the other branch. For this reason, baseless merges are discouraged. Your branching model should attempt to constrain most merges between parent and child branches to minimize the amount of baseless merging required.
Forward/Reverse Integration
Forward integration (FI) occurs when you merge code from a parent branch to the child branch. Reverse integration (RI) occurs when you merge code from a child branch up to the parent branch. The terms FI and RI can often fly around quite freely during a branching debate, so it is important to understand what they mean. If you are doing feature development in branches, it is common to use FI at various points during the feature development cycle, and then to use RI at the end. See the “Feature Branching” section later in this chapter for more information.
Common Branching Strategies
Depending on the organization of your team, and the software that you need to develop, there are numerous branching strategies that you can adopt, all with various pros and cons. However, just as every strategy in chess is made up of simple moves, every branching strategy uses one or more combinations of some basic techniques. This section details some of the basic techniques, how they are used, and why.
When developing your own branching strategy, you should take into account the needs of your organization. In all likelihood, you may adopt a strategy that combines one or many of the basic techniques described here.
When looking at any strategy for branching and merging, you should keep in mind the following important rules:
- Choose simplicity over control.
- Branch only when you really need to. (You can branch after the fact if you find you need to.)
- If you ever want to merge two branches, keep the time between merges to a minimum.
- Ensure that your branch hierarchy matches the path you intend your merges to follow.
No Branching
It may be counterintuitive, but the simplest branching technique is to not branch at all. This should always be your default position. Do not branch unless you know you need to. Remember that you are using a version control tool that tracks changes over time. You can branch at any point in the future from any point in the past. This gives you the luxury of not having to create a branch “just in case”—only create branches when you know you need them.
However, there are things you can do to prepare yourself to make branching easier in the future if you decide you need a branch.
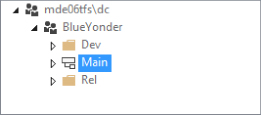
Figure 3.27 illustrates the most important thing that you should do if you think you might possibly need to branch in the future. When you first create your team project in Team Foundation Server, create a folder called Main and check it in. Then, right-click the folder in Source Control Explorer and select Branching and Merging ⇒ Convert to Branch to get to the screen shown in Figure 3.28.

With no branching, you only have one code line to work in for all teams. This technique works great when you have small teams working on the same code base, developing features for the same version of the application, and supporting only one version of the application at a time. At some point, no matter how complex your branching strategy evolves to support your business needs, you need at least one stable area that is your main (or mainline) code. This is a stable version of the code that will be used for the build that you will create, test, and deploy.
However, during stabilization and test periods, while you are getting ready to release, it may be necessary for the team to not check in any new code into the code base (that is, undergo a code freeze). With smaller teams working on a single version, this does not affect productivity because the people who would be checking in code are busy testing to ensure that the application works, as well as getting ready for deployment.
With this technique there is no way to start work on something new before the final build of the current version has been performed. The code freeze period can, therefore, be very disruptive because there is no way to start work on the next version until the current one has shipped. It's these times when other strategies become useful for teams of any size, even a team of one.
Branch Per Release
After no branching, the second most common branching technique is branch per release. With this technique, the branches contain the code for a particular release version, as shown in Figure 3.29.
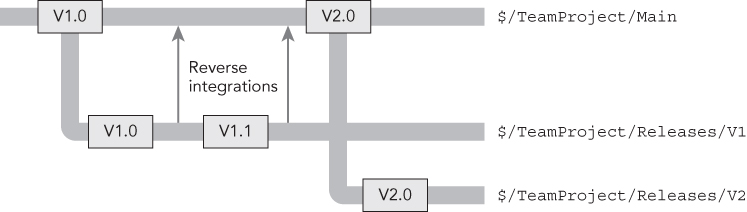
Development starts in the Main branch. After a period of time, when the software is considered ready, a branch is made to the V1 branch, and the final builds are performed from it. It is then released into production (with the code in the final production build getting a label to indicate which versions of which files were in that version). Meanwhile, development of new features for version 2 (V2) continues on the Main branch.
Let's say that some bugs are discovered in production that must be addressed, and a small change is necessary to reflect how the business needs something to work. However, the development group does not want to include all the work for V2 that has been going on in the Main branch. Therefore, these changes are made in the V1 branch, and builds are taken from it. Any bug fixes or changes that must also be included in the next version (to ensure the bug is still fixed in that next release) are merged back (that is, reverse-integrated) into the Main branch. If a bug fix was already in the Main branch, but needed to go into V1, then it might simply be merged (that is, forward-integrated) into it. At a certain point, the build is determined to be good, and a new V1.1 build is performed from the V1 branch and deployed to production.
During this time, development on the next version can continue uninterrupted without the risk of features being added into the code accidentally and making their way into the V1.X set of releases. At a certain point, let's say that it is decided that V2.0 is ready to go out the door, the mainline of code is branched again to the V2 branch, and the V2.0 build is created from it. Work can continue on the next release on the Main branch, but it is now easy to support and release new builds to customers running on any version that you want to keep supporting.
Branch per release is very easy to understand and allows many versions to be supported at a time. It can be extended to multiple supported releases very easily, and makes it trivial to view and compare the code that was included in a particular version of the application. Branch per release is well-suited to organizations that must support multiple versions of the code in parallel—such as a typical software vendor.
However, for a particular release, there is still no more parallelism of development than in a standard “no branching” strategy. Also, if the organization must only support two or three versions at a time (that is, the latest version, the previous version, and, perhaps, the version currently being tested by the business) then this model can lead to a number of stale branches. Although having lots of old, stale branches doesn't affect the performance of Team Foundation Server, or even cause any significant additional storage requirements, it can clutter the repository and make it difficult to find the versions you are interested in—especially if the organization releases new versions frequently. If this is the case, you may want to move old branches into an Archive folder, and only have the active branches (that is, the versions that the development team are currently supporting) in the Releases folder.
Code-promotion Branching
An alternative to the branch per release technique is code-promotion branching (or promotion-level branching). This technique involves splitting the branches into different promotion levels, as shown in Figure 3.30.
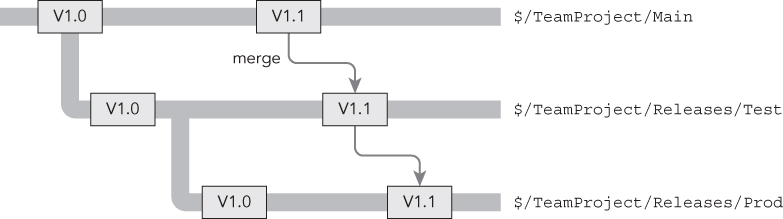
As before, development starts with just the Main branch. When the development team is ready to test the application with the business, it pushes the code to the Test branch (also often called the QA branch). While the code is being tested, work on the next development version is carried out in the Main branch. If any fixes are required during testing, they can be developed on the Test branch and merged back into the Main branch for inclusion in the next release. When the code is ready to release, it is branched again from Test to Prod. When the next release cycle comes along, the same is done again. Changes are merged from Main to Test and then Test to Prod.
Code-promotion branching works well in environments that have a single version running in production, but have long test-validation cycles that do not involve all of the development team. This allows development to continue on the next version in Main while test and stabilization of the build occurs in the Test branch. It also makes it trivial for the development team to look at the code currently on each system. Finally, the branch structure makes it easy to create an automated build and deployment system using Team Foundation Build that can automatically update the QA/Test environment as code is pushed to the QA branch.
Feature Branching
The previous branching strategies involve a single team working on the system in its entirety as they work toward a release. All features for that release are developed in parallel, and the build can be deployed only when all features in flight have been completed and tested. However, in large systems, or systems that require very frequent deployment (such as a large commercial website), feature branching (or branch per feature), as shown in Figure 3.31, can be useful.
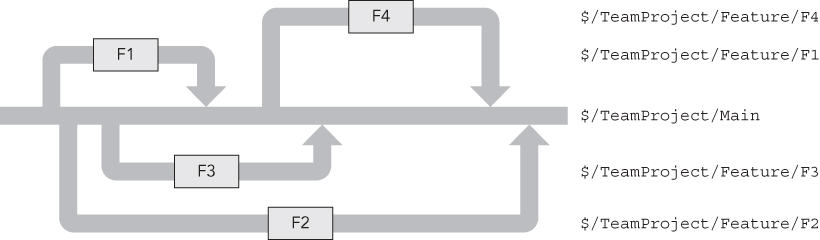
Feature branching is used when a project requires multiple teams to be working on the same code base in parallel. In Figure 3.31, you see four feature teams working in separate branches (F1, F2, F3, and F4). Note that in a real branching structure, the feature branches themselves would likely have meaningful names such as FlightSelling, InsuranceExcess, or whatever shorthand is used by the project to refer to the feature under development. The Main branch is considered “gold code,” which means that no active development goes on directly in this branch. However, a feature must be reverse-integrated into this branch for it to appear in the final release build and for other teams to pick it up.
Initially, F1 is started with a branch from Main. But, while F1 is being developed, second and third teams start F2 and F3, respectively. At the end of development of the feature, F1 is merged back into the Main branch, and the F1 branch is deleted. Then that team starts on feature F4. The next feature to finish is F3, followed by F2. At each point, after the feature is merged into the Main branch, a new version of the software is released to the public website, but only one version is supported at any time.
Feature branching allows for a large amount of parallel development. However, this comes at the cost of delaying the pain of integrating each team's changes together until the feature is complete and you are merging the feature branch back into the Main branch. For example, in Figure 3.31, when merging the F2 branch, all changes and inevitable conflicts introduced by features F1, F2, F3, and F4 must be analyzed and resolved.
The longer a period of time that code is separated into branches, the more independent changes occur, and, therefore, the greater the likelihood of merge conflicts. To minimize conflicts, and to reduce the amount of integration debt building up, you should do the following:
- Keep the life of a feature short—The time taken to develop features should be as short as possible, and should be merged back into the
Mainbranch as soon as possible. - Take integrations from the
Mainbranch regularly—In the example shown in Figure 3.31, whenF1is merged back intoMain, the feature teams still working on their features should merge those changes into their feature branches at the earliest possible convenient point. - Organize features into discrete areas in the code base—Having the code related to a particular feature in one area will reduce the amount of common code that is being edited in multiple branches, and, therefore, reduce the risk of making conflicting changes during feature development. Often, the number of teams that can be working in parallel is defined by the number of discrete areas of code in the repository.
When using feature branching, the whole team doesn't necessarily have to be involved. For example, one or two developers might split off from the rest of the team to go work on a well-isolated feature when there is a risk of the move not being possible (that is, they are working on a proof of concept), or when it is decided that the current release should not wait for that particular feature to be implemented.
Summary
In this chapter, you examined the core features of Team Foundation version control and how to use it for day-to-day development.
You found out how to use Source Control Explorer and how to check in code, showing you the concepts of workspaces, changesets, and shelvesets. You learned how to view the history of files and apply labels. The chapter also covered advanced concepts, such as workspaces and the differences between local and server workspaces.
Version control is the most important tool you can use to help you manage your development process; it provides an effective way of organizing your source code. The branch and merge capabilities of Team Foundation Server not only allow for some complex software configuration management scenarios, but they also provide the tooling to help understand what is happening with changes in your version control repository. Chapter 4, which covers Git in Team Foundation Server, shows a different style of version control and branching.
Finally, Part V of this book talks more about software development in general and provides guidance about how to make sure the code that you are checking in is good code.