
Chapter 6
Release Management
What's in this chapter?
- Developing good practices around release management, including binary releases
- Understanding why and when to use continuous delivery and what value you get from releasing more frequently
- Using and creating release paths, environments, and servers along with release templates and components to successfully deploy your software
In Chapter 5 you looked at how Visual Studio 2013 supports continuous integration as part of its application lifecycle management. You learned how the build process produces the binaries that are stored either on a network share or inside the server. In this chapter, you learn how to create a binary promotion model to transition those versioned binaries through your environments. After reading this chapter, you will have a better understanding of how to use the release management tools in combination with automated build. This will enable you to get your software from development to production so that you can get quick, actionable, and timely feedback from testers, users, and the business.
What Is Release Management?
A release is the process by which you create a working instance of your development efforts to date and subject it to a series of checks before releasing it for consumption by your customers.
While some organizations are still trying, and as often failing, to implement a code promotion release model, many companies have switched to a binary promotion model. In a code promotion model, you create a version of your software on a development code line, deploy versioned output to an environment, and then approve it. Once approved, the development code line is then merged with the next level up, likely quality assurance (QA), and another version of your application is created from this new code line. In a code promotion model you can end up with untested code in production and thus a much greater likelihood of bugs. In Figure 6.1 you can see that a bug was found and fixed in production. The resultant ChangeSet was then reverse-integrated into the main code line. When the development team reverse-integrates their changes into the main code line, there is a change that impacts their code. Although it might not conflict directly, it does mean that all of their regression tests need to be run again to make sure that nothing has been broken.

However, the reality in many organizations is that this nuance is ignored and someone picks and chooses a few tests to run and calls it good. In all likelihood, the programmers don't have the coverage that they need in order to know that the code is good, so they guess. Whoever makes this decision is then taking on the risk to the company and its reputation if there's a fault that is not picked up until production.
In most modern organizations, a more stable binary promotion model tends to be used as it avoids unnecessary retesting. In a binary promotion model, you have a single code line that moves through the states of development, stabilization, and release. When you create a version of your application, it is deployed to your development environment. Once it's approved the same output, with configuration-only changes, is deployed to the QA environment. This means that all of the functional checks that you ran in your development environment do not need to be rerun for QA as the results are still valid as you are using the same binaries. You may need to run cursory checks that validate your configuration changes, however.
In Figure 6.2 you can see a forward-only model in action. This is commonly called a staircase branching model. You can take a build from the R1 code line at any time and get incremental binaries.
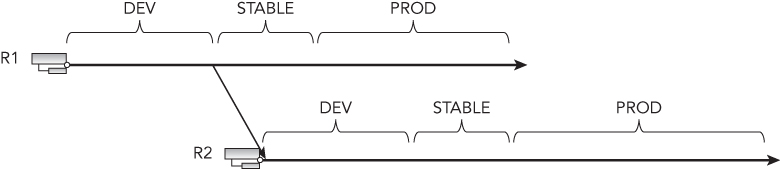
This will create an incremental model of consecutive builds. Now that you have that you can then choose to create a release from any one of your build outputs and push it through a set of stages or gates until it gets to production. A failure at any of the stages would result in feedback to the development team and may result in a new build and potentially a new release.
Continuous Software Delivery
The nirvana that any modern organization should be striving toward is the ability to get a change into production as quickly as possible. The quicker you get your product through the pipeline, the quicker you can get its value, which has already started to depreciate, to your customers. There are of course trade-offs between cost and effort. Although many companies would like to be able to deliver to production many times a day, it might not be financially viable. However, all companies should be able to deliver working software frequently, from a couple of weeks to a couple of months, preferably on the shorter timescale.
In Figure 6.3, you can see the lifecycle of any application as a repeating process of ‘releasing’ to production. An agile team would typically take 30 days or less to loop around the lifecycle proving an opportunity to inspect and adapt every iteration. A two-year project that ships once a year takes 365 days to get around the lifecycle once, so there would be only two opportunities for feedback in total. If you are in a very long release process, you might want to try moving to multiple 30-day iterations between releases. The goal is to release every 30 days, at least.
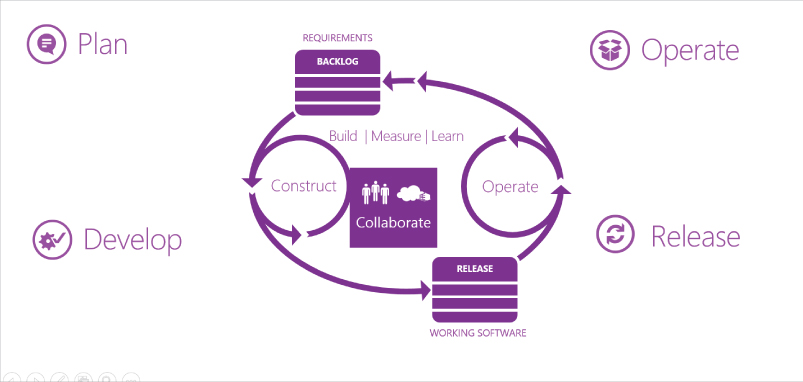
There are really only four main phases to any software delivery cycle. The diagram shows the relationships between them and indeed many teams break each area up into even smaller time slots:
- Requirements—Ultimately there is always a list of requirements somewhere. Some requirements are formal and some are more fluid. If you are building for life-critical systems, you need more detail; if you are building a dating site, you need maybe a little less detail.
- Construct—At some point your teams get busy building something.
- Release—Each time your teams create a working increment, you release it to get feedback.
- Operate—You will have folks that monitor your release and support it, all the while providing feedback to your development teams.
With these phases we can model any software delivery.
The key to being able to deliver to production more quickly is to have working software at all times, fewer branches (preferably one), and better automation. Just because you deliver to production every 30 days or more, does not mean that you can't deliver quarterly or even yearly marketing releases. This tends to be achieved by using feature flippers (or feature toggles), which are flags or configuration options in your code that allow you to turn features on and off based on criteria like time or users. Advanced feature flippers can be found in many systems that allow two users to run different versions of the same function or algorithm at runtime.
If you use the feature flipper methods, then you can push your latest code, and any bug fixes, to production more frequently. You can then save up a viable set of features for a big marketing push, secure in the knowledge that the risk of failures is low. The code that you are turning on has likely been in production for many months and has passed user acceptance testing from your delegated early adopters. While there is often added conditional complexity in using feature flippers, there is a lot to gain from implementing them.
If you have a complicated branching model, you are going to find it difficult to move toward continuous delivery. Branch integration is where most failures and regressions occur and you must minimize your branches to something more like Figure 6.2. Ideally, you should move toward a single branch line with feature flippers. This setup gives you the same capabilities if not more than branching. Traditionally we in the software industry have used branches as a crutch in order to avoid planning. We find ourselves, as our teams grow, stepping on each other's toes and thinking, “If only we could separate one group's work from another's.” Using branching as a solution to this problem results in a plethora of difficult-to-merge branches. Teams often leave things undone too long and end up with “big bang” merges or (shudder) have to “cherry-pick” the merge.
There is still a place for branching and it can be phenomenally useful. However, always ask yourself, when creating a branch, if there is another, cheaper way.
After you have fewer branches, with feature flippers doing the heavy lifting and good automation in place, it is time to create your release pipeline. If you do not have these things then you will likely find it incredibly difficult to achieve an automated pipeline. If you are struggling to achieve continuous delivery, the best way forward is to start taking steps to minimize branching, enable feature flippers, and create automation scripts.
Defining a Release Pipeline
A release pipeline is a defined workflow or process that your binaries pass through to get to production. Ideally, every step along your release pipeline should be automated, although in the beginning some may not be automated, and others may never be. For example, maybe you have a change board that must approve deployment to production. In this case, you have a queue of releases waiting to go and the board is responsible for manually approving them prior to release. Everything else should be automated so that when the board clicks the Approve button, your software is automatically deployed.
When you're creating a release pipeline from the ground up, you may not have all of your processes automated yet. You need a tool that can grow with you and provide that automation on demand. There are a number of good release management tools out there.
In mid-2013 Microsoft purchased one of these leading release management tools for Team Foundation Server, called InRelease. They brought it up to Microsoft standards and released it with Visual Studio 2013 under the Release Management moniker.
There are three components to Microsoft's new release management tools:
- Release Management Client for Visual Studio 2013
- Microsoft Deployment Agent 2013
- Release Management Server for Team Foundation Server 2013
The Release Management Server for Team Foundation Server 2013 component provides the background processing that orchestrates the release in an automated fashion. It has a web interface to allow actioning of tasks without the need to install a client. A database is added to your Team Foundation Server data tier to maintain all of its data. The Release Management Client for Visual Studio 2013 has rich features that allow you to configure, create, and customize your deployment orchestration for any number of applications. The Microsoft Deployment Agent 2013 installs onto the servers that you want to deploy applications to. It handles the silent execution of the processes you have configured that need to be run for a deployment. You can find out more at http://aka.ms/RelMgmtVS.
Configuring for First Use
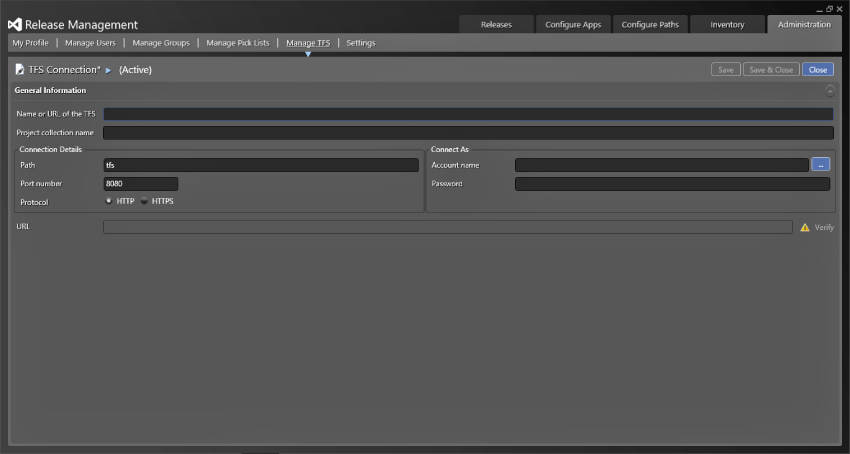
The very first thing you have to do is connect your release management instance to your Team Foundation Server collection. You can connect many collections across many Team Foundation Server instances, which gives you the ability to run a central release pipeline even if your organization has multiple TFS servers. In Figure 6.4 you can see the details from your TFS server that you need to enter and the additional credentials. These credentials must have the appropriate permissions on the server. For more details of the required permissions, reference the release management manual at http://aka.ms/RelManOctopus.
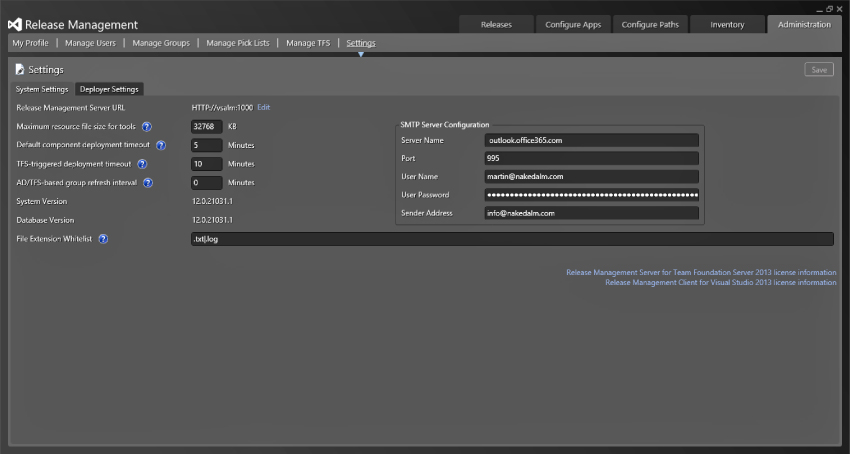
You can configure release management to send notification emails by configuring the SMTP settings shown in Figure 6.5. This will allow the system to send out emails to approval gates that require manual approval detailing what needs approved. The users can then accept, reject, or reassign the required approval. This gives you massive flexibility and latitude for approvals, as the approver does not need to install the client or have a license to respond to approval requests.
You can manage what your release path gates are called from the Manage Pick Lists tab. You can manage the pick-lists for both Stage Type and Technology Type. You will get the most use out of the Stage Type list, as it generates the heading for each of the gates in your process. The pick-list items are just simple strings, but they will be used later in the chapter. If you add entries to the Administration ⇒ Manage Pick-Lists ⇒ Technology Type pick-list, you can select them as being available on servers, which is explained in the “Introduction to Release Paths” section later in this chapter.
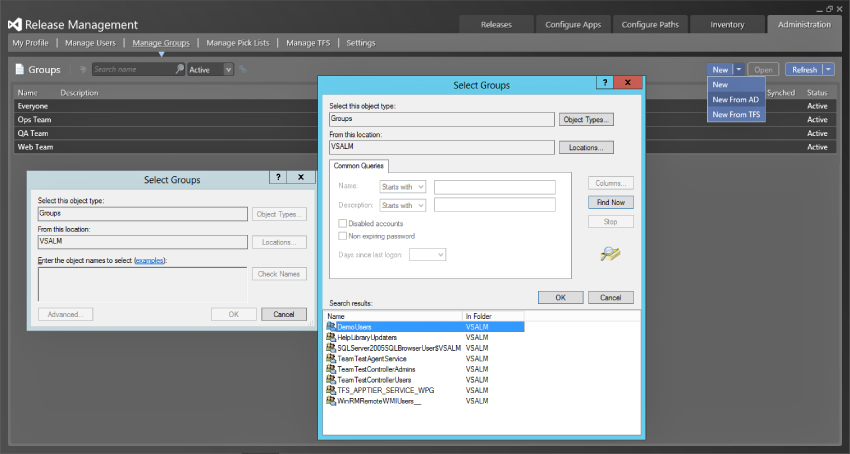
You can also manage the groups and users who have permission to interact with the release management process. Not only can you select individual users, you can also import whole groups of users and have them synchronized with Active Directory on an ongoing basis. To add an Active Directory group, go to Administration ⇒ Manage Groups ⇒ New ⇒ New from AD, after which you can select an AD group using the familiar Active Directory dialog shown in Figure 6.6. If you are on the Manage Users screen, you can manually add a single user as well as see all of the users who are synchronized from the added groups. There are three role options for users. None is depicted by a blank Role column and reflects that the specified user is simply a user with no special permissions. These users can only action approvals that have been assigned to them. Service User is used to designate service accounts that should not appear in selection pick-lists as it is used for a Deployer account or Web Service Application Pool Identities. The last designation is the Release Manager role, which gives the specified user the ability to manage and customize the deployment processes. If you are not in this category, you will not see very much in the UI and should instead log in with an account that has been designated as a release manager.
The last tab on the left of the UI allows you to edit your own profile. It allows you, for example, to edit your language and email preferences.
Introduction to Actions
Actions are the activities that you perform as part of the sequence of your deployment. They are available in the toolbox you use to create your deployment workflow within the client tool. In the Release Management for Visual Studio 2013 client, you get a comprehensive menu of options for building your workflows. However, you may find that you have some custom action, or a third-party action, that is not yet listed or included in the product.
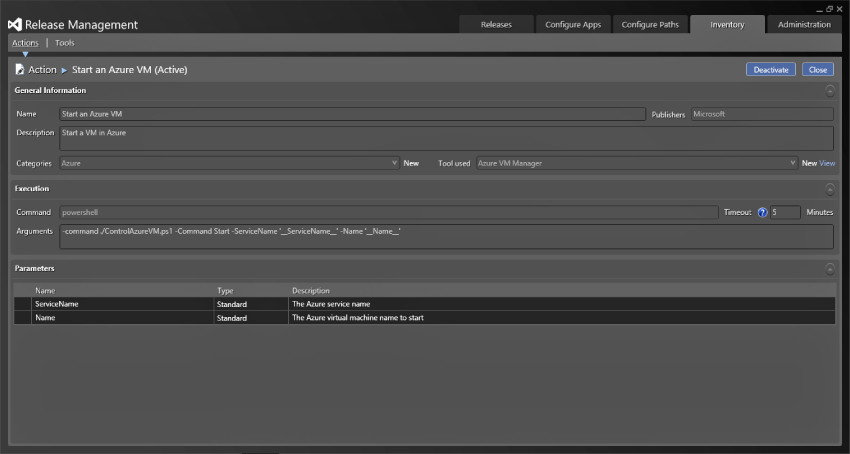
Figure 6.7 shows the components that make up an action. This particular action starts an existing virtual machine in Azure. One of the general options is to select the tool that will be used. I will talk about tools later on, but for now the tool in this case, Azure VM Manager, is a PowerShell script called ControlAzureVM.ps1. This tool has two parameters that are defined and a third “command” parameter that has been hard-coded for this action. When you drop this action onto a release workflow (discussed later in this chapter in “Creating Release Templates”), you get to specify the two parameters that might be different, depending on the environment you are deploying to. In this case, you have ServiceName, which is the name that you give your Azure service, and Name, which specified the individual virtual machine within that service that you want to start. With this model you can create any number of custom actions for any particular tool.
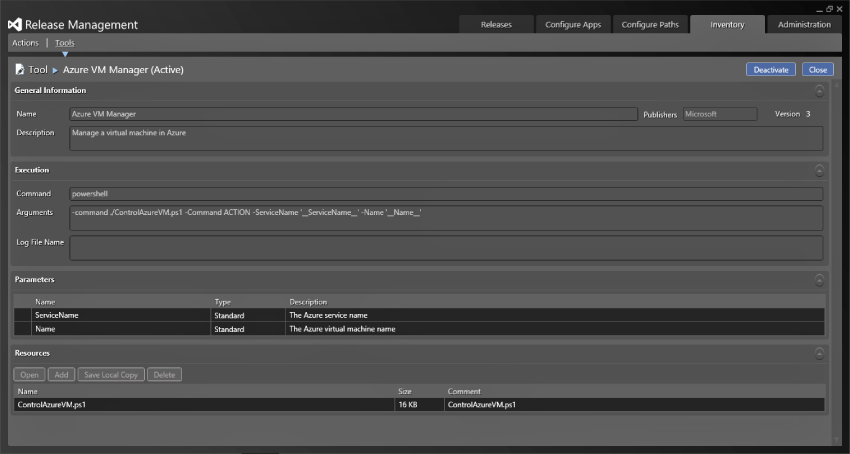
Tools are things that are uploaded into the release management server and stored in the database for later use. They are deployed automatically to the servers that have deployment agents just in time for the execution of the workflow that contains them. Figure 6.8 shows the tool associated with the actions discussed previously. This tool, called Azure VM Manager, has a number of resources that are deployed to the deployment agent environment as part of the execution process. You do not have to install all of the tools, or deploy them, to the individual servers.
Creating custom actions may require you to first create a custom tool and upload that tool into the release management server as a resource. To deploy a simple website and database, you should find the out-of-the-box tools to be sufficient. For example, there are actions for creating and removing IIS components like websites and application pools, as well as actions for moving files around. This is discussed in the “Creating Release Templates” section later in this chapter; you can find out more about creating custom actions in the release management manual on http://aka.ms/RelMgmtMan.
Introduction to Release Paths
Now that you have an idea which actions you need, you need to create a release path. A release path is made up of servers, environments, and a little bit of deployment workflow that allows you to orchestrate the approval process. At this point, you should not be concerned with the minutia of how you will be deploying your application, but instead about the flow of your deployments. In this section, you look at whether you want pre- or post-approval, or both, as well as who will be approving. In addition, you will set the order and number of environments you will deploy to.
Environments are not the same as servers. You can have many environments on the same server, or indeed an environment that spans servers. You can even have many environments of the same application that span a single set of servers. In this case, you look at a web application that is deployed to three environments that exist on the same server.
You first need to configure the list of servers. Your servers need to have Microsoft Deployment Agent 2013 installed. You can find out how to install the release management deployment agent in the release management manual on http://aka.ms/RelMgmtMan.
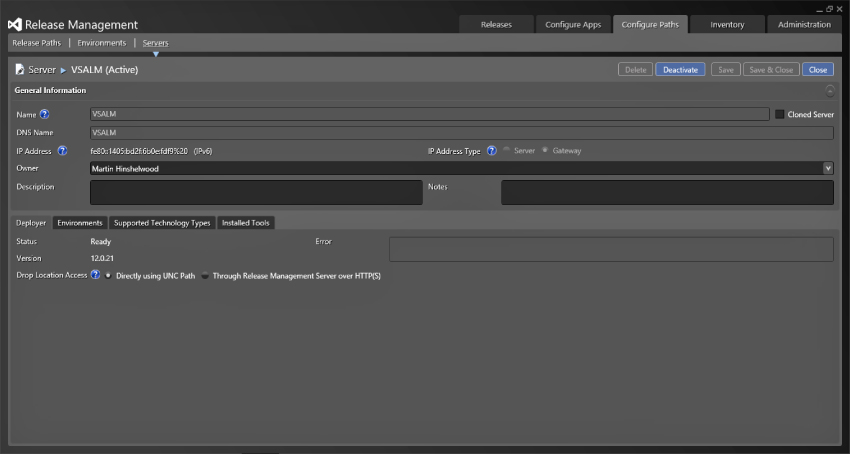
Figure 6.9 shows an agent added to the Release Management client for Visual Studio 2013 and the options you can configure. If you have correctly installed the deployment agent, you can simply select Configuration Paths ⇒ Servers ⇒ New ⇒ Scan for New to list all of the installed agents that have not been added to your instance. All of the details are auto-detected, so you only need to configure the Drop Location Access at the bottom of the screen according to your network topology. If the servers that you are deploying to have direct UNC access to your drop locations, then you can leave it as the default. However, if the server that you are deploying to exists on another network or domain and does not have direct UNC access to the drop location, then you must configure it for HTTP by selecting the Through Release Management Server over HTTPS option. When this option is enabled, the agent must have access to the Release Management Server over HTTPS and the release management server must have access to the drop folder over UNC. The Release Management Server will then proxy the files from the drop location to the agent.
In addition, if you have configured the pick-list for technology types in Administration ⇒ Manage Pick-Lists ⇒ Technology Type, then you will see a list of check boxes on the tab marked Supported Technology Types. From there, you can check the technologies that are available. These technology types work just like the tags that you apply to your build agents and can be used to specify what is available on that server. This allows you to, for example, tag all of the servers that have Java installed with the “Java” technology type. This can be immensely valuable when you're trying to deploy applications to environments as you can gain more insight into what has been installed or is available.
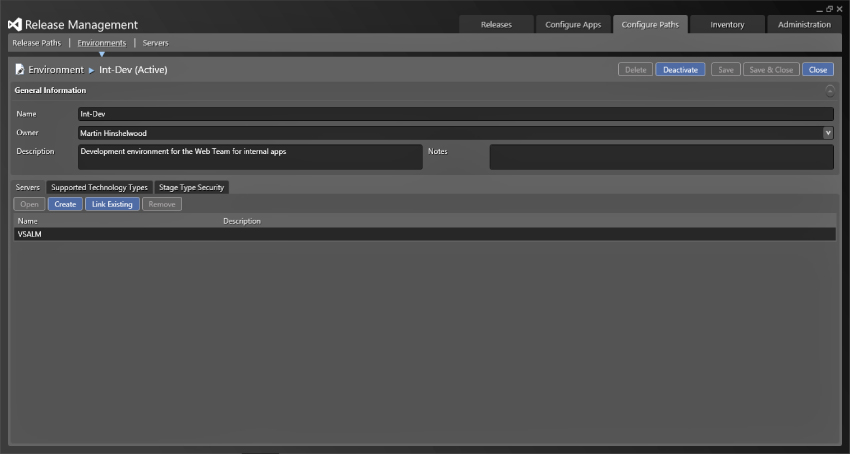
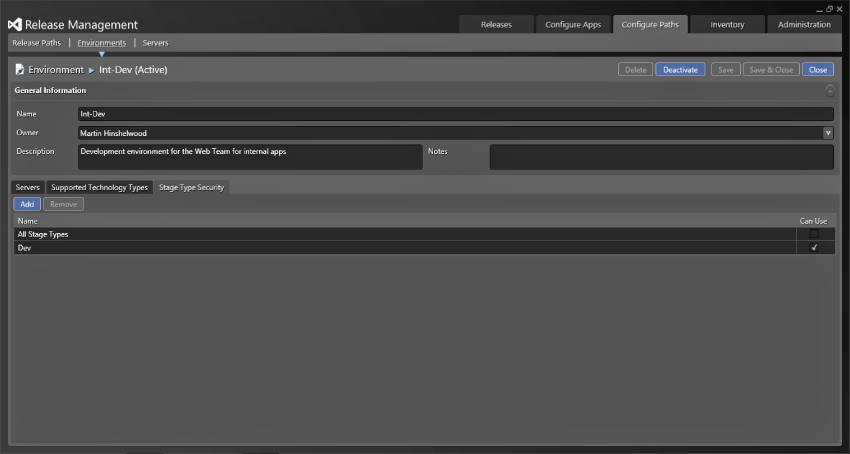
Once your server is configured as a deployment target you can configure your environments. Initially, you are going to deploy only one application—the Fabrikam Fiber Support site. This site is for users internal to the organization to track support tickets and is fairly straightforward for illustrative purposes. Figure 6.10 shows a simple development environment, entitled Int-Dev, that represents the deployment location for a web application for internal applications. Here, you simply enter a Name, Owner, and Description to help you remember what this was configured for. You have three additional tabs for configuration. The first allows you to specify the servers that are involved in this environment. If you select more than one server, you will have more than one server as a deployment target for your environment. You do not even need the same number of servers in each of your environments. You may only have a single server in your development environment, but then have two in the QA environment. This allows you to minimize the cost in development and then scale out for other environments, like production. You can add an existing server with the Link Existing button or create a new server. Creating a new server takes you through to the previous sections' screens for servers. In addition, you can also use the Supported Technology Types option to add metadata to the environment. At this point you can select which stages, which you configured in the Stage Type pick-list, have permission to use this environment. You can add any of your stages and select the Can Use box to make it available to that stage. The default configuration is to make the environment available to any stage. Changing this setting as shown in Figure 6.11 will restrict the environments that are available for stages in the Configure Apps ⇒ Release Templates section.
Now that you have both your servers and environments configured, you can look at creating the release path for our application. The release path describes how your application moves, at a high level, from one state to another. It also describes who is responsible for approval of each stage. In Figure 6.12 you can see a simple movement of stages from Dev ⇒ QA ⇒ Prod. These values are the ones that you entered for the pick-list in Administration ⇒ Manage Pick-Lists ⇒ Stage Type. You can now order them however you want for this specific application or platform. At this time, you are not specifying the components of the application that you are deploying as you will do that as part of creating your release templates later in this chapter. For now, you are solely focused on the high-level flow of the release. To model your current organization's flow, you have a few simple tools. You can create columns that represent a combination of stage type and environment. You can use a stage only once, and although you can have many stages I would recommend that you try to minimize, if only for simplicity.
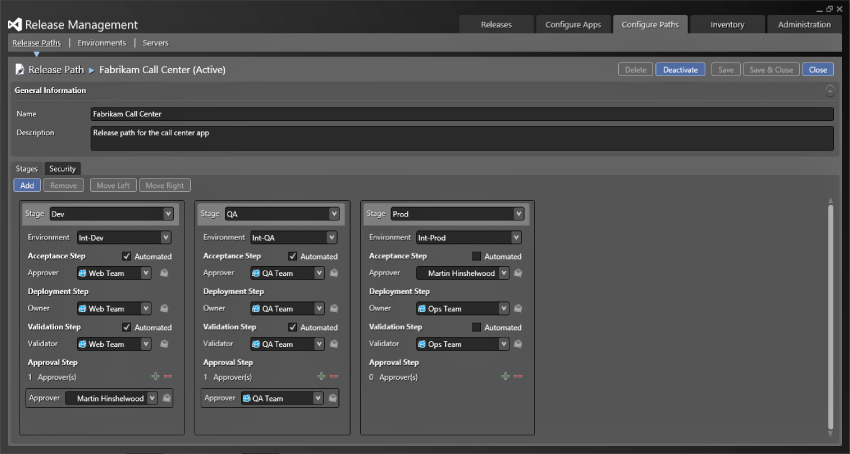
Once you have created your columns like you see in Figure 6.12, you can select the environment that you want to use for this stage. After that, you get to configure the four steps—the Acceptance step, the Deployment step, the Validation step, and the Approval step. They each have their own meaning and nuance:
- Acceptance—At this step in the process you have not done anything. You must select an approver but you can choose whether you need physical approval or if this is an automated step. As you tend to get to this first stage as the result of an automated build, this is often configured as an automated step (see Figure 6.12). If you do not check the box marked Automated, the individual or group selected will be required to use either the web or client approval process for the process to continue. If you have email configured, the system will send instructions to the participants via email. After this step has been completed, the deployment step will execute.
- Deployment—This step is always automated but you still need to select an owner. The owner will be notified if there are any issues with the process, either on a poll basis (they have to manually check the application or site) or via email.
- Validation—In Figure 6.12 this is configured as an automated step. However, if you need to do any configuration (which you will hopefully automate) or validate that the environment is working before you pass it to the Approval step, you can uncheck the automation box. The process will stop until the “validator” validates the deployment.
- Approval—This is the most configurable step, as it allows you to select multiple approvers who must all approve before you can move to the next stage. At this point, the approver(s) are determining whether the current stage was successful and if you should now move to the next stage.
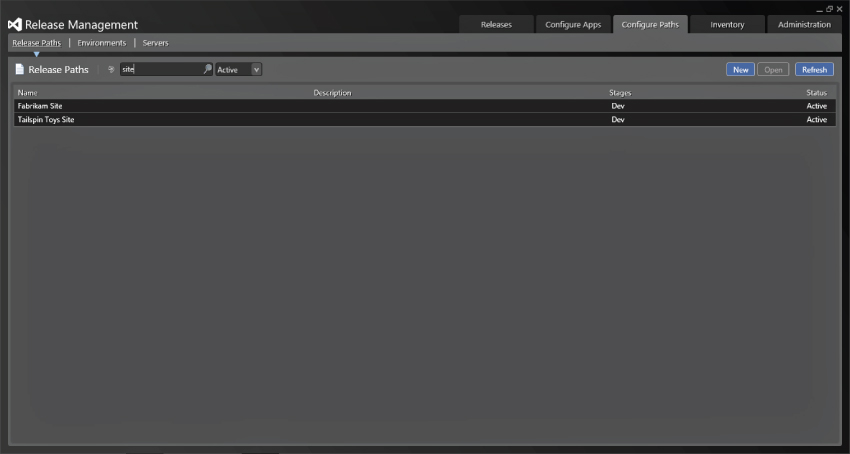
Now that you have looked at the flow through a single stage, you can see how the overall flow through multiple stages allows you to deploy your applications from environment to environment while maintaining your audit and traceability trail. As you build your list of applications, as in Figure 6.13, you can make use of the dynamic search functions to find what you want more easily.
You just learned how and why to configure release path(s) to allow you to create an orchestration flow for your overall application deployment to one or more servers that exist within one or more environments. Next you see how the software is deployed to those servers.
Creating Release Templates
In order to get started with release templates, your release path configuration must be complete. The servers, environments, and release paths that you just looked at are integral to the creation of release templates. In addition, before you can create your first release template, you need to specify the components you are going to deploy as part of that release.
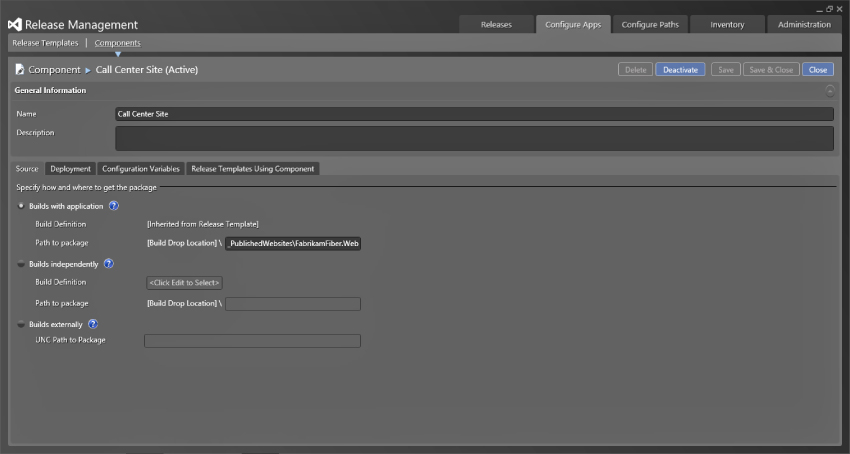
In Figure 6.14 you can see the basic options for configuring a new component. On this screen are a number of options that you need to fill in, as well as then a number of optional fields to help you with more complicated deployments. First are the usual title and description to help identify your component. You will select the title on other screens, so try to make it concise enough to be easily understandable. Figure 6.14 shows the Source tab. This tab specifies where you get the component. There are three important options:
- Builds with application—As you learn later in this chapter, a release template can be associated with a build so that it is triggered from that build's successful completion. With this option selected, you only need to enter the last part of the package locations. For example, if you have a web application then it will automatically end up in a folder of the same name as your web application in Visual Studio under the _
PublishedWebsitesfolder. The source files that will be used for this component will be loaded dynamically from this folder. - Builds independently—If you have an independent build for this component that is not related to the release template, then you can select it here. You can select both the team project and the build definition that should be used. Specify the folder as explained previously. This will then grab the correct output from the latest successful build.
- Builds externally—If your component is not built by Team Foundation Build, then you can just specify the full UNC path from which the output will be loaded. This could be from a Maven build from another team or from a library of legacy components that you no longer compile regularly.
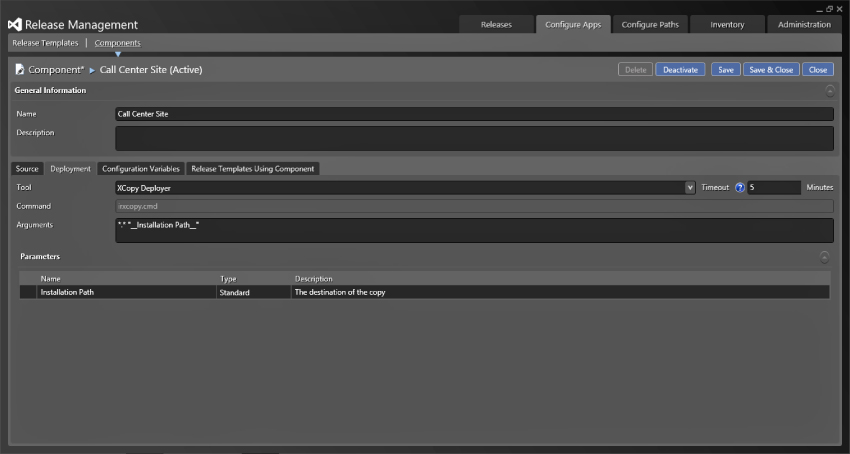
The Deployment tab provides a way to specify a set of default deployment instructions. Configuring the Deployment tab is very similar to the actions described later. In this case you are doing a simple Xcopy of your files using the Xcopy Deployer tools, as you can see in Figure 6.15, and a single parameter of the path. You may perform other tasks before or after this and they will be configured in the release template.
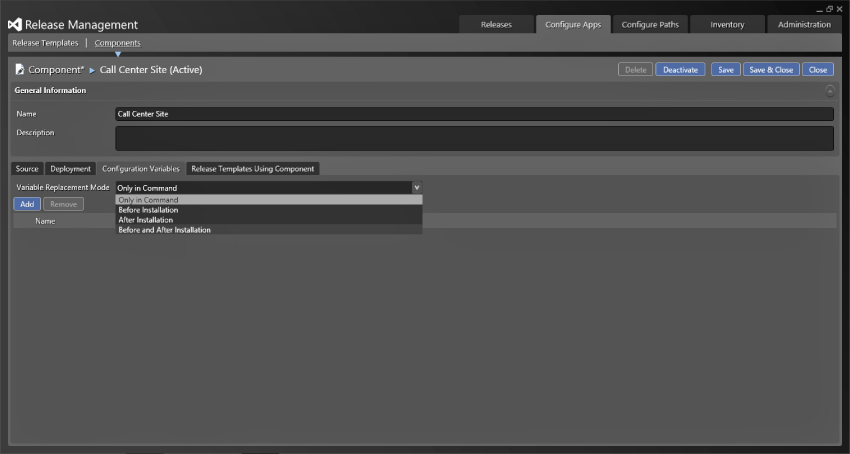
Although you have no need to configure variables for this particular deployment, you can add additional variables, as shown in Figure 6.16. These variables can be used at different points depending on the configuration. Each variable has a title that identifies it and can be set to Standard or Encrypted mode. If you have to store sensitive information it would make a lot of sense to store it as an encrypted string in case your database falls into unscrupulous hands. You can have many variables of both formats. The Variable Replacement Mode determines when the variable token, for example __My variable__, will be replaced with their values. If you have a configuration file, you can put the variable token in place of the actual value and the deployment system will automatically insert the correct value. The available modes specify when this happens and include a number of options:
- Only in Command—If this mode is selected then the variables will be replaced only in the execution command string and you don't need to specify any additional options.
- Before Installation—With this option selected not only will the values be replaced within the installation command, but also the variable token will be opened and replaced in any file specified before the execution takes place. If you have text-based configuration files that are used as part of the installation then this is a good option so that the variables are prepopulated.
- After Installation—If you only have the files that you need to replace the variable token in after the installation, for example from an MSI installation, then you need to do the replacement after.
- Before and After Installation—If you have a bit of both—some configuration files available before and used as part of the installation as well as some configuration files as a result of the command execution—then you will want to replace the variable tokens both before and after the execution of the command.
If you select Before, After, or Before and After, you will be required to enter a file filter expression. This will tell the system which files to do the replacement in. You can still specify all files with *.* or you can speed up the process if there is a large number of files by restricting the replacement to only configuration files with *.config. You can even specify a comma-delimited list of filter options.
The final tab on the component definition gives you a view into which and how many release templates use this component. You may have a component that is used in many applications or deployments and you want to keep track of the implications of changes to the variables or command. If you make such changes then you would need to update all of the release templates that use this component.
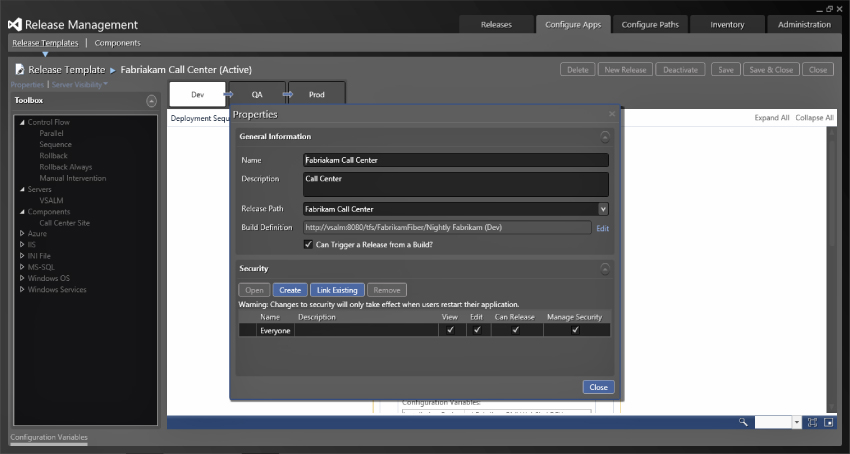
Now that you have created the component, you can create a release template for your release. When you create a new release template, as in Figure 6.17, you are first asked for some metadata. Again you have a simple name and description, and you then have to specify the all-important release path. You learned how to configure release paths earlier and the release template is really defining what happens at the Deployment step; see Figure 6.12. You can also select a build at this point. If you are going to create a continuous release process, then you should trigger this process from the completion of a build definition. You can also add security around the process to restrict who can view, edit, or even create a release using this release template.
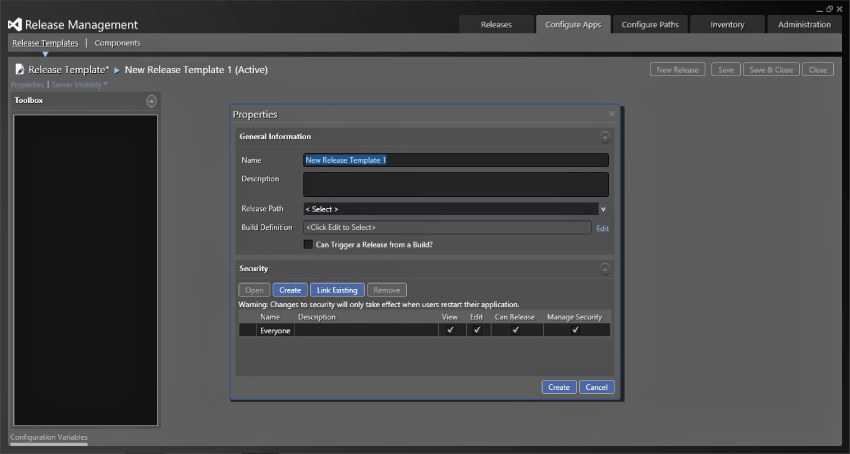
Selecting the correct release path in Figure 6.17 will give you the correct set of release path steps along the top of the workflow, as you can see in Figure 6.18. In Figure 6.18, the ability to trigger the release from a build is enabled. This will automate the process of creating the release but to do this you need to add some custom attributes to the build template.
With the properties complete, you can start to build the actual deployment process to use for each of the stages. You can use exactly the same process; however, there could also be many differences as the server names and variables differ between environments. You may even have one server to deploy to in the Dev Stage while deploying to a hundred servers in the Prod Stage. This will invariably require differences in the workflow. To that end you can configure a different workflow for each of the stages, which you can see in Figure 6.19. On the left side of the Release Template edit view, you can see the actions, components, and servers that you configured previously. There are also a set of control flow elements, common to workflow, that allow you to create sequential, parallel, and manual flows within the workflow.
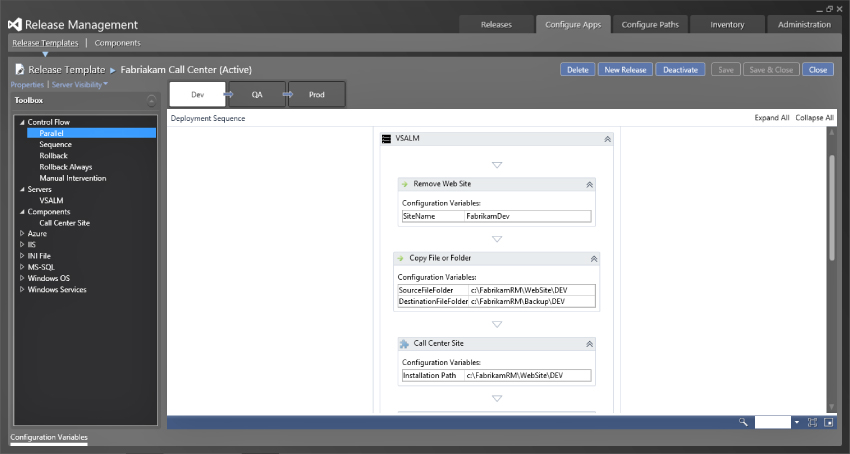
You can create the workflow to perform deployments by simply dragging the things that you want from the left to the design surface provided. You can, for example, drag a parallel activity across from the Control Flow section and, if you have two servers, deploy and configure them in parallel to improve the speed of the deployment.
In this way, you can build up the mechanics of your deployment, even allowing for failures. You can add rollback elements and the system will execute all rollback elements that have already been passed as well as the next one. In this way, you can create many checkpoints at which the deployment can fail gracefully. On each activity the variables that are configured, either in the action or the component, will be shown and you can set them to different values depending on the stage that is executing. You can see at the bottom of Figure 6.19 that there is only one variable to be configured, from the command you looked at earlier. This is the deployment location to which the website files are deployed. If you configured other variables then they would also show up here.
To switch between the stages, you can click the title of the stage at the top of the screen and configure additional workflow elements for each of them. For more information on how to configure release templates, refer to the release management manual at http://aka.ms/RelMgmtMan.
Now that you have a release template, you can create releases that use it to deploy your application.
Creating Releases
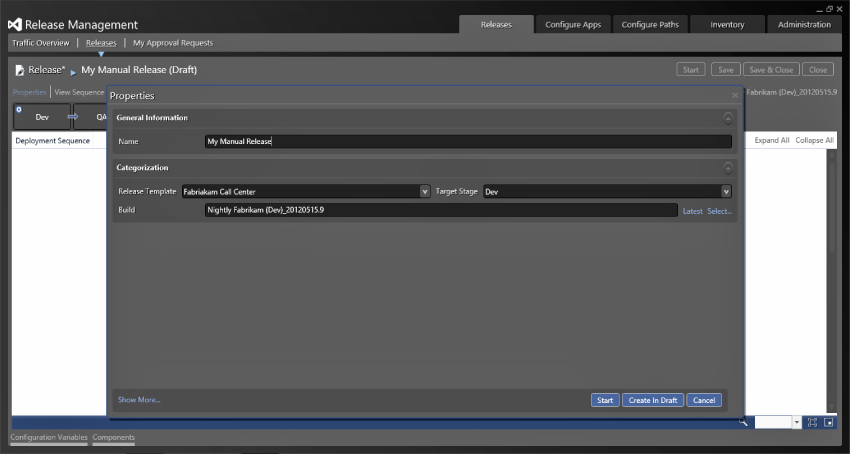
With everything else configured, you can now create your release. Choose Releases ⇒ Releases and create a new release, as shown in Figure 6.20. Here you specify a release template which, because you selected a build template as part of configuring the release template, will ask which build you want to use. This example uses Latest and has picked that build. You can also select a target stage based on the permissions that you set when you created the stage. If you are a test manager you may want to create a release of a specific version, such as for verifying that a regression exists in an older version of the software.
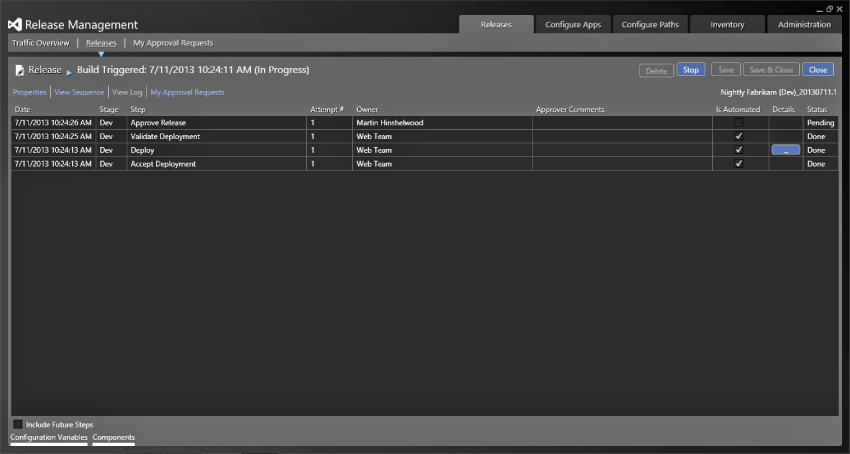
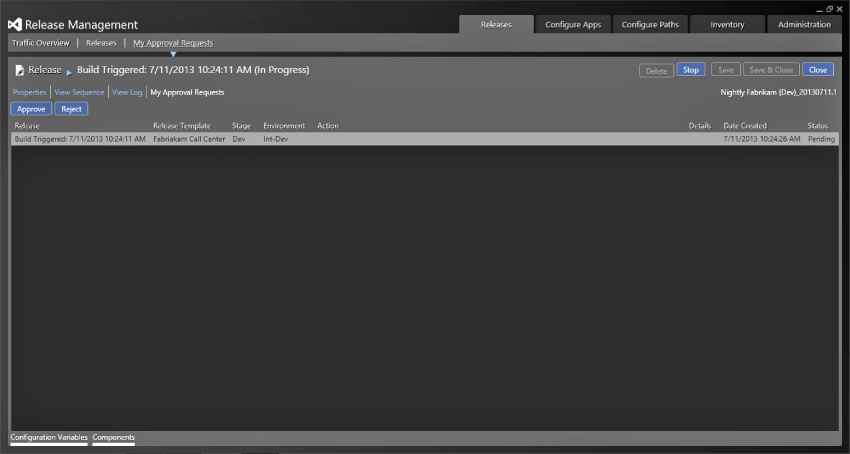
The release can also be generated from the execution of an automated build. This will result in the same process, except the name will begin with Build Triggered with a date following it. This type of build is pushed through the system and will stop on any of the manual processes, as in Figure 6.21. In Figure 6.21 you can see that the deployment process to the Dev stage has been completed and that the process is now waiting for my approval. This is the first non-automated step and represents the post-deployment approval discussed earlier in the chapter.
Approvals
There are two ways that you can action approvals. The first is through the Release Management client for Visual Studio 2013 and consists of a list of approvals that are assigned to you, such as in Figure 6.22. In this version, you can look at the sequence, which shows which stage the release is at, and see a read-only view of the workflows for each of the stages. You can also view a log of previous activities and see the properties that were used to call the release.
The other way is a much simpler web interface that shows a subset of the information available in the client tool. The advantage here is that you do not need to have anything additional installed to action the approval. Figure 6.23 shows the web interface and the options that are available. You can click the “stage” icon on the right to see the parts of the stage. The blue indicator shows the stages that have been completed.

In both of these interfaces, you can approve or reject the request. The web interface also allows the user to reassign a task to another user.
This is a capable release management system that will rise to meet your needs. Regardless of whether you have a complex deployment process, you can configure Release Management in Visual Studio 2013 to support it.
Summary
In this chapter, you learned about how software release management can help reduce delay and increase time to market. You learned about continuous delivery and release pipelines and about how Microsoft has provided tools to configure your own pipeline specific to your software.
The next chapter discusses some of the common customizations and advanced customization points that are available in Team Foundation Server 2013.