
Chapter 5
Team Foundation Build
What's in this chapter?
- Getting to know build automation
- Introducing Team Foundation Build
- Looking at what's new in Team Foundation Server 2013
- Understanding the Team Foundation Build architecture
- Working with builds
- Understanding the Team Build process
This chapter examines the build automation capabilities of Team Foundation Server—what is provided out of the box, how to use it, and how to customize it to suit your organizational requirements. But first, let's take a quick look at build automation in general.
After version control, automating the build is the second most important thing you can do to improve the quality of your software.
Only after the parts of your application come together can you tell if your application works and does what it is supposed to. Assembling the parts of an application is often a complex, time-consuming, and error-prone process. There are so many parts to building the application that without an automated build, the activity usually falls to one or two individuals on the team who know the secret. Without an automated build, even they sometimes get it wrong, with show-stopping consequences that are often discovered very late, making any mistakes expensive to fix.
Imagine having to recall an entire manufacturing run of a DVD because you missed an important file. Worse still, imagine accidentally including the source code for your application in a web distribution, or leaving embarrassing test data in the application when it was deployed to production. All these things make headlines when they happen to organizations that build software, yet they can easily be avoided.
Integration of software components is the difficult part. Teams work on their features in isolation, making various assumptions about how other parts of the system function. Only after the parts are assembled are the assumptions tested. If you integrate early and often, the integrations are tested as soon as possible in the development process—therefore reducing the cost of fixing the inevitable issues.
It should be trivial for everyone involved in the project to run a copy of the latest build. Only then can you tell if your software works and does what it is supposed to. Only then can you tell if you are going to have your product ready on time. A regular, automated build is the heartbeat of your team.
In Visual Studio 2013, developers are usually able to run their application by pressing the infamous F5 key to run the code in debug mode. This assembles the code on the local workstation and executes it. This makes it trivial for developers to test part of the code base. But what it doesn't do is ensure that the code works with all the latest changes committed by other members of the team. In addition, pressing the F5 key simply compiles the code that's ready for manual testing. As part of an automated build, you can also run a full suite of automated tests, giving you a high degree of confidence that no changes that have been introduced have broken something elsewhere.
Pressing the F5 key is easy for a developer. You want your automated build to make it just as easy to run your application—if not easier.
Team Foundation Build
Build automation is so important to the quality of the software development process that Team Foundation Server 2013 provides build services as part of the core platform.
The build services provided by Team Foundation Server offer an enterprise-class, distributed build platform. Utilization of the build services is done inside the development environment in which the code is being created (either in Visual Studio or Eclipse). Information on the build services is tightly integrated with the version control, work item tracking, and the testing features provided by Team Foundation Server.
In addition, data obtained from the build system is fed into the Team Foundation Server data warehouse, thus allowing for the analysis of historical reports and trends. The build services provide notifications on build events using the standard Team Foundation Server event publication mechanisms, which means for example that email alerts can easily be sent to the team regarding build status. As part of the standard installation in Visual Studio 2013, the Build Notifications tool is installed alongside Visual Studio, which can provide the capability for additional build notifications via the application that runs in the system notification area.
Team Foundation Server provides a number of ways to trigger the build. Builds may be started by a manual request, automatically triggered by a check-in to Team Foundation Server version control, or run on a specified schedule. Team Foundation Server also has a concept called gated check-ins. A gated check-in means that a developer's changes must successfully build on the build server when merged with the latest code from version control before the code is then checked in on behalf of the user, thus preventing “broken” code from ever being checked in.
Team Foundation Build also has a full API in .NET or Java. These are the same APIs used by the Visual Studio and Eclipse integrations as well as the build notification tool. They provide you with deep integration into the build services. Combined with the build events, there is a highly extensible platform to integrate any additional systems that you can imagine.
What's New in Team Foundation Build 2013
The build services offered by Team Foundation Server have changed significantly since the initial version in Team Foundation Server 2005.
In the first version, Team Foundation Build was based heavily on MSBuild, along with a build server machine called the build agent. All configuration of the build was done by editing files stored in version control.
In the 2008 release, build management was greatly improved with the capability to trigger builds automatically, queue builds, and manage builds. This second version introduced the Build Definition as a Team Foundation Server entity in its own right that contained various configuration data about the build (such as the build name, workspace definition, default build agent, drop location, and build trigger). The file describing how to do the build (the TFSBuild.proj file) was still based on MSBuild.
The 2010 release continued much of the work done in 2008, with some notable changes that included the following:
- Windows Workflow 4.0
- Gated check-ins
- Private builds
- Build notifications
- Build controller
- Properties exposed for common customizations
- Integration with symbol and source server
- Enhanced build deletion options
By the 2010 release, Team Build's capabilities had matured significantly since the original release; therefore, the 2012 release was more evolutionary than revolutionary. However, there were a few significant changes worth noting:
- Hosted build services
- Drop to version control
- Batched gated check-in
- Changes to the Build Service protocol
- Updated build report
For the 2013 release, Microsoft continued the evolutionary approach by changing the way things work and removing support for older features. Some of the changes are significant and hint about the future, while other changes are minor like moving to Windows Workflow 4.5. Some of the bigger changes include:
- Support for Git-based repositories
- Simplified building and testing of Windows Store apps
- MSTest support removed
- Enhanced hosted build services
- Build output changes
- Simplified process template
- Built-in support for calling scripts
Support for Git-based Repositories
As with version control, the addition of Git support to Team Foundation Server means Team Build needed to add support as well. For a majority of the features of Team Build, it just works. This means compiling your bits, testing them, dropping output and publishing symbols, and build notifications all work as expected. However, due to the significant differences between Team Foundation version control and Git, there are differences in the way Team Build works. The major differences are:
- No support for gated check-in
- Source settings support both Team Foundation Git repositories as well as remote repositories
- Sources aren't tagged as part of the build (Builds with Team Foundation Version Control label by default. The semantics are not the same for Git.)
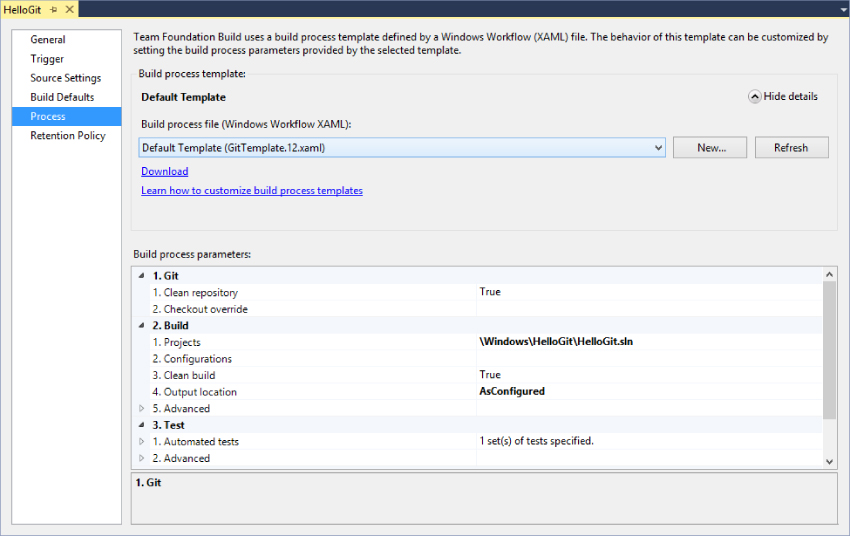
Beyond that, most things work the same. The Build hub in Team Explorer has the same options regardless of which type of version control you're using. Thus, when you create a new build, the Build Definition editor opens up just as before. You will note there is a Git-specific template now like what's shown in Figure 5.1. Later in the chapter, the process of creating a build is discussed and any Git-specific subtleties are called out there as well as later when the build process is covered.
Simplified Building and Testing of Windows Store Apps
With the release of Windows 8, Microsoft introduced a new type of application optimized for touch screens and tablets but that is also good for desktop computers. These apps were originally known as Metro apps, but as of this writing are known as Windows Store apps. Building and testing these apps using the 2012 Team Build release wasn't generally straightforward. The good news is that with the release of Windows 8.1 and Windows Server 2012 R2 and Team Foundation Server 2013, things are a lot easier. That said, you'll still generally want a dedicated build agent for this particular type of build. In addition, you'll need a dedicated account that can run interactively on the build agent. You can of course use a real person's account, but we recommend you create a special account just for building Windows Store apps so you can lock it down for traceability, and so on.
In order to successfully build and test your Windows Store apps, you'll need a build agent running Windows 8.1 or Windows Server 2012 R2. You'll then need to install Visual Studio 2013. Next you'll need to install the Team Foundation Build agent software. Then you configure your build agent to run interactively using the account you created earlier. In addition, if you want to run unit tests, you'll need to acquire a Developer License (which requires a valid Microsoft account) and either install your trusted publishing certificate for the Windows Store or generate a temporary one. You'll note that you need to update the Developer License every 30 days. Finally, you'll want to create a tag for this agent, which you'll then use (and which is discussed later) when you define your builds. Figure 5.2 shows a completed Build Service Properties dialog, where you configure all of these settings.

MSTest Support Removed
In Visual Studio 2012, Microsoft introduced a new test runner that was modern, fast, and open. In doing so, it put MSTest on notice that its days were numbered. Starting with Team Foundation Server 2013, new builds that are created using the new templates no longer support MSTest. Your existing builds from 2012 and earlier will continue to run but only with the pre-2013 templates. While the Team Foundation Server installation installs the MSTest assemblies, you must install Visual Studio 2013 on build machines for running tests including legacy MSTest ones.
Enhanced Hosted Build Services
Visual Studio Online, the hosted version of Team Foundation Server (www.visualstudio.com), not only provides a hosted Team Foundation Server instance for version control and work item tracking but also provides virtualized hosted build infrastructure. By default, every project collection in the hosted service also has a Hosted Build Controller available that you can use for your builds. When a build is queued, the hosted service creates a new virtual machine, attaches it to your project collection, executes the build, and then returns the machine into the pool ready for the next account that wants to perform a build. Because the build virtual machines are created from a fresh image for each invocation, incremental builds are not currently supported. In addition, if your build requires any dependencies that are not pre-installed in the standard hosted image, then you need to have those checked in to version control and configure those as part of the build, or use Nuget. As of this writing, Microsoft continues an active update process to the service about every three weeks.
Build Output Changes
One long-time issue with the way Team Build outputs binaries to the drop share is that it would just dump everything into one folder. To fix this, you often had to resort to customizing your build process or in Team Build 2012 using .NET 4.5 using a bunch of MSBuild arguments. In Team Build 2013, you can now use the Output location to control how Team Build lays out your files.
There are three choices:
- SingleFolder maintains the same behavior as prior releases of Team Build, where all the output is copied into a single drop folder.
- PerProject copies output into subfolders based on the solutions or code projects that you're building. The key thing to understand is that you get only one folder per item specified in the projects option. If you only specify a single solution, then a folder with the name of the solution is created and all the files are put inside it. This option makes sense if you're building more than one solution or you're going to specify Visual Studio projects individually.
- AsConfigured, when used on its own, will not copy any files to the drop folder. To use this option, you need to customize your build definition so that it copies the files you want from the compilation folders on the agent to the drop share using a folder structure of your own design.
Simplified Process Template
When Microsoft changed the orchestration engine in Team Build 2010 from MSBuild to Windows Workflow, they provided a very powerful execution mechanism. However, with great power came a bit of complexity. To make things easier, Microsoft consolidated the number of items exposed in the build workflow and internalized many of the lower-level operations. This means when you do need to work with the XAML file in the editor, it loads faster and there's less noise. This is covered in more detail later in this chapter in the “Team Build Process” section.
Built-in Support for Calling Scripts
Related to making the build template less complicated, Microsoft wanted to make it easier to customize your build process without resorting to customizing the XAML or writing a custom workflow activity. To do this, they introduced four points where you can have PowerShell scripts executed by the build process. The new default template provides you with four call points to execute a batch file, a command script, or a PowerShell script, as well as pass arguments. You can have your script called before and after your code is compiled as well as before and after the engine runs your build's tests. This is covered in more detail later in the chapter also in the “Team Build Process” section.
Team Foundation Build Architecture
As shown in Figure 5.3, several logical components are used as part of the Team Foundation Build services.

When a build is triggered, the application tier sends a notification to a server called the build controller using a communication channel established by the build service and queues the build. The controller then downloads the build's Windows Workflow-based process and executes it. By default, this is then allocated to the next available build agent in the controller's pool of agents.
The build agent is the machine that actually executes the main portion of the build process as coded in the build's workflow—including calling MSBuild to perform the compilation step. Then, if configured, the build agent archives the build results (that is, your executable binaries or your website) to the location known as the drop location, and publishes symbols to the symbol server (if configured). Note that when you're using the hosted build services, the symbol server capabilities are not available.
For an on-premises installation, the build controller and the build agent services are provided by the Visual Studio Team Foundation Build service host installed from the Team Foundation Server installation media. The build controller and build agent are configured using the Team Foundation Server Administration tool.
The build controller and build agent may live on the same machine as the Team Foundation Server application tier. However, because a build is typically very CPU- and disk I/O-intensive, the build agent should at least be located on a separate server to avoid affecting the performance of the main Team Foundation Server application. If you run the build agent on the same machine as Team Foundation Server, this may cause some performance issues if certain intensive diagnostic data collectors are used as part of the build.
The actual details of the build (such as the build name, what to build, when to build it, how to build it, and what to do with the results) are all configured in the build definition. The results of individual builds are called the build details.
Working with Builds
This section examines working with team builds in Visual Studio. Figure 5.4 shows the key windows that you need to use:
- Team Explorer
- Build Explorer
- Build Details
Team Explorer
You should already be familiar with the Team Explorer view (accessed in Visual Studio through View ⇒ Team Explorer). Team Explorer contains a Builds page that provides you with access to all the functionality you need to interact with the build services in Team Foundation Server. The New Build Definition link at the top of the page enables you to create a build definition. There is also an Actions link that provides you with additional functionality, such as being able to manage the Build Controller settings, set Build Qualities, and configure security permissions.
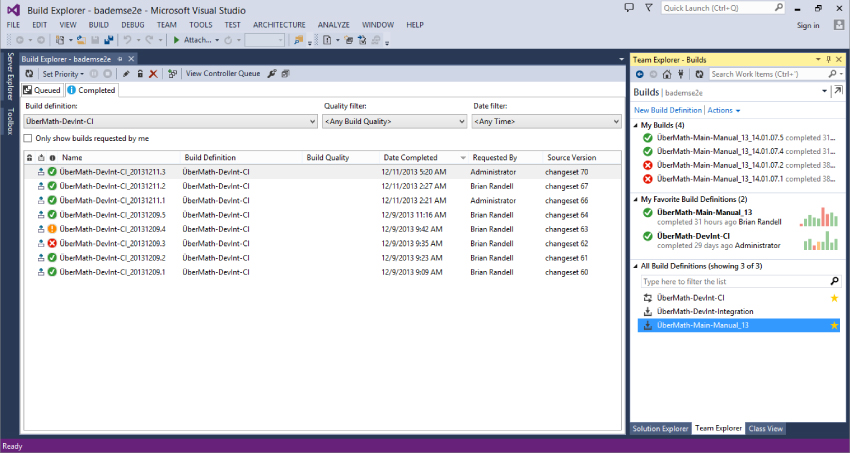
Under My Builds you find your most recently executed builds (that is to say, builds that you have triggered manually or by checking into a version control folder that is being monitored by a continuous integration, rolling, or gated trigger). My Favorite Build Definitions displays a summary of the build definitions that you have marked as a personal favorite in Visual Studio, Web Access, or Eclipse. Finally, under All Build Definitions, you find all the defined builds for that team project and a search box that enables you to quickly find a particular build definition from that list. Double-clicking one of these or clicking the build in Favorites opens the Build Explorer for that build definition.
Build Explorer
The Build Explorer view enables you to see all the builds that are currently executing (or awaiting execution) in the Queued tab, and those that have run in the Completed tab.
Queued Builds
From the Queued tab of the Build Explorer, you can pause or change the priority of builds that are currently awaiting execution. You can also cancel paused builds or stop builds that are currently executing.
Completed Builds
From the Completed tab of the Build Explorer, you can view the build details, delete the build, or set the quality of the build.
The build quality is a text string assigned to particular builds to denote the quality of that particular build (that is, “Released,” “Ready for Test,” and so on). In addition, you may mark the build with Retain Indefinitely to exclude it from any automatic retention policies on the build definition. You also have the option to Reconcile Workspace with the build, which is useful for a gated or private build because it removes any pending changes that you may still have that were checked in on your behalf as part of the build.
Build Details View
When you double-click a build in the Build Explorer, you see a report of the build details, as shown in Figure 5.5.
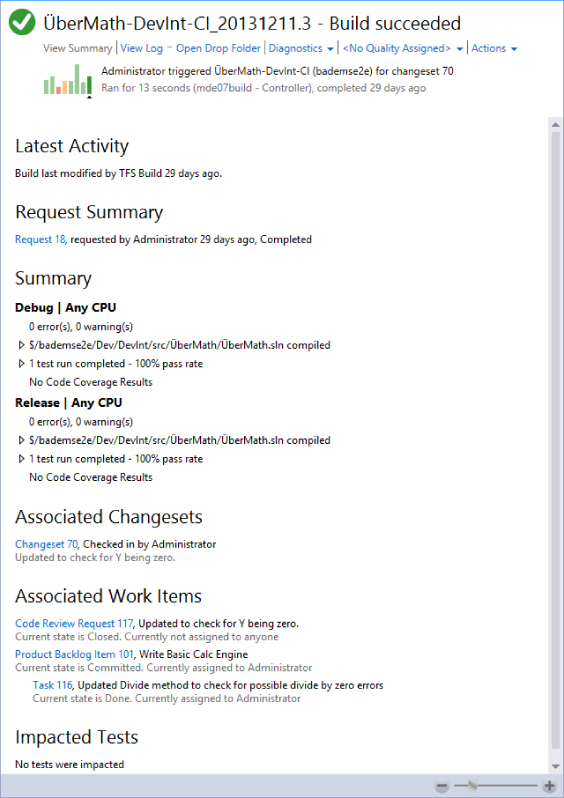
While the build is queuing, details are given about the build's position in the queue and the mean time that builds have been queued. After the build is executing, summary data about the execution time compared to previous builds is displayed. Clicking the Build Details link shows you more information about the build in progress and is automatically refreshed to show you the current build log data. A small bar chart in the top-left corner displays the currently executing build time against previous builds, which can give you an indication of how long the build might run.
When the build has completed, you see the build summary view showing all the projects, compilations, and tests runs, as well as any unit test results, code coverage, or test impact data. You also see information regarding the changesets included in the build since the last successful build of that build definition, along with any work items associated with those changesets when they were checked in.
In this way, you can start to see how full requirements traceability is obtained in Team Foundation Server, from the requirement being logged as a work item through to the development task to implement the requirement, to the change in source code to implement that task, and then, finally, the build of the software that includes that check-in. All the data is passed into the Team Foundation Server data warehouse to allow historical trend analysis and reporting.
From the build details view, you can open the drop folder in Windows Explorer to access the outputs of your build. If you've chosen the new option to copy build output to your server, you'll be taken to a web page where you can download a zipped copy of your build's output. You may modify the build quality assigned to that build, mark it to be retained indefinitely, or delete the build and associated results. You may also view the logs in the drop location (either in the drop network share or in version control) and perform many other additional activities from under the Actions link.
Creating a Build Definition
A build definition describes how, what, when, and where to perform your build. You create a new team build definition by clicking the New Build Definition link at the top of the Builds page in Team Explorer. Alternatively, from Visual Studio you can go to Build ⇒ New Build Definition.
You see a new build definition form inside Visual Studio. The form is split into two parts — a set of areas on the left side that basically function like tabs, and the main area for that section on the right side. Notice that, when you first open the dialog, a number of the sections on the left side have warnings associated with them; this is completely normal. The purpose of these warnings is to highlight areas that need information before the definition can be saved.
You can save the definition by using the usual mechanisms (File ⇒ Save, or Ctrl+S, and so on). When saved, the definition is stored in Team Foundation Server and appears in the Builds page for all team members. You can mark your build definition as a personal favorite to make it easier to find later by right-clicking the created build definition and selecting Add to Favorites.
General Section
On the Builds page in Build Explorer, click General in the left-side pane to bring up the General section. Then you must give the build definition a name, and, optionally, a description, as shown in Figure 5.6.
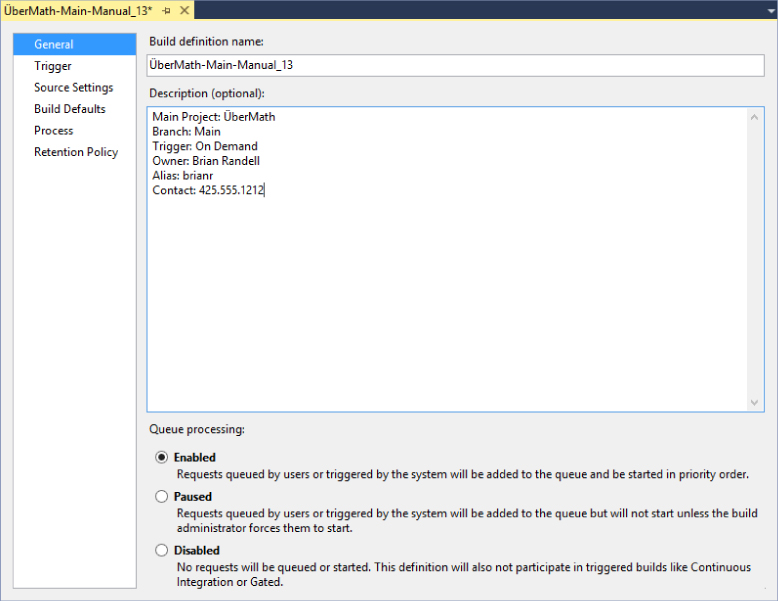
As you can easily search by name in the Builds page in Team Explorer, it may be useful to develop a naming convention for your builds to make them easier to find when filtering. A convention such as “Team: Project (Trigger)” is useful for large team projects. For example, the BizApps team might have two build definitions defined for their framework, one that is a CI build triggered on every check-in to give quick feedback on the state of the build, and another scheduled build that not only does a full build but packages the latest version and generates documentation, making it easy to consume by other teams. They might call these builds “BizApps: Framework (CI)” and “BizApps: Framework (Nightly).”
For the description of your build, you should provide a short, one-line summary of what the build is for, and contact details about the owner or “build master” of the build. The first three lines of the build description are displayed in other dialogs in Team Foundation Server before scrolling is required. Therefore, this important information should be placed at the top so that people working with the builds can see what the build is for and who to contact for questions.
When creating a new build definition, you should set the Queue Processing to Enabled, as this allows builds to be triggered as soon as the build definition is saved. However, it might be useful to adjust the Queue Processing setting when performing maintenance to the build definition or build controllers. For example, if you are customizing the build process you can mark the build as Paused. New builds are queued if they get triggered as a continuous integration build or a gated build. However, they do not run until the build is enabled or a build administrator forces the build by right-clicking the queued build request in Build Explorer and selecting Start Now. This enables you to safely test that your changes to the build customization are working before re-enabling the build definition for use by the team. After the build is re-enabled, queued jobs are processed according to priority level and the order that they were submitted.
Trigger Section
Located in the Trigger section, the build trigger tells Team Foundation Server when to perform a build. As shown in Figure 5.7, there are a number of triggers available, including the following:
- Manual
- Continuous Integration
- Rolling Builds
- Gated Check-in
- Schedule
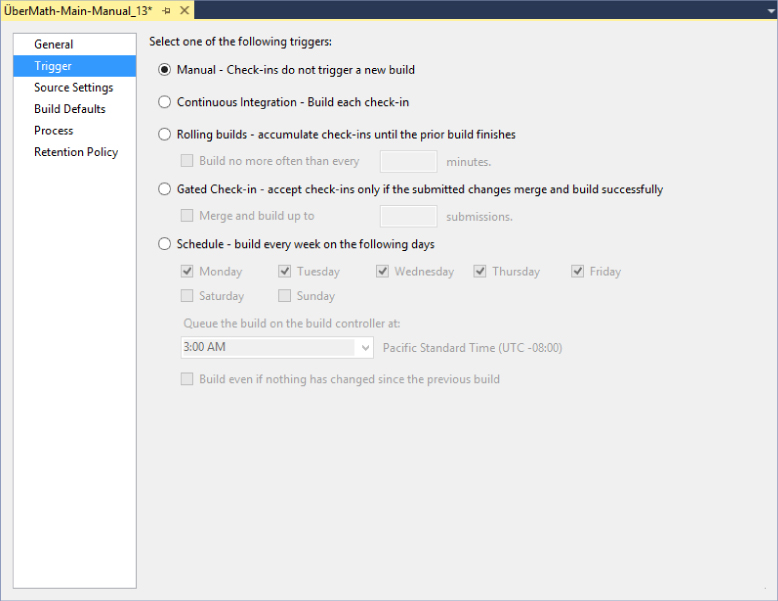
Manual
When you configure a build for a Manual trigger, the build runs only when explicitly queued. You can queue it by using the user interface, by using the command line (that is, tfsbuild.exe), by using the Team Foundation Server .NET object model, or by using the TFS SDK for Java.
Continuous Integration
In Team Foundation Server, the Continuous Integration trigger queues a build for every check-in performed on the areas of code that you define as related to your build. (The “Source Settings” section, later in this chapter, provides more information on defining those areas.)
Check-ins to Team Foundation Server are discrete, atomic transactions represented by a changeset. By rebuilding the system for every changeset, you can easily determine which change broke the build (as well as who checked in that change). The downside to this is that there are, obviously, a lot of builds performed. Therefore, it is essential that build times are kept short to ensure rapid and frequent feedback to the development team as to the status of the current code base.
Rolling Builds
Rolling builds are similar to the Continuous Integration trigger in that a check-in will trigger a build. However, rather than building on every check-in, rolling builds batch several check-ins together to ensure that the build server never becomes backlogged—and optionally setting a minimum time interval between which a new build may be triggered. This type of trigger might be familiar to those who have experience with build servers that support multiple version control tools such as CruiseControl, CruiseControl.NET, or Hudson/Jenkins.
Performing rolling builds has the advantage of reducing the number of builds performed, which helps to reduce the number of builds queued at peak times (and, therefore, the time before the results of an individual developer's check-ins are known). However, it has the disadvantage of grouping changes together, therefore making it more difficult to determine the check-in responsible for the build failure. For this reason, many people stick with the Continuous Integration trigger and instead focus efforts on increasing the speed of the build or the number of build agents available to perform the build.
Gated Check-in
A Gated Check-in trigger means that check-ins to the areas of version control covered by the build are not allowed by the server until a build has been performed and passed successfully. You should note that this option is available only when using Team Foundation version control. When users attempt to check in a file, they are presented with the dialog shown in Figure 5.8.
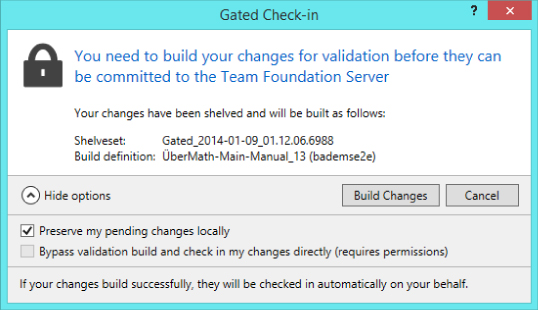
The changes are stored as a shelveset in version control. The build server takes the shelved changes and merges them with the latest version of code from version control before performing the build. In the event of a successful build, the changes are then checked into the build server, and users are notified via the build notification tool in the system notification area. At this point, users can “reconcile” their workspaces to remove the pending changes that were committed as part of the build from the current pending changes list.
Because of the automatic merge process that is performed by the build server, it is important to realize that the actual code committed by the gated check-in may differ from the code submitted as part of the shelveset.
If you have two build definitions with overlapping workspace mappings that both have Gated Check-in triggers, the user gets to pick which one is built to verify her changes at the time of check-in. In addition, even though Team Foundation Server 2013 has build agent pooling features, only one build of a gated check-in may be executed at a time to prevent conflicting merges from being submitted.
Schedule
Builds may be triggered by a particular schedule—that is, a daily or nightly build. Note that a single time may be specified for each build definition for the chosen days of the week—repeated weekly. Also note that, in the case of a nightly build, the build time should be set outside of any backup or other regular maintenance jobs.
The time for a scheduled build is actually converted into the time zone for the application tier when the build definition is saved. But this is always displayed in the time zone of the user's machine when editing the build definition in Visual Studio. For this reason, there can be some slight confusion as to the actual build time during periods where Daylight Savings Time is in operation in one of the time zones and not the other.
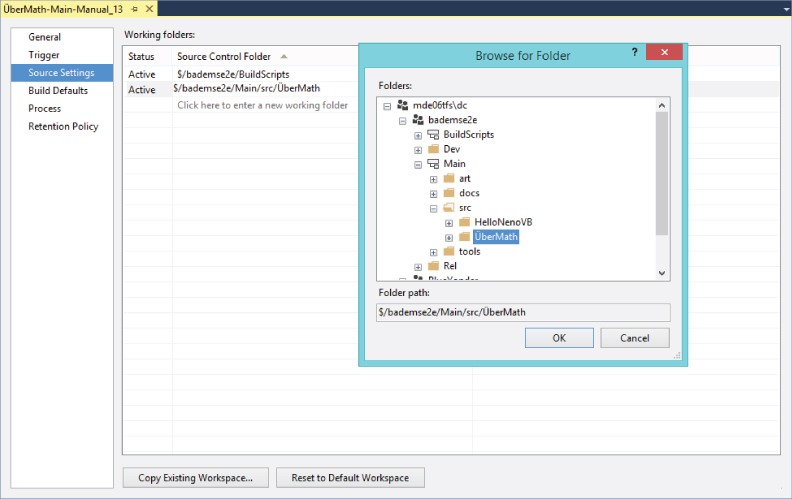
Source Settings
The Source Setting section (called Workspace in previous releases) enables you to define the working folder mappings that should be used for your build. These working folder mappings not only determine where on disk the files should be located but also which files on the server are considered relevant to the build.
The default working folder mapping for a new build definition is given as mapping the root of the team project (for example, $/Demo) to the sources directory represented by the environment variable ($(SourceDir)). In addition, you'll now see an entry for a folder called Drops in your Team Project that is cloaked (for example $/Demo/Drops). This Drops folder mapping is primarily designed for folks using Visual Studio Online and can be safely removed if you're only using the on-premises version of Team Foundation Server. That said, these default settings are almost always too broad for your build, and include too many files, which not only slows down the build (because more files must be downloaded from version control), but also means that some check-ins to the project risk triggering a build even though they do not affect the results of the build.
Therefore, you should always modify the server path of the build to only include the files you need, as shown in Figure 5.9. You may also make use of cloaked working folder mappings to exclude certain subfolders or files from a working folder mapping that do not affect the build (such as a folder containing the source PSD image files used in a website).
Build Defaults
On the Build Defaults section shown in Figure 5.10, you specify which build controller you would like to use for the definition and where to copy the outputs from your build.
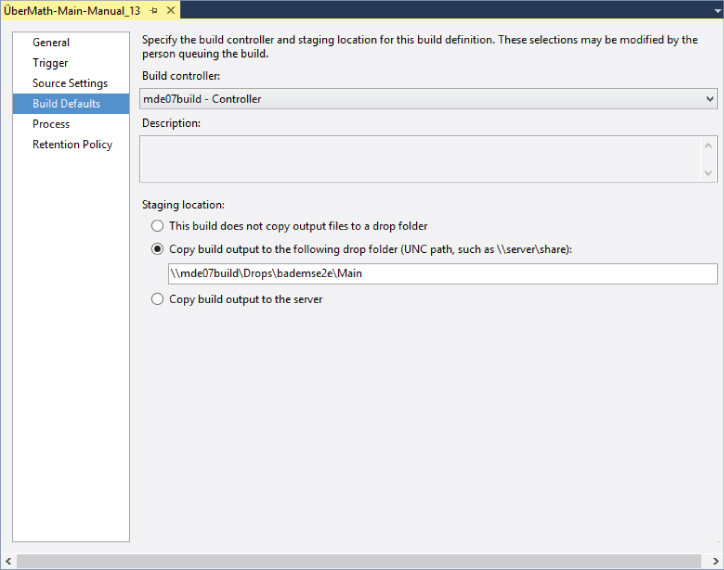
In Team Foundation Server 2013, build controllers and build agents are responsible for notifying the Team Foundation Server application tier of their existence as they are installed. If you have no build controllers available in the controller drop-down, then your Team Foundation Server administrator must install a build controller (and build agent) using the Team Foundation Server Setup media and configure it to point to your project collection. The description field displays the description given to the build controller, and it is not editable from this dialog. Note that when using Visual Studio Online at http://visualstudio.com, a Hosted Build Controller is present for every project collection that allows builds to be performed using a build controller in the cloud.
You now have more choice when it comes to your staging location. For regular builds, the drop folder location must be a Windows file share on the network to which the user running the build agent services has access. There is a limit (inherited from the .NET base class libraries) of 260 characters for the full path of all files copied to the drop folder location, so you should ensure that your server and share names are as short as possible, leaving you with the maximum space for your output. That being said, you should put your builds in directories corresponding to the build definition inside your drop folder location to help keep them organized. Note that the build definition name is appended to the path specified, so there is no need to specify it in the dialog.
For CI builds, you often only care about the correctness of the build. Therefore, the option to not copy build output to a drop folder can decrease build time and reduce management of the output. You can use the new option to copy the build output to your Team Foundation Server.
When talking to the hosted service, you also have the option to store files in version control. Traditional network shares are not easily accessible over the Internet. Therefore, a new option was created in the 2012 release that is only enabled for hosted builds to enable results of the build to be copied to version control. Note that when builds are deleted (either by the retention policy settings or manually) and deletion of build drops has been requested, the results of the builds are not only deleted from version control but destroyed. This means that they no longer occupy space within the version control system in Team Foundation Server. This reduces the amount of space consumed by your project collection.
Process
When talking to a Team Foundation Server 2013 server, you are required to select which process should be used to perform the build, as shown in Figure 5.11. These processes are Windows Workflow 4.5-based processes. The initial list of processes are defined by the process template you used, and can then be added to from the Process section. Each process has a number of easily customizable properties that are designed to be used to alter the behavior of that process. Processes with mandatory inputs are marked with a warning triangle when the build definition is created.
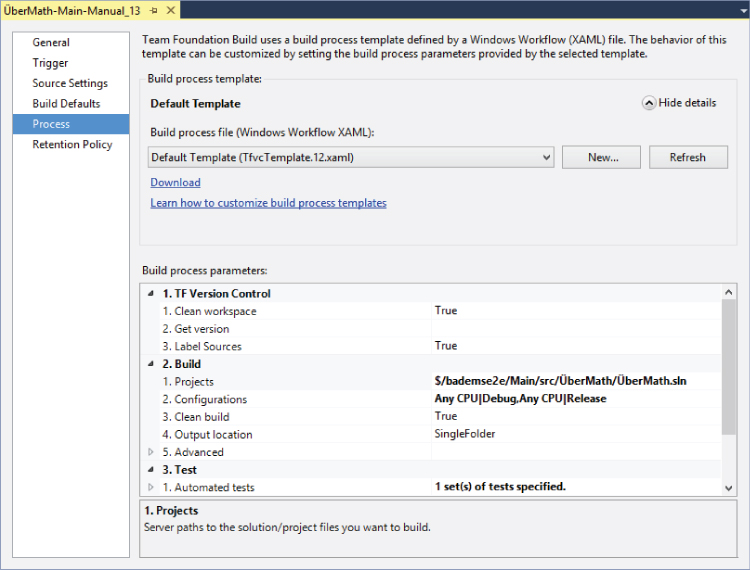
From this section, you can edit and customize the build process parameters. (For more information on this, see the section “Team Build Process,” later in this chapter.)
For the creation of a basic team build using the Default Template, the only property that you must initially configure is which solution or project to build. Simply click the Projects to Build property and click the ellipsis (…) button to add your solution or project to the list. By default, if you have a version-controlled solution open in Visual Studio when you create a new build definition, Visual Studio will automatically set your current solution as the one to build. You'll of course need to make sure that the solution's files are available via the workspace mappings that you configure using the Source Settings option.
Retention Policy
After you start automating builds, you quickly end up with a lot of build results in your archive. Finding the build you need can get complicated—not to mention a large amount of disk space may be required to store all the build results. Team Foundation Server has automatic retention policies to help with this, as displayed in the Retention Policy section shown in Figure 5.12.
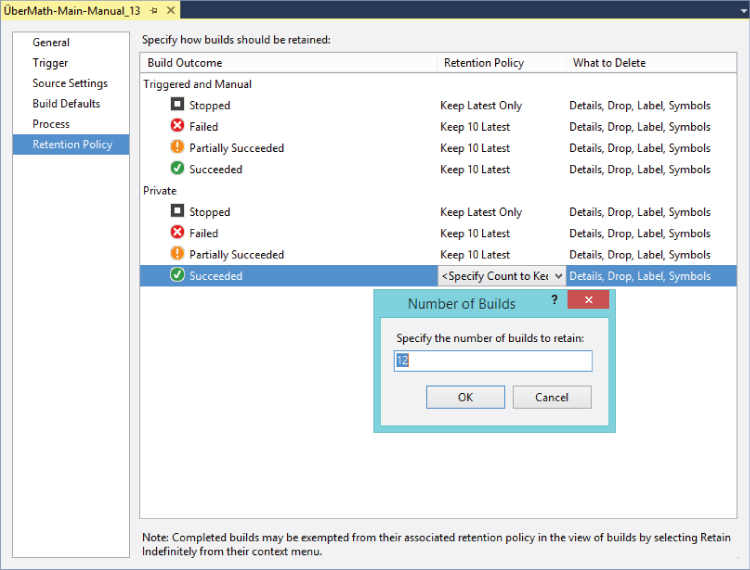
The retention policies determine, for each build result type, how many of those results you want to keep by default. Note that, at any time, you can mark a build with the Retain Indefinitely retention policy from the build details context menu in the Build Explorer view. Marking a build as Retain Indefinitely means that it will be excluded from these automatic retention policies.
There are separate retention policies to control the team builds that are triggered or manually queued from the private builds of individual developers. Changing the private build retention policy affects all the developers performing private builds on that build definition—not just the developer editing the setting.
If you're storing build output in version control using the hosted service, when the build binaries are deleted they are destroyed in version control to allow the disk space to be recovered.
Queuing a Build
Whenever you create a new build definition or make significant changes to it, you should manually queue the build the first time to ensure that it is working as desired. The first successful build for a build definition also acts as the baseline for that build. Every build from that point on records the changesets included since the last successful build for that definition. This information is stored in the build detail for each build, and reports into the Team Foundation Server data warehouse, thus allowing for historical trends over time.
A build can be manually invoked from the Builds node in Team Explorer by using the TFSBuild.exe command-line tool, or by using the Team Foundation Server API. Alternatively, the build might be triggered using one of the triggers defined earlier in this chapter (such as on a check-in into version control or on a specified schedule).
To manually queue a build in Visual Studio, right-click the build definition in Team Explorer and select Queue New Build. You are presented with the Queue Build dialog, as shown in Figure 5.13. The build definition is preselected in the build definition drop-down at the top of the dialog, and its description is displayed underneath.
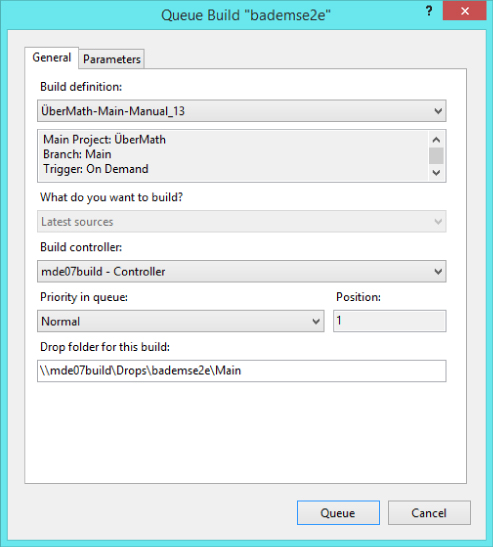
When you manually queue a build, you have options of selecting an alternative build controller (if one is available), adjusting the priority of the build, and modifying the drop folder location to be different from the default. Based on the selected queue priority, you are also given an indication of the current position in the queue that your build would get if it were submitted.
On the Parameters tab you find all the customizable properties defined for the process, so you can alter the value of that property for this single invocation of the build.
Private Builds
You can adjust what you want to build from the General tab in the Queue Build dialog (Figure 5.14). You can either build from the latest version in source control at the time that the build is submitted to the queue, or you can take the latest version and apply a specified shelveset to the build before it is performed.
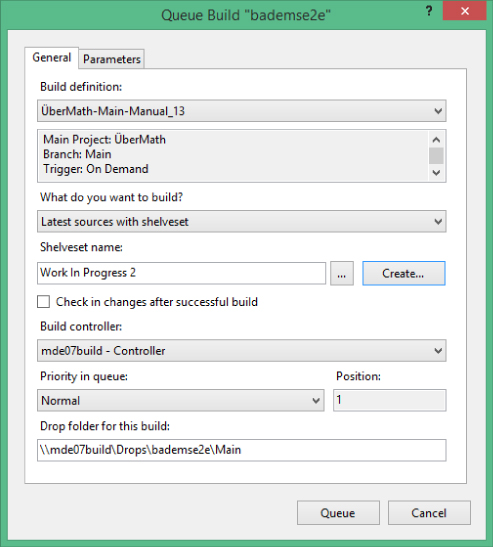
If you decide to perform a build that includes a shelveset of your changes not yet checked in to version control, this is called a private build, which sometimes is referred to as a buddy build.
Private builds are useful when you want to check that you are including all the changes necessary to successfully perform the build on a different machine before you commit your changes to version control. Another use for them is when you may not have all the dependencies to perform that particular build definition on your local machine (such as a code signing certificate installed), but you want to test that your code functions correctly when built with those dependencies.
In many ways, a private build is similar to a gated check-in, apart from the fact that your changes are not automatically checked in to version control after a successful build, but you can choose to have them checked in if you want.
Private builds do not follow the same build numbering mechanism defined for the regular team builds, and have separate retention policies. The build results for a private build are displayed to the developer who is invoking the private build, not to the whole team.
Build Notifications
Team Foundation Server exposes a powerful eventing model and both .NET- and Java-based APIs that allow for custom integrations of any imaginable application or device for notification of build results—from standard email alerts to lava lamps, confetti-filled leaf blowers, and even talking robot rabbits. However, two main notification systems are exposed to the developer out of the box—the build notification tool and email alerts.
Build Notification Tool
The build notification tool is a separate application installed with Visual Studio. As shown in Figure 5.15, it is a small application that runs in the system notification area of Windows and notifies the end user of build events via an Outlook-style pop-up message in the bottom-right corner of the screen.
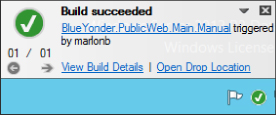
This tool can be configured to automatically start when you log in to Windows. However, it always runs during a gated check-in process so that the developers are aware of the status of the build containing their changes. If the build is a success, the developers can easily reconcile their workspaces to remove any pending changes that were included in the gated check-in shelveset from their local workspace.
To configure the build notification tool, while the tool is running right-click the icon and select Options. To quit the application entirely, right-click the icon and select Exit.
Email Alerts
Basic and custom email alerts can be configured from the web. To quickly view the appropriate web page from Visual Studio, go to the Team ⇒ Project Alerts menu. Using the interface shown in Figure 5.16, you can enable basic email alerts when a build quality changes, when any build completes, or when builds are initiated by the developer. For a more powerful alerts editor, click the Custom Alerts link. (In previous versions of Team Foundation Server, this level of control over alerts required use of power tools or the command line.)
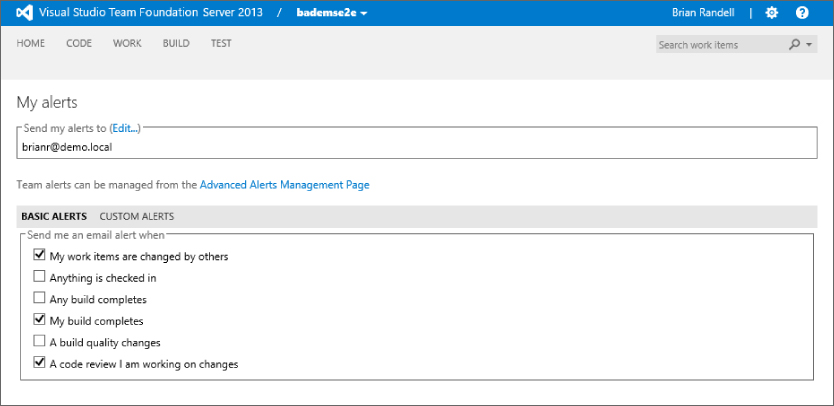
As shown in Figure 5.16, a link is also provided on the My Alerts page to configure advanced alerts that are applicable to the whole team. Clicking the link takes you into the administrative configuration web portal for your team project.
Emails can be sent to any email address, including team aliases, provided the Team Foundation Server application tier is configured with the correct SMTP server details to send the messages.
On the Team Foundation Server application tier machine, the BisSubscribe.exe command is available in the Team Foundation Server 12.0Tools folder, and can be used to script the creation of project alerts.
Team Build Process
The process controlling the end-to-end build process in Team Foundation Server is described in a Windows Workflow 4.5 XAML file. The build process templates are created as part of the project creation process and are defined in the process template. The process templates provided will be different depending upon if you choose traditional Team Foundation Server version control or Git.
In the Scrum, MSF Agile, and MSF CMMI processes, the following build processes are included:
- Default template—This is the default template to be used for most new builds created for Team Foundation Server. This template is the primary focus of discussion in the remainder of this chapter.
- Upgrade template—This is the default template for builds upgraded from Team Foundation Server 2008, or newer builds that make heavy use of MSBuild rather than Windows Workflow. Basically, it performs some housekeeping, and then just wraps the call to the
TFSBuild.projfile for an MSBuild-based build configuration. Java builds created by Team Explorer Everywhere make use of the Upgrade template to provide a thin wrapper around Ant or Maven. This allows all the configuration files to be edited by a simple text editor and does not require knowledge of Windows Workflow—but it pushes the majority of the build logic down into the Ant or Maven build script that is invoked. This template is not available in Team Projects created with a Git repository.
In addition, the LabDefaultTemplate build process template is installed for the Lab Management functionality by the Lab section of the MSF processes.
Unlike previous releases of Team Foundation Server, all of the build process templates are stored inside the databases on your data tier. If you want to examine them you need to download them locally to your machine. Once you've done that you can view one and if desired extend it. At that point, you'll want to practice good customization practices and check it into a version control repository.
The majority of the remainder of this chapter focuses on the Default template—how it works, how to use it, and how to modify it.
Default Template Process
The Default template is used for most new, un-customized build definitions. Compared to the 2010 and 2012 versions of the template, Microsoft has dramatically simplified the process. You can explore it in detail by opening the correct XAML file: TfvcTemplate.12.xaml when using a Team Foundation version control-enabled Team Project; or GitTemplate.12.xaml when using a Git-enabled Team Project. As mentioned earlier, in order to examine the file, you'll need to download it from Team Foundation Server and save it to a local file. Once you've done this, you can explore the template and modify it if needed. The only differences between the two files are the specific features related to retrieving files from version control.
On the build controller, the build number is calculated and the drop location for the build is created if necessary. Then the build agent is determined, and the majority of the rest of the process is performed on the selected agent from the controller's build agent pool.
The working directory for the build is calculated by using the build agent working directory setting as defined in the Build Agent Properties dialog. Then the local work area (workspace for Team Foundation version control; local repository for Git) is created, and source is downloaded from version control. The version that is downloaded is usually the changeset that represented the latest version in the project collection at the time the build was triggered. If a subsequent change has been made while the build was queued, this change is not included. If the build is for source you've stored inside a Team Foundation version control repository, the build process labels the files that were downloaded with the build number. As of the writing of this book, this feature does not carry over for builds that are pulling source from Git.
Next, the process calls MSBuild to perform the actual compilation of the desired project files for the configuration, and then any specified automated tests are executed. The build agent then looks at the changesets included since the last successful build of the build definition, and records any work items that were associated with those check-ins. For work items that were marked as resolved during check-in, the Fixed-In Build field for the work item is updated with the current build number.
From the files changed since the last successful build, the build agent then calculates which tests have been affected, and records them. The source code is then indexed and linked with the symbols that are published to the symbol server (if provided). Finally, on the build agent, the output from the build is copied over to the drop folder location previously created by the controller.
The process then moves back to the controller for the final step, which, for a build with a Gated Check-in trigger, is to check in the shelveset that contained the modified files included in the build.
Build Process Parameters
The build process templates are configured to make a number of parameters visible in the user interface in either the Build Definition editor or the Queue Build dialog (or both). These parameters (see Figure 5.17) are provided to control the behavior of the selected build process.
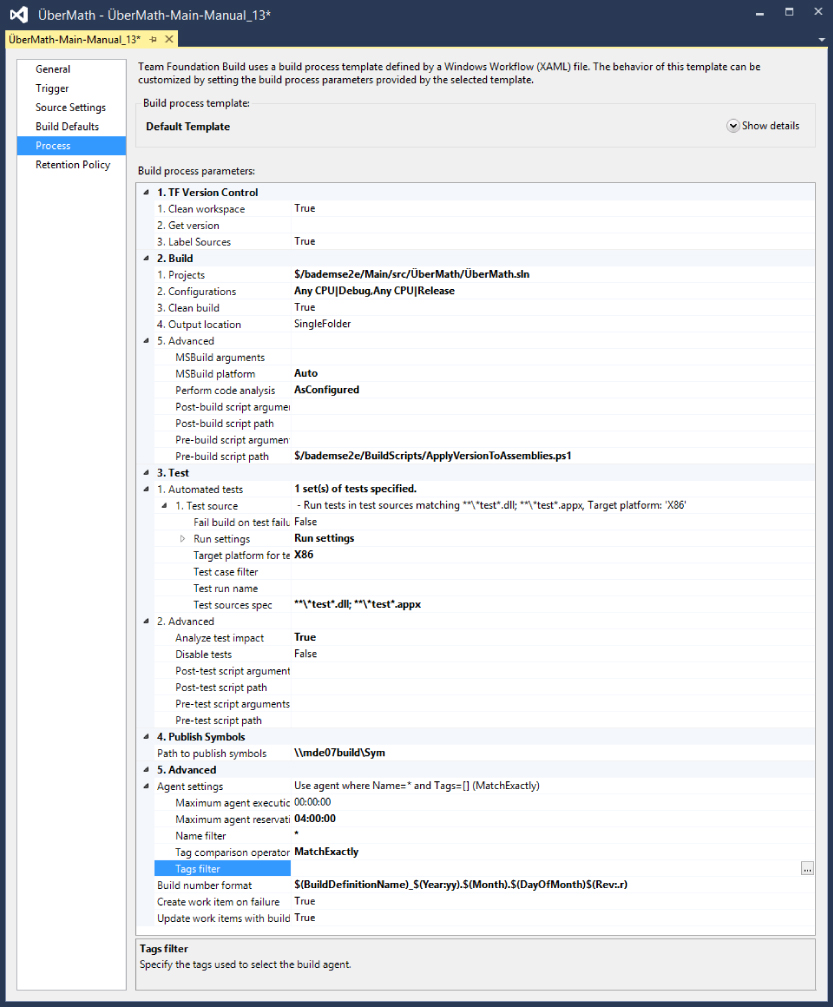
When you create the build definition, you set one of these parameters, Items to Build, to be the solution file that you want to build. However, there are many other parameters provided for you to adjust the behavior of the template. If you select one of the parameters, additional information is displayed about the parameter in the comments box at the bottom of the process parameter table.
In the default process templates, these parameters are broken down into five categories: Version Control, Build, Test, Publish Symbols, and Advanced. Some of these parameters are worth calling out in this chapter, and are examined in the following discussions. However, it is worth familiarizing yourself with all the parameters and what they do.
Configurations to Build
The default Visual Studio build configuration to use is the default build configuration for your solution. To modify the configuration, use the Configurations dialog that is available when you press the ellipsis (…) button in the Configurations to Build parameter under Required, Items to Build.
Logging Verbosity
In previous releases, you controlled how much log data Team Build generated. While in theory this could make your build run faster, when you had a problem, you had to change the setting, rerun the build, and hope the error occurred the same way. In 2013, Microsoft revamped how logging is handled and the build process always generates a detailed log that goes to a file and is put on your drop share as well as stored in the server. Because Microsoft removed a bunch of database I/O, you shouldn't see any negative performance impact to your build times.
Clean Workspace
The Clean Workspace parameter, only available in Team Foundation version control builds, changed in 2013 from being a three-value item to simply a True/False option. By default, the Clean Workspace parameter is set to True, meaning that all existing build outputs and sources for that build definition are deleted for every build. Although this is the safest option, it is also the slowest, because all the files must be downloaded from version control, and everything is rebuilt for every build, regardless of what has changed.
If you set the value of the parameter to False, then neither the sources nor the build outputs are deleted at the start of a build. Only the files that have changed in version control are downloaded each time, and only the things that have changed are recompiled as part of the build. Because not a lot of things usually change between builds, this normally gives your builds a significant performance boost by taking much less time to complete. It is also often useful for things such as ASP.NET-based websites, where you might want to subsequently only publish the items that have changed to your public website to minimize the upgrade effect for new versions.
However, if you have customized your build process and you make any of the source files writable for some reason (for example, to modify the AssemblyInfo files to contain your version number), or if your customized build process assumes a clean output directory, then you may run into issues with altering the default value of the Clean Workspace. So, use with caution.
Note that on the hosted service at http://visualstudio.com, all build agents are created from a fresh image each time a build is executed so there is no persistence of the workspace in between builds. Therefore, altering this setting has no effect when using a hosted build agent.
Get Version
Builds are usually performed with the latest sources from version control. However, occasionally you may want to perform a build of the source at a particular date, changeset, or label. In those circumstances, you can modify the Get Version process parameter, only available in Team Foundation version control builds, which is in the TF Version Control section. This is usually done as you queue the build by clicking the Parameters tab. The value provided should be a valid version specification such as C1234 for changeset 1234, D2008-04-22T17:37 for a date/time, or LmyLabel for a label called myLabel.
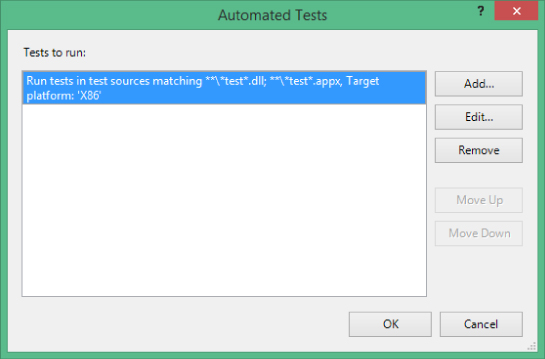
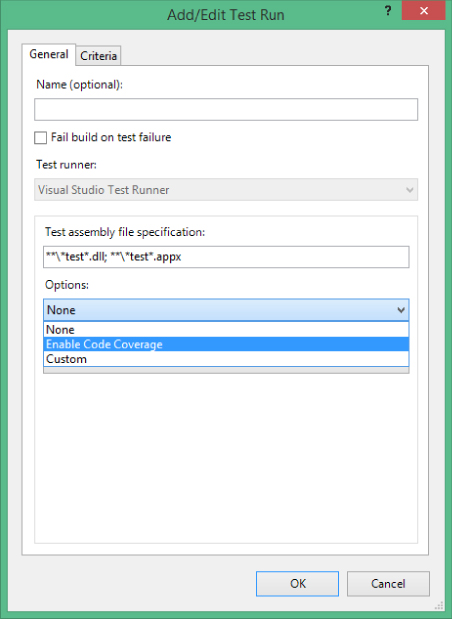
Automated Tests
In the Test category of process parameters, you can configure automated tests that should run as part of the build using the Automated Tests parameter. By default, a new build runs all unit tests in assemblies matching the pattern *test*.dll and *test*.appx. This means that, if you have created some unit tests in a companion test project called HelloWorldTests, for example, then they will be run automatically.
Pressing the ellipsis (…) button opens the Automated Tests dialog shown in Figure 5.18, where you can add additional tests to run, or you can edit the test configuration.
If you select the existing test configuration and click Edit, the Add/Edit Test dialog shown in Figure 5.19 is displayed, enabling you to edit aspects of your test run. For example, you can configure it to fail the build on test failure, modify the test case filter criteria, specify the test runner, or enable code coverage data collection.
Path to Publish Symbols
The Default Template in Team Foundation Server includes a step to index source code and publish symbols to a symbol server in the organization. As mentioned earlier in this chapter, a symbol server is simply a file share that is used to store the symbols for your executable binaries. Visual Studio can then be configured with details of this server. From then on, when debugging code live, or when using the advanced historical debugging features, Visual Studio can take you directly to the version of the source code from which the binary was generated, regardless of which version of the code you have on your local system at that time.
The configuration of the symbol server is performed by adding the UNC file path of the share to be used as the symbol sever in the Path to Publish Symbols process parameter under the Publish Symbols Server Settings. Unfortunately, this feature doesn't work with hosted builds on www.visualstudio.com.
Agent Settings
Agent settings can be found in the Advanced category of parameters. As well as limits for how long a build can run or wait for an available build agent, the Agent Settings group of process parameters includes the Name Filter and Tags Filter. Together, these are used to determine on which build agent the build will be executed. If multiple build agents match the agent requirements, then the agent with the least number of builds running executes the build.
Specifying the name of a build agent enables you to force it to run on a particular machine. You can also adopt a naming convention for your build agents, and then use wildcards in the Name Filter setting to assign builds to a pool containing a subset of all the build agents for the project collection (for example, ProjectX* for all build agents assigned to ProjectX).
A more flexible way you can limit which build agents are used for a build is to make use of the tagging feature for build agents. From the build agent properties dialog, you can assign tags (which are sets of text strings) to an agent to denote certain features. For example, you could use CodeSign if you have the project's code signing certificate installed on the machine, Datacenter1 if it is located in your main data center, or Ireland if the build server is located in your remote office in Ireland. You can then filter on which tags are required for your build agent by using the Tags Filter in the agent's requirements; only agents with that tag will be used.
To edit the tags applied to a particular agent, you can use the Team Foundation Server Administration Console on the build agent machine itself, or you can select the Actions ⇒ Manage Build Controllers menu item in the Builds page in Team Explorer. You then select your build agent and click the Properties button. You are presented with the Build Agent Properties dialog, and, provided you have sufficient permissions, you can edit the assigned tags.
Build Number Format
By default, Team Foundation Server numbers the builds in the format $(BuildDefinitionName)_$(Date:yyyyMMdd)$(Rev:.r). For example, in HelloWorld_20090927.5, the 5 is the fifth build executed for that build definition on that day. Build numbers must be unique across a team project, and this format serves as a good default. However, it is often not the format that people want.
Thankfully, starting in Team Foundation Server 2010, editing the build number is very easy using the Build Number Format parameter. When you edit the Build Number Format parameter, you are presented with a dialog, similar to Figure 5.20, that gives you the format string, a preview of what a build number of that format will look like when generated, and a set of macro strings that can be used in the format. Clicking each macro gives you more information about its behavior in the command section at the bottom of the dialog.
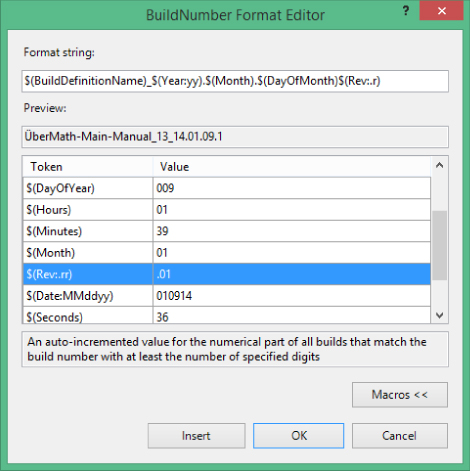
A common number format to use is $(BuildDefinitionName)_V1.0.0$(Rev:.r), where you are currently working on version 1.0.0 of the product, and the $(Rev:.r) macro translates to an incrementing number that makes the build number unique.
Summary
In this chapter, you examined the build services provided by Team Foundation Server 2013 and how they have been enhanced from previous versions.
You learned how to create build definitions, trigger builds, and view and manage build results. You also learned how the new Windows Workflow-based build process works and how to perform common customizations by editing the process parameters.
In Chapter 6, you'll learn about the new Release Management feature. This new part of Team Foundation Server allows you to take the output from your builds and deploy to test staging, production, or wherever your Team Foundation Server and Release Management tools can reach.
Then, in Chapter 7, you'll learn about common Team Foundation Server customizations, including how to edit the process template used by your builds to include new logic and parameters that do not ship in the default build processes.