William Shakespeare wrote, “All the world’s a form, and all the controls and labels merely players: they have their exit events and their entrance events; and one control in its time exposes many properties” (from “As You Code It,” Act 2.7.0). Although .NET was still in beta when he penned these words, they apply perfectly to any Windows Forms application you write, even today.
The .NET technology known as Windows Forms includes all the classes and features needed to develop standard “desktop” applications for Microsoft Windows. In the early days of Windows, this was pretty much the only type of program you could write for the platform. But now it is just one of many application types, along with console applications, web (“Web Forms”) applications, and services.
If you’re new to development on the Windows system, writing applications in the .NET Framework may keep you from a full appreciation of what really happens inside a Windows application, and from being involuntarily committed to an asylum. That’s because the internals of Windows applications are no fun.
Windows was originally developed as an application running within MS-DOS, and this had a major impact on the design of Windows and of any applications running within its pseudo-operation-system environment. The latest releases of Windows are true operating systems, no longer dependent on MS-DOS. But the programming methodology was left unchanged for backward compatibility. Applications written in Visual Basic for .NET still use this Windows 1.0 technology internally, but it is mostly hidden by the many well-designed classes of the Windows Forms package.
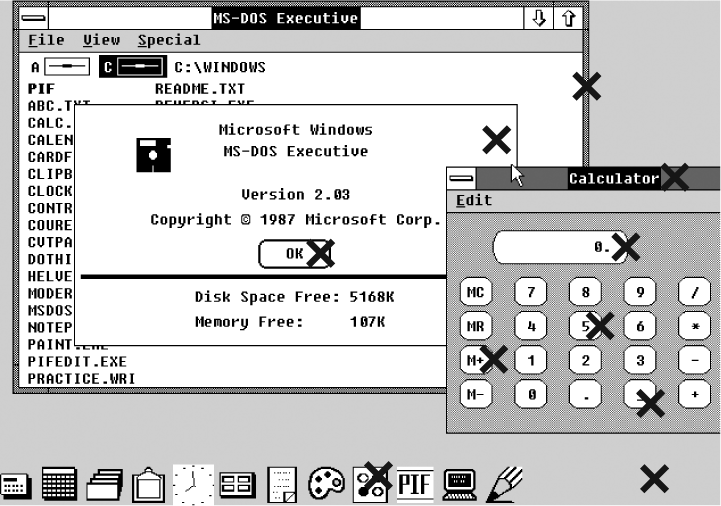
Rumors abound about why Microsoft attached the name “Windows” to its flagship product. Some say it represented the “Windows of Usability and Opportunity” that users would gain by using the enhanced graphical user interface. Some believe it represents the building cavity through which Microsoft executives promised to toss several key developers and managers if the product bombed. But the name actually refers to the different elements that appear on-screen when using Windows and its included applications. In short, everything you see on the screen either is a window or appears within a window: all forms, all controls, all scroll bars, and all display elements. Figure 7-1 points out some of the windows within a typical Microsoft Windows 2.0 display.
Every main application window was clearly a “window,” as were all push buttons, text entry fields, checkbox and radio selection buttons, listboxes, and “combo” boxes (with a separate window for the “drop-down” portion). Static text and graphical images were drawn on a window’s surface, and did not embody windows by themselves. But certainly hundreds of windows could be on display at any one time.
Although the original developers on the Windows project team suffered from a deplorable lack of originality in the area of feature naming, Microsoft compensated for this somewhat with its release of Visual Basic. Though everything was still a window internally, Microsoft divided the public world of windows into two hemispheres: forms and controls. There were always some internal differences between these two types of windows, and the new names did a lot to bring normalcy to the Windows application development situation. Microsoft elected to keep these useful monikers when it implemented the .NET Windows Forms package.
When you interact with Windows, it’s pretty easy for you (as a human) to detect the different forms and controls on the screen. The image of Windows 2.0 I showed you in Figure 7-1 looks like a typical Windows screen, with its ability to interact with the keyboard and mouse, but it isn’t. Go ahead; try to tap Figure 7-1 with your finger. You can tap all day long, but except for putting a hole in the page and not being able to get your money back on the book, nothing else will happen. But while you’re tapping, you could shout out, “I just tapped on the OK button” or “I just tapped on the 4 button of the Calculator window.”
This is what Microsoft Windows does for you. Windows keeps a list of all windows displayed on the screen, how they overlap and obscure each other, and which application each window belongs to. (Some applications are broken into multiple “threads” that all run at the same time. In such programs, Windows keeps track of all windows on a per-thread basis, not just on a per-application basis.) Each user input action (such as mouse clicks and key presses) gets placed in the system message queue by the related device driver. As you click on the screen with your mouse, Windows extracts the system message from this queue, determines where you clicked, tries to figure out which window the mouse-click occurred on, and then informs that window’s application about the mouse click by adding a message to the application’s message queue. It does the same thing for keyboard input and other actions that a window might need to know about.
To function within the Windows environment, your application (or a specific thread within your application) includes a message pump, a block of code that monitors the message queue. Each incoming message includes the ID number of the intended window. The code extracts the message from the queue, and routes it to the window procedure (also called a WndProc) of the appropriate window for final processing. In the C language, this message pump looks somewhat like this:
while (!done)
{
   /* ----- Extract and examine the next message. */
   MSG msg;
   if (GetMessage(&msg, NULL, 0, 0))
   {
      /* ----- WM_QUIT means it's time to exit the program. */
      if (msg.message == WM_QUIT)
         done = true;

      /* ----- Send the message to the right window. */
      TranslateMessage(&msg);
      DispatchMessage(&msg);
   }
}
I know, I know. It makes you glad that you write in Visual Basic.
So, each application (actually, each thread within an application) has one message pump, but multiple window procedures. The message pump exists to route incoming messages to the correct window procedure.
Just as the message pump dispatches messages to distinct window procedures, the WndProc routine directs processing to individual code blocks or procedures based on the type of incoming message. Here’s a general logic outline (pseudocode) that shows the structure of a typical window procedure:
If (message type is a mouse click)
   Do mouse-click related code
Else If (message type is a key press)
   Do key-press related code
Else If (message type is a window resize)
  Do window-resizing-related code
Else...
(The pseudocode uses successive If statements, but an actual window procedure would more commonly use a Select Case type of statement to process the incoming message.) So, the window procedure is like a vending machine. If the customer pushes the cola button, do the processing that returns a can of cola. If the customer presses the chewing gum button, do the processing that returns chewing gum. If the customer presses the coin return button, keep the money.
For each type of message (at least those that the program wants to handle), some related code gets processed when a message arrives. Boy, that really sounds familiar, but I just can’t seem to recall what . . . events! This sounds just like events in Visual Basic. And so it does. Even way back in Visual Basic 1.0, all generated applications included a message pump and WndProc procedures for each window, all hidden from view. The primary task of these WndProc procedures was to call the code in your Visual Basic event handlers.
Take it from someone who used to write Windows applications in the C language: writing message pumps and window procedures isn’t a lot of fun. Microsoft did try to mask some of the tedium with a variety of technologies, including “Message Crackers” and “MFC.” It was Visual Basic that finally succeeded in burying the complexity under a programmer-friendly logical system.
The .NET Framework uses a system that is quite similar to that of older Visual Basic implementations, having the WndProc call custom event handlers written by you. It bundles up all this power and simplicity in a technology called Windows Forms. All of its classes appear in the System.Windows.Forms namespace. Many of these classes implement specific types of windows, such as ordinary main windows, buttons, text boxes, drop-down combo box lists, and so on.
If you really want to, you can still access the message pump and the various WndProc routines. Each window-specific class includes a WndProc method that you can override and craft yourself. The message pump is found in the System.Windows.Forms.Application.Run method. You could commandeer any of these components and control the whole ball of wax yourself, but you’ll soon find out that the Windows Forms development process is so pleasant, you will work hard to forget what “message pump” even means.
In .NET, as in older versions of Visual Basic, windows are grouped into “forms” and “controls.” But they are still all windows, built from the same core components. If you don’t believe me, check out the classes for the various forms and controls in .NET. Both forms and controls derive from the common System.Windows.Forms.Control class, which abstracts the core Windows “window” functionality.
Some of the controls supplied with .NET (and also with the older Visual Basic) don’t actually implement on-screen window elements. These controls—such as the “Timer” control—include no user interface experience, but do provide a programming experience that is similar to that of the visible controls. I’ll list the specific controls a little later in this chapter, and indicate which ones are not user interface controls.
Creating a Windows Forms application in Visual Basic is easy. Let’s try it. Start Visual Studio and select New Project from the File menu. The New Project form appears, as shown in Figure 7-2.
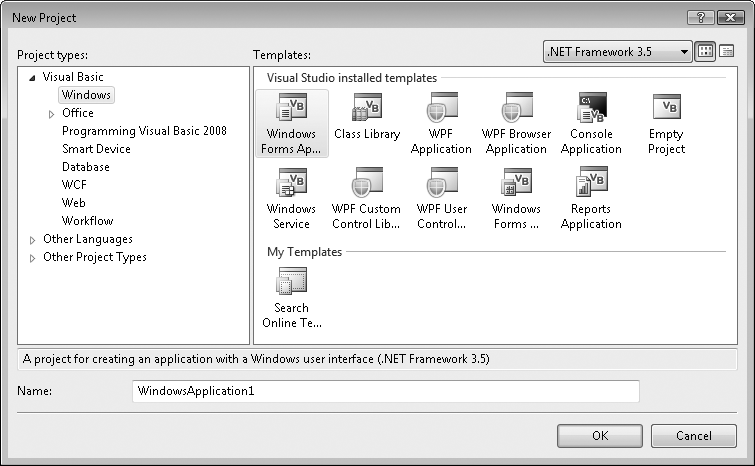
Select the Windows Project type, and then the Windows Forms Application Template. Give the project any name you want in the Name field, and then click OK. The new project has a single form (Form1) already for you to use. At this point, Visual Studio has already added about 250 lines of source code to your application. If you click on the Show All Files button in the Solution Explorer panel (described way back in Chapter 1, Figure 1-12) and open the various files in the project, you can see the code for yourself. Some of the most interesting code is in the Form1.Designer.vb file, slightly edited here:
Partial Class Form1
   Inherits System.Windows.Forms.Form

   'Form overrides dispose to clean up the component list.
   <System.Diagnostics.DebuggerNonUserCode(  )> _
   Protected Overrides Sub Dispose(ByVal disposing As Boolean)
      Try
         If disposing AndAlso components IsNot Nothing Then
            components.Dispose(  )
         End If
      Finally
         MyBase.Dispose(disposing)
      End Try
   End Sub

   'Required by the Windows Form Designer
   Private components As System.ComponentModel.IContainer

   'NOTE: The following procedure is required by
   'the Windows Form Designer
   'It can be modified using the Windows Form Designer.
   'Do not modify it using the code editor.
   <System.Diagnostics.DebuggerStepThrough(  )> _
   Private Sub InitializeComponent(  )
      components = New System.ComponentModel.Container(  )
      Me.AutoScaleMode = _
         System.Windows.Forms.AutoScaleMode.Font
      Me.Text = "Form1"
   End Sub
End Class
All the code that implements a form’s behavior appears in the Form class in the System.Windows.Forms namespace. This project’s initial form, Form1, inherits from that base form, receiving all of Form’s functionality and default settings. Any custom design-time changes made to Form1’s user interface, such as adding child controls, are added to the InitializeComponent procedure automatically as you use Visual Studio. Check out the routine periodically to see how it changes.
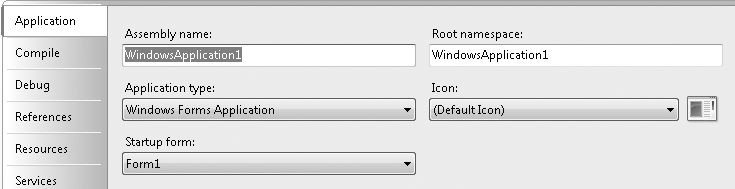
Most programs will have multiple forms. I suppose that .NET could select one of the forms at random to display when a program first runs. That would be fun and unpredictable. But it doesn’t work that way. Instead, you indicate the starting form through the project’s properties, via the “Startup form” field on the Application tab (see Figure 7-3). (The project properties window appears when you select the Project → Properties menu command in Visual Studio, or when you double-click on the My Project item in the Solution Explorer.)
When a .NET application begins, the framework calls a method named Main somewhere in your code. You indicate which form’s Main routine is used through the “Startup form” field. It includes a list of all forms; just choose the one you want. But wait, you haven’t added a Main method to any of your forms? No problem. Visual Basic will write a simple Main routine on your behalf that will display the indicated form. This ad hoc Main routine, added at compile time, performs just the minimum processing needed to display the form.
If you want to add a custom Main routine to your form, or to some other non-Form class in your application, that’s no problem. If you uncheck the “Enable application framework” field on that same properties form, the “Startup form” list changes to include any class in your application with a compatible Main routine. But the application framework enables a lot of cool functionality, and all without any work on your part. Disable it only when you need precise control over the application’s early lifetime.
If you need to add a new form to your application, use the Project → Add Windows Form menu command.
In .NET, all forms are simply classes, variations of the System.Windows.Forms.Form class. Each time you create a new form, you are creating a derived class based on that common Form class. And your new class is loaded with functionality; it includes all the fields, methods, bugs, properties, and events that make up the Form class. Visual Studio takes these elements and presents them in a way that makes it easy to program a form, both through source code and through the drag-and-drop interface of the Visual Studio Forms Designer.
When you first add a form to your application, it’s kind of plain and boring. Use the Properties panel (see Figure 7-4) to adjust the form to your liking. This panel shows the principle properties for the currently selected item within the Visual Studio environment. It includes a separate entry for each property setting, most of which can be updated through simple text entry. For instance, you can alter the caption displayed at the top of the form by changing the content of the Text property from Form1 to Cool Form.
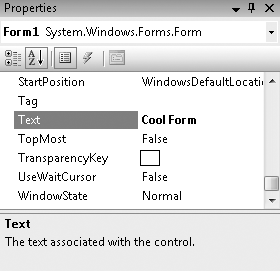
Table 7-1 lists some of the more interesting form properties and their uses.
Table 7-1. Form properties
Property | Description |
|---|---|
| This is the name of the form, or more correctly, of the class that is the form. By default, it is named |
| Indicates which |
| If you set this field to |
| The background color. Uses a specific or general system color. |
| Use this property, along with the |
| This is just like the |
| This property lets you create a custom shortcut menu that appears when the user right-clicks on the background of the form. |
| You hide or show the control box in the upper-left corner of the form through this property setting. |
| Indicates the style of mouse cursor that appears when the mouse is over the form. This property demonstrates one of the many editors that appear within the properties window. If you click the “down arrow” at the right of the property setting, it displays a graphical list of all included mouse cursors. Click an image to get the one you want. (Other properties include custom editors designed for their type of content.) This list includes only the built-in cursors. You can also modify this property in the form’s source code if you need to set the cursor to a custom graphic. |
| This property indicates the type of form to display. The default is |
| Sets the graphic displayed in the upper-left corner of the form’s border. |
| Enables “multiple document interface” support on this form. This allows a master form to “contain” multiple child document forms. Visual Studio itself can display forms and source code windows in the MDI style. |
| If you set this property to |
| Sets the top and left positions of the form on the screen. The |
| Identifies the |
| Indicates whether the “maximum box” appears in the upper-right corner of the form. This button lets the user show a form in “full-screen” mode. |
| Indicates whether the “minimize box” appears in the upper-right corner of the form. This button lets the user send the form to the system task bar. |
| On forms that can be resized, this property indicates the minimum allowed size of the form. The user will not be able to size the form any smaller than this. This property, like some of the others, is a composite property, built by merging two or more other properties. In this case, it is built from distinct |
| Allows you to specify the level of transparency for a distinct color that appears on the form (set via the |
| Specifies whether this form should appear as an item in the system task bar. |
| Indicates the current size of the form through distinct |
| Specifies how the form should be placed on the screen when it first appears. It is set through a list of predefined values, which actually link to an enumeration. |
| You can put any type of data you want in this property; it’s there for your use. |
| The form’s display caption is set through this field. |
| If set to |
| Indicates the color to use for transparency when the |
| Identifies the current state of the window: normal, maximized, or minimized. |
I listed only about half of the available properties; clearly you have a lot of control over the form and how it is presented to the user. What’s really interesting is that many of these properties are not limited to just forms. Some of these properties come from the mutual System.Windows.Forms.Control class, and also appear in all other controls that use that same base class. This includes properties such as Location, BackColor, and Text. Although the text displayed in a form’s caption and the text displayed on a command button differ significantly in their presentation, the usage through code is identical.
Form1.Text = "This is a form caption."
Button1.Text = "This is a button caption."
Although you can set all of the properties in Table 7-1 through the Properties panel, you can also update and view them through code. In fact, if you’ve modified any of the properties through the Properties panel, you’ve already updated them through source code, since Visual Studio is just updating your code for you. Try it out! Set the form’s TopMost property to True, and then view the InitializeComponent routine in the Form1.Designer.vb file. You’ll find the following new statement near the bottom of the method:
Me.TopMost = True
I know what you’re thinking: “I’m a programmer, but my text editor is having all the programming fun. When do I get a chance to modify properties through code?” That’s a fair question. Properties are pretty easy to modify. You just name the object to be modified along with the property name and its new value, as Visual Studio did with the TopMost property.
Me.Text = "The Library Project"
You can also retrieve the property values by naming them.
MsgBox("The form's caption is: " & Me.Text)You access the form’s various methods in much the same way. For instance, the Close method closes the form:
Me.Close( )
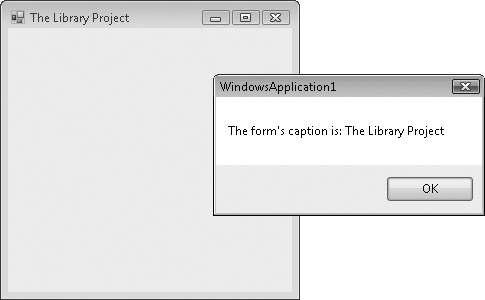
Of course, these statements need to appear within some valid procedure, such as an event handler. Let’s add some code to the form’s Click event so that when the user clicks on the form, the new code will alter the form’s caption, remind us what that caption is, and close the form, causing the program to exit. What a great program! Access the form’s source code by selecting Form1.vb in the Solution Explorer, and then clicking on the View Code button at the top of the Solution Explorer. The form’s default code block appears.
Public Class Form1

End Class
As you remember from earlier in the chapter, this is the tourist portion of the Form1 class, the part that Visual Studio shows to the public (you), and not the more interesting hidden parts (the part in Form1.Designer.vb). But we’ll be able to make this section interesting in no time. Add a Click event to the form’s surface by selecting (Form1 Events) from the Class Name list (above and to the left of the code text editor), and then selecting Click from the Method Name drop-down list to its right, as shown in Figure 7-5.

Modify the event handler so that it displays the code listed here:
Private Sub Form1_Click(ByVal sender As Object, _
      ByVal e As System.EventArgs) Handles Me.Click
   Me.Text = "The Library Project"
   MsgBox("The form's caption is: " & Me.Text)
   Me.Close(  )
End Sub
If you run this code and click on the form’s surface, a message box appears with the form’s caption just before the application exits (see Figure 7-6).
New forms are like blank canvases, and like the great painters before us, we have available a large palette of colorful tools at our disposal. In Visual Studio, these tools are in the form of controls, .NET classes designed specifically for use on form surfaces. Visual Basic and .NET include dozens of Windows Forms controls, and even more are available from third parties. You can even build your own controls, either by deriving them from existing control classes or by implementing them completely from scratch.
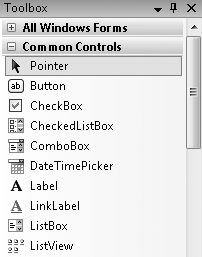
Visual Studio’s Toolbox includes all the basic controls you need to build high-quality, or even pathetic low-quality, software applications. Access the Toolbox, part of which appears in Figure 7-7, through the View → Toolbox menu command.
There are five ways to add a control to a form:
Double-click on a control in the Toolbox. An instance of the control appears on the form in its default location with all of its default settings.
Drag-and-drop a control from the Toolbox to the form.
Click on a control in the Toolbox, and then use the mouse to draw the rectangular area on the form where the control will appear. Some controls, such as the
ComboBoxcontrol, have limits on their width or height; they will not necessarily size themselves as you intend.Ask someone else to add the control to the form. This option is for the faint of heart. If you are reading this book, this option is not for you.
Add the control to the form using Visual Basic source code. As you add controls to the form in Visual Studio, it is writing source code for you on your behalf. There is no reason why you can’t add such code yourself. Although there are warnings in the Form1.Designer.vb file telling you not to edit the file, you can hand-modify the
InitializeComponentsroutine if you properly conform to the code style generated by Visual Studio. You can also add controls in other areas of your code, such as in the form’sLoadevent. Adding controls dynamically is beyond the scope of this book, but go ahead, experiment.
Some controls have no true user-interface presence in a running application. These controls, when added to your form, appear in a panel just below the form’s surface. You can still interact with them just like form-based controls.
Once a control appears on the form, use the mouse to move the control, or resize it using the resizing anchors that appear when the control is selected. A few of the controls are limited in their resizing options. The ComboBox control, for instance, can only be resized horizontally; its vertical size is determined by things such as the font used in the control. Other controls let you resize them, but only sometimes. The Label control can be manually resized only when its AutoSize property is set to False.
Some controls include a small arrow button, often near the upper-right corner of the control. These are Smart Tags, similar to the Smart Tags feature included in Microsoft Office. Clicking the Smart Tag provides access to useful features associated with the control, as shown in Figure 7-8.
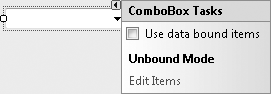
Table 7-2 lists some of the more commonly used controls, all included in the Toolbox by default with a new Windows Forms application. If you create a Web Forms application in Visual Studio—used to design web-based applications with ASP.NET—the available controls will differ from this list. See Chapter 23 for a discussion of ASP.NET applications.
Table 7-2. Windows Forms controls available in Visual Studio
Icon | Control | Description |
|---|---|---|
| .NET includes support for multithreaded applications. The | |
| A standard push button. A button’s | |
| This control implements a two-way (on, off) or three-way (on, off, other) “checked” selection field. The | |
| The | |
| Displays the standard Windows form used for color selection by the user. Display the color dialog using this control’s | |
| This control implements the standard Windows drop-down | |
| This control lets you design a shortcut or “context” menu, to be displayed when the user right-clicks on the form or the control of your choice. It is designed and used in much the same way as the standard | |
| The | |
| The | |
| Through this control, the user selects one from among a list of choices that you define, choices that have a specific inherent order. Use this control as an alternative to a | |
| Displays the standard Windows form used for directory or folder selection by the user. Display the selection dialog using this control’s | |
| Displays the standard Windows form used for font selection by the user. Display the selection dialog using this control’s | |
| The | |
| The | |
| This control implements a horizontal scroll bar, allowing the user to scroll among a display region or list of choices. For a vertical implementation of this control, use the | |
| The | |
| This control displays static text on a form. By using the various border and background properties, you can display simple lines and rectangles on a form. Visual Basic 6.0 included specific line and rectangle drawing controls, but they are not available in .NET. You must either simulate them using a | |
| The | |
| This control implements the standard Windows listbox control, displaying a list of items from which the user can select zero or more. The list of items can include any objects you wish; it is not just limited to strings. You can also provide custom “ownerdraw” code that lets you draw each list item yourself. | |
| The | |
| This variation of the standard text field helps the user enter formatted numeric or text data by displaying an entry template or mask. For instance, you can force the user to enter a telephone number in “xxx-xxx-xxxx” format by using a numeric mask with embedded hyphen characters. | |
| This control lets you design standard form menus, which are displayed along the top of the user area of the form. Menus within the menu strip are implemented through | |
| The | |
| The | |
| Allows the user to select a numeric value using a scrollable up/down section method. Use this control as an alternative to | |
| Displays the standard Windows form used for “open” file selection by the user. The user can select one or more existing files from local or remote filesystems. Display the selection dialog using this control’s | |
| Displays the standard Windows form used for printed page configuration by the user. Display the selection dialog using this control’s | |
| The | |
| This control displays an image in a variety of formats. It should not be confused with the Visual Basic 6.0 | |
| Displays the standard Windows form used for document printing and print property selection by the user. Display the selection dialog using this control’s | |
| This control is used as part of the print and print preview process. It adds a wrapper around your custom print implementation, providing a consistent method of selecting and printing document pages. | |
| This control provides a standardized interface for print preview, implementing all elements of the entire print preview dialog. When used with a | |
| The | |
| The | |
| This control implements the standard Windows radio selection button. Although the circular “point” display is most common, the control can also appear as a toggle button by setting the | |
| The | |
| Displays the standard Windows form used for “save” file selection by the user. The user can select a new or existing file from local or remote filesystems. The control optionally prompts the user to overwrite existing files. Display the selection dialog using this control’s | |
| This control adds a “split bar” by which you can divide your form into multiple sizable regions, each of which contains a | |
| This control displays a “status bar,” usually along the bottom edge of a form, through which you can display status and other context-sensitive information to the user. The strip can contain multiple | |
| The | |
| This control implements the standard Windows text box, in both its single-line and multiline styles. The main body content is set through the | |
| This control triggers a timed event at an interval you specify. The size of the interval, in milliseconds, is set through the | |
| The | |
| The | |
| The | |
| The | |
| The | |
| This control implements a vertical scroll bar, allowing the user to scroll among a display region or list of choices. For a horizontal implementation of this control, use the | |
| Implements a web browser within your application. You can use the standard web-based navigation features available within Internet Explorer for URL-based access, or provide your own custom HTML content through the |
Although there is no reasonable limit on the number of controls you can add to a form, there is a limit on how much information the user can experience on a single form without a direct wired connection to the brain. Don’t go too wild.
Each form and control in a .NET application contains its own WndProc window procedure, and as it processes each incoming message from the message pump, it translates those messages into events. Events are the standard .NET technique that controls—and all other classes—use to say, “Hey, something is happening, and you might want to do something about it.” When you include a form or control in your application, you can monitor one, some, or all of these events, and write custom code that responds appropriately. All the custom code you write for each event appears in an event handler. But what actually happens between the finger of the user on the mouse and the logic in your custom event handler? Figure 7-9 shows you graphically what actually happens between action and custom logic.

Clearly, there is still some mystery surrounding event processing.
Controls—and all classes—determine which events they will make available. For controls, many of the events parallel user-initiated actions: Click, MouseDown, KeyPress, and SizeChanged. But there are also many events that could be triggered only by modifications to the control through your source code: TabIndexChanged (when the tab-key order of the controls changes), BackgroundImageChanged, and CursorChanged are just three of the many events that the user cannot affect directly. A few final events tie to system-level changes, such as the SystemColorsChanged event, which fires when the user modifies the system-wide color scheme through the control panel.
Each event has not only a name (such as Click), but also a set of parameters that the event handler will receive when called. Here’s a typical event handler for a Button control:
Private Sub Button1_Click(ByVal sender As System.Object, _
   ByVal e As System.EventArgs) Handles Button1.Click

End Sub
This event handler receives two arguments from the triggering event: a System.Object instance (sender) and a System.EventArgs instance (e). Other event handlers may use a slightly different set of arguments, so how do you know what to use? Any events defined within a control class must also indicate the number and type of arguments it will send to the event handler. Visual Basic includes an Event statement that defines events. Although the Button control was likely written in C#, here is a possible look at what the event definition for the Button’s Click event might look like in Visual Basic:
Public Event Click(ByVal sender As System.Object, _
   ByVal e As System.EventArgs)
This definition sure looks a lot like the event handler, and it should. The Event statement establishes a parameter-passing contract between the control and any code that wants to receive event notifications. In this case, the Click event promises to send two arguments to the event handler. The first, sender, is a reference to the object that the event refers to. For Button controls, this parameter receives a reference to the Button instance itself. The second argument, e, provides a method for passing an entire object of additional information. The System.EventArgs class doesn’t have much information, but some events use a variation of the second argument that uses System.EventArgs as its base class.
It turns out that the arguments used for the Click event are pretty common among the different controls and events. Instead of retyping the argument list in each Event statement, the designer of a control can define a delegate, a .NET type that defines an argument list and, for functions, a return value.
Public Delegate Sub StandardEventDelegate( _
   ByVal sender As System.Object, _
   ByVal e As System.EventArgs)
Event statements can then use the defined delegate as a shortcut for typing out the entire parameter list.
Public Event Click As StandardEventDelegate
Whether the Event statement uses a delegate or a full argument list, it has a firm grasp on what data it needs to send to any listening event handlers. And it sends those arguments using the Visual Basic RaiseEvent statement. Let’s trace this process down for the Button control. When the user clicks on the button, the message pump finds a way to get a message to the WndProc procedure for the Button control. That control examines the message, sees it is a mouse click, and decides to tell event handlers about it. Then, from within the WndProc code, it raises the event.
RaiseEvent Click(Me, New System.EventArgs)
The Visual Basic Me keyword refers to the Button control instance itself. The e argument for a Button control contains no information beyond the default fields included in a System.EventArgs instance, so WndProc just sends a new empty instance. Controls with other event arguments would have created an instance first, filled it in with the relevant data, and passed that instance to the event handler.
If an event fires in an application, and there is no event handler to hear it, does it make a sound? Perhaps not. There is no requirement that an event have any active handlers listening. But when we do want to listen for an event, how do we do it? The standard way to do this in a Windows Forms application is a two-step process. First, the user of the control (your form class) needs to announce to the control, “I want to monitor your events.” Then it attaches event handlers to specific events.
Earlier in the chapter, we saw that adding a control to the Form1’s user interface actually triggers Visual Studio to write source code in the Form1.designer.vb file. Here’s the code added for a Button control named Button1 (with line numbers):
01  Partial Class Form1
02     Inherits System.Windows.Forms.Form
03
04     Friend WithEvents Button1 As System.Windows.Forms.Button
05
06     Private Sub InitializeComponent(  )
07        Me.Button1 = New System.Windows.Forms.Button
08
09        Me.Button1.Location = New System.Drawing.Point(48, 16)
10        Me.Button1.Name = "Button1"
11        Me.Button1.Size = New System.Drawing.Size(75, 23)
12        Me.Button1.TabIndex = 0
13        Me.Button1.Text = "Button1"
14        Me.Button1.UseVisualStyleBackColor = True
15
16        Me.Controls.Add(Me.Button1)
17     End Sub
18  End Class
The code in the InitializeComponent method creates the Button control instance (line 07), modifies its properties to get just the look we want (lines 09 to 14), and attaches it to the form (line 16). But there is one additional line that defines the actual Button1 reference type variable (line 04):
Friend WithEvents Button1 As System.Windows.Forms.ButtonI talked about class-level fields in Chapter 6, and Button1 is just a typical class-level field. But the WithEvents keyword included in the statement is what lets the control know that someone wants to monitor event notifications. Now, whenever a Button1 event fires, it knows that Form1 may contain event handlers that are watching and listening.
The second part of our two-step event-to-handler connection process involves the actual connection of the handler. Let’s look at the Click event handler definition again for the Button1 instance:
Private Sub Button1_Click(ByVal sender As System.Object, _
   ByVal e As System.EventArgs) Handles Button1.Click

End Sub
It’s just an ordinary class method, but with a Handles clause hanging off the end of the definition. This clause is what links the event handler with the Button1.Click event itself. You can follow the Handles keyword with multiple event names.
Private Sub ManyButtons_Click(ByVal sender As System.Object, _ ByVal e As System.EventArgs) HandlesButton1.Click, _Button2.Click,Button3.Click End Sub
Now the single ManyButtons_Click event handler will listen for Click events from three different controls. You can even mix up the monitored events; one event handler can listen for different named events.
Private Sub ManyEvents(ByVal sender As System.Object, _ ByVal e As System.EventArgs) Handles Button1.MouseDown, _ Button2.MouseUpEnd Sub
Another variation is to have multiple event handlers monitor a single event, although Visual Basic gets to decide which handler to call first.
Private Sub FirstHandler(ByVal sender As System.Object, _
   ByVal e As System.EventArgs) Handles Button1.Click

End Sub

Private Sub SecondHandler(ByVal sender As System.Object, _
   ByVal e As System.EventArgs) Handles Button1.Click

End Sub
There is another way to connect events to event handlers that does not involve either the WithEvents keyword or the Handles keyword, and that lets you control the processing order for multiple handlers. Once you have an instance of an event-exposing class, you attach a handler to one of its events using the AddHandler statement. The following statement links Button1’s Click event to an event handler named MyHandler. The MyHandler method must have the correct argument list for the defined event.
AddHandler Button1.Click, AddressOf MyHandler
A related RemoveHandler statement detaches a handler from an event.
A lot of complicated steps take you from an initial user or system action to the code in an event handler. I’ve spent a lot of chapter space discussing exactly how events work, but with good reason. Events and event processing are core features of .NET application development. Eventually, you will spend so much time writing event handlers that it will all become second nature to you. But I also went into all of this detail so that you could take full advantage of this technology. Not only does Visual Basic let you monitor controls for events, it also lets you design new events into your own classes. You can use the Delegate, Event, RaiseEvent, WithEvents, Handles, AddHandler, and RemoveHandler keywords for your own custom events, triggered by whatever conditions you choose. If you have a class that represents an employee, you can have it trigger a Fired event whenever the employee loses his job. By adding custom events, you make it possible for custom code to be attached to your class logic, even if a programmer doesn’t have access to your class’s source code.
Any form identified as your project’s startup object appears automatically when the program begins. All other forms need to be displayed manually, using either the Show or the ShowDialog method of that form. For instance, if you have a form called Form2, you can display it using its Show method:
Form2.Show( )
The Show method displays a modeless form. Modeless forms can be accessed independently from all other forms in the running application. All modeless forms can be activated at any time just by clicking on them; the form you click on will come to the front of the others and receive the input focus. A program might have one, two, or dozens of modeless forms open at once, and the user can move between them freely.
Modal forms take control of all input in the application for as long as they appear on-screen. Modal forms are commonly called “dialogs”; the user must complete a modal form and close it before any other open forms in the application can be accessed. The message box window that appears when you use the MsgBox function is a common modal dialog window. The ShowDialog method displays forms modally, and lets you return a value from that form. The values returned are the members of the System.Windows.Forms.DialogResult enumeration.
If you think of forms as works of literature by Alexandre Dumas, modeless forms would be a lot like The Three Musketeers: “All for one and one for all.” They work with one another in support of the entire application. Modal forms are akin to The Count of Monte Cristo. Yes, there are other forms/characters in the application/story, but they are nothing when the Count is in view.
To display the Count—that is, a modal form—use the form’s ShowDialog method, and optionally capture its return value.
Dim theResult As DialogResult
theResult = Form2.ShowDialog(  )
Modal dialogs are useful for editing some record that requires a click on the OK button when changes are complete. Let’s say you were writing an application that displayed a list of books by Alexandre Dumas. It might include two forms: (1) a “parent” form that displays the list of books; and (2) a “child” form that lets you type the name of a single book. Wouldn’t it be great if you could return the name of the book (or, perhaps, an ID number of a record for the book as stored in a database) instead of a DialogResult value?
If the ShowDialog method, a public method of the underlying Form class, can return a result code, perhaps we can add another public method to a form that will return a result code that has actual meaning. Indeed, we can. Consider the child form (named BookEntry) with a data entry field (BookTitle), and OK (ActOK) and Cancel (ActCancel) buttons, as shown in Figure 7-10.
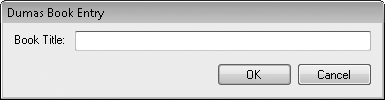
When empowered with the following code, this simple form returns whatever is typed in the field when the user clicks OK (first rejecting blank values), or returns a blank string on Cancel:
Public Class BookEntry
   Public Function EditTitle(  ) As String
      ' ----- Show the form, and return what the user enters.
      If (Me.ShowDialog(  ) = DialogResult.OK) Then
         Return BookTitle.Text.Trim
      Else
         Return ""
      End If
   End Function

   Private Sub ActCancel_Click(ByVal sender As System.Object, _
         ByVal e As System.EventArgs) Handles ActCancel.Click
      ' ----- Return a blank title for "Cancel."
      Me.DialogResult = DialogResult.Cancel
      ' ----- Continue with EditTitle(  )
   End Sub

   Private Sub ActOK_Click(ByVal sender As System.Object, _
         ByVal e As System.EventArgs) Handles ActOK.Click
      ' ----- Only accept valid titles.
      If (Len(BookTitle.Text.Trim) = 0) Then
         MsgBox("Please supply a valid title.")
      Else
         Me.DialogResult = DialogResult.OK
         ' ----- Continue with EditTitle(  )
      End If
   End Sub
End Class
To use this form, the parent form calls the EditTitle method, which returns the book title entered by the user.
Dim newTitle As String = BookEntry.EditTitle( )
The EditTitle routine shows the form modally with the ShowDialog method, and just sits there until the user closes the form. Closing the form is done through the OK or Cancel button event; setting the form’s DialogResult property has the side effect of closing the form. Great!
Once the form closes, execution returns to EditTitle, which does a quick status-check before returning the final value. And there we have it: a new public interface for a form’s most important return value. We’ll use this method a lot in the Library Project application.
Windows programming really hasn’t changed much since Windows 1.0. It still does everything through messages, message queues, and window procedures. What has changed is the way the code is abstracted for the benefit of the programmer. The .NET Framework’s package for Windows development, Windows Forms, makes Windows desktop development easy and—dare I say it—fun!
This chapter’s project code implements the Library Project’s basic “Main” form, as well as the “Splash” form that appears when the project first starts up. Microsoft, knowing that this was a common need, included support for both main and splash forms in Visual Basic’s Application Framework system. By default, this system is enabled through the project properties’ Application panel (see Figure 7-11).

The “Startup form” and “Splash screen” fields indicate the main and splash forms, respectively. It’s quick, it’s easy, and it’s just the thing for us. So, let’s get to work. Now would be a great time to load the starter project for Chapter 7.
PROJECT ACCESS
Load the Chapter 7 (Before) Code project, either through the New Project templates or by accessing the project directly from the installation directory. To see the code in its final form, load Chapter 7 (After) Code instead.
I’ve already added a new form file to the project, named Splash.vb (the form itself is named Splash), including some simple display elements to gussy it up somewhat. Check out the graphic on the form. It’s presented through a PictureBox control, but it’s stored in the application as a resource, a collection of strings and images attached to your source code. The Resources folder in the Solution Explorer includes this graphics file. It’s linked into the picture box through that control’s Image property. And it sure makes the form look pretty. Your job will be to attach this form into the startup sequence of the application.
Access the project properties’ Application panel (which you just saw in Figure 7-11), and set the “Splash screen” field to Splash. This has the side effect of setting My.Application.SplashScreen to the Splash form. Now run the program. You should see the splash screen appear for about 1/100 of a second, quickly replaced by the main form. Hey, what was that?
Altering the “Splash screen” field does cause the splash screen to briefly appear, but the application will keep it up only until it thinks the program has done enough preparation for the main form. Since we aren’t doing any preparation, it shows the main form right away.
Eventually, we will add a bunch of database-related startup code that will consume a little more time. But for now we’ll have to fake it. In the Application Framework model, any code you want to process when the program first begins appears in the application’s Startup event. This event is one of a small collection of events included with the My hierarchy. The source code for these events appears in the ApplicationEvents.vb file, a file that Visual Studio automatically adds to your project when needed. Use the View Application Events button on the project properties’ Application panel to open that file’s source code.
Namespace My
   Class MyApplication

   End Class
End Namespace
Let’s pretend that the initialization required for the Library Project takes about three seconds. .NET includes a Sleep method that delays the code for a specific number of milliseconds. Code snippet 1 adds the Startup event handler for the application. Add it between MyApplication’s Class and End Class keywords.
INSERT SNIPPET
Insert Chapter 7, Snippet Item 1.
Private Sub MyApplication_Startup(ByVal sender As Object, _
      ByVal e As Microsoft.VisualBasic.ApplicationServices. _
      StartupEventArgs) Handles Me.Startup
   ' ----- Take a three-second nap.
   System.Threading.Thread.Sleep(3000)
End Sub
Now run the program, and you will see the splash screen stick around for about three seconds (3,000 milliseconds). As gratifying as it is to see the splash screen for that long, there’s a good chance that the actual database and application initialization code will take much less than three seconds. I mean, we’re talking about SQL Server here. It’s supposed to be blazing fast.
So, it’s clear that we still need to delay the removal of the splash screen. The My.Application object just happens to include the very property we need to enforce a delay. The MinimumSplashScreenDisplayTime property indicates the minimum number of milliseconds that the splash screen must be displayed. The bad part is that you have to assign it in a really strange place, at least when compared to how much Visual Basic programming we’ve learned so far.
Delete all the code that you added from snippet 1, which would be the entire MyApplication_Startup method. Then fill in that empty space with the following code.
INSERT SNIPPET
Insert Chapter 7, Snippet Item 2.
Protected Overrides Function OnInitialize _
      (ByVal commandLineArgs As System.Collections. _
      ObjectModel.ReadOnlyCollection(Of String)) As Boolean
   ' ----- Display the splash form for at least 3 seconds.
   My.Application.MinimumSplashScreenDisplayTime = 3000
   Return MyBase.OnInitialize(commandLineArgs)
End Function
That code block contains a lot of things we just haven’t talked about yet, and won’t talk about for a few more chapters. Suffice it to say that the OnInitialize method is one of the first things that happens in the lifetime of the program, and that is the place where MinimumSplashScreenDisplayTime must be assigned.
The last thing to do for the splash screen is to include some code that displays the version number. We already did this for the About form back in Chapter 5, so we’ll just add similar code to the Splash form’s Load event. We’ll update the copyright message, too. Open the source code for the Splash form and add the following code.
INSERT SNIPPET
Insert Chapter 7, Snippet Item 3.
Private Sub Splash_Load(ByVal sender As Object, _
      ByVal e As System.EventArgs) Handles Me.Load
   ' ----- Update the version number.
   With My.Application.Info.Version
      ProgramVersion.Text = "Version " & .Major & "." & _
         .Minor & " Revision " & .Revision
   End With
   ProgramCopyright.Text = My.Application.Info.Copyright
End Sub
Run the program again and sit in awe as you witness a fully functional splash screen.
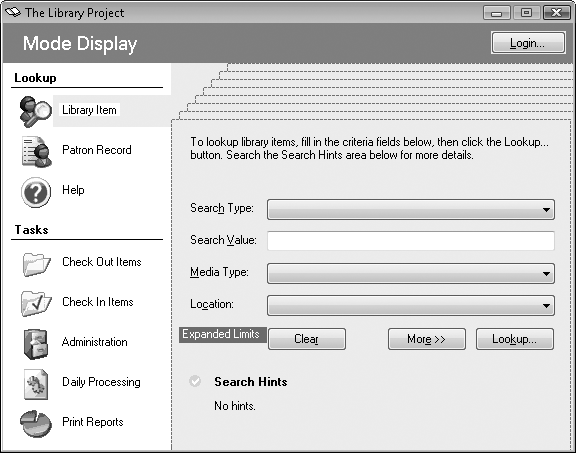
Although we designed a main form in an earlier chapter, it was pretty sparse, including only an About button. This chapter’s project adds all the user interface elements to the form. In fact, I’ve already added that form’s controls to its surface for you (see Figure 7-12). But you can add some of the event handlers that will give some of its display pizzazz.
All the general event code for the form appears as code snippet 4.
INSERT SNIPPET
Insert Chapter 7, Snippet Item 4.
Most of this code exists to move things around on the display. For example, the user can access different features of the form by clicking on the icons or related text labels along the left side of the form. Each icon and label triggers one of seven common routines that exist to rearrange the furniture. The upper-left icon, PicLibraryItem, calls the common TaskLibraryItem routine when clicked.
Private Sub PicLibraryItem_Click( _
      ByVal sender As System.Object, _
      ByVal e As System.EventArgs) _
      Handles PicLibraryItem.Click
   ' ----- Library Item mode.
   TaskLibraryItem(  )
End Sub
The TaskLibraryItem procedure adjusts the various panels and fields on the display so that the user sees those fields needed to look up library items.
Private Sub TaskLibraryItem(  )
   ' ----- Update the display.
   AllPanelsInvisible(  )
   PanelLibraryItem.Visible = True
   ActLibraryItem.BackColor = SystemColors.Control
   LabelSelected.Location = New System.Drawing.Point( _
      LabelSelected.Left, PicLibraryItem.Top)
   Me.AcceptButton = ActSearch
End Sub
The AllPanelsInvisible routine also does some on-screen adjustment.
I like to have the existing text in a TextBox field selected when it becomes the active control. Each text control includes a SelectAll method that accomplishes this feat. We’ll call that method during each TextBox control’s Enter event, an event that occurs when a control receives the keyboard input focus.
Private Sub SearchText_Enter(ByVal sender As Object, _
      ByVal e As System.EventArgs) Handles SearchText.Enter
   ' ----- Highlight the entire text.
   SearchText.SelectAll(  )
End Sub
Using the mouse to access the different features of the form is good, but I’m a keyboard person. To deal with keyboard users like me, the code adds support for feature access using the F2 through F9 keys.
Private Sub MainForm_KeyDown(ByVal sender As Object, _
      ByVal e As System.Windows.Forms.KeyEventArgs) _
      Handles MyBase.KeyDown
   ' ----- The keys F2 through F9 access the different
   '       sections of the form.
   Select Case (e.KeyCode)
      Case Keys.F2
         TaskLibraryItem(  )
         e.Handled = True
      Case Keys.F3
         TaskPatronRecord(  )
         e.Handled = True
      Case Keys.F4
         ' ----- Allow form to handle Alt+F4.
         If (e.Alt = True) Then
            Me.Close(  )
         Else
            TaskHelp(  )
         End If
         e.Handled = True
      Case Keys.F5
         TaskCheckOut(  )
         e.Handled = True
      Case Keys.F6
         TaskCheckIn(  )
         e.Handled = True
      Case Keys.F7
         TaskAdmin(  )
         e.Handled = True
      Case Keys.F8
         TaskProcess(  )
         e.Handled = True
      Case Keys.F9
         TaskReports(  )
         e.Handled = True
   End Select
End Sub
As each keystroke comes into the KeyDown event handler, the Select Case statement examines it. When a matching Case entry is found, the code within the Case block executes. Pressing the F2 key triggers the code in the Case Keys.F2 block. Keys is one of the many built-in enumerations that you can use in your .NET applications. Notice the special code for the F4 key. It allows the Alt-F4 key combination to exit the application, which is the standard key combination for exiting Windows programs.
Normally, all keystrokes go to the active control, not to the form. To enable the MainForm.KeyDown event handler, the form’s KeyPreview property must be set to True. Set this property back in the form designer.
The Library Project is designed for use only within a small library; it will run on only a few workstations at a time, perhaps up to 10 at most. And there’s no need to run more than one copy on a single workstation, since each copy includes all the available application features. One of the cool features included with Visual Basic is the ability to create a “single-instance application,” one that enforces the one-at-a-time run policy on each workstation. Although you could create such applications before, it is now enabled with a single mouse click.
To make the Library Project a single-instance application, display the project properties’ Application panel, and then select the “Make single instance application” field. When the user tries to start up a second instance, .NET will refuse to carry out the request. Instead, it will trigger the application’s StartupNextInstance event. Any special handling you wish to perform on a second instance startup will be done in this handler. Like the Startup event handler, the StartupNextInstance handler appears in the ApplicationEvents.vb file.
For the Library Project, the only thing we really need to do when the user tries to start a second instance is to make sure the application is displayed front and center, where the user can readily view it. Open the ApplicationEvents.vb file, and add the StartupNextInstance event handler.
INSERT SNIPPET
Insert Chapter 7, Snippet Item 5.
Private Sub MyApplication_StartupNextInstance( _
      ByVal sender As Object, _
      ByVal e As Microsoft.VisualBasic.ApplicationServices. _
      StartupNextInstanceEventArgs) _
      Handles Me.StartupNextInstance
   ' ----- Force the main form to the front.
   My.Application.MainForm.Activate(  )
End Sub
That’s all the changes for this chapter. See you on the next page.