Many years ago my TV’s remote control died. I had received this TV secondhand from a college-student friend of mine—that should tell you about the quality of the set—and it was already a few years old. But I could still watch Gilligan’s Island, so why complain? But when I contacted the manufacturer to get a replacement remote, they told me it was going to cost 75 bucks! The TV didn’t cost anywhere near that, and I’m sure Gilligan’s Island cost even less to produce.
The TV was pretty much useless without a remote control, so I went out and bought a universal remote control. These handy devices have the infrared codes for most common television manufacturers built right into the circuitry. Simply scan through all of the codes to find your TV set, and in a matter of minutes—and this demonstrates the modern miracle that is electronics—you will still not have the functionality you had with your original remote. I did lose all use of the closed-captioning system, but the power, channel, and volume buttons seemed to work.
Despite its deficiencies, the universal remote could control a TV, a VCR, and a DVD player, all through a common set of buttons. Imagine a universal remote control for your Visual Basic development. Well, stop imagining and start grabbing that TV Guide: Visual Basic is now empowered with LINQ, a new feature in Visual Basic 2008 that lets you query unrelated data sources using a common syntax.
LINQ, short for Language Integrated Query, is not just one, but somewhere around a million new Visual Basic and .NET technologies all working in tandem to make your programming life easier. Well, not easier in every case. As with any new whiz-bang technology, there’s good and bad.
LINQ exists because some weary programmers at Microsoft were tired of accessing data in their databases differently than they did their file-based data, or their in-memory object data, or their XML data. With LINQ, a single syntax lets you access all of these flavors of data, and more. The syntax itself is similar to SQL, the database query language already familiar to you, your programming associates, and a team of hackers at the FBI.
Visual Basic 2008 includes LINQ support for SQL Server database tables and objects (“LINQ to SQL”), ADO.NET data sets (“LINQ to ADO.NET” and “LINQ to DataSet”), in-memory object collections such as arrays or Generic collections (“LINQ to Objects”), and XML (“LINQ to XML”). Soon after the official Visual Studio 2008 release, Microsoft released the ADO.NET Entity Framework (“LINQ to Entities”), which provides enhanced LINQ support to SQL Server, Oracle, DB2, and other database platforms. That’s a great start, but the good news doesn’t end there.
LINQ is extensible. That means you can enhance LINQ so that it can query any type of data you specify. LINQ to Spreadsheet, LINQ to Tab-Delimited-File, and LINQ to DVD-Chapter-Content are all possible. Is that a universal remote control I see in your programming language? As exciting as those possibilities are, I don’t have space in this book to show you how to develop them, and that’s where the bad news comes in.
LINQ is a swell system for querying data—once you have established the connection between the query statements and the data. For some of the LINQ flavors, especially LINQ to Objects, there’s not much to connect, so the querying is a snap. For other LINQ varieties, especially of the database sort, you must create go-between classes that join your requests to the data. LINQ is a generic technology that can interact with any data once you provide the glue. And that glue can sometimes get very sticky.
As an example, consider LINQ to SQL. This LINQ implementation needs a class that represents the tables and records that you will query through LINQ. These classes aren’t hard to create, and they look a lot like the original database tables. However, if you modify the structure of your table, you will need to modify the go-between class to take advantage of the table changes. It’s a task that you would have needed to do anyway, even without LINQ, but it’s something to keep in mind when considering the way that some programmers go gaga over LINQ.
The go-between nature of LINQ also means that some data processing may be slower when compared to accomplishing the same task without LINQ. Extra layers of data and code mean extra things for your computer to do. But that’s already life in the world of the .NET Framework, so I wouldn’t avoid LINQ because of it.
LINQ is a big deal for Microsoft and for the .NET Framework. Most of the new features added to Visual Basic’s 2008 edition were introduced primarily to support LINQ. Before we get into using LINQ, let’s take a quick look at the technologies involved in making LINQ possible.
Query expressions, the heart of data access through LINQ. This chapter discusses query expressions in detail.
Lambda expressions, discussed in Chapter 9.
Extension methods, covered in Chapter 12.
Local type inference, discussed in Chapter 6.
Anonymous types, something that is new to Visual Basic in 2008, but also something that I haven’t discussed yet. I’ll give you the details just after this list.
Relaxed delegates, a feature that lets Visual Basic make educated guesses as to whether a method and a delegate are a match or not. It’s similar to type inference, but for delegates instead of plain types.
XML Literals, XML axis properties, embedded XML expressions, and XML namespace support within your source code. You probably remember all about these features from the discussion in Chapter 13.
Nullable types, discussed in Chapter 6, with some extended discussion appearing in the Generics chapter, Chapter 16.
Partial methods, first appearing in Chapter 8.
Object initializers, demonstrated in Chapter 9.
Other new language and compiler features that must not have been important enough since they didn’t get their own new cool-sounding names.
Anonymous types are a new feature included in Visual Basic to support LINQ, but you can use them in your own code as well. They are exactly what the name states: types without names. Well, that’s not fully accurate. The types do have names, but they are generated automatically by the Visual Basic compiler, and they never show up directly in your source code.
Consider a typical class designed to hold information on sushi selections.
Class Sushi
   Public FishName As String
   Public ServingCost As Decimal
End Class
Creating an instance of this class is straightforward.
Dim tastyFood As New Sushi
tastyFood.FishName = "maguro"
tastyFood.ServingCost = 3.5@
Or, using the object initializer syntax I talked about back in Chapter 9, you can create the instance and fill in its fields, all in one statement.
Dim tastyFood As New Sushi With { _
   .FishName = "maguro", .ServingCost = 3.5@}
Anonymous types take this terse syntax one step further by leaving out the class name altogether.
Dim tastyFood = New With { _
   .FishName = "maguro", .ServingCost = 3.5@}
The tastyFood instance is now an instance of a class with two members, a string named FishName and a decimal value named ServingCost. The only thing it doesn’t have is a class name that is known to you. But Visual Basic knows what it is.
Just for fun I compiled that last block of code and looked up the name of the generated type. Here it is:
VB$AnonymousType_0`2<T0,T1>
Hmm. I still think sushi tastes better. What’s really interesting is that Visual Basic created a generic type with two type parameter placeholders: T0 (probably linked to the FishName string member) and T1 (probably the decimal ServingCost).
Anonymous types are major users of type inference. Visual Basic is guessing the data type of each member based on the data you supply with each name. In the sushi instances, the ServingCost member is of type Decimal based on the decimal literal supplied with the instance definition.
LINQ lets you query data from many different sources of data, and each LINQ-to-data interaction is managed by a LINQ provider. I listed the providers included with Visual Basic 2008 a little earlier; they all have the name “LINQ to something.” For me, the most straightforward of the providers is LINQ to Objects, designed to interact with sets of in-memory objects. LINQ to Objects lets you process queries based on object collections, Visual Basic arrays, and any object that supports .NET’s IEnumerable or IEnumerable(Of T) interfaces, including your own custom collections. (Various objects within the world of ADO.NET support these interfaces, but those types fall under the LINQ to DataSet provider, discussed a little later.)
When you run LINQ to Objects queries, the output of the query is a new set of objects that contains a subset of the original source object data. This lets you run queries by saying things like, “Hey LINQ, from this list of employees and their properties, give me just the names of those employees who were hired in the past 90 days.” This results set, a collection based on IEnumerable, can be further queried or used as you would any other collection in your Visual Basic code.
Tip
Although LINQ has a finite number of operators and keywords, they can be used in a rich variety of combinations, only some of which I will introduce in this chapter. For additional examples and syntax descriptions, see the LINQ section of the MSDN documentation included with your copy of Visual Studio.
Before we get into some of the more complex LINQ providers, let’s discover the syntax of LINQ queries using LINQ to Objects. In the next few sections, I’ll use two small in-memory collections of books as my query source data. Here’s the class definition for each book that includes a few reasonable members:
Class Book
   Public Title As String
   Public AuthorID As String
   Public Pages As Integer
End Class
Authors appear in a separate class. Book and Author instances match up through the common AuthorID field.
Class Author
   Public AuthorID As String
   Public FullName As String
End Class
I’ll create two small collections to manage the authors and books.
Dim Writers As New Generic.List(Of Author)
Dim Library As New Generic.List(Of Book)

Writers.Add(New Author With _
   {.AuthorID = "LT", .FullName = "Tolstoy, Leo"})
Writers.Add(New Author With _
   {.AuthorID = "LW", .FullName = "Wallace, Lew"})
Writers.Add(New Author With _
   {.AuthorID = "JB", .FullName = "Barrie, J. M."})

Library.Add(New Book With _
   {.Title = "War and Peace", _
    .AuthorID = "LT", .Pages = 1424})
Library.Add(New Book With _
   {.Title = "Anna Karenina", _
    .AuthorID = "LT", .Pages = 976})
Library.Add(New Book With _
   {.Title = "Ben-Hur", _
    .AuthorID = "LW", .Pages = 544})
Library.Add(New Book With _
   {.Title = "Peter Pan", _
    .AuthorID = "JB", .Pages = 192})
To make our understanding of the output for each query easier, let’s pretend that I’ve written a method that displays the results of any query in table form. I’ll call the routine ShowResults.
LINQ expressions are built from query clauses that have the same feel as clauses in SQL statements at the database level. With the exception of the From clause, which must appear first, the other clauses can generally appear in any order within the query.
Every basic LINQ query begins with the From keyword.
Dim bookBag = From bk In Library
ShowResults(bookBag)
' Results --> War and Peace   LT   1424
'             Anna Karenina   LT   976
'             Ben-Hur         LW   544
'             Peter Pan       JB   192
This four-word query is pretty much the shortest LINQ query you can write. I stored the results of the query in the bookBag variable (with its data type inferred by the query), but the query can also be used directly as an expression.
ShowResults(From bk In Library)
The bk variable included in the query is known as a range variable or iteration variable. (You don’t have to use “bk”; I just chose that name at random. It’s a variable, so give it any name you wish.) This variable provides a way to identify objects and object members from the source data within the query. Since Library is a collection, it wouldn’t make sense to say Library.Title when referring to the title of just one book. Instead, you refer to bk.Title.
Personally, I find this variable In source syntax a little indirect. I much prefer the table-alias syntax used in SQL queries.
SELECT * FROM Library AS bkThe SQL AS keyword performs much the same function as the LINQ In keyword. Yet despite my internal tension, the In syntax prevails; you cannot use the AS syntax in LINQ since the As keyword in Visual Basic is used for data type assignment.
If you use only the From clause in your query, it returns all data from the original object set, including all object members. If you want to limit the results so that only some of the members are included, use the Select clause to identify the fields to include.
Dim bookBag = From bk In Library _
              Select bk.AuthorID, bk.Title
ShowResults(bookBag)
' Results --> LT   War and Peace
'             LT   Anna Karenina
'             LW   Ben-Hur
'             JB   Peter Pan
The results set of this new query omits the page count found in the original data. That’s because the LINQ query requested only the AuthorID and Title fields; the Pages member did not make it through the Select clause. Also, notice that I reversed the order of the AuthorID and Title fields from the original class definition. This reversal is reflected in the printed results.
Behind the scenes, LINQ is creating a new anonymous type that includes two members: a string AuthorID field and a string Title field. One instance of this anonymous type is created for each resultant query record. These instances are then bundled up in a new collection that is based on IEnumerable(Of T). This lets you use the query results in a new query, or in any code that would normally interact with a collection of results, such as a For Each statement.
Dim bookBag = From bk In Library _
              Select bk.AuthorID, bk.Title
For Each oneResult In bookBag
   MsgBox(oneResult.Title)
Next oneResult
' The Loop Displays --> War and Peace
'                       Anna Karenina
'                       Ben-Hur
'                       Peter Pan
In addition to migrating fields from the original objects over to the results set, you can use operators and functions to modify the results. This next example uses the StrReverse function to alter the title name before compiling the results:
Dim backward = From bk In Library _
               Select StrReverse(bk.Title)
ShowResults(backward)
' Results --> ecaeP dna raW
'             anineraK annA
'             ruH-neB
'             naP reteP
Tip
Although we’re still pretty early into our discussion of LINQ, you should know now that working with LINQ requires lots of experimentation. Despite its goal of consistency, LINQ is full of surprises. For instance, the previous example didn’t create the anonymous type collection that I expected. Instead, it discerned that the results set contained only strings, and created a simple string set instead of a collection of types with a string member. Be on your guard against little shocks like this when writing LINQ queries.
By default, the Select clause returns all records from the source. Getting complete information is a good thing, but sometimes it’s too much of a good thing, especially when the information contains duplicates. For instance, this query returns just the author IDs for each available book:
Dim justIDs = From bk In Library _
              Select bk.AuthorID
ShowResults(justIDs)
' Results --> LT
'             LT
'             LW
'             JB
The results are complete, but “LT” appeared twice. Depending on your needs, that might be a bad thing. By adding the Distinct clause, you can weed out the unneeded duplication.
Dim justIDs = From bk In Library _
              Select bk.AuthorID _
              Distinct
ShowResults(justIDs)
' Results --> LT
'             LW
'             JB
The Distinct keyword looks at entire records for duplicates. A record is excluded only if all fields in that record exactly match all fields in another record.
Whereas the Select clause lets you weed out unwanted fields, the Where clause lets you eliminate entire objects based on criteria you specify.
Dim bigBooks = From bk In Library _
               Where bk.Pages >= 1000
ShowResults(bigBooks)
' Results --> War and Peace   LT   1424
This query examines all incoming source records in the Library collection and includes a source object in the results only if it has a page count of 1,000 or more. Where clauses can be complex, with multiple criteria joined with And and Or keywords, and grouped with parentheses.
Dim choices = From bk In Library _
              Where bk.Pages >= 1000 _
              Or (bk.Pages < 1000 _
              And InStr(bk.Title, "-") > 0) _
              Select bk.Title
ShowResults(bigBooks)
' Results --> War and Peace
'             Ben-Hur
That last query also showed how you can include non-LINQ features, such as the InStr function, in your criteria, allowing you to restrict the results based on calculated results.
LINQ results, depending on the source of the data, are not guaranteed to appear in any particular order. To generate query results in a specific order, use the Order By clause. The Order By keywords precede one or more source fields or calculated values, delimited by commas, and you can optionally include the Ascending or Descending keyword to reverse the sort order of each sorting field. (Ascending is the default for each field.)
Dim bookBag = From bk In Library _
              Select bk.Pages, bk.Title _
              Order By Pages Descending
ShowResults(bookBag)
' Results --> 1424   War and Peace
'             976    Anna Karenina
'             544    Ben-Hur
'             192    Peter Pan
Fields included in the Order By clause must be present in the Select clause; leave off the range variable prefix (bk in this case). If you use a From clause without a Select clause, you must include the range variable prefix in your Order By fields.
If you were only ever going to query data from a single data collection or source, you probably would not have needed something like LINQ in the first place. When it does come time for you to merge results from different tables, LINQ again provides a SQL-like syntax for joining the tables. Actually, it provides two variations, paralleling the syntax variations supported by different SQL vendors.
The first syntax uses the Join keyword to specify a field-specific link. The following query “inner joins” the Library and Writers tables at the expected AuthorID connection point.
Dim bookBag = From bk In Library _Joinau In Writers _Onbk.AuthorIDEqualsau.AuthorID _ Select bk.Title, au.FullName _ Order By bk.Title ShowResults(bookBag) ' Results --> Anna Karenina Tolstoy, Leo ' Ben-Hur Wallace, Lew ' Peter Pan Barrie, J. M. ' War and Peace Tolstoy, Leo
The special On and Equals keywords assist in the join syntax. If your join involves multiple keys, you can use the And keyword to specify the different key links.
Dim results = From t1 In Table1 _Joint2 In Table2 _Ont1.Key1Equalst2.Key1 _Andt1.Key2Equalst2.Key2
The second join syntax lets you use the Where clause to indicate the field links.
Dim bookBag = From bk In Library, _
              au In Writers _
              Where bk.AuthorID = au.AuthorID _
              Select bk.Title, au.FullName _
              Order By bk.Title
' Same results as before
LINQ includes another join variation that generates hierarchical query results. In such queries, one of the fields in each resultant record will be a collection that contains multiple results. This syntax allows LINQ to return a list of all authors, one author per row, where each author record includes a “books” field, possibly with multiple values.
Dim authorBooks = From au In Writers _Group Joinbk In Library _ On au.AuthorID Equals bk.AuthorID _IntoPublished= Group_ Select au.FullName, Published _ Order By FullName ShowResults(authorBooks) ' Results --> Barrie, J. M. Peter Pan ' Tolstoy, Leo War and Peace ' Anna Karenina Wallace, Lew Ben-Hur
This query has a somewhat strange syntax, but it successfully creates a results set with two columns: FullName (for the author name) and Published (for the collection of books published by a specific author). For each returned record, the Published member is a subordinate collection that can be processed like any other collection.
The Skip clause lets you skip over the first x records in the results set, effectively throwing them in the trash, like unwanted banana peels. The Take clause does just the opposite, keeping only the first few records in the generated results. The following query skips over the first two records in the original data collection, returning just those records following the ignored values:
Dim someBooks = From bk In Library _
                Select bk.AuthorID, bk.Title _
                Skip 2
ShowResults(someBooks)
' Results --> LW   Ben-Hur
'             JB   Peter Pan
Related Skip While and Take While clauses let you use a Boolean expression instead of a number to indicate when to continue skipping or taking records.
Skip and Take are useful for paging results, as when showing just one “page” of results at a time from a larger set of queried results. Logic similar to the following could be used to show just the records destined for CurrentPage:
Dim onePageWorth = From bk In Library _
                   Select bk.AuthorID, bk.Title _
                   Skip ItemsPerPage * CurrentPage _
                   Take ItemsPerPage
One word of warning about Skip and Take: it does make a difference where you put them in your query. (I’ll explain the technical reason why this is in the "Deferred Execution" section, later in this chapter.) For instance, consider this query based on our original book data:
Dim someBooks = From bk In Library _
                Order By bk.Title _
                Take 2
This query returns Anna Karenina followed by Ben-Hur, as you would expect. But if you move the Take clause earlier, you get a different result.
Dim someBooks = From bk In Library _
                Take 2 _
                Order By bk.Title
This time, the query returns Anna Karenina followed by War and Peace. In the first query, the contents of Library were sorted by Title before the two records were taken. In the second query, the two records were taken first, before any sorting had been applied.
It’s not just Take and Skip that are impacted by this ordering. All clauses in your query are affected. Thinking through the logic of your query is essential, since a misplaced clause can give you unexpected results.
Because the results of any LINQ query conform to the IEnumerable(Of T) interface, they are immediately ready to be used in other queries or in enumerable scans. If you need to access the records in a more traditional form for other purposes, LINQ provides a few conversion features that quickly move the results into either an array or a generic collection.
Each query result includes three methods that perform these conversions: ToArray, ToDictionary, and ToList. ToArray converts the results into a standard Visual Basic array, with one result record stored in each array element.
Dim queryResults = From ...
Dim arrayVersion = queryResults.ToArray(  )
ToList performs a similar operation, creating a new Generic.List collection based on the results of the query. ToDictionary creates a Generic.Dictionary collection, but you must provide a function to ToDictionary that extracts the key. In most cases, a lambda expression that identifies the key field will suffice.
Dim authors = From au In Writers _
              Order By au.FullName
Dim authorDict = authors.ToDictionary(Function(x) x.AuthorID)
MsgBox(authorDict("LW").FullName)
' Results --> Wallace, Lew
Aggregate queries let you “sum up” information from a larger query into a condensed or single result. Instead of starting with the From keyword, pure aggregate queries begin with the Aggregate keyword. Each aggregate query uses one or more of the aggregate functions, such as the Sum function in the following query:
Dim numBooks =Aggregatebk In Library _Into Sum(bk.Pages) MsgBox(numBooks) ' Displays: 3136
LINQ includes eight standard aggregate functions, shown in Table 17-1. Each function accepts an expression that indicates what should be aggregated during the query.
Table 17-1. Standard aggregate functions
Function | Description |
|---|---|
| Returns a Boolean value indicating whether the expression passed to it is true for all records. The clause |
| Similar to |
| Returns the average of whatever expression is passed to it. |
| Returns a count of records with |
| Same as |
| Returns the maximum numeric expression from the set of records. |
| Returns the minimum numeric expression from the set of records. |
| Returns the sum of the numeric expressions from the set of records. |
If you include more than one aggregate function in the query, the results set is a single record that includes multiple named fields. Use an alias before the aggregate function to give it a name. (Aliases are allowed in all query types, not just aggregates.)
Dim numBooks = Aggregate bk In Library _
               Into TotalPages = Sum(bk.Pages), _
               AvgPages = Average(bk.Pages)
MsgBox(numBooks.AvgPages)  ' Displays: 784
You can also include aggregate expressions in standard non-aggregate queries. The following query returns a count of books written by each author, using the Count aggregate function to add up the results for each author:
Dim authorBooks = From au In Writers _
                  Group Join bk In Library _
                  On au.AuthorID Equals bk.AuthorID _
                  Into NumBooks = Count(True) _
                  Select au.FullName, NumBooks _
                  Order By FullName
ShowResults(authorBooks)
' Results --> Barrie, J. M.   1
'             Tolstoy, Leo    2
' Wallace, Lew 1You’ve probably been wondering when some of the new technology features such as lambda expressions and extension methods will show up in my examples. Well, in a way, they already did. When you create LINQ queries using query expressions, the Visual Basic compiler converts what you type into code that uses extension methods and lambda expressions. You might remember from Chapter 9 that lambda expressions are themselves updated by the compiler into something simpler. Once your queries are broken down into subatomic particles, the CPU is ready to act.
But you don’t have to start with full queries. You can create your own queries using extension methods and lambda expressions. The extended methods in question are attached to the IEnumerable interface. This means that anything that looks like a collection or array can be involved in extension-method-based queries, using lambda expressions as the arguments.
Let’s convert one of our earlier queries into its extension method counterpart.
Dim bigBooks = From bk In Library _
               Where bk.Pages >= 1000
It’s the query that returns only big books. The same query using extension methods looks like this:
Dim bigBooks = Library.Where(Function(bk) bk.Pages >= 1000)
In this example, the Where method is actually an extension method of the IEnumerable interface, which also includes Select, OrderBy, Join, GroupJoin, Count, Max, Min, and other methods that correspond to operators within the LINQ query language. As I discussed in Chapter 12, you can add your own extension methods to the IEnumerable interface, giving you even more ways to customize your LINQ queries.
In Chapter 13, I introduced XML Literals, XML content that is embedded right into your Visual Basic source code. When you bring LINQ into the picture, you suddenly have a way to generate large XML documents by merging a set of records with an XML Literal template.
The following block of code creates an XML document using our Library and Writers collections, intermixing LINQ and XML in a way that actually makes my head hurt:
Dim bookXML As XDocument = _
   <?xml version="1.0"?>
   <booklist>
      <%= From bk In Library _
         Join au In Writers _
         On bk.AuthorID Equals au.AuthorID _
         Order By bk.Title _
         Select _
         <book>
            <title><%= bk.Title %></title>
            <author><%= au.FullName %></author>
            <pages><%= bk.Pages %></pages>
         </book> _
      %>
   </booklist>

bookXML.Save("books.xml")
Notice how you must put line continuation characters in the LINQ portions of the code, but not in the XML portion? Yeah, I hate it, too. But it does generate nice XML. If you look at the books.xml file generated by this code, it contains successfully merged content from the XML and our original collections. It’s also nicely indented.
<?xml version="1.0" encoding="utf-8"?>
<booklist>
  <book>
    <title>Anna Karenina</title>
    <author>Tolstoy, Leo</author>
    <pages>976</pages>
  </book>
  <book>
    <title>Ben-Hur</title>
    <author>Wallace, Lew</author>
    <pages>544</pages>
  </book>
  <book>
    <title>Peter Pan</title>
    <author>Barrie, J. M.</author>
    <pages>192</pages>
  </book>
  <book>
    <title>War and Peace</title>
    <author>Tolstoy, Leo</author>
    <pages>1424</pages>
  </book>
</booklist>
The key to intermixing XML and LINQ is correctly placing the <%= and %> markers around the LINQ-specific code. If you look at the sample carefully, you will see that there are two sets of markers, one inside the other.
<%=From ... <title><%=bk.Title%></title> ...%>
The outer set of markers surrounds the entire LINQ query, whereas each inner set of markers identifies a replacement variable to include in the XML content.
As easy as it is to generate XML using LINQ, it’s just as easy to query data from existing XML documents. Reloading the XML we just saved allows us to query a list of book titles by intermixing LINQ with XML axis properties.
Dim bookXML As XDocument = _
   XDocument.Load("books.xml")
Dim fromXML = From bx In bookXML...<book> _
              Select bx.<title>.Value
ShowResults(fromXML)
' Results --> Anna Karenina
'             Ben-Hur
'             Peter Pan
' War and PeaceWith ADO.NET’s focus on querying data, it’s understandable that ADO.NET has declared all-out war on its new enemy, LINQ. Oh wait, a truce was called in Beta 1. ADO.NET and LINQ now work very well together. In fact, ADO.NET sports three LINQ providers.
Soon after the launch of Visual Studio 2008, Microsoft released the ADO.NET Entity Framework. This interface between your programming code and a database will let you define a logical view of your system. For instance, you can create an entity called Order that includes your customer, vendor, order header, order detail, and product tables, all in one logical view. Related stored procedures can also be part of the package.
The framework does all of this magic by creating a set of go-between classes and related XML structural content that manage the link between the logical and physical views of the data. Those classes can then be used in LINQ queries, and the author of the queries need not be concerned with trivial matters such as database connections and foreign key references. In reality, programmers have been writing code like this for years, abstracting the physical data model into a logical view that is easier to program against. The Entity Framework simply makes this process quicker and easier to set up.
The framework includes several tools that help you build the entities from the source database structures. One key tool is the ADO.NET Entity Data Model Designer, a visual drag-and-drop tool that makes creating entities as easy as creating Visual Basic forms.
Because the ADO.NET Entity Framework comes out after Visual Studio 2008, I will not be demonstrating the framework in this book.
LINQ supports queries of records within ADO.NET data tables. ADO.NET DataTable objects do not directly support the IEnumerable interface, and fields within these tables are, by default, untyped, which really makes LINQ angry. The new LINQ to DataSet functionality overcomes both of these limitations so that querying of data sets works.
Earlier in this chapter, we saw LINQ examples that used a Book class. Let’s keep that sample data, but pretend that the data now appears in an ADO.NET DataTable instance. The table will have four records (for the four books in our sample) and three columns: Title, AuthorID, and Pages.
Class Book
   Public Title As String
   Public AuthorID As String
   Public Pages As Integer
End Class
Instead of issuing a LINQ to Objects query like this:
Dim choices = From bk In Library _
              Where bk.Field(Of Integer)!Pages >= 1000 _
              Or (bk.Pages < 1000 _
              And InStr(bk.Title, "-") > 0) _
              Select bk.Title
LINQ to DataSet uses dataset-object-specific methods that coerce the ADO.NET objects into something that LINQ can interact with, and in a strongly typed fashion.
Dim choices = _ From bk In bookTable.AsEnumerable( )_ Where bk.Field(Of Integer)("Pages")>= 1000 _ Or (bk.Field(Of Integer)("Pages") < 1000 _ And InStr(bk.Field(Of String)("Title"), "-") > 0) _Select New With_{.Title = bk.Field(Of String)("Title")}
It looks really different, but it is the same query. The bookTable DataTable instance is first forced to look like an IEnumerable instance through its AsEnumerable method. Then, as each field is involved in the query, its data type is declared through generic Of clauses, followed by the name of the field in quotes. Finally, because the query doesn’t have direct access to field names, the results set is created using the object initializer syntax. It’s much more roundabout than LINQ to Objects. But if you already have data sitting in ADO.NET in-memory objects, LINQ to DataSet is the way to go.
LINQ to DataSet also includes support for “typed” data sets, data sets that include the necessary metadata to fully describe the data type of each field. With typed data sets, you don’t need to constantly hold LINQ’s hand through Of datatype clauses; LINQ will figure out the field types on its own. For information about creating typed data sets, see the MSDN documentation that comes with Visual Studio.
LINQ to SQL is the provider that lets LINQ queries interact with SQL Server databases. Since the Library Project uses SQL Server, we will spend a little more time on this technology. As with LINQ to Entities, LINQ to SQL works through go-between classes. Although you could provide a different logical view of your physical data tables using LINQ to SQL, there is more of an expectation that your LINQ to SQL objects will more closely resemble the underlying database tables.
LINQ to SQL includes a tool, the Object Relational (O/R) Designer, which will assist us in creating the go-between classes. You can take a quick peek at Figure 17-2 to see what it looks like, but I warn you, it’s no Rembrandt. Still, it does a respectable job at making the needed database link. The O/R Designer is drag-and-drop simple, and is suitable for databases that aren’t too terribly large. If you need to create the link classes for a database that has, say, hundreds of tables, you should read up on the SqlMetal.exe tool that comes with Visual Studio. You’ll find full details in the MSDN documentation that comes with Visual Studio.
Using LINQ to SQL is done in five easy steps. You can follow along in a new Windows Forms project if you want:
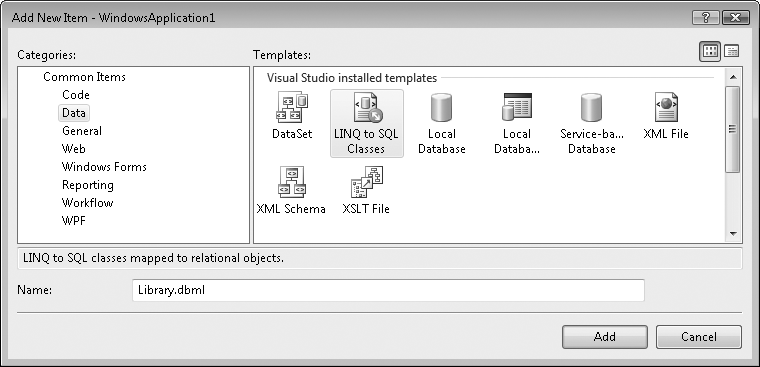
Add a new “dbml” file. This file—actually, a few files that Visual Studio displays as one—describes your data context, the master class that contains link code for each database table that you will use in your application. To create this file from a Visual Studio project, use the Project → Add New Item menu command to display the Add New Item form. From the Data category, select the LINQ to SQL Classes template, change the name of the file to Library.dbml from the default, and click the Add button (see Figure 17-1).
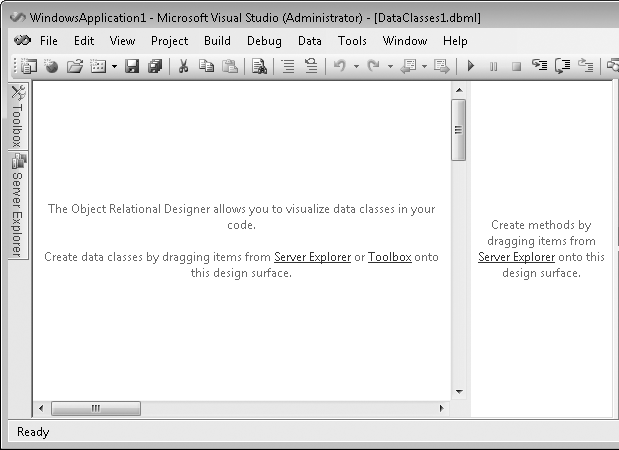
A new
Library.dbmlitem appears in your project, which opens the O/R Designer, shown in Figure 17-2. If you examine its properties, you’ll see that its name isLibraryDataContext.Add tables to the O/R Designer. Open the Server Explorer in Visual Studio. (Select the View → Server Explorer menu command to find it.) You should already see a link to the Library database in the Data Connections portion of the Server Explorer tree, since we created it in an earlier chapter. It will be called something like myserversqlexpress.Library.dbo. Expand that branch of the tree, and then the Tables branch below it. All of the tables in the Library database should appear.
Drag and drop the
Activitytable from the Server Explorer to the left half of the O/R Designer. Sooner or later, an image of the table should appear on-screen (see Figure 17-3).Build your application. I’ve found that this step is necessary in some installs of Visual Studio, but not in others. It refreshes Visual Basic’s view of the new
LibraryDataContextclasses. To build the application, select the Build → Build WindowsApplication1 menu command.Open your custom data context. The code generated by the O/R Designer defines the interaction between your program and the database, but you should still specify the database connection when you run your application, just in case anything changes down the road. Add a new
Buttoncontrol toForm1, then add the following code to that button’sClickevent handler:Dim LibraryDB As New SqlClient.SqlConnection( _ "Data Source=
myserversqlexpress;" & _ "Initial Catalog=Library;Integrated Security=true") Dim libraryLink = New LibraryDataContext(LibraryDB)Replace
myserverin the code with the name of your own system, and update the security settings if you use SQL Server authentication.Write queries. You’re ready to design your LINQ queries. Here’s some code that gets the first five activities from the
Activitytable and sorts them:Dim activities = From act In libraryLink.Activities _ Where act.ID <= 5 _ Order By act.FullName For Each oneItem In activities MsgBox(oneItem.ID & ": " & oneItem.FullName) Next oneItem ' Messages --> 2: Manage author and name types ' 1: Manage authors and names ' 3: Manage copy status codes ' 4: Manage media types ' 5: Manage series

If you click the Show All Files button in the Solution Explorer, you can access the .dbml file’s underlying designer file, Library.designer.vb. This file contains the generated go-between classes used by LINQ to SQL. As far as using the Activity table in our LINQ queries, here are the relevant parts of the auto-generated source code:
<System.Data.Linq.Mapping.DatabaseAttribute(Name:="Library")> _
Partial Public Class LibraryDataContext
   Inherits System.Data.Linq.DataContext

   Public ReadOnly Property Activities(  ) _
         As System.Data.Linq.Table(Of Activity)
      Get
         Return Me.GetTable(Of Activity)
      End Get
   End Property
End Class

<Table(Name:="dbo.Activity")>  _
Partial Public Class Activity
   Private _ID As Long
   Private _FullName As String
   <Column(Storage:="_ID", DbType:="BigInt NOT NULL", _
      IsPrimaryKey:=true)>  _
   Public Property ID(  ) As Long
      Get
         Return Me._ID
      End Get
   End Property

   <Column(Storage:="_FullName", _
      DbType:="VarChar(50) NOT NULL", CanBeNull:=false)> _
   Public Property FullName(  ) As String
      Get
         Return Me._FullName
      End Get
   End Property
End Class
The LibraryDataContext class implements a custom LINQ data context class that looks like, well, a mini version of my database. It contains references to those tables that I chose to include in the linkup; all of the Library tables would have appeared in this class if I had selected them. So, when I referenced libraryLink.Activities in the sample LINQ query, it was referencing the public Activities member from the data context.
The Activity table exposes distinct properties that match up with the underlying database fields. So really, it’s no surprise that I’m able to query these classes through LINQ just like I do with any LINQ to Objects-type class. But there is that strange part about how the class actually gets the data from the database. That’s the hidden LINQ to SQL part, handled through the base DataContext class and the associated attributes from the System.Data.Linq.Mapping namespace.
Tip
Behind the scenes, LINQ to SQL is regularly generating SQL statements to query and even update records in the actual database tables. You can examine these generated queries using the SQL Query Debug Visualizer tool. It doesn’t come with Visual Studio, but you can download it from Microsoft’s MSDN web site.
When you build a LINQ query, Visual Basic does not process the query immediately. Instead, it defers execution, running the query only when you request a record from the results. This allows you to build up a query in parts, and not have it consume CPU cycles until you actually need the final data.
' WARNING: Simplistic example. DimsomeBooks= From bk In Library _ Select bk.Title, bk.Pages Dim orderedTitles = From bk InsomeBooks_ Order By bk.Title
In this code, the ordering of the records doesn’t happen until the second statement. But that doesn’t matter since nothing was actually processed by the first statement. Remember that LINQ is really just converting your queries into extension methods and lambda expressions. The assignment of someBooks is doing something like this:
someBooks = Library.Select("Title, Pages")The assignment of orderedTitles simply extends someBooks:
orderedTitles = _
   Library.Select("Title, Pages").OrderBy("Title")
Actual processing occurs when you request a record from orderedTitles. By “processing” I mean that each extension method is executed on the original Library data source in order, from left to right. For orderedTitles, the original Library data is reduced through the Select method, and then further modified by the OrderBy method.
Having methods processed from left to right explains why the order of clauses such as Skip and Take is so important. The expression
Library.Take(2).Skip(2)
is different from
Library.Skip(2).Take(2)
That was a fast overview of LINQ with some of its first-release permutations. It seems like a lot, but I covered only the basics. Besides querying data, you can also update the underlying data store through specially crafted LINQ statements. And the ability to craft your own LINQ provider means that the types of data stores that LINQ can process are unlimited.
The major downside of LINQ is that, especially for LINQ to SQL, the SQL statements and MSIL code that LINQ ultimately generates based on your query will probably not be as efficient as those that you could craft on your own. Some of your LINQ queries may run so slowly that you have no choice but to replace them with pre-LINQ alternatives. But for most common querying purposes, especially across divergent data sources, LINQ is a giant step forward.
This chapter finally adds what many consider to be the heart of a library system: the lookup of books and other library items by patrons.
PROJECT ACCESS
Load the Chapter 17 (Before) Code project, either through the New Project templates or by accessing the project directly from the installation directory. To see the code in its final form, load Chapter 17 (After) Code instead.
When we built the main Library form back in Chapter 7, we included fields that allowed a patron to search for library items. But that’s about all we did; we didn’t enable the fields or make them usable. We also didn’t include any place to display a list of matching items. Let’s complete those components in this chapter. We’ll start with the matching items list.
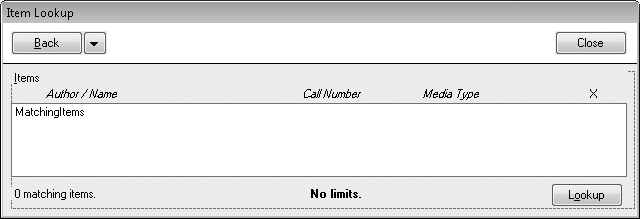
I’ve added a form to the project named ItemLookup.vb that displays the results of a search for library items. It includes a few buttons at the top of the form, and three main display panels:
PanelMatchesContains a large listbox that displays non-item matches. For instance, it displays a list of matching author or publisher names as searched for by the patron. When this panel appears, the patron selects a match from the
MatchingGenerallist, and clicks the Lookup button to display items tied to that selected author, publisher, or other entry.PanelItemContains a large listbox that displays items from the
NamedItemdatabase table. That is, it displays a list of library items matching some criteria. Selecting an item from theMatchingItemslist and clicking the Lookup button displays the details of that item.PanelOneItemContains a
WebBrowsercontrol that displays details about a single library item. The detail content is built using standard HTML, and may contain links that return you to thePanelItemspanel with a new set of matching items displayed. For instance, if you are viewing the details of an award-winning (one can hope) Visual Basic 2008 programming book and click on the publisher name for that item, thePanelItemspanel appears, listing all items made by that publisher.
The form also includes a set of Back buttons (in the upper-left corner) that work like the Back button in your web browser, a Close button that returns to the main form, and a menu (BackMenu), used to support the Back button feature. Figure 17-4 shows the form with the PanelItems panel out in front, since it looks a little more interesting than the other two panels.
The associated source code weighs in at around 1,000 lines, much of it focused on filling in the two listboxes and the HTML detail content. The search performed on the main form calls into this lookup form through the InitiateSearch method. The actual database search for matching items occurs in the PerformLookup method, which is called by InitiateSearch. PerformLookup includes LINQ queries that travel to the Library database and back via the LINQ to SQL provider. Queries for all different types of searches are included: title, author, subject, keyword, publisher, series, bar code, and some ID number searches, mostly for internal use. The type of search performed determines which of the three panels gets displayed (via the resultType variable). An author search displays PanelMatches with a list of matching author names; a title lookup displays matching items on the PanelItems panel.
Before we look at that LINQ code, we need to set some things up in the rest of the application to support these new LINQ queries. I’ve disabled the ItemLookup.vb file from compiling for now since it would just generate gobs of errors.
As amazing as LINQ to SQL is, it still requires the human touch (that’s you) to help it locate the SQL Server database tables. We’ll use the Object Relational Designer that we played with earlier in this chapter. Select the Project → Add New Item command from the Visual Studio menus. On the Add New Item form, select Data from the Categories list, select LINQ to SQL Classes from the Templates field, and set the Name field to “Library.dbml” before clicking the Add button. A blank O/R Designer window appears.
Open the Server Explorer and browse down to the Library database. From the Tables branch, drag and drop the following tables onto the left half of the O/R Designer window:
AuthorCodeMediaTypeCodeSeriesItemAuthorItemCopyItemKeywordItemSubjectKeywordNamedItemPublisherSubject
The designer will correctly analyze the relationships between the tables and show link lines between foreign references. You can rearrange the tables as needed to better see the tables, or keep them in a heap if you like; I’m not your mother. But we do have to do a little renaming of the tables. The O/R Designer tries to be really smart, changing any plural table names it finds into their singular equivalent. (By tradition, singular names are preferred when designing database tables.) Unfortunately, it botched the conversion of the CodeSeries table, changing it to CodeSery. It’s cute, but meaningless. Select that table and change its Name property to CodeSeries in the Properties panel.
That resets the table names to their roots, but it’s still no good. The problem is that we used some of those table names for form names in the Library application. The conflicting classes are in different namespaces, so the code could compile, but we’d have to type a lot of namespaces when identifying these classes, and I’m just too lazy for that. To eliminate the conflicts, I arbitrarily decided to add the letter Q to the start of each LINQ to SQL table name. In the designer, select each table and rename them, adding a Q to the start. CodeSeries becomes QCodeSeries; ItemAuthor becomes QItemAuthor, and so on. When you are finished, you should have a designer view that looks something like Figure 17-5.
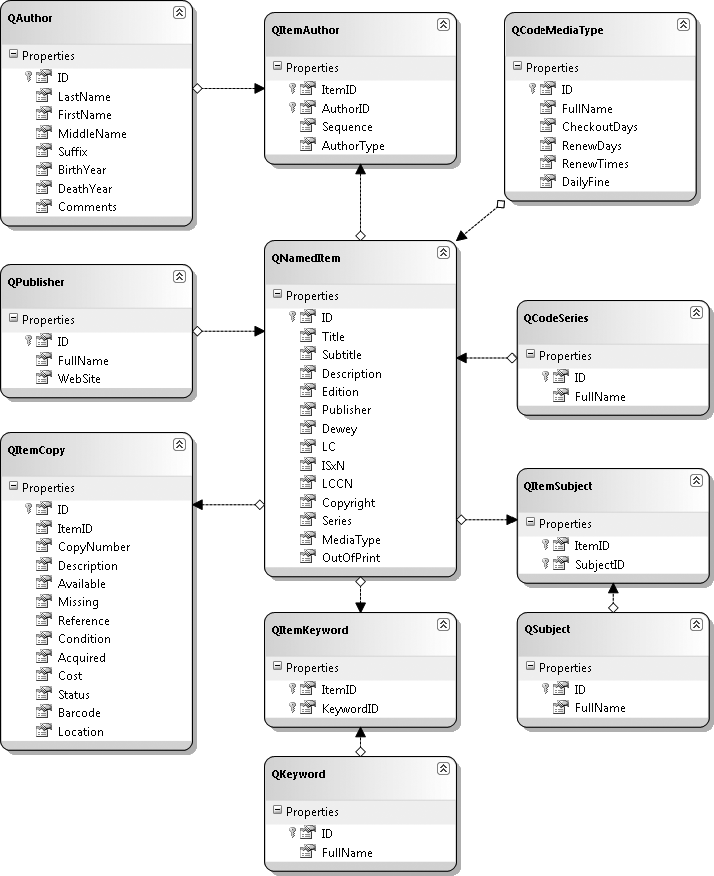
Despite working so hard to ensure that all the names avoid conflicts and that they are singular, when we use the library data context in our LINQ queries, we’ll find that all of the class names for these LINQ-to-SQL-generated tables are somehow pluralized (QPublishers instead of QPublisher). Amazing.
Back in the project code for Chapter 12, we added an extension method to the SqlClient.SqlDataReader class that formats an author name from a database query.
<System.Runtime.CompilerServices.Extension(  )> _
Public Function FormatAuthorName( _
      ByRef dbInfo As SqlClient.SqlDataReader) As String
Unfortunately, this routine is usable only with SqlDataReader objects. In the PerformLookup routine we’re about to add, we’ll need to format author names from a LINQ query of QAuthor table records. I guess we’ll need another extension method for that type of object. Open the General.vb source code file and add a new FormatAuthorName method to the General module. Some of the code appears here.
INSERT SNIPPET
Insert Chapter 17, Snippet Item 1.
<System.Runtime.CompilerServices.Extension(  )> _
Public Function FormatAuthorName( _
      ByVal author As QAuthor) As String
   ' ----- Given an author record, return the formatted name.
   Dim authorName As String

   On Error Resume Next

   ' ----- Format the name.
   authorName = CStr(author.LastName)
   If (author.FirstName IsNot Nothing) Then
      authorName &= ", " & author.FirstName
      If (author.MiddleName IsNot Nothing) Then _
         authorName &= " " & author.MiddleName
   End If
   If (author.Suffix IsNot Nothing) Then _
      authorName &= ", " & author.Suffix

   ...some code omitted for brevity...

   ' ----- Finished.
   Return authorName
End Function
If you compare this source code to the SqlDataReader version, you’ll find that this version is much cleaner since it references class members instead of database fields through a reader. Thanks LINQ!
That’s it for the LINQ support changes. Enable the ItemLookup.vb file by selecting it in the Solution Explorer panel and changing its Build Action property from None to Compile. Now let’s return to the code in that file.
The PerformLookup routine consists mostly of a giant If statement, with different conditions for most of the different types of searches. The last Else clause handles all of the searches that will fill in the list on the form’s PanelItems panel. That’s the list that shows actual items. It’s got a lot of If statements, too. But what’s really cool is its LINQ query. Instead of just being a simple query, it’s a complex query that is built up little by little. The query starts with the basics, requesting matching records from the database’s NamedItem table. (The libraryDC variable is the opened data context for the Library database.)
Dim itemQuery = From ni In libraryDC.QNamedItems
Next, if the user requested items of a specific media type (“just show me matching DVDs, not books”), the query is updated with the appropriate Where clause.
If (LimitByMedia <> −1) Then
   ' ----- Limit to a specific media type.
   itemQuery = From ni In itemQuery _
               Where ni.MediaType = LimitByMedia
End If
The type of search also adjusts the query. For instance, a keyword search adds user-specified keywords as the criteria.
keywordSet = New Generic.List(Of String)
keywordSet.AddRange(Split(searchText.ToUpper, ","))
itemQuery = From ni In itemQuery _
            Let keySet = (Aggregate ik In ni.QItemKeywords _
              Into Any(keywordSet.Contains( _
              ik.QKeyword.FullName.ToUpper))) _
            Where keySet = True _
            Select ni
That addition used an Aggregate subquery within the main query. The Let keyword, part of LINQ, assigns a subquery or other type of result to a temporary variable within the query (keySet in this case) so that it can be referenced elsewhere in the query.
Once the Where clauses have been added, the entire query is sorted and used.
itemQuery = From ni In itemQuery _
            Order By ni.Title, ni.Subtitle
Some of the LINQ queries in the PerformLookup routine are very straightforward. Here’s the code that does a publisher-name search:
' ----- Prepare the query for a publisher lookup.
holdText = Trim(searchText)
If (InStr(holdText, "*") = 0) Then holdText &= "*"
Dim publisherQuery = From pb In libraryDC.QPublishers _
                     Where pb.FullName Like holdText _
                     Order By pb.FullName
It doesn’t look that different from what you would expect in a SQL query. One nice thing is that wildcards use the * character instead of the SQL standard % character.
After processing this query, the LINQ results are scanned, and records are moved into the MatchingGeneral list.
For Each publishItem In publisherQuery
   MatchingGeneral.Items.Add(New ListItemData( _
      publishItem.FullName, CInt(publishItem.ID)))
   matches += 1
Next publishItem
This is just more of the same code you’ve seen in previous chapters. It loads the ListBox control with ListItemData objects, each containing a display name and an ID number from the database. That’s fine for a list with simple display requirements. But if you look back at Figure 17-4, it’s clear we want something a little more interesting for the list of matching items. We want columns, and columns require reasonable data.
To store this data, we’ll make up a new class, called MatchingItemData, which works just like ListItemData, but has more data fields.
Private Class MatchingItemData
   Public ItemID As Integer  ' NamedItem.ID
   Public Title As String
   Public Subtitle As String
   Public Author As String
   Public MediaType As String
   Public CallNumber As String

   Public Overrides Function ToString(  ) As String
      ' ----- Build a simple display string.
      If (Subtitle = "") Then
         Return Title & ", by " & Author
      Else
         Return Title & ": " & Subtitle & ", by " & Author
      End If
   End Function
End Class
Since this class will be used only to display matching items on this form, I’ve made it a subordinate class within the larger ItemLookup form class. The ToString method outputs the text that appears in the list. We won’t generate the actual columnar output until the next chapter. For now, we’ll just display the title and author.
The PanelMatches and PanelItems panels each include a Lookup button that initiates a new call to PerformLookup based on the item selected in the list. The Lookup button on the PanelItems panel retrieves the selected MatchingItemData object from the list, and performs the new search.
Private Sub ActItemLookup_Click( _
      ByVal sender As System.Object, _
      ByVal e As System.EventArgs) _
      Handles ActItemLookup.Click
   ' ----- Look up the item with the selected ID.
   Dim itemID As Integer

   ' ----- Ignore if no match is selected.
   If (MatchingItems.SelectedIndex = −1) Then Return
   itemID = CType(MatchingItems.SelectedItem, _
      MatchingItemData).ItemID
   ' ----- Perform the lookup.
   If (PerformLookup(LookupMethods.ByDatabaseID, _
      CStr(itemID), False) = False) Then Return

   ' ----- Store the history.
   AddLookupHistory(LookupMethods.ByDatabaseID, CStr(itemID))
End Sub
The call to PerformLookup starts the process all over again.
Let’s say you have a patron with a lot of time on his hands, and he wants to look up the book War and Peace.
Starting from
InitiateSearchand moving on to thePerformLookupcode, the initial title search (“War and Peace”) displays a list of matching titles on thePanelItemspanel.The patron locates the book in this list, and clicks the Lookup button, which calls the
ActItemLookup_Clickevent handler.This event handler in turn calls
PerformLookupagain, this time doing a precise lookup based on a database ID within theNamedItemtable.The detail of the item appears on the
PanelOneItempanel. (I’ll discuss how it’s done later in this chapter.)The detail includes a link to “Tolstoy, Leo,” the long-suffering author of the book. When the patron clicks on this link, it initiates another call to
PerformLookup, this time by author ID.We’re back to the
PanelItemspanel, viewing a list of books and other items by Tolstoy, assuming he had time to write anything else.
So, the patron now has an experience with three search panels: (1) a “general” list of titles matching the name “War and Peace”; (2) the “detail” display for the selected “War and Peace” item; and (3) an “items” list of books written by Leo Tolstoy. The history feature included in this form lets the patron return to any previous search page, just like the feature in your web browser.
It’s possible that some of the searches performed could return hundreds of results. We don’t want to store all of that content in memory, since it’s possible the patron will never use the Back button. Instead, we will do just what your web browser does: store the minimum information needed to perform the query again. Your web browser maintains just the name and URL of visited paths in its “back” list. (File and image caching is not part of the history feature.) The ItemLookup.vb form needs to store only those values that PerformLookup needs to do the search again: the type of search, and the numeric or text criteria used in the search.
Patron history is accessed on a “last-in, first-out” basis. The most recent page viewed is the one the patron wants to see first when using the Back button. We discussed just such a last-in, first-out, or “LIFO,” structure in Chapter 16: the stack. Each time the user views a panel, we’ll make note of it, pushing just those values we will need later onto the stack. When the user wants to view history, we will pop the most recent lookup content off the stack and update the display.
The ItemLookupHistory class, another subordinate class within the ItemLookup class, stores the values we need to manage history in the stack.
Private Class ItemLookupHistory
   Public HistoryDisplay As String
   Public LookupType As Library.LookupMethods
   Public LookupData As String
End Class
HistoryDisplay provides a short display name to help the user scan through history. LookupType and LookupData are the values that get passed to PerformLookup. It’s all nice and neat. To make things even neater, we’ll use a generic stack for actual storage. It’s declared as a field of the ItemLookup class.
Private LookupHistorySet As _
   Collections.Generic.Stack(Of ItemLookupHistory)
As the patron visits each panel, calls to the AddLookupHistory method populate the stack with each new visited item.
Private Sub AddLookupHistory( _
      ByVal searchType As Library.LookupMethods, _
      ByVal searchText As String)
   ' ----- Add an item to the lookup history.
   Dim newHistory As ItemLookupHistory
   Dim displayText As String

   ' ----- Build the text for display in the new item.
   displayText = BuildDisplayText(searchType, searchText)

   ' ----- Build the new history item.
   newHistory = New ItemLookupHistory
   newHistory.LookupType = searchType
   newHistory.LookupData = searchText
   newHistory.HistoryDisplay = displayText
   LookupHistorySet.Push(newHistory)

   ' ----- Update the back button.
   RefreshBackButtons(  )
End Sub
Later, when the patron clicks one of the Back buttons, the BackMenuItems_Click event handler examines the history stack, and calls PerformLookup as needed. And because we stored the ItemLookupHistory objects in a generic stack, we don’t have to specifically convert them from System.Object; the program just knows what data type they are.
Private Sub BackMenuItems_Click( _
      ByVal sender As System.Object, _
      ByVal e As System.EventArgs) _
      Handles BackMenu1.Click, ..., BackMenu10.Click
   ' ----- One of the back menu items was clicked.
   Dim whichItem As Integer
   Dim counter As Integer
   Dim scanHistory As ItemLookupHistory

   ' ----- Determine the clicked item.
   whichItem = CInt(DigitsOnly(CType(sender, _
      System.Windows.Forms.ToolStripMenuItem).Name))
   If (whichItem >= LookupHistorySet.Count) Then Return

   ' ----- Get rid of the in-between items.
   For counter = 1 To whichItem
      LookupHistorySet.Pop(  )
   Next counter

   ' ----- Perform a lookup as requested.
   scanHistory = LookupHistorySet.Peek
   If (PerformLookup(scanHistory.LookupType, _
      scanHistory.LookupData, False) = False) Then Return
   RefreshBackButtons(  )
End SubThe BuildHTMLAndLinks function builds the HTML content that appears on the PanelOneItem panel. This panel includes SingleItemDetail, a WebBrowser control included with .NET. It’s basically a version of Internet Explorer that you embed in your applications. Normally, you supply it with a URL to display, but you can also provide custom content through the control’s DocumentText property. The ByDatabaseID and ByBarcode lookup methods within the PerformLookup routine assign this property with content returned from BuildHTMLAndLinks.
SingleItemDetail.DocumentText = _
   BuildHTMLAndLinks(CInt(idQuery.ToArray(0)))
The content supplied by this routine is standard HTML, but with some specially crafted links that let the library program perform additional lookups based on the details of the displayed library item.
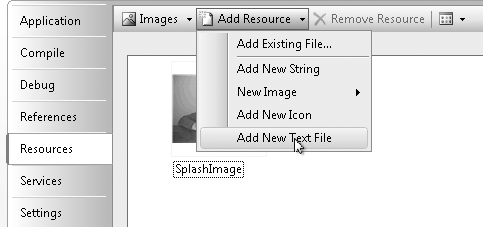
Most of the HTML is boilerplate, and it seems a shame to waste brain cells doing string concatenation just to include it. So instead, I stored much of the HTML as a text file resource through the Resources panel of the project properties. On that panel, I clicked the Add Resource button, clicked the Add New Text File menu item, and entered “ItemLookupBody” as the name for the new text file (see Figure 17-6).
In the text editor window that appeared, I added the following HTML content:
<html>
<head>
<style type="text/css">
body { font-family: "Arial"; }
h1 { font-family: "Arial"; margin-top: 0px;
   margin-bottom: 0px; font-size: 18pt; font-weight: bold; }
h2 { font-family: "Arial"; margin-top: 20px;
   margin-bottom: 0px; font-size: 15pt; font-weight: normal; }
h3 { font-family: "Arial"; margin-top: 0px;
   margin-bottom: 0px; font-size: 15pt; font-weight: normal;
   font-style: italic; }
p { margin-top: 2px; margin-bottom: 2px;
   margin-left: 15px; font-family: "Arial"; font-size: 12pt; }
table { border: solid black 1px; margin-left: 15px; }
th { border: solid black 1px; background-color: black;
   color: white; white-space: nowrap; text-align: left; }
td { border: solid black 1px; white-space: nowrap; }
a:visited { color: blue; }
</style>
</head>
<body>
If you’re familiar with HTML, you’ll recognize most of the content as an embedded Cascading Style Sheet (CSS). Its various formatting rules will bring a specific and consistent look and feel to the browser content that appears within the item lookup form. This is not a book on CSS, but there are some good books at your local bookstore that can talk you through the rules and syntax if you’re interested.
You can find the HTML content portion in the Solution Explorer, within the Resources branch. You’ve probably already noticed that the closing </body> and </html> tags aren’t included. We’ll attach those in the BuildHTMLAndLinks method. Since string concatenation is notoriously slow, I chose to use a StringBuilder class, a special string-like class that is custom-designed for speed when repeatedly adding content to a base string. You attach content to the end of the StringBuilder using its Append and AppendLine methods, and retrieve the entire string through the standard ToString method.
We’ll begin the content with the boilerplate HTML listed previously. Since we added it as a resource, it already appears in the My.Resources object under the name we gave it.
Dim detailBody As New System.Text.StringBuilder
detailBody.Append(My.Resources.ItemLookupBody)
Most of the code adds plain text to the detailBody string builder using its AppendLine method. Here’s the code that adds the main book title:
sqlText = "SELECT Title, Subtitle FROM NamedItem " & _
   "WHERE ID = " & itemID
dbInfo = CreateReader(sqlText)
dbInfo.Read(  )
detailBody.AppendLine("<h1>" & _
   HTMLEncode(CStr(dbInfo!Title)) & "</h1>")
The HTMLEncode function, called in this block, is included in the ItemLookup class. It does some simple modification of special characters as required by HTML. It’s called repeatedly throughout BuildHTMLAndLinks.
So, that’s the HTML, but what about the links? If I put a standard link to, say, http://www.microsoft.com, the embedded browser will jump to that page when the link is clicked. But that doesn’t help me do database lookups. The WebBrowser control doesn’t really expose a “link clicked” event, but it has a Navigating event that is close. This event fires whenever the browser is about to move to a new page. Fortunately, one of the data values passed to the event handler is the target URL. So, all we have to do is build a link that contains the information we need to perform the database lookup.
I decided to store the relevant database lookup details as a collection (similar to the history stack), and create fake URL-like links that indicate which item in the collection to use. After a lot of thought and contemplation, I decided on the format of my fake URL links:
library://xwhere x gets replaced by an index into the collection of links. It’s simple, and it works. The collection of search details is a generic dictionary stored as a field within the form class.
Private Class SingleItemLink
   Public LinkType As Library.LookupMethods
   Public LinkID As Integer
End Class

Private ItemLinkSet As Collections.Generic.Dictionary( _
   Of Integer, SingleItemLink)
Then back in the HTML-building code, I add fake URLs and SingleItemLink objects in tandem. Here’s some of the code used to add in author links, given a data reader with author name fields. (The entryID value supplies the x in library://x.)
Do While dbInfo.Read
   ' ----- Add in this one author name.
   holdText = FormatAuthorName(dbInfo)
   entryID += 1
   detailBody.AppendLine("<p><a href=""library://" & _
      entryID & """>" & HTMLEncode(holdText & " [" & _
      CStr(dbInfo!AuthorTypeName) & "]") & "</a></p>")

   ' ----- Add in an author link.
   newLink = New SingleItemLink   newLink.LinkType =
General.LookupMethods.ByAuthorID
   newLink.LinkID = CInt(dbInfo!ID)
   ItemLinkSet.Add(entryID, newLink)
Loop
When the user clicks on a link in the embedded web browser, it triggers the Navigating event handler.
Private Sub SingleItemDetail_Navigating( _
      ByVal sender As Object, ByVal e As System.Windows. _
      Forms.WebBrowserNavigatingEventArgs) _
      Handles SingleItemDetail.Navigating
   ' ----- Follow the clicked link.
   If (e.Url.Scheme = "library") Then _
      FollowItemLink(CInt(e.Url.Host(  )))
End Sub
The e.Url.Scheme property returns the portion of the URL before the :// characters, while e.Url.Host returns the first slash-delimited component just after these characters. That’s where we stored the index into the ItemLinkSet dictionary. The FollowItemLink method extracts the lookup details from ItemLinkSet, and calls our trusty PerformLookup method, resulting in a new search that gets stored in the search history.
Private Sub FollowItemLink(ByVal entryID As Integer)
   ' ----- Given a character position in the single item
   '       text panel, follow the link indicated by that item.
   Dim scanLink As SingleItemLink

   ' ----- Access the link.
   scanLink = ItemLinkSet.Item(entryID)
   If (scanLink Is Nothing) Then Return

   ' ----- Perform a lookup as requested.
   If (PerformLookup(scanLink.LinkType, _
      CStr(scanLink.LinkID), False) = False) _
      Then Return

   ' ----- Store the history.
   AddLookupHistory(scanLink.LinkType, CStr(scanLink.LinkID))
End SubThe ItemLookup form is ready to use. We just need to call it from the search fields on the main form. The PanelLibraryItem panel in MainForm.vb includes several ComboBox selection controls, but there is no code to fill them in. Let’s add that code now. Access the source code for MainForm.vb, and locate the MainForm_Load event. There’s already some code there that adjusts the form elements. Append the new list-filling code to the end of this routine.
INSERT SNIPPET
Insert Chapter 17, Snippet Item 2.
Here’s the portion of that new code that fills in the list of search methods:
' ----- Load in the list of search types.
SearchType.Items.Add(New ListItemData( _
   "Lookup By Title", LookupMethods.ByTitle))
SearchType.SelectedIndex = 0
SearchType.Items.Add(New ListItemData( _
   "Lookup By Author", LookupMethods.ByAuthor))
SearchType.Items.Add(New ListItemData( _
   "Lookup By Subject", LookupMethods.BySubject))
SearchType.Items.Add(New ListItemData( _
   "Lookup By Keyword (Match Any)", _
   LookupMethods.ByKeywordAny))
SearchType.Items.Add(New ListItemData( _
   "Lookup By Keyword (Match All)", _
   LookupMethods.ByKeywordAll))
SearchType.Items.Add(New ListItemData( _
   "Lookup By Publisher", LookupMethods.ByPublisher))
SearchType.Items.Add(New ListItemData( _
   "Lookup By Series Name", LookupMethods.BySeries))
SearchType.Items.Add(New ListItemData( _
   "Lookup By Barcode", LookupMethods.ByBarcode))
The Clear button on the search panel resets all of the search fields and prepares them for a new search. Add a new ActSearchClear_Click event handler either by using the method selection fields just above the code editor window, or by double-clicking on the Clear button on the form itself. Then add the following code to the handler.
INSERT SNIPPET
Insert Chapter 17, Snippet Item 3.
' ----- Clear the current search criteria.
SearchType.SelectedIndex = SearchType.Items.IndexOf( _
   CInt(LookupMethods.ByTitle))
SearchText.Text = ""
SearchMediaType.SelectedIndex = _
   SearchMediaType.Items.IndexOf(−1)
SearchLocation.SelectedIndex = _
   SearchLocation.Items.IndexOf(−1)
Since the Library application will probably be used by many different patrons throughout the day, we should assume that a different person is using the program each time the form returns to the search panel. Let’s simulate a click on the Clear button whenever the user views the search panel. Locate the existing TaskLibraryItem method, and add the following code to the end of the routine, just before the SearchText.Focus( ) statement.
INSERT SNIPPET
Insert Chapter 17, Snippet Item 4.
ActSearchClear.PerformClick(  )
If (ActSearchLimits.Top = LabelMoreLimitsTop.Top) Then _
   ActSearchLimits.PerformClick(  )
In the interest of being as user-friendly as possible, let’s add some “help text” to the search panel that varies based on the search type selected in the Search Type drop-down list. Add a new SearchType_SelectedIndexChanged event handler, and then add its code.
INSERT SNIPPET
Insert Chapter 17, Snippet Item 5.
I won’t list it all here since it’s rather repetitive. The code simply examines the current selection in the SearchType control, and sets the LabelSearchHintsData label to some helpful descriptive text.
We’re getting close. The only thing left to do is to perform the search when the user clicks the Lookup button. Add an event handler for ActSearch_Click, and then add its code.
INSERT SNIPPET
Insert Chapter 17, Snippet Item 6.
Most of this routine checks for valid input before calling the ItemLookup form through its InitiateSearch public method.
Call (New ItemLookup).InitiateSearch( _
   CType(searchMethod, Library.LookupMethods), _
   Trim(SearchText.Text), mediaLimit, locationLimit)
You’ve done it, doctor. You’ve added a heart to the patient. The program is ready to run and use for item lookups! If you’ve already added some named items, you can locate them using any of the relevant search methods. Try doing a title search, using just the * wildcard character for the search criteria.
Although the search feature works, you will find that some of the display elements on the ItemLookup form don’t work perfectly. We never did get those columns working on the item results panel. Improvements are coming soon. With the next chapter’s focus on user interface techniques, we’ll soon be able to customize the display to our heart’s content.