If there’s one thing I’ve learned in nearly 25 years of programming, it’s that users often need some help to run software on their systems. Programmers need help, too, but getting back to computers: it’s rare that you find a technically conversant user. If you write applications that target businesses and departments within organizations (that’s what I do), you find that the users are very skilled at their jobs, but not necessarily skilled at using a computer. That’s why it is imperative that you make your programs as straightforward to use as possible.
You should also add online help to your applications. These ready documents act as the first wave of support for your users’ software needs. Of course, they seldom read it, and so you (or your technical support staff) will actually become the first wave of support. But it’s somewhat refreshing to be able to say, “Did you check the online help, which covers this issue in detail?”
In this chapter, we’ll discuss the online help options available to you in Visual Basic and focus in on HTML Help 1.x, Microsoft’s standard Windows XP help system.
Online help has been a part of Windows since its initial release, back in the days when applications and operating systems still shipped with printed manuals and never required more than two floppy disks. I really miss those days. That sense of touch; the cold, smooth pages in my hands. I remember the first Windows software I ever purchased, a newly released “Personal Information Manager.” It had everything I needed, including a 400-page user’s guide and reference manual. Sheer delight.
Those days are gone, replaced by online help systems and HTML readme files. Now you buy books such as this one to bring back that included-user’s-guide feeling. But you can do a lot with online help, especially these days with the ability to include dynamic, active content in online help pages.
The original Windows help system was WinHelp. It included simple formatted help pages with hyperlinks to other pages. A separate “contents” file added table-of-contents support; you had to ship the .cnt contents file with the .hlp file as a set. These basic help files were (and in many ways, still are) good enough for most users’ needs, and they are still supported by all releases of Microsoft Windows.
WinHelp files were designed using Rich Text Format (RTF), a word-processing format supported by many vendors. Because of this, the content was easy to build, although hyperlinks and other help-specific features required bizarre text and formatting combinations. But WinHelp met the needs of Windows users for years.
RTF documents are so 1980s. When the Internet started sweeping the world with its ability to generate beautifully formatted pages through the common HTML tag-based language, Microsoft decided to upgrade its help system to one that used standard HTML documents: HTML Help. As its name implies, HTML Help is truly HTML-based. Anything that generates HTML can generate HTML Help content: third-party web-page designer tools, word processors, your own custom applications, even Notepad. As expected, some vendors designed tools specifically targeting the HTML Help system.
HTML Help is better than WinHelp, due to its dependence on HTML and other related technologies. Each page of your online help file is a separate HTML page/file. Hyperlinks to other help pages are standard HTML hyperlinks. And HTML Help employs most of the features used in any web page, including Cascading Style Sheets (CSS) and Java scripting.
Compiled HTML Help files have a .chm extension, and a single file includes primary content, the table of contents, and a predefined index of terms. We will use HTML Help technology to add online help content to the Library Project. I’ll skip the details of the system until a little later in the chapter.
Most applications sold as of this writing use HTML Help, but not all. One big exception is Visual Studio itself. Its help system—Microsoft Help 2 (a.k.a. HTML Help 2.x)—combines HTML and XML content into a set of collections that work together as one. If you’ve installed the full version of SQL Server on a system with Visual Studio, they together share a common help interface. You can even search for pages in both collections at the same time.
Microsoft makes a “Help Integration Kit” available for developers who wish to merge their own content into the Microsoft Help 2 system. This is most useful for vendors who develop third-party controls and tools that integrate with .NET or SQL Server. Microsoft Help 2 is rarely used for typical end-user software.
Windows Vista uses a new help system called Assistance Platform (AP). All of the online help that comes with Vista is written using AP, but not much else is. That’s because Microsoft decided not to release the file format for other vendors to use. Well, there are a few big companies and OEMs using AP as guided by Microsoft, but you and I are not two of them.
Not every application uses these Microsoft-defined help systems. Some applications include no online help at all because they are designed by bad people. No, I’m just kidding. There may be instances where online help adds no value to a program. But it’s usually best to include some sort of written assistance.
Standalone HTML pages are just one step down from HTML Help files, and are a viable alternative for simple applications, or those hosted on a web site. You can use other standard formats, such as word processing or text documents, if you just don’t have the resources to generate true online help files. And of course there are books, which will get my attention.
Visual Studio includes a feature that lets you generate documentation from the XML comments added to each member of your class. (I don’t discuss this in this book; see the Visual Studio online help—aren’t you glad it’s there?—for additional information on “XML Comments.”) Don’t even consider using this for your own user documentation needs unless you are developing class-based components for use by other developers.
HTML Help files are built from multiple source files:
Content files, especially standard HTML files, communicate core information to the user, either through static text and graphics or through advanced web-page-style behaviors and scripts normally available in web pages.
The Help Contents file uses .hhc for its file extension. Using standard HTML
<ul>and<li>tags, the file specifies the hierarchical table of contents used by the help file.The Help Keywords file uses an .hhk file extension, and documents the index used to access help pages from specific predefined keywords.
The Help Project file, using an .hhp file extension, defines an entire help project and its target .chm file. This INI-style text file identifies all the other files that will be compiled into the target help file. It also defines a few project-wide options.
You can build the primary content files by hand using any standard HTML tool you wish, as long as the output format matches what is expected by the HTML Help Compiler (supplied by Microsoft). For the content files, it generally doesn’t matter what tool you use since standard HTML is sufficient. Any hyperlinks that you include in the content to other help pages in the same directory will become standard help links in the compiled help file.
The non-content files require a very precise format; they are all based on HTML, except the Help Project file, which is an INI file. You will need to either design these files by hand using the expected format, or use a tool that can generate these files for you in the right format.
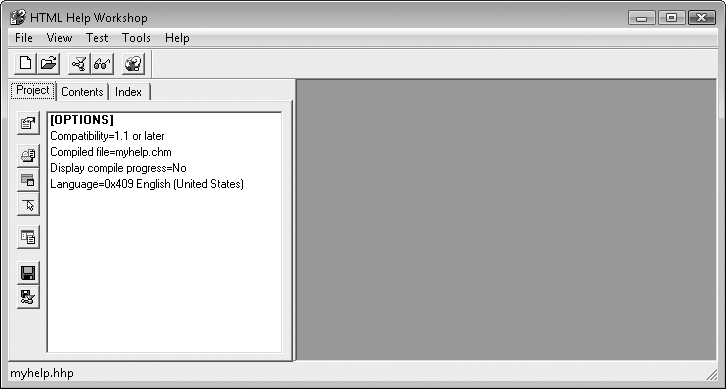
Microsoft provides a free tool that helps you create the non-content files, and joins together the content files with them for final compilation. You can download HTML Help Workshop directly from Microsoft’s web site. Go to the Microsoft Download Center at http://www.microsoft.com/downloads and search for “HTML Help Workshop.” You will receive a few results, but the first one in the list (when sorted by popularity) should be the one you need. Figure 24-1 shows the main page of the HTML Help Workshop application with an active project file open.
In the rest of this section, we’ll use HTML Help Workshop to build a simple HTML Help file that contains two pages: a welcome page and a “more information” page. You can find this sample help project in the HTMLHelpSample subdirectory of the book’s installation directory.
Our mini project includes two content files: welcome.htm and moreinfo.htm. Ever the technology maven, I crafted them in Notepad. Here’s the content for welcome.htm:
<html>
  <head><title>Welcome to My Help</title></head>
  <body>
    Welcome to My Help. For more information,
    <a href="moreinfo.htm">click here</a>.
  </body>
</html>
The moreinfo.htm file is a lot like it.
<html>
  <head><title>My Help Additional Info</title></head>
  <body>
    Not much more to say. For a greeting,
    <a href="welcome.htm">click here</a>.
  </body>
</html>
You can add graphics files (such as JPEG and GIF files) and link them in as you normally would in a web page. Be sure to store the graphics files in the same directory (or subdirectory) as the main file for easy access.
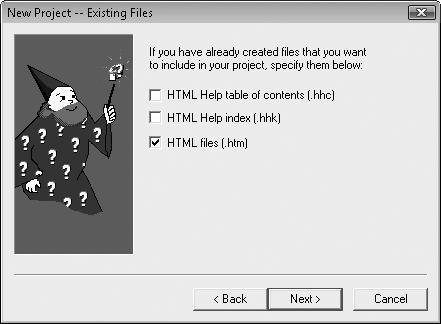
Let’s generate the remaining files through HTML Help Workshop. Start it up, and use the File → New menu command to create a new project. Using the New Project Wizard, identify the location and name of your new .hhp file. I’ll create a file named Simple.hhp in the same folder as the two content files. The wizard prompts you for files already created. Check the “HTML files” field, as shown in Figure 24-2.
Add the two HTML files in the next step and complete the wizard. The project file is created with references to your two files.
The project is pretty empty; it doesn’t even have a window title defined for the compiled help file. You can set the title and other general settings through the project options, accessed through the topmost button in the toolbar that runs on the left side of the main window. You can also double-click on the [OPTIONS] item in the project details list. When the option window appears, enter Simple Help in the Title field, and then click OK.
Here is what the project file contains at this point:
[OPTIONS]
Compatibility=1.1 or later
Compiled file=Simple.chm
Default topic=welcome.htm
Display compile progress=No
Language=0x409 English (United States)
Title=Simple Help

[FILES]
welcome.htm
moreinfo.htm

[INFOTYPES]
The file will change as we add the other two non-content files, but not by much.
Compiling the file right now (using the File → Compile menu command) and running it displays a very simple help window, as shown in Figure 24-3.

A table of contents will help the user peruse this massive online help experience. To add a contents file, click on the Contents tab on the left side of the main form, and respond to the prompt that you wish to create a new file, naming it Simple.hhc. The form changes to display a table-of-contents editor. Another way to create the contents file is by using the File → New menu command, and choosing Table of Contents from the New selection form. This is less direct, as it doesn’t immediately connect the contents file with the project.
Use the new toolbar buttons running down the left side of the window to add and modify content entries. First, use the top button (“Contents properties”) to edit the options for the table of contents. On the Table of Contents Properties form, uncheck the “Use folders instead of books” field and click OK.
The next two buttons—the book button (“Insert a heading”) and the page/question mark button (“Insert a page”)—are the main buttons used to add new entries to the contents. I clicked the “Insert a page” button to get to the Table of Contents Entry form shown in Figure 24-4.
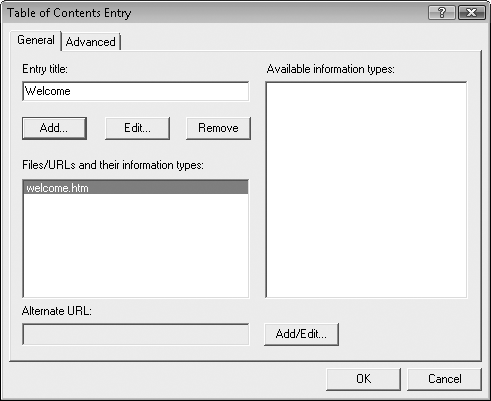
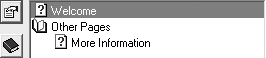
As shown in the figure, I set the entry title (“Welcome”), and selected the Welcome to My Help (welcome.htm) file through the Add button. I did the same for the moreinfo.htm file, giving it a title of “More Information.” I also added a heading entry using the “Insert a heading” toolbar button on the main form, naming it “Other Pages.” I used the arrow toolbar buttons to move the moreinfo.htm entry into this heading section. Then I took a much-needed break and looked at my completed table of contents in Figure 24-5.
If you compile and run the file, it now includes the table of contents in a separate panel, plus a toolbar (see Figure 24-6).

An index file lets the user access specific pages by searching for a concept or subject from a list. There is a many-to-many relationship between these keywords and the help pages: one keyword can lead to one or more pages, and a single page can be the target of multiple keywords.
Create an index by clicking on the Index tab on the left half of the main form, and respond to the prompt that you want to create a new index file, calling it Simple.hhk. As with the Contents editor, the Index editor includes a small vertical toolbar. Use the second button in the toolbar, the one with the key image, to create new keyword entries. I will add three keywords:
basic, linking to welcome.htmadvanced, linking to moreinfo.htmeverything, linking to both pages
The Index Entry editor form works just like the Table of Contents Entry form, allowing you to specify the target pages for each keyword.
Saving and compiling the project adds index features to the compiled help file.
On my system, running the compiled help file displayed the content in a little window in the upper-right corner of the screen. But my help content is important; I want it to appear much closer to the middle of the screen, and in a larger window. Fortunately, you can control the windows used to display the content. Return to the Project tab and click on the third toolbar button down on the left side of the window. This “Add/modify window definitions” button lets you define one or more windows to use for distinct help pages in your file. When prompted, add a New Window Type named SimpleWindow.
The Window Types dialog that appears has many options for getting just the window you want, although you’re probably being too picky if you need more than, say, 243 different window types. The Position tab is a lot of fun. It includes an Autosizer button that lets you drag a window to the desired size. Adjust the size to something reasonable, add a “Title bar text” of “Simple Help” back on the General tab, and click OK. Since this is the only defined window, it becomes the default, and will be used for the main help display the next time you compile and run the file.
Visual Studio provides two primary methods of integrating online help into desktop applications. The first uses the HelpProvider control, found in the Components section of the Visual Studio Toolbox. The second uses the Help.ShowHelp method of the Windows Forms package. Both methods let you display specific pages or portions of a compiled HTML Help file.
The HelpProvider control can be added to a form to enable access to online help. It provides two primary online help experiences: (1) standard access to compiled HTML Help files; and (2) pop-up help. Both methods put the focus on individual controls of a form, and on the specific help features to be tied to each control.
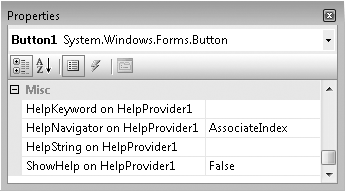
To use the HelpProvider control with compiled HTML Help files, set the control’s HelpNamespace property to the location of a valid help file. Then adjust the properties of other controls on the form to refer to specific features within the help file. The HelpProvider control impacts other controls by adding several additional properties to each. Figure 24-7 shows the four additional properties (HelpKeyword, HelpNavigator, HelpString, and ShowHelp) automatically added to a Button control.
The HelpNavigator property added to each control defines what features of the help file to access when the user presses the F1 key while that control has the focus. To access a specific page within the help file (such as welcome.htm), you set the target control’s HelpNavigator property to Topic and set the related HelpKeyword property to the filename of the page (welcome.htm).
The HelpNavigator property for a control can be set to access non-page sections of the online help file as well. The value TableOfContents displays the file’s contents outline; Index jumps to the keyword index. There are a few other choices as well.
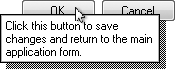
The HelpProvider control also enables “pop-up” help on individual controls. This help variation causes a small tool tip window to appear just above a control, displaying a short message that provides usage information for that control, as shown in Figure 24-8.
Pop-up help works when you enable the “Pop-up button” in the form’s title bar. To set pop-up help for a control, follow these steps:
Add a
HelpProvidercontrol to the form, but don’t bother setting itsHelpNamespaceproperty to a file.Set the form’s
HelpButtonproperty toTrue.Set the form’s
MaximizeBoxandMinimizeBoxproperties toFalse.Set the
HelpString on HelpProvider1property to some informational text on each control that will display its own pop-up help.
The user displays pop-up help by first clicking on the question-mark “help” button in the form’s title bar, and then clicking on a control.
The System.Windows.Forms.Help.ShowHelp method displays specific portions of a compiled HTML Help file based on the arguments passed to the method. It’s quite similar to the file-based help portion of the HelpProvider control, but in method form. To display a specific page within a help file, use this syntax:
Windows.Forms.Help.ShowHelp(Me, "Simple.chm", _
   HelpNavigator.Topic, "moreinfo.htm")
The first argument is a reference to the form calling the method.
A common way to use this method is to monitor the form for the F1 key, and call ShowHelp from the form’s KeyDown event handler.
Private Sub Form1_KeyDown(ByVal sender As Object, _
      ByVal e As System.Windows.Forms.KeyEventArgs) _
      Handles Me.KeyDown
   ' ----- Call online help.
   If (e.KeyCode = Keys.F1) Then
      Windows.Forms.Help.ShowHelp(Me, "Simple.chm", _
         HelpNavigator.Topic, "moreinfo.htm")
   End If
End Sub
You must set the form’s KeyPreview property to True to trigger the form-level KeyDown event. Otherwise, all keys go to the active control and bypass the form-level events.
The ShowHelp method offers a lot more control over the user’s online help experience since you (and not the HelpProvider control) determine exactly when to access the help file.
If it is your plan to stand over the shoulder of each user and give running verbal instructions while they sit before your software, by all means skip the writing of any online help or other user documentation. But if you plan to have a life, make it easier by including usage support right in the application. These are not the bad old days when you had to provide your own method of online help display, or needed to dig through the Windows API library to find the function that accessed the help file. This is .NET! It has all the help features you need built right in.
Crafting compiled HTML files is not too difficult with the HTML Help Workshop tool. But if you will work on any sizable help file, or if you want to add enhanced features consistently, you should think about plunking down a few hundred dollars on a third-party help development tool.
Once you have access to an online help file, you have access to every page of it. That’s usually a good thing, because users are curious. (I mean that they are inquisitive and not merely objects of curiosity.) But in the case of the Library Project, that curiosity could lead to topics that are really no business of ordinary patrons. Most of the features in the Library application are for administrative use only. To keep things as calm as possible, the Library Project includes two online help files:
LibraryBasic.chm, a patron-focused help file that describes only the parts of the program the patron can access
LibraryAdmin.chm, a file targeting administrators and librarians that fully describes the features of the application
This section builds both of these online help files, and integrates them into the Library application.
I’ve written the content for both online help files for you. You’ll find it all in the Online Help subdirectory in the primary install directory for this book, with distinct directory branches for Basic and Admin files. Figure 24-9 and Figure 24-10 list the files found in each directory.


Most of the HTML files have a one-to-one link with specific forms in the application. For instance, the ItemLookup.htm file contains the online help content for the ItemLookup.vb form in the application. And this help page shows up in both the basic and administrative versions of the file. When the user presses F1 from the Item Lookup form, the application tries to show the online help page ItemLookup.htm. If the user is a standard patron, it accesses this page in the LibraryBasic.chm file; administrative users access the same page name, but from the LibraryAdmin.chm file instead.
Each help source folder contains .hhp, .hhc, and .hhk files that define the project, the contents, and the index details, respectively. The administrative version also includes a few GIF graphics files.
I’ve already compiled each file and placed a copy of the .chm file in these directories.
To keep things simple and somewhat centralized, we’ll employ the ShowHelp method described earlier to display online help for each form in the application. Because of the busywork nature of the changes involved in this chapter’s project code, I’ve already made all of the updates to the project. Most of the changes involve making the same change to every form in the project, all of which I’ll describe soon.
PROJECT ACCESS
Load the Chapter 24 (After) Code project, either through the New Project templates or by accessing the project directly from the installation directory. This chapter does not include a “Before” variation of the project code.
The Maintenance.vb form already provides a way for the administrator to specify the location of each online help file. It updates two settings through the My.Settings object.
My.Settings.HelpFile = Trim(RecordBasicHelp.Text)
My.Settings.HelpFileAdmin = Trim(RecordAdminHelp.Text)
Those settings also get stored in two global variables.
MainHelpFile = RecordBasicHelp.Text
MainAdminHelpFile = RecordAdminHelp.Text
That means we only need to call ShowHelp from each form and access one of the two files whenever the user presses F1.
But what if the administrator never uses the Maintenance.vb form to configure the locations of the help files? Since the help files will probably be installed in the same folder as the Library.exe program file, we should look there automatically. The InitializeSystem method in General.vb already sets the two global variables to the values stored in the settings.
' ----- Locate the online help files.
MainHelpFile = My.Settings.HelpFile & ""
MainAdminHelpFile = My.Settings.HelpFileAdmin & ""
Just in case these settings don’t exist, let’s add some code just after these lines to provide default access to the files.
If (MainHelpFile = "") Then MainHelpFile = _
   My.Computer.FileSystem.CombinePath( _
   My.Application.Info.DirectoryPath, "LibraryBasic.chm")
If (MainAdminHelpFile = "") Then MainAdminHelpFile = _
   My.Computer.FileSystem.CombinePath( _
   My.Application.Info.DirectoryPath, "LibraryAdmin.chm")
Since we need to continuously adapt to the current user state of the application (whether the user is a patron or an administrator), a centralized routine that displays help from the correct file seems best. Here’s the code for OnlineHelp, a new method in the General.vb file:
Public Sub OnlineHelp(ByVal whichForm As _
      System.Windows.Forms.Form, _
      ByVal contextName As String)
   ' ----- Show the online help. Differentiate between the
   '       basic and the administrative online help usage.
   Dim fileToUse As String
   ' ----- Which file to use.
   If (LoggedInUserID = −1) Then
      fileToUse = MainHelpFile
   Else
      fileToUse = MainAdminHelpFile
   End If
   If (fileToUse = "") Then
      MsgBox("Online help is not properly configured.", _
         MsgBoxStyle.OkOnly Or MsgBoxStyle.Exclamation, _
         ProgramTitle)
      Return
   End If

   ' ----- Show the online help.
   Try
      Help.ShowHelp(whichForm, fileToUse, _
         HelpNavigator.Topic, contextName)
   Catch
      MsgBox("An error occurred while trying to access " & _
         "the online help file.", MsgBoxStyle.OkOnly Or _
         MsgBoxStyle.Exclamation, ProgramTitle)
   End Try
End Sub
The biggest task in this chapter involves going to each form in the project and making these two changes:
Set the form’s
KeyPreviewproperty toTrue.Add a call to
OnlineHelpfrom the form’sKeyDownevent handler.
Here’s the code added to the ChangeUser.vb form:
Private Sub ChangeUser_KeyDown(ByVal sender As Object, _
      ByVal e As System.Windows.Forms.KeyEventArgs) _
      Handles Me.KeyDown
   ' ----- F1 shows online help.
   If (e.KeyCode = Keys.F1) Then _
      OnlineHelp(Me, "ChangeUser.htm")
End Sub
A few of the forms process online help requests a little differently from the others. About.vb doesn’t include its own online help page. Instead, it displays Welcome.htm. Splash.vb doesn’t show any online help since the user isn’t really supposed to interact with it. ReportBuiltInViewer.vb, the form that shows each of the five built-in reports, displays help for a related form via ReportSelect.htm. The CheckLookup.vb form has two associated online help pages: one for checkout and one for check-in of items. Its KeyDown event handler chooses the right page based on the current mode of the form.
If (e.KeyCode = Keys.F1) Then
   If (CheckInMode = True) Then
      OnlineHelp(Me, "CheckLookup_In.htm")
   Else
      OnlineHelp(Me, "CheckLookup_Out.htm")
   End If
End If
The Main.vb form is even more diverse, choosing from among nine distinct online help pages when in administrative mode. Each panel on the main form is like a whole separate form, so I added an online help page for each panel. Code in the form’s KeyDown event handler shows the right page based on the currently displayed panel.
If (PanelLibraryItem.Visible = True) Then
   OnlineHelp(Me, "MainForm_Library.htm")
ElseIf (PanelPatronRecord.Visible = True) Then
   OnlineHelp(Me, "MainForm_Patron.htm")
ElseIf (PanelHelp.Visible = True) Then
   OnlineHelp(Me, "MainForm_Help.htm")
ElseIf (PanelCheckOut.Visible = True) Then
   OnlineHelp(Me, "MainForm_Out.htm")
ElseIf (PanelCheckIn.Visible = True) Then
   OnlineHelp(Me, "MainForm_In.htm")
ElseIf (PanelAdmin.Visible = True) Then
   OnlineHelp(Me, "MainForm_Admin.htm")
ElseIf (PanelProcess.Visible = True) Then
   OnlineHelp(Me, "MainForm_Daily.htm")
ElseIf (PanelReports.Visible = True) Then
   OnlineHelp(Me, "MainForm_Print.htm")
Else
   OnlineHelp(Me, "MainForm_Basic.htm")
End If
The Help panel on the main form includes buttons designed to jump to the table of contents and index of the current online help file. I added event handlers for these buttons. The code for both MainForm.ActHelpContents_Click and MainForm.ActHelpIndex_Click is just like the code in the generic OnlineHelp routine, except for the final call to ShowHelp.
Private Sub ActHelpContents_Click(ByVal sender As Object, _
ByVal e As System.EventArgs) _
Handles ActHelpContents.Click
' ----- Show the online help table of contents.
...
Help.ShowHelp(Me, fileToUse, _
HelpNavigator.TableOfContents)
...
End Sub
Private Sub ActHelpIndex_Click(ByVal sender As Object, _
ByVal e As System.EventArgs) _
Handles ActHelpIndex.Click
' ----- Show the online help index.
...
Help.ShowHelp(Me, fileToUse, HelpNavigator.Index)
...
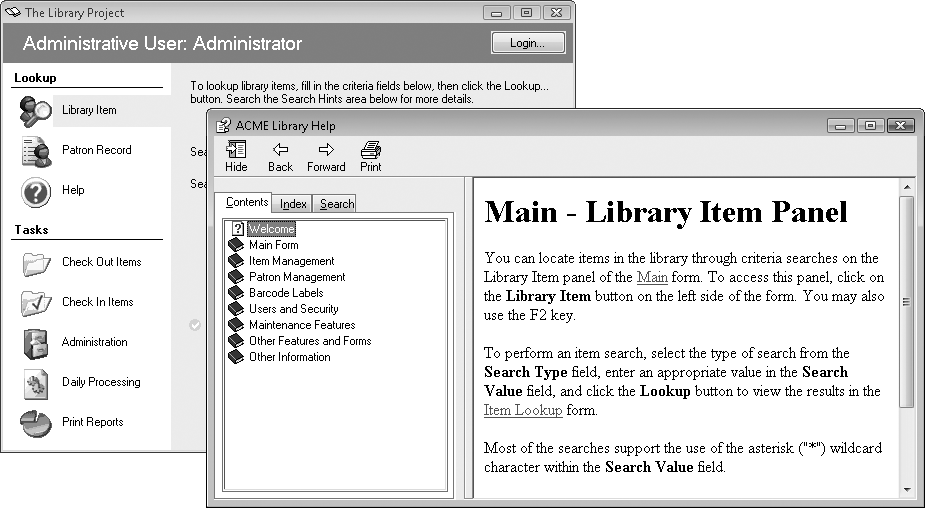
End SubOnce the online help (.chm) files are in place, and once the application is properly configured to locate those files on the workstation, the user can access help from any form by pressing the F1 key. Figure 24-11 shows help accessed from the Library Items panel of the main form.
Speaking of correctly configuring the .chm files, we still have to figure out how to get the entire application—including the online help files—onto the client workstation, and at a cost that will put food on the table. We’ll look at these deployment issues in the next chapter.