Although Aesop lived thousands of years ago, he has much to tell us about software development. His story of the boy who cried wolf is a perfect example. It concerns a young shepherd boy who tricks nearby villagers repeatedly by shouting, “Wolf!” when no such danger exists. The trick was good for a few laughs, but then the boy found out the consequences of his actions: he couldn’t get any villagers to buy his sheep and he had to eat them all by himself. Yuck! If only the boy had learned how to properly deploy his flock into the hands of the villagers instead of making up wolf-based lies, he would never have come to such a tragic end.
So, Aesop clearly shows us how important deployment is. And Microsoft took this lesson to heart by including several different options right in Visual Studio that let you install your compiled applications and supporting files onto a target workstation. We’ll look at these methods in this chapter, and use one of the methods to build a “setup” program for the Library Project.
In the days before Microsoft Windows, deployment wasn’t so difficult. Many programs were nothing more than an MS-DOS executable file, with perhaps one or two supporting data and help files. That was it. Once you copied those files into some folder on the client workstation and updated the PATH environment variable, you were done.
Microsoft Windows applications (and large and complex MS-DOS programs) were not as easy to install. They often had these DLL file things hanging off them—files that had to be put in the proper places. And sometimes you didn’t know what that proper place was, since a third-party vendor may have supplied the DLL without sufficient documentation. Then there were the configuration files, supporting data files, user-specific and workstation-specific changes to the system registry, shortcuts on the desktop and in the Start menu, uninstall settings and programs, two sets of forms (in triplicate) to the Library of Congress, online help files, the readme and license agreement files for the distribution CD, special fonts that may be required for the program, and on and on and on.
I don’t think I even included half the files you need to deploy a full-bodied Windows application, but you can already see how involved it is. Fortunately, Visual Studio will share the burden with you in exchange for some simple configuration on your part.
The deployment features in Visual Studio provide you with the basic functionality you need to distribute standard desktop and web-based applications. If your deployment needs are complex, you can also purchase a third-party “setup and deployment” tool that includes advanced features such as scripting support.
With the early releases of Visual Basic, if you wanted to install your custom software using a setup program, you had to either write it yourself or use a purchased tool. Deployment tools did eventually appear in Visual Basic, especially the infamous “Package and Deployment Wizard.” This canned setup program was written in Visual Basic, and you could enhance it to meet your own custom deployment needs. But it wasn’t easy. And the rest of the world was already adopting the new “Windows Installer” platform for standardized deployment via .msi files. The Package and Deployment Wizard used the older .cab file format. Even for someone like me who actually enjoyed programming, the need to write effective installation programs sometimes made life ugly.
When Visual Basic .NET 2002 came out, life became beautiful again. Visual Studio included tools that let you target the Windows Installer technology, just like the big boys used. Sure, it was a stripped-down version that let you release only the simplest of applications, but third-party vendors have to have some fun.
These days, Visual Studio includes several deployment methods, a tribute to the different types of applications, the different types of users, and the different types of secure environments that a programmer may need to target. Read through each of the available methods to see which one best meets the needs of your program. I’ve already made my selection for the Library Project, which I’ll reveal in a public ceremony about halfway through this chapter.
ASP.NET applications are clearly different from desktop applications. One big difference is that, for the final user, ASP.NET applications don’t really have any deployment. You just browse to the right web site and you’re using the application. But deployment still is needed for the hosting web server.
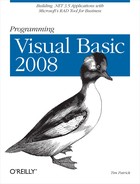
If your web server has Microsoft FrontPage Extensions installed, you can install a compiled ASP.NET application right from the comfort and safety of your development environment. I just glossed over it back in Chapter 23, but Visual Studio presents you with the option of putting a web application on a real live web site when you first try to create the ASP.NET application. In the New Web Site form, you can select an HTTP URL as the development location, as shown in Figure 25-1.
Since you will be interactively developing your web site, you might not want to use this method on a production server. Instead, you can develop locally in a directory or on a development web server, and then later publish the site to the production server. This is just as easy as setting the HTTP location from the start. With the web site open in Visual Studio, select the Build → Publish Web Site menu command, and specify the URL of the new web site. No separate setup program is required.
ASP.NET is careful about how it handles the files in your application. It will not publish your source code. It will copy your web.config file to the server (it’s a required file), which may contain your database connection string. But a properly configured ASP.NET web server will keep this file from prying eyes.
Compiled .NET assemblies contain a manifest that fully describes the assembly and its needs. This means that you can copy any assembly to another system that has the correct version of the .NET Framework installed, and as long as the other files the assembly needs are copied as well, the program will run. This is called “XCopy deployment” because you can use the command-line XCopy command to move the files.
You may be thinking, “Well, duh! An EXE assembly is a real Windows program. Of course it will run when I copy it to a new system.” Well, that’s true. But it wasn’t true for older Visual Basic applications. The ActiveX controls used by COM-based Visual Basic applications had to be registered in the Windows Registry before they could be accessed at runtime. Older Visual Basic programs also required that the Visual Basic runtime libraries be installed. The .NET Framework must also be installed for .NET programs, but since the framework is managed automatically by the Windows Update system, this is not as big of a headache.
What I’ve taken too many sentences to say is that in most cases, you can install a .NET application on a workstation just by copying the program, and maybe a few support files, to a directory. I’m not saying that this is how you should install programs. Actually, I would be shocked—shocked!—if I discovered any of my programming friends using this method in a real business environment. But .NET makes this deployment option available to you if you don’t want to be my friend anymore.
If you do use XCopy deployment, you probably won’t have any issues with security or administrative limitations that may be imposed on the workstation. Chances are, if you’re installing software using the XCopy command or by dragging-and-dropping files, it’s probably because you are friends with the owner of the workstation, and it’s really none of my business who you want to have as your friends.
Windows Installer is the official installation system provided by Microsoft. It serves as the base system for standard Visual Studio-generated installation packages, and also provides the underpinnings for most popular third-party installation tools.
Before Windows Installer, each installation package vendor pretty much did things as they saw fit. But this meant that installed products sometimes clobbered one another, since one software package didn’t necessarily look out for files installed by another tool. Repairing such damage was difficult for the user, who usually didn’t even know which files were installed or updated.
Microsoft sought to change that with Windows Installer. One of the key features of the system is its database of installed and updated files. It also supports a full uninstall/restore and rollback capability so that any failure can be fully undone, restoring the system to its previous state. Other features include support for patching, rebooting, custom enhancements, some limited user interface and prompt design, the ability to repair or “heal” a previously installed but damaged program, and install-on-demand, which keeps features or full applications on the installation media until the user tries to use that feature.
Windows Installer Version 4.x is the latest version for Windows Vista and other parallel Windows systems. (You can still get version 3.x for Windows XP, or 2.x for some older Windows systems such as Windows 98.)
The heart of the Windows Installer system is the “MSI” file (with an .msi file extension), the single file that contains all the files and instructions needed to install, update, and uninstall a software product. Visual Studio can create setup projects based on the MSI standard, although you can’t use some of the more advanced features of Windows Installer through Visual Studio. Still, if your needs are simple—and most business-level software written in Visual Basic has simple installation needs—Visual Studio is probably all you require.
Building a setup project is just as easy as creating regular Visual Studio development projects. But first, I need something to set up. For the discussion in this section, I’ve created a desktop application. Well, not a very good one. I simply created a new WindowsApplication1 project with its default Form1, and saved it to my C: emp folder. All it does when you run it is display Form1.
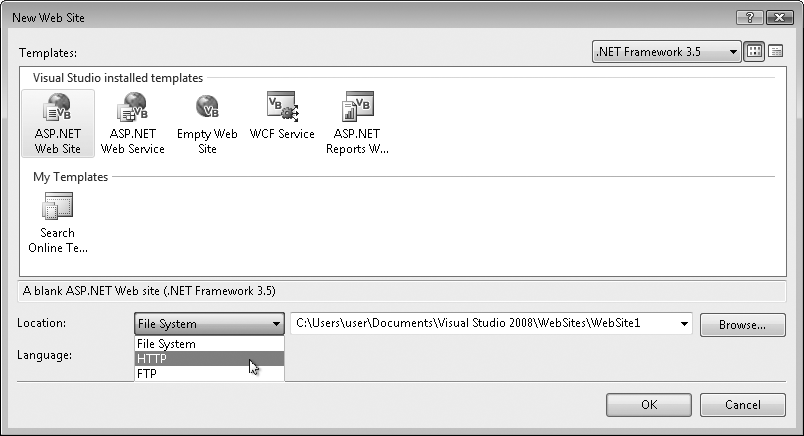
To create an MSI installation file for a Visual Basic project, open that project in Visual Studio and use the File → Add → New Project menu command to add a setup project to the entire solution that contains your original project. Figure 25-2 shows the Add New Project dialog. Select the Setup and Deployment project type, and then the Setup Wizard template to create a setup program for the active project. Set the Name and Location fields according to your needs, and then click OK.
The Setup Wizard appears, leading you through five steps to peace, harmony, and a working MSI file.
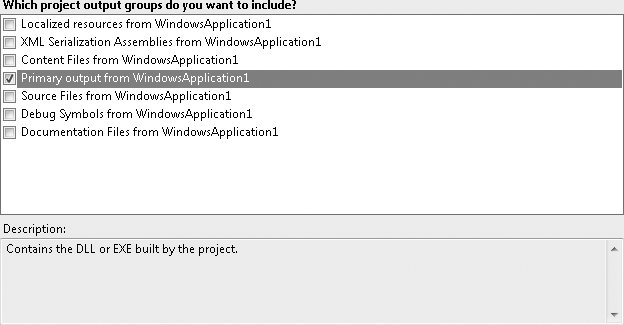
Step 2 asks you for the type of setup project to generate. Personally, I think it could have figured this out from the content of the already-loaded projects, but if the wizard did everything, why would the world need programmers like us? There are four choices, shown in Figure 25-3.

The first two choices create full setup files for either desktop or web-based applications. (The web-based setup would be delivered to a web site administrator for installation on the server.) Merge modules let you create a portion of an installation that can later be merged into a full MSI file. This is a good choice if you are designing a library that will be used for multiple applications, but it’s useless on its own. The CAB file option creates an archive of files that can be installed using slightly older file distribution technology. It’s also the distribution system used for handheld devices. Since I’m targeting a desktop application, I’ll choose “Create a setup for a Windows application” and click Next.
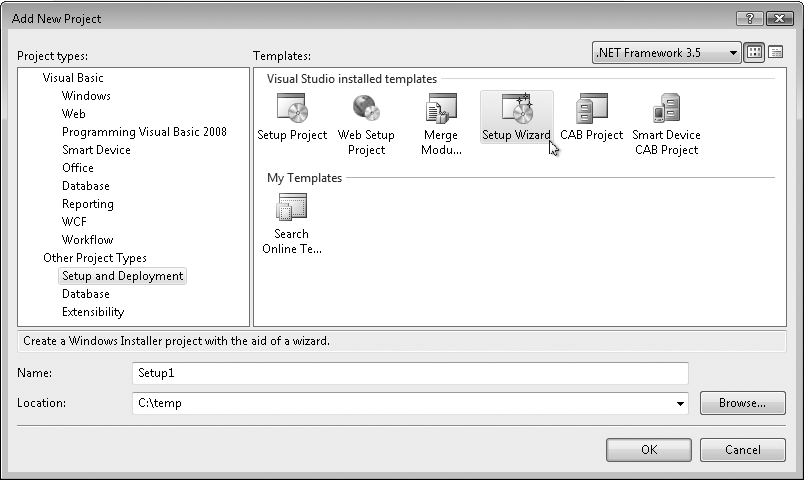
Although you can create a setup program that simply installs miscellaneous files scavenged from your hard disk, you usually build a setup project based on the files or compiled output of other projects. The third wizard step prompts you to include elements from the other projects found in the active Visual Studio solution. I’ve chosen to include the compiled EXE file from my desktop project, as shown in Figure 25-4.
I generally don’t want to include my source code in the setup project, so I’ll leave that element unchecked. But the Content Files item may be useful. If my project had a compiled online help file (with a .chm file extension), I could have added it as a standard content file to the main project via the Project → Add Existing Item menu command. That file would be classified as Content, and could move into this setup project through the Content Files selection. But there are other ways to include online help in the installation, which we’ll see in the next step. For now, I’ll stick with the “Primary output” selection, and click the Next button.
In this step, you can add any other non-project-specific files you want to the setup project (see Figure 25-5). Readme files, online help content, license agreements, pictures of your kids, and pretty much anything else can be included here. I’ve got nothing more to add. Click Next.

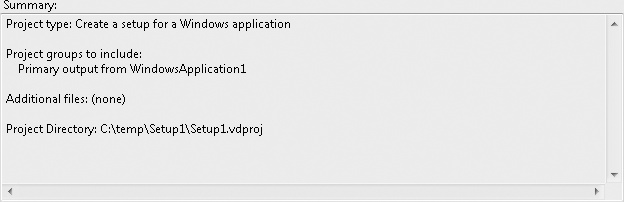
The final step displays a summary of the choices you made (see Figure 25-6). Well, that wizard was pretty easy. We had to do work in only three of the five steps. Click Finish to complete the wizard.
Once the wizard completes, the primary interface for Visual Studio setup project design appears in the development window. Figure 25-7 shows Visual Studio displaying the newly generated setup project for WindowsApplication1, another project that also appears in the Solution Explorer panel.
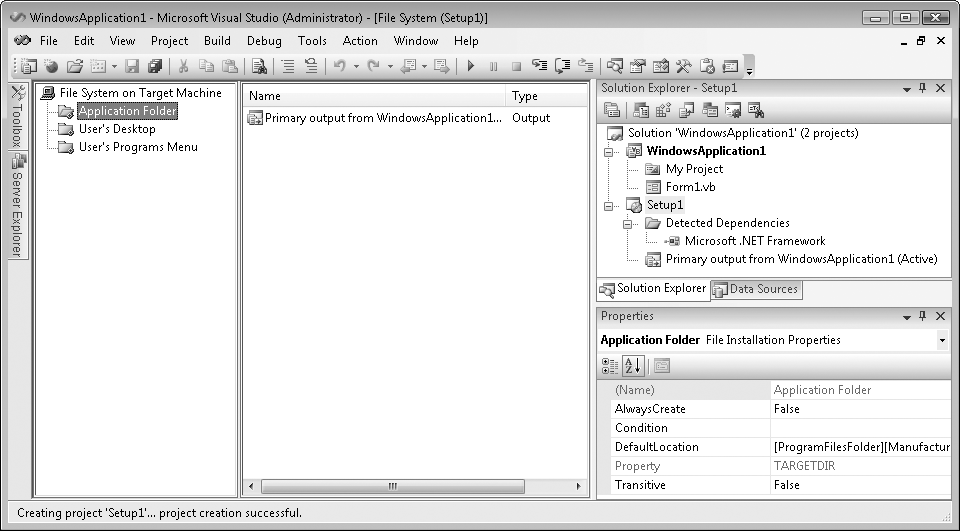
The main window in Figure 25-7 is one of several “editors” that let you customize the setup project. You can access each editor through the View → Editor menu command, or by using the toolbar buttons in the Solution Explorer panel.
- File System Editor
That’s the editor you already saw in Figure 25-7. It presents a standard folder/item view of portions of the target system’s filesystem. Through this hierarchy, you place files (the EXE output from your main project, help files, configuration files, shortcuts to any of these files, etc.) into special folders (Application folder, Desktop, 32- or 64-bit Program Files, Fonts, the Start Menu folder, and others). If you don’t see a folder you want in the File System on Target Machine panel, use the Action → Add Special Folder menu command to include it in the list. Besides the standard special folders, the Add Special Folder menu includes a Custom Folder option that lets you create a specific folder anywhere on the target system.
- Registry Editor
This editor displays a truncated hierarchy of the registry hives. Any keys or values added here will be created in the user’s registry during installation.
- File Types Editor
This editor lets you define associations between a file extension (such as .txt) and specific programs or actions. Any custom action, such as Open or Print, can be linked to any command text you wish, including commands that target the primary assembly being installed.
- User Interface Editor
The default setup project includes a few forms that prompt for things such as installation location and confirmation that the installation should occur. You can insert additional dialog boxes into the flow of the installation. But beware: you will not be adding full Visual Basic-enabled forms. Instead, you will choose from a few predefined dialogs (such as the License Agreement dialog, or the 4 Radio Buttons dialog), and set the dialog properties to configure the display text of each dialog field or prompt. Each user entry field/control includes a named value that you use in the other editors to limit a specific installation action. For instance, you could monitor the value of a user-prompted checkbox, and if the user didn’t check it, you could withhold the installation of certain files that were associated with that checkbox.
- Custom Actions Editor
If you need the ultimate level of control, you can add a custom action, a call to an external program or script, that runs at a certain point in the install (or uninstall) process.
- Launch Conditions Editor
If the target workstation must be in a certain state before you can successfully install the project, this editor lets you define the limiting conditions. By default, the installer adds the .NET Framework as an installation condition; the framework must be installed before the project can be installed. You can look for specific files or registry keys that must be present before installation begins. For instance, you might want to confirm that the target database drivers are on the system before you install a database-dependent application.
Once you’ve set up your project through the various editors, you output the final MSI file by building the solution via the Build → Build Solution menu command. The MSI file appears in the location specified in the setup project’s properties (Project → Properties). This file contains all the instructions and content required to fully install the application on the target workstation.
Visual Studio 2008 includes a deployment method called ClickOnce. It is designed to provide the ultimate in setup deployment ease for desktop (Windows Forms) applications. It still involves a wizard, darn it, but for basic installations, that’s all there is to it. Once your application is “published” through ClickOnce, the user can install it directly from a web site or other stored location.
This sounds like a standard MSI installation, but it is different in several ways:
ClickOnce deployments can be installed even if the current user does not have local administrative privileges. Many software installs affect key files in the Windows and WindowsSystem32 folders, or in other important but restricted folders. If you are a developer, it’s likely that you never experience this problem because you are the administrator on your own workstation. But in IT department-managed organizations with many users, there is a benefit to reducing the privilege level of individual users. One negative side effect of this is that an administrator must be present to install any software. But that’s not the case with ClickOnce. Is your entire IT department out to lunch? (I mean that literally.) No problem. Any ClickOnce-published application can be installed by any user. The software is installed in a “sandbox” that protects the system and other applications from the ClickOnce-installed program’s villainous intents.
A ClickOnce-deployed application can trigger its own automatic software updates. If configured in this way, the program will check the original deployment location for a new version each time it runs. If there is a new version, it will be installed automatically without the user having to do a thing.
ClickOnce applications are designed for ease of installation. With an MSI-deployed application, you need to download the MSI file and process it through the Windows Installer system. Although you also have to download a ClickOnce deployment, it happens more or less transparently. A ClickOnce-published application can be configured so that it looks like an extension of a web page: click a link, and the program immediately runs, displaying its main form to the user. (There may be some delay as the program is downloaded over the Internet.)
That sounds great. But it’s not all peaches and cream. Since ClickOnce-enabled applications (by default) run in their own sandbox, they are limited in their access to some local resources. Also, to fully support all of the automatic-updating features, you must add code to your application that performs the actual update. (The My.Application.Deployment property provides access to these features.)
To deploy your project via ClickOnce, use the Build → Publish menu command in Visual Studio. After asking you some very basic questions about where the user will obtain the deployment file (from a web site, a network folder, or a CD/DVD), Visual Studio generates the installation file and makes it immediately available for use.
Of course, that method gives you only the most basic installation options. It makes the primary EXE or DLL of your project (and its dependencies) available for installation on the target workstation, but that’s about it. If you want more control over the publishing process and the components it will include, use the Publish tab of your project’s properties, as shown in Figure 25-8.
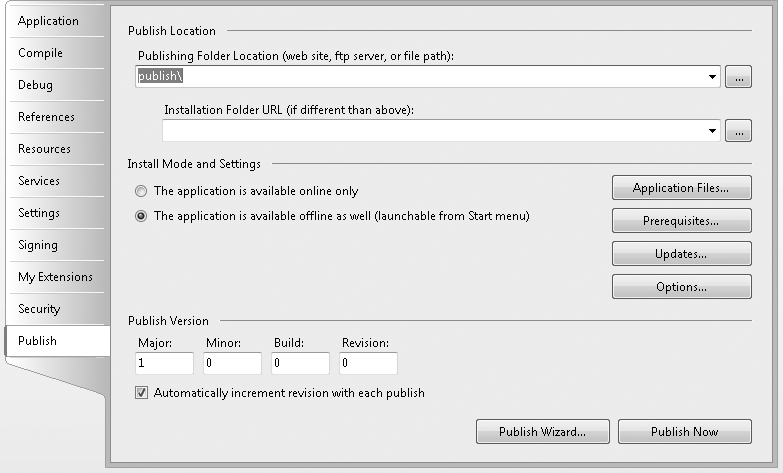
This panel includes fields that let you set the version number for the published installation package. If you modify this version number and republish the application, the custom deployment code you added to the application can detect the new version and initiate an update from the distribution location.
It’s really nice that Visual Studio provides a few different deployment methods for your custom applications. Visual Basic and the larger Visual Studio environment were designed as general-purpose programming systems that allow you to solve almost any development problem facing you or your users. But that doesn’t mean that every single feature in the system is applicable to all environments. By having a few different deployment options available, Visual Studio is even more general-purpose than before, and I think that’s just great. Sure, you have to take five minutes and decide between MSI and ClickOnce. But in most projects, the needs of the users will push you in one direction or the other.
I promised you earlier in the chapter that I would tell you my choice for the Library Project’s deployment method. I have decided on a standard Windows Installer deployment with an MSI file. I’ll explain some of my reasons for choosing this method in the next section.
I chose a standard Windows Installer deployment because I thought it would match more closely with the needs of the typical Library system user. The Library application is meant to be a permanent feature on the target workstation, so it’s likely that someone with IT knowledge or administrative privileges will perform the actual installation. As it is a licensed product, there is little chance that I would be putting copies of the Library installation out on my public web site. A CD distribution—common for MSI installations—is the expected medium. Also, since it’s a quality piece of software from a trusted vendor (that’s me), there isn’t a need for a protective sandbox. Still, the application does include several files, including two online help files, so an XCopy installation would be a burden. All in all, a standard MSI installation is the best deployment plan.
The Setup Wizard automatically adds my project assembly to the MSI file, but I am sure other files are needed to properly deploy the Library Project. A quick look through the previous chapters reveals the following list of file requirements:
- The .NET Framework 3.5
This must be installed on the target system to run the Library application. The setup program will need to automatically install the framework if it isn’t already on the target system.
- Library.exe
This is the primary assembly. The install would be useless without it.
- LibraryBasic.chm and LibraryAdmin.chm
These online help files will be installed in the same folder as the primary application.
- The bar code font
If you have obtained distribution rights for a bar code font, your setup program can copy it directly to the target system’s Fonts folder.
- LibraryLicense.lic
Ah, the license file—remember that this hand-generated file needs to be custom-crafted for each customer purchasing the Library application. Compiling it directly into the setup program seems extreme, since I would have to regenerate Setup for each customer. Instead, I will put the file on the distribution media (the CD), and have the user locate it when running the Library program.
- ACME Library Resource Kit.pdf
This administrator-level file shouldn’t be installed by default on a workstation. It will remain on the distribution CD instead.
- Database Creation Script.sql
If I were developing a full end-user application, I would build a separate setup system for the server portion, focusing mainly on the database setup. Since this book is designed as an introduction only, I will just copy the database build script to the distribution CD and assume that a qualified IT representative or database administrator will take charge of this installation step.
- The Library web site
As with the database creation script, I am just going to copy the web site files to the CD and let the administrator figure things out.
- Readme.htm
The CD should include an informational file right at the root that will tell the user how to use the files on the CD. I haven’t written this file yet, but I will before the chapter ends.
The generated Setup file will include only the first four items in that list (three if you are excluding the font), and the first two are added automatically by the Setup Wizard. This won’t be too difficult.
Earlier in the chapter, we added a new setup project to an existing project, combining them into a single solution. It is possible to build a setup project that appears alone within Visual Studio. In such projects, you need to browse for the target assembly (releaseLibrary.exe) to include it in the Setup output. However, the Setup Wizard doesn’t do much for you if you go that route. So, for the Library project, let’s add a new setup project to a Library project already loaded into Visual Studio.
PROJECT ACCESS
Load the Chapter 24 (After) Code project, either through the New Project templates or by accessing the project directly from the installation directory. Then save the project to a folder where you want to build the complete Setup solution. I have also included a Chapter 25 folder in the installation directory, but not as a project template. This folder already contains a linked setup project. If you want to view this finished solution, open the Library.sln file in the Chapter 25 folder.
The first few steps parallel those we performed earlier in this chapter. Once you have the Library project loaded and saved to its target folder, add a new setup project using the File → Add → New Project menu command. Select Setup Wizard as the template, enter LibrarySetup for the Name, and use the just-saved Library project’s folder as the Location. Apply the following settings within the wizard:
In step 2, select “Create a setup for a Windows application”.
In step 3, select “Primary output from Library” from the list.
In step 4, locate and add the LibraryBasic.chm and LibraryAdmin.chm files. In this book’s installation directory, you can find them in the subdirectory named Online Help.
Complete the wizard and use the File → Save All menu command. When prompted to save the solution file (Library.sln), just store it in the Library project directory, which should already be selected.
As before, the setup project opens to the File System Editor. Before making any changes within the editor, let’s set some Setup-wide properties. Click on LibrarySetup in the Solution Explorer panel, and modify the following properties in the Properties panel:
Set the
Authorproperty to “Tim Patrick” or your own name.Set the
Manufacturerproperty to “ACME”.Set the
ManufacturerURLproperty to "http://www.timaki.com or any web site you wish to use.Set the
ProductNameproperty to “ACME Library”.Set the
Titleproperty to “ACME Library Setup”.
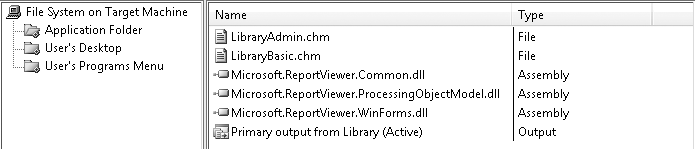
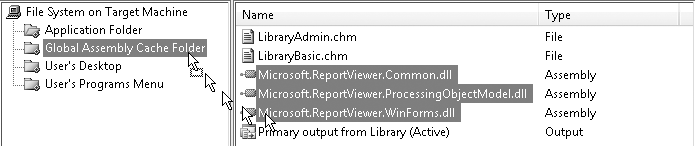
Since the File System Editor is open, let’s make a few changes there. When we added the Library.exe assembly through the wizard, it figured out all of the required dependencies. Not only do the main program and help file items appear in the Application Folder section, but three additional DLLs appear, all used to run the library reports (see Figure 25-9).
Since these three DLLs are supplied by Microsoft as part of .NET, it doesn’t make much sense to store them in my own application’s installation directory. They should go in the Global Assembly Cache (GAC), the special system folder that maintains shared .NET assemblies. The GAC isn’t one of the folder choices displayed in the editor, but it can be. Make sure that the lefthand panel of the File System Editor is selected (the one with File System on Target Machine) and then use the Action → Add Special Folder → Global Assembly Cache Folder menu command. A new folder, Global Assembly Cache Folder, appears in the left-side panel. Select the Application Folder item again, and then drag the three DLL items into the new Global Assembly Cache Folder item, as shown in Figure 25-10.
Let’s add two shortcuts to the user’s system during installation: one on the desktop and one in the Start menu’s Programs section. Both shortcuts point to the main Library.exe assembly. The Setup Wizard anticipated our needs by adding the User's Desktop and User's Programs Menu folders to the File System Editor. All we have to do is add a shortcut to each folder.
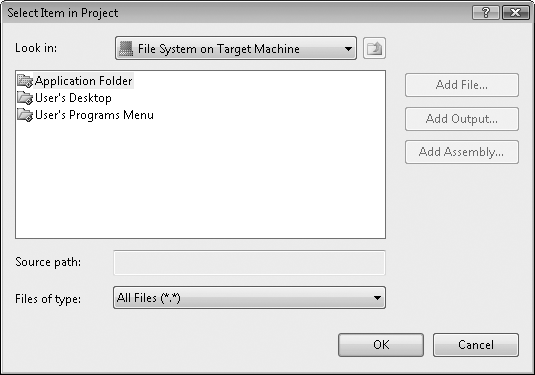
Let’s start with the desktop. Select the User's Desktop folder and then right-click in the right-side panel (where the files would appear). From the context menu, choose the Create New Shortcut menu command. (This same command is available from the main Action menu when the right-side panel is active.) The Select Item in Project dialog, shown in Figure 25-11, appears. Browse into the Application Folder item and select Primary Output from Library (Active). The new shortcut appears in the right-side panel, waiting for you to give it a more meaningful name. Give it the name “ACME Library”.
To create the same shortcut in the Start menu, follow all the steps in the previous paragraph, but start from the User's Programs Menu folder instead of the User's Desktop folder.
Adding those shortcuts was a good idea, but whenever I install new software, I always immediately delete any shortcut that was added to the desktop. Adding an icon to the Start menu’s Programs folder makes sense, but I like keeping a nice, clean desktop. Laugh if you want, but keeping that desktop free from clutter is what helps make me a world-famous author and developer.
What we need is a way to alter the behavior of the setup program so that it doesn’t create the desktop icon if the user doesn’t want one. The setup project provides a way to do this. First, we need to add a prompt where the user indicates a desktop-icon preference, and then we need to act on that preference. The first step involves altering the user interface of the setup program. Such changes occur through the User Interface Editor. Display this editor with the View → Editor → User Interface menu command. The User Interface Editor appears, as shown in Figure 25-12.
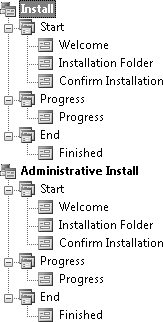
The User Interface Editor is divided into two main installation types: Install and Administrative Install. The administrative branch is used only when an administrator wants to store the setup image on a shared network folder. It doesn’t allow the types of changes we want to make. So, let’s focus on the standard Install branch, which manages standard user installations on a client workstation. Both branches include step-by-step prompts that appear to the user during the setup process. Custom data collection prompts can only be added to the Start entry in the Install main branch.
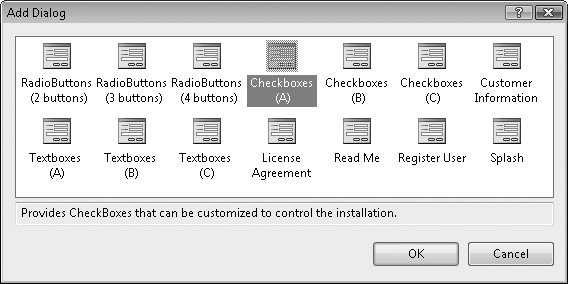
During actual setup, the user interface prompts the user in a wizard-like fashion. During the initial Start phase, the setup program collects the user’s desires for the remainder of the process. Once this section ends, the installation proceeds until it completes or fails. What we want to do is insert a new step in the wizard process, displaying a checkbox to the user that asks whether the desktop icon should appear or not. Additional data collection fields such as these are added through new “dialogs.” And there just happens to be a dialog that includes a customizable checkbox. In the Install branch, right-click on the Start item and select Add Dialog from the context menu. The Add Dialog window, shown in Figure 25-13, displays the available dialogs. Select the Checkboxes (A) item from the list and click OK.
The new Checkboxes (A) item appears in the Install/Start section. Use the mouse to drag it up until it appears between the Welcome and Installation Folders dialogs. The Checkboxes dialog lets you display up to four checkbox selections with custom captions. Make sure it is selected in the dialog outline, and then use the Properties panel to set this new dialog’s properties:
Set the
BannerTextproperty to “Installation Options”. This text appears near the top of the dialog window, displaying a large main title.Set the
BodyTextproperty to “Select the options you wish to use for this installation”.Set the
Checkbox1Labelproperty to “Add an icon for ACME Library to the desktop”. This defines the custom text for the first checkbox control.Set the
Checkbox1Propertyproperty to “LIBRARY_DESKTOP_LINK”. This gives the checkbox a name that we can use later to alter the install process.Set the
Checkbox1Valueproperty to “Checked”. This defaults the installation to include the desktop icon.Set the
Checkbox2Visible,Checkbox3Visible, andCheckbox4Visibleproperties to “False”, hiding the other three unused checkboxes.
During the setup process, the user sees the new dialog prompt in Figure 25-14. It includes the banner text, the body text, and the single checkbox as configured in the custom dialog’s properties.

Now it’s time to use that checkbox setting. Close the User Interface Editor and return to the File System Editor. Select the User's Desktop folder in the left-side panel, and then go to the Properties panel. One of the few listed properties is Condition, which lets you define a Boolean condition that, when true, installs the associated files on the user’s desktop. However, if the condition is false, no associated files will be placed on the user’s desktop during installation. Set this property to the following text:
LIBRARY_DESKTOP_LINK
This is the name we gave to the first checkbox back in the dialog design. During installation, the setup program checks the user’s selection, and alters the desktop update as requested.
One thing I won’t be adding to my version of the setup program is the bar code font. Sadly, I have not acquired a license to distribute a third-party font to you or anyone else reading this book. The good news is that I just saved you $10 on the cost of the book. The bad news is that I will have to tell you how to add the font, but not actually do it.
Actually, you can probably already guess how to do it. The Fonts folder is one of the special folders available in the File System Editor. When the File System on Target Machine item on the left-side panel is active, use the Action → Add Special Folder → Fonts Folder menu command. Then add the original font file (a TrueType .ttf file) to the Fonts folder section. You won’t be able to add this font directly from your WindowsFonts folder. Instead, you will need to get the original .ttf file and use that. On the target workstation, the setup program properly installs and registers the font for use in Windows.
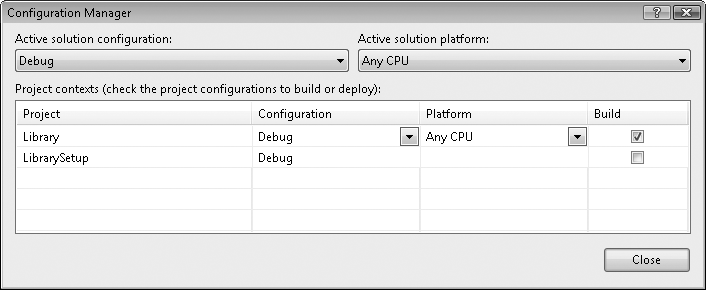
The setup project is complete. The only thing left to do is to generate the MSI file. You might not have noticed it, but Visual Studio includes different “compilation configurations” in every project. The two default configurations are Debug and Release, and they each generate a different set and flavor of final output files when you compile your application. Normally, your project is set to Debug, but you can change it by using the Configuration Manager. In Visual Studio, select the Build → Configuration Manager menu command to display the manager’s form (see Figure 25-15). In this form, change the “Active solution configuration” setting from Debug to Release, then click the Close button.
It’s time to build the MSI file. Right-click on the LibrarySetup root in the Solution Explorer panel, and select Build from the context menu. In just a few seconds, your MSI file will be baked and ready to eat. You’ll find it in the setup project’s Release subdirectory. This directory also includes a Setup.exe file that acts as a bootstrapper. Any workstation with the Windows Installer system present will work with just the plain MSI file, but providing a Setup.exe file may add a level of comfort to novice users.
I hate it when users come over to my office and try to copy the MSI file directly from my hard drive. I find that providing the file on a CD tends to improve the vendor-customer relationship. So, let’s build a CD for client use.
The distribution CD contains all of the content needed by the library IT staff to support the application. It contains distinct directories for each type of content. Here’s what I am planning to put in the root of the CD:
Readme.htm, an HTML file that displays information about the contents of the CD.
Database, a directory containing the database creation script, Database Creation Script.sql.
License, a directory containing the specific user’s license file, LibraryLicense.lic.
Setup, a directory containing the main MSI file, LibrarySetup.msi.
Technical, a directory containing the technical support documentation, ACME Library Resource Kit.pdf.
Web, a directory containing the full source code for the Library web site that we created in Chapter 22. The administrator can use this as the basis for an expanded Library web site.
I’ve put all these directories and their files in the book’s installation directory, in a subdirectory named Library CD Contents.
The Readme.htm file contains the following administrator-friendly content.
I want this file to appear automatically when the user inserts the CD into the workstation drive. This requires one additional file named autorun.inf at the root of the CD. This simple INI-style file supports the Auto Run feature used by Windows CDs. Here is the content of the file that will display the Readme.htm file automatically:
[Autorun]
Open=explorer.exe Readme.htm
Copying all of these directories and files to a CD and adding a pretty label should result in a happy librarian.
We’re quickly approaching the end of the book. Only one chapter remains. Turn the page to find out what exciting content you’ll find there.