More than seven score years ago, President Abraham Lincoln began his famous Gettysburg Address with “Four score and seven years ago . . . “. Why this poetic reference to the founding of America 87 years earlier? He could have started the speech with “Last week, I was talking with members of my cabinet” or even “These three confederate soldiers walked into a bar . . . “. But he stuck with the decades-old anecdote.
Lincoln understood that his listeners, as humans, had a tie with the past, a fondness for the familiar, a love of fast sports cars, and a desire to see the stability of a former era restored. This is how people are. They like peace, not war. They like the status quo, not change. They like dinner on the table when they return home from a hard day at the office. They like short lines at the amusement park. They like seeing their favorite football team win once again.
People like to know that things are configured in a way that makes sense to them, set up in a way that is familiar and known. They expect this in life, and they expect this in their software. That’s why Visual Basic includes features that let you maintain user-specific and application-specific settings, to give the people what they want.
Since that short yet dynamic speech by Lincoln, programmers have sought a convenient way to maintain configurable values in their applications. In the early days of MS-DOS development, it was a configuration free-for-all; each program provided its own settings system. Many applications needed no specialized configuration, but those that did often stored configuration settings together with the application’s managed data, all in proprietary .dat files.
With the advent of mainstream Windows development, Microsoft introduced file-based settings management through its application programming interface (API). The “private profile” API calls (GetPrivateProfileInt, GetPrivateProfileString, SetPrivateProfileString, and a few others) supplied a standard way to store short configuration values in an open and easy-to-understand text file format. Microsoft used these “INI” files (named for their .ini file extension) for its own configuration. A few of these files still reside in your system’s Windows folder. Here’s the content I found in my system’s win.ini file:
; for 16-bit app support
[fonts]
[extensions]
[mci extensions]
[files]
[Mail]
MAPI=1
[CDWINSETUP]
AUTOUNLOAD=No
[MSUCE]
Advanced=0
CodePage=Unicode
Font=Arial
The format of an INI file was simple to understand. Each file included named sections defined within square brackets, as in [fonts]. Each section maintained a set of key-value pairs in the form “key=value.” The format was simple enough that anyone could use Notepad to make changes. It wasn’t even that hard for a program to write its own INI-file management routines, but having them included in the Windows API made them that much more attractive.
But then came the clutter. With so many programs opting to store their configuration files in a known central location, the Windows folder quickly became the file equivalent of Grand Central Station at 5:00 p.m. on a Friday. Speed was an issue, too, since the constant parsing and rewriting of INI files consumed precious CPU resources.
Microsoft came up with a solution: the registry. This hierarchical database of key-value pairs cleaned up the filesystem and brought speed improvements to configuration management. It also added new administrator-defined security settings for access to the registry, and provided support for some limited strongly typed data. But the new API features weren’t the most intuitive (although Visual Basic did include simple commands, such as GetSetting, that provided limited access to registry keys and values).
The registry threw technology at the configuration values problem, but it wasn’t a full triumph. With so many vendors stuffing gobs of data in the registry, bloat once again became an issue. And with the system managing all access to the registry, the larger the registry, the worse the performance.
.NET’s initial release included application-specific configuration files, a sort-of return to those days of INI-file yesteryear. In some ways, “app.config” and “web.config” files were better than INI files since they contained structured XML content. But big whoop. INI files had structure, and you could update them in Notepad. .NET config files were notoriously difficult to update, either within a .NET application or externally in Notepad (due to some weird caching issues). Also, .config files had neither the security nor the strong data typing available in the registry.
Configuration settings have been giving programmers at least some level of angst since Windows first appeared. But a new and improved settings system, first added to Visual Basic in 2005, seeks to change all that.
The settings system in Visual Basic 2008 is a multifile, XML-based, strongly typed, and easy-to-manage configuration approach. Its file-focused methodology includes these features and benefits:
Data is stored in XML format for efficient processing by .NET libraries. Although it is not free-form text, XML is not overwhelmingly difficult when manual updates need to be made by mere mortals.
The data stored in each settings-specific file is strongly typed, reducing errors from the processing of invalid data.
Settings are managed on a per-application, per-user, and even per-assembly-version basis to promote security and reduce conflicts. You can also store multiple sets of settings per application as you require, such as one set of settings per document opened by your application. (I won’t discuss it in this chapter, but you can search for “SettingsKey property” in the online help for additional information on this feature.)
Visual Studio includes a user-friendly management tool used to configure settings within an application.
Visual Basic has its own simple interface to make the use and update of settings at runtime easier.
But it’s not all fun and games. As a developer, you have to do some of the heavy lifting, such as coming up with meaningful names for each setting (“MainFormLocation,” “DatabaseConnection,” etc.), and altering the behavior of your program as needed based on the stored settings.
The actual settings appear in XML files scattered throughout the filesystem:
At design time, all the settings you create get stored in a Settings.settings file, stored in the My Project subdirectory of your source code folder. Here’s the Settings.settings file as it exists so far in the Library Project:
<?xml version='1.0' encoding='utf-8'?>
<SettingsFile xmlns="http://schemas.microsoft.com/
VisualStudio/2004/01/settings"
    CurrentProfile="(Default)">
  <Profiles>
    <Profile Name="(Default)" />
  </Profiles>
  <Settings />
</SettingsFile>
VisualStudio/2004/01/settings"
CurrentProfile="(Default)">
<Profiles>
<Profile Name="(Default)" />
</Profiles>
<Settings />
</SettingsFile>At runtime, all user-specific settings appear in a user.config file, typically stored in C:Documents and Settings
<user>Local SettingsApplication Data<company><appdata><version>, where<user>is the Windows username,<company>is the company name recorded in the assembly,<appdata>is a combination of values that help to differentiate the settings based on use, and<version>is the four-part version number of the assembly. It seems like a difficult place to store settings, but it keeps things nice and ordered. (The location of the user.config file is a little different if you deploy an application using ClickOnce, a method described in Chapter 25.)You’re probably wondering whether this contributes to disk bloat. Yes! Each time you bump up the version number of your application, .NET creates a new settings file to go with it. There’s a way to mitigate this somewhat, but with 120 GB hard drives, no one’s really complaining about disk space usage anymore.
Some settings are application-focused, and apply to all users of the application on a particular workstation. These are stored in the app.config file that appears in the same folder as your assembly’s executable. The settings appear in an XML branch named
<applicationSettings>within this file. Application-focused settings cannot be modified by the application; you must manually update the app.config file to force a change.
The settings system is a great place to store state, things that you want the program to remember from the last time it was run, but that shouldn’t be hardcoded into the source code.
The Project Properties window within Visual Studio 2008 provides centralized control of the settings for an application. The Settings panel of this window, shown in Figure 14-1, provides access to the application’s custom settings.
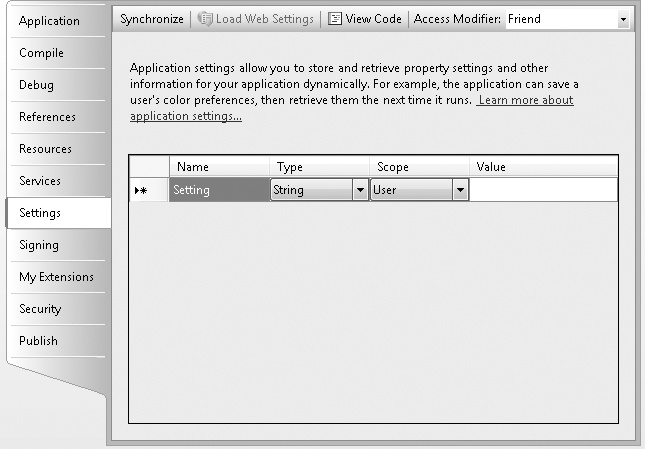
To add a setting, type in its Name, select its data Type from the drop-down list, choose the Scope (User or Application), and enter its Value using whatever value editor is available for the selected type. The Type list includes many default selections, including the basic Visual Basic data types, fonts, colors, and drawing-related sizes. Also included is a “(Connection string)” type that, when selected, enables a Connection Properties string builder in the Value column.
It’s important that you select the correct type for each stored setting; otherwise, your workstation will explode. Actually, I think they fixed that in a later beta. It’s really because all settings are strongly typed. If you set the type to Integer, you won’t be able to stuff the word None in there as a special flag as you could have done with an INI file. You can choose any valid .NET type for the data type, although complex types without their own custom editors will require that you set their value through code.
What happens when you add a new setting to your Visual Basic project? Let’s find out. I’ll add two settings to a new Windows Forms project: an Integer named WarningLimit, and a System.Drawing.Font named NoticeFont (see Figure 14-2).

As you already know, Visual Studio is just a user-friendly wrapper around .NET code, and the Settings panel is no different. So, the real changes occur somewhere in the code, or more correctly, in both code and the related Settings.settings file. If you “Show All Files” in the Solution Explorer panel, and expand My Project followed by Settings.settings, you will find that this XML file has its own Visual Basic source code file, Settings.Designer.vb.
If you open the Settings.Designer.vb file, you find the following partial code:
Namespace My
   Partial Friend NotInheritable Class MySettings
      Inherits Global.System.Configuration. _
         ApplicationSettingsBase
      <Global.System.Configuration. _
         UserScopedSettingAttribute(  ),  _
         Global.System.Diagnostics. _
         DebuggerNonUserCodeAttribute(  ),  _
         Global.System.Configuration. _
         DefaultSettingValueAttribute("25")>  _
      Public Property WarningLimit(  ) As Integer
         Get
            Return CType(Me("WarningLimit"),Integer)
         End Get
         Set
            Me("WarningLimit") = value
         End Set
      End Property

      <Global.System.Configuration. _
         UserScopedSettingAttribute(  ),  _
         Global.System.Diagnostics. _
         DebuggerNonUserCodeAttribute(  ),  _
         Global.System.Configuration. _
         DefaultSettingValueAttribute( _
         "Arial, 14.25pt, style=Bold")>  _
      Public Property NoticeFont(  ) _
            As Global.System.Drawing.Font
         Get
            Return CType(Me("NoticeFont"), _
               Global.System.Drawing.Font)
         End Get
         Set
            Me("NoticeFont") = value
         End Set
      End Property
   End Class
End Namespace
I excluded a lot of the extra code. It’s amazing how much code Microsoft loads up in prewritten attributes, and it’s not really possible to know what goes on inside. I can guess what the DefaultSettingValueAttribute attribute does for each setting (assigns the initial default value of the setting), but some of the others are mysteries. Oh well. Even the ancients didn’t have answers for everything.
But the code that remains is quite clear. Visual Studio generates two properties within the My.MySettings class, properties named—amazingly enough—WarningLimit and NoticeFont. Here’s the property entry for NoticeFont:
Public Property NoticeFont(  ) As Global.System.Drawing.Font
   Get
      Return CType(Me("NoticeFont"), _
         Global.System.Drawing.Font)
   End Get
   Set
      Me("NoticeFont") = value
   End Set
End Property
You won’t find any private class members that store the hidden WarningLimit and NoticeFont values. Instead, somewhere else in this partial class is a default property (named Item) that gets and sets each defined property value, accessed through Me("something").
The settings available through this default property are loaded directly from the XML stored in the Settings.settings file. (This file is compiled into the application; you don’t have to distribute Settings.settings with the application.) Here’s the content from that file with our two new configuration values:
<?xml version='1.0' encoding='utf-8'?> <SettingsFile xmlns="http://schemas.microsoft.com/
Each setting contains distinct Name, Type, Scope, and Value attributes or entries, matching the four columns that appeared in the Visual Studio settings editor.
Visual Basic creates an instance of the My.MySettings class we just saw previously, and makes it available as My.Settings. As you add settings to your project, they become strongly typed class members of My.Settings. To access one, simply reference it directly in your code.
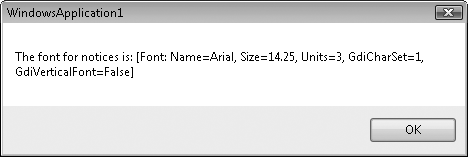
MsgBox("The font for notices is: " & _
   My.Settings.NoticeFont.ToString(  ))
(The output for this code appears in Figure 14-3.) The My.Settings.NoticeFont is an actual instance of System.Drawing.Font that you can use like any other Font instance.
You can modify the value of any setting scoped as “User,” and have the new value preserved for your next use of the application (i.e., for the current user’s next use of the application).
My.Settings.WarningLimit = 30
All changes made to these settings are saved automatically to the user-specific setting files by default. If you don’t want the updates saved automatically, set the My.Application.SaveMySettingsOnExit flag to False. Then, when you are ready to save the new settings, use the My.Settings.Save method.
Settings come in three delicious flavors: default, persisted, and current. Default settings are those values defined by the programmer through the Visual Studio settings editor. Persisted settings include the saved changes to specific settings, and the default settings for those that have never been altered by the user. Current settings include any changes made to the settings during the current session, but not yet saved. You can play with these states using members of the My.Settings object:
One of the strangest aspects of settings is that they are version-specific. If you release your application as version 1.0.0.0, and then later release version 1.1.0.0, each user will lose all of the previously persisted settings. Actually, they won’t be lost, but they will be stuck in 1.0.0.0-land. If you always want to have the most up-to-date settings as modified by the user, you will have to make sure that older settings are “upgraded” when installing a new version. My.Settings includes an Upgrade method that does the work for you. But if the user installs a newer version and upgrades the settings, makes changes to those settings, and then calls Upgrade again, any changes made since the last upgrade will be lost.
To get around this problem, the code should upgrade settings only when a new version appears. The easiest way to do this is to include a setting called something like SettingsUpgraded and set it to False. Check this flag before calling Upgrade. If it is still False, it is safe to call Upgrade. Once the code upgrades the settings, change SettingsUpgraded to True.
If (My.Settings.SettingsUpgraded = False) Then
   My.Settings.Upgrade(  )
   My.Setttings.SettingsUpgraded = True
End If
This need to upgrade settings whenever even minor version number changes are made to an assembly seems a bit over the top. But it’s necessary to support .NET’s goal of side-by-side installation. The user should be able to install two different versions of your application on the same workstation, and use each one without interference from the other. Storing version-specific settings helps to achieve this goal.
Although using and updating your own custom configuration values can be exciting, even more exciting is that the fields in your Windows Forms and related controls can interact with the persisted settings automatically. By binding form- and control-specific properties to the settings system, Visual Basic automatically saves and restores user-controlled preferences within the user interface.
A typical use for bound settings is to have the application remember where a particular form appeared on the screen when the program was last run. The form’s Location property maintains its on-screen position. Recording this value to the settings requires two steps. First, create a setting of type System.Drawing.Point to hold the persisted location value. Second, indicate in the form’s properties that its Location value should persist to the new settings entry.
Perform the first step by adding a new user-scoped System.Drawing.Point setting in the project properties’ Settings panel. Let’s name it “MainFormPosition,” and leave the Value field blank for now.
Back in the form editor, select the form object itself, and then access the Properties panel. Expand the “(ApplicationSettings)” property to locate the “(PropertyBinding)” subproperty. Clicking the " . . . " button for this entry displays the Application Settings dialog. This selection process appears in Figure 14-4.
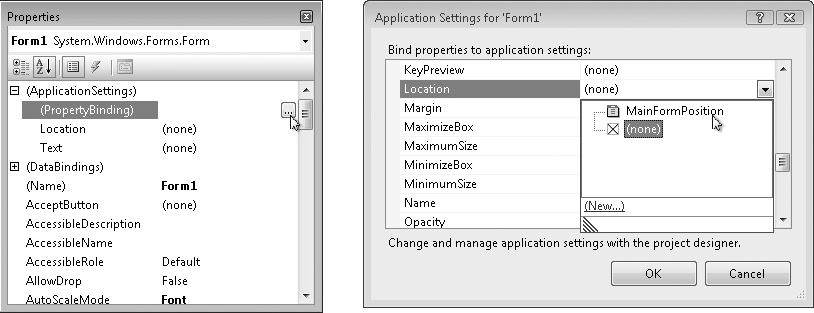
Find the Location entry in the list, and choose “MainFormPosition” for its value. Now, each time you run the application containing this bound setting, the modified form will “remember” its previous location.
As with XML, the .NET settings system is one of those internal, behind-the-scenes, don’t-let-the-boss-know features that makes your program great to use, but without all of the whiz-bang showing-off stuff. Personally, I found it a little hard to part with my precious INI files and all of their simplicity. But the automation attached to the settings system makes the migration painless.
Of course, we will add settings to the Library Project in this chapter, but we’ll also go back and start to use some of those settings in code that we previously entered as hardcoded values.
I really struggled over whether to use application-scoped or user-scoped configuration values for some of the rarely changing settings, such as the database connection string. I finally decided on the user area so that they could be modified through the features of the program. Application-scoped settings are read-only and can only be updated outside the program, so that idea is out. The expectation with application-scoped settings is that the system administrator will manage them, either by using Notepad on the XML file, or through some custom administrative tool. Since we aren’t going to take the time in this book’s project to write a separate administration tool, we’ll keep everything at the user level and allow modification through the main Library program.
PROJECT ACCESS
Load the Chapter 14 (Before) Code project, either through the New Project templates or by accessing the project directly from the installation directory. To see the code in its final form, load Chapter 14 (After) Code instead.
Let’s document the settings used by the application in the project’s Resource Kit. Add the following content to the Resource Kit word processing file.
The Library Project uses Visual Basic’s settings system to track user-specific state values maintained between uses of the application. All of these settings are stored in an XML file in the user’s portion of the C:Documents and Settings (or equivalent) directory in a format dictated by .NET. The following is a list of the settings recognized by the Library program:
DBConnection(String)A properly formatted connection string that identifies the SQL Server database used by the application. If missing, the application will prompt for the location of the database on startup.
HelpFile(String)Indicates the UNC or drive letter-based location of the basic application online help file, with a .chm extension.
HelpFileAdmin(String)Indicates the UNC or drive letter-based location of the administrative application online help file, with a .chm extension.
HideLogin(Boolean)Indicates whether the Login button in the upper-right corner of the main Library form should be hidden from view when in patron (nonadministrative) mode. Use
Trueto hide the button orFalseto show the button. If this field is missing,Falseis assumed.MainFormPosition(System.Drawing.Point)The position of the upper-left corner of the main Library form. This value is updated each time the application closes.
ReceiptPostlude(String)Any raw character data to send to the receipt printer at the end of each ticket. This text may include the following special characters:
A newline character (ASCII 10)
A carriage return character (ASCII 13)
eAn escape character (ASCII 27)
x??Any ASCII value, where
??is a two-character hexadecimal code\The backslash character (”
“)
ReceiptPrinter(String)The UNC pathname to the receipt printer used by this workstation to print out patron checkout receipts and payment receipts.
ReceiptWidth(Integer)The width, in characters, of each line on the receipt printer. If missing or empty, the program uses a default width of 40 characters.
ReportConfig(String)Indicates the UNC or drive letter-based location of the XML report configuration file. This file has the XML format described in the "Report Configuration File" section of this document. This file indicates the reports available in the application.
SettingsUpgraded(Boolean)When upgrading the application from an older release, this flag indicates whether the settings associated with that older release have already been upgraded into this new version. It defaults to
Falsefor all new releases.UseReceipts(Boolean)Indicates whether printed receipts are to be used at this workstation. If this field is missing,
Falseis assumed.
This technical description appears in the Technical Resource Kit document, originally developed in Chapter 4 and updated in subsequent chapters. Some of the content added here refers to features and technical content that won’t be added until later chapters, so don’t spend too much time thinking about features that you thought you already forgot.
Since we know all of the settings we will add to the application, let’s add them now. Open the project properties window and select the Settings tab. Add each setting to the application using Table 14-1 as a guide. If a setting in Table 14-1 has no listed value, leave the Value field blank as well in the settings editor.
Table 14-1. Default settings for the Library Project
Name | Type | Scope | Value |
|---|---|---|---|
|
| User | |
|
| User | |
|
| User | |
|
| User |
|
|
| User | |
|
| User | |
|
| User | |
|
| User |
|
|
| User | |
|
| User |
|
|
| User |
|
Make sure you type the settings names as listed. The application will not be able to match up incorrectly spelled names.
I showed you how to link a form’s or control’s property value to one of the settings earlier in this chapter, so let’s do it for real in the project. We’ll link the main form’s Location property to the MainFormPosition setting. Just to refresh your memory, follow these steps to enable the link:
Open MainForm.vb in Design view.
Make sure the form itself is selected, not one of its subordinate controls.
In the Properties panel, expand the “(ApplicationSettings)” property.
Select the “(PropertyBinding)” subproperty, and click on the " . . . " button in its value area.
Locate the Location property in the binding list.
Select the MainFormPosition setting for the Location property’s value. It should be the only setting available since it is the only one we defined as type
System.Drawing.Point.Click the OK button to enable the link.
Although all the settings are as close as typing “My.Settings.something" in the code, some settings may initially be undefined, and using them could involve a lot of repetitive code that checks for valid settings. To reduce overall code and CPU cycles, we will cache some of the settings for easy use throughout the application.
Let’s add three more global variables to cache some of the settings. Open the General.vb module, and add these three new class members.
INSERT SNIPPET
Insert Chapter 14, Snippet Item 1.
Public MainHelpFile As String
Public MainAdminHelpFile As String
Public FineGraceDays As Integer
Let’s give these variables initial values in the InitializeSystem method, where the code already initializes some other values. Add the following statements to that routine in the General module.
INSERT SNIPPET
Insert Chapter 14, Snippet Item 2.
FineGraceDays = −1

' ----- Locate the online help files.
MainHelpFile = My.Settings.HelpFile & ""
MainAdminHelpFile = My.Settings.HelpFileAdmin & ""
In an earlier chapter, we stored some settings in the SystemValue table that apply to all workstations that connect to the database. Since we’re caching settings anyway, we should add some code to cache these database-stored values so that we don’t have to keep opening and closing the database. Add the LoadDatabaseSettings method to the General module.
INSERT SNIPPET
Insert Chapter 14, Snippet Item 3.
Public Sub LoadDatabaseSettings(  )
   ' ----- Get some system-level values from
   '       database storage.
   Dim holdText As String

   On Error Resume Next

   ' ----- Get the default location.
   holdText = GetSystemValue("DefaultLocation")
   If (holdText = "") Then holdText = "−1"
   DefaultItemLocation = CInt(holdText)

   ' ----- Get the maximum number of search matches.
   holdText = GetSystemValue("SearchLimit")
   If (holdText = "") Then holdText = "−1"
   SearchMatchLimit = CInt(holdText)

   ' ----- Get the number of days to wait before
   '       charging fines.
   holdText = GetSystemValue("FineGrace")
   If (holdText = "") Then holdText = "−1"
   FineGraceDays = CInt(holdText)
End Sub
We will call this routine during application startup, just after we open and confirm the database. Add the following code to the end of the MyApplication_Startup event handler. If it’s been awhile, remember that this handler is in the ApplicationEvents.vb file, one of the files normally hidden from view in the Solution Explorer.
INSERT SNIPPET
Insert Chapter 14, Snippet Item 4.
' ----- Load some settings that reside in the database.
LoadDatabaseSettings(  )
It’s time to actually use a setting. The My.Settings.HideLogin setting indicates whether the Login button (ActLogin) on the main Library application form should appear when running in nonadministrator (nonlibrarian) mode. The administrator can still bring up the login form through the F12 key, even if the button is hidden. In an environment where the patrons may be unknown, the system will be slightly more secure if the temptation of a Login button is removed.
The UpdateDisplayForUser routine in the MainForm class includes code for user mode (LoggedInUserID = −1) and administrator mode (LoggedInUserID <> −1). In the user mode block (the first block), replace this line:
ActLogin.Visible = True
with the following code:
INSERT SNIPPET
Insert Chapter 14, Snippet Item 5.
' ----- Show or hide the Login button per the settings.
ActLogin.Visible = Not My.Settings.HideLogin
It’s time to add the forms that will manage all of the various application settings, both those stored locally in the user-focused settings file, and the system-wide settings stored in the database. Most of the settings are pretty simple—just basic strings, numbers, and Boolean flags—so it shouldn’t overwhelm the administrator to have them all appear on a single form. But before we get to that form, we’ll add a form that lets us manage the database connection.
I thought about calling up the connection properties dialog that Visual Studio uses to establish connection strings. I’m sure it’s possible, but it provides way more flexibility than we need in this project. For instance, it supports the configuration of non-SQL Server databases, which is of no interest to the Library Project. Instead, we’ll design a simpler form that collects only those data values that we need to build the Library connection string. The LocateDatabase form appears in Figure 14-5.
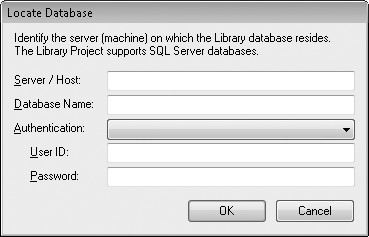
I’ve already added the form and its controls to the project. Open the LocateDatabase.vb file to see the form. Four of the fields on this form are basic text entry fields (one with a password mask character). The fifth entry field, Authentication, lets the user select between Microsoft Windows authentication and SQL Server authentication.
Most of the form’s code parallels what we’ve seen in many of the other forms already in the application. Go ahead and add in all of the form’s code now.
INSERT SNIPPET
Insert Chapter 14, Snippet Item 6.
The significant work in this form occurs in the Load event when the existing connection string is parsed out into distinct data entry fields, and in the PromptUser routine where the parts are put back together.
There are many different ways you could chop up the connection string into its base parts. I took the basic divide-and-conquer approach, extracting out each semicolon- and equals sign-separated component. Here’s the main block of code from the Load event handler that does the chopping and extracting:
' ----- Load in the existing data.
connectionString = My.Settings.DBConnection & ""
For counter = 1 To CountSubStr(connectionString, ";") + 1
   ' ----- Each comma-delimited part has the format
   '       "key=value".
   oneKey = GetSubStr(connectionString, ";", counter)
   oneValue = Trim(GetSubStr(oneKey, "=", 2))
   oneKey = Replace(UCase(Trim(GetSubStr( _
      oneKey, "=", 1))), " ", "")

   ' ----- Process each part.
   Select Case oneKey
      Case "DATASOURCE"
         ' ----- Show the server host.
         RecordServer.Text = oneValue
      Case "INITIALCATALOG"
         ' ----- Show the default database name.
         RecordDatabase.Text = oneValue
      Case "INTEGRATEDSECURITY"
         ' ----- Only check for "true". False is assumed.
         If (UCase(oneValue) = "TRUE") Then _
            RecordAuthentication.SelectedIndex = _
            RecordAuthentication.Items.IndexOf( _
            AuthenticationTypeWindows)
      Case "USERID"
         ' ----- A user ID forces SQL authentication.
         RecordAuthentication.SelectedIndex = _
            RecordAuthentication.Items.IndexOf( _
            AuthenticationTypeSQL)
         RecordUser.Text = oneValue
      Case "PASSWORD"
         ' ----- A password forces SQL authentication.
         RecordAuthentication.SelectedIndex = _
            RecordAuthentication.Items.IndexOf( _
            AuthenticationTypeSQL)
         RecordPassword.Text = oneValue
   End Select
Next counter
Putting the parts together is less complicated. Here’s the needed string concatenation code found in the PromptUser routine:
newConnection = "Data Source=" & Trim(RecordServer.Text) & _
   ";Initial Catalog=" & Trim(RecordDatabase.Text)
If (CInt(CType(RecordAuthentication.SelectedItem, _
      ListItemData)) = AuthenticationTypeWindows) Then
   ' ----- Use Windows security.
   newConnection &= ";Integrated Security=true"
Else
   ' ----- Use SQL Server security.
   newConnection &= ";User ID=" & Trim(RecordUser.Text) & _
      ";Password=" & Trim(RecordPassword.Text)
End If
Although the LocateDatabase form does all of the parsing and building of the connection string, it doesn’t actually update the saved setting. Instead, it returns the newly built connection string, and depends on the calling code to save it.
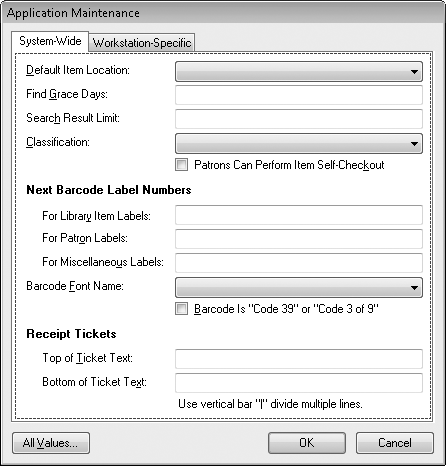
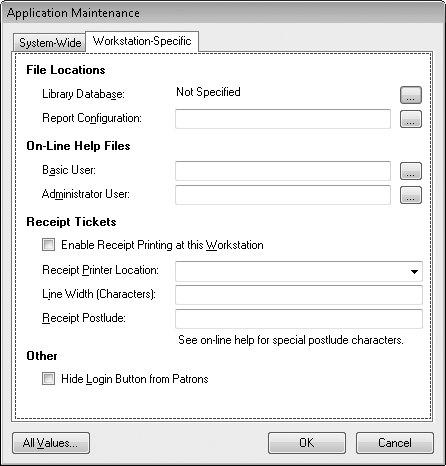
Now, back to our single-form configuration editor, Maintenance.vb. This form does all of the direct modification of the values in both the database and the local My.Settings items. Figure 14-6 and Figure 14-7 show the two main panels of the Maintenance form. The centralized settings stored in the database are “system-wide,” and the “workstation-specific” values are those accessed through My.Settings.
This form begins its work in its Load event handler, Maintenance_Load. This routine sets up the choices in some drop-down fields, including a list of fonts. The code loops through the collection of installed fonts made available through the GDI+ object System.Drawing.Text.InstalledFontCollection.
Dim allFonts As New _
   System.Drawing.Text.InstalledFontCollection
RecordFontName.Items.Add(New ListItemData( _
   "<Not Selected>", −1))
For counter = 0 To allFonts.Families.Length − 1
   RecordFontName.Items.Add(New ListItemData( _
      allFonts.Families(counter).Name, counter))
Next counter
The routine also includes similar code to load a list of installed printers.
For Each installedPrinter As String In _
      PrinterSettings.InstalledPrinters
   RecordPrinterLocation.Items.Add(installedPrinter)
Next installedPrinter
Once everything is set up, the PopulateCurrentValues procedure completes the initialization. Its code retrieves all the current values from both the database and the My.Settings object, and stores those values in the various on-screen data entry fields. I’ve already added the database-specific code. Go ahead and add in the settings-specific code.
INSERT SNIPPET
Insert Chapter 14, Snippet Item 7.
LibraryConnection = My.Settings.DBConnection & ""
RecordDBLocation.Text = GetDBDisplayText(LibraryConnection)
RecordConfigLocation.Text = My.Settings.ReportConfig & ""
RecordBasicHelp.Text = My.Settings.HelpFile & ""
RecordAdminHelp.Text = My.Settings.HelpFileAdmin & ""
EnableReceipts.Checked = My.Settings.UseReceipts
RecordPrinterLocation.Text = My.Settings.ReceiptPrinter & ""
RecordPrinterWidth.Text = CStr(My.Settings.ReceiptWidth)
RecordPostlude.Text = My.Settings.ReceiptPostlude & ""
HideLogin.Checked = My.Settings.HideLogin
Most of the code in this form deals with basic user interaction while the form is in use. For example, the ActDBLocation_Click event handler displays the LocateDatabase form we added earlier. Add the relevant source code to that event handler.
INSERT SNIPPET
Insert Chapter 14, Snippet Item 8.
' ----- Prompt for the database connection details.
Dim newConnection As String

' ----- Prompt the user for the new setting.
newConnection = LocateDatabase.PromptUser(  )
If (newConnection = "") Then Return

' ----- Store the new value.
LibraryConnection = newConnection
RecordDBLocation.Text = GetDBDisplayText(LibraryConnection)
Several of the settings specify the locations of files used by the application, such as the online help files. The user can type in the path to the file directly, or use the Open File dialog to locate the file visually. To display this dialog, I’ve added an OpenFileDialog control named LocateFile. Using it is a matter of setting the various file-specific properties and calling the ShowDialog method. Here’s some of the code already included in the ActBasicHelp_Click event handler used to locate the nonadministrative online help file:
' ----- Set up the file structure.
LocateFile.DefaultExt = "chm"
LocateFile.FileName = RecordBasicHelp.Text
LocateFile.Filter = "Help Files (*.chm)|*.chm|" & _
   "All Files (*.*)|*.*"
LocateFile.FilterIndex = 1
LocateFile.Title = "Locate Help"

' ----- Prompt the user.
If (LocateFile.ShowDialog(  ) <> _
   Windows.Forms.DialogResult.OK) Then Return

' ----- Save the file path.
RecordBasicHelp.Text = LocateFile.FileName
Once the user has made the various setting changes, a click on the OK button saves each new setting to its storage area. I’ve included the database-focused saving code in the SaveFormData routine. I’ll let you add the settings-focused code, near the end of that routine.
INSERT SNIPPET
Insert Chapter 14, Snippet Item 9.
My.Settings.DBConnection = LibraryConnection
My.Settings.ReportConfig = Trim(RecordConfigLocation.Text)
My.Settings.HelpFile = Trim(RecordBasicHelp.Text)
My.Settings.HelpFileAdmin = Trim(RecordAdminHelp.Text)
My.Settings.HideLogin = HideLogin.Checked
My.Settings.UseReceipts = EnableReceipts.Checked
My.Settings.ReceiptPrinter = Trim(RecordPrinterLocation.Text)
My.Settings.ReceiptPostlude = RecordPostlude.Text

' ----- Save the receipt printer width.
If (Trim(RecordPrinterWidth.Text) = "") Then
   My.Settings.ReceiptWidth = DefaultReceiptPrinterWidth
Else
   My.Settings.ReceiptWidth = CInt(RecordPrinterWidth.Text)
End If
Although the Maintenance form provides a user-friendly interface to the database-stored settings, you probably remember that we already wrote code to update SystemValue table records through the SystemValue.vb file. In Chapter 12, we connected that form to the main form, but we’re going to alter that logic. First, we’ll add the call to the SystemValue form to the Maintenance form’s ActAllValues_Click event handler.
INSERT SNIPPET
Insert Chapter 14, Snippet Item 10.
' ----- Let the user edit the list of system values.
Dim RecordsForm As Library.ListEditRecords

' ----- Edit the records.
RecordsForm = New Library.ListEditRecords
RecordsForm.ManageRecords(New Library.SystemValue)
RecordsForm = Nothing

' ----- Refresh the display elements.
PopulateCurrentValues(  )
Then we’ll change the AdminLinkValues_LinkClicked event handler back in MainForm.vb. Currently, it calls the SystemValue editor directly. Replace that part of the LinkClicked handler’s code with code that calls the Maintenance form instead.
INSERT SNIPPET
Insert Chapter 14, Snippet Item 11.
' ----- Access the maintenance portion of the program.
Maintenance.ShowDialog(  )
The last change in this chapter uses the configured connection string to establish the connection to the database. When we originally wrote the ConnectDatabase routine in the General module, we added a hardcoded connection string just to get the program working.
' ----- Build the connection string.
' !!! WARNING: Hardcoded for now.
connectionString = "Data Source=MYSYSTEMSQLEXPRESS;" & _
   "Initial Catalog=Library;Integrated Security=true"
Now that we have a user-configured connection string available, we will use that instead. The changes we must make to this routine are somewhat extensive, so just replace the function’s existing content with the updated code.
INSERT SNIPPET
Insert Chapter 14, Snippet Item 12.
' ----- Connect to the database. Return True on success.
Dim connectionString As String
Dim configChanged As Boolean

' ----- Initialize.
HoldTransaction = Nothing
configChanged = False

' ----- Obtain the connection string.
If (Trim(My.Settings.DBConnection & "") = "") Then
   ' ----- Inform the user about the need to configure
   '       the database.
   If (MsgBox("This copy of the application has not " & _
      "been configured to connect to the library " & _
      "database. If you know the database settings, " & _
      "you can configure it now. Would you like to " & _
      "proceed?", MsgBoxStyle.YesNo Or _
      MsgBoxStyle.Question, ProgramTitle) _
      <> MsgBoxResult.Yes) Then Return False

   ' ----- Prompt for the new connection details.
   connectionString = LocateDatabase.PromptUser(  )
   If (connectionString = "") Then Return False
   configChanged = True
Else
   connectionString = My.Settings.DBConnection
End If

TryConnectingAgain:

' ----- Attempt to open the database.
Try
   LibraryDB = New SqlClient.SqlConnection(connectionString)
   LibraryDB.Open(  )
Catch ex As Exception
   ' ----- Some database failure.
   GeneralError("ConnectDatabase", ex)

   ' ----- Perhaps it is just a configuration issue.
   If (MsgBox("The connection to the database may " & _
      "have failed due to invalid configuration " & _
      "settings. Would you like to change the " & _
      "database configuration at this time?", _
      MsgBoxStyle.YesNo Or MsgBoxStyle.Question, _
      ProgramTitle) <> MsgBoxResult.Yes) Then Return False

   ' ----- Prompt for new details.
   connectionString = LocateDatabase.PromptUser(  )
   If (connectionString = "") Then Return False
      configChanged = True
   GoTo TryConnectingAgain
End Try

' ----- Save the udpated configuration if needed.
If (configChanged = True) Then _
   My.Settings.DBConnection = connectionString

' ----- Success.
Return True
The basic gist of the code involves setting the connectionString variable to the persisted connection string, and using that to open the LibraryDB object. The new code obtains the connection string from My.Settings.DBConnection. If for any reason the connection string is missing or fails to generate an open database connection, the user is prompted to supply or correct the connection string through our new LocateDatabase form.
The program is back to a condition where you can run it. The first time you run the program, it will prompt you to supply the database connection information. The values you supply will match the hardcoded version that used to be in the ConnectDatabase routine:
Set Server/Host to “MYSERVERSQLEXPRESS” or to the name of your actual SQL Server host.
Set Database Name to “Library” or any other name you previously assigned to your library database.
Set Authentication to “Microsoft Windows” if you use Windows integrated security. If you need to connect using SQL Server’s security system, set this field to “SQL Server,” and enter a valid user ID and password.
In the next chapter, we’ll focus on file manipulation techniques. Although we did update the settings file in this chapter, it was done indirectly through features provided by the framework. Chapter 15 will discuss more direct approaches to file manipulation.