Bienvenue à chapitre dix-neuf! My apologies to those of you who don’t speak French—and also to those who actually do. I took four full years of the language in high school, but for some reason, it didn’t stick. I can still remember a few important sentences, such as «Je suis un garçon» and «Où est le crayon?», but that’s about it. We even read Candide and Le Petit Prince in class, but to no avail. I did take Japanese in college, and found it much easier to digest than French. So, perhaps I should instead say ![]() .
.
In an attempt to expand this book beyond the shores of English-speaking nations, I localized that previous paragraph. In an attempt to expand the appeal of your own applications beyond the English-speaking world, .NET provides features that let you localize your project in another language, even after your software has been compiled and released.
Coverage of all localization features in .NET would include lunar- and emperor reign-based calendars, and right-to-left writing systems. This chapter covers only some of the more common user interface localization features. Hopefully, it will entice you to push the language limits of your own applications, reaching out to les étoiles.
Microsoft has hundreds of for-sale and freely available software applications, and the company makes a lot of money worldwide providing these software products to consumers. Most of its products are developed in the United States, written by programmers who speak mainly English, directed by technical leads and product managers who make decisions in English, marketed by a sales team that plans out campaigns in English, and dogged by competitors and detractors who blast the motives and business practices behind each product in English. So, how is it possible that Microsoft can sell software to non-English speakers around the globe?
The key lies in the globalization and localization of its products. Sure, Microsoft or any other company could develop distinct yet identical products, each in a different language, and sell them in the appropriate markets. But that would be expensive and time-consuming. Instead, it writes a single program, and then enhances it with language- and culture-specific features.
Globalization is the process of preparing software so that it can be easily adjusted for each language and culture market. No foreign terms are added to software during the globalization process. Instead, the developers design the application so that all relevant English (in my case) terms and American cultural elements (such as currency displays in U.S. dollars) can be quickly and easily replaced by foreign substitutes, all without impacting the core software elements.
Windows applications have traditionally used resources to keep applications globally generic. Resources contain text strings, images, and other non-code elements that are replaced at runtime based on the active language and culture of the operating system. On a German-language system, the application loads its German-language resources (if available) and displays them instead of the default resources. The .NET Framework continues to use resources for this purpose, although it enhances resource development through XML-based resource files and tools.
Localization adds the actual non-native language and culture elements to an application. It is in this step that, say, English-language form labels get translated into Swahili, or some other target language. Visual Studio lets you localize an application within the development environment itself, or through external tools that translators who have no access to the application source code can use.
The good news for .NET developers is that Microsoft pretty much took care of the globalization part for you. You mainly need to focus on localizing your application. Your local community college offers foreign language instruction in a dozen or so languages, so I’ll let you choose your first localization target.
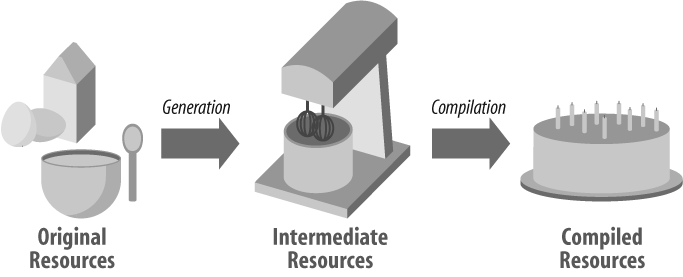
Resource files are the key to language localization in .NET programs. Visual Studio will write the files for you, but it’s good to know something about how they work, since you may want to craft your own resource files (if you have a lot of time on your hands). The life of a resource moves through three phases, as determined by the type of file in which it appears:
- Source
An application’s resources start their lives in a resource source file. Before .NET, resources appeared in “resource script” files, which merged all the best of C-language development and UPPER CASE SCRIPT COMMANDS, and used an .rc file extension. In Visual Basic 2008, you use XML-based .resx files. Every new Windows Forms application already includes a Resources.resx file just waiting to be joyfully filled with your application resources.
Beyond the core resource source files, other file types can be included as resources, although they are still referenced through the .resx file content. Common external resource files include image files (such as .gif and .jpg files) and plain-text files (.txt). The Library Project uses a file named SplashImage.jpg as a resource for the splash screen, and another file named ItemLookupBody.txt that contains HTML content used when displaying items through the ItemLookup.vb form.
- Intermediate
Once you have your resource sources ready, they are converted into an intermediate form, and stored with a .resources file extension, through a process called resource generation. Visual Studio normally does this step behind the scenes for you, but you can also use a tool supplied with the .NET SDK (called resgen.exe) to generate these files yourself. Intermediate resource files include binary content only, and are not designed for browsing in Notepad.
- Compiled
Intermediate resource files aren’t much use to your deployed application. The term intermediate kind of gave this secret away, didn’t it? Before employing the resources in your program, they need to be compiled into a DLL or EXE file. Perhaps you already knew that these files contained multiple sections, including distinct code and data sections. A compiled resource file contains only a data section with the resources; there is no code in a compiled resource file, although standard compiled code files may also include compiled resources.
In .NET, compiled resource files are satellite assemblies. They support your primary application assembly, and are not generally useful apart from that master assembly.
Figure 19-1 shows the lifetime of a resource through these three stages.
Some standard resource types are stored in .NET resource (.resx) files:
- Strings
We’ll focus primarily on string resources in this chapter. Each string resource includes a name and a string value.
- Images
Visual Basic applications can include JPEG, GIF, TIFF, PNG, and BMP image files. Each image, as with all resources, includes an associated name, which may differ from the original name of the graphics file.
- Icons
Program icons used with forms and the application itself appear as standard resources. Icons have an .ico file extension.
- Audio
Resources can include named audio files, based on WAV audio content.
- Files
If the file types listed so far don’t meet your needs, you can include whole files of any type as a named resource.
- Other
Beyond files, you can store the content of any valid .NET data type as a resource. The resources in a .resx file are actually strongly typed to .NET types, so there’s really no limit to the type of data you can place there. You can also modify the underlying .resx file to include “non-standard” resources. Non-standard resources are beyond the scope of this chapter.
The project properties window includes a manager for application-wide resources (see Figure 19-2). The IDE also includes special editors that let you edit standard and a few non-standard resource types.

We discussed this in earlier chapters, but as a reminder, you can access an application’s resources through the My.Resources object. If you have a string resource named MainFormCaption, the following reference returns its value:
My.Resources.MainFormCaption
All resources are strongly typed. In this case, MainFormCaption is of type System.String. The SplashImage image resource included in the Library Project is declared as type System.Drawing.Bitmap. Because each resource is strongly typed, you can use the My.Resources reference in your code just like any data of the resource’s type.
In new Windows Forms applications, all application-wide resources appear in the Resources.resx file, found in the My Project directory within the application’s source code directory. You can view it in Notepad if you want. It’s a pretty big XML file that doesn’t immediately interest me, except that it works! Here’s the portion of the Library Project’s Resources.resx file that specifies our two existing resources. (I’ve wrapped some of the lines to make it fit on the page.) I’ve highlighted the name of each resource, and their strong data types.
<data name="ItemLookupBody"
  type="System.Resources.ResXFileRef, System.Windows.Forms">
  <value>..ResourcesItemLookupBody.txt;System.String,
    mscorlib, Version=2.0.0.0, Culture=neutral,
    PublicKeyToken=b77a5c561934e089;Windows-1252</value>
</data>

<data name="SplashImage"
  type="System.Resources.ResXFileRef, System.Windows.Forms">
  <value>..ResourcesSplashImage.jpg;System.Drawing.Bitmap,
    System.Drawing, Version=2.0.0.0, Culture=neutral,
    PublicKeyToken=b03f5f7f11d50a3a</value>
</data>
Each form you add to your project also has its own private resource file. The one for Form1 is called Form1.resx. These files end up being a big plus in the localization of Windows Forms applications.
Behind the scenes, your application is taking an object-oriented approach to resource management. It’s using the System.Resources.ResourceManager class to locate and return instances of each resource when you need it. And this same class makes decisions about which language-specific or culture-specific resources—from the dozens I’m sure you’ll have added to your application—will be made visible to the user.
There’s no sense in postponing the introduction to the localization features of Visual Studio, since they are so easy to use. You already know about the application-wide project properties resource editor. Instead, let’s look at the amazing part: localizing forms and controls right in the Visual Studio form editor. You might as well start up Visual Studio and try it out with me, because it’s just so fun.
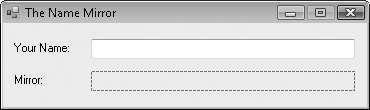
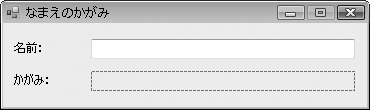
Here’s a cute but relatively harmless Windows Forms application that writes your name upside down. I added some Label controls, a TextBox control, and a PictureBox control to a form, as shown in Figure 19-3.
Then I added the following source code to the form:
Private Sub TextBox1_TextChanged( _
ByVal sender As System.Object, _
ByVal e As System.EventArgs) _
Handles TextBox1.TextChanged
' ----- Force a redraw.
PictureBox1.Invalidate( )
End Sub
Private Sub PictureBox1_Paint(ByVal sender As Object, _
ByVal e As System.Windows.Forms.PaintEventArgs) _
Handles PictureBox1.Paint
' ----- Draw the blank background.
e.Graphics.Clear(SystemColors.Window)
e.Graphics.DrawRectangle(SystemPens.InactiveCaption, _
0, 0, PictureBox1.Width - 1, PictureBox1.Height - 1)
' ----- Change the orientation of the display.
Dim saveState As Drawing2D.GraphicsState = _
e.Graphics.Save( )
Dim mirrorMatrix As New Drawing2D.Matrix( _
1, 0, 0, −1, 0, PictureBox1.Height)
e.Graphics.Transform = mirrorMatrix
' ----- Draw the text.
e.Graphics.DrawString(TextBox1.Text, TextBox1.Font, _
SystemBrushes.WindowText, 1, 4)
' ----- Put everything back.
e.Graphics.Restore(saveState)
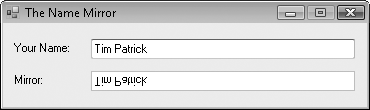
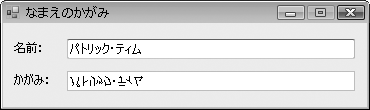
End SubWhen you run the program, it creates a mirror image of whatever you type in the TextBox control using GDI+ features. Figure 19-4 shows me playing with the program instead of meeting this chapter’s submission deadline.
As interesting as this program may be, it is neither fully globalized nor localized. It’s almost globalized. All we need to do to fully globalize it is to “throw the switch” on the form that enables later localization. We do this through the form’s Localizable property. Change this property from False to True. Ta-da! Your form is globalized!
Now for part 2: localization. Here are the steps to localize the form:
Determine which language or language-culture combination you want to localize.
Select that language or language-culture from the form’s
Languageproperty. When you open this property list, it includes languages alone, such as “French,” and languages combined with a culture or country, as with “French (Canada).” The language-alone entries are known as “neutral language” entries. You can use either type for localization. If you select, for instance, “French,” users of your application in either France or French-speaking Canada will use the French resources. If you localize using “French (Canada),” French Canadian users will access the localized resources, but not French-language users in France.Modify any of the properties of the form or its controls.
That’s it. Whenever the form’s Language property is changed to something other than (Default), Visual Studio starts recording all form and control changes into a separate form-specific and language- or language-culture-specific resource file.
You can localize the form with multiple languages. Each time you change the Language property to another language or language-culture selection, the changes to the form or controls apply only to that selection. Whatever you change gets saved in a separate resource file.
Let’s try it with the sample mirror program. I’m going to choose Japanese for the localization language. First, I set the form’s Language property to “Japanese.” The form momentarily blinks, but there is no other noticeable change. It looks just as it did in Figure 19-3.
Next, I change the Text properties of the form and of each label control to their Japanese language equivalents (see Figure 19-5).
Do you notice how the shorter Japanese language labels are farther away from the text and mirror display fields? Does it bother you as much as it bothers me? To get it out of my mind, I will resize the two fields a little larger by stretching them to the left, as I’ve done in Figure 19-6.
The amazing part is that if you set the form’s Language property back to (Default), not only will the labels return to English, but the resized text and mirror fields will return to their “natural” sizes. Although I haven’t checked out every property, the localization feature seems to impact all display elements of each control.
The program is now fully localized for English (the default language) and Japanese. Normally, the Japanese resource would be used only on a system running the Japanese version of Microsoft Windows. But we can force the program to use Japanese by changing its “user interface culture.” In the application’s startup code (the MyApplication_Startup routine in the ApplicationEvents.vb file), I add the following code:
Private Sub MyApplication_Startup(ByVal sender As Object, _
      ByVal e As Microsoft.VisualBasic.ApplicationServices. _
      StartupEventArgs) Handles Me.Startup
   If (MsgBox("Switch from English to Japanese?", _
         MsgBoxStyle.Question Or MsgBoxStyle.YesNo) = _
         MsgBoxResult.Yes) Then
      My.Application.ChangeUICulture("ja-JP")
   End If
End Sub
And sure enough, running the program and saying “Yes” to the “Switch to Japanese” prompt presents a form in Japanese, as shown in Figure 19-7. (If you answer “No” to the question, the default language, English, appears.)
Let’s look at the files created in this project. (Look in the installation directory of this book’s code for the Foreign Names subdirectory. I’ve placed a copy of this mirror-text project there for you.) The source code directory includes a Form1.resx file, added by default to all new Windows Forms applications. But there is also a Form1.ja.resx file, the Form1 resource file for the Japanese language. Visual Studio will compile this file into a language-specific resource when it builds the project. At that time, the code’s binRelease subdirectory will contain a further ja subdirectory with a file named ForeignNames.resources.dll. This is the satellite assembly that contains all of the Japanese language resources. If the application had included multiple forms, all of the Japanese resources for all forms would appear in that single DLL file.
Visual Studio makes localization quite easy. But it’s rare that the developer of a major application would also be fluent in multiple target languages. And you certainly don’t want non-programmers gaining access to your forms and code in Visual Studio, where they can do who-knows-what to its logic.
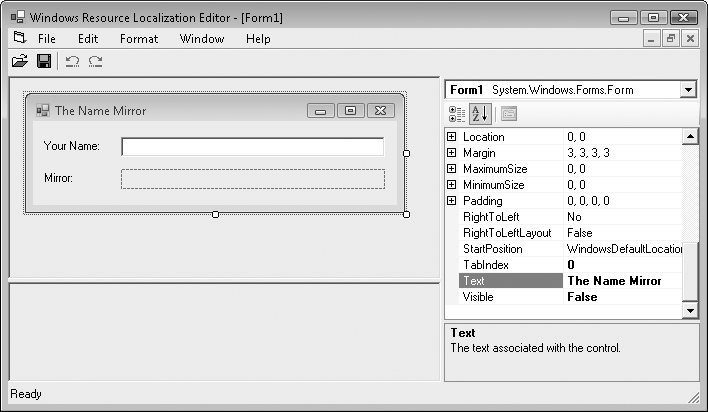
To keep foreign-language eyes and fingers where they belong, Microsoft wrote the Windows Resource Localization Editor, and included it with the Software Development Kit supplied with .NET. (On my system, it’s located at Start → [All] Programs → Microsoft Windows SDK v6.0A → Tools → Windows Resource Localization Editor. Its command-line name is winres.exe.) When you are ready to have a translator convert a form to a specific language, you only need to provide them with this program, and the form’s .resx file (such as Form1.resx). The program simulates the display of the form as it appears in Visual Studio, and lets the translator modify any relevant form or control properties for a specific language. Figure 19-8 shows ForeignNames’s Form1 in the Localization Editor.
The program prompts for the target language or language-culture when you try to save changes. It outputs a language-specific .resx file (such as Form1.ja.resx for Japanese) that can be used in your application. Once you get the foreign resource files back from the translators, store them (the files, not the translators) in the project’s source directory, and rebuild the project to generate the correct satellite assemblies.
It’s possible to generate the satellite assemblies manually from the source .resx files without rebuilding the entire project in Visual Studio. You will have to use the Windows command line (cmd.exe), and you will need access to the main assembly’s EXE or DLL file. It’s not for the faint of heart, and a single mistyped character could cost American taxpayers millions.
Figure 19-1 summarized the steps needed to move a .resx file into a satellite assembly. The “generate” and “compile” steps can be done using two command-line utilities: resgen.exe and al.exe. Doesn’t that sound like great fun?
As with other .NET command-line tools, these tools need the command-line environment to be set up just so, or they will have a snit and refuse to run. To ensure that you have the correct environment, you need to open the special .NET version of the command line. The .NET SDK was installed when you installed the framework, so you should be able to find a Start-menu entry for it at Start → [All] Programs → Microsoft Visual Studio 2008 → Visual Studio Tools → Visual Studio 2008 Command Prompt.
Once you have a .resx file available, either by creating it manually or by using the Windows Resource Localization Editor, you generate a .resources file using resgen.exe, the Resource Generator command-line utility, part of the SDK toolset. It accepts an input and an output filename as its arguments.
resgen.exe Form1.ja.resx Form1.ja.resources
If you omit the output filename, resgen will simply replace the .resx extension with .resources.
If you have multiple foreign-language assemblies (for multiple forms, for instance), generate resource files for all of them. Then you will be ready to compile the satellite assembly.
.NET uses al.exe, the Assembly Linker program, to compile all of your .NET applications to their final assembly files. We’ll use this same program to generate the satellite assemblies. Its command-line arguments were designed by a secret society, so getting them just right will take some work. Let’s look at the command first, and then I’ll explain it.
al.exe /target:lib/embed:Form1.ja.resources,ForeignNames.Form1.ja.resources
You should enter these lines as one long line. I had to wrap them in the book because the publisher didn’t want to do one of those fold-out pages that you see in some children’s books. They didn’t like my interactive “pop-up” Visual Studio environment idea, either (something about keeping the book at less than $100 per copy).
The options provided to al.exe work all of the magic:
/target:libThe
libpart says, “Output a DLL-style file.”/embedThis option indicates which source files you want to include in the output assembly. The first comma-delimited part indicates the source filename. The second part indicates the name by which this resource will be known in the application. The name must be in the format
basename.cultureName.resources, wherebasenameis the application name (for application-wide resources) or the class name (qualified with its namespace) for a specific class, such asForm1. Since my application and its default top-level namespace are both “ForeignNames,” I’ve included that in the name component. You can add as many/embedoptions as you have resource files to include./cultureAlthough you will eventually put the satellite assembly in a folder named for the target culture, Visual Basic doesn’t trust you. Instead, it wants a record of the culture embedded in the assembly itself. You do that through this command-line option.
/outThis option specifies the output name of the satellite file. You really need to use the name
application.resources.dll for the file, whereapplicationis the same as your application’s name before the .exe part. If you don’t do this, it won’t work. Well, you could still get it to work by adjusting the application’s app.config file, but that file is just plain scary, so you don’t want to go there./templateThis is the option that says, “I’m making a satellite assembly, and the related primary assembly is x.”
To use the satellite assembly, locate the directory that contains the main EXE assembly. Create a new subdirectory right there, giving it the name of the language or language-culture key used to create the assembly (“ja” in my case; “ja-JP” would have been an option if I created the assembly using “Japanese (Japan)”). Then put the new satellite assembly in that subdirectory.
Localization is more than just words on a screen. There are also issues of how you display times, dates, and monetary values to the user. The good news is that these features will work automatically if you globalize your program properly. Just as each .NET program maintains a “user interface culture” (which we played with in the sample program previously), it also has a “general culture” used for string manipulation of times, dates, financial values, and other similar culture-dependent things.
If you use core methods such as CDate to extract date values, instead of scanning through a user-entered date string by hand, you get culture-specific date processing for free. Also for output, if you use the predefined formats for the Format method (and other similar string output methods), you get correct culture-specific formatting for no additional effort on your part. Let’s try a quick sample that displays money using the local currency.
I’m creating a new Windows Forms application. I’ll add the following code to the ApplicationEvents.vb file:
Private Sub MyApplication_Startup(ByVal sender As Object, _
      ByVal e As Microsoft.VisualBasic.ApplicationServices. _
      StartupEventArgs) Handles Me.Startup
   If (MsgBox("Switch from English to Japanese?", _
         MsgBoxStyle.Question Or MsgBoxStyle.YesNo) = _
         MsgBoxResult.Yes) Then
      My.Application.ChangeCulture("ja-JP")
   End If
End Sub
This code block is almost identical to the one we used in the previous sample, but I’m calling My.Application.ChangeCulture instead of My.Application.ChangeUICulture (the UI part is missing). This changes the string-manipulation culture instead of the user interface culture.
Now I’ll add the following code to Form1’s class:
Private Sub Form1_Load(ByVal sender As System.Object, _
ByVal e As System.EventArgs) Handles MyBase.Load
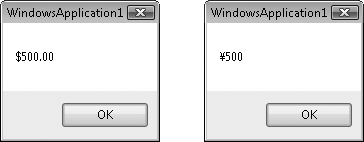
MsgBox(Format("500", "Currency"))
End SubFigure 19-9 shows the results of this code when run in both English and Japanese modes.
The Framework Class Libraries (FCLs) include even more culture management features in the System.Globalization namespace. The classes in this namespace let you manually adjust the output of culture-sensitive strings to meet your needs. Most of them are pretty esoteric and are intended for specific culture groups, so I won’t be discussing them here.
It’s a small world, after all. And the culture-specific features in .NET have helped to make it that way, at least for your software. I’m still amazed that I’m able to use Japanese on my English version of Microsoft Windows. (I first had to enable support for East Asian languages in the Control Panel’s Regional and Language Options applet.) And now it’s not just Windows or Microsoft Office that can automatically shift with the current culture. Politicians can do it, too. Oops, I mean that your own applications can do it, too. By taking advantage of culture-specific resources and the automatic and manual formatting features included with .NET, you’ll soon be selling your snazzy business application in six of the seven continents.
I know you’re expecting me to localize all of the forms in the Library Project into Greek, and it is a tempting idea. But in the interest of brevity (and my sanity), I’ll leave that as an exercise for the reader. (Muffled laughter.)
What we will do in this chapter’s project code is to enable the remaining patron-specific tracking and management features. Those features include the management of fines for naughty patrons who don’t return their library books on time. We’ll use the generic currency formatting features discussed in this chapter to make the application as globally accessible as possible.
PROJECT ACCESS
Load the Chapter 19 (Before) Code project, either through the New Project templates or by accessing the project directly from the installation directory. To see the code in its final form, load Chapter 19 (After) Code instead.
Let’s create a class that exposes the important features of each set of payments applied to a specific checked-in item. Of course, they’ll all be stored in the Library database. But keeping a summary of payments temporarily cached in memory simplifies some processing.
Add a new class item to the Library Project, giving it the name PaymentItem.vb. Define it using the following code.
INSERT SNIPPET
Insert Chapter 19, Snippet Item 1.
Public Class PaymentItem
   ' ----- Used to track and print payment tickets.
   Public ItemTitle As String
   Public PatronCopyID As Integer
   Public FeesPaid As Decimal
   Public BalanceDue As Decimal
End Class
Each instance of this class identifies the collected fines and payments for a specific library item (ItemTitle) and for the patron who turned in the item late (PatronCopyID).
We also need to know the total fines owed by a patron for all items, even when we’re not showing the details. Add the CalculatePatronFines function to the General.vb module.
INSERT SNIPPET
Insert Chapter 19, Snippet Item 2.
Public Function CalculatePatronFines( _
      ByVal patronID As Integer) As Decimal
   ' ----- Given a patron ID, calculate the fines due.
   Dim sqlText As String

   On Error GoTo ErrorHandler

   ' ----- Retrieve the fine records for the patron.
   sqlText = "SELECT SUM(Fine - Paid) FROM PatronCopy " & _
      "WHERE Patron = " & patronID
   Return DBGetDecimal(ExecuteSQLReturn(sqlText))

ErrorHandler:
   GeneralError("CalculatePatronFines", Err.GetException(  ))
   Return 0@
End Function
It’s pretty basic code, actually, since the database does all of the work of adding up the values. I checked the database documentation and confirmed that Fine and Paid are required fields, and will never be NULL. This keeps the SQL code terse.
Before reviewing a patron’s record, the user must identify the patron. This is done through a Patron Record Access form, sort of a login form for patrons. Each patron is assigned a password, which must be supplied before the patron can access his or her record. Administrators can access a patron’s record without providing the password.
I’ve already added the PatronAccess.vb form to your project; it appears in Figure 19-10.
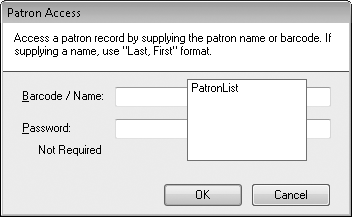
This form’s code is a lot like that found in the ChangeUser.vb form, a form that provides administrative access to the program, and that we added back in Chapter 11. The Patron Access form behaves a little differently for administrators and regular patrons.
Regular patrons must either provide their bar code, or supply their name (full last name, optional wildcards on the first name) and their password. If they use a partial name instead of a bar code, and a search of that name results in multiple matches, they will have to provide a more correct entry of their name. (If two patrons have the same name, they will have to depend on bar codes; but this program is for a small library, so name conflicts should be rare.)
Administrators enter the patron’s name or bar code, but no password is needed. If there are multiple name matches, the form presents all matching names in a list, and the administrator can select the correct entry from the list. This gives an administrator full access to all patron records. It’s obviously important for an administrator to log out when finished using a workstation that is available to patrons.
The PatronAccess form’s SelectPatron method provides the interface to the form for both administrators and ordinary patrons. The function returns the ID of the selected patron, or −1 if the user didn’t successfully access a patron record.
Although administrators can change the password of each patron through the Patron.vb form, we don’t want to give ordinary patrons access to that form and all of its raw, unadulterated power. But we still want the patrons to be able to change their own passwords, because it’s the nice and secure thing to do. I’ve added the PatronPassword.vb form to your project to fulfill this purpose (see Figure 19-11).
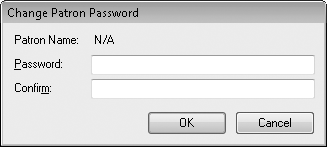
The form is basically a dramatically reduced subset of the full Patron.vb form. Since it needs to deal with only active patrons, it doesn’t have a lot of the Patron.vb code that differentiates between new and existing patron records. The focus of the Patron Password form is the update statement that sets the patron’s password, in the SaveFormData method.
sqlText = "UPDATE Patron SET [Password] = " & _
   DBText(EncryptPassword("patron", _
   Trim(RecordPassword.Text))) & _
   " WHERE ID = " & ActiveID
ExecuteSQL(sqlText)
The word Password is a reserved keyword in SQL Server, so we need to “escape” it with square brackets when referring to the field in SQL statements.
In a perfect world, patrons would never let their books and other library items reach the overdue state. Of course, in a perfect world, libraries would let you keep books you like indefinitely. And give me a break with those incessant overdue notices. What’s up with that?
But for those small libraries that insist on charging fines for overdue items, the Library Project includes features for assigning and tracking fines. In a later chapter, we’ll add the code that automatically calculates the fines for overdue items. Right now, we’ll implement the form that lets you document patron payments and other financial adjustments to items in the patron’s record.
I’ve added the PatronPayment form to the collection of project files, but it’s not yet integrated into the project. Select the PatronPayment.vb file in the Solution Explorer, and then change its Build Action property (in the Properties panel) from None to Compile. Figure 19-12 shows the controls on this form.
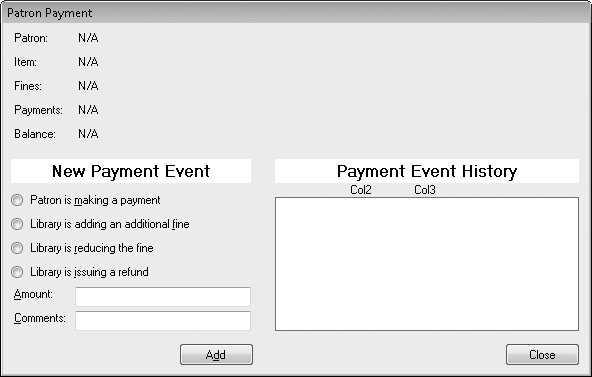
Fines that are automatically added to an overdue item appear in the PatronCopy.Fine database field. Although that value is displayed on the Patron Payment form, it’s not the primary focus of that form. Instead, the form exists to allow a librarian to enter charges and payments for a previously checked-out item, storing these updates in the PatronPayment database table. This table tracks four types of financial events for each item checked out by a patron:
Additional fines imposed by a librarian or administrator. For example, a librarian may add the value of an item as a fine if it turns out that the patron has lost the item. Additional fine entries use the letter F in the
PatronPayment.EntryTypedatabase field.Payments made by the patron for an overdue item. P is the entry type.
A dismissal of some or all of the pending fines for an overdue item, indicated by a D entry type.
If the entry type is R, the record indicates a refund paid to the patron by the library.
Each PatronPayment table record includes a transaction date, the amount of the transaction, optional comments, and the identity of the administrative user recording the entry. To make the code a little clearer, the letter codes in the database table are converted into enumeration values from the EventEntryType enumeration.
Private Enum EventEntryType
   NotDefined
   PatronPayment
   FineAdded
   FineDismissal
   RefundToPatron
   OverdueFines
End Enum
The OverdueFines entry allows the PatronCopy.Fines value to be part of the displayed financial history on the form.
The librarian uses the fields in the New Payment Event section of the PatronPayment form to add charge and payment records. All previously added records appear in the EventHistory list, in the Payment Event History section of the form.
The calling form (added later in this chapter) needs to pass in the PatronCopy.ID value to identify the proper record. But the plan is to have payments added on this form flow back to the parent form. The two forms will share a set of PaymentItem objects using the class we added a few sections earlier in this chapter. We’ll store it in a local member variable as a generic set.
Private PaymentsOnly As Generic.List(Of PaymentItem)
The entry point into the form will be a public method named ManagePayments. Add that code now to the PatronPayment class.
INSERT SNIPPET
Insert Chapter 19, Snippet Item 3.
Public Sub ManagePayments(ByVal patronCopyID As Integer, _
      ByVal sessionPayments As Generic.List(Of PaymentItem))
   ' ----- Manage the payments for an item.
   ActivePatronCopyID = patronCopyID
   PaymentsOnly = sessionPayments
   Me.ShowDialog(  )
End Sub
This method records the patron-copy ID number and the collection of payments for that checked-out item. Processing then moves on to the form’s Load event handler. It’s in this routine that we will add our localized financial management code. In the PatronPayment_Load routine, scan down about one-third of the way through the method to the code that loads in the “summary details” from the database. Just after the line:
RecordItem.Text = CStr(dbInfo!Title)
add the statements that will globally format currency values for the Fines, Payments, and Balance summary labels that appear near the top of the form.
INSERT SNIPPET
Insert Chapter 19, Snippet Item 4.
originalFine = CDec(dbInfo!Fine)
RecordFine.Text = Format(originalFine, "Currency")
RecordPayments.Text = Format(CDec(dbInfo!Paid), "Currency")
balanceDue = originalFine - CDec(dbInfo!Paid)
RecordBalance.Text = Format(balanceDue, "Currency")
The rest of the Load event handler’s code loads existing records from the PatronPayment table, plus the original overdue fine, if any, from the PatronCopy.Fine database field.
Later, when the user clicks the Add button to add a new financial event to the patron-and-item-copy entry, the SaveEventData routine—equivalent to the SaveFormData method in most of the other forms we’ve developed so far—saves the updated information in the database. This routine needs to save the new charge or payment in the PatronPayment table, plus update the charge and payment summary in the PatronCopy record. Add the code that writes out these records, just after the calculations for the fineAmount and paidAmount variables in the SaveEventData method.
INSERT SNIPPET
Insert Chapter 19, Snippet Item 5.
' ----- Add the entry to the database.
TransactionBegin(  )
sqlText = "INSERT INTO PatronPayment (PatronCopy, " & _
   "EntryDate, EntryType, Amount, Comment, UserID) " & _
   "OUTPUT INSERTED.ID VALUES (" & ActivePatronCopyID & _
   ", GETDATE(  ), " & DBText(entryCode) & ", " & _
   RecordAmount.Text & ", " & _
   DBText(Trim(RecordComment.Text)) & _
   ", " & LoggedInUserID & ")"
newID = CInt(ExecuteSQLReturn(sqlText))

sqlText = "UPDATE PatronCopy SET Fine = " & fineAmount & _
   ", Paid = " & paidAmount & " WHERE ID = " & _
   ActivePatronCopyID
ExecuteSQL(sqlText)
TransactionCommit(  )
I’ve wrapped up both database statements in a transaction to help ensure the integrity of the data. Once the database is up-to-date, it’s time to update the screen. The on-screen list of charges and payments needs this new record. That list uses the local EventHistoryItem class, a variation of the application-wide ListItemData class that we usually use in ListBox controls. EventHistoryItem has fields that are specific to displaying financial information in the EventHistory listbox. Add the code that builds an EventHistoryItem record and add it to the EventHistory list, immediately after the database update code we just added.
INSERT SNIPPET
Insert Chapter 19, Snippet Item 6.
' ----- Add an item to the entry list.
historyItem = New EventHistoryItem
historyItem.PaymentID = newID
historyItem.EntryDate = Today
historyItem.PaymentAmount = CDec(RecordAmount.Text)
historyItem.Comments = Trim(RecordComment.Text)
historyItem.EntryType = entryType
EventHistory.Items.Add(historyItem)
This code block is followed by similar code that updates the PaymentsOnly list, the Generic.List(Of PaymentItem) that was passed in from the calling form. The code either updates the existing payment summary record, or adds a new record to the generic list.
' ----- Add a new payment.
scanPayment = New PaymentItem
scanPayment.PatronCopyID = ActivePatronCopyID
scanPayment.ItemTitle = RecordItem.Text
scanPayment.FeesPaid = paidAmount
scanPayment.BalanceDue = fineAmount - paidAmount
PaymentsOnly.Add(scanPayment)
Before leaving this function, we need to refresh the three financial summary values near the top of the form, the ones we set when the form first loaded. Add this code just after the update to the PaymentOnly list.
INSERT SNIPPET
Insert Chapter 19, Snippet Item 7.
' ----- Update the on-screen values.
RecordFine.Text = Format(fineAmount, "Currency")
RecordPayments.Text = Format(paidAmount, "Currency")
RecordBalance.Text = Format(fineAmount - paidAmount, _
   "Currency")
The EventHistory list is a variable-line-height owner draw control, similar to one we designed in Chapter 18. Its MeasureItem event handler sets the height of each list item (comments appear on a second line when available), and its DrawItem event handler does the actual drawing of each data column and the comments.
The Patron Payment form lets a librarian enter individual fines and payments, but the program still needs a form to manage all fines and payments for a single patron, a form that calls up the Patron Payment form when needed. The new PatronRecord.vb form fulfills this need. I’ve added this form to your project, although you need to enable it. Select it in the Solution Explorer, and change its Build Action property (in the Properties panel) from None to Compile. Figure 19-13 shows the controls on this form.

This form is available to both administrators and patrons, although some of the fields are hidden from patron view.
The Password button leads to the Change Patron Password form we added earlier in this chapter. The Edit button, available only to administrators, provides access to the full Patron.vb form. The main section of the Patron Record form displays a list of all items the patron currently has checked out. It includes a Renew button that lets a patron extend the due date for a checked-out item. We’ll add the code for that feature in a later chapter.
The form also displays a summary of all pending fines and payments. Figure 19-14 shows the Fines tab and its fields.
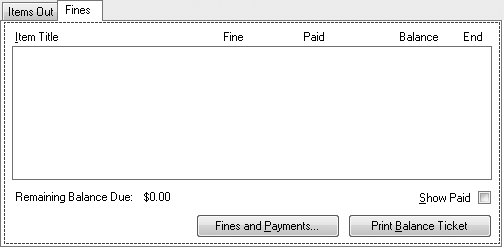
The Print Balance Ticket button generates a printed receipt of all fines and payments for the patron. We’ll add its code in a later chapter.
Most of the code in this form exists to manage fines and payments. To add a charge or payment, the librarian selects an item from the Fines list, and then clicks the Fines and Payments button. This brings up the just-added Patron Payment form.
The two main lists on the Patron Record form will each forgo the standard ListItemData class, and use a more property-rich class to support the display needs of each list. We’ll add this PatronDetailItem as a separate public class since (as we’ll see in a later chapter) it will be used elsewhere in the Library Project. Create a new class named PatronDetailItem.vb, and use the following code for its content.
INSERT SNIPPET
Insert Chapter 19, Snippet Item 8.
Private Class PatronDetailItem
   Public DetailID As Integer
   Public TitleText As String
   Public DueDate As Date
   Public FineAmount As Decimal
   Public PaidAmount As Decimal
   Public BalanceDue As Decimal
End Class
Now back to the PatronRecord form. As you can tell from looking at the form, the Fines list displays several columns of currency values. Let’s add the code that correctly formats the currency according to the regional monetary settings. First, locate the RefreshPaymentFines method. This routine adds up all fines and payments, and displays the result through the BalanceDue Label control.
Near the top of this routine is a comment that states, “Clear the current list.” Add the following code just after this comment.
INSERT SNIPPET
Insert Chapter 19, Snippet Item 9.
Fines.Items.Clear(  )
totalBalance = 0@
BalanceDue.Text = Format(0@, "Currency")
Me.Cursor = Windows.Forms.Cursors.WaitCursor
We could have just set the BalanceDue field to “$0.00,” but this would not be properly globalized. Using the Format function with “Currency” as the formatting rule still results in “$0.00” when used in America, but properly adjusts for other cultures as well.
The RefreshPaymentFines method does a whole bunch of calculations, and ends up with the remaining patron balance in the totalBalance local variable. Locate the comment that reads, “Show the total balance,” and add the following code just after it.
INSERT SNIPPET
Insert Chapter 19, Snippet Item 10.
BalanceDue.Text = Format(totalBalance, "Currency")
The Fines list, an owner draw ListBox implementation, also displays currency values. This is another list that forgoes the standard ListItemData class, using the local PatronDetailItem class instead for its item management. Locate the Fines_DrawItem event handler, and the “Extract the details from the list item” comment within that handler. Add the following code just after the comment.
INSERT SNIPPET
Insert Chapter 19, Snippet Item 11.
itemDetail = CType(Fines.Items(e.Index), PatronDetailItem)
titleText = itemDetail.TitleText
fineText = Format(itemDetail.FineAmount, "Currency")
paidText = Format(itemDetail.PaidAmount, "Currency")
balanceText = Format(itemDetail.BalanceDue, "Currency")
If (itemDetail.BalanceDue = 0@) Then useNotice = useBrush
This block properly formats each currency value. By default, all due amounts appear in red in the list. The last line in this code block resets the color to the neutral list item color if no balance is due.
That does it for the new patron-specific forms. Let’s enable access to them through the main Library form. Wow! It’s been awhile since I really looked at this form. I’ve forgotten what it looks like. Ah, yes. One of the main icons provides access to a patron’s record (see Figure 19-15).
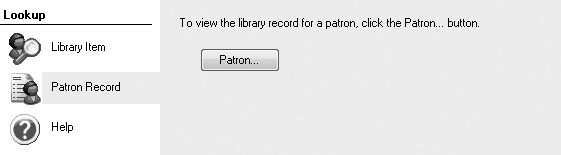
All we need to do is add an event handler for the Patron button. Locate the ActAccessPatron_Click event handler in the form’s source code. Then add the following code to that handler.
INSERT SNIPPET
Insert Chapter 19, Snippet Item 12.
' ----- Look up the record of an active patron.
Dim patronID As Integer

' ----- Get the ID of the patron.
patronID = (New PatronAccess).SelectPatron(  )
If (patronID = −1) Then Return

' ----- Show the patron record.
Call (New PatronRecord).ViewPatronRecord(patronID, True)
This code makes direct calls to two of the forms we added in this chapter: PatronAccess and PatronRecord. It first prompts the user to select a patron record, and then displays its details through the Patron Record form.
Let’s make one more change regarding patron records. Way back in an earlier chapter, we included a Manage Patron Items button on the Patron.vb form. This button existed to provide access to the future PatronRecord.vb form, but it’s pretty much been dead weight until now. But with the PatronRecord.vb form in place, we’re ready to make patron management history.
Open the source code for the Patron.vb form, and locate the ActItems_Click event handler. Then add the following code to it.
INSERT SNIPPET
Insert Chapter 19, Snippet Item 13.
Call (New PatronRecord).ViewPatronRecord(ActiveID, False)
This is all well and good, but you are probably thinking to yourself, “The Patron form now lets you open the Patron Record form. And that form has an Edit button that lets you once again open the Patron form. If you get a rogue librarian, there may be millions of patron management forms on the screen at once.” And that’s all true. So, we had to add some code to prevent that from happening. The second False argument to PatronRecord.ViewPatronRecord is a flag that says, “Don’t show the Edit button on the Patron Record form.” Similar code exists in the Patron Record form that stops the recursion.
Private Sub ActEditPatron_Click...
   If ((New Patron).EditRecordLimited( _
      ActivePatronID) <> −1) Then...
The EditRecordLimited method hides the Manage Patron Items button on the Patron.vb form. Whichever form you start with, you can access the other form, but you won’t be able to generate a new copy of the initial form.
There was a lot of new code in this chapter, but it was all very pedestrian. We could have made even more culturally sensitive changes. For example, the Due Date column in the list of checked-out items on the PatronRecord.vb form uses a hardcoded date format for its display.
dueDate = Format(itemDetail.DueDate, "MMM d, yyyy")
You could change this to Short Date or another culture-neutral setting. Whichever method you choose really depends on your target audience. And if that target audience likes to see things spelled out on paper, the next chapter on printing is just for you.