13.3 Event-Driven Programming with the Turtle
The turtle module provides three methods to register callbacks for key, mouse, and timer events:
▶
onkey▶
onclick▶
ontimer
In addition, the listen method is used to give the turtle canvas focus so that the event handler can respond to key presses. Each method has conventions for the parameters it accepts. TABLE 13.3 explains each of these methods to register callbacks for events, as well as the listen method.
TABLE 13.3 Turtle Methods to Register Callbacks |
|
|---|---|
Method |
Description |
|
Bind a function to a key press so that |
|
Bind a function to a mouse click, so that |
|
Bind a function to a timer event. The |
|
Give the current turtle’s canvas focus so it can listen for key events. Key events will not be recognized until this function is called. This |
Our video game will use all three of these callback types. In this section, we will investigate the use of these callbacks in more detail.
13.3.1 A Simple Etch-a-Sketch Using Key Presses
Let’s begin our investigation of event-driven turtle programming by creating a simple drawing program. In this program, the user can draw just by using the arrow keys. Each arrow key will have the following effect:
▶
Up: The turtle goes forward 5 pixels.▶
Left: The turtle turns counterclockwise by 10 degrees.▶
Right: The turtle turns clockwise by 10 degrees.▶
Down: The turtle backs up 5 pixels.
In addition, pressing the “q” key will cause the program to quit. Note that the arrow keys go by the special names Up, Left, Right, Down, respective to the direction of the arrows on the keys.
The turtle module allows us to add a callback function for any key by using the onkey method of a Screen object. This method takes two parameters: (1) a reference to a function and (2) the name of a key. For example, myScreen.onkey(myKey,'a') sets up a callback so that when the user presses the “a” key, the function myKey is called. This approach allows us to set up a different callback function for each key on the keyboard.
One important question remains: What about parameters? The first solution that might occur to you is to have the callback function for the left arrow call the turtle method left. But the left method requires a parameter. Perhaps you might think that the solution is to set up the callback by using myScreen.onkey(myTurtle.left(5),'Left')—but this would result in an error. Why? If you think about how Python evaluates the statement, you will realize that call-by-assignment parameter passing evaluates the parameters to a function call. Python will actually try to evaluate myTurtle.left(5), which will return the value None. The onkey method, however, expects to receive a reference to a function.
In the turtle module, the callback for keys cannot accept any parameters. In consequence, we will have to implement our callbacks with zero parameters and have them call the turtle methods with the appropriate parameters. With this point in mind, we will write five callback functions for our program, one for each of the arrow keys and one for the “q” key. In the case of the arrow keys, the callback functions will be short, because all we need to do is call the appropriate turtle function. The callback functions are shown on lines 19–32 of LISTING 13.3.
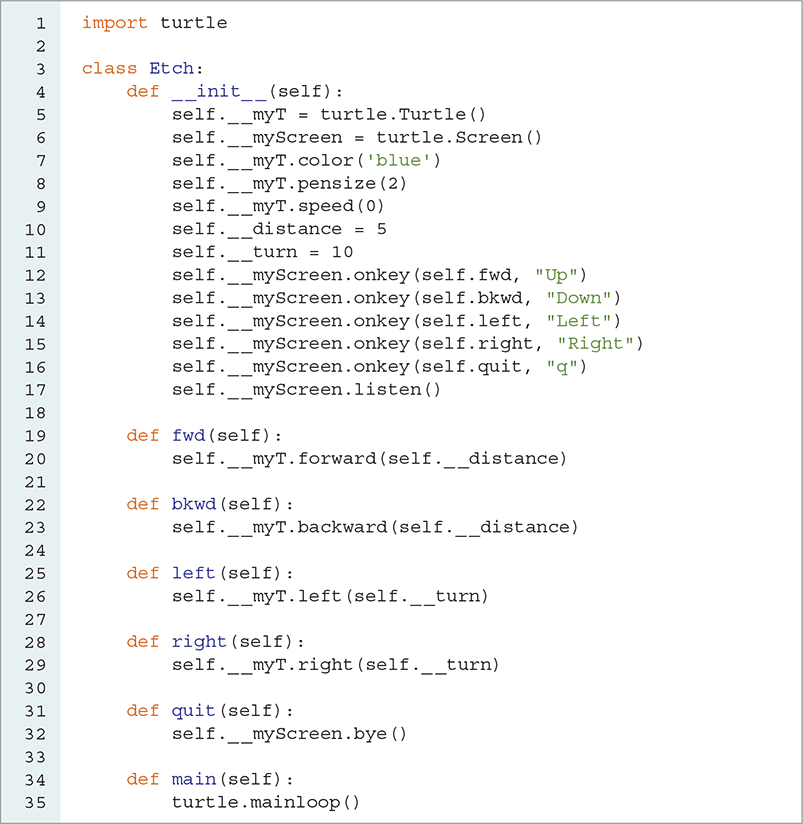
LISTING 13.3 A simple drawing program
The most interesting part for us is the _ _init_ _ method. In that method, we create a turtle, initialize its colors, create a screen, and set up the callback functions. The final line of _ _init_ _ calls the screen method listen, which specifically tells the screen to start listening for keyboard events.
The final method is main, which just calls the turtle.mainloop function. By now, you can probably guess that mainloop starts the event loop for the turtle so that the turtle can process events. This method call needs to be the last statement in a turtle graphics program. TABLE 13.4 describes the mainloop method.
TABLE 13.4 The |
|
|---|---|
Method |
Description |
|
Starts the turtle event handler so that the turtle graphics program can respond to events. This method call must be the last statement in a turtle graphics program. |
To run this little drawing program, you load the Etch class as defined in Listing 13.3 and then execute the command shown in SESSION 13.3.

SESSION 13.3 Running the drawing program
Once the program is running, you can create a drawing by pressing the arrow keys to move the turtle around the window.
The program in Listing 13.3 uses composition—a style of object-oriented programming in which the Etch class uses a turtle to do the bulk of the work and, therefore, “HAS-A” reference to a turtle as an instance variable. This approach is a common and useful way to think about programming. However, we can apply the concept of inheritance when thinking about this problem. The inheritance view of this problem would say that an Etch “IS-A” special kind of Turtle and, therefore, our Etch class would inherit from Turtle.
LISTING 13.4 shows how to implement our drawing program using inheritance. The main difference between this program and the previous one is that we do not explicitly create a reference to a turtle inside the Etch class, because now an Etch “IS-A” Turtle. So, the real work of creating the window and the Turtle part of our Etch object happens on lines 5–6. Notice that this also simplifies the rest of the code because we can now just call self.forward rather than self._ _myT.forward.

LISTING 13.4 The drawing program implemented with inheritance
Neither implementation of Etch is implicitly “right” or “wrong.” That is, the programs in Listings 13.3 and 13.4 are two alternative ways of accomplishing the same goal. Each has both advantages and disadvantages.
13.3.2 Placing Turtles Using Mouse Clicks
We will continue our investigation of event-driven programming by looking at how our programs can respond to mouse click events. To set up a callback for a mouse click, we call the onclick method and pass it the function to call whenever the mouse is clicked. The main difference between the keyboard callbacks and the mouse callbacks is that the function we write to handle mouse callbacks must accept two parameters, which will be the x and y coordinates of the cursor location when the mouse was clicked.
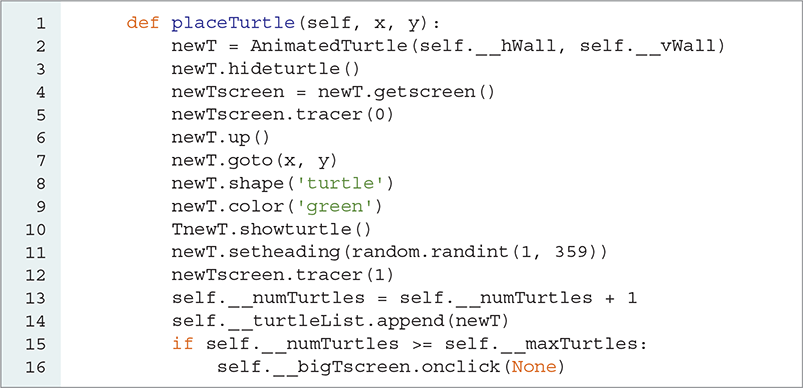
As a first example, let’s write an application to place turtles in the window. Wherever the user clicks the mouse, a new turtle will appear. The number of turtles that the user is allowed to create is passed as a parameter during startup time. Once the maximum number of turtles have been placed, no more turtles should be created.
To solve this problem, we create a class called TurtlePlace, which has three methods (see LISTING 13.5). The _ _init_ _ method creates the initial window and—unfortunately—an initial turtle. We hide the initial turtle. The _ _init_ _ method also calls onclick to register placeTurtle as the method to be called whenever the mouse is clicked. In addition, _ _init_ _ sets up a turtle counter so we can keep track of how many turtles we have created at any time. Finally, the third method, called drawField, draws a rectangle for the turtles to live in. Once the setup is done, _ _init_ _ calls mainloop to begin processing events.
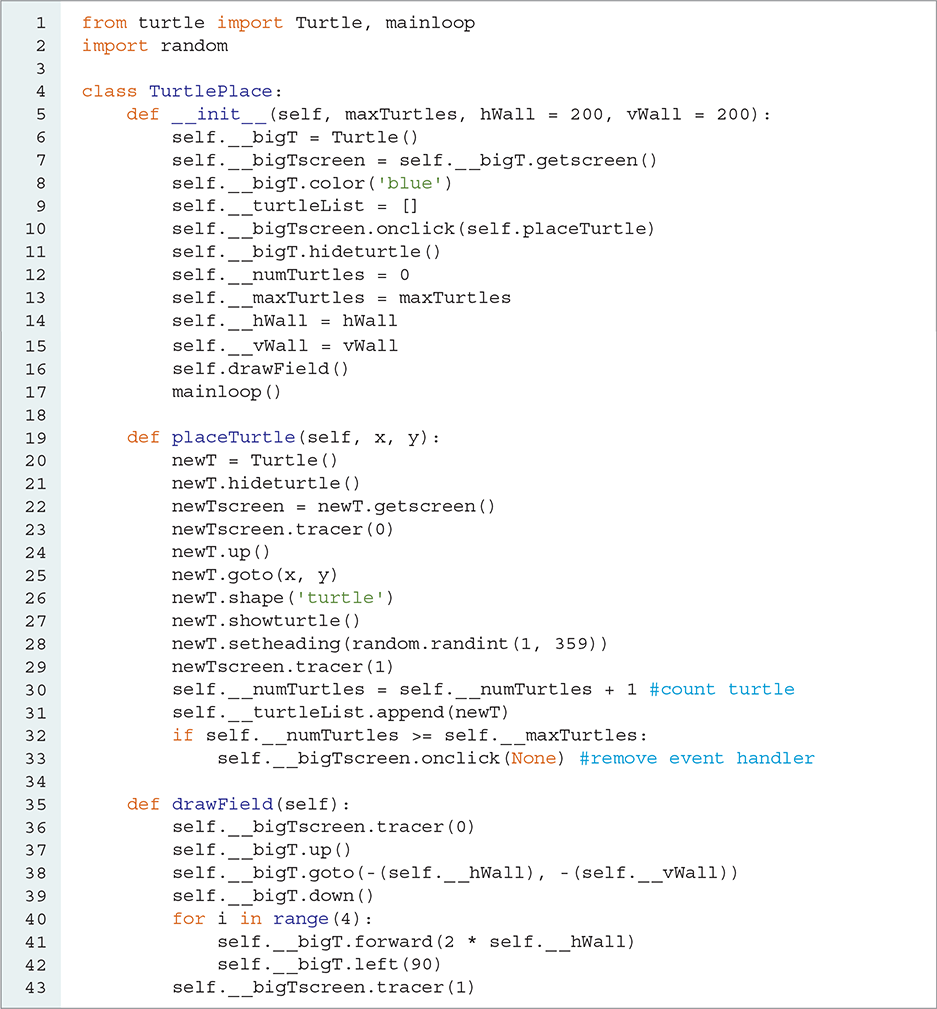
LISTING 13.5 A turtle placement program
The placeTurtle method creates a new turtle at position (x, y) in the window. It updates the number of turtles created, gives the turtle a random heading, and gives the turtle a fancy shape. Finally, placeTurtle checks whether maxTurtles have been created. If the limit on turtles is reached, then placeTurtle calls onclick and passes None as the function to call. Passing None to the onclick function effectively cancels the callback mechanism so that placeTurtle will no longer be called when the mouse is clicked.
To test the TurtlePlace implementation, you simply create an instance of TurtlePlace, passing the maximum number of turtles as a parameter. Because mainloop is called on the last line of the _ _init_ _ method, _ _init_ _ will never return and the event loop is started.
13.3.3 Bouncing Turtles
The final turtle event handler we examine is ontimer. We will use a timer to animate the turtles that are placed in the window using the TurtlePlace program. The ontimer method takes two parameters: (1) the callback function and (2) the number of milliseconds to wait before calling the function. Timer callback functions have no parameters.
For this part of our program, we would like to be able to move the turtles that we placed in the last section. We can animate a turtle by calling the forward method every few milliseconds. Furthermore, we want the turtles to bounce off the walls of an imaginary box and off each other as they move around.
We can approach this problem in several ways. The first solution, which we leave for you to implement later, is to take advantage of the self._ _turtleList instance variable, which keeps track of all turtles that have been created. Every so many milliseconds, a timer callback function will iterate over the turtles on the list and call the forward method on each turtle. This approach uses composition.
An alternative solution relies on inheritance. Suppose that rather than making a plain Turtle, we create a special kind of turtle called an AnimatedTurtle. Once an AnimatedTurtle is created, it automatically begins to wander around the box, bouncing off the walls and the other turtles.
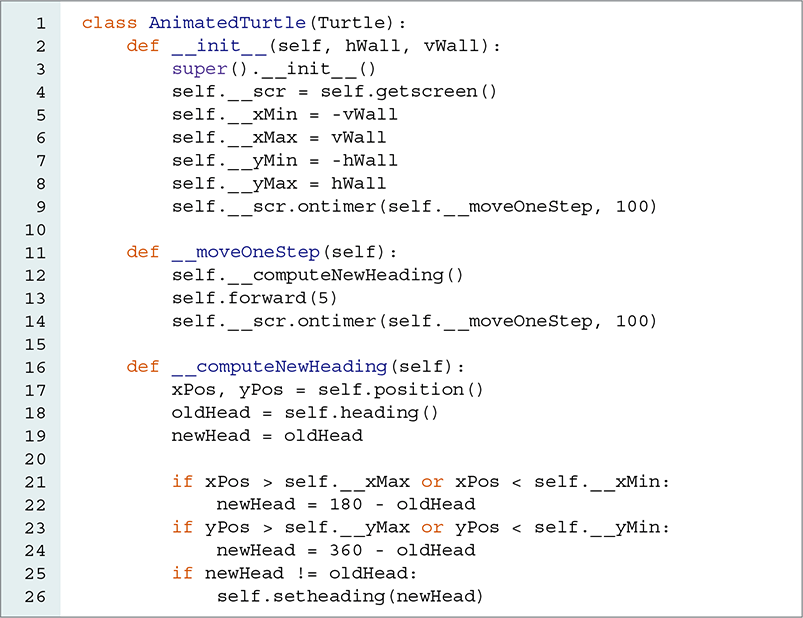
Because the animated turtle class is not meant to be controlled like a regular turtle, we will not add any methods that we expect the user to call. To this end, we name our two methods beginning with double underscores to hide those methods from code outside the AnimatedTurtle class. Recall that names that begin with two underscores undergo mangling by Python; mangling a name hides the name from any functions outside the class.
The important point to note in the AnimatedTurtle class is on line 9 of LISTING 13.6, which calls the ontimer method to set up a callback for the _ _moveOneStep method, causing the method to execute after 100 milliseconds.
LISTING 13.6 A class to implement an animated turtle
The _ _moveOneStep method calls the _ _computeNewHeading method to check whether the turtle has run into one of the boundary walls. If so, the _ _computeNewHeading method turns the turtle 180 degrees. If not, _ _moveOneStep method moves the turtle forward by 5 units. Note that a timer callback is good for only one interval; it does not repeat. Therefore, the last thing we do in the _ _moveOneStep method is reset the timer callback to execute again after another 100 milliseconds.
To integrate the TurtlePlace class with the AnimatedTurtle class, we need to modify the placeTurtle method so that it creates an AnimatedTurtle rather than a plain Turtle. The AnimatedTurtle also requires that we pass its boundaries as parameters. The new placeTurtle method is shown in LISTING 13.7, where only line 2 is different from the same method in Listing 13.5.
LISTING 13.7 A modified placeTurtle method
At this point, we must load both the modified TurtlePlace and AnimatedTurtle turtle classes. Once the classes are loaded, we can start the whole program by typing

This statement creates a new instance of the TurtlePlace class that allows us to create five new turtles in a box with dimensions of 400-by-400 units.
The turtles bounce off the walls, but at this point they go right through each other if their paths cross. Clearly, this is not a realistic simulation of turtle behavior. The next step to make our program more realistic is to add the ability for turtles to bounce off each other.
There is no magic to this part of the solution. To find out if a turtle has “hit” another turtle, we will need to check the distance between the moving turtle and all the other turtles. You might be tempted to think that some very elegant solution to this problem exists. In fact, for this application, a simple brute-force check of all other turtles will work quite well.
The question is how to keep track of all the turtles. Of course, we will want to use a list, but where will we keep that list? Who is responsible for adding turtles to the list, and how can we ensure that each AnimatedTurtle has access to the list of all other turtles? We could use the turtleList instance variable in the TurtlePlace class, but then every animated turtle would need to have a reference to an instance of TurtlePlace.
The answer is to use a static variable—a variable that is shared by all instances of a class and is available to all the methods in the class. LISTING 13.8 creates a static variable on line 3. As you can see, static variables are defined inside the class but outside any method definition.
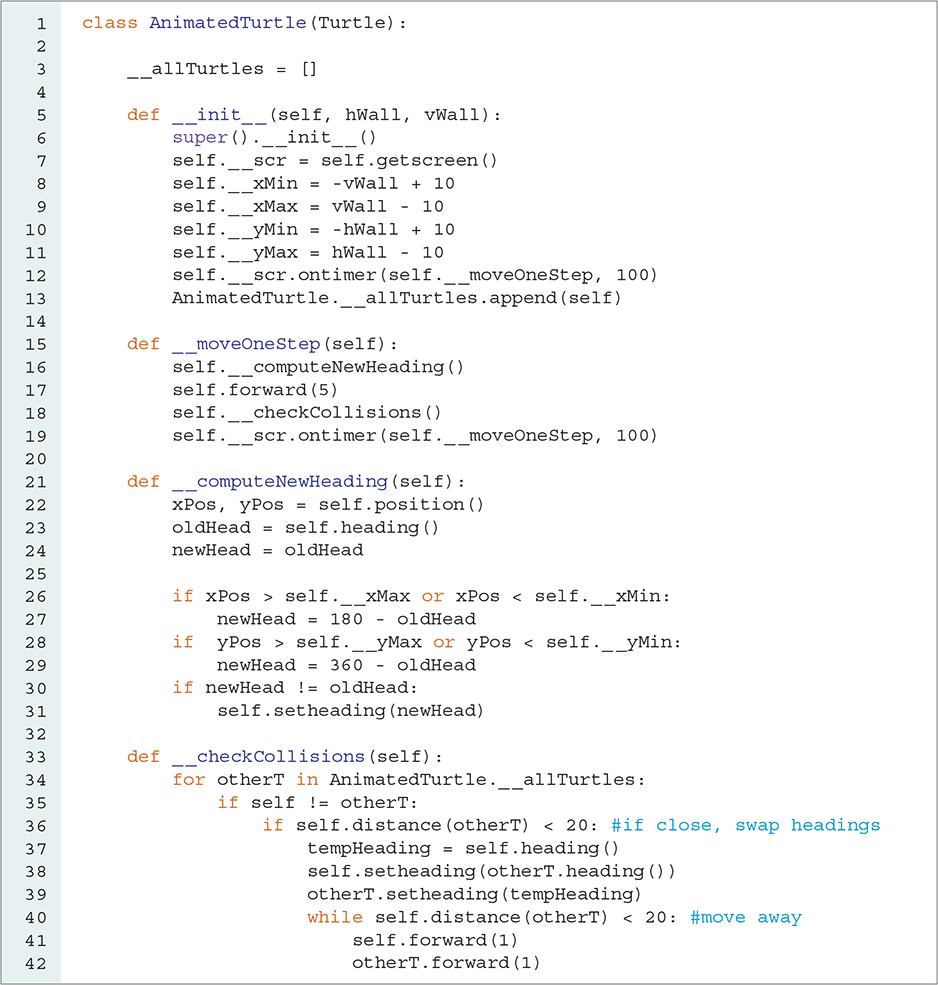
LISTING 13.8 An AnimatedTurtle class with turtle–turtle collision detection
With the static variable _ _allTurtles defined, the _ _init_ _ method can add new turtles to this list as they are created using the statement AnimatedTurtle. _ _allTurtles.append(self). Similarly, the _ _checkCollisions method can now access the list of all turtles by referencing the variable AnimatedTurtle._ _allTurtles. Notice that when we reference a static variable, we use the class name rather than self. The beauty of the static variable approach is that it keeps the accounting of all the animated turtles inside the AnimatedTurtle class.
To calculate the approximate distance between two turtles, we will use the distance method provided by the turtle module; this method calculates the distance between the center points of two turtles. To make our simulation look more realistic, we need to think about the distance between the edges of the circles that circumscribe the two turtles. In other words, if the edges of the circles touch, we should consider that the two turtles have collided.
With this in mind, take a look at the _ _checkCollisions method in Listing 13.8. This method uses two loops. One loop iterates over all the turtles on the AnimatedTurtle. _ _allTurtles list. The statement if self != otherT ensures that we do not compute the distance between the same turtle using two different references. If the turtles are too close, then they bounce off each other by exchanging their headings. This behavior assumes that turtles collide in a perfectly elastic collision, which may not be the case in nature, but is easy to program. The loop—a while loop—moves the turtles forward along their new headings to ensure that they are no longer inside the collision distance. If we omit the while loop, our program may produce some funny-looking simulations in which the turtles may appear to be stuck together for a short time.
FIGURE 13.3 shows 5 turtles moving around the screen in various directions.
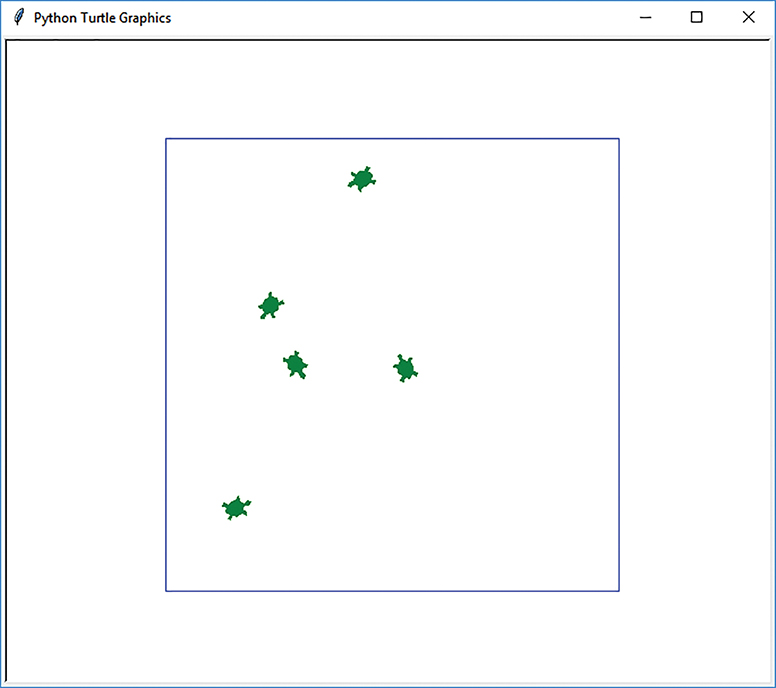
FIGURE 13.3 Animated turtles with collision detection.
© 2001–2019 Python Software Foundation. All Rights Reserved.