
Chapter 20. Creating QuickViews by Using QuickViewer
In this chapter
Creating a QuickView by Using QuickViewer 245
The Options Available on the QuickViewer Screen 249
Using QuickViewer in Layout Mode 251
Converting a QuickView to a SAP Query 251
QuickViewer Security Considerations 253
Creating reports by using the QuickViewer tool is easy. This chapter outlines how to create basic reports, called QuickViews, by using the QuickViewer tool.
Helpful Hint
Although it is recommended that you create SAP query reports live in your production environment, it is important while you are learning and training to practice in your test quality assurance client so as not to have any impact on production while you are learning.
Understanding QuickViewer
Unlike the SAP Query tool, which is a complete reporting solution tool, the SAP QuickViewer tool, delivered with SAP version 4.6 and above, is a WYSIWYG (what you see is what you get) utility for quickly collecting data from an R/3 system. To define a report by using the QuickViewer, you simply enter texts (titles) and select fields and options to define the QuickView. With this tool, you create QuickViews, not reports. Users cannot share QuickViews as they can reports, but they can convert QuickViews to reports to use them with the SAP Query tool.
Like the other Query tools, the QuickViewer allows you to define reports without having any technical or programming knowledge. The QuickViewer is especially useful for new users and occasional system users. The QuickViewer is basically a single-screen version of the SAP Query tool. Although QuickViews are user dependent, you can convert a QuickView into a SAP Query report to make the information available to others.
QuickViews have the same functional attributes as queries. However, there are a number of differences between QuickViews and queries created using the SAP Query tool:
• Basic lists—QuickViews can define only basic lists, as opposed to the multiple-line queries and ranked or statistical lists that the SAP Query tool can create.
• Security—Security initial setup is simpler in the QuickViewer than in the SAP Query tool because no query group assignment is necessary with QuickViews.
• User dependency—Each user has his or her own personal list of QuickViews, and unless they are converted to SAP queries, QuickViews cannot be shared or exchanged among users.
• Data source—Unlike with the SAP Query tool, with the QuickViewer, you are not required to use an InfoSet. When you define a QuickView, you can specify its data source dynamically. You can use tables, database views, table joins, logical databases, and even InfoSets as the data sources for QuickViews.
• Modes—A similarity between the SAP Query tool and the QuickViewer is that each provides two modes for designing reports: a standard mode (called Basis mode) and a graphical mode (called Layout mode).
The QuickViewer emulates the SAP Query reporting tool on a single screen. It is divided into three major sections:
• The top left lists the tables and data fields contained in the data source.
• The bottom left is the Help application.
• The right side of the screen is the QuickViewer main screen, where you design a QuickView. The main screen section has three tabbed sections that you use to specify a QuickView.
Creating a QuickView by Using QuickViewer
Creating a QuickView by using the QuickViewer tool is simple. You just follow these steps:
Note
Like the SAP Query tool, QuickViewer can be run in two modes: Basis (standard) and Layout (graphical) mode. In Basis mode, the system automatically renders the report from specified parameters, and in Layout mode, a user can tweak the report’s interface via a visual tool that allows dragging and dropping. As with the SAP Query tool, it is easier to work with the QuickViewer in Basis mode.
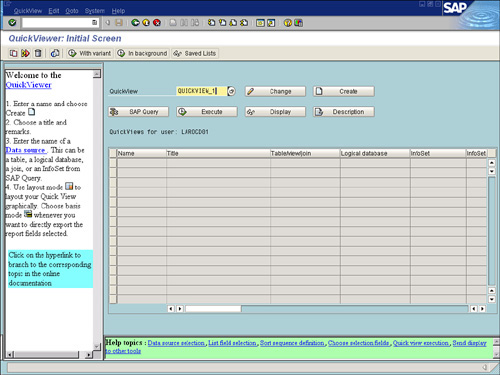
1. Navigate to the main screen of the SAP R/3 QuickViewer by using transaction SQVI (see Figure 20.1). (You can also open the QuickViewer’s main screen by clicking the QuickViewer button on the main screen of the SAP Query tool or by choosing an application-specific role from the Easy Access menu.)
Figure 20.1. The main screen of the QuickViewer reporting tool looks very similar to the main screen of the SAP Query tool.
2. On the main screen, enter a name for your QuickView (for example, QUICKVIEW_1) and then click the Create button. A dialog box appears, asking you to select your data source (see Figure 20.2).
Figure 20.2. The selection of a data source at design time mirrors the process of creating a data source during configuration.
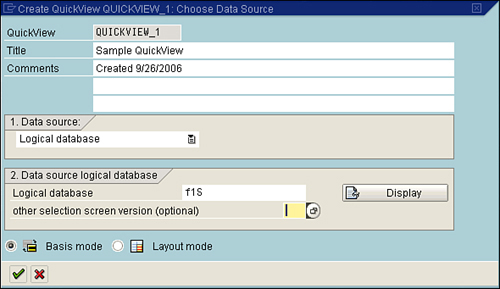
3. On the Create QuickView: Choose Data Source dialog box, insert a title (for example, Sample QuickView) and, if desired, insert comments (for example, the date it was created).
4. Identify where your data is coming from by selecting an option in the Data Source field (for example, a logical database). When you select a data source, the bottom of the screen changes to show suboptions specific to the data source (for example, a specific logical database). For this example, enter the logical database Flight Scheduling System (f1S).
5. At the bottom of the dialog box, choose to create the QuickView in Basis mode. When you are done making entries and selections in this dialog, click the green arrow Enter button.
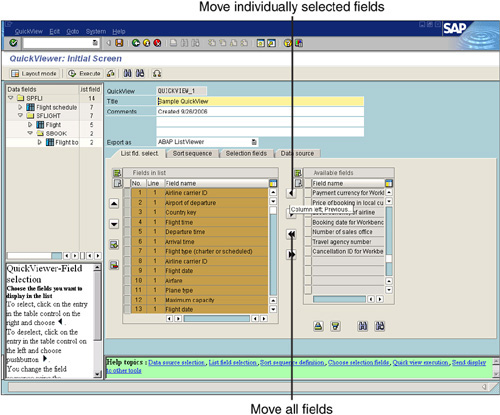
6. Select the first tab on the main screen, the List Fld. Select tab, which lists the output fields. Select any fields on the right side of the screen, listed in the Available Fields grouping, by selecting the gray keys to the left of the field names, and then click the left-pointing single-arrow button between the two groupings. To move all fields in the data source so that they will be included in your report output, click the left-pointing double-arrow button (see Figure 20.3).
Figure 20.3. You indicate what fields you want to be output in your QuickView by using the Fields in List column section of the main screen.
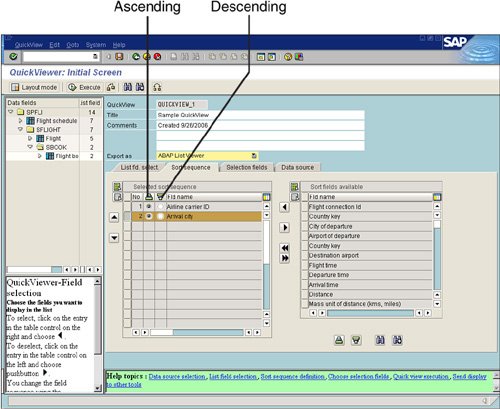
7. Select the second tab, Sort Sequence, to dictate the sort order for the selected fields (see Figure 20.4). Indicate a desired order by selecting fields on the right side of the screen, in the Available Fields grouping, and then click the left-pointing single-arrow button between the two groupings. The selected fields appear in the Fields in List column, in the order in which they were selected. Use the radio buttons to the left of the fields to specify that you want the field to be sorted in ascending or descending order.
Figure 20.4. You can sort in ascending or descending order.
8. Select the third tab, Selection Fields, to indicate what fields to include on the QuickView’s selection screen upon execution (see Figure 20.5). (Note that some fields already exist, as indicated by a lock icon, based on designations in the logical database—f1S in this case—selected for the QuickView.) Select fields on the right side of the screen, in the Available Fields grouping, and then click the left-pointing single-arrow button between the two groupings. The selected fields appear in the Selection Fields column. For example, Figure 20.5 shows that the Flight Class field has been added.
Figure 20.5. You can add fields to the selection screen to specify particular data upon execution.

9. Select the fourth tab, Data Source, to confirm that the QuickViewer is using the correct data source for this QuickView (see Figure 20.6).
Figure 20.6. You can display the details of your data source by clicking the Display button.
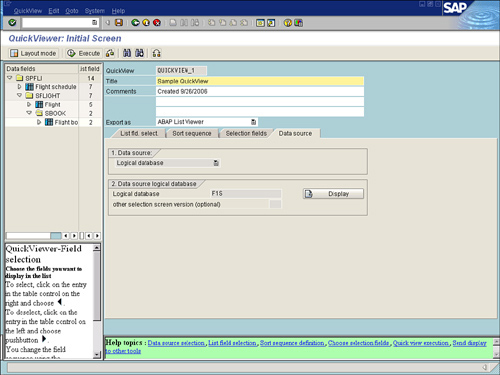
10. Note in the middle of the screen that you have different export options for the QuickView. SAP List Viewer is the default, but you can select a different option from the Export As drop-down box.
11. Click the Execute button on the Application toolbar to view the report’s selection screen. If needed, further specify your selections on the selection screen.
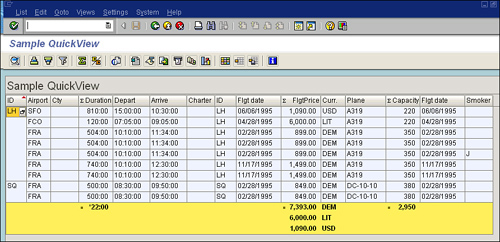
12. Click the Execute button to see your completed QuickView, which should look similar to the QuickView shown in Figure 20.7.
Figure 20.7. The QuickView output looks similar to the output of an SAP query.
The Options Available on the QuickViewer Screen
The QuickViewer reporting tool provides a number of options on its four tabs.
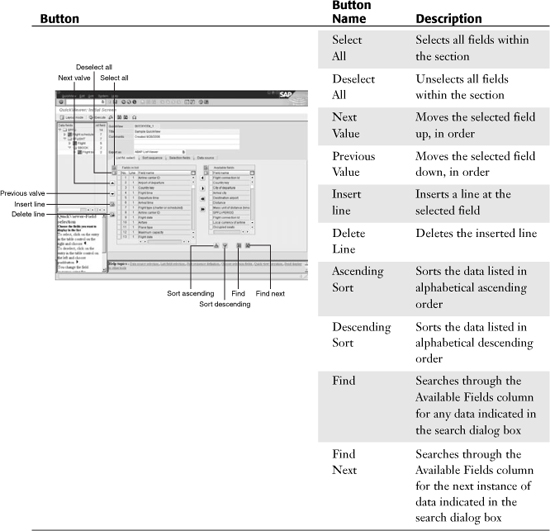
The first tab in the QuickViewer, Output Fields, lists all the fields that will be included in your QuickView output. This tab has 10 buttons; their functions are described in Table 20.1.
Table 20.1. Buttons on the Output Fields Tab of the QuickViewer
Modifying a QuickView
After you create a QuickView, only you have access to it, because it is user-dependent (unless you convert it to an SAP query). However, you can return to an existing QuickView and make changes by following these steps:
1. Navigate to the main screen of the SAP R/3 QuickViewer by using transaction SQVI. (You can also open the QuickViewer’s main screen by clicking the QuickViewer button on the main screen of the SAP Query tool or by choosing an application-specific role from the Easy Access menu.)
2. Select an existing QuickView from the list (or type in its name) and then click the Change button. The QuickViewer: Initial screen appears.
3. Make any required changes to the QuickView.
4. Save your changes by clicking the Save button on the Application toolbar.
Using QuickViewer in Layout Mode
As mentioned earlier in this chapter, you can use the QuickViewer in Basis or Layout mode. Layout mode provides a graphical representation of the QuickView. To see a QuickView in Layout mode, follow these steps:
1. Navigate to the main screen of the SAP R/3 QuickViewer by using transaction SQVI. (You can also open the QuickViewer’s main screen by clicking the QuickViewer button on the main screen of the SAP Query tool or by choosing an application-specific role from the Easy Access menu.)
2. Select an existing QuickView from the list (or type in its name) and then click the Change button. The QuickView main screen appears.
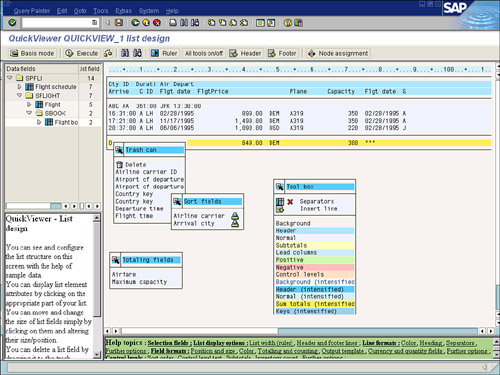
3. Select Goto, Layout Mode (or press F5). The screen displays graphically, as shown in Figure 20.8.
Figure 20.8. The QuickView output looks similar to the output of the SAP Query tool when displayed in Layout mode.
Converting a QuickView to a SAP Query
As mentioned earlier in this chapter, QuickViews are user-dependent, and other users cannot use them. If you have created a QuickView and you want to share it with others or add to it functionality that is not supported by QuickView, you can convert the QuickView to an SAP query. To do so, follow these steps:
Note
To convert a QuickView into an SAP query, you first choose a query group that you are assigned to and that you will want to assign your query to. If the QuickView you want to convert is based on an InfoSet, that InfoSet must be assigned to your query group. See Chapter 2, “One-Time Configuration for Query Tool Use,” for more information.
1. Navigate to the main screen of the SAP R/3 Query tool by using transaction SQ01.
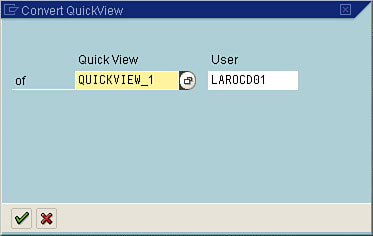
2. Select Query, Convert QuickView. A Convert QuickView dialog box, like the one shown in Figure 20.9, appears. The very first alphabetical QuickView you have created appears in this dialog, as does your username.
Figure 20.9. All the QuickViews you have created are listed in the QuickView drop-down box.
3. Click the green check mark Enter button. New fields appear on the dialog box (see Figure 20.10). Enter a name for your SAP query. Your assigned query group is listed here as the default query group.
Figure 20.10. You must input a name for your converted QuickView and declare an InfoSet.
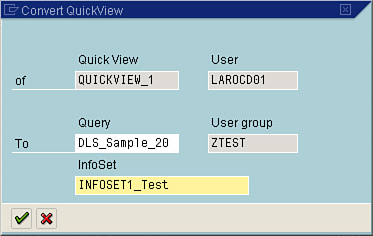
4. If the QuickView you want to convert was created using a logical database, a table, or a table join, input your choice for the InfoSet. The InfoSet is then generated automatically. Recall from Chapter 2 that the SAP Query tool’s functionality is based on InfoSets. To be able to proceed in the SAP Query tool, you must define an InfoSet (data source) for this query.
5. Click the green check mark Enter button. Your QuickView is now in your list of SAP queries.
QuickViewer Security Considerations
An important security distinction that applies to the QuickViewer does not apply to the InfoSet (Ad Hoc) Query tool or the SAP Query tool: the dynamic declaration of the data source.
If you think about the recommended strategies for deploying and configuring the data source with the SAP Query tool and the InfoSet (Ad Hoc) Query tool, you will recall that the configuration of the data source happens only in the development environment. A technical professional trained in your development environment must configure the InfoSet (data source) for reporting with the InfoSet (Ad Hoc) Query tool and the SAP Query tool. Furthermore, when creating InfoSets (data sources) with those tools, you should use logical databases to provide security. When a logical database is used within a data source and a user writes a query-based report by using that data source, the SAP solution is smart enough to determine who the user is and what the user has access to; it then restricts the user’s reporting results accordingly.
A QuickView’s data source is declared when the QuickView is built. So, for example, you can say you want to create a QuickView that uses a table. Doing so ensures that every field and every record in the table is available to you. This raises a security concern, however. With the ability to directly read tables, you can bypass traditional security concepts and have access to all data.
Let’s look at a real-world example from the Human Capital Management (HCM) module. In the HCM module, users commonly have access to different things. One level of access can be based on location. For example, some users would have access to all associates in New York, and others would have access to associates in California. When any SAP Query report is created that uses a logical database within its data source, the security settings specify which users can see which locations. For example, if Jim had access only to New York, his executed report would contain only New York associates, and if Dan had access only to California associates, upon execution of the same report, Dan would see only the California associates.
If a user created a QuickView by using the QuickViewer tool and specified the employee table directly (rather than the logical database that includes it), the user would see all associates (from New York, California, North Carolina, and so on) in his or her report output, bypassing security.
It is a best practice to choose one reporting solution and use it exclusively. Considering the security limitations of the QuickViewer, best practice dictates that it should not be the tool of choice.
Things to Remember
• Creating QuickViews is quick and easy.
• You must declare a data source when creating a QuickView.
• You can convert QuickViews to SAP queries.
• QuickViews are available only in SAP 4.6C and later.
• There are security implications for allowing end users to use the QuickViewer reporting tool.