
Chapter 11. Inserting Pictures and Graphics in SAP Queries
In this chapter
Using Symbols and Icons in an SAP Query 144
Inserting black-and-white Symbols in an SAP Query 146
Inserting black-and-white Symbols in an SAP Query by Using a Simple Condition 148
Inserting a Color Icon in an SAP Query by Using a Simple Condition 150
Inserting a Color Icon in an SAP Query Using Multiple Conditions with Two Operators 153
Chapter 9, “Creating Basic Calculated Fields with the SAP Query Tool,” discusses how you can create local fields to perform basic calculations without having any special technical training or security access. Chapter 10, “Creating Advanced Calculated Fields with the SAP Query Tool,” discusses advanced calculations that also do not require you to have any advanced training. In this chapter, you’ll use the skills you learned in the previous chapters to insert pictures and graphics. This chapter explains the calculations you can use to insert black-and-white pictures and color icons into SAP queries. A regular end user can perform these calculations in an SAP query without having any special ABAP training or security provisions.
Using Symbols and Icons in an SAP Query
SAP has several dozen black-and-white pictures and color graphics that you can insert into reports. These symbols and icons are available to be used in any type of reporting, from SAP Query tool reporting to custom ABAP reporting.
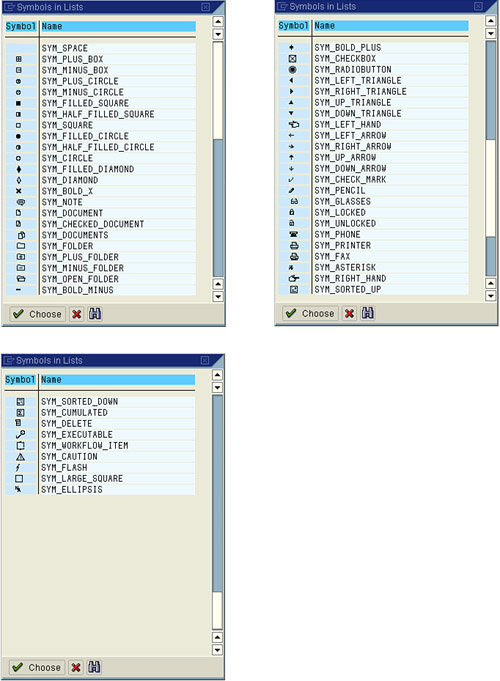
Each symbol and icon in SAP has a technical name, which is stored in the SAP database. If you were writing a custom ABAP report, you would need to know these technical names and reference them in your code. For example, to reference the Carrier ID field from the SAP IDES Flight Scheduling test system in a report, you would reference its technical name, CARRID. With symbols and icons in SAP it works the same way, in that you need to reference the technical name of an object to include it in an SAP query report. Figure 11.1 lists the black-and-white symbols that are available in SAP.
Figure 11.1. Symbols available in SAP Version 4.6C.
Creating the Basic SAP Query for the Examples
For the examples in this chapter, it would be ideal if you could follow along in your own SAP system. To do so, you need to create a basic SAP query, using the instructions outlined in Chapter 3, “Creating Basic Reports with the SAP Query Tool.” Your SAP query should contain the fields listed in Table 11.1.
Table 11.1. Specification of a Sample SAP Report from the IDES System
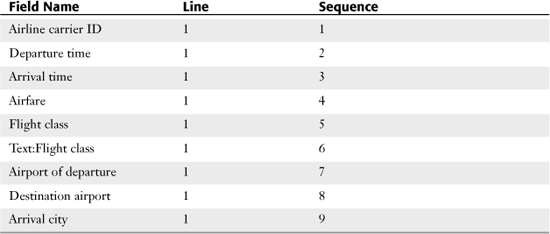
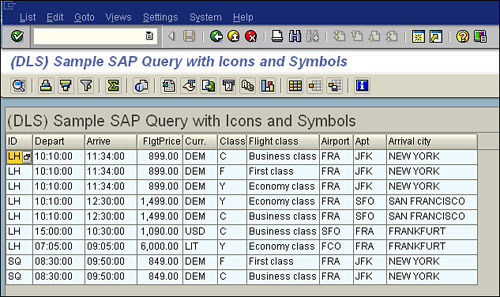
Figure 11.2 shows an example of the report output of this report.
Figure 11.2. The output in the report depends on your SAP installation, but the column format should be the same as shown here.
Inserting Black-and-White Symbols in an SAP Query
There are many instances in which you might want to insert a symbol in a report. The most popular use of symbols is for the insertion of field-relevant pictures. For example, you could easily insert a picture of a telephone next to a column containing telephone numbers. To use local fields to insert a symbol, follow these steps:
1. Navigate to the main screen of the SAP Query tool, using transaction code SQ01. Select the query you want to work with (for example, DLS_QUERY_11) and then click the Change button.
2. Navigate to the Select Fields screen by using the white forward Next button on the Application toolbar.
3. Select Edit, Short Names, Switch On/Off. This allows you to create short names for your existing query fields so that you can easily refer to them in calculations. Start by giving the Flight Class field the short name CLASS.
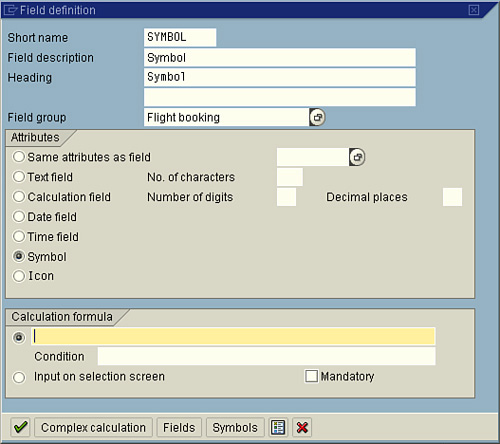
4. Select Edit, Local Field, Create. Because your cursor was on the Flight Class field, a custom field is added to its field group (Flight Booking Table). The Field Definition dialog box appears.
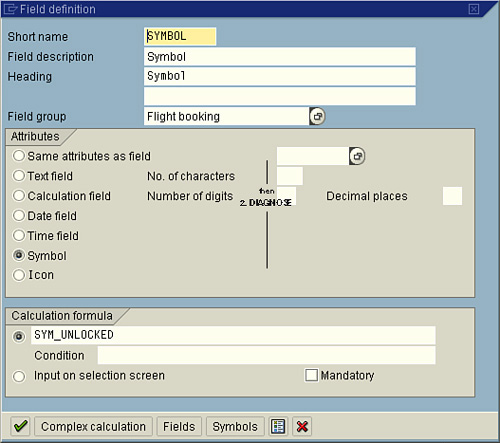
5. In the Field Definition dialog box, input a short name for your newly created local field (for example, SYMBOL) and input a field description (for example, Symbol), which will be the heading for the column in the report.
6. Define the attributes for the field. To output a symbol, select the Symbol option (see Figure 11.3).
Figure 11.3. When you set the Attributes section to Symbol, SAP formats the field so that a black-and-white picture can be displayed.
7. Click the Symbols button at the bottom of the Field Definition box to bring up a list of symbols and their names (refer to Figure 11.1). Note the name of the symbol you want to use, because you will need to type it in in the next step. For example, you could select SYM_UNLOCKED, a symbol representing an item that is unlocked.
8. Although the Symbols in Lists dialog box has a button labeled Choose, you actually have to click the green check mark Choose button to return to the Field Definition dialog box and type your symbol name in the Calculation field (see Figure 11.4). Press Enter to return to the SAP query.
Figure 11.4. The SYM_UNLOCKED symbol typically represents an item that is unlocked.
9. To add the newly created field to your report output, confirm that the field is selected on the Select Field screen. In other words, the small box to the right of the Symbol field at the bottom of the Flight Booking field group should be selected.
10. Navigate to the Basic List Line Structure screen by clicking the Basic List button on the Application toolbar. You should see your newly created field listed there. Add the new local field to your report output on the Basic List screen of the SAP Query tool by using the skills you learned in Chapter 3 (indicating a line and sequence number). Click the Save button on your SAP query.
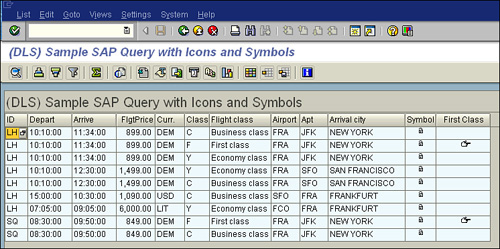
11. Execute your report by clicking the F8 Execute button; you are presented with the SAP query’s standard selection screen. Click the F8 Execute button again to see your updated SAP query, which now contains your newly added symbol (see Figure 11.5).
Figure 11.5. The added symbol field appears in the report output in the last column, as indicated on the Basic List Line screen.

Inserting Black-and-White Symbols in an SAP Query by Using a Simple Condition
You have inserted a picture in every row, which can be helpful if the picture is representative of all the data in the report. For this next example, however, let’s use a condition to determine whether the picture should be output in each row.
In some cases, you might want to output a picture only if a certain condition exists. For an example using the SAP query you just worked with, you can create a local field that contains a symbol that appears if the passenger is listed as flying in first class. Best practice is to include the output of a symbol or icon in either the first or last position of your report data to call attention to that record.
To output a symbol based on a single condition, follow these steps:
1. Navigate to the main screen of the SAP Query tool, using transaction code SQ01. Select the query you want to work with (for example, DLS_QUERY_11) and then click the Change button.
2. Navigate to the Select Fields screen by using the white forward Next button on the Application toolbar. If the short names are not already displayed, select Edit, Short Names, Switch On/Off. This allows you to create short names for your existing query fields so that you can easily refer to them in calculations. Enter the short name CLASS for the Flight Class field in the Flight Booking field group.
3. Place your cursor on the field name that you will base your calculated field on (for example, the Flight Class field).
4. Select Edit, Local Field, Create. Because your cursor was on the Flight Class field, a custom field is added to its field group (Flight Booking Table). The Field Definition dialog box appears.
5. In the Field Definition dialog box, input a short name for your newly created local field (for example, FCLASS) and input a field description (for example, First Class Indicator).
6. Define the attributes for the field. Indicate that the field will be a symbol.
7. Click the Symbols button at the bottom of the Field Definition box to bring up a list of symbols and their names (refer to Figure 11.1). Note the name of the symbol you want to use, because you will need to type it in in the next step. For example, you could select SYM_RIGHT_HAND, a symbol representing a hand pointing to the right.
8. Although the Symbols in Lists dialog box has a button labeled Choose, you actually have to click the green check mark Choose button to return to the Field Definition dialog box and type your symbol name in the Calculation field (see Figure 11.6).
Figure 11.6. You can add a symbol to report based on a condition.
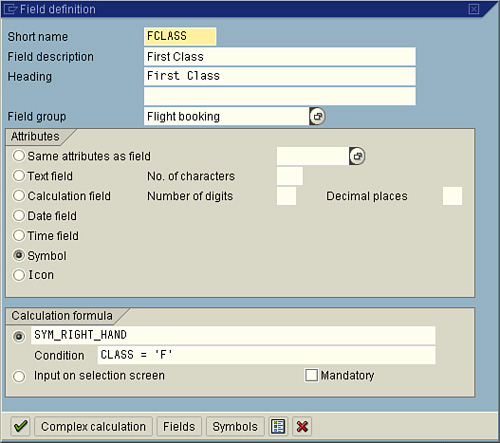
9. At the bottom of the Field Definition dialog, position your cursor in the text box to the right of the radio button labeled Condition, and then type the condition CLASS = 'F'. This translates to output the symbol if the class is first class. Press Enter to return to the SAP query.
10. To add the newly created field to your report output, confirm that the field is selected on the Select Field screen. In other words, the small box to the left of the First Class Indicator field at the bottom of the Flight Booking field group should be selected.
11. Navigate to the Basic List Line Structure screen by clicking the Basic List button on the Application toolbar. You should see your newly created field listed there. Add the new local field to your report output on the Basic List screen of the SAP Query tool by using the skills you learned in Chapter 3 (indicating a line and sequence number). Click the Save button on your SAP query.
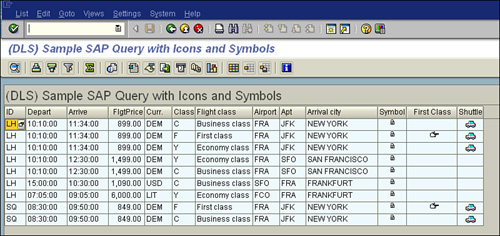
12. Execute your report by clicking the F8 Execute button; you are presented with the SAP query’s standard selection screen. Click the F8 Execute button again to see your updated SAP query, which now contains your new symbol for any line that contains data for a first-class passenger (see Figure 11.7).
Figure 11.7. The newly added column contains a symbol for any record that meets the indicated condition.
Note
Depending on your printer settings, symbols may appear slightly different in the printed document than onscreen. Symbols do not transfer to Microsoft applications.
Inserting a Color Icon in an SAP Query by Using a Simple Condition
There are many instances in which you might want to insert a color icon in a query report. The most popular use of icons is to identify certain records to make them stand out in electronic and printed reports. For example, you could easily insert a warning icon to indicate a line item in a report that requires special attention.
In this next example, you will insert an icon of a small car for any flight arriving in New York to indicate that those flights require shuttle transfers (via car) from the plane. To use local fields to insert an icon based on a single condition, follow these steps:
1. Navigate to the main screen of the SAP Query tool, using transaction code SQ01. Select the query you want to work with (for example, DLS_QUERY_11) and then click the Change button.
2. Navigate to the Select Fields screen by using the white forward Next button on the Application toolbar. If the short names are not already displayed, select Edit, Short Names, Switch On/Off. This allows you to create short names for your existing query fields so that you can easily refer to them in calculations. Enter the short name ACITY for the Arrival City field in the Flight Schedule field group.
3. Click the field name that you will base your calculated field on (for example, the ACITY field).
4. Select Edit, Local Field, Create. Because your cursor was on the Arrival City field, a custom field is added to its field group (Flight Schedule). The Field Definition dialog box appears.
5. In the Field Definition dialog box, input a short name for your newly created local field (for example, SHUTTLE) and input a field description (for example, Shuttle).
6. Define the attributes for the field. Indicate that the field will be an icon.
7. Click the Icons button at the bottom right of the Field Definition dialog box to bring up a list of icons and their names (see Figure 11.8). Use your cursor to select the name of the symbol you want to use. For example, you could select ICON_CAR, an icon representing a small car. Then click the Choose button. The Field Definition dialog box appears, with the icon name in the Calculation field (see Figure 11.9).
Figure 11.8. Icons, unlike symbols, are in color and are often larger.
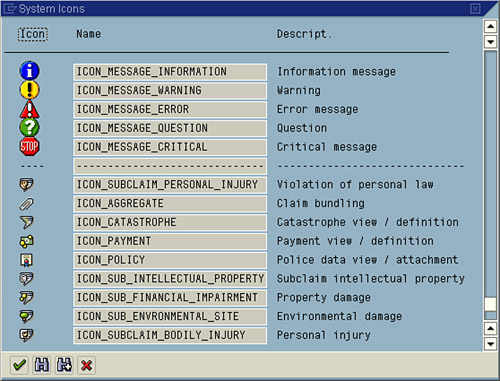
Figure 11.9. As with a symbol, the addition of an icon to a report can be based on a condition.

8. At the bottom of the Field Definition dialog, position your cursor in the text box to the right of the radio button labeled Condition and then type the condition ACITY = 'NEW YORK'. This translates to output the icon if the arrival city is New York. Press Enter to return to the SAP query.
9. To add the newly created field to your report output, confirm that the field is selected on the Select Field screen. In other words, the small box to the left of the Shuttle field at the bottom of the Flight Schedule field group should be selected.
10. Navigate to the Basic List Line Structure screen by clicking the Basic List button on the Application toolbar. You should see your newly created field listed there. Add the new local field to your report output on the Basic List screen of the SAP Query tool by using the skills you learned in Chapter 3 (indicating a line and sequence number). Click the Save button on your SAP query.
11. Execute your report by clicking the F8 Execute button; you are presented with the SAP query’s standard selection screen. Click the F8 Execute button again to see your updated SAP query, which now contains your newly added symbol (see Figure 11.10).
Figure 11.10. The newly added column contains an icon of a car for any record that meets the indicated condition.
Note
A color icon appears in an SAP List View (ALV) or in an ABAP list. Depending on your printer settings, icons may appear slightly different in a printed document than onscreen. Icons do not transfer to Microsoft applications.
Inserting a Color Icon in an SAP Query Using Multiple Conditions with Two Operators
As discussed in Chapter 10, you can use a calculated field to evaluate multiple conditions to produce output.
To use local fields to perform complex calculations, follow these steps:
1. Navigate to the main screen of the SAP Query tool, using transaction code SQ01. Select the query you want to work with (for example, DLS_QUERY_11) and then click the Change button.
2. Navigate to the Select Fields screen by using the white forward Next button on the Application toolbar.
3. Select Edit, Short Names, Switch On/Off. Start by giving the Airfare field the short name FARE.
4. Select Edit, Local Field, Create. Because your cursor was on the Airfare field, a custom field is added to its field group (Flight Demo). The Field Definition dialog box appears.
5. In the Field Definition dialog box, input a short name for your newly created local field (for example, POINT) and input a field description (for example, Price point), which will be the heading for the column in the report.
6. Define the attributes for the field. To output an icon, select the Icon option.
7. Click the Complex Calculation button to bring up the Define Field: Complex Calculation dialog box, which allows you to input multiple conditions. You input the conditions, as shown in Figure 11.11, very similarly to the way you enter them for a basic calculation; however, in this case, you enter more than one condition.
Figure 11.11. The Define Field: Complex Calculation dialog box lets you enter three conditions, although you are not required to use them all.
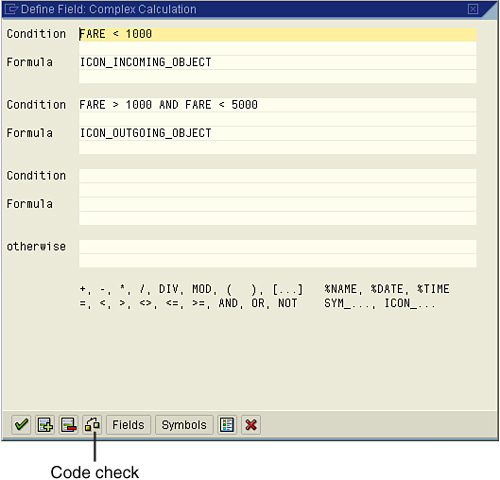
8. Type a condition in the Condition line (for example, FARE < 1000) and type the desired output if the condition is met in the Formula line (for example, ICON_INCOMING_OBJECT).
9. Proceed to the next Condition line and insert your second condition, using multiple operators (for example, FARE > 1000 AND FARE < 5000) and type the desired output if the condition is met in the Formula line (for example, ICON_OUTGOING_OBJECT).
10. To check that you have typed correctly, click the Code Check button, shown in Figure 11.11 (or press Shift+F4). Code Check then checks your syntax to ensure that there are no typos.
11. Click the green check mark Enter button on the Field Attributes dialog box to return to the SAP query.
12. To add the newly created field to your report output, confirm that the field is selected on the Select Field screen. In other words, the small box to the left of the Price Point field at the bottom of the Flight Demo field group should be selected.
13. Navigate to the Basic List Line Structure screen by clicking the Basic List button on the Application toolbar. You should see your newly created field listed there. Add the new local field to your report output on the Basic List screen of the SAP Query tool by using the skills you learned in Chapter 3 (indicating a line and sequence number). Click the Save button on your SAP query.
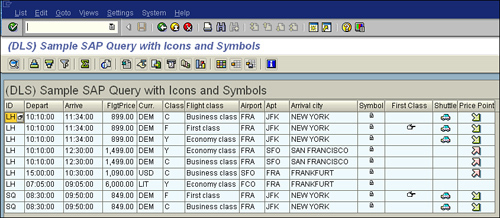
14. Execute your report by clicking the F8 Execute button; you are presented with the SAP query’s standard selection screen. Click the F8 Execute button again to see your updated SAP query, which now contains your newly added symbol (see Figure 11.12).
Figure 11.12. The added icon appears as a down-pointing arrow for rows where the airfare is less than 1,000 and as an up-pointing arrow for those over 1,000 but under 5,000.
Things to Remember
• You can use black-and-white symbols for basic or advanced calculations.
• You can use color icons for basic or advanced calculations.
• A symbol or icon will appear in an SAP List View (ALV) or ABAP List SAP query report but will not carry over to Microsoft applications.
• The manner in which a symbol or icon appears on a printed report varies based on the printer.
• SAP offers several dozen symbols to choose from.
• SAP offers several hundred icons to choose from.
• In using symbols and icons when certain conditions are met, best practice is to output them in the first or last column of a report so that they call attention to that line in the report.