Chapter 6. Using Reporting Selection Screens: Advanced Skills
In this chapter
Using Multiple Selection Buttons 72
Now that you understand how important selection screens are and how you can use them to produce multiple types of reports from a single query, you can take them a step further. This chapter covers the advanced usage of selection screens and how you can use them in query-based reporting.
Module-Specific Options on a Selection Screen
Depending on the data source (InfoSet) selected and the module for which it is designated—Human Capital Management (HCM), Accounts Payable, Sales and Distribution, and so on—different options may be available. This book covers many of them, but to best familiarize yourself with the items specific to the reporting area you are interested in, you should begin with a basic list report from within your area of interest and vary your selections to view the result on your selection screen and on your report output.
Using Multiple Selection Buttons
Next to many of the fields on a selection screen is a multiple selection button (see Figure 6.1).
Figure 6.1. Each multiple selection button is a right-pointing arrow.
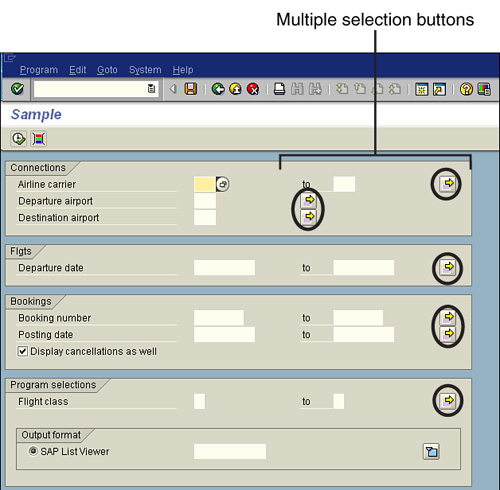
This button, located immediately to the right of the input field, allows you to specify multiple selections. In an example in Chapter 5, “Basics of Using Reporting Selection Screens” (refer to Figure 5.4 and Table 5.2), you input a value of 1 in the Employee Group field so that the report output would contain only associates (that have a number 1 designation in the Employee Group field) on their records. The multiple selection button gives you even more options.
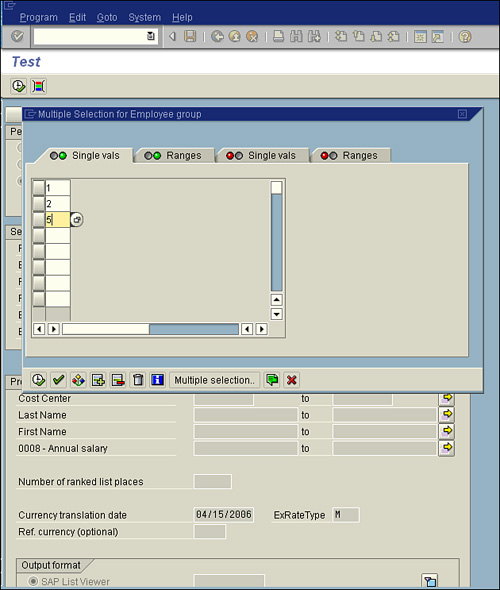
Single-Value Inclusions
The first tab available in the Multiple Selection dialog box is Single Vals (indicated by two green circles), which gives you the ability to designate more than one single (nonsequential) entry. For example, if I select the multiple selection button to the right of the Employee Group field on the HCM report example from Chapter 5, I am indicating that I want to include associates from Employee Groups 1, 2, and 5 in the report, as shown in Figure 6.2.
Figure 6.2. By indicating Employee Groups 1, 2, and 5, I ensured that associates classified in those categories are included and that all others are excluded.
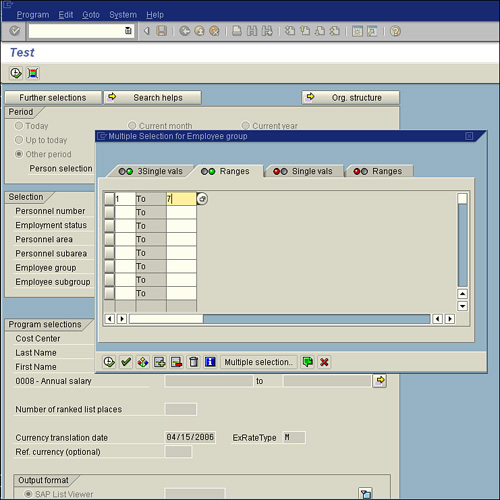
Range Inclusions
The second tab available in the Multiple Selection dialog box is Ranges (indicated by two green circles), which gives you the ability to designate a consecutive range of data by indicating start and end values. This data can be numeric or alphabetical; in either case, you enter the lower value in the first box (for example, A) and the higher value in the second box (for example, C). For example, if I selected the multiple selection button to the right of the Employee Group field on the HCM report example and then selected the Ranges tab, I could then indicate that I want to include associates from Employee Groups 1 through 7 in the report, as shown in Figure 6.3.
Figure 6.3. By indicating a consecutive range for the Multiple Selection option for the employee group, I ensured that associates classified in any of the Employee Groups 1, 2, 3, 4, 5, 6, and 7 are included in the report output.
Single-Value Exclusions
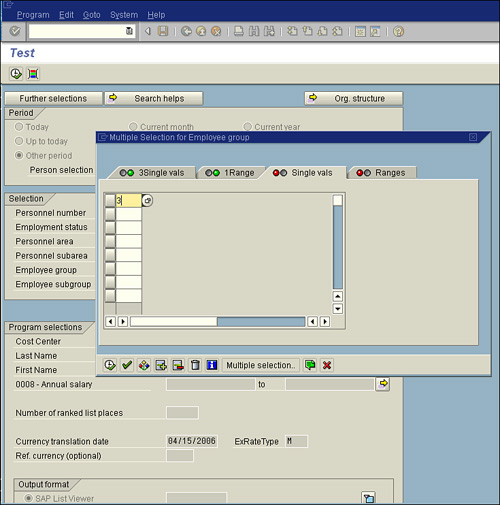
The third tab available in the Multiple Selection dialog box is Single Vals (indicated by two red circles), which gives you the ability to designate more than a single entry to be excluded from your report output. For example, when I click the multiple selection button to the right of the Employee Group field on the HCM report example and select the Ranges tab, I can indicate that I want to include associates from Employee Groups 1 through 5, as shown in Figure 6.3. If I then select the Single Vals (indicated by two red circles) tab and input value 3, I would be including in the report output associates in Employee Groups 1, 2, 4, and 5 and excluding Employee Group 3, as shown in Figure 6.4.
Figure 6.4. By indicating any values on the Single Vals tab (indicated by two red circles), I ensure that I will output all values except those where an employee group equals 3.
Range Exclusions
The fourth tab available in the Multiple Selection dialog box is Ranges (indicated by two red circles), which gives you the ability to designate a consecutive range of data to exclude by indicating start and end values. This data can be numeric or alphabetical, and again, you enter the lower value in the first box (for example, 1) and the higher value in the second box (for example, 3). For example, when I click the multiple selection button to the right of the Employee Group field on the sample HCM report and then select the fourth tab, I can indicate that I want to exclude associates from Employee Groups 1 through 5 in the report by indicating a starting value of 1 and an ending value of 5.
Helpful Hint
You can tell if multiple selections have been input for a field because the multiple selection button (to the right of the field) includes a green box under the existing yellow arrow. This signifies that values are input somewhere on the Multiple Selection dialog box for that field. (See the Personnel Number multiple selection button in Figure 6.7 later in this chapter.)
The Multiple Selection Dialog Box Toolbar
By now you have noticed that the Multiple Selection dialog box has a toolbar at the bottom (see Figure 6.5). The following sections describe each of these toolbar buttons.
Figure 6.5. The toolbar options present in the Multiple Selection dialog box give you even more flexibility in excluding or excluding data.
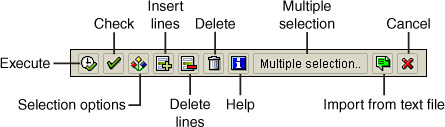
Execute
The first button on the Multiple Selection dialog box toolbar is the Execute button. This button functions the same as the Enter key: When you click it, any selections on the dialog box are transferred to the selection screen.
Check
The second button on the Multiple Selection dialog box toolbar is the Check button. This button functions as the validation key that checks your selections for validity and applicability.
Selection Options
The third button on the Multiple Selection dialog box toolbar is the Selection Options button. This button gives you even greater flexibility in selection, including options for equal to, greater than or equal to, less than, not equal to, and so on. This button was available in earlier versions of SAP, before the multiple selection button was enhanced.
Insert Lines and Delete Lines
Two buttons, Insert Lines and Delete Lines, allow you to insert and delete lines in a dialog box so you can insert or remove indicated values.
Delete
The sixth button on the Multiple Selection dialog box toolbar is the Delete button. This button deletes any entry or selections in any area of the dialog box—not just the displayed tab.
Help
The next button on the Multiple Selection dialog box toolbar is the Help on Screen button. This button is available on almost all dialog boxes, and it serves as a specific item help reference.
Multiple Selection
The Multiple Selection button serves the same function as the multiple selection arrow button that appears next to a field. Clicking this button brings up a list of all available options that are valid for the selected field.
Import from Text File
The Import from Text File button on the Multiple Selection dialog box toolbar allows you to restrict your report output based on a pasted-in or imported set of values. This button is covered in the next section.
Restricting Values in a Report Based on an Existing List of Values
The Import from Text File button on the Multiple Selection dialog box toolbar is the button you are likely to use most often when reporting. It serves a couple different purposes. This button allows you to specify the precise list of data you want in your report output by using a pasted-in or imported list of values from any source.
For example, in my job, I am often provided with data from third-party solutions, such as a large Excel file that contains a list of associates’ Social Security numbers. Let’s pretend that this list of associates is from my benefits vendor, which is alerting me that the list of associates contains associates who can expect to have a benefits coverage change. I would like to easily identify these associates so that I can send each of them a personalized letter, informing them of the change. In the old days, I could use a Microsoft Access database to compare data from two sources and merge similar data (which is discussed in Chapter 23, “SAP Reporting with Microsoft Access”), or I could use Excel’s VLook-Up function to compare two data sources. However, by clicking the Import from Text File button, I can paste or upload the data I want directly into the selection screen to restrict my SAP query report output to contain only the records that match those included in the third-party file. For example, if my SAP HCM database contained 15,000 associate records, and my vendor sent me a list of 1,000 Social Security numbers, I could look up each one manually to find the correct name and address, use a Microsoft solution, or leverage the functionality of the Import from Text File button and simply reference the third-party values in one of the two ways described in the following sections.
Pasting in Third-Party Values
The first way to restrict values in a report is by pasting third-party values. To reference third-party values, you can either design a new SAP query report or use an existing one. In my third-party values example, upon execution of the query, when the selection screen is presented, I can go to the field that contains a value from the third party. In my list of Social Security numbers, I would simply make sure that the Social Security Number field is available on the selection screen. (For a quick refresher on how to add fields in a query to a selection screen, see the section “The Selections Screen” in Chapter 3, “Creating Basic Reports with the SAP Query Tool.”) When I am viewing the query’s selection screen, I minimize the SAP environment and navigate to the third-party file. Its format is relatively unimportant, so it is best to open it in a known application, such as Notepad or Excel. Then I select the data—in this example, all 1,000 Social Security numbers contained in the file—and then press Ctrl+C to copy this list to the Windows Clipboard. Next, I navigate to the SAP query report and the selection screen for the report and click the multiple selection button followed by the Import from Text File button. A second dialog box appears. When I click the Paste button, the list of 1,000 Social Security numbers is pasted from the Windows Clipboard memory to the value selection for the dialog box. When the SAP Query tool is executed, it will not contain all 15,000 records in the database; instead, it will contain detailed data for only the 1,000 values specified on the selection screen.
Transferring Text From a Text File
Instead of copying and pasting, you can restrict values in a report by transferring data directly from a file by clicking the Transfer button instead of the Paste button in the Import from a Local file dialog box and indicating the navigation path where the source file can be found (for example, c:My Documentssource file.txt). When I use this methodology when the SAP Query tool is executed, the report will not contain all 15,000 records in the database; instead, it will contain detailed data from SAP for only the 1,000 values specified in the source file that have been transferred to the selection screen.
Using Variants
As mentioned throughout this chapter and Chapter 5, you can use a single SAP query report to satisfy multiple reporting needs simply by changing the values entered on the report’s selection screen. To spare a user from having to enter the values each time a report is executed, you can save entries on a selection screen as a variant. A report can have an unlimited number of variants associated with it.
As discussed in Chapter 5, which introduces the concept of selection screens, one basic report (for example, a list of all associates at Mama Tricarico’s Restaurant) can be run with three different variations on the selection screen to produce three different reports. The following sections describe how to make a saved version of a selection screen for an SAP query report.
How to Create a Variant for an SAP Query
You can create a variant in several different ways. The following instructions work for any version of SAP, beginning with version 4.0:
1. Begin at the main screen of the SAP Query tool, which you reach by using transaction code SQ01. Select the query for which you would like to create a variant by selecting (highlighting) the gray bar to the left of the table or by typing the query name in the box at the top of the screen. (The example used here uses a test HCM query. To follow along, you can use an existing query of your own from any application module.)
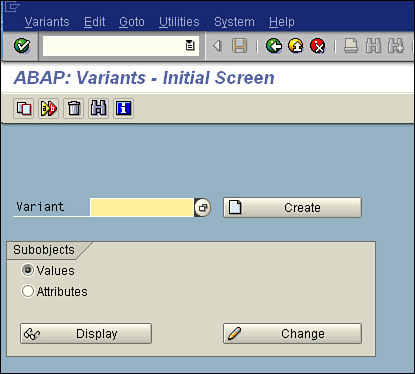
2. Select Goto, Maintain Variants. The screen ABAP Variants - Initial Screen, shown in Figure 6.6, appears.
Figure 6.6. You use the screen ABAP Variants - Initial Screen to create variants for SAP queries.
3. Type a name for your variant (for example, DLS_Variant01, where you replace DLS with your initials) and then click the Create button. You are presented with the selection screen for the report for which you decided to create a variant in step 1. This screen gives you the opportunity to input selections that will be saved as a variant (see Figure 6.7).
Figure 6.7. This selection screen lets you input selections that will be saved as a variant.
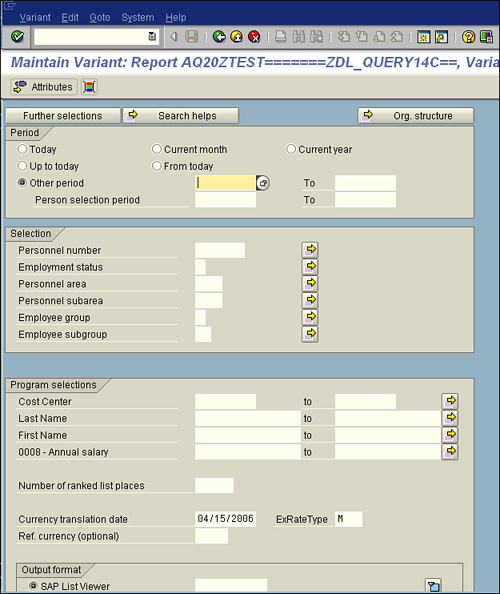
4. Input values on the selection screen that you want to save. Which specific values you input for the example are unimportant, but for the sake of this example, input the Period field as of today and enter the value 1 in the Employee Group field. After inputting any values you want to save, click the Save button on the Application toolbar. The first time you save the variant, the Save Attributes screen, shown in Figure 6.8, appears. When you modify an existing variant, you can click the Variant Attributes button to access this screen.
Figure 6.8. The Save Attributes screen looks the same for all reporting variants.
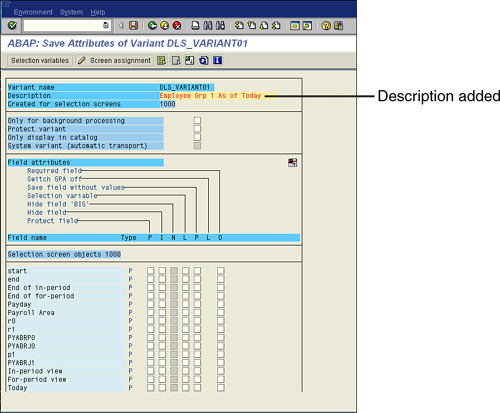
5. The only required field for entry on the Save Attributes screen is the Description field. Enter a description for your variant in this field and then click the Save button to complete the variant creation process. It is a good idea to use a description that describes the variant (refer to Figure 6.8).
6. Click the green Back button to return to the Maintain Variants screen.
7. Click the green Back button again to return to the main SAP Query tool screen.
To see that the variant you created is now available for the report, you need to execute the report that has the variant, as described in the following section.
Executing a Report with a Variant (Execute with Variant)
Upon report execution, you can select a variant for use in your report. By using variants, you can use a single report for multiple things, based on the information entered on the selection screen. Multiple variants can exist for a report, and you can decide which one to use prior to report execution by following these steps:
1. Begin at the main screen of the SAP Query tool, which you reach by using transaction code SQ01. Select your report and then click the Execute with Variant button on the Application toolbar. A dialog box that contains a drop-down field of all the variants for the selected report appears.
2. Select the variant you want to use and then press Enter.
3. Click the Execute button. The report executes, displaying the saved variant.
Executing a Report with a Variant (Execute)
You call also select the variant of your choice from a report’s selection screen. Multiple variants can exist for a report, and you can decide which one to use upon report execution by following these steps:
1. Begin at the main screen of the SAP Query tool, which you reach by using transaction code SQ01. Select your report and then press F8 or click the Execute button. The report’s selection screen appears.
2. On the Selection screen’s Application toolbar, click the Get Variant button (immediately to the right of the Execute button). A dialog box containing a drop-down field of all variants for the selected report appears.
3. Select the variant you want to use and then press Enter.
4. Click the Execute button. The report executes, displaying the selected variant.
Saving an SAP Query with a Variant
In addition to selecting a variant prior to or upon report execution, you can save a variant with a query as a default, such that when the report is executed, that variant is automatically used to populate the report’s selection screen.
1. Begin at the main screen of the SAP Query tool, which you reach by using transaction code SQ01. Select your report and then click the Change button. The Title, Format screen of the SAP Query tool appears.
2. In the Special Attributes section of the Title, Format screen, select the Variant drop-down box to see a list of all variants that exist for the selected report.
3. Select the variant you want to use and then press Enter.
4. Check the Execute Only with Variant check box.
5. Click the Save button and then press F8 or click Execute.
6. Click the Execute button. The report executes, displaying the saved variant. Because it was saved with the query, every time it is executed, the saved default variant will be used. The variant can be overwritten with new values, or a new variant can be selected after execution; however, it will always be presented as the default.
Editing a Variant for SAP Query (Directly on the Selection Screen)
After a variant is created, you can modify it on the selection screen by following these steps:
1. On the selection screen, change the values as desired and then click the Save button on the Application toolbar. A confirmation box appears, asking if you want to overwrite the existing variant.
2. Click Yes. The changes to your variant are saved.
Editing a Variant for SAP Query (on the Maintain Variants Screen)
After a variant is created, you can modify it on the Maintain Variants screen by following these steps:
1. Begin at the main screen of the SAP Query tool, which you reach by using transaction code SQ01. Select the query for which you would like to modify the variant by selecting (highlighting) the gray bar to the left of the table or by typing the query name in the box at the top of the screen.
2. Select Goto, Maintain Variants. The screen ABAP Variants - Initial Screen appears.
3. Select your variant from the drop-down box and then click the Change button. You are presented with the selection screen for the report.
4. Modify the values on the selection screen as you like and then click the Save button on the Application toolbar.
5. To modify the attributes, click the Variant Attributes button and make the desired changes.
6. Make any other modifications desired on this screen and then click the Save button to complete the variant modification process.
Advanced Functions for Variants
To see what options are available on the Variant Attributes screen, follow these steps:
1. Begin at the main screen of the SAP Query tool, which you reach by using transaction code SQ01. Select the query for which you would like to modify the variant by selecting (highlighting) the gray bar to the left of the table or by typing the query name in the box at the top of the screen.
2. Select Goto, Maintain Variants. The screen ABAP Variants - Initial Screen appears.
3. Select your variant from the drop-down box and then click the Change button. You are presented with the selection screen for the report.
4. Click the Variant Attributes button to view the available options on the Save Attributes screen (refer to Figure 6.8).
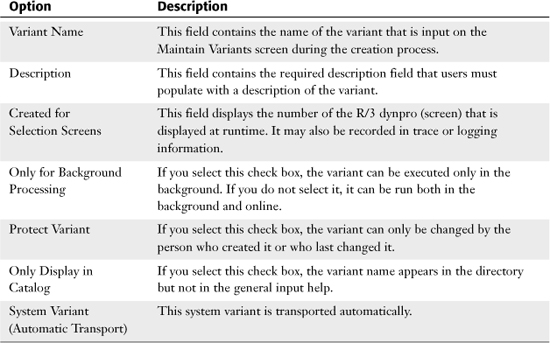
The Save Attributes screen has dozens of available options. Table 6.1 describes the general options available.
Table 6.1. General Functions Available on the Save Attributes Screen
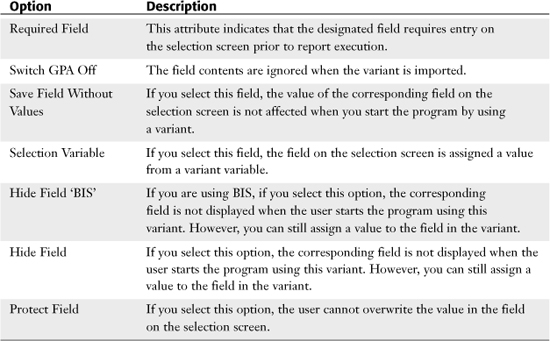
The Field Attribute options listed in Table 6.2 can be indicated for any of the fields by placing a check mark in the bog next to each.
Table 6.2. Field Attributes Available on the Save Attributes Screen
Note that the bottom section of the Save Attributes screen lists every field available on the selection screen. Each is classified with a type. The field type indicates whether the field is a parameter (P) or selection option (S).
Helpful Hint
The selection screens designated for the program are displayed one after the other. Because a parameter or selection option can occur on more than one screen, the attribute fields for that field accept input only the first time they appear.
Things to Remember
• The Multiple Selection dialog box has four key tabs.
• The Import from Text File button allows you to restrict your report output to data contained in a third-party list or data source.
• You can create a virtually unlimited number of variants for a single SAP query report.
• You have multiple options when executing a report with a variant, including saving the variant in the SAP Query tool as a default for a specific query.
• You can prevent users from modifying entries on a report’s selection screen by using the Protect option.