
Chapter 10. Creating Advanced Calculated Fields with the SAP Query Tool
In this chapter
Creating a Basic SAP Query for This Chapter 134
Using Multiple Conditions to Create an Advanced Calculated Field 135
Using Multiple Fields to Perform a Calculation in an Advanced Calculated Field 138
Using a Calculated Field to Update a Variant in a Scheduled SAP Query 141
Chapter 9, “Creating Basic Calculated Fields with the SAP Query Tool,” discusses how you can create local fields to perform basic calculations without having any special technical training or security access. In this chapter, you will take those skills one step further and learn how to perform more advanced calculations.
Chapter 9 describes sample calculations, including basic mathematical operations and conditional operations. This chapter takes that information a step further by explaining how you can use the SAP Query tool to create more complex calculations. Not many SAP users are aware that basic calculations can be performed using the SAP Query tool reporting solution, and even fewer are aware of the advanced functions that are possible. In Chapter 9 you performed an if…then scenario. By using advanced calculations, you can perform an if…then scenario that has multiple conditions. Being able to perform these more complex types of calculations is a bonus that gives end users even greater access and flexibility in working with data within SAP.
The following are examples of advanced calculations you might want to perform by using the SAP Query tool:
• HR/payroll—You could create suggested specific salary increases for associates who are currently paid under the minimum for their pay grade.
• Finance—You could subtract the invoice date from the current date to determine the number of days that payment is past due and then determine late fees based on days-late increments (30 days, 45 days, and so on).
• Logistics—You could project future inventory levels based on projected sales figures and marketplace conditions.
Creating a Basic SAP Query for This Chapter
For the examples in this chapter, you need to follow along in your own SAP system. To do so, you need to create a basic SAP query that contains the fields shown in Table 10.1. (For a reminder of how to create a basic SAP query, see the instructions in Chapter 3, “Creating Basic Reports with the SAP Query Tool.”) For my example, I named my report DLS_QUERY_10, where DLS is my initials.
Table 10.1. Sample SAP Query IDES Report for Use in Chapter 10 Exercises


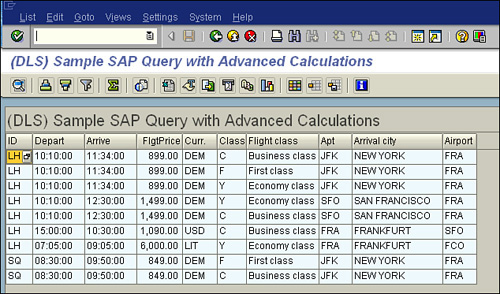
Figure 10.1 shows an example of the report output of this report.
Figure 10.1. Your report output may vary from what is shown here based on your system’s data.
When your SAP query is complete and your report output appears in the same format as the example shown in Figure 10.1, you are ready to begin with the first exercise to insert an advanced mathematical formula in your SAP query report.
Using Multiple Conditions to Create an Advanced Calculated Field
In many cases, you want to see report output only if certain complex conditions are met. Chapter 9 provides an example of how to perform a calculation if a single condition is met. In that example, you added to Figure 9.6 a new calculated field that contains the value of the Airfare field minus 100, but only if the flight is first class. In this single-condition scenario, you performed a calculation only if the flight was first class. What if you wanted to perform different calculations depending on the flight class? For example, say that for first class, the Airfare field would be reduced by 100, for business class the Airfare field would be reduced by 50, and for coach class the Airfare field would be reduced by $25. As another example, you might need to base a condition on several variables, such as the wing of the airport used for each departure. There are several real-world applications for this type of calculation, including the following:
• HR/payroll—You could determine what security badge should be given to an employee based on the employee’s location.
• Finance—You could determine the general ledger account number associated with a wage type.
• Logistics—For rebate processing, you could report on which accounts a rebate will be included with, based on certain account numbers.
To use local fields to perform complex calculations, you follow these steps:
1. Navigate to the main screen of the SAP Query tool by using transaction code SQ01, select the query you want to work with (for example, DLS_QUERY_10), and click the Change button.
2. Navigate to the Select Fields screen by clicking the Next Screen button on the application toolbar twice.
3. Select Edit, Short Names, Switch On/Off. This allows you to create short names for your existing query fields so that you can easily refer to them in calculations. Start by giving the Airline Carrier ID field the short name Airline.
4. Select Edit, Local Field, Create. Because your cursor was on the Airline field, a custom field is added to its field group (Flight Schedule Table).
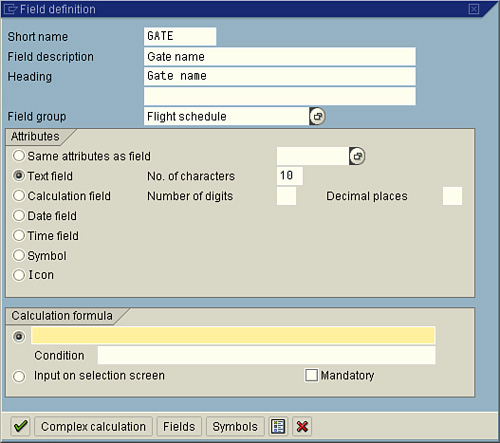
5. When the Field Definition dialog box appears, input a short name (GATE) for your newly created local field and input the field description (Gate name), which will be the heading for the column in the report.
6. Define the attributes for the field, as shown in Figure 10.2. To output a potentially 10-digit gate code (for example, South gate), you could select the Text option and indicate that it will be 10 characters wide. However, you need to be sure that the column is wide enough to fit the column heading, which is set on the Field Definition dialog box (in this case, Gate Name—9 characters). Be sure to indicate that the character width will be able to accommodate the column heading and the largest entry (Gate Name) that could possibly be in that field.
Figure 10.2. Setting the attributes to a text field with 10 characters permits the eventual output in the report of the largest gate name, North Gate.
7. Click the Complex Calculation button to bring up the Define Field: Complex Calculation dialog box, which allows you to input multiple conditions. As shown in Figure 10.3, you input of the conditions in the same order and mathematical format mentioned in Chapter 9.
Figure 10.3. The Define Field: Complex Calculations dialog box permits the entry of three fixed conditions, although you are not required to use them all.
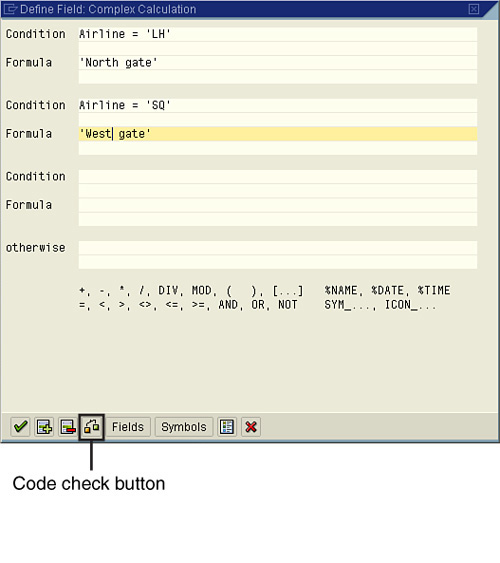
8. Type the condition AIRLINE = ‘LH’ in the Condition line and then enter ‘West Gate’ as the desired output if the condition is met in the Formula line. You can enter up to three different conditions on this screen. To ensure that you have typed correctly, click the Code Check button (or press Shift+F4). The SAP Query tool then checks your syntax to ensure that there are no typos.
9. To add the newly created field to your report output, confirm that the field is selected on the Select Fields screen by ensuring that the small box next to the Gate Name field at the bottom of the Flight Schedule field group is selected.
10. Navigate to the Basic List Line Structure screen by clicking the Basic List button on the application toolbar. You see your newly created field listed there, under the name you gave it in step 6. Add the new local field to your report output on the Basic List screen of the SAP query report by indicating a line and sequence number. (I listed mine as Line 1 and Sequence 10.) Click the Save button.
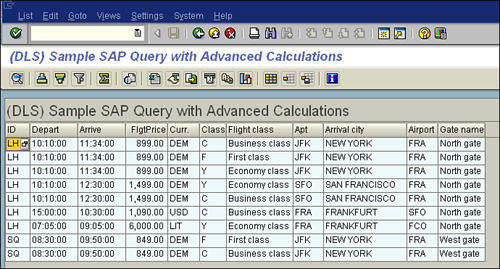
11. Execute your report by pressing F8. You are presented with the report’s selection screen. Press F8 again to see your updated SAP query, which should now contain your newly added calculated field (see Figure 10.4).
Figure 10.4. The added calculated field appears in the report output, displaying data as requested in the Define Field: Complex Calculation dialog box.
Using Multiple Fields to Perform a Calculation in an Advanced Calculated Field
In Chapter 9 you learned how to perform a dynamic calculation based on the entry of data on a report’s selection screen upon execution. In some cases, you might want to perform a calculation or output a value based on a value that is only calculated or input dynamically at report execution time. For example, you can use the same SAP query you have been working with in this chapter to create a calculated field to output the gate name based on the day the weather is entered on the selection screen (assuming for this example that the gate may vary based on the weather). There are several real-world applications for this type of conditional calculation, including the following:
• HR/payroll—You could analyze how much it would cost for an employee on the third shift to work on a holiday by calculating the cost of increasing the hourly rate by a conditional dollar amount that varies based on the year entered on the selection screen.
• Finance—You could monitor the impacts of accounts payable reports if an invoice were paid in a conditional time frame, based on whether the account was in good or poor standing, as indicated on the report’s selection screen.
• Logistics—You could calculate the number of days a plant maintenance order has been open as of a conditional date entered on the selection screen and perform a calculation on a fee entered at runtime based on the date.
To create a calculated field that is based on another calculated field that uses dynamic selection screen input, you follow these steps:
1. Navigate to the main screen of the SAP Query tool by using transaction code SQ01, select the query you want to work with (for example, DLS_QUERY_10), and click the Change button.
2. Navigate to the Select Fields screen by clicking the Next Screen button on the application toolbar twice. If the short names are not already displayed, select Edit, Short Names, Switch On/Off to turn them on. You will create a new local field within the first field group (the Flight Schedule field group).
3. Position your cursor within any field in the Flight Schedule field group and then select Edit, Local Field, Create.
4. When the Define Field dialog box appears, input a short name (WEATHER) for your newly created local field and input the field description Weather, which will be the heading for the column in the report.
5. Define the attributes for the field by selecting the Text Field option and indicating that the width of the field will be seven characters. This is long enough to support the column heading and to accommodate the entries in the field that will be only one character.
6. Because the newly created field will simply store a value entered at runtime, select the Input on Selection Screen option button and the mandatory check box. Selecting the mandatory check box ensures that a value is entered on the selection screen upon report execution. Click the green Continue button to return to the Select Fields screen.
7. Create a calculated field that uses the Weather field’s dynamic entry to affect the calculated field. In this case, you can reuse the Gate Name advanced calculated field from the previous example.
8. Position your cursor in the Gate Name field, on which you will base your calculated field.
9. Select Edit, Local Field, Change because, again, you are changing a field, not creating a new one. The Field Define Field dialog box appears. Click the Complex Calculation button to review the complex calculation created in the previous example (refer to Figure 10.3).
10. Modify the conditional statements to use the data entered in the new Weather field on the selection screen. You input these conditions, as shown in Figure 10.5, very similarly to how you entered them in the previous example, but this time, you are assuming that the value options for entry in the Weather field at runtime are limited to R (for rain), S (for snow), and F (for fog).
Figure 10.5. Three different conditional options and an otherwise condition are included.
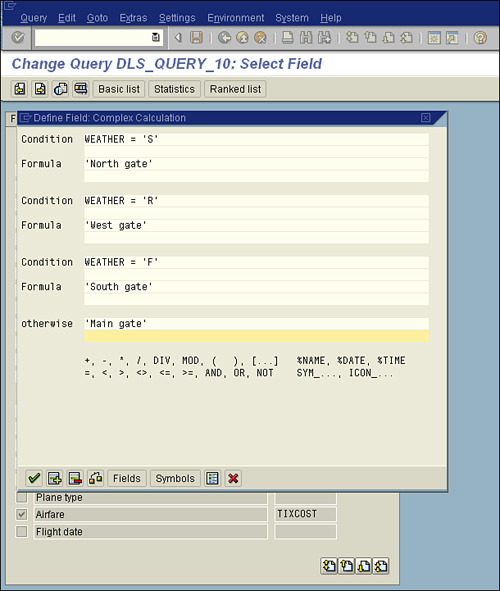
11. Type the condition WEATHER = ‘R’ in the Condition line and then enter the desired output ‘West Gate’ if the condition is met in the Formula line. You can enter up to three conditions and an “all else/otherwise” option. This says that if an option other than the three listed occurs, the value listed should be output in the Otherwise section.
12. To ensure that you have typed correctly, click the Code Check button (or press Shift+F4). The SAP Query tool then checks your syntax to ensure that there are no typos.
13. To add the newly created field to your report output, confirm that the field is selected on the select fields screen by ensuring that the small box next to the Gate Name field at the bottom of the Flight Schedule field group is selected.
14. Navigate to the Basic List Line Structure screen by clicking the Basic List button on the application toolbar. You see your newly created field listed there, under the name you gave it in step 6. Add the new local field to your report output on the Basic List screen of the SAP query report by indicating a line and sequence number. (I listed mine as Line 1 and Sequence 11.) Click the Save button.
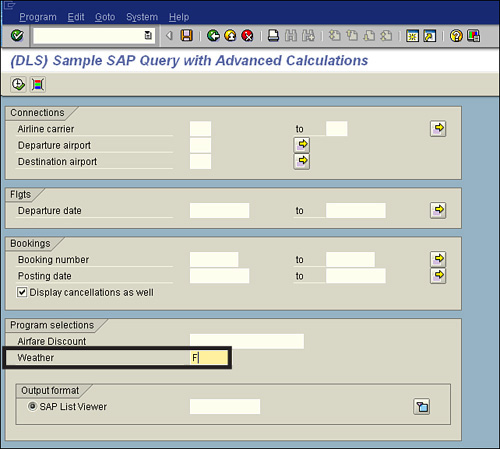
15. Execute your report by pressing F8. You are presented with the report’s selection screen, on which you are required to enter a value in the Weather field: R (for rain), S (for snow), or F (for fog), as shown in Figure 10.6.
Figure 10.6. When not populated, the Weather field has a check mark in it to indicate that it is mandatory on the selection screen.
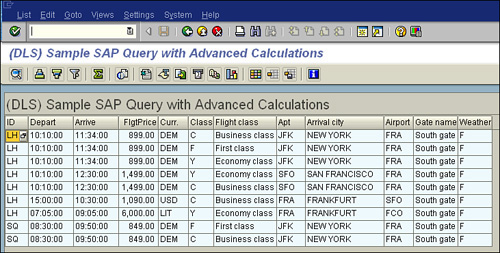
16. Input a value in the Weather field and then press F8 to see your updated SAP query. It should now contain your dynamically updated calculated field that varies the gate number based on the weather (see Figure 10.7). Press F8 again to see the finished report (refer to Figure 10.6), which now includes the dynamically populated gate name. (In my example, I entered a weather condition of F.)
Figure 10.7. Because an entry of F (fog) was indicated on the selection screen, the query reads the complex logic that says to output South Gate.
17. To test what other entries on the selection screen would do to the report output, click the Back Screen button and try various options, including weather conditions not listed, such as W, X, or Y. The SAP Query tool should appropriately read the complex calculation logic and output the otherwise condition, Main Gate.
Be sure to refer to Table 9.3 in Chapter 9 for assistance in properly performing complex calculations.
Helpful Hint
In the preceding example I used the Complex Calculation button to do three fixed conditions and an otherwise condition. Keep in mind that by maximizing the use of the operands AND, NOT, and OR, you can include even more conditions in your complex calculation logic.
Using a Calculated Field to Update a Variant in a Scheduled SAP Query
In Chapter 6, “Using Reporting Selection Screens: Advanced Skills,” you learned how to create variants to be saved with reports so that selection screens could be prepopulated with values, requiring no user interaction for report execution. As mentioned throughout this book, you can use a single SAP query report to satisfy multiple reporting needs simply by changing the values entered on the report’s selection screen.
Having a variant saved with a report allows you to schedule the report as an SAP job to be run with no user interaction. To do this, you need to follow the steps outlined in any of the calculation examples provided in this chapter and Chapter 9. Then complete the steps outlined in Chapter 6, in the sections “How to Create a Variant for an SAP Query” and “Saving an SAP Query with a Variant.”
Things to Remember
• You can perform advanced calculations in the SAP Query tool by using local fields, and you do not need any programming skills to do so.
• You can utilize multiple calculated fields that reference each other.
• You can automatically insert a system value, such as the date, into a report by using a local field, or you can insert it as a dynamic entry on the selection screen.
• You can utilize multiple calculated fields in conjunction with dynamic entry fields on the selection screen to create even more complex calculations.
• You can have up to three hard-set conditions (A, B, or C) plus an otherwise condition when using complex calculations.