
Chapter 22. SAP Query Reporting with Microsoft Word and Outlook
In this chapter
Maximizing SAP Reports by Using Word 270
Maximizing Reporting Options by Using Word and Outlook 279
This chapter describes how you can maximize the use of the Microsoft Word application in reporting. This chapter is designed for those who are currently using some form of reporting that they wish to transmit and share with Word for further processing or analysis. You can use this chapter even if you do not create any SAP reports but can execute reports in SAP and have access to Word.
Maximizing SAP Reports by Using Word
As discussed throughout this book, SAP has a variety of reporting solutions to assist you in extracting meaningful data from your SAP database. The decision of whether to use Word as part of a reporting arsenal is often based on the reporting need. You can use Word as a complement to the existing SAP reporting solutions.
The two most common reasons users share SAP data with Word are to create mailing labels/envelopes and to create mail merges for letters or other communications. Suppose that you need to send to each of your vendors a letter that contains information specific to your account with that vendor, including the vendor number, payment terms, and so on. Manually creating each letter individually would take an exhaustive amount of time. That’s where the mail merge concept comes in. By using Word’s mail merge functionality, all you have to do is create one document that contains the information that is the same in each copy and then add some placeholders for the information that is unique to each copy. The mail merge functionality automatically produces all the letters for you, and it automatically inserts the relevant data that is unique to each.
The Fictional SAP Report for a Word Form Letter
Mail merging allows you to take data from a data source (such as an SAP report) and insert it into a template letter. For this example, you will create a form letter from a simple data source (an Excel worksheet). This fictional example involves a company that sells dog treats, MyDoggieTreats.com. It wants to send a thank-you letter to each of its vendors.
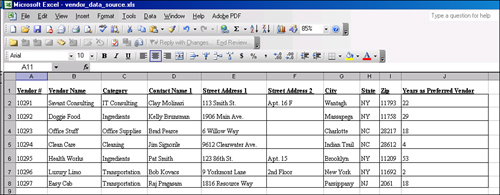
The assumption is that MyDoggieTreats.com uses SAP, and each vendor is stored in the MyDoggieTreats.com SAP R/3 database. Sample data (which can be in any form, whether an SAP query, a custom ABAP report, or something else) is shown in Figure 22.1. The fictional report data in this example contains basic information about the vendor. To follow along in your own SAP system, you can use any report that contains any data. However, it will be most meaningful if your report output has a single line for each record you want to include in the mail merge. For example, if it is a list of vendors, each vendor should be output on a single line.
Figure 22.1. The fictional data source to be used in the examples in this chapter is a list of vendors in SAP.
Note
For my examples, I use Microsoft Word 2003, Service Pack 2, although I indicate version differences where applicable.
Creating a Mail Merge Form Letter by Using Word
To create a Word mail merge, follow these steps:
1. Open any report output screen that displays an SAP report. It can be an SAP query, a custom ABAP report, a standard SAP-delivered report, or any other format.
2. You have multiple options for how to get your SAP data into Microsoft Word for use in a mail merge; the options vary, depending on your installation version of SAP R/3 and your installation version of Word. Because there are multiple options for different versions, the menu path and buttons vary for each. It is a good idea to save your SAP report output into an Excel worksheet, which you will use as your mail merge data file. The most popular way to do this is to click the Excel button on your report output toolbar. Excel launches and displays the SAP report in an Excel worksheet. Next, save the report in Excel (for example, as c:vendor_data_source.xls). Close and exit SAP and Excel.
3. You have multiple options for how to get your SAP data into Word; the options vary, depending on your installation version of SAP R/3 and your installation version of Word. Because there are multiple options for different versions, the menu path and buttons vary for each. It is a good idea to save your SAP report output into an Excel worksheet, which you will use as your mail merge data file. The most popular way to do this is to click the Excel button on your report output toolbar. Excel launches and displays the SAP report in an Excel worksheet. Next, save the report in Excel (for example, as c:vendor_data_source.xls). Close and exit SAP and Excel.
4. Launch Word. The menu path to create a mail merge varies, depending on your installed version of Word. If you are unable to locate the mail merge option, you can search for it in Microsoft Help to find the menu path. One possible menu path is Tools, Letters and Mailings, Mail Merge Wizard (see Figure 22.2). Selecting this option brings up a dialog box or navigation menu that walks you through the process of creating a mail merge letter. The objective is to have the mail merge options displayed and your data source open behind the scenes (see Figure 22.3).
Figure 22.2. The wizard alerts you to the steps in the process, including what step you are currently on.
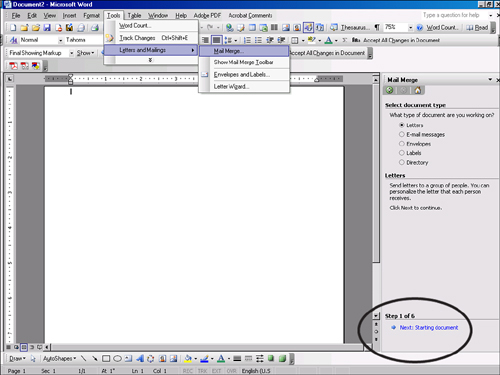
Figure 22.3. The wizard may appear differently in various versions of Word, but the steps to continue are the same.
5. On the bottom-right side of your screen (refer to Figure 22.2), select (Step 1 of 6) Next: Starting Document; this is the section of the wizard that walks you through the creation of the mail merge. After you select this option, the wizard section of the screen updates, allowing you to decide whether to create a new Word template, use the current one open onscreen, or open an existing Word document. Any option is okay, but for demonstration purposes, keep the default selection, which is Use the Current Document.
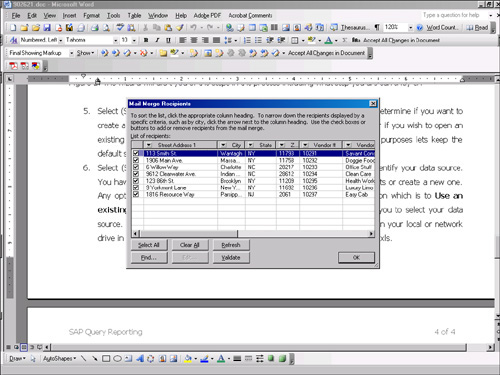
6. In the wizard, select (Step 2 of 6) Next: Select Recipients; you are prompted to identify your data source. You have three options: use an existing file, select from Outlook contacts, or create a new one. Any option is okay, but for demonstration purposes, keep the default selection, which is Use an Existing List. Use the Browse link to select the Excel worksheet that you saved on your local or network drive in step 1 (for example, c:vendor_data_source.xls). A dialog box appears, asking you to indicate whether your data source has column headings.
7. For this example, select Yes. (Note that the sample report shown in Figure 22.1 has a heading for each column.) A dialog box like the one shown in Figure 22.3 appears, displaying your data source.
8. In the wizard, select (Step 3 of 6) Next: Write Your Letter. A blank document appears on the main screen, and options appear on the Application toolbar or on the navigation pane on the right (see Figure 22.4).
Figure 22.4. In earlier versions of Word, the fields are located in the Insert Merge Fields drop-down menu on the Application toolbar.
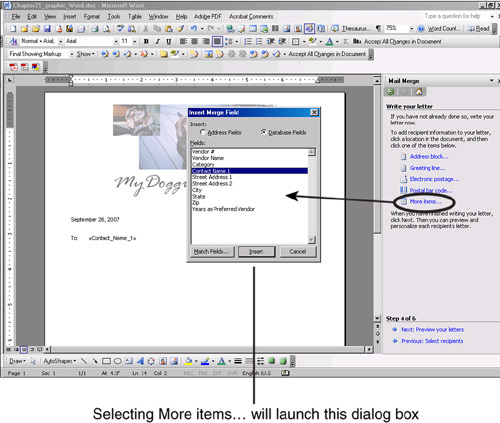
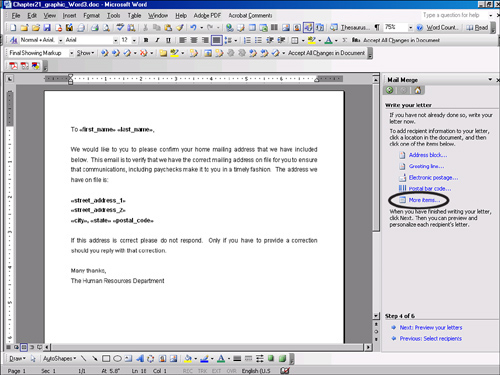
9. Begin to type your form letter directly into the document. You can include pictures or use only text. When you are ready to begin inserting fields from your data source into the document, you can select the appropriate option on your screen; the available options vary by version. In the Word 2003 version displayed in Figure 22.4, you can select the More Items link to open the Insert Merge Field dialog box, which displays each of your fields (see Figure 22.4).
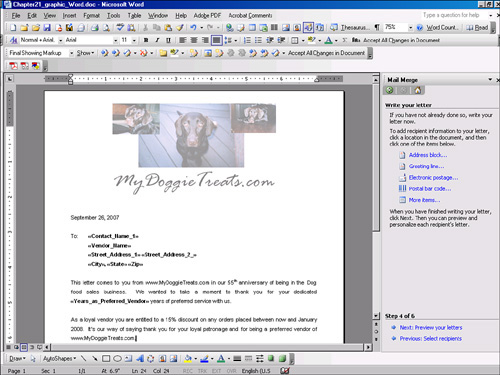
10. In the Insert Merge Field dialog box, select the fields you want to include and then click the Insert button. When a field is inserted, it appears as a placeholder surrounded by double brackets. Data from your data source will be inserted into this placeholder when you are finished with your letter. Continue typing your letter and inserting fields as necessary (see Figure 22.5).
Figure 22.5. The inserted placeholders for the fields are shown in boldface in this figure only to assist you in viewing them; they do not normally appear in boldface.
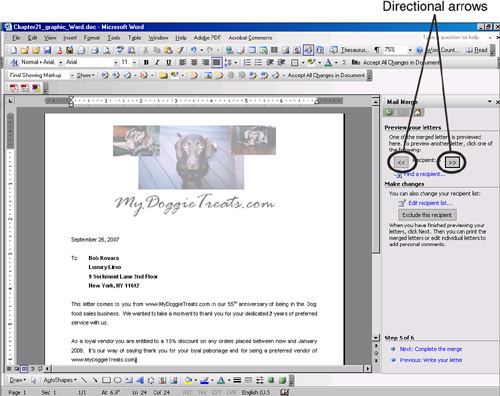
11. When you are finished writing your letter, select the link (Step 4 of 6) Next: Preview Your Letters. The document displays your letter with the first row of your data source report inserted. To preview the other letters, you can select the forward directional arrow button (see Figure 22.6).
Figure 22.6. Each record in your data source will be a separate page in your mail merge document.
12. After you preview your letter, select the link (Step 5 of 6) Next: Complete the Merge. The wizard proceeds to Step 6 of 6, where you have the option to print or save the merged document. Select the appropriate option. Your individual customized letters are sent to your designated printer, one for each record in the data source file, or saved as a Word document.
Helpful Hint
There is a distinction between the mail merge letter “template” you created during the steps outlined here and the finished product that you are asked to save. Saving the template document gives you the ability to update the data source (the Excel worksheet) in the future, and your template will be available with the new data each time it is opened. That is different from the saved merged version. If you elect to save the merged version, a fixed (that is, with no dynamic data) copy of a Word document will be saved. If that document is opened again, it will not read from the data source file.
When you complete your mail merge to Word, you can edit individual letters, make changes, and so on by using the Microsoft solution options. To learn more, visit www.support.microsoft.com and search for “Microsoft Word mail merge letter.”
Creating Mail Merge Mailing Labels by Using Word
As shown in the previous example, mail merging allows you to take data from a data source (such as an SAP report) and insert it into a template letter. On some occasions, you might want to use Word to produce mailing labels or envelopes. For this example, you will create mailing labels from the same data source used in the previous example and shown in Figure 22.1. In this fictional example, you need to create the mailing labels to go on the envelopes of the letters created in the previous example.
To create a Word mail merge document of mailing labels, follow these steps:
1. Open any report output screen that displays an SAP report. It can be an SAP query, a custom ABAP report, a standard SAP-delivered report, or any other format.
2. You have multiple options for how to get your SAP data into Microsoft Word for use in a mail merge; the options vary, depending on your installation version of SAP R/3 and your installation version of Word. Because there are multiple options for different versions, the menu path and buttons vary for each. It is a good idea to save your SAP report output into an Excel worksheet, which you will use as your mail merge data file. The most popular way to do this is to click the Excel button on your report output toolbar. Excel launches and displays the SAP report in an Excel worksheet. Next, save the report in Excel (for example, as c:vendor_data_source.xls). Close and exit SAP and Excel.
3. Launch Word. The menu path to create a mail merge varies, depending on your installed version of Word. If you are unable to locate the mail merge option, you can search for it in Microsoft Help to find the menu path. One possible menu path is Tools, Letters and Mailings, Mail Merge. Selecting this option brings up a dialog box or navigation menu that walks you through the process of creating mail merge labels. The objective is to have the mail merge options displayed and your data source open behind the scenes. Figure 22.7 shows the first screen of the wizard, shown on the right side of the screen.
Figure 22.7. The different types of merges are listed, including the option for labels.
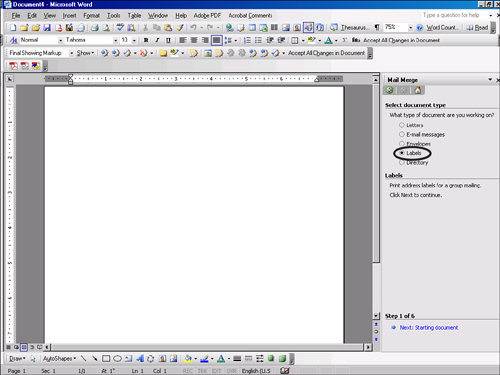
4. Select the link (Step 1 of 6) Next: Starting Document and then select the Label Options link. Word is compatible with a variety of label programs, including Avery. To format your document to make labels, select the appropriate label type by number, size, or description from the dialog box shown in Figure 22.8. Click the OK button. Your document should now look like a sheet of labels.
Figure 22.8. Boxes of labels are coded with numbers that correspond to the numbers listed in this dialog box.

5. Select (Step 2 of 6) Next: Select Recipients; you are prompted to identify your data source. You have three options: use an existing file, select from Outlook contacts, or create a new one. Any option is okay, but for demonstration purposes, keep the default selection, which is Use an Existing List. Use the Browse link to select the Excel worksheet that you saved on your local or network drive in step 1 (for example, c:vendor_data_source.xls). A dialog box appears, asking you to indicate whether your data source has column headings.
6. For this example, select Yes. (Note that the sample report shown in Figure 22.1 has a heading for each column.) A dialog box appears, displaying your data source.
7. Select (Step 3 of 6) Next: Arrange Your Labels. A blank sheet of labels appears on the main screen, and options appear on the Application toolbar or on the navigation pane on the right (as shown in Figure 22.9). Select More Items to open the Insert Merge Field dialog box, which displays each of your fields.
Figure 22.9. Using this version of Word, you are designing only the first label on the sheet.
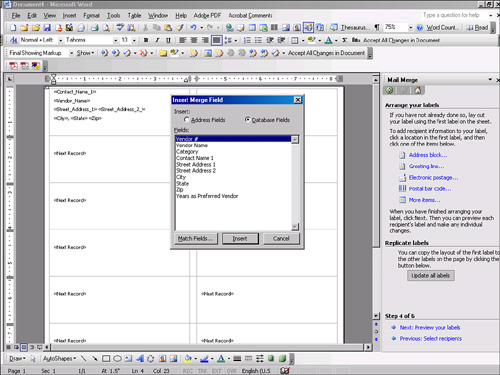
8. In the Insert Merge Field dialog box, select the fields you want to include and then click the Insert button. When a field is inserted, it appears as a placeholder surrounded by double brackets. Data from your data source will be inserted in this placeholder when you are finished creating your labels.
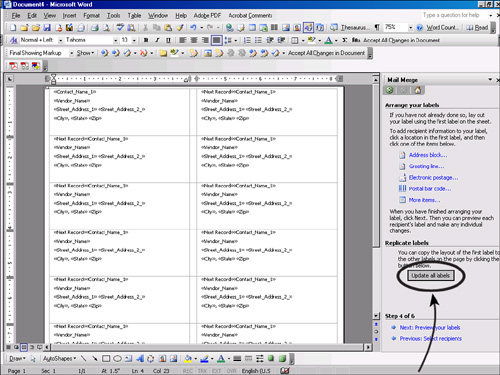
9. After completing the design of a single label, click the Update All Labels button (see Figure 22.10). Your entire sheet of labels is updated with placeholder fields, one in each label on the sheet.
Figure 22.10. The placeholder that Word inserts automatically, <<Next Record>>, determines where a new record should be inserted.
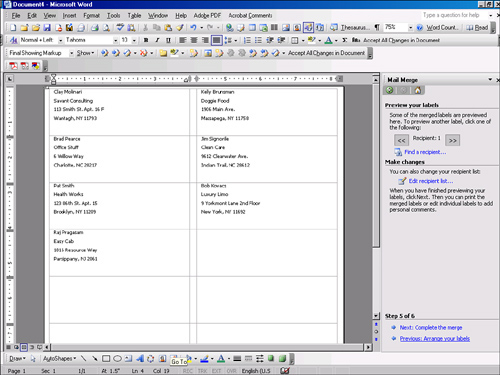
10. Select the link (Step 4 of 6) Next: Preview Your Labels. Your sheet is populated with the fields in your data source (see Figure 22.11).
Figure 22.11. The address labels are updated from the data in the Excel file.
11. Preview your labels and then select the link (Step 5 of 6) Next: Complete the Merge. The wizard proceeds to Step 6 of 6, and you have the option to print or save the merged labels. Select the appropriate option. Your mailing labels are sent to your designated printer (be sure to insert the label paper according to the instructions) or saved as a Word document.
Helpful Hint
As with form letter templates in the previous example, there is a distinction between the mail merge labels “template” you created during the steps outlined here and the finished product that you are asked to save. Saving the template labels enables you to update the data source (the Excel worksheet) in the future, and your template will be available with the new data each time it is opened. That is different from the saved merged version. If you elect to save the merged version, a fixed (that is, with no dynamic data) copy of a Word document will be saved. If that document is opened again, it will not read from the data source file, and the labels will not be updated.
When you complete your mail merge to Word, you can edit individual labels, make changes, and so on by using the Microsoft solution options. To learn more, visit www.support.microsoft.com and search for “Microsoft Word mail merge labels.”
Creating Mail Merge Envelopes by Using Word
The steps to create mail merge envelopes using your SAP data and Word are almost identical to the steps for creating mailing labels. However, in step 3 in the preceding section and shown in Figure 22.7, you select the option Envelopes instead of Labels.
To learn more, visit www.support.microsoft.com and search for “Microsoft Word mail merge envelopes.”
Maximizing Reporting Options by Using Word and Outlook
Did you know that you can create automated email messages by using the mail merge process? Here is a fictional example of how this would be helpful. Every so often, you receive a paycheck (or remuneration statement showing wages earned). Your company is responsible for getting that to you each pay period. Some companies distribute it via the mail. In order for it to successfully get to you, your address record in the SAP Human Capital Management (HCM) system has to be accurate.
The Fictional SAP Report (Data Source) for a Word-to-Outlook Automatic Email
You can use Word to send an individual email to each associate that contains his or her own unique personal information (that is, address) for the associate to review and validate/respond. The method described in the following section is not unique to SAP but can be based on data in an SAP solution.
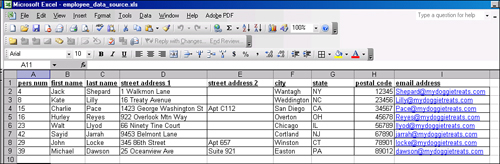
In the HCM module of SAP, records of associate data are stored on screens called infotypes. Each area of data is stored on a separate screen. For example, an associate’s name and birth date are stored on Infotype 0002, and that person’s rate of pay is stored on Infotype 0008. An associate’s email address can be stored on Infotype 0105. The fictional report used in this example contains the basic information about an associate, including that person’s email address. A sample of the data source used in this example is shown in Figure 22.12.
Figure 22.12. A list of associates from the SAP HCM module of a fictional company.
Creating Mail Merge Outlook Emails with Word
To create a Word mail merge for emails, follow these steps:
1. Open any report output screen that displays an SAP report. It can be an SAP query, a custom ABAP report, a standard SAP-delivered report, or any other format.
2. You have multiple options for how to get your SAP data into Word; the options vary, depending on your installation version of SAP R/3 and your installation version of Word. Because there are multiple options for different versions, the menu path and buttons vary for each. It is a good idea to save your SAP report output into an Excel worksheet, which you will use as your Word mail merge data file. The most popular way to do this is to click the Excel button on your report output toolbar. Excel launches and displays the SAP report in an Excel worksheet. Next, save the report in Excel (for example, as c:employee_data_source.xls). Close and exit SAP and Excel.
3. Launch Word. The menu path to create a mail merge varies, depending on your installed version of Word. If you are unable to locate the mail merge option, you can search for it in Microsoft Help to find the menu path. One possible menu path is Tools, Letters and Mailings, Mail Merge Wizard. Selecting this option brings up a dialog box or navigation menu that walks you through the process of creating a mail merge letter. The objective is to have the mail merge options displayed and your data source open behind the scenes. Figure 22.13 shows the first step of the wizard on the right side of the screen.
Figure 22.13. The option to create mail merges with email is not available in all versions of Word.
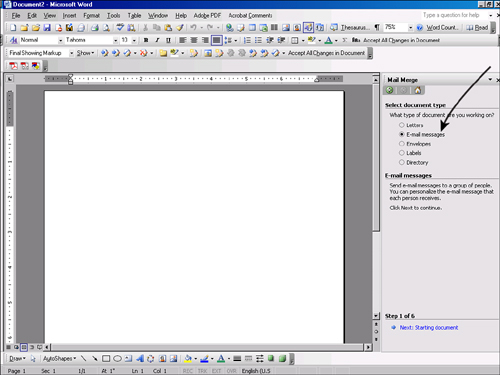
4. Select the E-mail Messages option button and then select the link (Step 1 of 6) Next: Starting Document. You are prompted to determine whether to create a new Word template, use the current one, or open an existing Word document. Any option is okay, but for demonstration purposes, keep the default selection, which is Use the Current Document.
5. Select (Step 2 of 6) Next: Select Recipients; you are prompted to identify your data source. You have three options: use an existing file, select from Outlook contacts, or create a new one. Any option is okay, but for demonstration purposes, keep the default selection, which is Use an Existing List. Use the Browse link to select the Excel worksheet that you saved on your local or network drive in step 1 (for example, c:employee_data_source.xls). A dialog box appears, asking you to indicate whether your data source has column headings.
6. For this example, select Yes. (Note that the sample report shown in Figure 22.1 has a heading for each column.)
7. Select (Step 3 of 6) Next: Write Your Letter. Begin typing your email text into the blank document. When you are ready to begin inserting fields from your data source into the document, you can select the appropriate option on your screen; the available options vary by version. In the 2003 version displayed in Figure 22.14, you can select the More Items link to open the Insert Merge Field dialog box, which displays each of your fields.
Figure 22.14. The merge fields are shown in boldface in this figure for illustration purposes only; they do not normally appear in boldface.
8. In the Insert Merge Field dialog box, select the fields you want to include and then click the Insert button. When a field is inserted, it appears as a placeholder surrounded by double brackets. Data from your data source will be inserted into this placeholder when you are finished with your email. Continue typing your email text and inserting fields as necessary.
9. When you are finished writing your email, select the link (Step 4 of 6) Next: Preview Your Letters. The text is populated with the fields in your data source.
10. After you preview your letter, select the link (Step 5 of 6) Next: Complete the Merge. The wizard proceeds to Step 6 of 6. Select the link Merge to Electronic Mail. A dialog box like the one shown in Figure 22.15 appears.
Figure 22.15. This box allows you to determine matching fields and specify whether to merge all records.
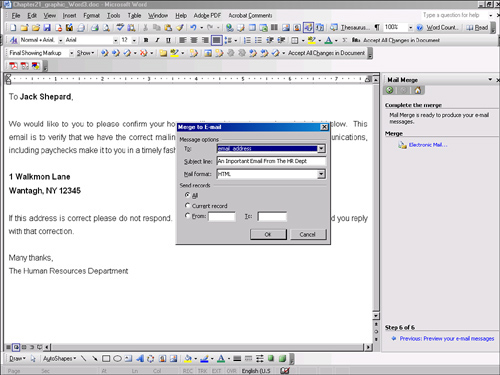
11. In the To: box in the Merge to E-mail dialog, select the field name in your data source that contains the email addresses (for example, the field labeled Email Address). Input a subject line that will be used for all the emails, and select a mail format. You can also indicate if you want to send the email to all or only some records. When you are done selecting options in this dialog, click the OK button.
12. Outlook immediately begins sending each of your emails, each of which contains unique information to the individual email addresses from the original report.
13. Save the mail merge by clicking the Save button on the Application toolbar.
To learn more, visit www.support.microsoft.com and search for “Microsoft Word mail merge e-mail.”
Things to Remember
• Microsoft Word is a good complement to SAP reporting solutions.
• The menu paths in SAP vary based on your installation versions. However, the ability to download an SAP report from SAP to an Excel file is available in all versions.
• Creating form letters by using SAP report data is an easy way to automate a communication so that you do not have to type the same letter over and over.
• Using the mail merge features to create mailing labels and envelopes is a helpful and fast way to do mailings that contain SAP report data.
• Creating automated email communications from a data source that contains email addresses is an ideal way to reach out to people and share unique data.