Running the Example
Before you can see your Message-driven bean working, there are a number of steps still to go through:
1. |
Compile the bean. |
2. |
Use j2eeadmin or deploytool to create the message queue. |
3. |
Deploy the bean. |
4. |
Create a sender client to create a message. |
Creating the Queue
The message bean is associated with a queue or topic at deployment time. This queue must already exist. To create a queue (or topic), do the following:
1. |
Ensure that J2EE server is running. |
2. |
Use j2eeadmin or deploytool to create the message queue or a topic. To see the existing queues and topics, use the following: j2eeadmin –listJMSDestination or view the Destinations screen in deploytool. This is found by selecting Server Configuration from the Tools menu and then the Destinations icon in the left panel. |
The J2EE RI has two default queues predefined—jms/Queue and jms/Topic.
To add your queue, use the following:
j2eeadmin –addJMSDestination jms/firstQueue queue
The j2eeadmin command works silently, so to check that your queue has been created, run J2eeadmin -listJMSDestination once more. Figure 10.5 demonstrates the use of these two commands to create a queue called jms/firstQueue (this is the queue you will use in this first example).
Figure 10.5. Using j2eeadmin to add a JMS queue to the container.

Alternatively, you can add the queue in deploytool on the Destinations screen.
When your bean is deployed, the following will appear in the XML deployment descriptor.
<message-driven-destination>
    <destination-type>javax.jms.Queue</destination-type>
</message-driven-destination>
Deploying the Message-Driven Bean
By this time, you should be familiar with deploying Entity and Session beans. This section will only cover in any detail where the process differs for Message-driven beans.
The steps are as follows:
1. |
Run the deploytool. |
2. |
Create a new application to hold your bean called MDBPrintMessage. |
3. |
Select New Enterprise Bean from the File menu and add the MDBPrintMessage.class file to the MDBPrintMessage application JAR file. |
4. |
On the next screen, where you choose the type of enterprise bean that you are creating, select the bean type to be Message-Driven—most of the screen will blank out at this point. |
5. |
Select MDBPrintMessage from the drop-down list for Enterprise Bean Class. The Enterprise Bean Name will be filled in automatically (see Figure 10.6). Figure 10.6. Selecting the Message-Driven bean.
|
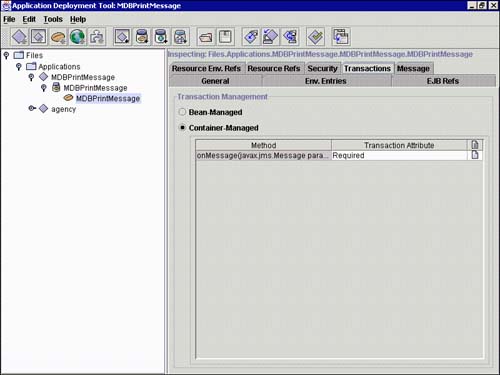
6. |
On the next Transaction Management screen, select Container-Managed (see Figure 10.7). Figure 10.7. Selecting Container-Managed transactions.
|
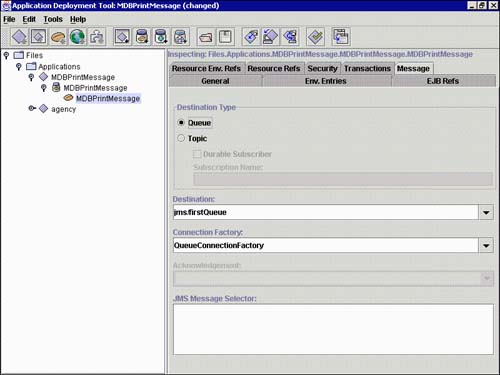
7. |
On the Message-Driven Bean Settings, select: Leave the JMS Message Selector blank (see Figure 10.8). Figure 10.8. Selecting JNDI references for Destination and Connection Factory.
|
8. |
Select Finish. |
9. |
Select the Verifier from the Tools menu. If the Verifier indicates that the bean has failed a tests.ejb.SecurityIdentityRefs test, this can safely be ignored. Security roles do not apply to a Message-driven bean because it runs within the identity of the container. |
10. |
Select Deploy from the Tools menu to bring up the screen shown in Figure 10.9. Figure 10.9. Deploying the MDBPrintMessage bean.
|
11. |
You will not need the Client Jar, so deselect it. |
12. |
Select Finish and check that the bean has been successfully deployed. |


Listing 10.2 shows the XML deployment descriptor that has been created for you. Highlighted in bold are those items that are of interest to you as a Message-driven bean writer.
Listing 10.2. Deployment Descriptor for MDBPrintMessage
Create a Sender Client to Create a Message
So far, you have created a Message-driven bean that is (as far as you are concerned) waiting to handle any message sent to the jms/firstQueue queue. All that is left to do is send a message to that queue and check that your bean is working correctly.
You can use the code or the PTPSender program described in Day 9 to send the message. This is not an EJB, it is a simple client application, so it does not need to be deployed. This code has been reproduced in Listing 10.3. for completeness.
Listing 10.3. Point-to-Point Sender Code to Create and Send a Message to the jms/firstQueue Queue
Run the PTPSender program from the command line to put a message in the queue jms/firstQueue.
Check that you see the message:
"Here is a message sent to jms/firstQueue"
Now check that your message bean has received the message. If you started the J2EE RI with the -verbose switch, you will see the output of the Message-driven bean in the server window. If not, the output will be in the server log file.
"Received: Here is a message sent to jms/firstQueue "