
Simple Servlet Example
You are now in a position to write your first servlet.
In Listing 12.5, you will generate a complete HTML page that displays a simple text string. This servlet extends the HttpServlet class and overrides the doGet() method.
Listing 12.5. A Servlet Generating a Complete HTML Page
When the client browser sends the GET request for this servlet, the server invokes your doGet() method, passing it the HTTP request in the HttPServletRequest object. The response is sent back to the client in the HttpServletResponse object.
The HttPServletRequest interface provides access to information about the request, and its main use is to give access to parameters passed in the URL query string. For this simple example, the request object does not contain any useful information, so it is not accessed in this servlet. You will see how to use the HttPServletRequest object in later examples.
The HttpServletResponse object is used to return data to the client. For this simple example, the data is sent as the MIME type text/html. The PrintWriter object encodes the data that is sent to the client.
Note
A call to the setContentType() method should always be made before obtaining a PrintWriter object.
Lines 9–14 in Listing 12.5 generate the HTML that the browser will use to display the page.
After compiling the code, start up the J2EE RI and run deploytool. You will now perform the following steps to deploy the servlet.
1. |
Create a new application called Servlets to store your servlet code. |
2. |
From the File menu, select New, Web Component. |
3. |
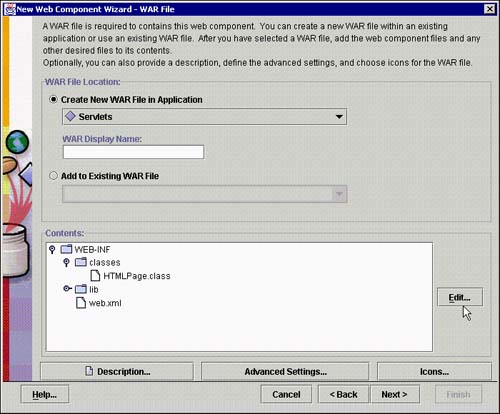
On the first input page, choose Create New WAR File in Application. Click the Edit button and add the HTMLPage class file (it will put the class file in a WEB-INF directory, why is explained later), as shown in Figure 12.5. Figure 12.5. deploytool WAR page.
|
4. |
On the next page, choose Web component type to be Servlet, as shown in Figure 12.6. Figure 12.6. deploytool Choose Component Type page.
|
5. |
On the next page, select the HTMLPage as the Servlet Class (see Figure 12.7). Take the defaults for the remainder of the parameters on this screen. Figure 12.7. deploytool Component General Properties page.
|
6. |
There are no initialization parameters, so skip the next page. |
7. |
On the next page, New Web Component Wizard—Aliases, add an alias for this page. Use the same name as the servlet and precede it with a / (/HTMLPage), as shown in Figure 12.8. The component alias is very important; it is used in the URL used to access the page. Without it, you will not be able to access your servlet. Figure 12.8. deploytool Aliases page.
|
8. |
There is no further configuration to do, so select Finish. |
9. |
As always, select the Tools, Verifier menu to check the application before deployment. Ignore any warning about a missing context because you will add this in the next step. |
10. |
To deploy the application, you will need to supply a context root; use /Servlets (see Figure 12.9). Figure 12.9. deploytool .WAR Context Root page.
|


The context root is used in the URL to find the WAR file. The final URL will be
http://<Web server address>/<Context root>/<Component alias>
For this example, if you have used the names suggested, the URL is as follows:
http://localhost:8000/Servlets/HTMLPage
Now, start up a Web browser. First, type in the URL for the Web server (http://localhost:8000) and check that server is up and running (see Figure 12.10).
Figure 12.10. J2EE 1.3 server page.

Note
If you have used the Web server before, you may not see this page. If you have problems starting the Web server, Sun Microsystems has provided an e-mail address ([email protected]), but this is not a commercial application and a response is not guaranteed.
Now access your servlet using the following URL (see Figure 12.11):
http://localhost:8000/Servlets/HTMLPage.
Figure 12.11. HTMLPage servlet.

Congratulations, you have just produced your first servlet.