
Deploying and Using an EJB in the J2EE Reference Implementation
You should now be in a position to write and test an EJB client. However, before you can do that, you must deploy an EJB that it can use. In this section, you will look at how to deploy an EJB in the J2EE Reference Implementation (RI) and how to then use it from a simple client.
The J2EE on which your EJB is deployed will provide a complete server-side environment. It houses any EJBs, runs a Web Server for JSP/servlets, runs a naming server for storing component location information, and provides database access. All J2EE-compliant application servers will do this—even a non-commercial version, such as the J2EE RI. The RI also provides you with a ready-to-use database so you do not have to concern yourself with hooking up to an existing database or installing a separate one.
To deploy and test your EJBs (and servlets/JSPs later), you only need a single machine. Both the J2EE client and the J2EE server (and its EJBs, servlets and JSPs) can run on the same machine. No connection to the Internet is required. The J2EE RI is available on multiple platforms (Win32, Solaris, and Linux) and should be consistent across these platforms, so that J2EE applications created on one platform can be deployed on another.
If you encounter problems at any stage, try referring to the troubleshooting section just before today's Summary.
Note
Before running any of the tools described in this section, you will need to set the J2EE_HOME environment variable to the location on your hard drive where you deployed the J2EE reference implementation. You should also add the bin directory below J2EE_HOME to your executable search path (%PATH% under Windows or $path under Unix/Linux) so that you can run J2EE tools and batch files from the command line.
Opening the Case Study EAR File
To deploy and manipulate EJBs under the RI, you will use a graphic tool called deploytool. Before you start using this, you will need to do two things:
1. | |
2. |
Start the J2EE RI runtime environment and the associated Cloudscape database. To do this, run the cloudscape and j2ee scripts/batch files found in the bin directory under J2EE_HOME as follows: cloudscape -start j2ee -verbose The use of the -verbose flag for J2EE is not strictly necessary, but you may find it useful to help you understand what the J2EE server does when it starts up. |
Now you are ready to run the deploytool. Again, this is a script/batch file found in the bin directory under J2EE_HOME. When you run it, the GUI screen will appear as shown in Figure 4.3.
Figure 4.3. The initial screen shown by deploytool.

You should now be able to open the initial agency enterprise archive provided in the JAR subdirectory of the Day 4 exercise code on the CD-ROM (agency.ear). Do this through the menus by selecting File, Open and then browsing for the file in the subsequent Open Object dialog box. Select the EAR file and click the Open Object button. The agency application will now be displayed in the list of applications, as shown in Figure 4.4.
Figure 4.4. The Agency application has now been loaded by deploytool.

All of the code for the Agency EJB that is contained in the Agency application can be found in the agency subdirectory of the src directory under the Day 4 Exercise part of the CD-ROM.
Now that the enterprise application is loaded in deploytool, you can examine its settings.
Examining the Case Study Application
You can use deploytool to examine and alter deployment descriptor information for the application and, if necessary, for individual components, such as EJBs.
If you select the JNDI Names tab for the agency application, you will see information about the resources that the application exports and consumes. This is largely based on information defined in the application deployment descriptor and the container-specific deployment descriptor described earlier in the “Enterprise Applications” section.
In Figure 4.5, you can see in the Application box that there is a single EJB in this initial form of the application. That EJB can be referenced through JNDI using the name ejb/Agency.
Figure 4.5. deploytool displays the JNDI information from the Agency application deployment descriptor.

In the References box, you can see that two of the components in the application use external resources. First, you can see that the component named Agency (the EJB) uses a resource called jdbc/Agency that is registered under JNDI as jdbc/Agency.
The References box also indicates that the application client, SimpleClient, references the Agency EJB by using the name ejb/Agency that appears under JNDI as ejb/Agency.
You can also examine the settings of the EJB through deploytool. Click the icon next to the Simple JAR file symbol to show the EJBs contained in the Simple EJB-JAR file. There is a single EJB in the JAR file called Agency. If you select the Agency EJB, you will see the properties defined in the deployment descriptor for that EJB. Select the Resource Refs tab to see what external resources this EJB uses, as shown in Figure 4.6.
Figure 4.6. You can examine the deployment descriptor information for a single EJB, such as the external resources it expects.

Figure 4.6 shows that the Agency EJB expects one resource called jdbc/Agency that is of type javax.sql.Datasource. This is the EJB deployment descriptor information you saw in Listing 4.5.
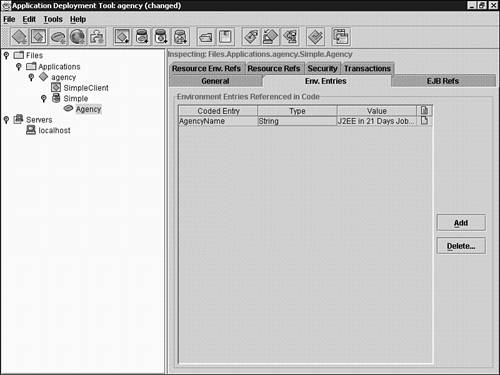
Figure 4.7 shows the environment entries for the Agency EJB. If you want to alter the AgencyName defined there, you can just double-click the Value field and type in an alternative name. If you make any changes to the configuration of the application or any of its components, the suffix (changed) will be added to the application name in the title bar.
Figure 4.7. Environment entries can be viewed or edited through deploytool.
Deploying the Case Study Application
You can deploy the server-side components of the agency application (in this case, a single EJB) using deploytool. To deploy them, select the agency application item (indicated by a blue diamond under the Applications folder in the explorer area on the left side), and select Tools, Deploy from the deploytool menu. This will display the initial deployment screen shown in Figure 4.8.
Figure 4.8. You can select a server on which to deploy an enterprise application.

As you can see from Figure 4.8, the default target host is localhost. This is fine, presuming that your copy of the J2EE RI is running on the local machine. If not, you should Cancel and add the appropriate server name through the File, Add Server menu item before proceeding.
The other point to note for this screen is that it allows you to obtain a client JAR file. Recall that this client JAR file will contain all of the classes required by a client of the application being deployed. A pre-prepared client JAR file is provided in the jar subdirectory of the Day 4 exercise code on the CD-ROM (agencyClient.jar), but you will need to obtain a client JAR file for any new applications or components you deploy. If you check the Return Client Jar box, you can browse and select an appropriate location to store the returned JAR file.
Caution
If you are deploying the agency application on an other machine (not localhost), you should not use the pre-provided agencyClient.jar file. Instead, select the option to return the client JAR file and add this JAR to the classpath when you run the client later.
Click Next to move on to the JNDI Names screen. This gives the deployer another chance to provide server-specific deployment information. Note that this is the same information you saw earlier when examining the application's JNDI information. For now, just click the Next button. At the last screen, click Finish to deploy the application to the selected server.
The progress of the deployment is shown in a separate window, as seen in Figure 4.9. The blue and green bars are progress bars that will increase as the deployment proceeds. Click OK when the deployment is complete.
Figure 4.9. deploytool will show you the progress of the deployment.

When you are done, the agency enterprise application should have been deployed, as shown in Figure 4.10. To view the applications deployed on a server, expand the Servers folder in the explorer area on the left side and then expand the particular server, such as localhost.
Figure 4.10. You can list the applications deployed on a server.
Testing the Case Study Application
After you have successfully deployed the server-side components of the application under the J2EE RI, you can run the test client to check that everything is okay.
The test client, client.SimpleClient, is provided pre-compiled in the classes subdirectory. To run this, use the script/batch file runSimple that can be found in the run subdirectory. When you run the client, you will need to provide a username and password. Use the username guest with a password of guest123. Your interaction with the client should look something like the following:
Initiating login ...
Username = null
Enter Username:guest
Enter Password:guest123
Binding name:`java:comp/env/ejb/Agency`
Welcome to: J2EE in 21 Days Job Agency
Customer list: J2EE in 21 Days Job Agency
abraham
alfred
george
winston
Unbinding name:`java:comp/env/ejb/Agency`
If you are not able to run this test, refer to the “Troubleshooting the Case Study Application,” section next.
As you can see, this has used the Agency EJB to list all of the customers in the job agency database. The code for the client is provided in the client sub-directory of the src directory. If you examine it, you will see that it is identical to the code shown earlier, but with some extra code to invoke the customer listing methods on the EJB and display the results.
If you examine the runSimple script/batch file, you will see that it uses the runclient utility provided by the J2EE RI as follows:
runclient -client agency.ear -name SimpleClient -textauth
Note
The precise command line used will differ between platforms to define the location of the agency EAR file using the correct direction of slashes (backslash or forwardslash). However, this makes no difference in how the command works.
This runs the client application directly from the EAR file without having to unpack it. The command line specifies that the client is called SimpleClient and that it lives in the agency.ear archive. It also specifies that simple, text-based authentication should be used between the client and the server.
The other thing to note in the script/batch file is that the environment variable APPCPATH is set before runclient is called. The runclient utility uses this environment variable to find the client JAR file for the application (in this case, it points to agencyClient.jar). This information will be needed at runtime, not only because the EJB's interface class files are needed, but also because it also contains RMI stubs that are targeted at the correct server and deployment information that is used to map resource names to the target server's JNDI names.
Should you need to re-compile the client, or to compile your own client, you will need to add this client JAR file to your classpath.
Troubleshooting the Case Study Application
If you have problems running the case study application, check out the following possible issues:
Have you started the J2EE RI (j2ee -verbose)? Make sure by locating its console window or looking for it in the list of processes or applications on your machine.
Have you started the cloudscape database (cloudscape -start)? Try running the initial database test at the end of Day 2 to ensure that the data is present and that the database server is running.
Have you deployed the EJBs? By opening the EAR file, you are simply loading the enterprise application into the deploytool environment. You must explicitly deploy the application to the server you are using through the Tools, Deploy menu.
Have you set the classpath correctly for your client? The client will need access to the J2EE libraries in order to run.
Try re-creating the client JAR file when you deploy the J2EE application to your server. Make sure that this client JAR file is on the classpath when you compile and run the client application.
Check the J2EE RI console window to see if exceptions or errors are shown there.
Check the J2EE log files under the logs directory in J2EE_HOME. There is a directory below logs that is named after the machine on which the server is running. Below this, there are two nested j2ee directories. In the lower of these, you will find various log files that you can examine for errors.
If you still have problems and you suspect that there is a problem with the configuration of your J2EE RI, you can either re-install the RI or you could try deleting the server-specific repository directory and then re-starting your server. You will lose all of your deployed J2EE applications, but you may find this easier than re-installing. Under the J2EE_HOME directory, you will find a directory called repository, and below this there will be a directory named after the server on which you are running this instance of the RI (for example, if your hostname is “fred”, there will be a fred directory below repository). Stop the J2EE RI, remove the directory that is named after your server, and then start the J2EE RI again.