
Configuring and Deploying a Stateless Session Bean
With the code compiled, the next step is to deploy the bean onto the EJB container.
As you learned yesterday, EJBs are designed to be portable across EJB containers, and the configuration information that defines the bean's name, interfaces, class(es), characteristics, dependencies, and so on is stored in an XML document called a deployment descriptor. This is provided along with the bean code itself.
As you appreciate from Day 2, there are several EJB roles involved in building the deployment descriptor. The bean provider specifies the information about a given bean (“intra-bean” configuration information, if you like), and the application assembler specifies the information about all the beans in an application (“inter-bean” configuration information). When both the bean deployer and application assembler have specified their information, the deployment descriptor is complete.
However, that's not the end of the story, because the deployment descriptor does not define every piece of configuration information necessary to deploy a bean. In effect, the deployment descriptor defines only the logical relationships and dependencies between the beans. There will also be additional configuration information that maps the logical dependencies of the deployment descriptor to the physical environment. Performing this mapping is the role of the deployer.
EJB container vendors are free to capture this additional mapping in any way they want, although most use auxiliary deployment descriptors, again usually XML documents. In the case of the J2EE RI, the auxiliary deployment descriptors are indeed XML documents. The EJB specification explicitly disallows vendors from storing their auxiliary mapping information in the standard deployment descriptor itself.
Thus, to port an EJB from one EJB container to another, all that should be required is to recreate an auxiliary deployment descriptor. In other words, the deployer has to redeploy the application, but the bean provider and the application assembler should not have to get involved.
Because manipulating XML documents can be somewhat error prone, most EJB container vendors provide graphical tools to do the work. As you saw yesterday, this is the deploytool GUI in the case of the J2EE RI. Unfortunately, many such tools do not distinguish between information that is being saved in the standard deployment descriptor and that which is being saved in the vendor's own auxiliary deployment descriptors. Also, many tools do not explicitly support the EJB architecture's concept of roles, making it possible for a bean provider to start specifying information that might more correctly be decided only by the application assembler or even the deployer. The J2EE RI deploytool is guilty on both counts.
Because you may not be using J2EE RI in your own projects, this section presents the task of deployment by looking at both the J2EE RI deploytool and also the underlying XML deployment descriptor. Having a firm understanding as to how these relate should make it much easier for you to deploy if you aim to deploy to some other EJB container. It also has to be said that understanding the XML deployment descriptor makes the deploytool GUI easier to comprehend.
Using deploytool
This section shows how to deploy the Day 5 version of the case study application to the J2EE RI. It's best if you follow along (but if you're on a train, just read the text and make do).
As usual, start up the Cloudscape RDBMS and J2EE RI using two console windows. Then, start up a third console window and start deploytool.
By choosing File, Open, load up the day05Examplesagency.ear enterprise application archive. This defines a single group of Session beans called Agency. Their contents have already been configured to contain the appropriate code. Click this in the explorer on the left side of the deploytool GUI and their contents will be shown on the right side. Note that some supporting classes (application exception classes) also constitute part of the bean.
To deploy the Session beans, select the Agency item (under the Applications folder in the explorer area on the left side) and choose the Tools, Deploy menu option. Click Next twice and then click Finish.
As you saw yesterday, the deployment descriptor holds configuration information. This is accessible within deploytool as follows. Select the Agency element from the explorer, and then choose Tools, Descriptor Viewer from the menu. This will display the XML deployment descriptor for all of the beans in that EJB JAR file (in this case, just the one Agency bean). Figure 5.6 shows this screen.
Figure 5.6. The deploytool lets you view the underlying deployment descriptor.

In the following sections, you'll see how this information is structured and built up.
Structural Elements
XML documents provide a mechanism to store data in a hierarchical format, and are similar in style to HTML documents. You shouldn't have too much trouble following the coming discussion, but if you want to do some additional background reading, skip forward to Day 16, “Integrating XML with J2EE,” which covers XML documents in more detail.
The format of the EJB deployment descriptor is defined by a document type definition (DTD) file called ejb-jar_2_0.dtd in the %J2EE_HOME%libdtds directory. The root of an EJB deployment descriptor is the ejb-jar element, whose definition is as follows:
<!ELEMENT ejb-jar (description?, display-name?, small-icon?, large-icon?,
enterprise-beans, relationships?, assembly-descriptor?, ejb-client-jar?)>
This indicates that an ejb-jar element may (the ? sign suffix) contain one each of a description, display-name, small-icon, large-icon, relationships, assembly-descriptor and ejb-client-jar elements, and must (no suffix) contain one enterprise-beans element.
The enterprise-beans element's definition is as follows:
<!ELEMENT enterprise-beans (session | entity | message-driven)+>
This states that an enterprise-beans element consists of one or many (the + sign suffix) elements that are either session, entity, or message-driven elements. In other words, the enterprise-beans element contains one or more session, entity, or message- driven elements. You will learn about the session element shortly.
In Figure 5.6, you can see this structure in the deployment descriptor, and you can also see the same hierarchy in deploytool's explorer pane on the left side of the explorer. The Advertise ejb-jar element consists of two beans.
Presentational Elements
In many of the definitions within the DTD, you will see the display-name, description, small-icon, and large-icon elements defined. These are used by vendor deployment tools when managing your beans, so you will certainly want to define a display-name to distinguish the beans in the tool's GUI. Whether you choose to provide the remaining elements is up to you. Their presence is primarily so that third- party companies can develop EJBs to sell as “off-the-shelf” business logic components.
The display-name element for the EJB JARs has been set to Agency. This is shown in the explorer on the left side of deploytool GUI. It is also presented as the (read-only) JAR Display Name on the right side when the Agency node is selected. There doesn't appear to be any good reason why this is read-only in deploytool, that's just the way the tool works.
If you wanted to add another EJB to the enterprise application, (using the File, New, Enterprise Bean menu option) it would either be in an existing ejb-jar or a new ejb-jar could be defined. When choosing the second option, the display-name for your new collection of EJBs can be specified. This is shown in Figure 5.7.
Figure 5.7. The deploytool allows EJBs to be defined in either their own ejb-jar (with attendant deployment descriptor) or in an existing ejb-jar.

For your own custom applications, it really is up to you whether you choose to use one ejb-jar or several. In the case study example, the latter has been used. Certainly, if you wanted to use some off-the-shelf component EJBs bought from a third-party vendor, the EJBs will already have been bundled into an EJB JAR file. To add these to your enterprise application, you would use File, Add to Application, EJB JAR menu option. When the selected JAR file is read, the display-name element from the associated XML deployment descriptor would then be used.
Session Element
The configuration information for Session beans is defined—not surprisingly—in the session element of the DTD. Its definition is as follows:
<!ELEMENT session (description?, display-name?, small-icon?, large-icon?,
ejb-name, home?, remote?, local-home?, local?, ejb-class,
session-type, transaction-type,
env-entry*,
ejb-ref*, ejb-local-ref*,
security-role-ref*, security-identity?,
resource-ref*,
resource-env-ref*)>
This indicates that a session element may contain the presentational elements just discussed, and also will consist of a number of other mandatory and optional elements. The mandatory elements are as follows:
The ejb-name element is the mandatory logical name for the EJB. This must be unique within all the EJBs defined within the ejb-jar element.
The home, remote, local-home, and local elements define the remote and local interfaces for the bean. They are all marked as being optional, although the specification also requires that either the home and remote and/or the local-home and local elements are defined. As was noted previously, you'll be learning about local interfaces in detail tomorrow.
The ejb-class element defines the class that has the bean's actual implementation.
The session-type element indicates whether the bean is stateless or stateful.
The transaction-type element indicates how the EJB container should manage transactions. You will be learning about this in detail on Day 8, so until then, just specifying that transactions are Required will be sufficient.
This information is available graphically in deploytool. Select the Agency Session bean in the explorer pane (under Agency ejb-jar). You should see something similar to that shown in Figure 5.8.
Figure 5.8. The deploytool represents the underlying deployment descriptor graphically.

You should be able to see a pretty close resemblance between the information portrayed in deploytool and the mandatory information required by the underlying deployment descriptor. The only mandatory item not shown is transaction-type; that is on the Transactions tab of the GUI.
The (fragment of the) underlying deployment descriptor for the Agency bean that is represented in Figure 5.8 is as follows:
<session>
    <display-name>AgencyBean</display-name>
    <ejb-name>AgencyBean</ejb-name>
    <home>agency.AgencyHome</home>
    <remote>agency.Agency</remote>
    <ejb-class>agency.AgencyBean</ejb-class>
    <session-type>Stateless</session-type>
...
</session>
This should tie in with the code that was presented earlier today.
Thus far, you have only seen the EJB standard deployment descriptor, but there is also the vendor-specific deployment descriptor for J2EE. The structure of this auxiliary deployment descriptor is defined by %J2EE_HOME%libdtdssun-j2ee-ri_1_3.dtd, but it is not so necessary to learn its structure in detail because it is all vendor specific, and deploytool allows it to be configured through its GUI.
The auxiliary information in this descriptor maps the logical names to the physical runtime environment. For the Session bean itself, a mapping is required from its logical ejb-name to its JNDI name. The following fragment from the auxiliary deployment descriptor shows this:
<j2ee-ri-specific-information>
    ...
    <enterprise-beans>
        ...
        <ejb>
            <ejb-name>AgencyBean</ejb-name>
            <jndi-name>ejb/Agency</jndi-name>
Figure 5.9 shows how deploytool portrays this information. Figure 5.9 also shows the JNDI mappings for references; you will learn about these shortly.
Figure 5.9. Behind the scenes, deploytool stores the JNDI mappings to an auxiliary vendor-specific deployment descriptor.

The remaining optional items of the EJB deployment descriptor (env-entry, resource-ref, and so on) also correspond to the different tabs of the deploytool window shown in Figure 5.8. These each indicate different types of dependencies that the bean may have with its runtime environment. The following sections discuss each in turn.
Environment Entries
Environment entries allow general configuration information—as might be found in a .ini file or in the Windows Registry—to be made available to the bean. Such entries are represented by the env-entry element in the deployment description and—not surprisingly—are configured on the Env. Entries tab within deploytool.
The Agency bean uses an environment entry to look up its name. The relevant code is in the ejbCreate() method:
InitialContext ic = new InitialContext();
// code omitted
name = (String)ic.lookup("java:comp/env/AgencyName");
The EJB specification requires that the EJB container makes the environment entries available under the well-defined context of java:comp/env. Therefore, this is needed in the JNDI lookup. However, this prefix is not required in the deployment descriptor itself.
The DTD defines the env-entry element as follows:
<!ELEMENT env-entry (description?, env-entry-name, env-entry-type, env-entry-
value?)>
The type of the environment entry (String, Integer, and so on) is indicated through the env-entry-type element. The actual value (env-entry-value) is optional, meaning that the bean provider/application assembler does not need to define it. If the actual value isn't specified by these roles, the deployer will need to define the value.
Figure 5.10 shows this information being configured within deploytool.
Figure 5.10. Environment entries can be managed graphically by deploytool.
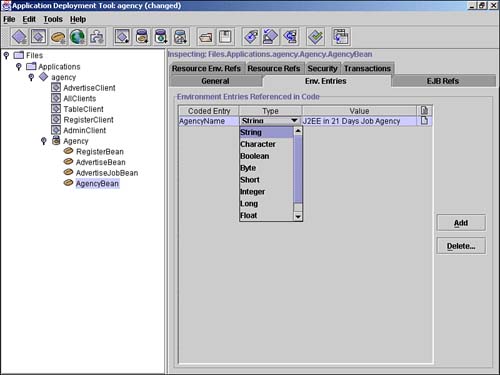
In the underlying deployment descriptor for the Agency bean, this corresponds to
<env-entry>
    <env-entry-name>AgencyName</env-entry-name>
    <env-entry-type>java.lang.String</env-entry-type>
    <env-entry-value>J2EE in 21 Days Job Agency</env-entry-value>
</env-entry>
To re-emphasize, note that the entry name is AgencyName, not java:comp/env/AgencyName.
EJB References
Declaring EJB references for an EJB indicates that the bean being deployed depends on other EJBs. Generally speaking, when there are inter-bean dependencies, both the dependent and dependee will have been written by the same bean provider. However, there will be cases when this isn't so. The issue then arises that the dependent EJB may not know the deployed name of the EJB upon which it depends.
For example, a vendor might provide some sort of business-oriented bean (perhaps an Invoice EJB) that can optionally perform logging through a Logging EJB. The same vendor might well provide an implementation of a Logging EJB, but would also allow for application assemblers to use some other EJB that implements the appropriate home and remote interfaces. In this way, the application assembler could ensure that all logging from beans within its application was consistent.
Now the Invoice EJB will have a reference to a Logging EJB in its JNDI lookup. This might be something like the following:
InitialContext ic = new InitialContext();
Object lookup = ic.lookup("ejb/Logger");
LoggerHome home = (AgencyHome)PortableRemoteObject.narrow(lookup,
LoggerHome.class);
Logger logger = home.create();
The "ejb/Logger" string is hard-coded into the Invoice EJB source code and cannot be changed by the application assembler or by the deployer. This is what is sometimes referred to as the coded name or coded entry. However, the deployment descriptor allows this logical name to be associated with an actual physical name through the ejb-ref elements.
The following is the ejb-ref element, as defined by the DTD:
<!ELEMENT ejb-ref (description?, ejb-ref-name, ejb-ref-type, home, remote, ejb-
link?)>
The ejb-ref-name element is the coded name—ejb/Logger in the previous example. The names of the home and remote interfaces must be specified. Finally, the ejb-link element specifies the actual ejb-name of the EJB that implements these interfaces. This is a way for the application assembler to constrain the reference in the dependent EJB to a particular EJB within the enterprise application.
In the Day 5 version of the case study, there are no EJB references between EJBs (you will see some such references between EJBs tomorrow), but there are EJB references from the clients and the EJBs. These are shown in Figure 5.11.
Figure 5.11. There are EJB references from the clients to the EJBs.

When EJB references are defined, they must also be mapped to the physical environment. Figure 5.9 showed the mapping of EJBs and of references to JNDI names. These are shown in the bottom half of the window. As an experiment, try temporarily creating a EJB (remote) reference between the beans themselves, and then return to the JNDI tab in deploytool (as shown in Figure 5.9). Here, the deployer should indicate the JNDI name for the EJB that implements the remote interfaces. As required by the EJB specification, deploytool validates that the JNDI name that is mapped by the deployer to the EJB reference is compatible with any ejb-link that may have been specified by the application assembler. When you have finished experimenting, you should delete these EJB references.
Resource References
Yesterday, you learned that the EJB container allows DataSources to be obtained via JNDI. Within the deployment descriptor, a resource reference is used to define that dependency of the EJB. The term resource reference is used instead of database reference because an EJB can depend on data resources other than databases. It could also depend on an e-mail session (Day 11, “JavaMail”), on a URL, on a message topic or queue factory (Day 10, “Message-Driven Beans”), or on a general resource as defined by the Connector architecture (Day 19, “Integrating with External Resources”).
The Agency bean has a dependency on a DataSource reference that it refers to as jdbc/Agency. This can be seen in the ejbCreate() method of the AgencyBean code. As with the environment entries, note that resource reference has been bound by the EJB container under the context java:comp/env:
InitialContext ic = new InitialContext();
dataSource = (DataSource)ic.lookup("java:comp/env/jdbc/Agency");
Resource references are defined in the DTD as follows:
<!ELEMENT resource-ref (description?, res-ref-name, res-type, res-auth, res-
sharing-scope?)>
The res-ref-name element is the coded name of the referenced resource.
The res-type element is the fully-qualified interface or class name of the resource.
The res-auth element indicates whether the container will provide the authentication information (username and password) or the application itself. In other words, it indicates which overloaded version of DataSource.getConnection() will be called—the one where username and password are supplied (Application authentication) or where they are not (Container authentication).
The res-sharing-scope element indicates whether this resource can be shared among beans (the default) or whether a separate resource will be set up for this bean's exclusive use.
So, in the deployment descriptor for the Agency bean, you will see the following:
<resource-ref>
    <res-ref-name>jdbc/Agency</res-ref-name>
    <res-type>javax.sql.DataSource</res-type>
    <res-auth>Container</res-auth>
    <res-sharing-scope>Shareable</res-sharing-scope>
</resource-ref>
This information is also shown in deploytool, as shown in Figure 5.12.
Figure 5.12. Resource references can be managed graphically by deploytool.

Again, resource references must be mapped to physical resources. You defined the physical resources for the case study on Day 2, when you used j2eeadmin to set up a JDBC DataSource using the command:
j2eeadmin -addJdbcDatasource jdbc/Agency jdbc:cloudscape:rmi:Agency;create=true
This instructs J2EE RI to create a DataSource using a URL of jdbc:cloudscape:rmi:Agency and bind it into JNDI with a name of jdbc/Agency.
From the deployment descriptor, you can see that the declared resource reference in the AgencyBean Session bean code is jdbc/Agency and is also mapped to a JNDI name of jdbc/Agency. The fact that the logical and physical names are the same string can be a source of confusion; the point is that both are needed. Moreover, the logical resource reference could have been anything at all, so long as it is the same string that appears in the code, in the standard ejb-jar.xml deployment descriptor and the vendor-specific auxiliary deployment descriptor.
The mapping between these two names is performed on the JNDI tab of deploytool, as shown in Figure 5.9. You should be able to see there that, for example, the resource reference in the Agency bean called jdbc/Agency maps onto the JNDI name of jdbc/Agency. The auxiliary deployment descriptor has the following entries:
<j2ee-ri-specific-information>
    // lines omitted
    <enterprise-beans>
        // lines omitted
        <ejb>
            <ejb-name>AgencyBean</ejb-name>
            // lines omitted
            <resource-ref>
                <res-ref-name>jdbc/Agency</res-ref-name>
                <jndi-name>jdbc/Agency</jndi-name>
            </resource-ref>
        </ejb>
        // remaining lines omitted
Resource Environment References
Resource environment reference entries allow access to so-called “administered objects.” In J2EE RI, this means JMS queues or JMS topics. In future versions of J2EE, other administered objects may well be specified.
Resource references and resource environment references sound very similar, and, indeed, they are related. However, a resource reference is access to some sort of factory object, used to manufacture (variously) database connections, URLs, JMS sessions, and so on. On the other hand, an administered object must be defined up-front by an administrator and is persistent. The EJB specification doesn't define RDBMS tables as administered objects, but it might well have. If it had, a resource reference would be to a database connection, and a resource environment reference might be to a table on the database to which you have connected.
The DTD defines resource environment references as follows:
<!ELEMENT resource-env-ref (
          description?, resource-env-ref-name, resource-env-ref-type)>
The resource-env-ref-name is the name of the reference in the code, less the java:comp/env prefix, and the resource-env-ref-type is either javax.jms.Queue or javax.jms.Topic.
The Agency session bean does not have any dependencies on resource environment references, so there is no screen shot of the deploytool. However, you will be using resource environment references on Day 10 when you work with the Java Messaging Service and Message-driven beans. But (again) as an experiment, try adding an resource environment reference on the Resource Env. Refs tab. On the JNDI tab (as shown in Figure 5.9), you should be able to indicate the JNDI name for the administered object. When you have finished experimenting, delete the resource environment reference.
Deploying the Enterprise Application
The enterprise application can be deployed from deploytool by using the Tools, Deploy menu option. This causes the bean's code components to be compiled and the proxy and home interfaces to be generated and then packaged up into an ejb-jar using information from the underlying deployment descriptor and auxiliary deployment descriptor. Finally, the package is deployed across the network to the J2EE RI.
Once deployed, you can run your application. To do this, use day05agency un unAll.