
Security and EJBs
EJB security is determined either by the declarative entries added to the DD, the programmatic constraints coded into the EJBs, or a combination of both.
Ideally, EJB security should only use the declarative approach, but where declarative security cannot represent the application's requirements, security must be encoded in the EJB class. The programmatic security is less portable and may restrict the way an application assembler can combine beans from different sources.
Defining EJB Security
Defining security for an EJB involves
Defining one or more roles to control access to different areas of your application
Restricting access to EJBs and EJB methods according to the clients roles
Mapping roles onto principals in the authentication domain
Optionally adding programmatic authorization to Session and Entity beans
If you are using the J2EE RI, the security can be defined using deploytool. Other J2EE environments may provide GUI tools similar to deploytool or, if you are unlucky, you may have to manually edit the DD to include the security requirements.
In the rest of this section, you will use deploytool to add security to the Agency case study. You will see how extra information is added to the DD to define the security requirements.
Defining Roles
There are three distinct roles with the simple Agency application:
Administrators that can modify the skills and location tables
Customers who advertise jobs
Applicants who advertise their locations and skills
You may even decide that there are only two roles—administrators and clients (for want of a better term). Clients can register their own skills or advertise jobs for other clients. While this is a perfectly acceptable model, it looses the differentiation between applicants and customers.
Currently, there are no constraints on who can be a client and who can be a customer. However, in a real world job agency, it may become necessary to restrict who can be applicants and customers. Perhaps customers will be charged for applicants who match their jobs, so they need to be validated before they can use your system.
Having decided on your roles, you must add them to the DD. Roles are added to JAR files in your application. If several EJBs are defined in the same JAR file, they can share the same roles. EJBs in separate JAR files must define their own roles. If the same role name is used in different JAR files, it still represents a different role.
Grouping related EJBs into a single JAR file is a good design philosophy because it allows related beans to share the same security roles.
Now you will add security constraints to the Agency case study. If you want to look at the finished results of following the steps described in the rest of this section, you can look at the agency.ear file in the exercises directory for Day 15 (“Security”) on the accompanying CD-ROM.
If you want to add security to the Agency case study as you have developed it so far, start up deploytool and open the agency.ear file in the Day 10 (“Message-Driven Beans”) examples directory. The Agency application has three JAR files—one for the Session beans, one for the Entity beans, and one for the Web interface. Select the agency Session bean and display the “Roles” page. Use the Add button to add the three roles defined in Table 15.3. Figure 15.5 shows the screen after adding these roles.
Figure 15.5. Adding security roles.
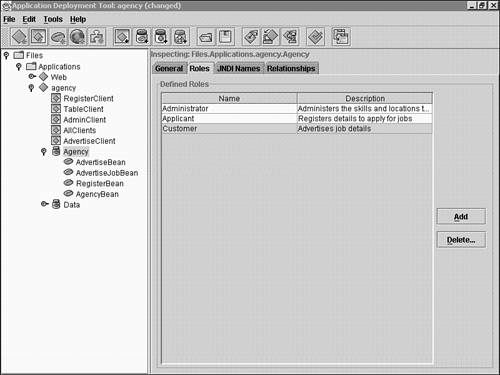
| Role | Description |
|---|---|
| Administrator | Administers the skills and locations tables |
| Applicant | Registers details to apply for jobs |
| Customer | Advertises job details |
Roles are defined in the <assembly-descriptor> component inside the <ejb-jar> tag in the DD. Listing 15.1 shows the entry created for the three roles you have just defined.
Listing 15.1. Security Role Entries in the DD
A <security-role> tag with <role-name> and <description> elements defines each role.
Defining the Security Identity
After the roles for a JAR file have been defined, you can restrict access to the methods of an EJB. In deploytool, select the AgencyBean EJB and then the Security tab. You will see the screen shown in Figure 15.6.
Figure 15.6. Security for EJB methods.

The Security Identity section at the top of the screen shows that authorization is controlled by the caller's identity. There are two options for security identity:
Use the caller's ID.
Use a defined role.
In Figure 15.6, Use Caller ID is selected.
The <security-identity> tag in the DD defines how access to an EJB is authorized. The tag is part of the <session> bean definition, and the <use-caller-identity> option is shown in Listing 15.2.
Listing 15.2. Security Identity Entries in the DD
The use of roles for the security identity is discussed in the “Using Roles as the Security Identity” section later in this chapter.
The lower part of the deploytool Security page is the Role References section, and this is discussed in the section “Programmatic EJB Security”.
Defining Method Permissions
The Method Permissions section in the middle of the deploytool window shown in Figure 15.6 lists the methods for the interfaces defined for your bean. The radio button selects which interface is displayed (the default for the agency bean is the remote interface). Each bean method defines a row in a table, and the columns are the roles defined for the JAR file. By using the cells in this table, you can select which methods can be called by each role.
From Figure 15.6, you can see that the default access (the Availability column) to all methods is All Users which is why, so far, you have been able to access all your application functionality regardless of any username you supplied when logging in to run the application.
In the underlying DD, the method permissions are added to the <assembly-descriptor> tag. The <method-permissions> tag associates one or more permissions with one or more methods. A permission is the name of a role specified with the <role-name> tag or the empty tag <unchecked/> to show that access is unchecked (it is callable by all clients). A method is defined by the <method> tag that has three variants:
Authorize all methods in an EJB using a tag of the following form:
<method>
  <ejb-name>EJBname</ejb-name>
  <method-name>*</method-name>
</method>
where the * means all methods
Authorize a named method in an EJB using a tag of the following form:
<method>
  <ejb-name>EJBname</ejb-name>
  <method-name>MethodName</method-name>
</method>
The third form is considered unnecessary because there should be no need to differentiate between overloaded functions for security purposes. Overloaded forms of the same method should perform the same function and therefore require the same security permissions. If the security requirements are different, good design would imply using different method names.
The <method> tag also allows a <method-intf> (method interface) tag for defining the interface name if it is duplicated in the home and remote interfaces.
As an example, you could set all the methods in the agency bean to be accessible only by the Administrator role using the example in Listing 15.3.
Listing 15.3. Method Permission Entries in the DD
1: <method-permission> 2: <role-name>Administrator</role-name> 3: <method> 4: <ejb-name>agency</ejb-name> 5: <method-name>*</method-name> 6: </method> 7: <method-permission> |
If a method is not listed in a <method-permission> tag, that method cannot be called by the client code.
Hopefully, you won't have to write the DD entry yourself but will be able to use a utility, such as deploytool. Returning to the deploytool screen shown in Figure 15.6, you can see that the default access for all methods is All Users. The All Users permission maps onto the <unchecked/> tag in the DD. If you examine the DD using the "Tools->Descriptor Viewer" menu, you will see the method permission entries for the agency EJB, as shown in Figure 15.7.
Figure 15.7. Security DD for EJB methods.

Applying security is now just a matter of deciding which roles can call which methods for every EJB in your application. In the agency bean, you can set the access permissions as shown in Table 15.4.
| Method | Roles |
|---|---|
| removeLocation | Administrator |
| updateLocation | Administrator |
| deleteCustomer | Administrator, Customer |
| getPrimaryKey | none |
| getEJBHome | none |
| findAllCustomers | All |
| getLocationDescription | All |
| findAllApllicants | All |
| removeSkill | Administrator |
| getSkills | All |
| getAgencyName | All |
| getHandle | none |
| select | Administrator |
| addLocation | Administrator |
| remove | All |
| updateSkill | Administrator |
| isIdentical | none |
| addSkill | Administrator |
| getSkillDescription | All |
| createCustomer | Administrator, Customer |
| getLocations | All |
| deleteApplicant | Administrator, Applicant |
| createApplicant | Administrator, Applicant |
Note
Setting the method permissions by using deploytool is laborious but, unfortunately, you have no choice in using the tool because you cannot edit the descriptor manually unless you use batch files or shell scripts to rebuild the EAR file as discussed on Day 5. Sometimes manually editing the DD is preferable to using a GUI tool.
When you have added the permissions, your application will look similar to that shown in Figure 15.8.
Figure 15.8. Security DD for agency EJB.

Authorization is only required for the methods in the remote interface. Some of the methods (such as getSkills()) can be accessed by all users, so the home interface methods (such as create()) must also be available to all users. Consequently, the default authorizations are appropriate for the home interface.
This is a slightly contrived example used to illustrate the purpose of roles within an application. In a real world job agency, you would probably only want administrators to create customers. However, you would probably be comfortable with allowing any user to register themselves as an applicant. There would be no need to differentiate between applicant clients and customer clients. In the “Programmatic EJB Security” section later in this chapter, you will see how the Agency case study can use programmatic security to provide a more realistic authorization mechanism.
The remaining three EJBs in the Agency application must also have method permissions defined. These are much easier to specify.
The Register EJB must have all the home and remote interface methods accessible to the Administration and Applicant roles only.
The Advertise EJB and AdvertiseJob EJB must have all the home and remote interface methods accessible to the Administration and Customer roles only.
After all these method permissions have been defined, the application is now ready for the deployer to map the principals on to the roles you have just defined. If you haven't already done so, it is worth saving your agency.ear file at this point just in case something goes wrong later.
Just before you learn how to do this with the J2EE RI deploytool, you should consider the security of the Entity beans in the data JAR file. How can the Entity beans be accessed, and what authorization is required?
The Entity beans are only ever accessed via the Session beans. Consequently, by applying authorization to the Session beans, you have also protected the Entity beans. Should you redesign the application so that the Entity beans are exposed to client code (maybe by accessing the beans directly from a Web page), you will need to change the method permissions for all of the Entity beans.
By designing access to Entity beans via the Session beans, you have simplified the design of the security features. This is one of the advantages of not exposing Entity beans to client code.
Mapping Principals to Roles
A developer or assembler in the EJB development lifecycle undertakes the process of defining the roles and method permissions. The process of mapping principals to roles is very much a deployer function.
The exact mechanism of mapping principals onto roles is not defined in the EJB specification (at least not yet). There are no tags defined in the DD; instead, each J2EE server defines its own mechanism for mapping principals to roles. The J2EE RI defines a proprietary XML file (sun-j2ee-ri.xml) that is stored in the Enterprise Application Resource (EAR) file. This file is maintained by using deploytool and deployed with the EJB components.
The deploytool maps principals to roles at the application level. To map the roles for the Agency case study, you must run deploytool and select the Agency application containing the JAR file in which you defined the roles. Select the Security tab and you will see a window similar to the one shown in Figure 15.9.
Figure 15.9. J2EE RI principal mapping screen.

You can see that deploytool has retrieved the role names from all the JAR files in the application. By clicking the Add button, you can map each role onto one or more users or groups in the authentication domain.
The Agency case study requires the role mappings shown in Table 15.5.
| Role | User | Group |
|---|---|---|
| Administrator | j2ee | |
| Applicant | applicant | |
| Customer | customer |
After defining the role mappings for the Agency case study, you can deploy and test your changes by using the GUI client code in the Day 15 “examples” directory.
Note
If you run the example GUI clients from Day 15 on the accompanying CD-ROM, you will see an error message and a stack trace prior to being prompted for a username and password. The last few lines of the error are
java.lang.NullPointerException
No local string for enterprise.deployment.unabletoloadtld
Unable to load TLD WEB-INF/agency.tld
 java.lang.Exception: parsing error: null
This error can be ignored because it is related to the TLD descriptor used by the custom tag libraries of the Web interface (see Day 14 “JSP Tag Libraries”). This error appears to be a problem with Sun Microsystem's J2EE RI and does not affect the functionality of the Web interface to the Agency case study (you may have seen this exception when working on the examples and exercise for Day 14).
Because the j2ee user has unrestricted access, you can test all the functionality if you log in as j2ee (password j2ee). If you log in as an applicant, such as romeo or juliet, you will only be able to use the applicant registration functionality. Similarly, customers such as winston and george will only be able to access job advertisement functionality.
Any attempt to access unauthorized functionality results in a J2EE vendor-specific exception.
Using Roles as the Security Identity
An alternative to propagating the caller's security identity is to define a bean as using a specific role. This is achieved using deploytool by selecting the Run As Specified Role option and selecting the appropriate role from the list of roles. The developer or assembler determines whether to use the caller ID or a specific role for a bean.
The <run-as> tag is used to define the role for beans that run with a specified role, as shown in Listing 15.4. The role name is defined in the <role-name> tag and must specify the name of a role defined in the <assembly-descriptor> of the <ejb-jar> definition.
Listing 15.4. Run-As Specified Role in the DD
Defining the bean to run using a specific role meets the developer's requirements, but the deployer must also map the role onto a principal in the target security domain for it to be effective. The actual method of defining the principal for the “Run as role” security identity is vendor specific. The J2EE RI adds an entry to the sun-j2ee-ri.xml descriptor file.
To set the required principal using deploytool, click the Deployment Settings button and choose the role from the available list in the pop-up window. Figure 15.10 shows the j2ee user selected as the principal for a bean that defines the run as role as Administrator.
Figure 15.10. J2EE RI defining the <run-as> security identity.

Note that deploytool will only list the users mapped onto the selected role, it will not include the users in groups mapped onto a role.
The Deployment Settings pop-up window is also used to configure client certificates and SSL support used with Web client security.
Defining a bean to run as a specific role is useful when the bean requires special permissions that the client cannot be guaranteed to provide. However, using the “Run as role” capability should be used carefully because it effectively negates the authorization process.
Any client with access to the bean automatically gets the appropriate security permissions; therefore, it is imperative that only authorized clients can use the bean.
The “Run as role" bean is often a helper Session bean used as an adapter (or wrapper) around other J2EE components, such as Entity beans.
Note
When using the “Run as role” security identity, it is usual to define all bean methods as having <unchecked/> access allowing access to all roles. If checked access is applied to the methods, the run as role must be allowed; otherwise, the method can never be called.
Programmatic EJB Security
If simple declarative security constraints cannot express all of the security policy rules, the developer must resort to adding security into the EJB code.
The javax.ejb.EJBContext interface defines two methods for supporting programmatic security:
java.security.Principal getCallerPrincipal() returns an object defining the principal calling the method. The Principal class defines a getName() method that returns the name of the principal. The getCallerPrincipal() method never returns null.
boolean isCallerInRole(String roleName) returns true if the caller of the method is in the role passed as a parameter.
These two methods allow the developer to use the client security identity to enable or disable EJB functionality.
Of the two methods, isCallerInRole() is considered portable because the developer defines the role name used in the code, and the deployer (or assembler) maps this role reference onto a real role. This allows the developer to write the code without knowing the real role names defined for the application.
The getCallerPrincipal() method is considered non-portable because the principal name used is dependent on the authentication mechanism used by the target J2EE server. In practice, as long as principal names are not defined as string literals in the Java code, the getCallerPrincipal() method can be used in a portable manner.
Using the Agency case study as an example, you will now implement a real-world solution to authorizing access to your application. Instead of identifying administrators, applicants, and customers, you can simply differentiate between administrators and all other clients.
Some functionality would be restricted to administrators only (creating new skills, for example), but most functionality would be available to all clients.
Client-specific authorization could be implemented so that
Any client can register as an applicant, but the applicant name must be the same as the client's principal name.
Any client can register an customer, but the customer name must be the same as the client's principal name.
Registered applicants or customers can only remove their own details from the system.
Registered applicants or customers can only log in to access their own data in the system.
Administrators have unrestricted access to the system.
Listing 15.5 shows the ejbCreate() method of the Advertise Session bean that has been modified to prevent a client from accessing data that does not match his or her principal name. Administrators are permitted to access data for any client.
Listing 15.5. The ejbCreate() Method from agency.AdvertiseBean.java
The revised ejbCreate() method checks if the caller is not in the admin role and rejects the operation if the customer login name does not match the caller's principal name.
The parameter to the isCallerInRole() method is a role reference, and this must be mapped onto a real role by the application deployer. Figure 15.11 shows the Advertise bean security page in deploytool with the role reference defined.
Figure 15.11. Defining a role reference.

In Figure 15.11, the coded role of admin is mapped onto the real role of Administrator. The role references for a bean are defined in the bean's entry in the DD with the <security-role-ref> tag, as shown in Listing 15.6.
Listing 15.6. Role References in the DD
In addition to the change to the Advertise EJB, the Agency Session bean must also be updated to ensure non-administrator clients can only create or delete customers with a login name equal to the client's principal name (see Listing 15.7).
Listing 15.7. The Create and Delete Customer Methods from agency.AgencyBean.java
The code uses the java.lang.IllegalArgumentException to show the error when the customer login name does not match the principal name.
The admin to administrator role ref must also be added for the Agency session EJB.
The ejbCreate() method in agency.AdvertiseJobBean should also be updated in a similar manner to the ejbCreate() method in agency.AdvertiseBean, and the admin to administrator role ref created for the AdvertiseJob session EJB.
The revised application can now be deployed and tested.
So far, the security constraints have been added to the Session beans. An alternative approach would have been to add the authorization code to the Entity beans.
The advantage of adding security to the Entity beans is that security is enforced at the data access level, preventing a badly written client from bypassing the security or violating the data integrity. Security is also applied uniformly across all clients and obviates any need for duplicated code to enforce security.
The disadvantage of applying the security within the Entity beans is that it confuses the role of the Entity bean. An Entity bean represents persistent data but should not enforce business rules (other than those required to ensure data integrity). Adding security controls to an Entity bean is adding business rules to the data access layer.
The Agency case study implements the business rules in the Session beans and consistently uses the beans in the GUI client and the Web client. For the Agency case study, the Session bean is the logical place to enforce the security business rules.