
5. Web Part Development
WEB PARTS ARE ONE of the most fundamental user interface components in SharePoint. Web parts enable developers to create visual components that can be configured by end users. This is core to the concepts of SharePoint as a composite application model in that you can compose applications from smaller building blocks, such as web parts. Out-of-the-box, Visual Studio supports creating web parts and Visual Web Parts. The difference between the two Visual Studio projects is that Visual Web Parts can be created using a visual designer, and the web part template is written using code only. In this chapter you learn how to leverage Visual Studio to create Silverlight Web Parts. These are web parts that use Silverlight as the user interface.
Silverlight Web Parts
In Chapter 4, “A First Look at Silverlight in SharePoint,” you saw a couple of techniques for hosting Silverlight in SharePoint using the built-in Silverlight Web Part and using the Content Editor Web Part (CEWP). Both of these techniques required you to manually upload the Silverlight application’s .xap file to SharePoint and then to manually create a web part to host the .xap file. Using this method to host Silverlight is problematic for a couple of reasons. First, it is a totally manual process and as such is prone to user error. Doing this manually doesn’t follow good application lifecycle management (ALM) practices such as using source control, testing, and deployment. To avoid all of these issues you want to also package all of your SharePoint applications into a SharePoint solution package, a .wsp file.
It is important to understand what is going on under the covers. First you will see how to manually build a Visual Studio project to package and deploy the Silverlight application. This process is not obvious and requires a number of steps. Because of this Microsoft has released a Silverlight Web Part extension project for Visual Studio that automates the process of creating a Silverlight Web Part. Later in the chapter you use this extension to build a Silverlight Web Part.
Manually Building a Silverlight Web Part
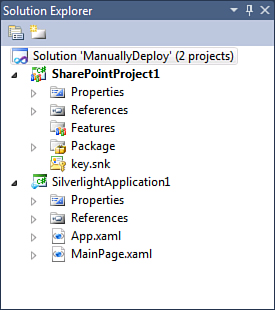
The first task you need to solve is how to package and deploy your Silverlight application in your SharePoint .wsp package. Start by creating a new Silverlight project in Visual Studio. Next, create an empty SharePoint project in the same Visual Studio solution that the Silverlight project is in. You will have something similar to the project structure in Figure 5.1.
Figure 5.1. Default Silverlight and SharePoint projects
At this point you have two projects in the solution, Silverlight and SharePoint, but they are not connected in any way. Normally to reference another project, you add a project reference to the other project in the solution. A Visual Studio project reference will make sure to build the referenced project before including the output of the referenced project into the refering project. In the case of Silverlight this does not work because the output you want to reference is not a .dll but the .xap Silverlight application’s package file. So the SharePoint tools had to come up with a different way to do this. This is the technique that is not totally obvious, but it is not too bad after you see it once.
Now that you have two projects, the task is to get the Silverlight .xap file into the SharePoint project. Modules are the ways in which you deploy files to SharePoint. Add a new Module Project Item to the SharePoint project in Visual Studio. The new Module Project Item contains a Sample.txt file and an Elements.xml file. The Elements.xml, shown in Listing 5.1, describes where to deploy the Sample.txt file. In this the URL property specifies a folder called Module1. If this folder does not exist in SharePoint, it is automatically created.
Listing 5.1. Elements.xml in a New Module
<?xml version="1.0" encoding="utf-8"?>
<Elements
xmlns="http://schemas.microsoft.com/sharepoint/">
<Module Name="Module1">
<File Path="Module1Sample.txt"
Url="Module1/Sample.txt" />
</Module>
</Elements>
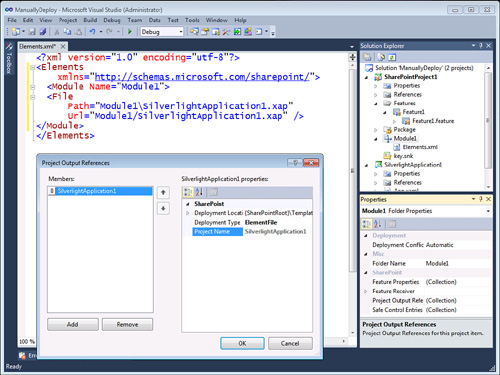
Go ahead and delete the Sample.txt file because it is not needed. You are now ready to add a reference to the Silverlight project. Click the Module1 node in the SharePoint project to view the Properties window. In the Properties window for the Module there is a property named Project Output References. This is a collection property; click the ellipse to open the Project Output References dialog window. Click the Add button to add a new reference. In the reference’s properties, set the Deployment Type to Element File. Choose the Silverlight project from the Project Name drop-down property list. In Figure 5.2 you can see that the Project Output References dialog adds a reference to the Silverlight project and adds the path to the Elements.xml file.
Figure 5.2. Project Output References
Also notice that the Module folder only contains the Elements.xml file, which has been updated as shown in Listing 5.2.
Listing 5.2. Elements.xml to Deploy a Silverlight Application
<?xml version="1.0" encoding="utf-8"?>
<Elements
xmlns="http://schemas.microsoft.com/sharepoint/">
<Module Name="Module1">
<File
Path="Module1SilverlightApplication1.xap"
Url="Module1/SilverlightApplication1.xap" />
</Module>
</Elements>
This is because there is only a refence to the Silverlight application. The actual .xap is not stored in the SharePoint project. Visual Studio also ensures the Silverlight is built before the SharePoint project if it is dirty, just like it does when adding a project reference.
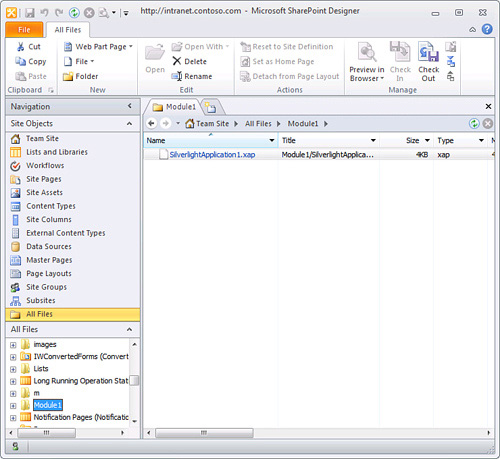
Build, package, and deploy the SharePoint project to SharePoint by pressing F5. Visual Studio deploys and activates the feature that then deploys the Silverlight application’s .xap file; in this case to the Module1 folder. You can verify that the Silverlight application was deployed using SharePoint Designer. Open SharePoint Designer and browse to the All Files folder of the site you deployed the solution to. Under the All Files folder you see the Module1 folder, which contains the SilverlightApplication1.xap file that you just deployed, as shown in Figure 5.3.
Figure 5.3. Verify the Silverlight deployment using SharePoint Designer
After you have deployed the solution, users can add Silverlight Web Parts to pages. All they need is the path to the deployed .xap file, for example http://intranet.contoso.com/Module1/SilverlightApplication1.xap. You could also take the next step and add a web part directly to your project. But Microsoft has already done all of these steps for you in a Visual Studio extension, which you can download for free. Let’s take a look at how to do this using the extension.
Visual Studio Silverlight Web Parts Extension
Microsoft has created a Visual Studio extension to automatically build Silverlight Web Parts. With this extension you can avoid doing all of the manual steps from the previous section. The extension also has a couple of other nice features, such as it automatically creates the web part for you and creates a test page that hosts the Silverlight Web Part. This makes it simple to add a Silverlight Web Part project item and press F5 and have a fully functional Silverlight Web Part created for you without any other steps for you to do.
Installing the Extension
The Silverlight Web Part project item templates are not part of Visual Studio out-of-the-box, so you need to download them from the Visual Studio Gallery and install them. But Visual Studio has made this process very easy and quick to not only install but uninstall as well. In fact it is built directly into Visual Studio.
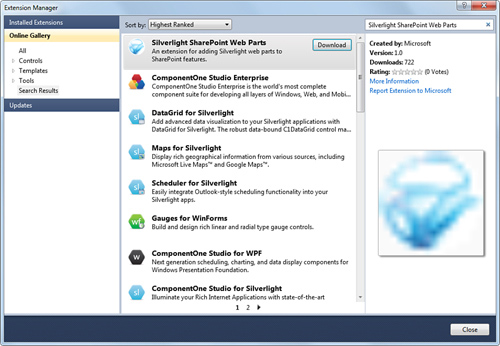
Before you install the Silverlight SharePoint web parts extension, you need to install the Visual Studio 2010 SharePoint Power Tools extension. Click Tools and then Extension Manager from the main menu. In the Extension Manager Gallery click Online Gallery from the menu on the left. When the online gallery loads, enter Visual Studio 2010 SharePoint Power Tools in the search box. Click the Download button. Follow the prompts to download and install the extension.
Click Tools and then Extension Manager from the main menu. In the Extension Manager Gallery click Online Gallery from the menu on the left. When the online gallery loads, enter Silverlight SharePoint Web Parts in the search box. Click the Download button, as shown in Figure 5.4. Follow the prompts to download and install the extension.
Figure 5.4. Visual Studio Extension Manager
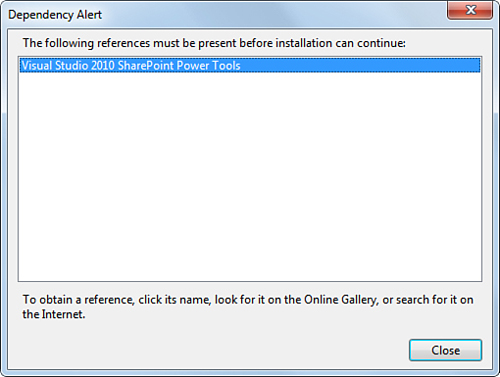
The extension does have a dependency on another extension that Microsoft ships called the Visual Studio 2010 SharePoint Power Tools, as shown in Figure 5.5. This extension adds support for sandboxed compatible Visual Web Parts. If you see this warning, click Close and install the Visual Studio 2010 SharePoint Power Tools first. Also be sure to restart Visual Studio after installing the power tools extension.
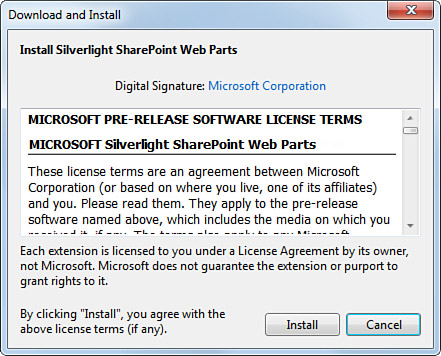
Click Install to accept the EULA and install the extension, as shown in Figure 5.6.
Figure 5.6. Install Visual Studio Extension
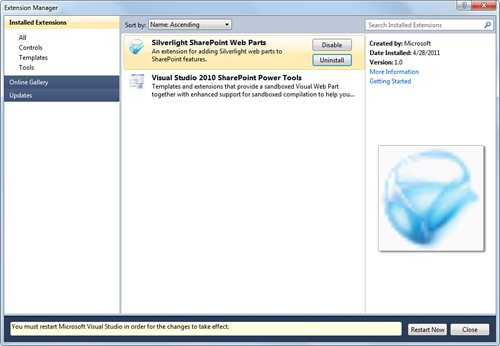
You can confirm that both extensions are installed from the Extension Manager dialog, as shown in Figure 5.7. In this case you can see that there is a warning to restart Visual Studio, which is required after installing any extension.
Figure 5.7. Restart Visual Studio after installation
With the Silverlight SharePoint Web Part extension successfully installed you are ready to start creating Silverlight Web Parts. Let’s look at the two different types of Silverlight Web Parts that you can create with the extension—Silverlight Web Parts and Custom Silverlight Web Parts.
Building a Silverlight Web Part
SharePoint ships with a web part for hosting Silverlight applications. The Silverlight Web Part project template uses this web part to host the Silverlight application. When developers create Silverlight applications for SharePoint, they generally follow one of two patterns. The first is that a Silverlight developer has created a Silverlight application and now wants to deploy it to SharePoint. The second pattern is that a SharePoint developer wants to add an existing Silverlight application to the SharePoint project. But what both of these patterns have in common is that you have one Silverlight and one SharePoint project in a single SharePoint solution and you want to connect them.
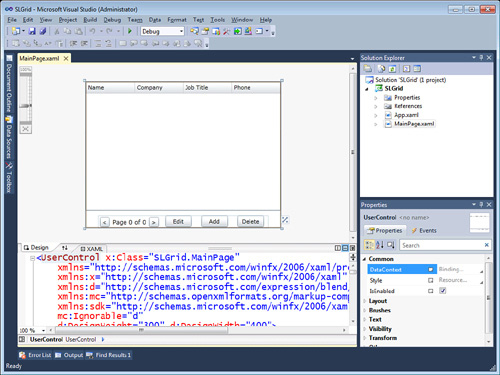
Let’s take a look at an example of how to do this using the Silverlight Web Part extension project item. Create or open a Silverlight project in Visual Studio. In this example you can open the SLGrid Silverlight application that is located in the sample code, as shown in Figure 5.8.
Figure 5.8. SLGrid.sln Silverlight application
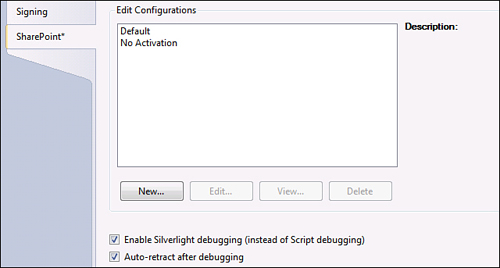
A developer iterates on the Silverlight application using Expression Blend or Visual Studio until it is ready to be deployed to SharePoint. The SharePoint developer adds a new empty sandboxed SharePoint project to the SharePoint solution. There are a couple of housekeeping tasks you need to do because SharePoint was added after the Silverlight project. First, set the SharePoint project as the startup project. This causes the SharePoint project to deploy to SharePoint when you press F5. You should always enable Silverlight debugging. This setting is somewhat hidden on the SharePoint tab of the Project Properties page; most of the time you need to scroll down to see the setting, as shown in Figure 5.9.
Figure 5.9. Enable Silverlight debugging
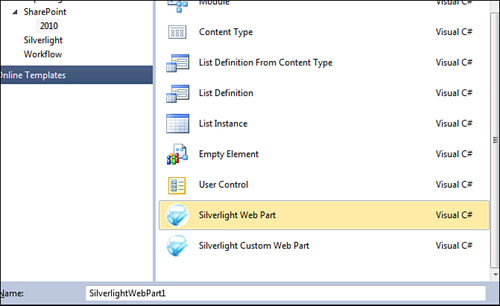
In your Visual Studio solution you now have one Silverlight and one SharePoint project. Technically it does not matter how you got to this state, whether you started with the SharePoint project or the Silverlight project. After you are in this state you can connect the two projects together by adding a Silverlight Web Part. Right-click the SharePoint project and add a new project item. In the new project item, click the Silverlight Web Part project item in the SharePoint2010 node, as shown in Figure 5.10.
Figure 5.10. Add a Silverlight Web Part
Click Add to create the Silverlight Web Part. The Silverlight Web Part project template sees that you only have one SharePoint and one Silverlight project so it automatically connects them. If you had zero or more than one Silverlight project you would be prompted to create a new Silverlight project or select the one you would like to connect. I don’t recommend using this feature because the Silverlight project is created using a default name.
The Silverlight Web Part project item template does more than just add a Silverlight Web Part to your project. First, it creates a module to deploy the Silverlight .xap file. This is equivalent to the steps you did manually earlier in this chapter. The main difference is that the Silverlight application is deployed to the Master Pages gallery. Specifically it is deployed to the ClientBin folder, and a subfolder is created that matches the package name, which is typically the same as the Visual Studio project’s name. The Visual Studio replacement token, $SharePoint.Package.Name$, is used to dynamically create the folder in the Elements.xml file as shown in Listing 5.3.
Listing 5.3. Elements.xml with SharePoint Package Name Token
<?xml version="1.0" encoding="utf-8"?>
<Elements xmlns="http://schemas.microsoft.com/sharepoint/">
<Module Name="SLGrid"
Url="_catalogs/masterpage/ClientBin/$SharePoint.Package.Name$">
<File Path="SLGridSLGrid.xap" Url="SLGrid.xap" />
</Module>
</Elements>
The project item template also creates a Silverlight Web Part definition file using the built-in Silverlight Web Part. This is equal to you manually adding a Silverlight Web Part from the Web Parts gallery. Unlike doing this manually, the web part that is created has all of the properties already set, including the URL property, which points to the location of the Silverlight .xap file. You can edit the SLGridWebPart.webpart file’s properties to change other values such as description, height, width, and title. The content of SLGridWebPart.webpart is shown in Listing 5.4.
Listing 5.4. SLGridWebPart.webpart File Sets WebPart Values
<webParts>
<webPart xmlns="http://schemas.microsoft.com/WebPart/v3">
<metaData>
<type name="Microsoft.SharePoint.WebPartPages.SilverlightWebPart,
Microsoft.SharePoint, Version=14.0.0.0, Culture=neutral,
PublicKeyToken=71e9bce111e9429c" />
<importErrorMessage>Cannot import this Web
Part.</importErrorMessage>
</metaData>
<data>
<properties>
<property name="HelpUrl" type="string" />
<property name="AllowClose" type="bool">True</property>
<property name="ExportMode" type="exportmode">All</property>
<property name="Hidden" type="bool">False</property>
<property name="AllowEdit" type="bool">True</property>
<property name="Direction" type="direction">NotSet</property>
<property name="TitleIconImageUrl" type="string" />
<property name="AllowConnect" type="bool">True</property>
<property name="HelpMode" type="helpmode">Modal</property>
<property name="CustomProperties" type="string" null="true" />
<property name="AllowHide" type="bool">True</property>
<property name="Description"
type="string">SilverlightSLGrid</property>
<property name="CatalogIconImageUrl" type="string" />
<property name="MinRuntimeVersion" type="string" null="true" />
<property name="ApplicationXml" type="string" />
<property name="AllowMinimize" type="bool">True</property>
<property name="AllowZoneChange" type="bool">True</property>
<property name="CustomInitParameters" type="string" null="true" />
<property name="Height" type="unit">480px</property>
<property name="ChromeType" type="chrometype">None</property>
<property name="Width" type="unit">640px</property>
<property name="Title" type="string">SilverlightSLGrid</property>
<property name="ChromeState" type="chromestate">Normal</property>
<property name="TitleUrl" type="string" />
<property name="Url"
type="string">~site/_catalogs/masterpage/ClientBin/$SharePoint.Package.
Name$/SLGrid.xap</property>
<property name="WindowlessMode" type="bool">True</property>
</properties>
</data>
</webPart>
</webParts>
The final item created by the project item template is a test page called SLGridWebPartPage.aspx that hosts the Silverlight Web Part, SLGridWebPart.webpart. This is a nice feature for developing the solution as you immediately have a page that you can run without taking any other steps. This page uses the SharePoint Wiki Page template. The SLGridWebPartPage.aspx page is a lot of standard wiki page code; the important section is at the very bottom where the Silverlight Web Part is hosted. This is equivalent to you creating a new wiki page in the Site Pages Library and inserting the SLGridWebPart onto the page. Although it is perfectly fine to ship this with the test page, developers generally delete it before going to production. You can see Listing 5.5 for the Silverlight Web Part that is inserted in the wiki field node of the wiki page.
Listing 5.5. Silverlight Web Part in the Page Wiki Field
<!-- Silverlight Web Part -->
<WebPartPages:SilverlightWebPart
runat="server"
Height="480px"
Url="~site/_catalogs/masterpage/ClientBin
/$SharePoint.Package.Name$/SLGrid.xap"
ExportMode="All"
ChromeType="None"
ApplicationXml=""
HelpMode="Modal"
Description="SLGrid Web Part"
ID="g_c24198d9_d504_4132_b56c_585e456d8855"
Width="640px"
Title="SLGrid"
__MarkupType="vsattributemarkup"
__WebPartId="{90D205F0-8BF4-4138-BCB5-7A947C14BDA9}"
WebPart="true"
__designer:IsClosed="false">
</WebPartPages:SilverlightWebPart>
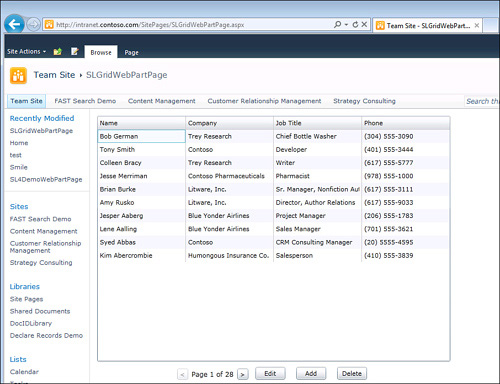
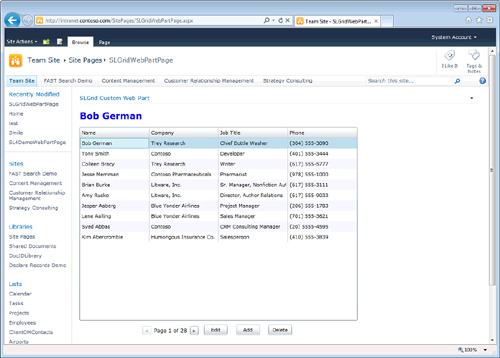
Though all of this detail is interesting, there is nothing that you need to change. You simply add the Silverlight Web Part and press F5 to deploy the solution to SharePoint. In this example the SLGrid application uses the client object model to display a grid of contacts, as shown in Figure 5.11.
Figure 5.11. Silverlight Web Part test page
Adding Silverlight Web Parts using this Project Item template is very simple to use and deploy, but it has some issues. The first is that the built-in Silverlight Web Part has a five-second timeout. This means that your Silverlight application needs to load and start up in five seconds. This is perfect for small applications, but it might be a problem for larger applications or those on slow networks. This is where the Custom Silverlight Web Part comes in. It offers another way to host your Silverlight applications. The second issue is that it is not possible to customize the web part that hosts the Silverlight control. In the next section you learn how to create and extend a custom Silverlight Web Part.
Building a Custom Silverlight Web Part
A custom Silverlight Web Part is very similar to the Silverlight Web Part you created in the previous section. The only difference is that it uses a sandboxed Visual Web Part to host the Silverlight application as opposed to the built-in Silverlight Web Part control that ships with SharePoint. Using the sandboxed Visual Web Part has some advantages over the built in Silverlight Web Part host, such as not having the five-second timeout. A custom Silverlight Web Part enables you to interact with the web part page that the Silverlight application is hosted on. You see an example of this later in the chapter. You can also include other HTML items with your custom web part such as JavaScript, CSS, and images.
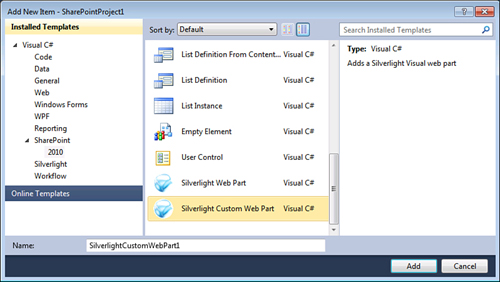
Create a Custom Silverlight Web Part just like you did in the previous section. Add a Silverlight project and a SharePoint project to a Visual Studio solution. In this case you can use the SLGrid project that you used in the previous section. After you create the two projects, you need to connect them together. Open the Add New Item dialog for the SharePoint project. Choose the Silverlight Custom Web Part project item, as shown in Figure 5.12.
Figure 5.12. Add a Custom Silverlight Web Part
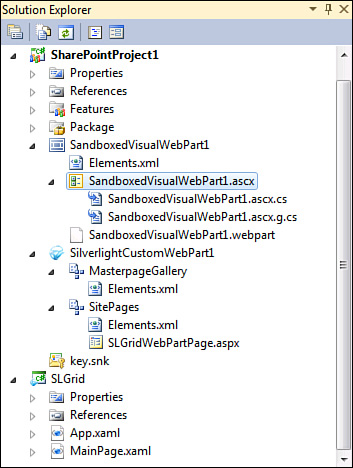
The Visual Studio project has the same items as it did when you added a Silverlight Web Part. There is a module that deploys the Silverlight .xap file. There is a wiki test page that hosts the Silverlight Web Part. The difference is now there is a sandboxed Visual Web Part instead of just a .webpart definition file. The sandboxed Visual Web Part Project Item template comes from the Visual Studio 2010 SharePoint Power Tools extension, which you installed as a prerequisite to the Silverlight Web Parts extension. The sandboxed Visual Web Part is implemented as an ASP.NET user control (.ascx). What makes this user control special is that normally you cannot deploy user controls as part of a SharePoint sandboxed solution because the .ascx file must be written to the _layouts directory in SharePoint. But because this is a sandboxed solution, you are not allowed to do this. To work around this problem the Visual Studio team wrote a custom sandboxed Visual Web Part that compiles the .ascx control to code before deploying it to SharePoint. This avoids the file restrictions of the sandbox as there is nothing to write to the file system. The Silverlight Web Part extension takes advantage of this special Visual Web Part to host the Silverlight application, as shown in Figure 5.13. This is important because Silverlight runs on the client, so there should never be a restriction that it cannot run in a sandboxed solution. Also by using the Visual Web Part it makes it easier for developers to extend the web part using the Visual Design tools in Visual Studio.
Figure 5.13. Custom Silverlight Web Part
The sandboxed Visual Web Part contains the code to host the Silverlight application. Open this page in Visual Studio to see the hosting code. This code is the same code that the Silverlight project generates in the test pages when you build the project. The only change to that generated code is the insertion of SharePoint tokens for the source and initparams.
First is the Silverlight error handling code in Listing 5.6. This code is unchanged from what is generated by the Silverlight project system.
Listing 5.6. Error Handling Script in the Custom Silverlight Web Part
<!-- Silverlight Error Handler -->
<script type="text/javascript">
function onSilverlightError(sender, args) {
var appSource = "";
if (sender != null && sender != 0) {
appSource = sender.getHost().Source;
}
var errorType = args.ErrorType;
var iErrorCode = args.ErrorCode;
if (errorType == "ImageError" || errorType == "MediaError") {
return;
}
var errMsg = "Unhandled Error in Silverlight Application " + appSource + "
";
errMsg += "Code: " + iErrorCode + "
";
errMsg += "Category: " + errorType + "
";
errMsg += "Message: " + args.ErrorMessage + "
";
if (errorType == "ParserError") {
errMsg += "File: " + args.xamlFile + "
";
errMsg += "Line: " + args.lineNumber + "
";
errMsg += "Position: " + args.charPosition + "
";
}
else if (errorType == "RuntimeError") {
if (args.lineNumber != 0) {
errMsg += "Line: " + args.lineNumber + "
";
errMsg += "Position: " + args.charPosition + "
";
}
errMsg += "MethodName: " + args.methodName + "
";
}
throw new Error(errMsg);
}
</script>
The next section of code, shown in Listing 5.7, is the code that inserts Silverlight on the page. The two properties to call out are source and initParams. The source property is the URL to the Silverlight .xap file host in SharePoint. The initParams are parameters passed to the Silverlight application when it is started. There is one special parameter called MS.SP.url. The MS.SP.url parameter is used by the client object model to set the ClientContext.Current value. Without the MS.SP.url parameter, ClientContext.Current returns null. You should always pass this parameter if you want to access the client context, even if you are creating your own Silverlight Web Parts.
Listing 5.7. Silverlight Object Tag in the Custom Silverlight WebPart
<!-- Silverlight Control -->
<div id="silverlightControlHost" style="position:relative; height:480px; width:640px;">
<object data="data:application/x-silverlight-2," type="application/x-silverlight-2"
width="100%" height="100%">
<param name="source" value="<%= Microsoft.SharePoint.SPContext.Current.Web.Url
%>/_catalogs/masterpage/ClientBin/SLGridCustomWebPartPackage/SLGrid.xap" />
<param name="onError" value="onSilverlightError" />
<param name="background" value="white" />
<param name="minRuntimeVersion" value="4.0.50401.0" />
<param name="autoUpgrade" value="true" />
<param name="initParams" value="MS.SP.url=<%=
Microsoft.SharePoint.Utilities.SPHttpUtility.HtmlEncode(Microsoft.SharePoint.SP
Context.Current.Web.Url) %>" />
<a href="http://go.microsoft.com/fwlink/?LinkID=149156&v=4.0.50401.0"
style="text-decoration: none">
<img src="http://go.microsoft.com/fwlink/?LinkId=161376" alt="Get
Microsoft Silverlight"
style="border-style: none" />
</a>
</object>
<iframe id="_sl_historyFrame" style="visibility: hidden; height: 0px;
width: 0px;border: 0px"></iframe>
</div>
You could run the project at this point. There is nothing more you need to do to deploy this to SharePoint. But let’s take a look at one more advantage of using the custom Silverlight Web Part by extending the application to interact with the user control hosting the Silverlight application. Open the Visual Web Part in the Visual Studio Code Editor and add the following div tag below the closing script tag and above the Silverlight object tag:
<div id="SLDiv"></div>
This div tag could really go anywhere on the page. In this example it appears above the Silverlight application within the web part. Next you need to add some code to the SLGrid application’s MainPage.xaml.cs file to populate this div tag with the currently selected user. In the Loaded event of the MainPage, add the code to handle the selection changed event of the data grid as shown in Listing 5.8.
Listing 5.8. MainPage_Loaded Event
void MainPage_Loaded(object sender, RoutedEventArgs e)
{
clientContext = ClientContext.Current;
listDataGrid.SelectionChanged +=
new listDataGrid_SelectionChanged;
RefreshData();
}
The selection changed event handler retrieves the current list item from the data grid. Note that because we are using data binding with the client object model, the list item is an actual SharePoint List Item object. Extract the FullName field from the list item and call the SetSLDiv() function. SetSlDiv() uses the Silverlight HTML Bridge to get a reference to the SLDiv tag that you added to the user control. When you have a reference to the div tag, you can set the innerhtml property with the FullName of the list item, and you could even set other values such as the style properties. Add the code in Listing 5.9 to the MainPage.xaml.cs file in theSilverlight application SLGrid.
Listing 5.9. Displaying SharePoint ListItem Properties in a Div Tag
void listDataGrid_SelectionChanged(
object sender, SelectionChangedEventArgs e)
{
ListItem selectedListItem =
(ListItem)listDataGrid.SelectedItem;
string fullName = "No Selected Item";
if(selectedListItem != null)
fullName =
selectedListItem["FullName"].ToString();
SetSLDiv(string.Format("<h1>{0}</h1>", fullName));
}
private void SetSLDiv(string InnerHTML)
{
HtmlElement SLDiv =
HtmlPage.Document.GetElementById("SLDiv");
if (SLDiv != null)
{
SLDiv.SetProperty("innerhtml", InnerHTML);
SLDiv.SetStyleAttribute("color", "blue");
}
}
Run the project by pressing F5, which compiles both the Silverlight project and the SharePoint project. It packages the SharePoint project, adding a copy of the Silverlight .xap file to the package. F5 also deploys the package to the SharePoint sandboxed Solution Gallery, activates the solution, launches Internet Explorer, and attaches the Visual Studio debugger. You can see in Figure 5.14 that Bob is selected in the Silverlight grid, that div tag has been set with his full name, and the color has been set to blue.
Figure 5.14. Silverlight interacting with HTML
The custom Silverlight Web Part is as easy to use as the built-in Silverlight Web Part and opens up a number of new scenarios.
Connecting Web Parts
A cool feature of SharePoint web parts is the ability to connect them together. This allows business users to compose their own mash-ups and dashboards of related information. For example, a master/detail display could allow users to select an item in one web part and then see details and related information in other web parts on the page. The only thing is that SharePoint’s web part connections run on the server, so a page refresh is required to update the connected web parts.
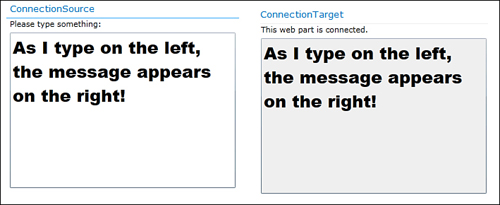
In this section, you will learn to build Silverlight web parts that can be connected, but since Silverlight runs on the client, the update will be immediate with no need for a page refresh. The strategy to do this is to use a SharePoint server-side web part connection to broker a direct Silverlight connection on the web page. Figure 5.15 shows the web parts in the ConnectedWebParts sample in the code download. When the web parts are connected, anything that’s typed into the source web part also appears in one or more connected target web parts.
Figure 5.15. Connected web parts
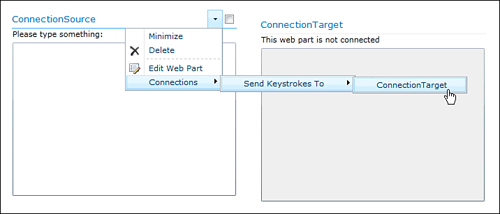
You can try this on your development machine if you place the two web parts on the page. Edit either web part; then pull down the same drop-down next to the web part title you used to edit the web part. This time, a Connections choice appears to let you connect the web parts as shown in Figure 5.16.
Figure 5.16. Connecting SharePoint web parts
Fortunately, SharePoint allows developers to create any kind of connection they like. In this case the connection is called ISilverlightConnection, and it defines a simple registration method for web parts that wish to connect. Listing 5.10 shows the interface.
Listing 5.10. The ISilverlightConnection Interface
public interface ISilverlightConnection
{
void RegisterReceiver(string receiverName);
}
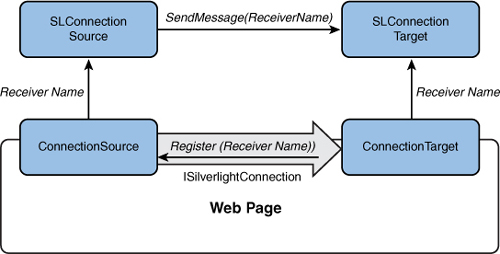
The ConnectionSource Web Part implements the ISilverlightConnection, and ConnectionTarget consumes it. The strategy is for each ConnectionTarget to register a unique receiver name by calling the RegisterReceiver() method in the source. Both web parts then pass the receiver name to their corresponding Silverlight applications, which can then use Silverlight’s messaging API to send messages. The ConnectionSource web part is capable of handling several receiver names if multiple target web parts are connected; go ahead and try this if you like. This is shown in Figure 5.17.
Figure 5.17. Brokering Silverlight communication with a server-side connection
Using Silverlight in Composite Controls
The sad truth is that sandboxed solutions don’t allow web part connections, and the Silverlight SharePoint Web Parts used earlier in this chapter use a sandboxed solution. To handle this, the web parts are written from scratch. A Visual Web Part would work, but this is a good opportunity to show you how to use Silverlight in composite controls, as explained in Chapter 2, “Introduction to SharePoint Development.” These concepts are used in other web parts later in the book as well as in editor parts, where a visual solution is not available. It’s also used in a navigation control in Chapter 13, “Creating Silverlight Navigation,” and a field control in Chapter 15, “Creating a Silverlight Field Control,” where, again, a composite control is the only option.
Beginning with a farm solution, each web part was added as a simple, nonvisual web part. As you recall from Chapter 2, instead of using a design surface containing ASP.NET controls and HTML, child controls are added in code by overriding a method called CreateChildControls().
To facilitate placing Silverlight on the page, a new SilverlightPlugin web control has been provided in the code download. It contains the same Javascript error handler and <object> tag as the standard Silverlight test page, which you might have noticed in the Custom Silverlight Visual Web Part. This time they’re in string constants that contain tokens such as {0} and {1} that hold values for the source, InitParams, and other properties. CreateChildControls() fills in the tokens and adds both the Javascript and <object> tag to the page, as shown in Listing 5.11.
Listing 5.11. CreateChildControls() in the SilverlightPlugin Control
private const string SILVERLIGHT_EXCEPTION_SCRIPT_BLOCK = @"
<script type=""text/javascript"">
function {0}Error (sender, args) {{
// Boilerplate error handler goes here, same as in any Silverlight
// web page. The full code is in the code download.
</script>";
private const string SILVERLIGHT_OBJECT_TAG = @"
<div style=""overflow-x: hidden; position:relative; width:{0};
height:{1};"">
<object data=""data:application/x-silverlight-2,""
type=""application/x-silverlight-2"" width=""{0}"" height=""{1}"">
<param name=""source"" value=""{2}""/>
<param name=""onError"" value=""{3}Error"" />
<param name=""background"" value=""white"" />
<param name=""minRuntimeVersion"" value=""4.0.50401.0"" />
<param name=""initparams"" value=""{4}"" />
<param name=""autoUpgrade"" value=""true"" />
<!-- Rendering for browsers without Silverlight follows -->
<!-- The code download contains the full code for this →
</object>
<iframe id=""_sl_historyFrame""
style=""visibility:hidden;height:0px;width:0px;border:0px"">
</iframe>
</div>";
protected override void CreateChildControls()
{
base.CreateChildControls();
if (Source != null && Source != "")
{
// Ensure we have set the height and width
string width = (this.Width == Unit.Empty)
? "100%" : this.Width.ToString();
string height = (this.Height == Unit.Empty)
? "100%" : this.Height.ToString();
// Render error handling script
this.Controls.Add(new LiteralControl(
String.Format(SILVERLIGHT_EXCEPTION_SCRIPT_BLOCK,
this.ClientID)));
this.Controls.Add(new LiteralControl(
String.Format(SILVERLIGHT_OBJECT_TAG, width, height, this.Source,
this.ClientID, this.InitParameters)));
}
}
It’s important to ensure the Height and Width properties are set on the Silverlight <object> tag, as they both default to zero. Leaving them out will result in a 0×0 pixel Silverlight application that won’t show on the page at all.
It would be typical to add Javascript to the page by calling Page.RegisterClientScriptBlock(), but this would preclude using the SilverlightPlugin control in sandboxed solutions in the future because the sandbox does not allow access to the Page object. Instead, the web part’s clientID property, which is guaranteed to be unique on the page, is used to make the error handler’s method name unique, and the script is generated inline, as in the Silverlight Custom Visual Web Part.
The SilverlightPlugin control shows up in other solutions later in this book in standard (nonvisual) web parts as well as editor parts and navigation and field controls. It makes writing composite controls with Silverlight easy and encapsulates the details about placing Silverlight on the page.
Making the Connection
Listing 5.10 shows the ISilverlightConnection interface used to connect the web parts in this example. The provider (ConnectionSource) web part implements the interface, and the consumer (ConnectionTarget) web part makes use of the interface. In SharePoint the connection provider always implements the interface; in this case, the consumer calls the provider’s RegisterReceiver() method, but event handlers are often used to allow information to flow from provider to consumer.
Listing 5.12 shows the ConnectionSource web part. The [ConnectionProvider] attribute tells SharePoint that the connection is available, and the ConnectionInterface() method hands SharePoint an object that implements the ISilverlightConnection interface. Because this web part only supports one kind of connection, the easiest approach is for the web part itself to implement the interface and pass itself back in this method. If you ever want to implement more than one kind of connection provider in a single web part, you’ll find yourself having to implement a separate class for each interface and manage them in your web part.
Listing 5.12. ConnectionSource Web Part Implements a Connection Provider
public class ConnectionSource : WebPart, ISilverlightConnection
{
// Register with SharePoint as a connection provider
// The provider name will appear in the connection message, as
// in, "Send Keystrokes To"
[ConnectionProvider("Keystrokes")]
public ISilverlightConnection ConnectionInterface()
{
return this;
}
// ISilverlightConnection members
void ISilverlightConnection.RegisterReceiver(string receiverName)
{
EnsureChildControls();
if (silverlightPlugin.InitParameters == null ||
silverlightPlugin.InitParameters == "")
{
silverlightPlugin.InitParameters = "SendOn=" + receiverName;
}
else
{
silverlightPlugin.InitParameters += ";" + receiverName;
}
}
private SilverlightPlugin silverlightPlugin;
protected override void CreateChildControls()
{
base.CreateChildControls();
silverlightPlugin = new SilverlightPlugin();
silverlightPlugin.Source = SPContext.Current.Site.Url +
"/ClientBin/SLConnectionSource.xap";
this.Controls.Add(silverlightPlugin);
}
}
The RegisterReceiver() method begins by calling EnsureChildControls(), which is a method in all ASP.NET controls that checks to see if CreateChildControls() has been called and calls it if it wasn’t. That way, the code that follows can be sure that the SilverlightPlugin control has been created.
The code passes the receiver name to its Silverlight application using its InitParam property. This is standard operating procedure in Silverlight: If you want to pass one or more values to Silverlight, place them in the InitParam property in the format name1=value1, name2=value2 and the Silverlight application is presented with a dictionary object containing the name-value pairs in its application startup event. In later chapters you learn how to pass more complex data in a hidden form field on the web page and to pass a reference to the form field in InitParam; for now the receiver name(s) can go in directly. The code uses the convention of a semicolon to separate receiver names, so as more target web parts register themselves the receiver names are simply appended to the InitParam value.
Listing 5.13 shows the ConnectionTarget web part, which registers as a connection consumer. Instead of implementing a method decorated with the [ConnectionProvider] attribute, this web part includes a [ConnectionConsumer] attributed method. As you can see, it uses its own client ID, which is sure to be unique and HTML-safe, as the receiver name, and it registers with the provider and also passes the same ID to its Silverlight application.
Listing 5.13. ConnectionTarget Web Part Implements a Connection Consumer
public class ConnectionTarget : WebPart
{
// Register with SharePoint as a connection consumer
// The consumer name will appear in the connection message, as
// in, "Get Keystrokes From"
[ConnectionConsumer("Keystrokes")]
public void GetConnectionInterface
(ISilverlightConnection providerPart)
{
providerPart.RegisterReceiver(this.ClientID);
EnsureChildControls();
silverlightPlugin.InitParameters = "ReceiveOn=" +
this.ClientID;
}
SilverlightPlugin silverlightPlugin;
protected override void CreateChildControls()
{
base.CreateChildControls();
silverlightPlugin = new SilverlightPlugin();
silverlightPlugin.Source = SPContext.Current.Site.Url +
"/ClientBin/SLConnectionTarget.xap";
this.Controls.Add(silverlightPlugin);
}
}
Now both the source and target Silverlight applications have the receiver name, so they can communicate directly on the client. Listing 5.14 shows the Application_Startup event in the SLConnectionTarget application; as you can see it simply retrieves the list of receiver names from InitParams and passes them to the main page by setting a public property.
Listing 5.14. The Application_Startup Event Passes InitParams to Main Page
private void Application_Startup(object sender, StartupEventArgs e)
{
MainPage page = new MainPage();
this.RootVisual = page;
if (e.InitParams.ContainsKey("SendOn"))
{
page.SendOnConnectionNames = e.InitParams["SendOn"];
}
}
The main page is extremely simple. It consists of a textbox, whose KeyUp event is hooked as shown in Listing 5.15. Each time the event fires, the content of the text box is sent to all receivers.
Listing 5.15. SLConnectionSource Sends Information on the KeyUp Event
internal string SendOnConnectionNames { get; set; }
private void messageTextBox_KeyUp(object sender, KeyEventArgs e)
{
foreach (string receiverName in SendOnConnectionNames.Split(';'))
{
LocalMessageSender msgSender =
new LocalMessageSender(receiverName);
msgSender.SendAsync(messageTextBox.Text);
}
}
The SLConnectionTarget Silverlight application’s job is to listen on its receiver and display messages sent to it in a text box. It uses the same Application_Startup code to pass in the receiver name, but instead of sending the main page, it receives as shown in Listing 5.16.
Listing 5.16. SLConnectionTarget Receives and Displays Text
LocalMessageReceiver msgReceiver;
internal void SetupReceiver(string receiverName)
{
msgReceiver = new LocalMessageReceiver(receiverName);
msgReceiver.MessageReceived += (s, e) =>
{
Dispatcher.BeginInvoke(() =>
{
this.messageTextBox.Text = e.Message;
});
};
msgReceiver.Listen();
this.StatusTextBlock.Text = "This web part is connected.";
}
The MessageReceived event handler is called whenever a new message is received and is implemented as an anonymous function as discussed in Chapter 3. In Silverlight, the user interface always needs to be updated on the UI thread, so a second anonymous function is passed Dispatcher.BeginInvoke(), which runs it on the UI thread. Anonymous functions are a big help with all the asynchronous activity in a Silverlight application.
The last thing to do is to listen on the event, by calling the Listen() method. Now any time a user types into the ConnectionSource web part, all connected ConnectionTargets are updated immediately with every key stroke.
Summary
In this chapter you have seen how to manually create Silverlight Web Parts that can host a Silverlight application in SharePoint. Creating the web parts manually is a little tedious and not very straight forward for beginners. This was the reason the Silverlight Web Part extension was created. The Silverlight Web Part extension automates all of the steps required to create Silverlight Web Parts. The extension also gives you the flexibility to use either the built-in Silverlight Web Part or use a sandboxed Visual Web Part.
You learned about some of the limitations of the built-in web part. You also saw how you could extend the Visual Web Part by interacting with the HTML tags in the web part. All of these options should be used in ways that make the most sense for your particular solution. The Silverlight Web Part extension helps you jump start your Silverlight Web Part projects and reduces the steps to get Silverlight running in SharePoint.
You’ve also learned how to connect web parts so you can show master-detail relationships, dashboards, and mash-ups. In the process, you also learned how to manually put Silverlight in a web control, which is helpful when writing navigation controls, field controls, and editor parts.