
Chapter 12. Security: users, groups, and roles
- Creating users and groups
- Roles: who can do what
- System administrators
So far, you’ve been working under the default accounts and permissions. You’ve made all your changes as Admin, and all your users have presumably been accessing SonarQube anonymously. In this chapter, we’ll help you set up a slightly more sophisticated system that takes advantage of SonarQube’s role-based authorization, which determines who can do what; and we’ll show you how to grant those roles at the project level to groups and individual users. Once your users have their own accounts in SonarQube, they’ll be able to manage their own preferences, so we’ll look at the settings on a user account and discuss the features available to a user.
We’ll end the chapter with a look at the plugins that let you delegate authentication to an existing system through the Lightweight Directory Access Protocol (LDAP), Central Authentication Service (CAS) protocol, Security Assertion Markup Language (SAML), OpenID, or Protocol Analysis Module (PAM).
12.1. Creating users and groups
The foundations of security in any application are users and their permissions. In a good application (which SonarQube is), these foundations include not just users and their individually granted permissions, but users, the groups they belong to, and user or group permissions. SonarQube can handle both authentication and authorization for you, but there are also several authentication integrations available, which we’ll tell you about at the end of the chapter. Using one of them will render user creation moot. But you can manage users directly in SonarQube; and whether or not you do, you still have to manage your groups in SonarQube. Both are easy, and this section will show you how.
12.1.1. Managing users
Russell sighed. Usually, being the company’s SonarQube admin was a piece of cake—once he got the analyses set up, they pretty much ran themselves. But lately he’d been spending a lot of time making piddly little SonarQube changes for a bunch of projects. The Blue team wanted to tweak their analysis exclusions—over and over again—while the Red team wanted some bad snapshots deleted and the Green team needed their Manual Measures updated. No single change took much time, but it was like being attacked by gnats—a never-ending swarm of annoyances—and each one pulled him away from the things he was supposed to be doing.
Fed up, Russell was considering handing out the default SonarQube admin credentials he’d been using (in appendix A, you’ll learn that the default admin credentials are login: admin, password: admin, and we’ll urge you to change the password), when he remembered he’d never dug into SonarQube’s security. As he fired up his browser, he wondered if there was a way to let one or two people on each team administer their own projects without having to give them the keys to the kingdom.
Because Russell wanted to grant rights to other users, he figured the Users option was a good place to start. The interface he found is shown in figure 12.1.
Figure 12.1. The Users interface gives a list of current users, links to manage each one, and the form to create new users.
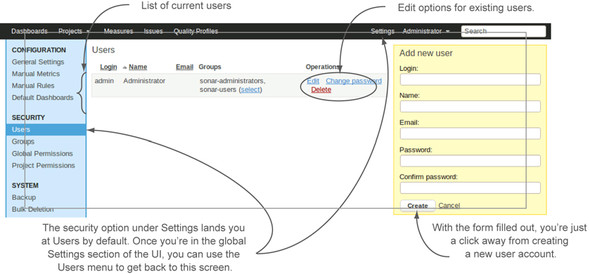
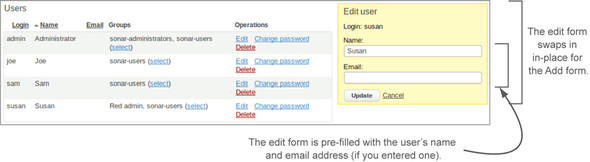
The interface for user management is straightforward. Just fill out and submit the Add New User form, and voilà! Your newly created user is added to the list in the center of the screen. Once created, you can’t edit a user’s login, but you can use the links provided to the right of each user to edit her name and email address, or use the Change Password link for a password reset. When you use the Edit links, the Add New User form is replaced with the Edit User form. At a glance, the forms are similar: blink, and you could miss the swap. So if you think you’ve been waiting a long time for the page to refresh and take you to the editing screen, make sure you read the title on the form at right on the page—it may already be in front of your face, as figure 12.2 shows.
Figure 12.2. When you click the link to edit a user, the Edit User form replaces the Add New User form. This is typically a blink-and-you’ll-miss-it operation.
As you’d expect, the Delete link by each user gives you a confirmation dialog. What you may not expect is that clicking the link doesn’t actually delete the user. But that makes sense when you consider that the user you’re axing may have entered some of the issues we talked about in chapter 10, and truly deleting the user would eliminate all record of his contributions and wreak havoc on the issue comment logs. Instead, the Delete link deactivates the user, removing him from all the security interfaces.
Of course, deactivate implies reactivate, but there’s no button for that. Instead, you re-add a user with the same login. If you do, you’ll see a dialog like the one shown in figure 12.3. When you resurrect a previously deleted user through the Add interface, you revive his old account, but the name and email address are the values you entered on the Add form—as though you had done an edit on the original account.
Figure 12.3. Once you’ve deleted a user, you can get him back by re-adding a user with the same login. If resurrection wasn’t intended, the additional confirmation shown here gives you the chance to go back and try another user name.

The other things you’ll notice inline with each user are a list of that user’s groups and a link to a separate interface where you can add the user to multiple groups in one easy go. But first, you need groups. SonarQube starts you out with a couple of default groups. But Russell needs an admin group per team, so in the next section we’ll look at setting that up.
12.1.2. Personalization: what users can manage for themselves
First, let’s see what having a user account gets you. The administrator isn’t the only person who can change a user’s password. When users log in to SonarQube, they have access to a brief menu of options tucked under their names in the top menu bar. What they see after picking the My Profile option is shown in figure 12.4.
Figure 12.4. Users can perform their own password changes and set their email preferences, as well as manage their own filters.
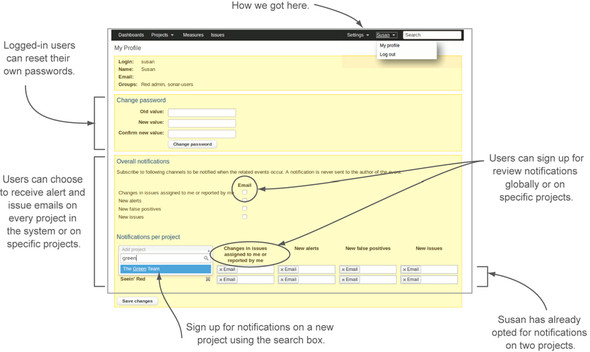
We’ll show you how to configure the global email settings in chapter 14; once you have that set up, users can also have SonarQube send them emails. They can choose to receive notification when “their” issues are edited, either throughout the system or on specific projects. They can also choose email notification for new issues, alerts, and false positives either globally or on specific projects.
The final thing users can do for themselves is set up their own filters—so they can pick and choose the projects they see in a list based on a number of different criteria—and dashboards. (We’ll cover filter administration in chapter 14 and dashboard administration in chapters 14 and 15.) Once you’re comfortable with filter and dashboard administration, it will be in your best interest as a harried administrator to teach your users how to take advantage of these capabilities (because every filter and dashboard they make for themselves is one you don’t have to make for them). You administer filters in the Configuration area of the interface. Dashboard administration is available from the Manage Dashboards link that appears for a logged-in user at upper right on each dashboard, as shown in figure 12.5.
Figure 12.5. Users can make their own private dashboards with whatever filters and widgets they like. New dashboards appear in the left navigation rail just like any other dashboard. Users can control the order in which dashboards appear.

There’s one more thing to mention before we leave users. The Admin account is just another user. In addition to all the administrative functions available to someone logged in with those credentials, she also sees at the top of the navigation list the same basic user options that any other user sees. And she has the same interface for changing the Admin account’s password and setting its email preferences.
Now let’s move on to managing groups.
12.1.3. Managing groups
SonarQube gives you the ability to grant permissions to either users or groups. But once you get past a couple dozen people, managing permissions for individual users can be a real pain—which is where groups come in. If you bundle your users into groups and only grant permissions to groups, controlling who can do what becomes much, much easier.
Out of the box, SonarQube provides two groups: sonar-administrators and sonar-users. We’ll look at global administration permissions a little later in the chapter, but the global Admin account you’ve been using so far is a member of the sonar-administrators group; this is what gives the account its global administration privileges, as well as admin privileges on every project. All new users are automatically added to the sonar-users group, which by default has non-admin permissions to every project (we’ll examine those privileges in the next section).
Russell, the harried SonarQube admin, needs to create some new groups. As figure 12.6 shows, the group-management interface is even simpler than the one for users because there are fewer moving parts: only Name and Description.
Figure 12.6. With fewer options, the group-management interface is even more straightforward than the one for users.

As with users, the Add and Edit forms swap in and out of the same spot at right on the group-management page. The only differences between them are the title at the top and whether the inputs are prefilled.
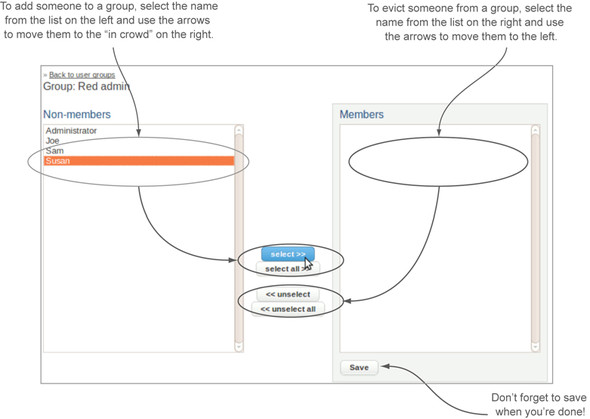
With some groups in place, you’re ready to start adding users to them. Click the Select link in the Members column for the target group: doing so takes you to a page like the one shown in figure 12.7.
Figure 12.7. The group membership interface presents two lists: the in crowd on the right and everyone else on the left. Use the arrows between the two lists to move people from one side to the other.
Note
When we looked at users, we skipped the interface to add groups to a user because you hadn’t created any groups yet. The interface to do so is much like that used to add users to a group, with a list of in groups on the right, the groups the user isn’t in on the left, and arrows in between to move items from one side to the other.
12.2. Roles: who can do what
Now that you have users and groups, it’s time to start granting permissions. That’s done through project roles. Membership in a role grants specific sets of privileges. You can grant a project role to a group or to an individual user; but managing individually granted permissions can be a pain, so you probably want to stick with groups. You can grant three roles: Administrator, User, and Code Viewer. We’ll cover their permissions in that order. But first, let’s look at the interface—there’s a bit more going on in it than in the ones you’ve seen so far in this chapter, as figure 12.8 shows.
Figure 12.8. The Roles interface is where projects, users, and groups all come together, giving you a dashboard of who has what permissions on any given project.
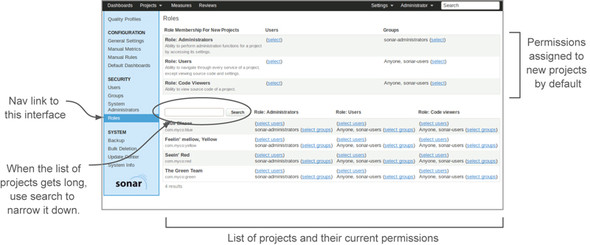
The bottom section of the Roles interface is a list of projects. To the right of each project name is a list of the users and groups who hold each of the three project roles. Use any of the Select links, and you’ll find yourself looking at another iteration of the two-lists-with-arrows-between interface to add either groups or users to a project role.
If you’re following along in your own SonarQube installation, you may be wondering at this point why you’re seeing entries in your projects’ role lists if you’ve never been to this page before. That’s what the top section of the Roles interface is about. It sets up the default permissions to be granted on any new project. The top row, with the Administrator role, shows that the sonar-administrators group is granted project administration rights on all new projects. The next two rows show that Anyone and the sonar-users group get the other two roles on every new project. You can use the links next to each role to change those defaults. Click through on any of the links to open the interface shown in figure 12.9.
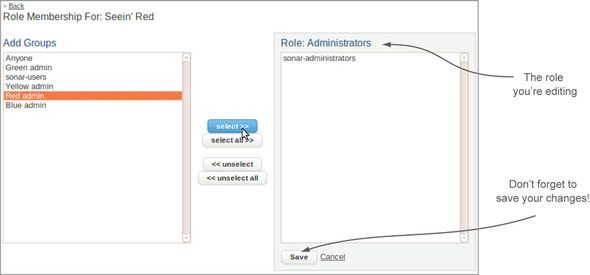
Figure 12.9. To add a group to a project role, highlight it on the left, use the Select button to move it to the right, and save your changes.
But who is this Anyone? Anyone is SonarQube-speak for anonymous, and it’s a phantom group. You can’t add members to it, but when you’re administering group project roles, you see it in the list as a way to give anonymous users rights to a project. Anyone (anonymous) has the ability to view all aspects of your rule profiles; and as we said, by default, Anyone gets both User and Code Viewer privileges on all new projects.
Just what those privileges are comes next.
12.2.1. Project Administrator role
Russell needs to grant the project Administrator role, which gives you permission to do pretty much what you’d think—administer a project. We’ll cover project administration in detail in chapter 15; but in short, it gives you access to twiddle all the project-level settings. That includes choosing your project’s analysis profile, granting other users permissions to the project, and tweaking a project’s analysis exclusions. With project Administrator rights you also get the ability to create the action plans we examined in chapter 10.
By default, this role is granted only to the sonar-administrators group. Thus only those people with global admin permissions have the lower-level permissions to administer a project—which is what’s making Russell crazy.
By this point, he has created a Red Team admin group and put Susan in it. When he grants that group the Administrator role on Red Team’s projects, Susan will see her new administration options the next time she logs in, as illustrated in figure 12.10. All that’s left for Russell to do is put on his Tom Sawyer hat and convince her that she wants to do the work herself instead of having to wait around for him to do it.
Figure 12.10. Project administrators have an additional menu of options—options that allow them to tweak every setting on a project.

Russell could certainly have granted admin permissions on Red Team’s projects directly to Susan as an individual—you can do it either way. But the beauty of using groups is that if Susan moves to another team, he takes her out of the Red Team admin group and adds her replacement. Compared to individual user permissions, a team swap like that works out to six of one, a half dozen of the other if there’s only one project per team. But if you have multiple projects per team (or if you will in the future), the extra step of creating the group makes life much easier.
One last note before we move on to the other roles: when you’re editing a project’s list of admin groups, think carefully before you evict the sonar-administrators group from the list. There’s nothing particularly special about the sonar-administrators group—it’s just another group. If you remove it from a project’s list of administrators, you remove the global administrators’ ability to configure that project. That’s not an irrevocable change, because you don’t lose the ability to configure that project’s roles, and it may be exactly what you want. But be aware of what you’re doing.
Next we’ll look at the User role.
12.2.2. User role
Having the User role on a project (as opposed to having a user account, which we showed you how to create earlier) lets you see the project—to know that it exists. If you don’t have the User role on a project, you see something like figure 12.11 when you look at a project list that would normally include that project.
Figure 12.11. A project’s users are the ones who are able to see it.
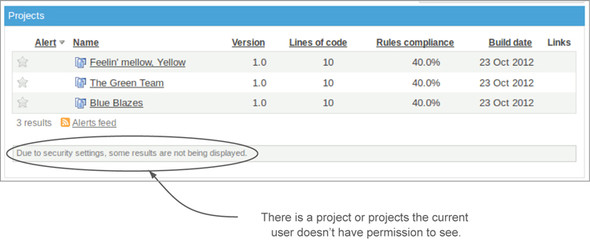
By default, the User role is granted to Anyone and the default group (sonar-users). It gives them the ability to see a project and navigate through every project interface, examining almost every aspect of the project.
To make a project private, you definitely want to remove Anyone and may want to remove sonar-users as well. But if you do, you should probably add back the sonar-administrators group as well as the group you’ve set up for the project-level administrators. Roles aren’t hierarchical—having access to administer a project doesn’t give you access to see it. Because you can’t administer a project you can’t see, you should make sure your project administrators also have the project User role—whether that’s through Anyone or through some other group.
If you find that you’ve somehow locked yourself out of seeing a project, don’t panic. Not having the User role on a project means you can’t see the project in filters or get to its dashboards or drilldowns. But you can still see it in the Roles interface, and you still have the ability to re-grant yourself permissions to it.
The final role to consider is Code Viewer.
12.2.3. Code Viewer role
There’s no mystery about what users with the Code Viewer role can do: they can see a project’s source code. Logged-in code viewers (but not anonymous users accessing a project through Anyone’s roles) can see the source code and also comment on it, or assign its issues for cleanup, or perform any of the other issue functions we covered in chapter 10, including marking issues as false positives or changing their severity.
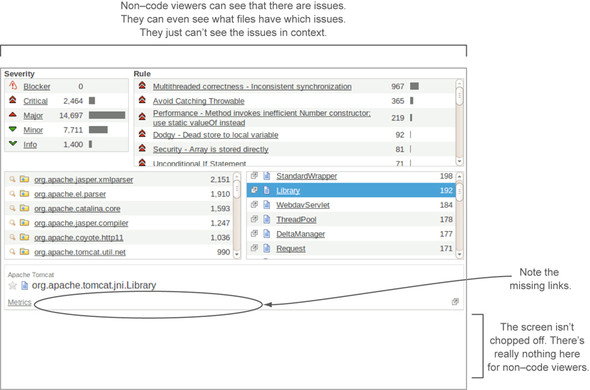
Again, just keep in mind that there’s no hierarchy to roles. Having the Code Viewer role without also having the User role is useless. But the reverse isn’t true. We mentioned that the User role gives you access to almost every aspect of a project; viewing the code is the one thing it doesn’t give you. Figure 12.12 shows the issues drilldown for a user who’s not assigned the Code Viewer role.
Figure 12.12. The User role grants access to view every facet of a project but one: seeing the code. That’s what the Code Viewer role does.
Appendix B’s list of analysis properties includes sonar.importSources, which accepts Boolean values and defaults to true. It controls whether the analysis process imports your source code into SonarQube. With source importing turned off, no one can see the code—not even code viewers—because it’s not there. With source importing turned on, careful use of a project’s Code Viewer role is the best way to control who can see the source code of sensitive projects.
12.2.4. Best practices for roles
Before we move on to global administration, we’d like to take a minute to talk about best practices. We’ve given you a couple so far: grant roles to groups rather than individual users, and create an administration group for each project or team that holds one or two members of that team. What we can’t do is go beyond that in terms of stating best practices, because they’re situational.
Work for the U.S. Navy on nuclear secrets? Then you want SonarQube locked down tight as a drum, and Anyone is definitely out. On an open source project? Then let everyone see everything, and just be choosy about who gets an account (and therefore issue permissions) and about who you put in a project admin group. In between are too many permutations to list, so we won’t even try.
Now that you know everything there is to know about project permissions, let’s move on to SonarQube’s global permissions.
12.3. System administrators
System administration in SonarQube is just another role: it gives you permissions, and you can grant it to either users or groups. There are two system administration–level roles in SonarQube: the Quality Profile Administrators role for profile editing, and the System Administrators role for general system administration. System administration will be covered in detail in chapter 14. But in short, system administration rights let you make all the security changes we’ve discussed in this chapter as well as install plugins, tweak all global settings, and administer all default dashboards and filters. The Quality Profile Administrators role lets you administer quality profiles (which we’ll discuss in chapter 13).
By default, both system administration roles are granted to the sonar-administrators group, and the lone default member of that group is the Admin account you’ve been using so far to make global changes. Now that you’re up to speed on administering users and groups, it’s time to change that.
Of course, you could continue using the default admin login, but at some point you should share administration rights with someone else. After all, everyone likes to take vacation now and then. That means either sharing the credentials to the admin account or granting individual users admin rights—preferably both to you and your stand-in. Why? Well, there’s not a lot of audit trailing in SonarQube, but for what is available you should be able to trace which of you made what changes.
The first step is creating the user accounts, if you haven’t already. Then add yourself and your stand-in to the sonar-administrators group. And you’re finished, because out of the box, the sonar-administrators group has system admin rights. You could use a different group if you wanted; again, there’s nothing special about either the default admin account—it’s just another user—or the sonar-administrators group. But the sonar-administrators group is clearly named and already in place, so you might as well stick with it.
If you did want to use a different group or grant system admin privileges to individual users, you’d do it in the System Administrators interface, shown in figure 12.13. As you’ll see, it’s the simplest of the security screens.
Figure 12.13. The System Administrators interface is the simplest of the security screens, with links to edit the lists of users and groups who have the privilege to make system-level changes.

Once you’ve given your vacation stand-in system administration rights, what he sees after clicking the Configuration link at the top of the page changes from the short list of user options to a much longer list that includes those options and a lot more. The discussions in the following three chapters will help you train your stand-in to run SonarQube in your absence so your vacation can be as peaceful and undisturbed as possible. But before we move on to that, let’s look at this chapter’s plugins.
12.4. Related plugins
The plugins for this chapter don’t do anything nifty to the interface. They don’t add metrics or rules. They don’t aggregate data in new and interesting ways. They just integrate with your local authentication system so you don’t necessarily have to worry about manually creating users, and your users don’t have to worry about remembering their system password and their SonarQube password. Whenever they log in to SonarQube, whether directly or through the Eclipse integration, they’ll do it with their normal system passwords.
Most of these plugins are installed like the rest—through the update center—but you configure them by adding options to the $SONAR_HOME/conf/sonar.properties file rather than through the SonarQube interface.
Each plugin has its own options, but one is common to most of them: sonar.authenticator.createUsers. Set this to true to have users created in the SonarQube database on their first successful login. Set to false, this option means you have to manually create every new SonarQube user.
12.4.1. LDAP
The LDAP plugin lets you use the Lightweight Directory Access Protocol for user authentication. Once you have it up and running, it automatically synchs in your users’ email addresses and names so you don’t need to maintain them manually. The LDAP plugin also offers a fallback for the SonarQube user database, so you can use accounts created directly in SonarQube (such as the Admin account) even if they don’t exist in your external authentication system.
You install the LDAP plugin through the update center. You can find its configuration details on its SonarQube wiki page: http://docs.codehaus.org/display/SONAR/LDAP+Plugin.
12.4.2. OpenID
The OpenID plugin lets you set up single sign-on through an OpenID provider. This means you can let users sign in to SonarQube with their Google accounts if you’d like. The configurations for this plugin are minimal: the sonar.authenticator.create-Users setting mentioned earlier, sonar.security.realm, the URL of the OpenID provider, the URL to refer users to once they’ve logged out, and the URL of the SonarQube server.
You install the OpenID plugin through the update center. You can find its configuration details on its SonarQube wiki page: http://docs.codehaus.org/display/SONAR/OpenID+Plugin.
12.4.3. Crowd
The Crowd plugin lets you delegate authentication to Atlassian Crowd. This plugin is one of the few authentication plugins that doesn’t use the sonar.authenticator .createUsers option. If you use Crowd, you still have to manually create your users.
You install the Crowd plugin through the update center. You can find its configuration details on its SonarQube wiki page: http://docs.codehaus.org/display/SONAR/Crowd+Plugin.
12.4.4. PAM
The PAM plugin allows delegation in Unix/Linux and Mac OS boxes to the OS’s underlying PAM authentication system. This is the only authentication plugin that’s not installed through the update center—or at least not solely through the update center. There is a plugin to install, and it can be installed through the update center. But you also need to add a Java-PAM (JPam) jar to your $SONAR_HOME/bin/lib directory, which means you have an extra step at SonarQube upgrade time. Thus you should make sure you migrate not just your plugins and settings to the new version but the jpam library as well.
The PAM plugin has another distinction: it’s one of the few authentication plugins that doesn’t use the sonar.authenticator.createUsers option. If you use PAM, you still have to manually create your users.
The plugin has only a few configurations to set, and you can find them at its SonarQube wiki page: http://docs.codehaus.org/display/SONAR/PAM+Plugin.
12.5. Summary
In this chapter, we’ve shown you how to create and administer groups and users. We’ve explained the phantom group named Anyone—which is SonarQube-speak for anonymous—and looked at the difference between what Anyone and a logged-in user can do.
We’ve explained the three project roles—User, Code Viewer, and Administrator—along with what permissions they give and the fact that there’s no hierarchy among the roles. Having the Administrator role on a project does you no good if you don’t also have the User role on that project, which allows you to see the project in the first place. And we hope we’ve convinced you that life will be far easier in the long run if you restrict your role-granting to groups rather than individual users.
You’ve learned how to grant system administrator permissions and why you should do that for your own user account and for a stand-in or two, rather than just passing around the credentials to the default Admin account. You’ve seen that Admin is just another user account and sonar-administrators is just another group.
And finally, you’ve seen that there are integration plugins that allow you to delegate authentication to your existing authentication system, lightening your administration burden (which is always a good thing, right?).
Now that, like Russell, you know how to share administration privileges judiciously, rather than handing around the keys to the kingdom, the next three chapters will take you in depth into what your administration options are and how to use them.