
Chapter 14. Making SonarQube fit your needs
This chapter covers
- Working with filters
- SonarQube notifications
- The power of SonarQube dashboards
- Exploring the rest of global configuration
In most books that talk about software systems or tools, the parts that cover configuration or administration topics are considered boring and are usually skipped by readers. You’re probably thinking the same about this chapter too, but don’t pull the trigger yet.
SonarQube’s default configurations are well thought out, but you can get much more out of them by adjusting some of the options we’ll show you in this chapter. We aren’t going to teach you only the “how”—instead, we’ll focus on explaining the “why.” You’ll learn through real-world scenarios when and why you need to modify SonarQube configurations or use an administration feature.
We’ll start by discussing filters. You might have already figured out that the default project list on SonarQube’s home page is actually a filter. You can create as many as you want, depending on your needs, and display their results in your dashboards. The first section of this chapter explains how to master SonarQube filters.
Then we’ll look at global dashboards. They can show information on the highest level. You’ll learn the purpose of default dashboards and how to share yours with other users (if you belong to the administrators group) or add theirs to your startup page. For normal users, dashboards are private, with no option to change that.
After that, we’ll jump to SonarQube’s embedded notification mechanism. You’ll learn how you and your team can automatically receive important information, such as new issues or assigned issues. Next we’ll cover custom metrics. These are metrics for which you manually enter the values because they can’t be computed during a typical quality analysis.
Then we’ll discuss some cases where you might want to modify the default SonarQube settings. For instance, how can you adjust SonarQube to appear in your language? Based on our experience, we’ll present some best practices that we hope you’ll find useful.
The rest of the chapter presents some low-level administration topics such as backup and restore, showing system info, and so on. Finally, although it may sound weird, we end with an overview of the related plugins. Before we start, make sure you’re logged on in SonarQube as an administrator, because most of the stuff we’ll show you is only available to registered users with admin rights.
14.1. Exploring filters
Tim’s company started using SonarQube a couple of years ago. In the beginning, for evaluation and learning purposes, only a few Java projects were analyzed. Today, SonarQube hosts hundreds of projects developed in various programming languages.
Tim is the R&D line manager, and one of his key responsibilities is to track source code quality in collaboration with team leaders. Every day, he struggles to find, in SonarQube’s first page, those projects for which the code-coverage metric is below 50%. He estimates that he spends around 15 minutes on searching activities. That’s more than one hour per week!
In this section, we’ll explain to Tim (and to you, of course) that SonarQube offers a flexible and powerful way to create filters based on a variety of attributes. Filters can be created by any logged-in user.
14.1.1. Adding a new filter
To create a new filter, click the Measures link, which can be found at upper left on your screen. When you do, the page shown in figure 14.1 opens. On the left are a link to manage your favorite filters and the search criteria form. The rest of the screen is currently blank. This is where you’ll see the results when you perform your first search. Note that you can’t use your new filter until you’ve added it to a dashboard, which we’ll cover in the next section of this chapter.
Figure 14.1. Managing filters and performing a search

Let’s try to create your first search and save it as a filter. Assume that you want to search all projects with test coverage less than 50%. Click the input labeled What? Projects, Files in the search form to define what you want to search for, and select Projects. (From now on, we’ll call this field the resources input field.) Then click the More Criteria button to add some more criteria. Select Metric from the criteria types drop-down list that appears. After that, click the Metric button, and pick Coverage (under the Tests category). Finally, fill in the rest of the fields so your screen looks like the left part of figure 14.2.
Figure 14.2. SonarQube’s flexible search form

Click the Search button, and the results of your search appear as shown in figure 14.2. You now have several options, which we’ll discuss in the next sections. For now, let’s save the filter so you can use it in your dashboards.
Click the Save As link at upper right in the search results. In the pop-up window, pick a name that describes your filter, enter an optional description, and check the last option if you want to share your filter with other SonarQube users. When you click the Save button, you’ll notice two changes on your screen: the Save As button is renamed Copy (clicking it opens the same window and makes a clone of the filter), and the filter you just created appears in the favorite filters section at left on your screen. From now on, whenever you browse the Measures page, you’ll see this filter; if you click its name, SonarQube will display its results.
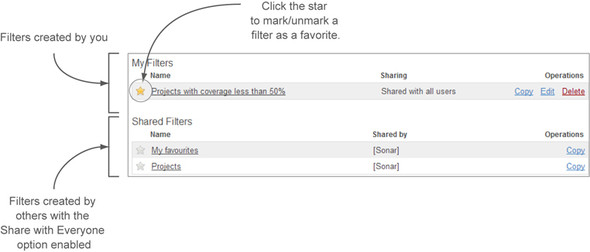
Before we explore more topics related to filtering, click the Manage link at the top of the search form. This link navigates to the filter administration page. As shown in figure 14.3, the upper part of this page displays the filters you’ve created, and the bottom lists filters created and shared by others. You’re probably wondering where these shared filters came from. These are predefined filters included in the SonarQube installation. Only administrators can manage them, but by default they’re available to all users.
Figure 14.3. Filter administration page
14.1.2. Customizing the filter view
Now that we’ve covered the basics of filter administration, let’s discuss how you can customize the look and feel of the search results. As shown in figure 14.2, two links appear at upper right on the page:
- Change columns/Change Treemap— Allows you to add/remove or change the order of the columns or change the values of the treemap view.
- Display as List/Treemap— Allows you to change the view of the current filter.
When you’re in List mode and you click the Change Columns button, a new panel is displayed at the top of the results, as shown in figure 14.4. You can add a new column by clicking the drop-down list box, remove an existing one, or change the order by using the arrows located over each column. Finally, you can sort the results by clicking a column’s name.
Figure 14.4. Change Columns panel at the top of the search results

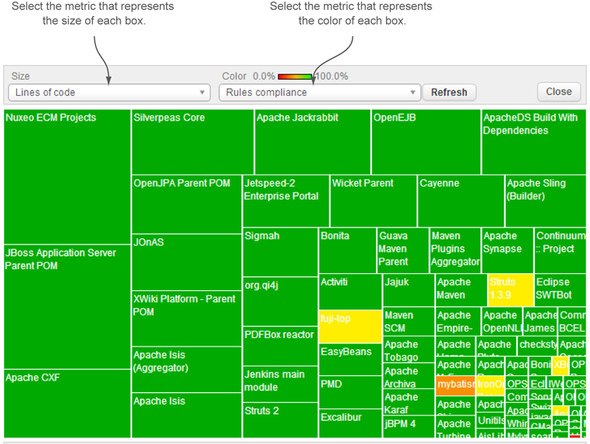
Let’s change the view mode to Treemap, which provides an alternative view of the filter results (see figure 14.5). Clicking the Change Treemap link displays a configuration panel similar to the one we showed you for the list view. There are only two attributes to set when using this display type: the selected Size metric is used to tell SonarQube how the project rectangles will be computed, and the selected Color metric is responsible for colorizing the rectangles.
Figure 14.5. Previewing and customizing how a filter looks as a treemap
Before we move on to more advanced cases of filter creation, as an exercise, try to remove the Date column from the filter you just created, and add a column about project complexity. Also move the Issues column so it’s the first column, and then sort the results by the Lines of Code metric. Finally, add criteria so the filter displays projects with code coverage less than 50% and code duplication more than 1%.
14.1.3. Advanced filtering
Looking again at figure 14.2, by clicking the More Criteria button you can add criteria to your search. Notice that every possible SonarQube entity can be included in your search, which makes SonarQube filtering a powerful and flexible mechanism. Let’s explore these options with some practical examples.
Differential Filters
Imagine that Tim (the R&D line manager) wants to get a list of all the resources for which the code coverage got worse since the last analysis. He’s in luck, because filters can take advantage of SonarQube’s differential service. You might want to refresh your memory by going back for a minute to chapter 9, where we covered this topic in detail.
We’ll guide you through the required steps to create such a filter in a couple of minutes. First, click the New Search button to reset the search form and the results. Now, in the first input, select all the available resources: Projects, Sub-projects, Directories, and Files. (We omitted the unit test files because SonarQube doesn’t compute code coverage for this type of resource.) Then enter the search criteria: select the Coverage metric; and instead of Value, change the drop-down list to the differential period Since Previous Analysis. Choose your assertion criteria (<= in this example), and enter the value 0 in the last input field. Your screen should look like the one in figure 14.6.
Figure 14.6. Creating a differential filter
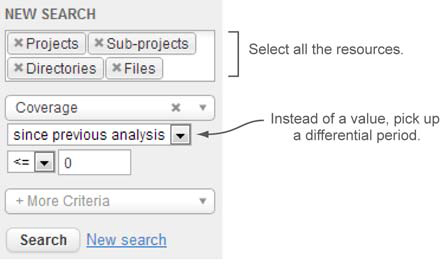
The filter criteria you just entered might look weird. A change of zero (0) would mean no change at all, whereas a change of greater than zero would mean a change. What does this negative change criteria mean? Well, when you’re dealing with differential periods, checking for negative change makes absolute sense: it means the metric got worse since the selected differential period.
Click the Search button to get a sneak peek at the results of your filter. Figure 14.7 displays a preview of the results. Notice that there are only two columns. We did that in the screenshot to call your attention to the difference between the value and differential period columns.
Figure 14.7. Results preview of a differential filter
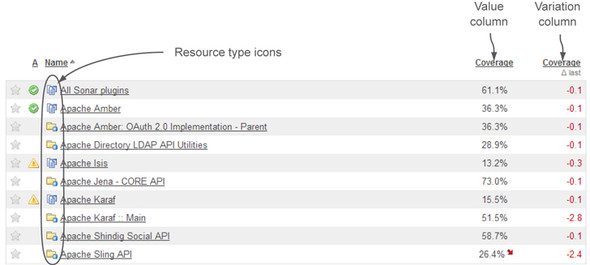
In the value column, in addition to the metric value, you also see the trending icon. Furthermore, we added a variation column for the coverage metric (there is a note under the column header to distinguish them) to show only the difference from the selected analysis for comparison. Note also that placing a variation column in a non-differential view is useless, because it doesn’t show anything (it’s blank). To familiarize yourself with columns and differential filters, try adding some more metrics as values or variations, or select another differential period to see how the filter results change.
Before the resource’s name is an icon indicating its type. Table 14.1 summarizes the different icons and their meanings.
Table 14.1. Resource types and icon indicators
|
Icon Indicator |
Resource type |
|---|---|
| Project | |
| Subproject/module | |
| Package | |
| Directory | |
| File/Class |
Other Cases
Filtering has more flexibility to show us. Let’s assume that in your SonarQube installation, you host projects written in multiple programming languages. You’d like to examine the quality of all web development files containing the word print, excluding those developed in Java. Due to the fact that there are plenty of legacy projects that have had no code modifications for a long time, you want to get results only for analyses triggered in the last three months.
Note
This example supposes that additional language plugins such as XML, JavaScript, and WEB have been installed in SonarQube. Chapter 1 provides an overview of the supported languages, and later in this chapter we’ll discuss the update center, which is the central place to manage your plugins.
For all the requirements we just described, SonarQube filtering has something to tell you. Create a new search, and follow these steps:
1. Select only Files in the Resources input. Select the required languages by clicking the More Criteria button and selecting the Language option. Click again on the input that appears, and select all the required languages. For instance, if you deal with J2EE web development, you might need to check XML, JavaScript, and WEB. Don’t select Java, because you don’t want Java files in your results.
2. Add a new Name criteria, and enter the following value: *print*. The character * can be used as a wildcard to match more than one resource.
3. Add a new Age criteria, and enter the number 90 in the Inspected field to tell your search to include only files built during the last three months (90 days).
4. Click Search.
Before we move on to the next topic, there are a couple of criteria types we haven’t discussed yet. In the last example, instead of using the resource name, you could have used its key. But be aware that for files, the key is composed of the project/module key plus the full package name.
For instance, let’s say a project has the following key: org.codehaus.sonar-plugins:sonar-widget-lab-plugin. The key for the file AlertsWidget contained in the package org.codehaus.sonar.plugins.widgetlab is org.codehaus.sonar-plugins:sonar-widget-lab-plugin.org.codehaus.sonar.plugins.widgetlab.AlertsWidget.
There is one last thing we’d like to explain: the Components criteria type. In general, you can use it to limit the results of a filter for a given project or subproject/module. By selecting this type, you can pick a project or a component/module. To do so, type the name or part of the name you’re looking for, and SonarQube will display a list of all projects and subprojects matching your input. Click Search to see the result of your filter and save it to your favorites.
14.1.4. SonarQube’s default filters
Now that you’re familiar with searching and creating filters, let’s go back to the filter administration screen. To do so, click the Manage link. The filter you just added is shown in the My Filters list, and SonarQube’s default filters appear below.
As we mentioned earlier, SonarQube comes with two ready-to-use-filters, which we’ll discuss in this section. The bad news is that they’re generic and, in large SonarQube installations, almost useless. The good news is that you copy them and modify their criteria.
My Favorites
As you’ve probably figured out, this filter lists all your favorite resources: projects, components, or files. You can easily flag (or unflag) a resource as a favorite by clicking the star icon that appears on many SonarQube screens. For instance, in the source code tab viewer, the star icon is located just before the name of the file, as shown in figure 14.8. Similarly, when you’re viewing a project’s dashboard, you can find the Favorite star at upper right on the screen.
Figure 14.8. Adding a file to your favorites
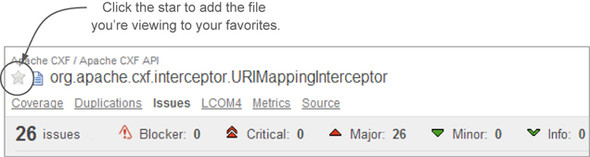
You can even flag/unflag resources when viewing a filter without needing to drill in to a project dashboard or browse resources. The Favorite star for each resource appears in the far-left column. Every resource that is flagged as a favorite is automatically displayed in the Favorites filter.
Projects
In small SonarQube installations, or if you’re making your first baby steps with SonarQube, this filter is useful because it shows all projects hosted in SonarQube. But as more and more projects are analyzed, such filters become obsolete or hard to use. Thus, we suggest you create filters that make sense to you and/or your team.
By now we hope that you’ve mastered SonarQube filters and can define search criteria based on your needs. The next section introduces dashboards and, among other things, teaches you how to use your mighty filters.
14.2. One size doesn’t fit all: managing global dashboards
As you’ve already figured out, SonarQube computes hundreds of metrics associated with different aspects of quality. Its usefulness isn’t limited to the developers’ world; as we’ve mentioned many times throughout the book, testers, architects, team leaders, line or project managers, and even upper management can take advantage of what SonarQube offers.
The problem is that a line manager, for instance, needs completely different information to track and evaluate the quality of a project than a developer. A line manager is presumably satisfied with an overview of all active projects without too many details, whereas team members surely want to have access to source code coverage reports or complexity metrics for the projects they’re currently involved in.
We’ve worked in all possible technical roles in a software project, and we’ve learned that each person needs a different point of view for the same data. SonarQube comes to the rescue and provides a powerful and easy-to-use mechanism to manage your dashboards at a global or project level.
Note
If you’re a SonarQube administrator or a SonarQube evangelist who introduces it to your team, then we advise you to empower users to create their own dashboards that show exactly what they want to see. Of course, SonarQube administrators should set up some generally useful dashboards and filters, but we’re pretty sure those will never manage to make everyone happy. Instead of trying to fit all the different needs into a few global dashboards, focus on teaching users how to customize dashboards of their own.
This section discusses global dashboards, but most of the content also applies to project dashboards, which we’ll cover in the next chapter. You’ll learn how to create and customize the look of global dashboards by adding widgets or adjusting the way they look. We’ll also show you the purpose of default global dashboards and how you, as an administrator, can manage them.
14.2.1. Creating your first global dashboard
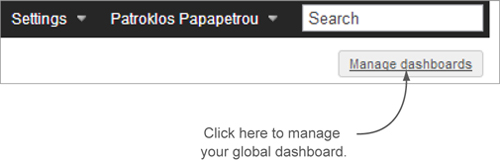
To start managing your global dashboards, click the Home link in the upper-left corner of SonarQube’s first page. Then click the Manage Dashboards link in the upper-right corner (see figure 14.9).
Figure 14.9. The Manage Dashboards link is available on your home page.
If you don’t see the latter, ensure that you’ve already logged in, because global and project dashboard configuration isn’t available to anonymous users. Figure 14.10 shows what you should see once you’ve clicked the Manage Dashboards link.
Figure 14.10. Global dashboard configuration page
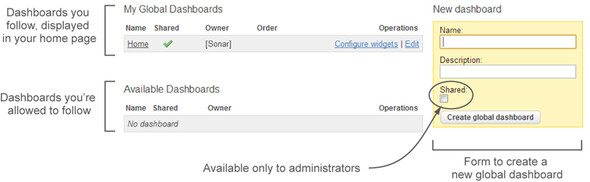
Similar to filters, SonarQube comes with default dashboards that we’ll explore later in this section. The Available Dashboards list includes all shared dashboards (either by administrators or by SonarQube). You can follow/unfollow any dashboard by clicking the relevant links. For clarification purposes, following a dashboard means the dashboard appears as a link in the left menu of your homepage.
Now that you’re familiar with the basic concepts of global dashboards, let’s create a new one. Enter a name and description in the New Dashboard panel, and click the Create Global Dashboard button. Keep in mind that only users with administrator privileges can share a dashboard, so if you can’t find the Shared check box, you’re probably logged in as a normal user.
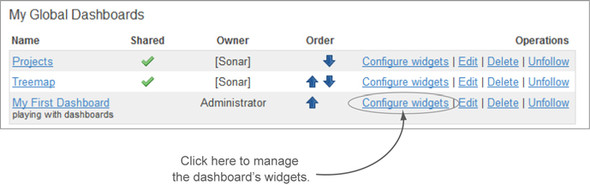
The newly created dashboard now appears in the My Global Dashboards list, as shown in figure 14.11. If you want to edit its details (name, description, or sharing), click the Edit link. To see how it looks, although it’s currently empty, click its name. If you want to completely remove it from SonarQube, click the Delete link.
Figure 14.11. Every new global dashboard is added to the My Global Dashboards list.
14.2.2. Customizing your dashboards
To add some widgets and customize the dashboard’s look, click the Configure Widgets link. As shown in figure 14.12, from the global dashboard customization page, you can do the following things:
Figure 14.12. Global dashboard customization page
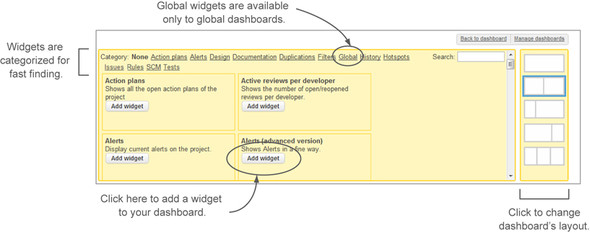
- Change the layout
- Add/remove global or project widgets
- Preview your dashboard
SonarQube dashboards support several common page layouts. You can choose from among the following: single column, two columns, and three columns. The two-column layout comes in three flavors:
- 50%-50%— Both columns are equally sized, and each gets half of the available page width.
- 30%-70%— The left column gets 30% of the available page width, and the right column gets the rest (70%).
- 70%-30%— The Left column gets 70% of the available page width, and the right column gets the rest (30%).
For this section’s example, select the last option (70%-30%).
Adding a widget to your dashboard is easy. Search for the widget you wish to add by clicking the categories shown at the top of the screen. Once you find it, click the Add Widget button, and your widget is added in the upper-left position on your dashboard. But we need to clarify a couple of things.
You haven’t met the Global widget category until now. This category contains widgets that can be placed only in global dashboards. Typical (project) widgets are available for both kinds of dashboards. Only three global widgets ship with SonarQube: Measure Filter as List, Measure Filter as Treemap, and Welcome, as shown in figure 14.13. Other plugins, such as the Widget Lab plugin, may offer additional widgets for your global dashboards.
Figure 14.13. Adding the global widget Measure Filter as List to a global dashboard
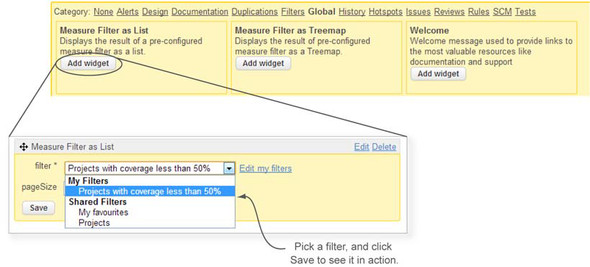
Once you’ve added a global widget to your dashboard, you need to select a filter from the drop-down list. You can pick either a filter you’ve created or a shared filter you follow. Click Save, and you’ll see your dashboard in action. There is no limit on the number of filter widgets allowed in the same dashboard.
Now let’s add a project widget in the same dashboard: code coverage, for instance, or any other one you’re familiar with. As shown in figure 14.14, as soon as you add the widget, SonarQube asks you to specify the project for which you want to fetch data (code coverage in this case).
Figure 14.14. Adding a project widget to a global dashboard requires that you specify the project from which SonarQube will fetch widget data.
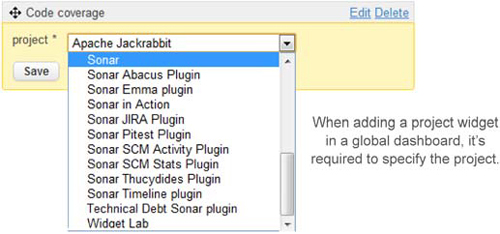
Click the Save button again, and the selected project’s code-coverage metrics are shown in the widget. Notice that widgets in global dashboards have a descriptive title to remind you of the project or the filter you’re viewing.
To remove a widget from the dashboard, click the Delete link in the upper-right corner of the widget. Finally, if you’re dealing with a configurable widget (such as the filter widget we’re looking at), you can edit its settings by clicking the Edit link, which is to the left of the Delete link.
Because new widgets are added to the left column by default, your dashboard probably isn’t attractive right now, with two widgets on the left side and none on the right. To move a widget between dashboard columns, grab the widget’s header to drag and drop it into a different column or into a different position in its current column (see figure 14.15).
Figure 14.15. Project widgets in global dashboards have a header you can drag and drop between columns, and a title displaying the project or filter name.

When you’re done rearranging your widgets, click the Back to Dashboard button, which is located in the upper-right corner of this page, and you’ll go to your home page. In the left menu you’ll see a new link that points to the dashboard you just created. If you want to make more modifications, you can always click the Configure Widgets button.
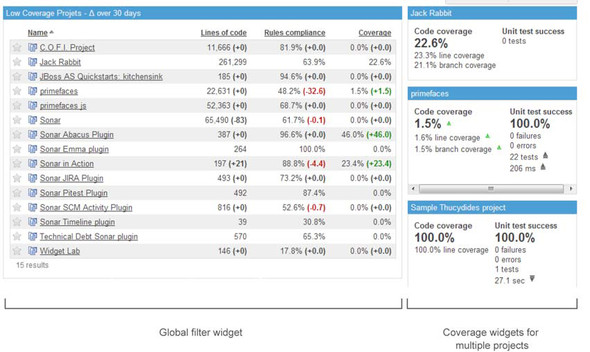
Figure 14.16 shows how the dashboard will look. Notice that in the right (30%) column, we’ve added the same project widget (coverage) for several projects.
Figure 14.16. A complete global dashboard. The left column contains one global filter widget, and the right column contains three instances of the same project-coverage widget showing information for different projects.
14.2.3. Defining default global dashboards
In the beginning of this section, we scratched the surface of the topic of default global dashboards. Now it’s time to expand on that topic. As you saw in figure 14.10, SonarQube ships with one preconfigured global dashboard named Home, which includes all the available global widgets. Recall from the section on SonarQube’s default filters that, by default, you can use the following shared filters:
- Projects (displays all projects analyzed by SonarQube)
- My Favorites (displays all resources flagged as favorites)
Accordingly, on your home page you can add any global dashboard by clicking the Follow link in the dashboard administration page. Every user automatically follows the global dashboard that SonarQube ships with.
The dashboards that are displayed by default for all users are called global default dashboards. Their usefulness isn’t restricted to logged-in users; they’re available for anonymous access as well. Otherwise, an anonymous user trying to access SonarQube’s home page would probably see a blank page, which isn’t convenient.
The beauty of default dashboards is that users with administrator privileges can add any global dashboards to or remove any global dashboards from them. Let’s see how.
Note
Global dashboards are likely to contain one or more filter global widgets. You might be wondering what happens if a user follows a default global dashboard that contains a non-shared filter. You can try it at home and see how SonarQube handles it, but you need to take several steps to do so. The answer is that SonarQube displays the results of the filter even if the filter isn’t shared.
First navigate to the global configuration page and click the Default Dashboards link from the left menu. As shown in figure 14.17, this administration page is split in three panels.
Figure 14.17. Default dashboard administration

On the top are the default global dashboards. All of them are shown by default on SonarQube’s home page. Remember that, as you learned in section 14.2.1, each user is free to choose which default dashboards to follow. Next, there’s a list of default project dashboards. As you probably figured out, these dashboards appear on a project’s home page. We’re going to cover them in depth in chapter 15. The last panel lists all available (flagged as shared by administrators or SonarQube) dashboards that can be added to global or project default dashboards.
To add dashboards to or remove them from the default lists, click the link shown in the Operations column. You don’t have to worry which list (global or project) to move it into, because SonarQube automatically picks the right place for you, depending on the dashboard’s type. You can change the order in which they appear by clicking the arrows shown in the Order column. Finally, the Shared By column indicates who has created (and shared) each dashboard.
For practice, play around with the default global dashboards. Try to remove all of them from the first list, and notice how SonarQube behaves.
So far, we’ve covered the two most important global configuration topics for SonarQube: filters and global dashboards. In the rest of the chapter, we’ll explore some valuable features such as notifications and global settings.
14.3. Getting notified by SonarQube
In the world of automation, collaboration, and Continuous Inspection, processes and tools should help you keep your team in good shape. Interruptions or losing time in non-development activities should be eliminated as much as possible.
Assume that you’ve recently adopted the code review practice. Ivan, your team leader, has assigned an issue to you. You need to refactor a class to remove the complexity issues raised during the latest SonarQube analysis. It’s a task that you’ll need around two days to complete.
Unfortunately, you got sick and were absent for a few days. When you returned, you immediately started working on your task. Meanwhile, Ivan had assigned the same issue to Helen, because it was a top priority for the current iteration. At the end of the day, in a stand-up discussion, you realize that you were both working—the whole day—on the same task. Lack of communication, you probably think. Well, we’d say lack of notification!
14.3.1. Activating the notification mechanism
SonarQube comes with a notification mechanism that was making its first baby steps when this book was published. To activate it, you need to set up your email server settings. To do so, navigate to the global configuration page, click General Settings in the left menu’s System section, and select the Email category.
As shown in figure 14.18, all attributes are straightforward, and SonarQube provides adequate information. When you’re done, you can test if everything works by sending a test email using the Test Configuration section.
Figure 14.18. Email settings: activation of SonarQube notifications

Note
Before we move on, double-check that you’ve entered a valid email address in your user profile. Otherwise you won’t be able to receive email notifications for the events you’ll subscribe to in the following sections. If you don’t remember how, go back and take a look at chapter 12.
Now that you’ve activated the notification mechanism, let’s see what kind of emails SonarQube can send you.
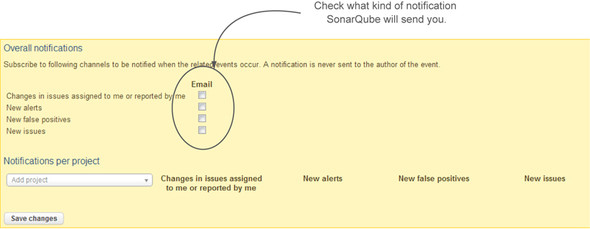
14.3.2. Subscribing to event types
SonarQube can notify registered users about four kinds of events per project or globally:
- Changes in an issue assigned to you or created by you
- New alerts created by the assigned quality profiles
- New false positives
- New issues on your favorite projects introduced during the first differential view period
You’ve learned that, by default, the first differential period is Since Last Analysis. All notification events except the first one are triggered as a post-analysis step, which means you’ll receive emails for new issues, alerts, and false positives on projects introduced during the last analysis. Of course, you can change the first differential period in the global configuration to something other than Since Last Analysis, in which case you’ll be notified about issues, alerts, and false positives introduced since the period you’ve set.
By default, all notification types are disabled, so each individual user needs to tell SonarQube that they want to receive email messages. Navigate to your profile either by clicking your name in the upper-right corner or by clicking Configuration and then My Profile in the left menu.
Figure 14.19 shows the available options. Check the boxes to subscribe to the event types and start receiving emails for all projects. If you enable the first notification, SonarQube will send you a message when a change (comment, resolution, new assignment, and so on) occurs in a review assigned to you or created by you. The rest of the events are triggered for all projects. You receive an email when new issues, alerts, and false positives are introduced during the first differential period—that is, period 1 in the global differential service settings, as you saw in chapter 10.
Figure 14.19. Event subscription
Tip
SonarQube includes a URL for accessing the issue or project issues in all email messages. Make sure you’ve changed the server’s base URL in the global settings, as we’ll show you in the next section, so the URLs make sense to you and you can access SonarQube in your intranet or from the internet.
If you host several projects in your SonarQube installation, after a while you’ll find that receiving emails for all of them isn’t very productive or useful. The good news is that you can tell SonarQube the projects for which you want to receive these notifications. Click the Add Project list in the Notifications per Project section. Then, type the first three letters and select your favorite project. Finally, choose which notification types you want, and you’re finished. Repeat the same steps for every project you’re interested in.
In the last three sections, we’ve discussed the most remarkable topics related to global administration in SonarQube. You can use SonarQube without knowing about them, but we believe that by mastering these features, you’ll boost the value of your SonarQube installation and, in some cases, the productivity of your team.
The rest of the chapter focuses on more specific configuration topics and ends by explaining the usability of the update center, as well as by describing a related plugin.
14.4. Adjusting global settings
We’re pretty sure you’re already familiar with the term global settings, because we’ve shown you many times how to edit global attributes for SonarQube core or other plugins. In this section we’ll add some glue to what you’ve seen so far in the book and explain the remaining categories.
SonarQube ships with many system plugins and features with editable global properties. A newly installed plugin may also provide attributes that can be configured globally.
To see this default global configuration and edit it for your environment, start from the global configuration page and click the General Settings link in the left rail. On the left side of the content area is a list of available configuration categories. Looking at them, you’ll realize that we’ve already covered most of them.
Configuring Checkstyle and FindBugs was introduced in chapter 2. Cobertura, code coverage, and JaCoCo were discussed in chapter 3, and duplications were explained in chapter 4. Email settings are fresh because you saw them earlier in section 14.3.1. Chapter 12 covered security settings; and finally, in chapter 9, we dealt with the differential view attributes and how you can use them to assist you in the Continuous Inspection process. Let’s see how and when the rest of the categories may be useful.
14.4.1. Database cleaner
In large installations with hundreds of projects and many analyses per day, it’s pointless to keep all snapshots stored in the database. SonarQube is enriched with a powerful database-cleanup mechanism that decides how many snapshots it will keep per day, week, or month, and how historical data of packages/directories should be handled.
We’ll cover in detail the concept of a project snapshot in the next chapter, but for now bear in mind that a snapshot is an image of your project quality at a specific time. In that sense, keeping multiple snapshots for the same day won’t make any difference when you’re looking back a few weeks later, so the database cleaner is responsible for removing these obsolete snapshots from the database.
In the global settings, you can specify the attributes presented in table 14.2. (SonarQube’s inline help is awesome in this category, so we don’t need to explain further.)
Table 14.2. Database-cleaning configuration attributes
|
Property description |
Default value |
|---|---|
| Number of hours before SonarQube starts keeping only one snapshot per day | 24 (one day) |
| Number of weeks before SonarQube starts keeping only one snapshot per week | 4 |
| Number of weeks before SonarQube starts keeping only one snapshot per month | 52 (one year) |
| Number of weeks before SonarQube starts removing all snapshots of a project | 260 (five years) |
| Enable/disable the cleaning of historical data for directories/packages | True |
| Number of days before deleting closed issues | 30 |
The default values shouldn’t cause you any problem because they’ve been carefully selected by the SonarQube team, but you can always adjust them if you feel that you need to increase or decrease the time before the snapshots will be removed.
Just keep in mind that these values don’t represent a schedule of when some sort of sweeper runs through the database, deleting snapshots. Snapshot cleanup is performed at the end of each analysis, and these values are the age thresholds beyond which any given snapshot (that’s not marked with an event) is eligible to be deleted.
So if you’ve got a lot of hoary old snapshots from idle projects clogging your database, adjusting these settings won’t free up any space. No analysis, no cleanup. You need to run a fresh analysis of each of those projects to have their snapshots cleaned out.
14.4.2. General
This category includes attributes that can’t be grouped elsewhere. You can find some things to modify:
- If you’re not in a Java house, you can change the default language of the source code to analyze.
- The next two attributes list the plugins that are accepted and excluded when running an analysis in DryRun mode. DryRun mode lets you get all data required to do a project analysis through a web service and dump the result of the analysis in a local file. So, DryRun mode is database-less. The first use case that takes advantage of this feature is Sonar Eclipse, but in the future it might be used in other cases such as pre-commit analysis to reject a file based on some criteria.
- Rules weight are related to issues and allow you to change the weight of each issue severity.
- The server base URL is the URL root SonarQube uses when it talks about itself.
As you saw in section 14.3.2, when SonarQube sends you an email notification, the message body includes a URL pointing to the issue page.
If you activate the notification mechanism, we strongly advise you to change the server base URL to something accessible at least within your intranet, because the default value (http://localhost:9000) doesn’t make any sense unless you’re reading the email messages on the same machine that hosts SonarQube.
Rules weight feeds into the formula SonarQube uses to calculate the Weighted Issues (WI) and Rules Compliance Index (RCI) metrics. Take a look at figure 14.20 to refresh your memory. If you edit the WI value, you’ll have to run a new analysis for all projects in order to use the new weights.
Figure 14.20. The Rules Compliance Index is the Weighted Issues score divided by the number of lines of code in the project, turned into a percentage and subtracted from 100.
![]()
14.4.3. Localization
As we’ve already told you, localization of SonarQube messages relies on browser configuration. But if you want to display the rule engine messages in your language as well (if it’s supported by the localization plugin), you need to change the value of the Localization attribute.
By default, it’s set to en, which means all messages are displayed in English. Set it to the language you prefer, install the relevant localization pack, and restart SonarQube, and if the rule engine’s message are translated, you’ll see them in the language you’ve chosen.
14.4.4. Server ID
When you purchase a commercial plugin from SonarSource (the company behind SonarQube), you’re asked for your server ID. To generate one, navigate to the Server ID category on the global settings page. You need to enter the name of your organization and the IP of the machine that hosts SonarQube.
If, for some reason, you change the IP address or move SonarQube to a new machine with a different IP address, you’ll have to generate a new server ID to match the new configuration.
14.5. Housekeeping
SonarQube offers a couple of useful features for housekeeping activities, and we’ll cover them in this section. We’ll start by showing how you can create copies of your configuration and restore it in another SonarQube instance, and then we’ll jump to the update center to discuss in detail how you can manage existing plugins, install new ones, and get upgrade information about SonarQube’s latest version.
14.5.1. Backing up your SonarQube configuration
Imagine that you’ve been using SonarQube for several years, but only for one department in your organization. A week ago, you had a request from another IT manager who wants to analyze her projects in SonarQube as well. The problem is that the machine hosting your SonarQube installation is old, and adding more projects isn’t the best idea. On the other hand, you’ve done a lot of work regarding quality profiles, general settings, and so on, and duplicating this configuration to a new machine is a time-consuming activity.
Your best bet is a full database backup. But if that’s not an option, SonarQube provides some native backup functionality for the following:
- Global settings
- Custom metrics
- Quality profiles (coding rules and alerts)
To see the screen shown in figure 14.21, navigate to the global configuration page and click the Backup link in the left menu’s General section. Both actions are simple. To back up your configuration, click the Backup button, and an XML file containing the configuration data will be locally downloaded. To do the opposite, choose a backup file located on your hard disk, and click the Restore button. Keep in mind that the restore process permanently deletes any previous configuration, and there is no way to get it back, unless of course you’ve already created a copy.
Figure 14.21. Configuration backup and restore, made easy by SonarQube
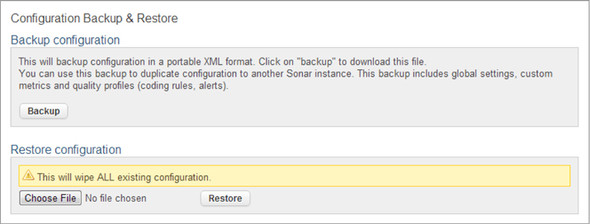
Before you’re tempted to play around with restoring a backup if you don’t need to, be aware that it doesn’t contain dashboards or filters, anything under Security (users, groups, and roles), or any details of your projects’ configurations. Additionally, the profile backup it contains has the same limitations discussed in chapter 13.
Another useful SonarQube feature, especially when something goes wrong in the setup, running, or analysis phase, is the system info page found in the left rail a couple of links below the Backup option. This page gives you detailed information about the SonarQube installation, installed plugins, system environment, Java virtual machine statistics, and various system properties.
Tip
Take a look at this page if you’re facing problems, to see if something isn’t as expected. Also, if you ask for help in a user mailing list, this page might provide you with important information for a quicker and more accurate reply/solution.
14.5.2. Working with the update center
Many times throughout this book, especially in part 1, we discussed plugins that add extra value to SonarQube’s core features. In chapter 1, we mentioned that SonarQube is suitable for more than just the Java community; it supports plenty of different programming languages. And as we hinted, SonarQube has been translated to several human languages.
The update center is the place where you perform the following activities:
- Install, remove, or update plugins to provide new features, localizations, or analysis of new languages.
- Get information about newer SonarQube versions. At the time this book was published, automated upgrades of SonarQube were unavailable (you have to upgrade manually). This is one reason we’ve included upgrade scripts in appendix A.
To access the update center, navigate to the global configuration page and click the link in the left menu’s System section.
As shown in figure 14.22, there are four tabs to explore. By default, you see the Installed Plugins tab, which lists all the plugins found in your SonarQube installation. Near the top is a list of all the plugins you’ve manually installed after the initial installation. Below that are the system plugins: those shipped with SonarQube core.
Figure 14.22. SonarQube’s update center
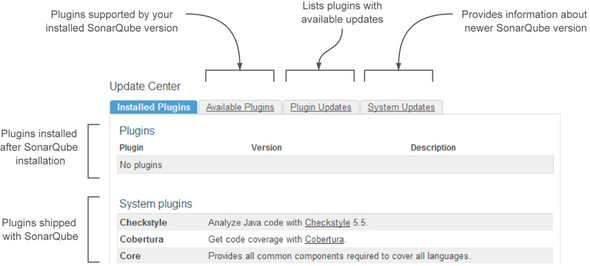
The Available Plugins tab displays the available plugins that are compatible with your SonarQube version. To see plugins in this page, the machine on which SonarQube is installed must have access to the internet. The same applies to the next two tabs. Also keep in mind that not all plugins can be installed in all SonarQube versions. For a complete and updated compatibility matrix, browse SonarQube’s online documentation at http://mng.bz/OOf9. The plugins are grouped according to their purpose. Table 14.3 summarizes the available plugin categories.
Table 14.3. Plugin categories
|
Category |
Plugins that... |
|---|---|
| Additional Languages | Support the analysis of new programming languages. |
| Additional Metrics | Calculate new metrics during analysis. |
| Developer Tools | Facilitate developers’ everyday life. |
| Governance | Use existing metrics to create an overview based on practices, indexes, or methodologies, such as SQALE and Technical Debt. |
| Integration | Integrate SonarQube with third-party systems, such as LDAP and Google Analytics. |
| Localization | Translate plugins into other human languages. |
| Visualization/Reporting | Use existing metrics to create reports, or offer new widgets to display quality data in different representations. |
Tip
If the update center doesn’t show any available plugins or other information retrieved from the internet, then you’re probably behind a firewall. To fix this, edit the sonar.properties file and set a couple of attributes (http.proxyHost and http.proxyPort) based on your intranet configuration.
To install a plugin, click its name on the Available Plugins tab and then click the Install button, as shown in figure 14.23. SonarQube downloads the plugin and installs it, but you need to restart SonarQube in order to activate your new plugin. An informative message that reminds you of that is shown at the top of the update center screen.
Figure 14.23. Installing a SonarQube plugin from the update center

If you’ve changed your mind, you can click the Cancel Pending Installations button, and SonarQube will roll back all pending plugin installations. Note that SonarQube needs to be restarted not only when you add plugins, but also when you update or remove them.
The third tab, Plugin Updates, is simple because it looks like a lot like the previous tab. The only difference is that it lists the plugins for which a newer version than the one you’re currently running (compatible with your SonarQube version) has been found. If no updates are found, then you should see the message “All of your plugins are up to date.”
The last tab, System Updates, doesn’t offer any actions. It displays messages about new SonarQube versions and detailed instructions on how to update your installation.
14.6. Summary
Well done, SonarQube administrator! Nothing now prevents you from feeling comfortable with every detail of SonarQube’s global configuration.
You’re ready to manage and configure what anonymous users and registered users who haven’t configured any dashboards yet will see when they access SonarQube. You’ve learned what global dashboards are, and that you can place both project widgets and global widgets in them. Furthermore, by now you should be able to do the following:
- Create filters and add them to your dashboards to show only the information you need. Design each filter by entering as many or few as you like of the following: criteria, differential periods, desired programming languages, and how results are displayed (treemap or table).
- Enable the notification mechanism to receive alerts about assigned issues or issues created by you. SonarQube also sends you messages whenever new issues are created for the projects you’ve flagged as favorites.
- Define your own custom metrics or use the preconfigured metrics that SonarQube ships with, and use them in filters or widgets to display their manually entered measures.
- Adjust a variety of global settings and make SonarQube fit in your development lifecycle instead of fighting it.
- Use the update center to install, update, and remove plugins, and to read the update instructions for the latest SonarQube version.
The next chapter is dedicated to project administration. It will guide you through the different ways you can customize a project analysis and manage its history.