
Chapter 16. Writing your own plugin
- Understanding SonarQube architecture
- Writing code for a SonarQube plugin
- Creating your own widgets
- Supporting new languages
Welcome to the last chapter of SonarQube in Action, which will teach you how to implement your own SonarQube plugins. If you wonder why you might want to write your own plugin, here’s a non-exhaustive list of possible needs:
- Integrate SonarQube with external tools such as the example we’ll show you in this chapter.
- Create customized reports based on the metrics computed by SonarQube.
- Translate SonarQube in a new language (localization).
- Add support for a new programming language.
We’ve told you that SonarQube isn’t Java-centric and that even though our examples are Java-based, the same ideas apply to other languages. From an analysis standpoint, that’s true; but in this chapter, that changes. What we’re going to show you requires you to be familiar with Java, jRuby, and Ruby on Rails, because these are the languages currently supported for plugin writing in SonarQube. You’ll also be using Maven to build your plugin, but we’ll feed you the commands, so only a passing familiarity with Maven is required.
We’ll start by briefly explaining how SonarQube works internally when you launch an analysis. It’s important to understand what’s going on behind the scenes when SonarQube runs a plugin. The first thing you’ll learn is the difference between decorators and sensors and when they’re executed during an analysis.
Then we’ll give you a step-by-step guide for implementing your own plugin. Together we’ll integrate SonarQube with Redmine (www.redmine.org), an alternative to JIRA. Redmine is more than a ticket system, but for the purpose of this chapter we’ll focus only on ticket-related features. It’s recommended, although not required, that you install Redmine (http://bitnami.org/stack/redmine) so you can run and see the plugin in action. Plugin writing can include many tasks, and we’ll cover most of them in this chapter: adding metrics, class loading and Dependency Injection, widget creation, and internationalization, just to name a few.
Finally, we’ll look at how you can make SonarQube support new languages. You won’t implement the entire plugin, but you’ll get the basic idea; and you’ll discover the SonarSource Language Recognizer (SSLR), a library that simplifies the development process of a language plugin in SonarQube. Let’s start by exploring SonarQube’s architecture.
16.1. Understanding SonarQube’s architecture
Now that you’ve gotten this far in SonarQube in Action, we’re betting you’re wondering how to implement your own plugin to integrate your favorite tool or external application with SonarQube. If so, this is the chapter you’ve been waiting for. But before you start writing code, you need to familiarize yourself with SonarQube’s architecture and the analysis process, as shown in figure 16.1.
Figure 16.1. SonarQube’s internal architecture

In general you can run a SonarQube analysis with three different tools: Maven, Ant, and SonarQube Runner (recommended by SonarSource). Let’s call them clients. Appendix B discusses all of them in detail, but no matter what your preferred method is, what happens in SonarQube during an analysis is the same.
As soon as an analysis is triggered by a client, the first thing SonarQube does is import the source code and (optionally) test files. This is done by the appropriate language plugin. As you know, SonarQube ships with Java support but you can add support for other languages by installing additional plugins. Once SonarQube has the source files loaded, it’s time to analyze them with a variety of analyzers that can create or update measures. These analyzers are either embedded in SonarQube core, included in language plugins, or provided by non-language-specific plugins.
The analyzers can be grouped in two categories. Analyzers that are able to create new measures, compute their metrics for each resource (method, file, or package), and store them in SonarQube’s database are called sensors. After all the sensors have done their jobs, other analyzers, called decorators, are triggered. They can aggregate the metrics that have already been computed at low levels into new, higher-level metrics. We’ll come back to the details of these two flavors of analyzers in the next section.
When the analysis is over, meaning that all sensors and decorators have completed their tasks, a new snapshot is created in SonarQube’s database, and all the newly computed metrics are connected to it. At this point, you can see the data by using your favorite browser to send requests to the SonarQube web server.
Now that you have a general idea of how SonarQube works, it’s time to move to the chapter’s core topic: plugin writing. We decided to implement a SonarQube plugin for the Redmine project management tool as a way to demonstrate most of the concepts of plugin writing in a real-world and easy-to-understand scenario. We’ll focus on Redmine’s issue-tracking features to provide functionality similar to the SonarQube JIRA plugin (http://docs.codehaus.org/display/SONAR/JIRA+Plugin). The purpose of the example is to retrieve from Redmine—using its Rest API—a project’s unresolved issues and display them by priority in a SonarQube widget.
Note
The source code shipped with the book includes only the first version of the plugin. In the meantime, the plugin might have been updated; to be sure you have the latest version, you can get the code directly from the GitHub public repository (https://github.com/SonarCommunity/sonar-redmine).
16.2. Implementing the Redmine plugin
This section will show you how to create a SonarQube plugin, step by step. The purpose of the example plugin is to collect open project issues from a Redmine installation and present them in a dashboard widget, grouped by priority. We’ll try to avoid getting bogged down in the details of the integration of SonarQube with Redmine and focus on the important stuff—plugin-related code and configuration.
You’ll start by setting up your development environment and creating the outline of the plugin. This is something you can do in many ways, but we’ll show you the easiest, especially if you’re not an experienced plugin developer. Then you’ll learn how you can specify the configuration and settings exposed by your plugin. After that, we’ll look at how new metrics can be described and configured. Then we’ll dig in to the difference between sensors and decorators and discuss how Dependency Injection works in SonarQube. You’ll learn how to compute measures using sensors. Then we’ll show you how to create a new widget to display the metrics you calculated on SonarQube dashboards. Finally, we’ll discuss a simple decorator example and show you how to support internationalization.
16.2.1. Creating the plugin Maven project
Let’s begin by ensuring that you have all the necessary tools available in your machine. You need Java 6 or above. You also need to install Maven (version 2 or later) to build and package the plugin (http://maven.apache.org).
Note
If you install a version of Java higher than 6, such as Java 7, your plugin must be compiled for Java 6 compatibility.
Now it’s time to create the plugin project. There are a couple of ways to do it. You could create the project from scratch, but then you’d have to manually edit the pom.xml file to enter some required property values. Alternately, you can copy an existing SonarQube plugin or the SonarQube reference plugin (http://mng.bz/FlZC). Although this approach sounds like a good idea, it adds extra work such as renaming classes, modifying headers, changing pom attributes, cleaning out unneeded code, and so on. Furthermore, inexperienced developers may get confused about what they actually want to implement. But you might use this technique later, if you’re familiar enough with plugin writing or if you’re going to implement a plugin that’s similar to an existing one.
To make it easy, we’ve implemented a simple Maven archetype that automatically generates a plain SonarQube plugin that includes only some basic classes you’ll need. The tutorial that follows in this chapter is based on this Maven archetype. Download the archetype’s source code compressed file from http://mng.bz/8hm3, unzip it, and install it in your local Maven repository by running the mvn install command. Then you’re ready to create a new SonarQube plugin based on this archetype by running the following Maven command: mvn archetype:generate -DarchetypeCatalog=local. You’ll be prompted for a series of values. Table 16.1 details them.
Table 16.1. SonarQube plugin Maven archetype input parameters
|
Parameter |
Explanation |
Default value |
Value you should enter |
|---|---|---|---|
| groupId | Maven group ID. It must be the same for all plugins submitted back to the SonarQube Community, so a default value is provided, and it’s highly recommended that you not change it. | Yes | |
| artifactId | Maven artifact ID. Used in pom.xml and for creating the project directory. | N/A | sonar-redmine-plugin |
| Version | Plugin’s version. Used in pom.xml. Usually, the first release of a SonarQube plugin is version 0.1. | Yes | |
| package | Full package name where plugin classes will be placed. For all plugins submitted back to the community, the packages should start with org.sonar.plugins followed by the plugin’s key. The actual value is composed of the default value and plugin’s key. If you don’t intend to submit the plugin to the community, you can change this value by editing your pom.xml file. | Yes | |
| inceptionYear | Used in pom.xml and headers license. | No | The current year |
| organizationName | Used in pom.xml and headers license. Also displayed in SonarQube’s update center information. | No | Your company’s name or your full name |
| pluginDescription | Used in pom.xml to describe the purpose of the plugin, and displayed in SonarQube’s update center information. | No | SonarQube Redmine Plugin: Integrates SonarQube with Redmine in various ways |
| pluginKey | Very important parameter. Used by the archetype to build the names of packages, auto-generated plugin classes, project folders, and so on. First letter should always be in uppercase. | No | Redmine |
| pluginName | Used in pom.xml and license headers. Also displayed in SonarQube’s update center information. | No | SonarQube Redmine Plugin |
| sonarVersion | Used in pom.xml to specify the minimum SonarQube version supported by the plugin. Keeps SonarQube from loading incompatible plugins. | No | 3.0 (if you’re not sure) or something greater if you’re going to use features introduced after version 3.0 |
When you’re done with all these parameters, the archetype creates your SonarQube plugin project in a directory named sonar-redmine-plugin. Open the project with your favorite IDE, and you’ll see the structure and contents shown in figure 16.2.
Figure 16.2. Project structure and contents of the plugin created by the SonarQube Maven archetype

The Maven archetype creates a generic plugin outline that includes the following:
- Two classes (RedmineMetrics and RedminePlugin) describing the plugin configuration and its metrics
- Two analyzer classes: a sensor (RedmineSensor) and a decorator (RedmineDecorator)
- Two files describing the dashboard widget: a Java class (RedmineWidget) and a Ruby file for the actual representation (redmine_widget.html.erb)
- One property file to support internationalization (redmine.properties)
The plugin is fully usable at this point, because there’s demo code in the auto-generated files that explains the purpose of each class. You can build and deploy it in your SonarQube instance immediately if you like. But right now, it doesn’t add any meaningful functionality, so the next step is to make it valuable.
16.2.2. Defining the plugin’s available configuration
The first thing you should consider is the configuration settings that will be exposed to the end user. You want to collect issues from a Redmine installation for a specific project, so you need to know the Redmine host URL and project. Furthermore, according to the Redmine API documentation (http://mng.bz/AC2P), you need an API access key, which a logged-in user can find on the Redmine account page in the right pane of the default layout.
The RedminePlugin class is where you define these properties. Take a close look at the following listing, which shows most of the actual RedminePlugin class (import statements and header definition are omitted for space).
Listing 16.1. RedminePlugin class: properties definition and plugin extensions
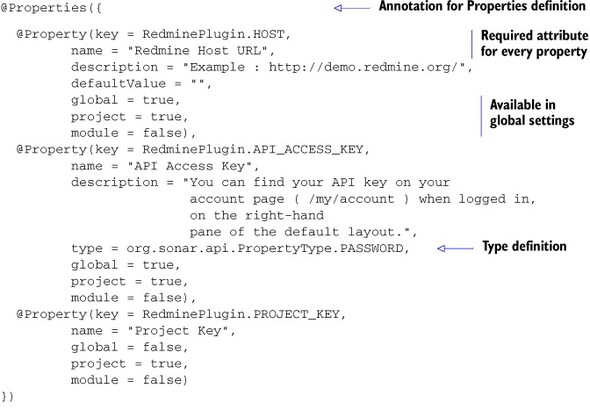
There’s a lot to take in here—more than can be adequately covered in a few code annotations, so we’ll walk through it field by field. First, two annotations in the SonarQube API can be used to specify properties (@Properties and @Property). The former is used to define an array of properties (you can skip it if you only have one), and the latter provides attributes to fully describe a property. The required attributes for the @Property annotation are key and name. We’ll look at the rest of its attributes shortly.
Each property should have a unique key, so it’s a good idea to follow some naming conventions: we started with the word sonar followed by the plugin key and then the property name. The name and description attributes are used by the SonarQube UI. Use name to briefly describe the property, and add some explanation—if necessary—in the description attribute. If there’s no user input, you have the option of setting a default value with the defaultValue attribute.
By default, all properties are Strings, but you can change a property’s type with the type attribute, which expects a value from the PropertyType Enum. Several options are available, such as Integer, Boolean, Regular Expression, Multi-line text, or even password to mask the input value with asterisks. For a complete (and up-to-date) list of the available property types, check the relevant API documentation.
Note
In the following pages we’ll talk a lot about SonarQube’s API. We recommend that you always look at the latest online documentation (http://docs.sonarsource.org/latest/apidocs/) before you use a provided class or interface.
Two of the properties in listing 16.1 use the default type, whereas the API access key property is set to PASSWORD because you don’t want its value to be visible in the SonarQube UI.
Finally, you need to tell SonarQube at which levels the property can be set, using the global, project, and module attributes, which accept Boolean values. If you don’t specify any of these attributes, then by default the property will be available only at a global level, because global is true by default and the other two attributes default to false. In listing 16.1, the host and API access key properties are settable at the global level and overridable at the project level. Nothing is set at the module level, and the project key can only be set at the project level, not globally.
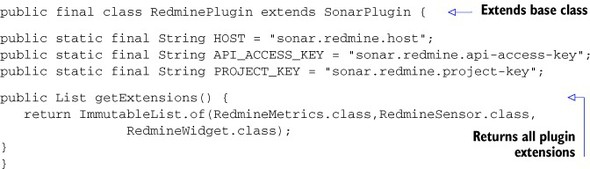
Now that we’ve covered the properties, we can move to the code of the RedminePlugin class. Each plugin should have one class that extends the base SonarPlugin class so that SonarQube will recognize and load your plugin. In this case, it’s the Redmine-Plugin class, and for that reason it implements the abstract method getExtensions. This method should return a list (preferably immutable) of all extension points implemented by the plugin.
We didn’t mention this earlier, but now it’s the right time: a SonarQube plugin is a set of classes that extend other classes or implement interfaces provided by the SonarQube API. We refer to them as extension points, and you can get a complete list of the available extension points by visiting the relevant API documentation.
Back to the RedminePlugin class, notice that the implementation of the getExtensions method returns a list of all classes found in the plugin (except of course the RedminePlugin class itself). This enables SonarQube to register these extension points and execute their code when needed (during analysis, when showing the widget, and so on).
At this point, the configuration and plugin description class is complete, so you can move to the next step: specifying the metrics the plugin will compute and store in SonarQube’s database.
16.2.3. Describing the metrics: what you’ll calculate and store
According to the requirements, the plugin should collect a count of all open issues for a given project and display the counts by priority. So you need a couple of metrics: one to keep the total number of open issues, and one to keep the number of open issues for each priority. Although these metrics can be combined as one, for clarity the responsible RedmineMetrics class in the next listing has two definitions (one for each metric).
Listing 16.2. RedmineMetrics class: metrics definition
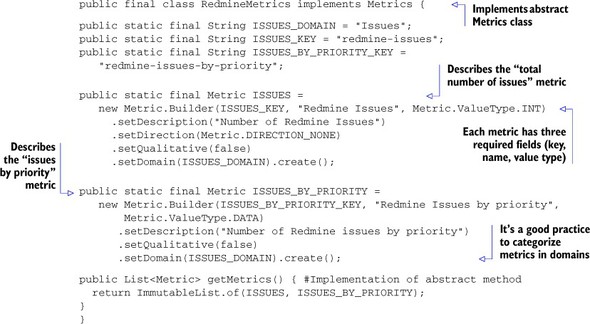
Looking at the class definition, you see that it implements the abstract Metrics class, which is another extension point provided by SonarQube. Then, each metric is described as a static final variable of type Metric using the Builder design pattern (www.oodesign.com/builder-pattern.html). You’re required to provide three attributes for every metric: a key, which should be unique (consider including the plugin key as part of the metric key to ensure uniqueness); a short name; and the value type.
The value type is critical because it tells SonarQube what kind of data is stored in the database. The possible choices are straightforward and can be found in SonarQube’s API documentation. But keep in mind that if you want to store large amounts of data, such as the example’s distribution of issues, you should use the Data value type. Wondering why you don’t define a metric per priority? Although this approach would work, it would make your code much more complex and make it difficult to handle and display your metrics in a widget. The Data value type was created by SonarQube for that reason: to avoid creating several metrics just to describe a distribution of them.
For the complete list of the available metric attributes, you can browse the latest online API documentation, but we’d like to give you some useful tips:
- A metric’s domain determines how it’s grouped in drop-downs in the SonarQube UI. You can make up your own value to put your metrics together in their own group, or use an existing value such as Complexity, Documentation, or Rules to add your metrics to one of those groupings.
- When you’re dealing with metrics where trending is important, be sure to set the direction attribute so SonarQube knows if an increase in this value is good or bad. Then you can use the quantitative attribute (if set to true) to tell SonarQube to colorize (green/red) the metric’s trending icons in the UI.
- If you want to hide resources from the drilldown view when they’ve reached the best possible value for a metric, set the metric’s bestValue attribute.
The last thing you need to do in a Metrics class is implement the getMetrics method to return a list of the plugin’s metrics.
As you’ll see in next section, there are two kind of metrics: those that hold a single value and those that hold a collection of values, which is called a distribution. We’ll show you how to compute and store both of these types in the database.
The basic configuration of the plugin is now ready. The next step is to compute the measures. In other words, you need to write the code that will perform the core functionality of your plugin.
16.2.4. Implementing your analyzer with a sensor
As we already told you, the hard work is done by analyzers, which are responsible for computing measures. There are two types: sensors and decorators. The logical difference is that sensors are executed only once during the analysis phase. They’re responsible for producing measures by parsing files (for instance, code-coverage result files), communicating with external services such as the Redmine server in the example, or even invoking a Maven plugin. On the other hand, decorators are triggered when all sensors have finished their tasks. The decorate method is executed for every resource of a given level following a bottom-up approach. Resources in SonarQube are considered the following: block units (methods, functions, and so on), files, directories (packages), program units (classes, interfaces) or projects (projects, modules, and so forth).
Because decorators are executed after sensors, they have access to the metrics calculated by sensors and can also create new metrics based on them. Normally, a decorator is used to aggregate at higher levels the measures computed by sensors at lower levels. Table 16.2 summarizes the differences between sensors and decorators.
Table 16.2. Differences between sensors and decorators
|
Sensor |
Decorator |
|
|---|---|---|
| Analysis | Triggered only once at the project or submodule level | Triggered several times, once for every resource. |
| Timing | Can be executed in random order | Executed only when all sensors have finished. You can specify the order of execution between decorators. |
| Metrics / Usage | Used to feed SonarQube with new measures | Used to aggregate already-computed measures on a higher level. |
You know the difference, and it’s time to decide. What kind of analyzer do you need: sensor or decorator? A complicated plugin can be composed of several sensors and decorators, so you might say, “Both.” Fortunately, in this example things are simpler. You want a component to access a Redmine server’s API, retrieve issues, and store them, and you want that to happen only once per analysis, not once per file (for example). Thus a sensor is what you’re looking for.
Before we continue, we recommended that you delete the RedmineDecorator class from the auto-generated project, because you won’t need it. Later we’ll discuss an example of a decorator out of the Redmine plugin context.
Listing 16.3 contains the basic code of the Redmine plugin. This is the code triggered by SonarQube during the analysis phase. Once again, the RedmineSensor class implements the appropriate base class (sensor) and two abstract methods (shouldExecuteOnProject and analyze).
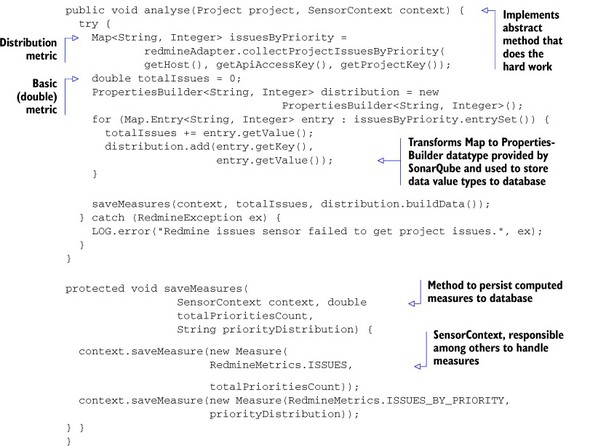
Listing 16.3. RedmineSensor class: analyzer implementation
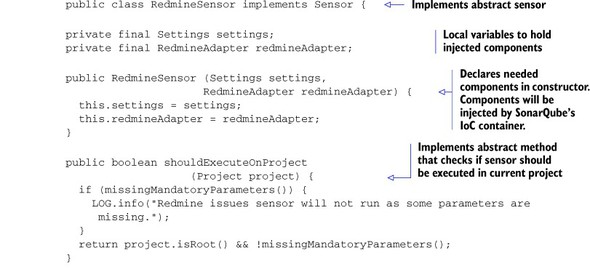
The first method (shouldExecuteOnProject) is responsible for allowing the plugin to run or not based on its output. In the example, the sensor analyzes the project (which is passed as a method parameter) only if it’s a root project (and not a submodule) and if all required parameters have been set (see the missingMandatory-Parameters protected method). Keep in mind that a project in SonarQube is either the root project or any of its submodules. If you don’t check for the project level, then the sensor will run for the root project and all submodules. Let’s consider a couple more examples to help you understand the purpose of this method. If you want to trigger the sensor for all analyses and then return just a true value—or, for instance, if you want to enable it only for Java projects—you should consider writing something like return Java.INSTANCE.equals(project.getLanguage());.
In general, keep in mind, that the shouldExecuteOnProject method should check for the existence of required settings and/or other project attributes (level, language) to turn on the green light for execution.
The analyze method is where all the great things happen. Here, you write the meat of your plugin: you get information from external resources, compute metrics, and save them in SonarQube. You have available as input parameters the project currently being analyzed and the context of the sensor. This context is used to store computed metrics in the database, add issues on source/test files, and so on.
As we told you, there are two kinds of metrics (single values and distributions), and the example deals with both of them. Before you compute the metrics, you need to get access to the data, which consists of the Redmine issues. To do so, by invoking the collectProjectIssuesByPriority method of the RedmineAdapter class, you get a reference to a map (key of String type, value of Integer type) that contains the number of open issues for each priority. You might wonder who created the RedmineAdapter object. Hold you breath; we’ll get back to that in a minute.
Having access to this map, you can iterate it and calculate the total number of open issues by simple addition. You may think that calculating and storing the distribution metric of open issues by priority would be done the same way. Well, that’s almost true. The difference is that you need to transform this map to String or Binary type (for a large amount of data) before you store it in the database. You can’t store the map that’s returned from the RedmineAdapter class. The PropertiesBuilder class is the gift of the SonarQube API for that transformation. You just need to fill it accordingly when you iterate through the map. Then you can use the buildData method to transform it to a readable String—for instance, "Normal=2;Urgent=1"—or use the build method to transform it to a Measure object that contains the same data in binary format.
To see how you can store these metrics in the database, look at the saveMeasures method. It uses the SensorContext reference by invoking the saveMeasure method. You can either pass as a parameter the object produced by the PropertiesBuilder#build method or create a new Measure object. The Measure constructor takes two arguments: the unique key of the metric and the computed value. The rest is automatically done by the SonarQube API.
With about 20 lines of code, you’ve written the most important part of the Redmine plugin, which computes and stores two metrics in SonarQube! The next step is to create a widget to show these metrics in a dashboard. But before we show you how to do that, we’ll explain a couple of dark spots we haven’t covered yet in the RedmineSensor class.
Dependency Injection in SonarQube plugins
In several places, the code uses the settings and RedmineAdapter variables, which are passed to the class as constructor parameters. But you may be wondering how those parameters are created.
Here comes the beauty of Dependency Injection in SonarQube. We told you before that it’s a good practice for every class you create in a plugin to extend an extension point and be included in the list of extensions returned by the getExtensions method of the class in the plugin that extends the SonarPlugin class. All classes that do so are automatically registered with SonarQube’s Inversion of Control (IoC) container, for constructor injection. That means you can pass any component you want to use in the class constructor, and SonarQube will automatically inject it (create it for you).
Note
If you’re not familiar with Inversion of Control and Dependency Injection, check out Martin Fowler’s excellent article on the subject at http://martinfowler.com/articles/injection.html, or refer to the book Dependency Injection by Dhanji R. Prasanna (Manning, 2009: www.manning.com/prasanna/).
Now you can specify any registered extension as a constructor parameter and use it as if you had manually initialized it. The great thing is, as shown in listing 16.3, you can pass objects not only from your own plugin (RedmineAdapter), but from SonarQube core (Settings) as well.
A final note about Dependency Injection in SonarQube: it’s a very bad technique, although programmatically allowed, to manually instantiate classes that implement (directly or indirectly) the BatchComponent or ServerComponent class, because those classes should be automatically instantiated via IoC. If you do, your plugin might work today, but nobody guarantees that it will work under future versions of SonarQube. To avoid this kind of potential problem, and to make your life easier, let the IoC container handle the creation/destruction of the classes you need.
You’re almost finished. You’ve created a plugin, declared its properties and metrics, and written the code to create and store those metrics. If you only wanted to show your metric values in filter columns, you’d be done. But you probably also want to make your metrics available on dashboards, so there’s one last step: the design of a dashboard widget. In the next section, we’ll teach you how to do it.
16.2.5. Creating your first widget
A widget is composed of two source files: a Java class that—what a surprise—extends another basic class and needs to be included in the plugin’s extension points, and a Ruby file that is the actual representation of the widget. Widgets are typically used to show in a nice way the metrics computed by the plugin and allow interaction with end users. The following listing shows the code for the RedmineWidget class.
Listing 16.4. RedmineWidget class: describing the widget
@WidgetCategory("Redmine")
public class RedmineWidget extends AbstractRubyTemplate implements RubyRailsWidget {

public String getId() {
  return "redmine";
}

public String getTitle() {
  return "Redmine Widget";
}

@Override

protected String getTemplatePath() {
  return "/redmine/redmine_widget.html.erb";
}
}
As you probably notice, RedmineWidget implements RubyRailsWidget to override the getTemplatePath method and provide its own Ruby file reference. The getTitle method is used in the SonarQube Web UI when adding the widget to a dashboard; but as you’ll see in the next section, you can change this when localizing the plugin. Finally, the getId method provides a unique widget ID, so it’s a good practice to include in the ID the name of the plugin to avoid duplications with other widgets.
Before we move on to the Ruby code, let’s explain the @WidgetCategory annotation. It’s used to group the plugins in the specified category during dashboard editing. It’s optional, but if you don’t use the annotation, then the widget will only be found under the None category (or by browsing the entire, uncategorized list).
Now it’s time to design the widget, so refresh your HTML and Ruby skills. The widget you’ll create will be split in two columns. On the left it’ll show the total number of open issues, and on the right will be a list of open issues by priority. This layout might be familiar, because it’s the general layout of the issues widget we discussed in chapter 2.
Listing 16.5. redmine_widget.html.erb
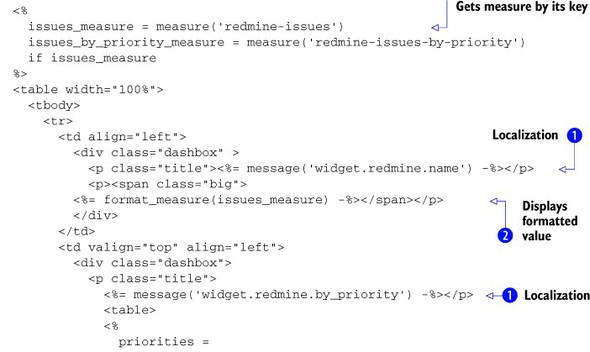
Listing 16.5 is a mixture of HTML with Ruby templating (ERB) included between the <% and %> symbols. We won’t explain the HTML formatting of the plugin but will instead focus on some Ruby functions provided by SonarQube that you can use in your widgets.
The first thing you want to do in a widget is get the value of a metric, which is easy thanks to the SonarQube Ruby function
measure. It takes as a parameter the metric ID discussed in section 16.2.3 and returns its value. To display the value in a formatted way, you can use the format_measure function ![]() . You’ll probably want to use this function because it automatically formats the measure based on its value, and you don’t
have to worry about adding symbols such as percent signs or commas in the widget. That’s all you need to get and display metrics
from SonarQube’s database.
. You’ll probably want to use this function because it automatically formats the measure based on its value, and you don’t
have to worry about adding symbols such as percent signs or commas in the widget. That’s all you need to get and display metrics
from SonarQube’s database.
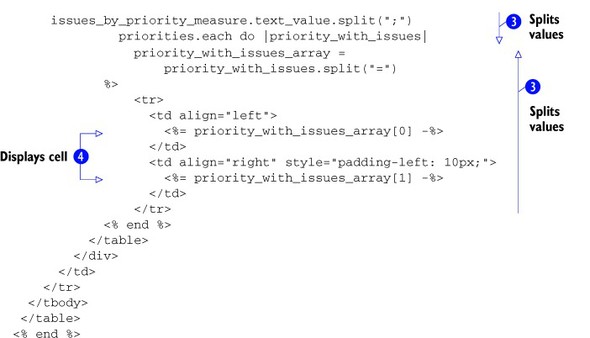
But what about distribution metrics like the issues by priority you implemented in the Redmine plugin? You need to introduce another step before you show them—one that splits the metric. Remember that it’s stored as a string in the following format: "Normal=2;Urgent=1". You don’t want end users to see something like that in your widget!
To split the values ![]() , you get the text_value of the metric and then call the split function by passing as a parameter the semicolon character (;). This creates an array of Strings: [Normal=2][Urgent=1]. You could display the content of each element; but you can also use the split function, this time passing an equal sign (=) as a parameter, to get an array of split values for each element. For example, splitting the first element, you get the
following table: [Normal][2]. Splitting the second, you get [Urgent][1]. From this point on, you can display the appropriate cell
, you get the text_value of the metric and then call the split function by passing as a parameter the semicolon character (;). This creates an array of Strings: [Normal=2][Urgent=1]. You could display the content of each element; but you can also use the split function, this time passing an equal sign (=) as a parameter, to get an array of split values for each element. For example, splitting the first element, you get the
following table: [Normal][2]. Splitting the second, you get [Urgent][1]. From this point on, you can display the appropriate cell ![]() .
.
And there you have it. Your widget is ready! But wait—we promised that your plugin would support localization. Where is it?
![]() : another Ruby function (message) that accepts a key as a parameter, finds its value (where?—we’ll show you in a minute), and displays it at runtime. In the
next section, we’ll discuss how SonarQube supports localization and how you should name the keys in your localized bundles.
: another Ruby function (message) that accepts a key as a parameter, finds its value (where?—we’ll show you in a minute), and displays it at runtime. In the
next section, we’ll discuss how SonarQube supports localization and how you should name the keys in your localized bundles.
16.2.6. Supporting internationalization
SonarQube uses the i18n mechanism for platform and plugin localization. We’re not going to cover how to create a language pack (a plugin that translates SonarQube core and other open source plugins), but if you’re interested in creating one you can visit SonarQube’s online documentation. In this section, we’ll explain how to allow the localization of the Redmine plugin you just finished.
The first thing you need to do is to create a properties file like the one shown in listing 16.6. It’s a simple text file containing keys and their values. This file must be placed under the src/main/resources project directory in a package named org.sonar.i18n, and its name should follow the pattern <pluginKey>.properties. In the case of the Redmine plugin, because its key is redmine (if you don’t remember when you gave this name, go back to section 16.2.1, where you initialized your plugin’s project), you should save the file as redmine.properties.
Listing 16.6. redmine.properties: localization file for the Redmine plugin
widget.redmine.name=Redmine issues
widget.redmine.description=Displays the number
                           of open issues of a given redmine project.
widget.redmine.redmine_issues=Redmine Issues
widget.redmine.by_priority=By Priority

metric.redmine-issues.name=Redmine Open Issues
metric.redmine-issues.description=Number of Open Redmine Issues
metric.redmine-issues-by-priority.name=Redmine Open Issues by Priority
metric.redmine-issues-by-priority.description=
                       Number of Open Redmine Issues grouped by Priority
You can use the localized messages in widgets or other Ruby on Rails pages by invoking the overloaded message Ruby function. The simplest form of execution requires only the message key. So, to display in your widget the message “By priority”, you could write
message('widget.redmine.by_priority')
Or you could provide a default value, in case the given property key isn’t found in the file:
message('widget.redmine.by_priority',:default=>'By Priority')
What we’ve shown you so far is all you need to know about i18n for widgets. But on the server side—during analysis—there’s a restriction: you can only take advantage of the localized messages in components that extend the ServerExtension base class. Classes that directly or indirectly extend from BatchExtension, such as the RedmineSensor class, can’t use these messages for logging or in the rare case where the metric may need to be internationalized before being stored in the database. To get the value of a property key in a server component, you need to pass the org.sonar.api.i18n.I18n component in its constructor to be injected by the IoC container discussed in section 16.2.4. Then you can write something like the following in your code (for instance, to get the value of the redmine.issue_subject property):
: i18n.message(Locale.getDefault(),"redmine.issue_subject",null,
  new Object[0])
The latest version of the Redmine plugin hosted in GitHub (https://github.com/SonarCommunity/sonar-redmine) adds integration with SonarQube issues. A class named RedmineLinkFunction extends ServerExtension and uses what we discussed in the previous paragraph, so you can see a real-world scenario of using localized messages in Java.
There’s one more thing to note about localizing messages. You probably noticed that the property keys follow some conventions. For instance, to localize the name/description of the metrics defined in section 16.2.3, you need to follow the conventions metric.<key>.name and metric.<key>.description and include in your properties file pairs of keys for each metric, as shown in listing 16.6. The same or similar idea applies to the widget key/description, property key/description, and other SonarQube concepts such as issues and rules. For a complete and updated list of these conventions, we recommend that you visit SonarQube’s wiki at http://mng.bz/Ufcv.
This completes our discussion of writing a SonarQube plugin. We covered most of the stuff you need to be aware of to start implementing your own brilliant ideas for extending SonarQube’s functionality. But before we close, there’s a little more to see. We promised we’d give you an example of a decorator; and after that we’ll discuss some concepts related to supporting new languages.
16.2.7. A decorator example
We mentioned earlier in this chapter that a decorator, in SonarQube terms, is a component that applies a decorate function to all resources. It’s your responsibility to check the level of resources in this method and perform tasks. In this section, we’ll show you an example of such a decorator.
The source code, shown in listing 16.7, is taken from the open source Abacus plugin (http://docs.codehaus.org/display/SONAR/Abacus+Plugin), which reads the complexity value of the given resource (as calculated by SonarQube), computes the so-called Abacus Complexity, and stores it in the database as a new metric.
Listing 16.7. AbacusDecorator: example of simple decorator
public class AbacusDecorator implements Decorator {
  @DependsUpon
  public List<Metric> dependsOn() {
    return Arrays.asList(CoreMetrics.FILE_COMPLEXITY);
  }

  public boolean shouldExecuteOnProject(Project project) {
    return true;
  }


  public void decorate(Resource rsrc, DecoratorContext dc) {
    computeAbacusComplexity(rsrc, dc);
  }

  private void computeAbacusComplexity(Resource rsrc, DecoratorContext dc) {
    if (ResourceUtils.isFile(rsrc) ||
        ResourceUtils.isPackage(rsrc) ||
        ResourceUtils.isDirectory(rsrc) ||
        ResourceUtils.isRootProject(rsrc)         ||
        ResourceUtils.isModuleProject(rsrc)) {
      Double fileComplexity =
      MeasureUtils.getValue(dc.getMeasure(CoreMetrics.FILE_COMPLEXITY),
                Double.NaN);
      if (!Double.isNaN(fileComplexity)) {
        dc.saveMeasure(new Measure(AbacusMetrics.ABACUS_COMPLEXITY,
        ComplexityThresholdsUtils.
         convertCyclomaticComplexityToAbacusComplexity(
               fileComplexity, complexityThresholds)));
      }
    }
  }
}
The class implements the decorator interface and its two required methods. The first method, shouldExecuteOnProject, is just like the sensor method with the same name. The second, decorate, is to a decorator what the analyze method is to a sensor. That means it’s where the real code goes.
The huge difference between decorate and analyze is that the former takes a Resource parameter, and not the Project itself; so as we told you, you need to do some additional work to check whether you want to run the decorator’s code for the given resource. To make it even clearer, if the analyzed project has a total of 120 resources, then SonarQube will trigger the decorate method 120 times: once for each resource with that resource passed as an incoming parameter.
Also notice the annotated method at the beginning of the class. When you want to use another metric calculated by SonarQube core or other plugins, you should declare it in an annotated (@DependsUpon) method. Don’t worry about the method name—you can choose anything you like. The signature of this method may return a list of Metrics instead of a single one. For instance, you can write something like the following:
@DependsUpon
public List<Metric> dependsOnCoreMetrics() {
  return ImmutableList.of(CoreMetrics.COMPLEXITY,CoreMetrics.COVERAGE);
}
This means the decorator depends on the Complexity and Coverage metrics already computed by other sensor(s).
Now let’s examine the core of the decorator: the decorate method. The context parameter, just as in sensor classes, is responsible for handling measures. If you want to refer to the value of a metric listed in any of the @DependsUpon annotated methods (you may have more than one methods annotated with @DependsUpon), invoke the DecoratorContext.getMeasure method.
What we’ve discussed about saving measures in sensors applies to decorators as well. Keep in mind that the context changes every time the decorate method is triggered. So, expect to get a different measure value each time—the value that corresponds to the current resource. If the metric isn’t calculated for the resource, such as when the metric you’re calculating is the average complexity per package but the resource you’re on is a file, the measure is null.
Finally let’s look at how you can check the resource’s level to control the flow of your decorator’s code. SonarQube provides a ResourceUtils class with static methods that test a resource against a level and return a Boolean. We suggest that you visit the latest SonarQube online Javadoc to read more about the method definitions and how you can use the ResourceUtils class.
So far, we’ve covered most of the basic and some advanced concepts related to SonarQube plugin development. As we’ve mentioned, plugins can be also used to add support for new languages. Next we’ll give you an overview of how you can start writing your own language plugin.
16.3. Adding support for new programming languages
Most of the basic concepts we’ve discussed apply to language plugins. To quickly begin writing, you can clone an existing plugin or create a new one from the Maven archetype we presented earlier. But this time, you need to make several modifications in the generated code.
Before we show you the basics, let’s consider the reasons you might want to write such a plugin and what it offers. At the time this book was written, SonarQube supported about 20 programming languages of the several hundred available. We know that most of them are known by very few people, but plenty of them are popular though not covered by SonarQube. Imagine that you’re using one of those languages. Too bad your projects can’t take advantage of all the brilliant SonarQube features discussed in this book. So why don’t you try to write your own language plugin? As you’ll discover in this section, a significant part of the work you need to do has already been implemented by SonarSource.
But you’ll still need to write some serious code for the plugin. Not all plugins do the same things: for instance, the open source C++ plugin doesn’t compute measures about LCOM4 and RFC metrics. So, your first and most important decision should be which metrics your plugin will support. Then you may consider adding coding rules grouped in a default profile. After that, you might include other features such as unit-test execution, duplication recognition, and so on. Let’s discuss the steps to start implementing such a plugin.
First you need a way to parse your target language: you need a “language recognizer.” Open source libraries are available for the job, but the SonarQube toolkit offers the SonarSource Language Recognizer (SSLR: http://docs.codehaus.org/display/SONAR/SSLR), a lightweight library for analyzing source code. It offers a stable integration with SonarQube core and facilitates the development of language plugins. Many of the most popular language plugins (JavaScript, COBOL, C#, Python, PL/SQL, C, C++, Flex, and so on) already use SSLR, so we strongly recommend it and will give you some insights in this section.
Typically, a language plugin based on SSLR is a multi-module Maven project. Figure 16.3 shows the structure of the JavaScript plugin, which is composed of four modules:
Figure 16.3. SSLR-based language plugin (JavaScript) project structure
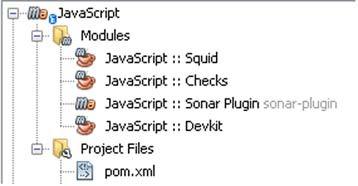
- JavaScript :: Sonar Plugin—The plugin module as discussed in previous sections. You need to provide code, apart from defining the extensions, for the language quality profile, the rule repository, the source importer, and basic metrics such as coverage, duplications, and so on.
- JavaScript :: Checks—Library that includes code for checking the code (using the SSLR, of course) against rules.
- JavaScript :: Squid—The core of the plugin. Here you can find the code for parsing and analyzing source code. Language grammar, as well as keywords, metrics, and punctuation definitions, are also placed in this module.
- JavaScript :: DevKit : A development kit for testing and displaying all the available measures on your project
You can integrate the plugin with external tools (such as coverage tools to parse result files) just as you’d do with simpler plugins. You can write as many sensors or decorators as you need, and you can create as many widgets as you like to display the metrics you compute during analysis. Certainly the most time-consuming and difficult task is to describe the language using the SSLR and to parse the source code files. Unfortunately, that’s beyond what we can cover in this book.
But we believe that if you know the basics—and you have surely learned more than the basics by reading this chapter—you’ll be able to quickly start implementing a SonarQube plugin for your favorite programming language.
16.4. Summary
Well done, developers! You’ve learned many great things about extending SonarQube and building your own plugins. We started this chapter by illustrating how SonarQube works behind the scenes. We discussed its architecture and briefly explained the core components. Then you began to implement a fully working plugin for SonarQube that integrates it with Redmine, a popular issue-tracking system. You’ve learned how to do the following:
- Quickly start a Maven SonarQube plugin project by using a Maven archetype.
- Implement a complete plugin that supports localization with basic and some advanced features.
- Choose between a sensor and a decorator. By now you should be able to identify their differences and when you should use each analyzer type.
- Write the analyzing code to compute the values of your metrics and store them in SonarQube’s database.
Finally, we scratched the surface of writing a plugin to support a new programming language with an overview of the SSLR and the factors you need to keep in mind when implementing such a plugin. The truth is that fully explaining how to write a language plugin would probably take several chapters; maybe we’ll include more content in the next edition of this book or—who knows?—in another book.
We hope you’ve enjoyed reading this book as much as we enjoyed writing it. We’d like to thank you for following us to the end. Best of luck with your first or advanced steps with SonarQube!