
In this chapter
The quickest way to create a photo slide show with Flash is to use one of the templates that comes with Flash. However, you can also take advantage of the power of Flash to create highly customized presentations from scratch. This chapter goes over the steps involved in building a photo slide show with XML-formatted data and external image files. If you like to build things yourself or if you’re using this as a learning experience, this project presents an opportunity to apply many of the concepts covered in previous chapters. Be sure to check out this book’s web page for the images and source code you’ll need, as well as the finished slide show.
So, you’ve got this collection of images. What kind of information about them would be useful in your project? At the bare minimum, you need to know the image’s filename so that you can tell Flash from where to load the image. Another useful bit of information is the image’s title. You might also want to add more and more information about the image, such as the photographer’s name and a description of the image.
If you’re using only the title and URL (filename and path) of each image, a simple XML data structure such as the following would work well:
<images>
    <image title="Slide 1" url="images/slide01.jpg" />
    <image title="Slide 2" url="images/slide02.jpg" />
</images>
In this case, you’re using the XML node attributes to format the information that is unique to each image. This format is easy to use with ActionScript.
Note
One misconception I’ve encountered as people start working with XML and media is that the photos are stored in the XML document itself. This is not true. All that actually is stored by the XML document is the file path to the photos used in the slide show. The photos themselves reside in individual files on the server.
In this section, you will create an XML file that describes the information needed to load your images into the slide show.
Create a new text document in a text editor. Save it as
images.xmlin a folder on your desktop called slideshow.Enter the following XML structure into the document:
<images>
    <image title="Orange 1970 Honda sl175" url="1970_honda_sl175_orange.jpg" />
</images>
Edit the structure so that there is an image node for each external image file that you will be loading into the slide show.
Save the document.
Okay, it’s time to start working with Flash. All the ActionScript will be on the first frame of the movie in the actions layer. This will keep the code centralized and easy to find.
Open Flash and create a new document. Save it as
slideshow.flain the slideshow folder on the desktop.Set the background to white, or another light color, and set the stage size to 500×400.
Create three layers named
text, image mc, andactions, withactionsas the top layer.Select the text layer, choose the Text tool, and draw a text field that stretches almost all the way across your stage. With the text field still selected, go to the Property inspector (see Figure 16.1) and format the text field as Dynamic, Arial, 14 point, white, and bold. In the upper-left instance name field, name the instance
title_txt.In the
image_mclayer, create a 400×300 grey rectangle with no outline. Select the rectangle and choose Modify, Convert to Symbol (or press F8). Select Movie Clip as the symbol option and click the upper-left dot on the registration widget to set the upper-left corner as the registration point. Name the new symbolmc_holder. This is the name of the master symbol that resides in your library. In the Property inspector, name the instance that resides on the stageholder_mc(see Figure 16.2).


Now you’re ready to start writing the code that gets the XML-formatted data and loads the images into the basic structure you set up for your slideshow.
Select the first frame, which should be a blank keyframe, in the actions layer of the timeline. With this new keyframe selected, add the following code to the Actions panel. This will pull the XML document information into Flash:
myXML = new XML();
myXML.ignoreWhite = true;
myXML.onLoad = handleLoad;
myXML.load("images.xml");
function handleLoad(success){
    //process XML
    if(success) {
        //trace( "xml loaded" );
        displayXML();
    } else {
        trace ( "xml loading failed" );
    }
}
This code first creates a new XML object and names it myXML. Next, it tells myXML to ignore the whitespace in the external XML file and tells myXML what function to call when the XML-formatted data is loaded from an external source. Then it tells myXML that it’s time to load the data and where to get it. This example uses a relative path to the images.xml file so you can save all the files for this project in the same directory folder.
To test the success of your loading process, uncomment (remove the // at the start of the line) the trace statement inside the success if statement. Then save the file and choose Control, Test Movie. If the XML document successfully loads, you’ll see the output window display xml loaded. If you do not see that statement, check your typing and syntax carefully. Re-comment the trace statement before you move on to the next step.
Next, you need to add the code that will use the XML-formatted data you just loaded. You can explore the XML by tracing it out first, and use this technique to discover the code you need to load and display the image (and its title) into your Flash document.
displayXML= function(){
trace(myXML.toString());
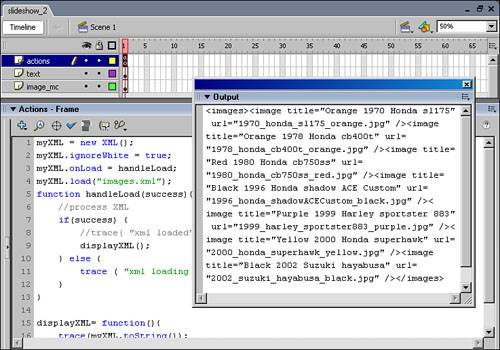
}When you run this code, you can see that there are no spaces between the nodes in the output panel. Flash ignores the whitespace from the XML document. Remember whitespace? It’s the tabs, blank spaces, and lines that visually organize the text characters for human eyes. Although these spaces make it easier for humans to read XML, it complicates things for the computer, so Flash ignores it. Figure 16.3 shows the results of trace(myXML.toString()) in the Output panel, which is “floating” over the Actions panel containing the code producing the output.
How do you get Flash to display your data? The first step is to get the information in one node, and then you can figure out a general method later.
Looking at the XML structure, you can see that you’ve got a node named images with three child nodes that are each named image. These child nodes each have attributes named title and url.
<images>
    <image title="Orange 1970 Honda sl175" url="1970_honda_sl175_orange.jpg" />
    <image title="Orange 1978 Honda cb400t" url="1978_honda_cb400t_orange.jpg" />
    <image title="Red 1980 Honda cb750ss" url="1980_honda_cb750ss_red.jpg" />
</images>
You know that you can get the entire structure if you trace out myXML.toString(), but how do you get to a specific node? Try tracing out myXML.firstChild.toString(). This returns the same thing as myXML.toString(). Why? Because the images node is the first child node of the document. To get at the inner nodes that contain the information about the individual images, you need to go deeper into the structure of the document:
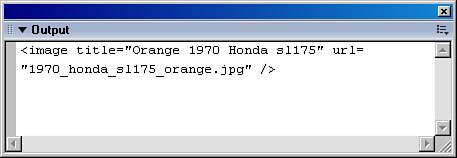
trace(myXML.firstChild.childNodes[0].toString());
This traces the first image node in the output window, as shown in Figure 16.4.
Great! Now, how do you get the rest of the nodes? Recall that in Chapter 14, you learned that XML structures are indexed similar to array indexes. That is, they start counting at 0. So, if childNodes[0] is the first node in its generation, you can get the next node with childNodes[1], and so on.
If you know that there are only three images, you can just write a new line of code for every image for which you want to access the information in the XML document. But it would be more efficient, and less prone to error, to write a looping function to collect the information in sequence. Because the index number is the part that changes for each node, it sets you up to use the following loop:
var i_max = myXML.firstChild.childNodes.length;
for(var i=0; i<i_max; i++){
    trace( myXML.firstChild.childNodes[i].toString() );
}
In this code example, you first get the number of child nodes through which you need to loop. Because you start the count at zero, you want to stop looping when the index counter is one less than the number of child nodes. Rather than make Flash do a calculation, you set the condition that i must be less than the node count for it to continue.
Now that you know how to get the node you want, how do you get the information from that node? You access its attributes. With a slight modification to the code you just wrote, you can trace out the title and url values for each image node. The results of this script can be seen in the output window shown in Figure 16.5.
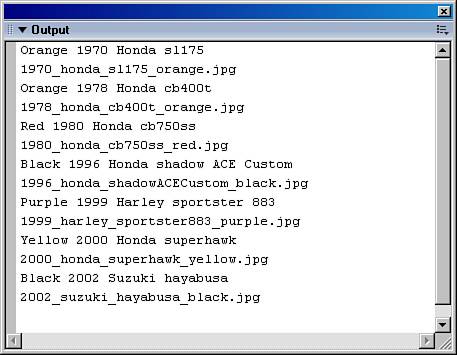
var i_max = myXML.firstChild.childNodes.length;
for(var i=0; i<i_max; i++){
    trace(myXML.firstChild.childNodes[i].attributes.title);
    trace(myXML.firstChild.childNodes[i].attributes.url);
}Now you’re ready to create the code that loops through the images in your XML file, creates an empty movie clip for each image, and saves the title and URL for that image as properties of that movie clip.
Modify the code used to loop through the nodes of the XML file. The following addition creates an empty movie clip to store each image. The image will be loaded into this clip later on:
var i_max = myXML.firstChild.childNodes.length;
for(var i=0; i<i_max; i++){

        // create an empty clip to load the image into
    var targ:MovieClip = this.createEmptyMovieClip("image" + i, 100 + i);

}
Create a new object and name it
imageListener. Add this code below the existing code inside the for loop in thedisplayXMLfunction.// create an object to use as a listener var imageListener:Object = new Object();
This gets the listener object ready to load the image with a
MovieClipLoaderobject (which you’ll create later). At this stage, you’re still getting everything ready to load the image.Define a function for the
onLoadInitevent handler to call. This is where you put all the code that needs to run after the image is loaded into the target movie clip, such as resizing the image and displaying the title. This goes immediately after the previous code inside the for loop in thedisplayXMLfunction. Usetemp.slice(5)to get the index number becauseidoes not scope to the loop inside of which the function is defined when it is inside theonLoadInitfunction.//define a function for the onLoadInit event handler imageListener.onLoadInit = function(targ) { // get the index number for this image var temp = targ._name; targ.i = temp.slice(5); // set position as the manually created clip targ._x = holder_mc._x; targ._y = holder_mc._y; // save title targ.myTitle = myXML.firstChild.childNodes[targ.i].attributes.title };Next, create the movie clip loader, register the listener with the loader, and then use the listener to load the image into the holder movie clip:
// create a new MovieClipLoader
var myLoader = new MovieClipLoader();
Finally, register the listener to the
MovieClipLoader://register the listener to the MovieClipLoader myLoader.addListener(imageListener); // load an image into the target movie clip myLoader.loadClip(myXML.firstChild.childNodes[i].attributes.url, targ);
That’s it. Save and test the document. Be sure to save the .fla in the same folder as the external images. When you test the code at this point, only the last image is visible. All the movie clips are on the stage with external images loaded into them, but they are stacked on top of each other so only the top image is visible (see Figure 16.6).

Tip
One of the simplest things you can do is bring an image to the top of the display stack when the user clicks on part of it. If you arrange your images to have at least some portion visible at all times, this can be an intuitive interface that takes very little code. Just place this code in the listener.onLoadInit function after you change the assignment of coordinates so each image has a unique position on the stage:
//bring this image to top if clicked
target.onRelease = function(){
    this.swapDepths(this._parent.getNextHighestDepth());
}At this point, you have a skeletal application that loads a series of external images into a Flash application and is ready to display their titles. Now you need to show the images sequentially.
A slide show can be a fairly simple application to code. In the simplest version, you turn on and off the visibility of the images, one at a time, over a set interval of time. To do this, you need a function to cycle through the images and control their visibility.
First, you need to get the reference to all movie clip holders that have images successfully loaded into them. Add a line to create a new array to the top of the code on the first frame of the actions layer:
var loadedImages = new Array();
Now skip to the
displayXMLfunction on the first frame of the actions layer, just after the empty movie clip is created, and add the following shaded line of code to save the new movie clip to the array for later use:var i_max = myXML.firstChild.childNodes.length; for(i=0; i<i_max; i++){ // create an empty clip to load the image into var targ:MovieClip = this.createEmptyMovieClip("image" + i, 100 + i); //define a function for the onLoadInit event handler imageListener.onLoadInit = function(targ) { // save image holder clip to an array loadedImages.push(targ); // get the index number for this image var temp = targ._name; targ.i = temp.slice(5); // set position as the manually created clip targ._x = holder_mc._x; targ._y = holder_mc._y; // save title targ.myTitle = myXML.firstChild.childNodes[targ.i].attributes.title }; }You want to show a different image after every increment of a specified interval of time. ActionScript has a method to call a function at set intervals called
setInterval(). You use this to control the display of your loaded images. Place the following code at the top of the Actions panel, above all other code. It enables you to call a function namedcycleImages()every 1000 milliseconds (which equals one call per second). By saving a value formyTimeand using themyTimevariable in thesetIntervalfunction, you can easily reset the time interval either by hand or by programming additional code later in the application.var myTime = 1000; var myInterval = setInterval( cycleImages, myTime);
Next, add the
cycleImagesfunction, which has two main jobs to accomplish: show the next image and hide the previous image. This code goes at the bottom of the existing code.function cycleImages(){ nextImage._visible = true; lastImage._visible = false; }Now you need to tell Flash which is the next image and which is the last image. If you know what the index number is for the current image, you can get the path to the movie clip from the
loadedImagesarray and save it as the next image. Add the following lines of code, which create the variables that track what the next and current images are in the cycle of images.cycleImages(){ var nextImage:MovieClip = loadedImages[iNext]; var lastImage:MovieClip = loadedImages[iLast]; nextImage._visible = true; lastImage._visible = false; }Next, you need to create a new object to keep track of what index you’re currently using in the array. Naming the object
controlwill help you remember what the data it’s holding is to be used for. You can give yourcontrolobject a property namedslideNumto hold the current index number for the images array. This is how Flash knows which image target clip to display next. Add the following lines just after the close of thecycleImagesfunction code. Initializing at 0 when you first declare the property sets up the image count as the first in the array:var control:Object = new Object(); control.slideNum = 0;
Next, insert a counter-incrementer into the
cycleImagesfunction so that it moves on to the next image in the array the next time it’s called bysetInterval.cycleImages(){ // get the holder clips for the next image and the last var nextImage:MovieClip = loadedImages[iNext]; var lastImage:MovieClip = loadedImages[iLast]; // show the next image and hide the last image nextImage._visible = true; lastImage._visible = false; // increment index counter of the images array control.slideNum++; }Now set the values for
iNextandiLast, which are dependent on the current value ofcontrol.slideNum:cycleImages(){ // get the next index and the last index var iNext = control.slideNum; var iLast = control.slideNum - 1; // get the holder clips for the next image and the last var nextImage = loadedImages[iNext]; var lastImage = loadedImages[iLast]; // show the next image and hide the last image nextImage._visible = true; lastImage._visible = false; // increment index counter of the images array control.slideNum++; }This is great, but after it goes through the array of images once, the counter just keeps going and no more images are displayed. You need a way to loop back to the beginning of the image series again.
First, loop through by getting the length of the
loadImagesarray to get the total number of images. Then use this result to test whether theslideNumcounter is less than the total. If it’s less, then Flash gets the next image in the array. If it’s greater than or equal to the total, it’s time to go back to the beginning of the array again. The next image will be at index 0 and the last will be at the end of the array, which is the total minus one. (Recall that the arrays start counting at zero; so, for example, the last element in an array with 10 elements in it has an index of 9.) You need to reset thecontrol.slideNumto zero as well.cycleImages(){ var iTotal = loadedImages.length; if(control.slideNum < iTotal){ var iNext = control.slideNum; var iLast = control.slideNum - 1; } else if (control.slideNum >= iTotal){ control.slideNum = 0; var iNext = 0; var iLast = iTotal-1; } // get the holder clips for the next image and the last var nextImage = loadedImages[iNext]; var lastImage = loadedImages[iLast]; // show the next image and hide the last image nextImage._visible = true; lastImage._visible = false; // increment index counter of the images array control.slideNum++; }You also need to change the title, which is displayed in the text field you manually created earlier in Step 4 of the “Creating the Flash Slide Show Document” section. This can be accomplished with one line of code. When the
cycleImagesfunction is called bysetInterval, the image title is changed to the title for the currently displayed image:cycleImages(){ var iTotal = loadedImages.length; if(control.slideNum < iTotal){ var iNext = control.slideNum; var iLast = control.slideNum - 1; } else if (control.slideNum >= iTotal){ control.slideNum = 0; var iNext = 0; var iLast = iTotal-1; } // get the holder clips for the next image and the last var nextImage = loadedImages[iNext]; var lastImage = loadedImages[iLast]; // show the next image and hide the last image nextImage._visible = true; lastImage._visible = false; // show title for this image title_txt.text = nextImage.myTitle; // increment index counter of the images array control.slideNum++; }
Before you move on, take a step back and take a look at the entire code set on the first keyframe in the actions layer. It’s always a good idea to keep the big picture in mind as you progress in your project.
If you haven’t already, save and test the file.
Now that you have a nice little slide show as a base, you can add a few additional features using your code knowledge from previous chapters. Many of these features either inform users of what is happening, allow them control, or simply add some fun visual effects to give the user feedback.
It can take a few seconds for the images to load and for the slide show to start. You don’t have to keep end-users in the dark and risk that they’ll give up on your slide show while they wait for the images to download to their systems. You can give users a message saying that data is loading. A simple way to handle this is to place a text field on the stage where the images will be displayed. When loaded in, the images cover it up.
While the slide show is running, users might want to pause the show and later restart it to get a longer look at one of the images. They might also like to speed up or slow down the playback.
First, create the movie clip symbols that become the interactive elements that enable the end-user to control the slide show.
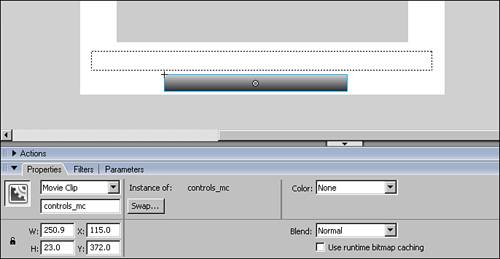
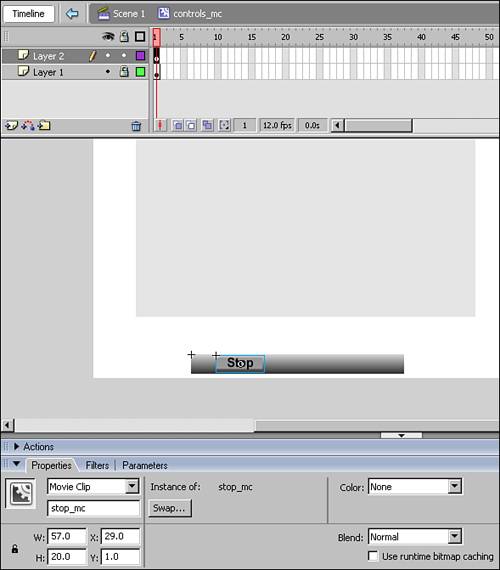
Set up the movie clip buttons. To keep all the control interface elements organized, create one movie clip to hold them all and call it
controls_mc. Create thecontrols_mcclip directly on the stage by drawing with the rectangle tool and then converting the shape to a symbol with upper-left registration and the Movie Clip behavior.Select the new symbol instance on the stage and give it an instance name of
controls_mcin the Property inspector (see Figure 16.7).Double click the
controls_mcinstance to edit it and add a new layer for thestop_mcmovie clip. To create this clip, draw a button shape, convert it to a symbol, again as a movie clip type, and name itstop_mc. Give the instance that is on the stage the same name (stop_mc) (see Figure 16.8) and return to the main timeline.
Now you’re ready to attach some code to the stop_mc clip.
Open the Actions panel and go to the end of our existing code on the first frame of the main timeline. Create a comment header so that you can easily find this segment of code later on.
//- - - - - - - - - - - - - - - -
// user control interface
//- - - - - - - - - - - - - - - -
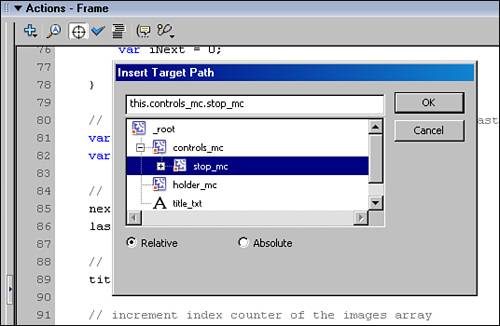
Above the code area of the Actions panel, you can select from a number of buttons. For now, select the Insert Target Path button. A nifty panel comes up with all the named instances that are currently on the stage. You should see
controls_mcwith a plus sign next to it. If you click on the plus sign, you should seestop_mclisted. Selectstop_mcand then click the OK button in the panel. Now take a look at the Actions panel, as shown in Figure 16.9. You now have the path to thestop_mc instancein the code.Now that you have the target path for the
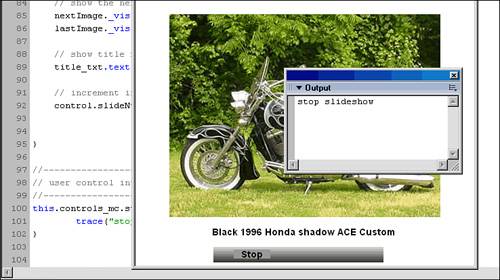
stop_mcmovie clip, it’s time to attach to it a function that will be called when the user clicks in it:this.controls_mc.stop_mc.onRelease = function(){ trace("stop slideshow"); }Test this out. You should see
stop slideshowin the output panel every time you click on thestop_mcsymbol (see Figure 16.10).Create another movie clip in the controls movie clip, this time for the
startfunction. Be sure to give the movie clip an instance name or it won’t be available to ActionScript. Add the following code, which is similar that of to thestop_mcclip://- - - - - - - - - - - - - - - - - - - - - - // user control //- - - - - - - - - - - - - - - - - - - - - - this.controls_mc.stop_mc.onRelease = function(){ trace("stop slideshow"); } this.controls_mc.start_mc.onRelease = function(){ trace("start slideshow"); }Test this out. You should now get
stop slideshowin the output panel when you click onstop_mcandstart slideshowwhen you click onstart_mc.
Now that you know your event handlers are working for the basic user interface you’re creating, you can start giving them some work to do.
To stop the cycle of images displayed, you need to clear the
setIntervalfunction. Because the function is defined on the main timeline, you need to go up the hierarchy of symbols from thestop_mcclip for the path tomyInterval:this.controls_mc.stop_mc.onRelease = function(){ trace("stop slideshow"); clearInterval(this._parent._parent.myInterval); }To restart the slide show, use the following code:
this.controls_mc.start_mc.onRelease = function(){
    trace("start slideshow");
    var myPath = this._parent._parent;
    myPath.myInterval = setInterval( myPath.cycleImages, myPath.my_time);
}
Now, if you just leave these functions as they are, the user could run into some very buggy behavior. You need to have only one button active at a time. You can accomplish this by adding a little code to each
onReleasefunction.this.controls_mc.stop_mc.onRelease = function(){ trace("stop button"); clearInterval(this._parent._parent.myInterval); //disable this this.enabled = false; var myPath = this._parent._parent; //enable the start_mc clip myPath.controls_mc.start_mc.enabled = true; } this.controls_mc.start_mc.onRelease = function(){ trace("start slideshow"); var myPath = this._parent._parent; myPath.myInterval = setInterval( myPath.cycleImages, myPath.my_time); //disable this this.enabled = false; //enable the start_mc clip myPath.controls_mc.stop_mc.enabled = true; }
This works great, but it can use a little polish. The user would benefit from a visual indication that the interface element is either active or inactive. You can accomplish this by changing the alpha, or transparency, value of the clips. The following bolded code sets the value to 100% alpha when they are active and 40% alpha when they are inactive:
this.controls_mc.stop_mc.onRelease = function(){
    trace("stop button");
    clearInterval(this._parent._parent.myInterval);

    //disable this
    this.enabled = false;

    this._alpha = 40;

    var myPath = this._parent._parent;
    //enable the start_mc clip
    myPath.controls_mc.start_mc.enabled = true;

    myPath.controls_mc.start_mc._alpha = 100;

}

this.controls_mc.start_mc.onRelease = function(){
    trace("start slideshow");
    var myPath = this._parent._parent;
    myPath.myInterval = setInterval( myPath.cycleImages, myPath.my_time);

    //disable this
    this.enabled = false;

    this._alpha = 40;

    //enable the stop_mc clip
    myPath.controls_mc.stop_mc.enabled = true;

    myPath.controls_mc.stop_mc._alpha = 100;

}
Now you need to set the initial state for the
start_mcclip as disabled and with alpha set to 40%. Where you place this bit of code is up to you. I personally prefer to put all initialization-related code at the top of the ActionScript.// initialize start_mc control element as disabled this.controls_mc.start_mc.enabled = false; this.controls_mc.start_mc._alpha = 40;
At this point, you have a slide show with some basic user control elements. Check out the book’s web page and compare your source code with slideshow_4.fla. The next thing to examine is how you can apply one of the new filter effects.
One of the new filters included in Flash 8 is dropShadow. You can apply it to individual movie clips on the authoring environment’s stage. You can also apply it programmatically to externally loaded images with ActionScript. This is handy because the application dynamically loads and displays external bitmap images.
Let’s start with a simple example, and when you have that working, you can integrate it into the code you developed for the slide show application.
Open a new Flash document and make sure that its publishing settings are set for Flash 8 and not an earlier version. On the stage, draw a shape, convert it into a movie clip, and give it an instance name of
myShape_mc.Create an actions layer above the layer with the movie clip, select the first frame in the layer, and open the Actions panel. Next, import the class for the
DropShadowFilter. At the top of the page, add the following code:import flash.filters.DropShadowFilter;
Before you can apply the filter, you have to set up some parameters for it. The following code not only assigns values to the parameters of the filter, it does so in a way that is easy to read and modify:
// set dropshodow properties
var shadowDistance:Number = 20;
var shadowAngleInDegrees:Number = 45;
var shadowColor:Number = 0×000000;
var shadowAlpha:Number = .6;
var shadowBlurX:Number = 16;
var shadowBlurY:Number = 16;
var shadowStrength:Number = 1;
var shadowQuality:Number = 3;
var shadowInner:Boolean = false;
var shadowKnockout:Boolean = false;
var shadowHideObject:Boolean = false;
Next, create a new
DropShadowFilterobject (datatype), passing the parameter values through local variables:var myFilter:DropShadowFilter = new DropShadowFilter(shadowDistance, shadowAngleInDegrees, shadowColor, shadowAlpha, shadowBlurX, shadowBlurY, shadowStrength, shadowQuality, shadowInner, shadowKnockout, shadowHideObject);
Although this might not seem easy to read, it is more meaningful than entering the values into the definition as it is created, which would look like this:
var myFilter:DropShadowFilter =new DropShadowFilter (20, 45, 0×000000, .6, 16, 16, 1, 3, false, false,false);
Now you need to create a new array to hold the filters you will apply to this movie clip. The movie clip object has an array property that holds the filters applied to it. If the array is empty, no filters are applied. This means you can apply more than one filter to a movie clip and you can specify in which order they are applied.
Create an array for the filters applied to this movie clip and then push the filter you just created (the
DropShadowFilter) into the array. Finally, save the array as thefiltersarray of themyShapeinstance of the movie clip:var filterArray:Array = new Array(); filterArray.push(myFilter); myShape.filters = filterArray;
All together, the code now looks like this:
import flash.filters.DropShadowFilter;
// set dropshodow properties
var shadowDistance:Number = 20;
var shadowAngleInDegrees:Number = 45;
var shadowColor:Number = 0×000000;
var shadowAlpha:Number = .6;
var shadowBlurX:Number = 16;
var shadowBlurY:Number = 16;
var shadowStrength:Number = 1;
var shadowQuality:Number = 3;
var shadowInner:Boolean = false;
var shadowKnockout:Boolean = false;
var shadowHideObject:Boolean = false;

// create new filter object with the parameters from above
var myFilter:DropShadowFilter = new DropShadowFilter(shadowDistance, shadowAngleInDegrees, shadowColor, shadowAlpha, shadowBlurX, shadowBlurY, shadowStrength, shadowQuality, shadowInner,shadowKnockout, shadowHideObject);

// create array to save filters for this movie clip
var filterArray:Array = new Array();
filterArray.push(myFilter);
myShape.filters = filterArray;
Doublecheck that the publishing settings are set for Flash 8 and test it out. Figure 16.11 shows a black rectangle that has a DropShadowFilter applied to it by the previous code. When it’s working, you can move on to integrating this into your project.

Now you can incorporate this into your project by adding code to the cycleImages function.
As mentioned earlier in the chapter, it’s best to put the
importstatement at the top of your existing code to keep allimportstatements at the beginning of all code.import flash.filters.DropShadowFilter;
Apply the filter to the movie clips holding the loaded images. You could put the filter code in the
onloadInitfunction, but then the filters would be prepared before they’re visible. This is generally not the best use of the end-user’s system resources.An alternative, and better option, is to put the filter code in the
cycleImagesfunction, which is called when the application is scheduled (withsetInterval) to transition from one image to the next in the gallery. With the added code, thecycleImagesfunction looks like this:function cycleImages(){ var iTotal = loadedImages.length;v if(control.slideNum < iTotal){ var iNext = control.slideNum; var iLast = control.slideNum - 1; } else if (control.slideNum >= iTotal){ control.slideNum = 0; var iNext = 0; var iLast = iTotal-1; } var nextImage = loadedImages[iNext]; var lastImage = loadedImages[iLast]; nextImage._visible = true; lastImage._visible = false; // set dropshodow properties var shadowDistance:Number = 20; var shadowAngleInDegrees:Number = 45; var shadowColor:Number = 0×000000; var shadowAlpha:Number = .6; var shadowBlurX:Number = 16; var shadowBlurY:Number = 16; var shadowStrength:Number = 1; var shadowQuality:Number = 3; var shadowInner:Boolean = false; var shadowKnockout:Boolean = false; var shadowHideObject:Boolean = false; var myFilter:DropShadowFilter = new DropShadowFilter(shadowDistance, shadowAngleInDegrees, shadowColor, shadowAlpha, shadowBlurX, shadowBlurY, shadowStrength, shadowQuality, shadowInner, shadowKnockout, shadowHideObject); var filterArray:Array = new Array(); filterArray.push(myFilter); nextImage.filters = filterArray; control.slideNum++; }To free up memory, you can also remove the filter from the filter array of the
lastImage. This way, you don’t have an accumulation of filters as Flash cycles through the images in the slide show:function cycleImages(){ var iTotal = loadedImages.length;v if(control.slideNum < iTotal){ var iNext = control.slideNum; var iLast = control.slideNum - 1; } else if (control.slideNum >= iTotal){ control.slideNum = 0; var iNext = 0; var iLast = iTotal-1; } var nextImage = loadedImages[iNext]; var lastImage = loadedImages[iLast]; nextImage._visible = true; lastImage._visible = false; // set dropshodow properties var shadowDistance:Number = 20; var shadowAngleInDegrees:Number = 45; var shadowColor:Number = 0×000000; var shadowAlpha:Number = .6; var shadowBlurX:Number = 16; var shadowBlurY:Number = 16; var shadowStrength:Number = 1; var shadowQuality:Number = 3; var shadowInner:Boolean = false; var shadowKnockout:Boolean = false; var shadowHideObject:Boolean = false; var myFilter:DropShadowFilter = new DropShadowFilter(shadowDistance, shadowAngleInDegrees, shadowColor, shadowAlpha, shadowBlurX, shadowBlurY, shadowStrength, shadowQuality, shadowInner, shadowKnockout, shadowHideObject); var filterArray:Array = new Array(); filterArray.push(myFilter); nextImage.filters = filterArray; // remove filter from image movieclip to conserve memory allocation // this is optional, but might be good to use if you have // a large collection of images lastImage.filters.pop(); control.slideNum++; }
So, there you go: a slideshow with several additional features that make for some pretty sophisticated Flash magic. Take the code (as well as the principles behind it) and apply it to your own projects. That is the easiest way to become a really great Flash coder.
When I trace myXML, I get [type Function] in the output window instead of the xml data.
Make sure that you called toString() correctly. If you leave out the (), you get the object type instead of the result of the function call. To get the string output of an XML object, write myXML.toString().
I’ve got the cycleImages function working now, but the titles are out of synch with the images.
Make sure that you push the target clip into the loadedImages array inside of the onLoadInit function. If you push the target clip (targ) before the image loads, the image information becomes available to the cycleImages function too early.
When I test my code, I get the following error message: The class or interface `flash.filters.DropShadowFilter' could not be loaded.
Check the document’s publishing settings. This can result from using Flash 8 classes when the player version is set to Flash 7.
It’s taking a very long time for the images to show up, and when I test this on my server it takes even longer.
Check the file sizes of your images. The bigger the file size, the longer it takes to process the images in Flash. To speed up things, try to optimize your file sizes for faster download and rendering.
I’m trying to load images from another server, but a warning box comes up.
This is the result of cross-domain security issues. For more information, visit the Macromedia website at http://www.macromedia.com/devnet/mx/flash/articles/fplayer_security.html. For information on the security enhancements introduced in Flash 8, see the article, “Security Changes in Flash Player 8,” which can be found at http://www.macromedia.com/devnet/flash/articles/fplayer8_security.html.
Before starting a project of this size, it’s a good idea to plan it out before creating it. I’m a coder, so I usually start with the data. When I have an idea of how the data is “shaped,” I can start designing the XML’s data structure. Then I start sketching out the user interface and determine what has to be accomplished with code.
In general, when I’m developing an application, I start out with a lot of trace commands. I don’t add the “guts” of a method until I know it’s called and is responding correctly. This helps me pin down the source of bugs during development.
It’s important to constantly test as you are developing. I usually test after adding each functional element of code. I also Save As with a new version number in the filename whenever adding anything that could potentially break the existing code. This way, I can revert to a previous version if I really mess things up.