
In this chapter
A Flash application can communicate with its local environment and pass data back and forth to a remote server. You might be wondering, “Application? Isn’t Flash usually a movie?” Flash is probably best known for its animation capabilities as well as interactive media, but Flash is also well suited for working with external data and interactive data visualization. In this chapter you will learn some of the basics of working with external data in Flash, including XML formatted data, so that you can build your own Flash applications.
Your published .swf file exists in various contexts. For example, a .swf can be embedded in an HTML document and viewed in a browser window or as a standalone document in a Flash Projector. This section discusses how your .swf file can communicate with these environments.
Note
Flash can be published in various formats, including as a .swf file displayed by an HTML document, a standalone executable file for Windows or Macintosh (called a Projector), or even as a QuickTime movie.
One of the common uses of Flash is to provide dynamic and interactive navigational elements for an HTML website. You might do this when you want the navigation to have more interaction (like animated roll-over effects) than a list of HTML links. Although you can create similar effects with JavaScript, Flash has the advantage of cross-platform performance. A Flash navigation element runs essentially the same in any browser that has a Flash Player installed.
To create “links” analogous to the <A HREF > tag in HTML, use the getURL() function. For example, a symbol named “home” in the navigation menu could have the following code attached to it programmatically:
home_btn.onRelease() = function{
    getURL("home.html");
}
Now, when the user clicks on that button, Flash passes the URL parameter in parentheses to the browser, which then loads a new page into the browser window.
You can also use the getURL command to pass URL-encoded data or a database query, as shown in the following example:
image_10.onRelease() = function{
    getURL("images.html?id=10");
}
Just as with HTML <A HREF> tags, you can specify the target by adding a second parameter to be passed to the getURL() command. For example, to open a new window with the target attribute, you can use code similar to this:
image_10.onRelease() = function{
    getURL("images.html?id=10", "_blank");
}
Now you know how to communicate with the browser using the getURL command in Flash. The next section briefly discusses another way to communicate with the browser: using JavaScript.
JavaScript is a scripting language that is used to communicate with a browser. ActionScript is based on the same code standard and is a close relative of JavaScript. You can use JavaScript in your Flash projects to help you communicate with the browser, although JavaScript itself has some cross-browser and platform issues that you have to stay aware of because they can limit what can be accomplished with a simple script. For example, JavaScript code that works in one browser may not function at all in another.
You can use the fscommand() command to control certain aspects of the performance of the standalone Flash projector. When a .swf is presented in a standalone projector, instead of as an embedded file in an HTML document, it exists in the context of the projector that plays the .swf.
To enlarge the projector display window to fill the user’s entire screen, use the fullscreen attribute of the fscommand statement. When fullscreen is set to true, the projector fills the screen, as shown in the following example:
fscommand("fullscreen", true);When at full screen, the movie fills the entire window and no borders are visible. Although this can be a nice visual effect, be sure to give the end user control over how the movie is displayed.
When fullscreen is set to false, the projector opens at the size you set in the Document settings, as shown in the following example:
fscommand("fullscreen", false);Tip
It is generally considered best practice to begin with a non full screen SWF and then provide a button to expand to full screen and one to reduce the display to original size.
Another useful command controls the scaling of the movie. The allowscale parameter of the fscommand enables you to control whether the SWF file stays the same size even when the browser window is expanded and contracted by the user. When the parameter is set to true, it allows the SWF movie to expand and contract with the browser window. To turn off scaling use the following command:
fscommand("allowscale", false);Be aware that if you have a lot of bitmap artwork that has been optimized for file size in your movie, it might be a good idea to set the allowscale parameter to false. Otherwise, the images might appear pixilated when enlarged.
In general, data is a collection of facts. When you see the word data in a programming book, it usually refers to a formatted set of numbers and letters.
With Flash, you have many options for visualizing data to help the end user gain meaning from that data. You can use a dynamic text field to display data that is as simple as a single string, such as “The cat is brown.” You can also visualize a large and complex set of data points with an interactive graph that’s been dynamically generated.
Previous chapters talked about using event handlers to execute specific code when an event occurs. The LoadVars object has a useful event handler called onLoad(), which is invoked when data completes loading into the LoadVars object.
You might use LoadVars when you are passing simple data, such as a short list of guests, to the .swf. This is very useful when you want to update information displayed in the published .swf, without changing the source .fla and republishing. You could keep a list of guests in an external file and edit it at a later time.
You can use the LoadVars() object to load data from an external text file in a variable/value pair format. The data in the external text file must be formatted as follows:
&guest1="Jill Smith"
The & symbol signals to the Flash Player that a variable/value pair follows that needs to be passed into a LoadVars object of the .swf file. There must be no spaces between the variable name, the = operator, and the first character in the value.
To use the LoadVars object, first create a new instance of the LoadVars object and give it a name. Next, assign a function to execute when the data has completed loading. Finally, load your external data file.
In the following example, a text file is loaded into a new LoadVars object (guestList). The onLoad function traces the value of the variable name1 to the Output window. Because the function is attached to the guestList instance, the this keyword refers to the guestList instance of LoadVars, which is holding the newly loaded data. Variable names in the original data become property names of the guestList instance and can be accessed as you would access a property of any instance.
// create new LoadVars object
guestList = new LoadVars();

// function to execute when data completes loading
guestList.onLoad = function(){
    //trace guest name
    trace(this.guest1);
}

// load data into my LoadVars
guestList.load("guest_list_data.txt");
You can also pass data from your movie with the LoadVars object. Instead of a .txt file, you might want to load a .cfm file instead and pass variable/value pairs to a query. In this case, format your URL address much as you would with the getURL example.
myLoadVars.load("loadVarsData.cfm?a=22&b=12");You can also send data with the send() method of the LoadVars object:
myLoadVars = new LoadVars();
myLoadVars.a = 22;
myLoadVars.b = 12;
myLoadVars.send("loadVarsData.cfm", "_self", "GET");
As you can see, the LoadVars object is very useful for loading and handling simple external data. The next section introduces you to how this external data should be formatted.
The LoadVars example used a .txt source file with the data formatted as follows:
&a=22&b=12&c="this is a string, and can have whitespace"
Whitespace can interfere with the data parsing process in this format, so be careful about leaving spaces between elements in your data unless they are between quotes, in which case you can leave spaces that will be read and formatted when they go into a text field.
You can also embed data in the Embed and Object tags used to embed the .swf file into an HTML document. This can be used to pass data needed to initialize your application. The following is a simple example of this technique. Note that the variable is created just after the source name.
<OBJECT>
<PARAM NAME="movie" VALUE= "movie.swf?title=Gallery&imageFiles=images/image1.jpg">
<EMBED src="/support/flash/ts/documents/movie.swf?title=Gallery&imageFiles=images/image1.jpg">
</EMBED>
</OBJECT>
What this code does is tell the .swf file embedded in this HTML document that the value of title is Gallery, and that the value of imageFiles is images/image1.jpg. These variable/value pairs can now be used by the .swf.
If the data you are using in Flash becomes complicated, it can be cumbersome to format it in a text file or embed it in an HTML document. This is where XML comes in handy.
XML, which stands for Extensible markup language, is a tag-based markup language for structuring data files, especially for passing data between applications. For example, a server-side database application can pass data to a client-side Flash application formatted as an XML file. XML looks similar to HTML because they are both tag-based markup languages. However, XML is more loosely defined. HTML has several predefined tags such as <p> and <h1>. Although specific applications of XML have predefined tags (as in CML for Chemistry), you can create your own tag definitions in generic XML.
An XML document consists of nested elements called nodes. Each pair of beginning tags and closing tags is a node. The elements between an opening tag and its closing tag also make up a node. The nested nodes (the element nodes inside the outer pair of tag nodes) have a parent/child relationship with the outermost node, which is called the base node. A base node is simply the outermost node in an XML structure. The sets of nodes within the parent node are siblings.
The following is an example of a simple XML data structure that uses the same data used in the previous LoadVars example. This is the same data and variable/value pairs, but in a different format. The tags are user-defined, and I designed this particular XML data structure. As you practice with XML, you’ll design your own user-defined XML tags.
<myData>
    <a>22</a>
    <b>12</b>
</myData>
Although this example may seem more involved than the LoadVars version, it illustrates how the same data would be formatted. If you wanted to expand this example and add several more data points, the embedded data of the LoadVars version can become unwieldy, whereas the XML format makes the same data easier to read.
XML nodes can have attributes similar to HTML tag attributes, which are variable name/value pairs included inside the brackets. Each node can have several attributes. Nodes must have a closing tag, but a syntax shorthand for empty nodes is to combine the opening and closing tags into a single tag. This is advised when using attributes with no text element for a pair of tags to enclose. In the following, this single tag syntax is used for information on each image. Each node represents a single image. In this shorthand form, the closing slash is what serves as the closing tag, and closes the img node.
<images>
    <img title="photo1" url="photo1.jpg" />
    <img title="photo2" url="photo2.jpg" />
This XML structure tells Flash that there are two objects in this list of images, and what the title and URL of each object is.
Designing a well-formed XML data structure requires attention to the character of the data itself. If each node has the same set of variables, you might want to use attributes instead of nested nodes because attributes can be parsed quickly by Flash. On the other hand, if your data is more globular in structure and each node has its own internal data structure with unique variables, a nested node structure might be more appropriate.
Now that you have a basic understanding of how to structure data with XML, you are ready to learn how to use it in Flash.
Importing XML documents into your Flash project is a fairly simple process that makes use of the XML() object in Flash. Just as with the LoadVars object, the XML object includes an onLoad event handler that executes when data finishes loading.
You should note that it is important to tell the XML object to ignore the whitespace in the document. Whitespace includes all extra returns or tabs in the document that don’t actually contain any data. This way, the XML object works only with nodes and ignores the whitespace formatting, which makes the XML document much easier to read. You do this by setting the ingoreWhite property of the XML object to true, as shown in the following example.
// create a new XML object for the XML formatted data
myXML = new XML();

// make sure that whitespace is ignored during parsing
myXML.ignoreWhite = true;

// function to execute when XML done loading
myXML.onLoad = function(){
    // do something with data
}

// load external xml file
myXML.load("myData.xml");
Tip
If you use the following code in the myXML.onLoad function, your XML data is traced to the output panel when you run a test:
trace( myXML.toString() );
This is a quick and easy way to test and make sure that your XML data is loading.
Flash’s XML object enables you to load XML-formatted data and use its onLoad event handler. The next section discusses some of the other methods of the XML object.
You can now get your XML-formatted data into Flash. Now what? The XML object has several properties that give you access to the nodes.
firstChildreturns the first child of a node.hasChildNodesreturnstrueif the node has children.lastChildreturns the last child of a node.nextSiblingreturns the next node from the same generation.nodeNamereturns the name (in the tag) of a node. If the node is a text node, it returns a 3.nodeTypereturns 1 if it is a tag node or a 3 if it is a text node.nodeValuereturns the content of a text node or null if it is a tag node.parentNodereturns the parent node of a node.previousSiblingreturns the previous node from the same generation.attributesreturns the attributes of a tag node, if they have been defined.childNodesreturns a list of child nodes.childNodes.lengthreturns the number of elements in the list of child nodes.
After the XML-formatted data is loaded into an XML object in Flash, that’s where it lives and you can access it from that object. One way to see that data in the authoring environment is to trace the entire contents of your XML object instance (myXML) to the output window, as in the following example:
trace(myXML.toString() );
Test the movie and you can see all your lovely XML in the output window.
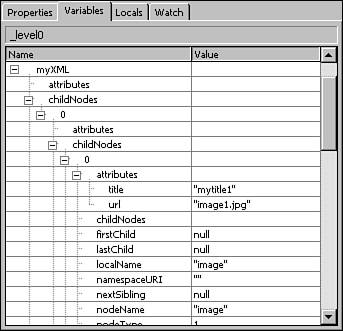
You can also explore your XML object with the debugger’s Variables panel. When you play your movie, it presents the information for each node in your XML object (see Figure 14.1).
Now would be a good time to look at an example of how to use these properties of the XML object to get access to XML-formatted data. First, however, take another look at the simple XML data structure we created earlier. In the following example, two variable-value data pairs are formatted in XML.
<myData>
    <a>22</a>
    <b>12</b>
</myData>
As you can see, the first node is <myData>. You can get some interesting information about it with ActionScript. For example, you can get its name, even if you didn’t know it ahead of time:
// show the name of the XML's first node
trace(myXML.firstChild.nodeName);
That’s all well and good, but what you really need is a variable name/value pair equivalent to a=22 that you can then use elsewhere in the application. How do you get that? Well, you know that the node named a has a child node, which is a text node with a value of 22. So, in ActionScript, you can write the following:
var a_name:String = myXML.firstChild.childNodes[0].nodeName;
trace(a_name);
This should return an output of a. This creates a local variable that holds the name of the node in which you’re interested. Next, you could run a conditional to test whether the local variable name is the same as the node name before proceeding:
if(a_name == "a"){
    // this is the node we want, continue
}
This is not a requirement, but it gives you more ways to manipulate your data after you’ve gotten it into Flash. I mention it now mainly to illustrate the relationships between the nodes, as well as how to access their data with ActionScript.
Next, you can get the value of the a node’s child node and assign it to a local variable (which is also called a):
var a:Number = myXML.firstChild.childNodes[0].firstChild.nodeValue;
trace("a = " + a);
When you test this, you should see a = 22 in the output panel.
Look at another simple example, this time with attributes. This time, the goal is to package information about image files, such as the title and URL address of each image in the list. You’ve seen this example earlier in the chapter:
<images>
    <img title="photo1" url="photo1.jpg" />
    <img title="photo2" url="photo2.jpg" />
</images>
To keep the code shorter and easier to read, you can give your node paths a name. For example, you can give the myXML.firstChild path the name path. This turns this code
img_0.title = myXML.firstChild.childNodes[0].firstChild.attributes.title;
into the following code:
// save root XML path as local variable
var myPath:String = myXML.firstChild;

img_0.title = myPath.childNodes[0].firstChild.attributes.title;
This technique is especially helpful when the data structure gets more complicated, with many levels of nested nodes.
To get the image title for the second node, you can use the following:
img_1.title = myPath.childNodes[1].firstChild.attributes.title;
This gives you the next node in the list of images. You can keep track of which node you’re on, much as with an array. Both XML nodes and array elements are numbered. The count starts at zero, so the first node is at childNodes[0], the second at childNodes[1], and so on. If you have several images described in an XML file, it would be a good idea to loop through them rather than write out line after line of complicated XML navigation. By using the node count, you can keep track of how many times you need to run a loop that does something with all the nodes describing the images. The following is an example of such a loop:
// get number of images to process
var i_max:Number = myXML.firstChild.childNodes.length;

// save root path as local variable
var path = myXML.firstChild;

for(var i=0; i<=i_max; i++){
    // save dynamic name as local variable
    var img:Object = ["image_" + i];

    // save title for this image
    img.title = path.childNodes[i].attributes.title;

    // save url for this image
    img.title = path.childNodes[i].attributes.url;
}
Working with XML data in Flash can be a challenge, but the XML object gives you a lot of methods for accessing that data. In the next section, you learn some of the basics of building XML data with Flash.
If you want to send data out of your Flash file to the server you can build XML data at run-time. In this section, you learn how to build XML data with ActionScript. One of the benefits of this is that you can use XML to format data passed to Flash from a database, create a user interface that enables the end user to edit the data content during run-time, and send the edited data in XML format back to the database.
Imagine you want to build an XML file to hold information for the guest list for a dinner party. Starting simply, you need some basic information for each guest, including his or her name. The XML structure for this data might look something like this:
<guestlist>
    <guest>Joe Smith</guest>
    <guest>Sally Jones</guest>
</guestlist>
To build this XML-formatted data structure from ActionScript, you must first create a new XML object to hold your data as shown in the following example:
guestXML = new XML();
Next, you create a node for your guest list and then attach it to an existing node as follows:
newList = guestXML.createElement("guestlist");
guestXML.appendChild(newList);
To add a node for a guest, you must first create the new node. This new node is the parent node; you can think of it as a wrapper for all the nodes that will contain information about the guest. Next, create a text node for the guest’s name. Finally, append the text node to the guest node, which nests the node containing the guest’s name inside of the wrapper for the guest’s information, as shown in the following example:
// create and append node for guest
newGuest = guestXML.createElement("guest");
newText = guestXML.createTextNode("Joe Smith");
newGuest.appendChild(newText);
At this point, the guest node is just hanging out in the XML object and is not yet part of the XML structure. To add the new guest node to the list node, do the following:
newList.appendChild(newGuest);
This process must be done for each guest that you want to add to the XML data.
What if you want to add an attribute to the guest node? For example, imagine you want to include the phone numbers of your guests. No problem. Before appending the newGuest node, add a line similar to the following:
newGuest.attributes.phone = "555-5555"
After your data is in XML format, you can send it back to the server, where it can be stored for future use.
To send XML-formatted data back to the server, use the send() method of the XML object as shown in the following example:
myXML.send("getxml.cgi");This sends your XML object to the server. As you can see, XML-formatted data can be passed back and forth from your user interface (built with Flash) and a server-side database.
Flash is wonderful. Not only can you load data that is mostly numeric or text, but you can also load assets such as images and even other .swf files.
The global loadMovie method enables you to load an image (JPG, GIF, or PNG) or .swf file into any target movie clip, and requires the name of the file that will be loaded and a path to the target clip into which the file will be loaded. The image or .swf file replaces any contents of the movie clip and is aligned by its upper-left corner at the registration point (crosshairs) inside the clip. This technique could be useful when you want to load images into different targets.
Tip
It is usually easiest to create a movie clip with a placeholder rectangle the same size as the .swf or image that you are trying to load. This enables you to visually place it and know where your loaded content will be landing.
In the following code, the image.jpg image file is loaded into the target_mc movie clip:
loadMovie("image.jpg", target_mc);This code can be used with a button event handler to provide a user interface to a selection of images:
myButton.onRelease = function(){
   loadMovie("image1.jpg", logo_mc);
};
With the global loadMovie method, you can load images and other .swf assets into any target clip in your project. However, the global loadMovie method is just one way to approach loading external assets. The next two sections discuss approaches that are preferred over the global loadMovie method.
The loadMovie method of the MovieClip class permits you to dynamically load external assets into a target clip that has been created at run-time. This is useful because it can reduce your project’s initial file size and allow for more flexibility in your code. In fact, this method for loading external images and .swf files is preferred over the global loadMovie method.
First, create an empty movie clip as the target clip:
this.createEmptyMovieClip("target_mc", 100);After you have a target movie clip, you can load an external .swf or image file into it:
target_mc.loadMovie(image.jpg);
The major drawback of using the loadMovie method is that there is no built-in method to handle the loading progress of external files.
The MovieClipLoader class is used to load external resources (such as .swf, .jpeg, .gif, and .png files) and utilize the built-in event handlers of a MovieClipLoader object. It works much like the event handlers in the LoadVars and XML objects. You can either create a new MovieClipLoader object for each file you will be loading or use a single MovieClipLoader object to handle the loading of several files. If you’re loading only a few assets into the .swf, you might want to create a new MovieClipLoader for each asset. On the other hand, if you are loading many assets, a single MovieClipLoader can manage them all without stressing the user’s processor.
In the following example, an empty movie clip is created to hold the incoming image file. Then a new object is created to be a listener for the MovieClipLoader (which is created soon). In the listener function, called mclListener.onLoadInit, the code to be applied to the holder clip is applied after it holds the external image file.
Why do this? When an external file is loaded into a movie clip, it overwrites any existing code on that clip (just as it replaces any visuals). So any changes to the clip must be done after the external image or .swf is loaded.
When the listener functions are defined, you can create the MovieClipLoader object instance and register the listener. After all this preparation, you can finally load the external image into the holder clip with the MovieClipLoader.
// create an empty clip into which the image is loaded
this.createEmptyMovieClip("image_mc", this.getNextHighestDepth());

// create an object to use as a listener
var mclListener:Object = new Object();

//define a function for the onLoadInit event handler
mclListener.onLoadInit = function(target_mc:MovieClip) {
    // position target clip on stage
    target_mc._x = Stage.width/2-target_mc._width/2;
    target_mc._y = Stage.height/2-target_mc._width/2;

    // resize image to 40%
    target_mc._xscale = 40;
    target_mc._yscale = 40;

};

// create a new MovieClipLoader
var image1_mc:MovieClipLoader = new MovieClipLoader();

//register the listener to the MovieClipLoader
image1_mc.addListener(mclListener);

// load an image into the target movie clip
image1_mc.loadClip("image_url.jpg", image_mc);
The advantage of the movieClipLoader is that it can respond to more events related to loading of the data than the other approaches to loading external assets.
With the MovieClipLoader, you can listen for various events during the loading process, including the following:
onLoadStart—Invoked when the first bytes of the downloaded file have been written to disk.onLoadProgress—Invoked during the loading process.MovieClipLoader.getProgress()can be called at any time during the load process.onLoadComplete—Invoked when the entire downloaded file has been written to disk.onLoadInit—Invoked after the downloaded file’s first frame actions have executed. When invoked, you can set the properties, use methods, and interact with the loaded file.
When these events are invoked, you can run code specific to that event. For example, you can use the onLoadProgress event handler to give your end user feedback on how the download is progressing.
There are several methods in the MovieClipLoader class, and they involve the loading and unloading of external assets. Following is a list of methods that can be applied to an instance of the MovieClipLoader.
addListener()—Registers an object to receive notification when a MovieClipLoader event handler is invoked.getProgress()—Returns the number of bytes loaded and the total number of bytes for a file that is being loaded usingMovieClipLoader.loadClip().loadClip()—Loades a.swfor image file into a movie clip in the Flash Player while the original movie is playing (in other words, it loads an external file during run-time).removeListener()—Deletes an object that was registered as a listener.unloadClip()—Removes a movie clip that was loaded withMovieClipLoader.loadClip().
Now that you know how to load external resources into your Flash application, you need to know something about the security issues involved.
Back with version 7 of the Flash Player, Macromedia introduced new features that improve security, including those discussed in the following sections.
If you are planning to load data from a domain (such as www.macromedia.com) or subdomain (such as store.macromedia.com) other than the one in which your Flash .swf file resides, you need to set up a cross-domain policy file. Without it, the Flash player pops up a warning box from the browser asking users whether they want to download data from a second domain.
Domains must be an exact match. For example, if you have a Flash .swf file on the www.mydomain.com domain, data on the data.mydomain.com subdomain is seen as belonging to a different domain and requires a cross-domain policy file.
A cross-domain policy file is a small XML-structured file on the domain server root, as shown in the following example. It contains a list of domains that are allowed to access those files. This tightens up the security of Flash, and offers some protection to end users because only files from domains listed in the policy file can be loaded into the host .swf without triggering an alert box. The file must be named crossdomain.xml and saved in the document root directory of the server from which your movie is accessing a file:
<cross-domain-policy>
    <allow-access-from domain="www.domain_to_allow_here.com" />
</cross-domain-policy>
You can list more than one domain. You can also use * to permit subdomains in one line.
<cross-domain-policy>
    <allow-access-from domain="www.mydomain.com" />
    <allow-access-from domain="*.anotherdomain.com" />
</cross-domain-policy>
With the cross-domain policy file, you can control from which domains external content can be loaded into your projects. The Flash Player automatically looks for this file in the domain server root of the file to be loaded. The next section discusses situations when you may need to tell Flash to look for a policy file in a specific location.
You need to use System.security.loadPolicyFile() to tell Flash where to look for your policy file in the following situations:
The server in question serves through a port other than a standard port.
You want to store your policy file in a location other than the root directory.
You want to name the policy file something other than crossdomain.xml.
In the following example, the policy file is named myPolicy.xml and is located in the flash directory.
System.security.loadPolicyFile("http://www.mysite.com/flash/myPolicy.xml");This code collects the list of allowed domains listed in the policy file in the specified location.
For more information on the security enhancements, see the Macromedia Developer Center article, “Security Changes in Macromedia Flash Player 7,” which can be found online at http://www.macromedia.com/devnet/mx/flash/articles/fplayer_security.html. For information on the security enhancements introduced in Flash 8, see the article “Security Changes in Flash Player 8,” which can be found at http://www.macromedia.com/devnet/flash/articles/fplayer8_security.html.
To set up detection of the Flash Player, go to File, Publish Settings in the Flash authoring environment and choose the HTML tab. Check the Detect Flash Version option to turn on Flash detection. The version to check for is automatically set to 8, but you can specify from which dot release you want to update. For example, if Macromedia makes a minor change to the player, it might be released as version 8.0.1.
Although it is true that over 94% of the web browsers include the Flash 7 Player plug-in, it still a good idea to provide non-Flash versions of any critical content for audiences that have older machines or browsers. For example, if you’re using Flash for navigation of an HTML website, you might also want to include an HTML version of that navigation at the bottom of the page. Another option is to create two side-by-side sites, one HTML and one Flash-based, and send users to the correct version after detecting whether or not they have the Flash Player. In addition, offer a link on your page to the Flash Player download page to give users a non-automatic option to acquire the most recent player version.
The Macromedia website has a great resource for learning about Flash Player detection, including the new Express Install options, at http://www.macromedia.com/software/flashplayer/download/detection_kit/.
As you can see, Flash has a lot of options for bringing in external data and resources. Although this chapter has focused mainly on data and images, the next chapter focuses on sound and video.
I’ve formatted my data in a text file, but when I pull it into Flash it doesn’t all show up.
Whitespace can affect how text file data is parsed by Flash. Check for any spaces between important characters in your data file.
When I test loading my data with loadVars(), instead of the traced value in the output box, undefined is displayed in the output box.
There are several possible causes to check for. Check that the variable name is spelled the same in your ActionScript as it is in the external data file. Also, check that you have the correct path to the data file itself.
When I try to get the name of a text node, I get an error in the output panel.
Text nodes in XML don’t have names. If you’ve named a node for a variable, and its child node contains the value of that variable, you need to get the name of the parent node and the value of the child node.
I’ve written a function that uses the MovieClipLoader method and resizes an image after the image finishes loading, but when I run a test the image never resizes.
Check to be sure that you registered the function as a listener to the MovieClipLoader and that the function is packaged as one of the MovieClipLoader event handlers.
If your images are the same physical size that you want them to be on the stage and they are optimized for small download file size, you can use the MovieClip.loadMovie method. However, if you need to do anything to the external file after it’s loaded, you’re much better off using the MovieClipLoader approach. This way, you can resize the files or execute other modifications when they’re loaded into a target clip.
When you use loadXML versus loadVars depends on the format in which the incoming data will be and how much processing of that data you want to perform. When using loadVars, the external data file is not designed to be easy for you to read, but the variable name/value pairs transfer directly into property name/value pairs of the object instance into which it’s loaded. On the other hand, the XML data format has the advantage of being easier to read and edit. However, you must take the extra step of extracting the data from the XML object if you want to use it as the property of an object instance.