
In this chapter
With the site design in place and the template created, the next step is to choose a platform for your pages and decide whether the site will be dynamic or static. In the case of Retro’s Cycles, they would like to be able to make updates to their own site, without having to rely on a web developer whenever a change is necessary. In this situation, there are two primary options. The first is to provide the client with a copy of an HTML editor or WYSISYW web page editor and give them basic instruction as to its use. The second option is to create a database-driven website that has an administrative section that enables clients to make updates to content stored in the database via their browsers. This second option is the one that the client has chosen.
This means that the web pages can’t be static HTML pages. Instead, they need to be created on one of the dynamic platforms such as ASP, JSP, PHP, or ColdFusion. Because we have covered just the fundamentals of ColdFusion and because ColdFusion is part of the Macromedia Studio, we’ll stick with the ColdFusion platform.
The second element that you need is a database that contains the data for the pages. Although a variety of databases is out there, one of the most common is a Microsoft Access database. Access databases are ideal for small sites because they are easy to build, perform relatively well on the web, and can be updated easily by someone with a basic understanding of Access.
The database that has been built for Retro’s Cycles is a very simple one. If you have Microsoft Access installed on your workstation, download the retros_cycles_99300d2.mdb database from the ColdFusion section of the companion website and familiarize yourself with the structure. If you don’t have Access installed, the figures should give you a pretty good understanding of how the database is structured. To examine the structure of the database, follow these steps:
Open
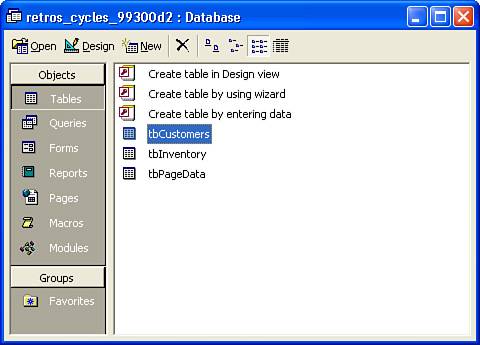
retros_cycles_99300d2.mdbin Microsoft Access. In the Database window, notice that the database consists of three tables namedtbCustomers, tbInventory, andtbPageData(see Figure 21.1).Select the
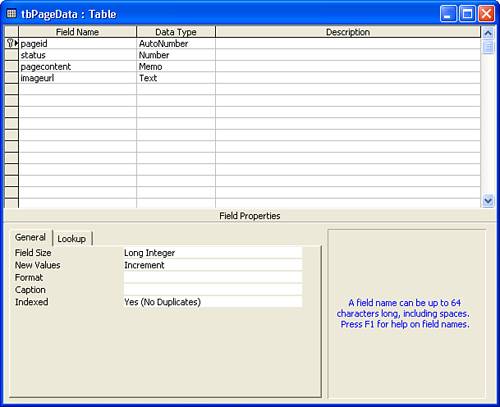
tbPageDatatable and click the Design button. This table, shown in Figure 21.2, contains the content that is displayed on each of the web pages and information relating to its status, an image URL that is associated with the page, and a unique page ID that also serves as the primary key for the table. The page ID field is an autonumber field, which ensures that each record has a unique page ID.Close the
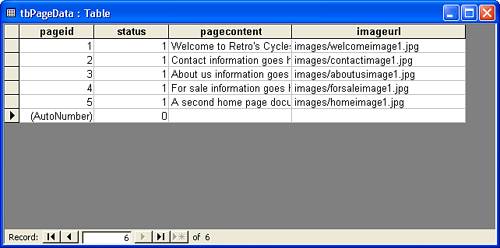
tbPageDatatable. In the Database window, double-click on thetbPageDatatable to open it in the data view. As you can see in Figure 21.3, several records in the database contain page content. Each of the records has a numeric page ID that is incremental in nature.Close the
tbPageDatatable.In the Database window, select the
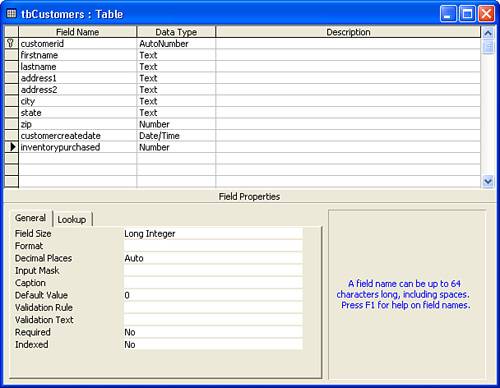
tbCustomerstable and click the Design button. This table, shown in Figure 21.4, contains information about Retro’s Cycles customers. Again, the table has a primary key calledcustomeridthat is an autonumber field. The staff at Retro’s Cycles can use this table to track customer information and purchases and to create mailing labels for periodic mailings.Close the
tbCustomerstable. In the Database window, double-click on thetbCustomerstable to open it in the data view. As you can see in Figure 21.5, this table contains customer information. Again, each of the records has a numericcustomeridthat ensures it is unique.Close the
tbCustomerstable.In the Database window, select the
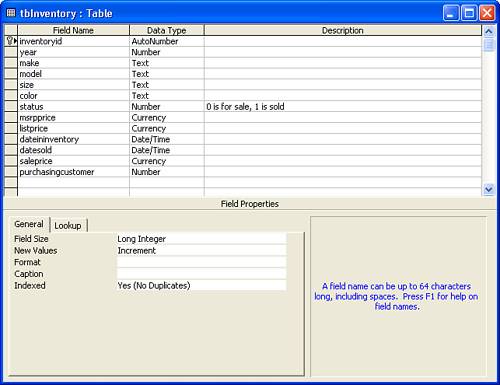
tbInventorytable and click the Design button. This table, shown in Figure 21.6, contains information about the various motorcycles that are in stock. The primary key for this table isinventoryid.Tip
When developing a database for the web, primary keys are very important. A primary key ensures that the record you request via a web page is the only record that is returned. For instance, suppose you didn’t have a primary key that identified each record as unique. If you created a query that said “Show me the record in the database where the last name is Smith,” you might encounter problems if there is more than one Smith in the database. If, however, you assign a primary key to each record and you ask “Show me the record in the database where the customerid is 1223,” then you know you’re going to get the correct record because there will never be more than one record in the database with a customer ID of 1223.
Close the
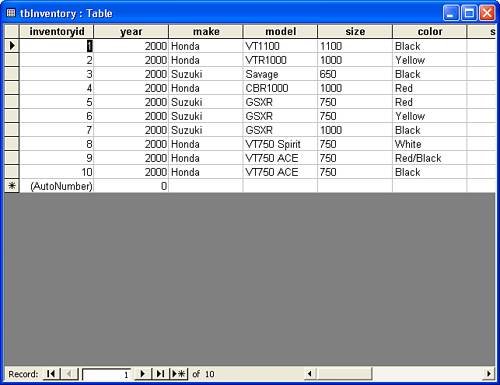
tbInventorytable. In the Database window, double-click on thetbInventorytable to open it in the data view. As you can see in Figure 21.7, this table stores information relating to the motorcycles that are in inventory and their status.Close the
tbCustomerstable and close the database.

As you can see, this database structure is relatively simple and straightforward. Just because a database will be used on the web doesn’t mean it has to be complex.
When you use an Access database to store information that will be available via the web, you need to address a few security issues. Microsoft Access creates file-based databases, which means that all the data is stored in a single, portable file that can be copied to a floppy, burned to a CD, or downloaded from a website. Although this is great because it makes it easy to transport your database from one place to another, it is also a security concern because you don’t want anyone downloading your database and having access to your customer information. A few things, however, will significantly decrease the chance of your database being stolen.
The first step you can take is to place the database in a directory with a unique name. Naming the directory something highly unique diminishes the chance that some clever hacker can to go to your site, guess the name of the directory, and be that much closer to downloading your database.
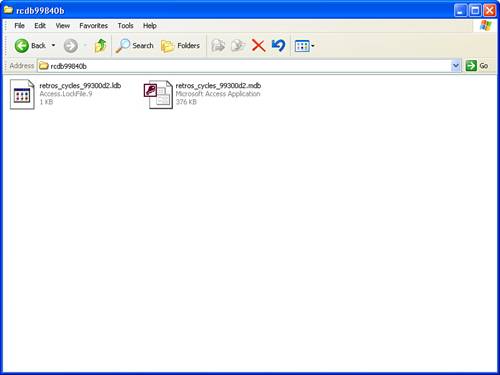
Create a new folder in your web root called rcdb99840b and save the retros_cycles_99300d2.mdb to that folder. If you are using IIS and chose the default settings when setting it up, the path to your database would be c:InetPubwwwroot
cdb99840b
etros_cycles_99300d2.mdb, as shown in Figure 21.8.
Note
Remember that the location of the root folder for your website is going to be different if you are using a web server other than IIS in Windows. If you are using a web server such as Apache, adjust the path to the database accordingly.
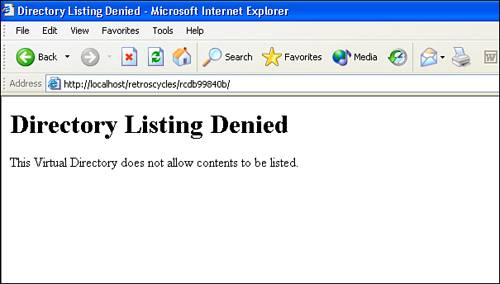
The second step you can take to protect your Access database is to simply name it something very unique. If you accept the default name of db1.mdb that Access tries to assign to your database, it’s likely that someone with an understanding of Access will be able to guess that name. In addition, it wouldn’t be safe enough to name the database for Retro’s Cycles something like retros_cycles_database.mdb because this name is still one that is easy to guess. Instead, name it something that you will be able to recognize and append a string of totally random letters and numbers, so that it’s highly unlikely that someone could just guess the name of the database. As you saw in the previous section, the database that was created for Retro’s Cycles is named retros_cycles_99300d2.mdb. The next step you can take is to disable directory browsing in your web server application. As shown in Figure 21.9, IIS and other popular browsers allow you to determine whether browsing to the root of a site that does not contain a home page displays the contents of that directory. To disable directory browsing in IIS, follow these steps:
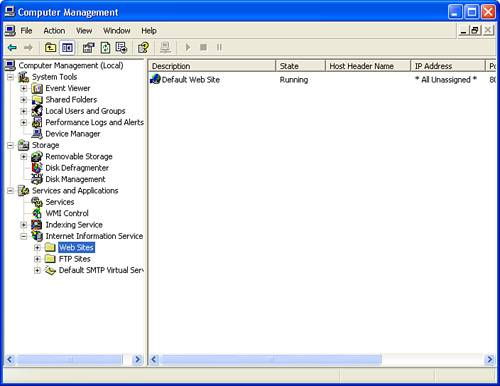
Open the Computer Management console by right-clicking on My Computer and choosing Manage. In the Computer Management console (see Figure 21.10), click the plus sign next to Service and then click the plus sign next to Internet Information Services.
Note
If you don’t see IIS in the list of services, you probably don’t have IIS installed. If you have Windows 2000 or XP Professional, refer back to Chapter 17, “Introducing ColdFusion MX 7,” for additional information on installing IIS. If you have Windows Me or XP Home Edition, you’re going to need to consider upgrading because neither of these operating systems support IIS. Mac users can use Apache as their web server.
Tip
If you are using Apache as your web server application, you can disable directory browsing by creating a text file in your root directory named
.htaccess. In that file, add the following line of code and save it:Options All – Indexes
With this
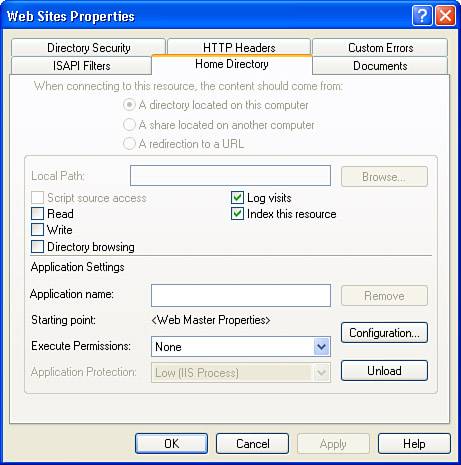
.htaccessfile in place, directory browsing is disabled for all folders within the site.Click the plus sign next to Web Sites. Right-click on the Default Web Site and choose Properties.
In the Default Web Site Properties dialog box (see Figure 21.11), choose the Home Directory tab and uncheck the Directory Browsing check box.
One additional note should be mentioned when it comes to securing your database directory. If you are familiar with Microsoft Windows directory permissions, you may know that in the Windows operating system, the typical default permission level is to allow the Everyone group access to your folder. This means that any user accessing the machine has access to that directory. To reduce the possibility of inappropriate access, consider removing the Everyone group’s access and further restricting access to the database directory to those accounts that need to access it. Before you rush in and remove all the permissions, however, be aware that certain accounts need to have read and write access to the database directory or your web applications may not function correctly. For complete details on the minimum permission levels that are required on your database directory, check out the Technote from Macromedia that can be found at the following URL:
http://www.macromedia.com/cfusion/knowledgebase/index.cfm?id=tn_18802
The final step you need to take to prepare for using the ColdFusion platform for your web pages is to create a connection to the database by using the ColdFusion Administrator. This connection enables the web server to access the contents of the database and tells the web server what driver should be used to “talk” to the database.
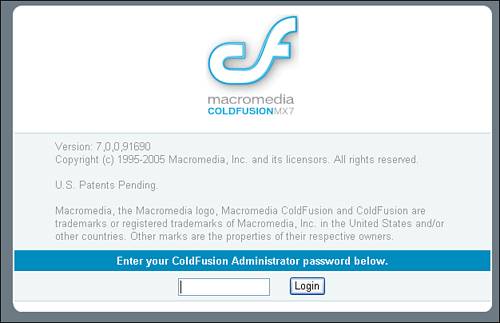
Open the ColdFusion Administrator by typing
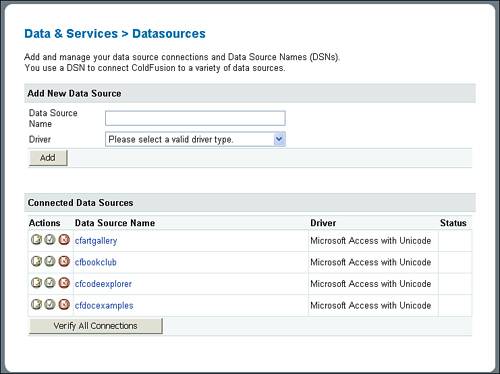
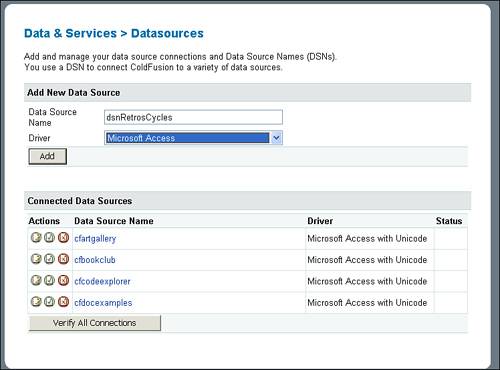
http://127.0.0.1/CFIDE/administrator/index.cfminto your browser’s address bar. In the login screen (see Figure 21.12), type your administrator password.In the left navigation frame, click Data Sources. The Data Sources page in the right frame (see Figure 21.13) displays all the existing ColdFusion data source names and enables you to create new entries.
Type
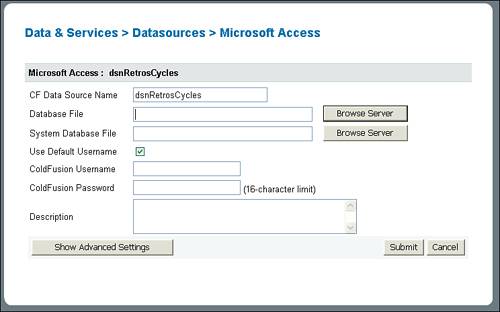
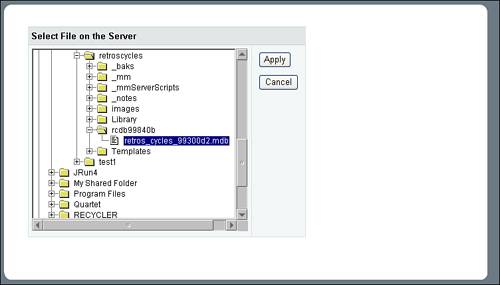
dsnRetrosCyclesin the Data Source Name field, choose Microsoft Access from the Driver dropdown (see Figure 21.14), and click Add.In the Microsoft Access page (see Figure 21.15), click the Browser Server button next to Database File.
In the next page (see Figure 21.16), browse to your database’s location. If you are using Windows and used the default path referred to earlier, the path would be
c:InetPubwwwroot cdb99840b etros_cycles_99300d2.mdb.Click Apply.
Back in the Microsoft Access Page, type a description for your DSN and then click Submit. After your DSN has been created, you will see it in the list of Connected Data Sources at the bottom of the page (see Figure 21.17), along with its status.
Log out of the ColdFusion Administrator.

With your database in place and your connection created, you’re ready to begin creating your pages and adding dynamic content to them. For this task, there is no better tool than Dreamweaver, which is covered in depth in Part V, “Dreamweaver 8.”
When I tried to create a DSN, I received an error that the data source name is invalid. What did I do wrong?
More than likely, you entered an invalid character in the name of your DSN. Make sure that your name contains only numbers and letters with no special characters such as ~ or _. In addition, the DSN cannot contain any spaces.
My DSN used to say OK in the status field, but now nothing is displayed there. Is there a way to check the connection?
Yes. Log in to the ColdFusion Administrator and choose Data Sources. In the Data Sources page, click the Verify All Connections button at the very bottom of the page. The status of the connections should return.
When using an Access database as the backend for your website, it’s often easy to forget about the database’s health. Because you’re accessing it through a web browser, it’s easy to focus more on web functionality and any coding errors and forget that your database might not be performing at its optimal level.
For this reason, it’s a good idea to create a periodic maintenance schedule for your Access database. This maintenance schedule might include the following elements:
Routine backups of the database and moving those backups to a secure location.
Archiving of the database on the local machine so that a copy is readily available in case of database corruption.
Periodic usage of the Compact and Repair tool from within Microsoft Access to reduce the size of your database.
Periodic defragmentation of the disk where the database is stored to ensure optimal performance.
Periodic review of the database size to ensure that size limitations are not being reached.
Adding these tasks to your database maintenance will move you in the right direction toward a worry-free database backend for your website.