
In this chapter
Over the last decade, the amount of data being delivered via web applications has grown at a tremendous rate. Every day, the web delivers content ranging from product catalogs to children’s sports league schedules to educational training and nearly everything in between. And as the need to manage vast amounts of information has grown, so have the options for storing and delivering it. Although today’s web pages are based around the HTML language, they have been paired with additional languages such as the ColdFusion Markup Language (CFML), JavaScript, VBScript, Java, PHP, VB.NET, and C# to supplement what HTML can’t do. Through their own syntax and functions, each of these languages provides additional calculation, data validation, and connectivity functionality.
Probably the most important aspect of any of these is the connectivity element. Each of these languages is capable of connecting to a wide variety of database management systems and communicating data requests, updates, edits, and deletions that enable you to leverage the powerful storage capabilities of databases and use them to provide data for your web applications.
Now, that was quite a mouthful, wasn’t it? What this all boils down to is that by using a supplemental language, you can allow your web applications to talk to databases and extract data from them. In real terms, this means that you can build a 10-page web, and those 10 pages can serve the same purpose as 1,000 HTML pages could have.
Imagine your company has a product catalog that consists of 500 items. As the web developer, your boss just told you that he needs an online catalog built that showcases each of these products. With only HTML in your toolbox, you would have to develop a catalog site that had at least 501 pages. The first page would be an index of all the products, and the other 500 would be product details pages for each of the individual products. Just think about how long it would take to create 501 HTML pages—even leveraging the template functionality that Dreamweaver offers. If creating each page and adding content took you one hour, you’d be looking at 12 weeks of straight work just to create the pages and fill them with data. And then what happens when it’s time to update the information? Ugh!
Now, what if I told you that you could provide exactly the same functionality with only two pages? Sounds much better, right? Just the savings in development time alone would make it worth the effort. And how about the opportunity cost savings of not having you tied up with the mundane task of generating HTML pages for the next three months? Those types of arguments are certainly going to grab your boss’s attention. So what is this solution that I’m offering? Database-driven web pages.
When combined with a relational database such as Microsoft SQL Server, MySQL, and even Microsoft Access, Dreamweaver is one of the most powerful web development tools on the market because the application makes it so easy to interact with databases. In this chapter, you’re going to see what it takes to develop database-driven (also referred to as “dynamic”) applications and how to add dynamic content to your site.
Note
Some web developers argue that any web page that changes (for example, via rollover buttons, Flash movies, and so on) is a dynamic web page—which is technically true. The term dynamic, however, has become somewhat of a technical term in the web community that typically refers to pages that display dynamic content extracted from databases. Throughout this chapter, I’ll be using the terms dynamic and database-driven interchangeably.
Note
The basics of creating a Dreamweaver site were already covered in Chapter 23, “Creating a Dreamweaver Site,” so if you haven’t read that chapter you might look over it so you have the fundamentals of what’s going to be covered here.
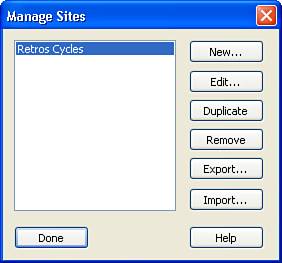
Before you can begin developing dynamic web pages, you need to ensure that your Dreamweaver site is configured for a specific platform. Because Dreamweaver will be generating the vast majority of your code, it needs to know in what language to write. To do this, open the Retro’s Cycles site that was created in Chapter 23 by choosing Site, Manage Sites from the menu bar. In the Manage Sites dialog box, shown in Figure 29.1, choose the Retro’s Cycles site and click Edit.
In the Site Definition dialog box, click the Advanced tab and choose the Testing Server category. If you followed the configuration set forth in Chapter 23, the dialog box should look similar to the one in Figure 29.2.
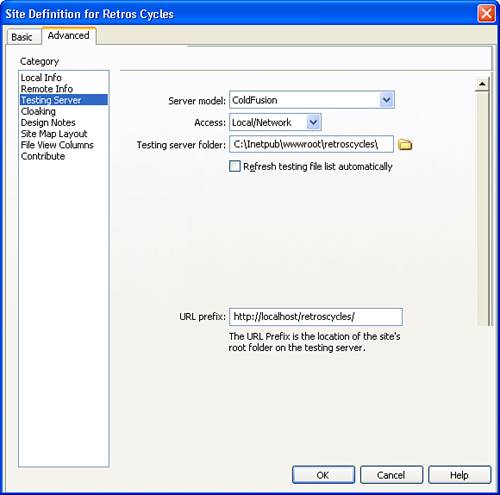
The ColdFusion section of the book explored the process of configuring ColdFusion on your local workstation so that you could develop and test dynamic applications. Here is where that configuration comes into play. The Site Definition dialog box defines on which server model your pages will be developed, which, in turn, determines in which language Dreamweaver will create code.
If you wanted to develop on the ASP, .NET, or PHP platforms, you could change this setting to reflect that platform and Dreamweaver would write in the appropriate language. Note, however, that you cannot mix platforms when developing with Dreamweaver. If you have a mixed environment and need to work on multiple platforms, you need to create a Dreamweaver site for each of the platforms and store the appropriate pages in separate root folders.
After you have your Dreamweaver site configured for the appropriate platform, click OK to close the Site Definition dialog box and click Done to close the Manage Sites dialog box, and we’re ready to talk databases.
Now that you have chosen a platform on which to develop pages, the next step is to determine what database you want to use for the back-end.
Tip
The user-facing portion of your website is generally referred to as the front-end, whereas the database and code that is processed by the server are generally referred to as the back-end.
There are quite a few relational database management systems on the market today, spanning the spectrum when it comes to price, portability, and power. Those databases that are extremely powerful usually (but not always) come with a high price tag. But how much you need to pay and how powerful you need the database to be depend on the expected usage of your web application. Will you be competing with eBay? Then you probably want to fork out the dollars for a high-end database such as SQL Server or Oracle. Are you creating a catalog that will serve your customer base of 500 companies? Then you would probably be better off saving yourself some coin and going with a MySQL database or Microsoft Access database.
Tip
Before I get lambasted with emails telling me that I shouldn’t compare MySQL with Access because it far outperforms Access, let me state that my comparison here was one of pricing. For those who aren’t familiar with MySQL and are looking for a very powerful database management system that is low cost, definitely look into MySQL. The biggest drawback of MySQL, however, is that there is no commercial support for the application, something that corporate America hasn’t quite grown comfortable with.
Regardless of which database you choose, you need to create a communication conduit between your website and the database called a connection.
The next step in developing a database-driven site is to build a connection to the database. All database connections are managed via the Databases panel, shown in Figure 29.3.
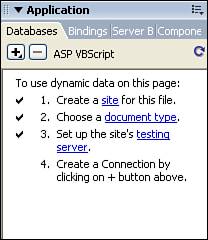
If the proper steps have not been taken to facilitate the creation of a database connection, Dreamweaver lets you know the steps that you need to take before you can proceed. If you have already created the ODBC connection to the database in the ColdFusion Administrator in Chapter 21, “Putting It All Together: Configuring ColdFusion for Database Connectivity,” your Databases tab should look like Figure 29.4 and you are ready to build a connection.
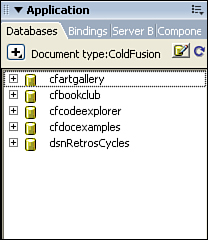
Figure 29.4. All the requisite steps have been completed and Dreamweaver can create a connection to the database.
Note
When you created a connection to the database in Chapter 21, you created a connection between the database and the ColdFusion server. The second connection that needs to be created within Dreamweaver is a connection between your pages and the ColdFusion server.
Because the Retro’s Cycles site is using ColdFusion, Dreamweaver automatically generates a list of data source names (DSNs) that were built with the ColdFusion Administrator. As you can see in Figure 29.4, the dsnRetrosCycles DSN is already in the list, so we would be ready to move on to the next step.
If, however, you are using a server platform such as ASP or PHP, you need to create either an ODBC DSN on your machine or a custom connection string by clicking on the plus sign in the Databases panel and choosing the appropriate connection method.
Note
For instructions on setting up a DSN in Windows, check out this Macromedia TechNote: http://www.macromedia.com/cfusion/knowledgebase/index.cfm?id=tn_19072 For instructions on setting up a custom connection string, check out this Article: http://livedocs.macromedia.com/dreamweaver/mx2004/using/wwhelp/wwhimpl/common/html/wwhelp.htm?context=Using_Dreamweaver&file=28_con17.htm
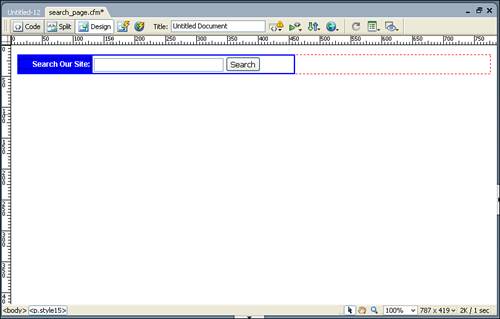
Although search forms aren’t necessarily required for displaying dynamic data, they are frequently used to pass criteria to a Results page, so it’s worth taking some time to look over and understand them before you jump into the dynamic pages. Figure 29.5 shows a basic form with a single text field and a Submit button.
By selecting the form and taking a look at the Property inspector (see Figure 29.6), you can see that the form is named fmSearch and, when submitted, passes its content to the search_results.cfm page, using the GET method.

In addition, clicking on the text field and taking a look at the Property inspector tells you that the text field is named tfSearch (see Figure 29.7).

This means that when the user types Honda in the text field and clicks the Search button, the contents of the form are passed to the search_results.cfm page via the querystring (because you are using the GET method). To accomplish this, the search form constructs a URL that contains the form data and looks something like this:
http://www.retroscycles.com/searchresults.cfm?tfSearch=Honda
This URL now presents you with the opportunity to extract data from the database that matches the search criteria and display it on your pages.
Note
The difference between the GET and POST methods is the fact that GET passes the contents of the form via the URL to the target page, which means the contents of the form are visible in clear text. POST, on the other hand, passes the data behind the scenes, which means the data is not visible in clear text. Both have their pros and cons, but a good rule of thumb is to use GET unless your data should be protected (as with credit card numbers, for example) or you are passing large amounts of data. In those cases, POST is the better choice.
After you have your database connection created and tested, the next step is to learn how to retrieve content from the database. Each relational database uses a derivative of the Structured Query Language (known as SQL and pronounced “see-quel” or “ess-cue-el,” depending on who you are talking to).
SQL can be used to specify what data should be retrieved from a database and even perform actions such as inserting, updating, or deleting data.
Note
The syntax and use of SQL is beyond the scope of this book, but even without a complete understanding of the SQL language you can still use Dreamweaver to have interactions with databases. If, however, you are planning on developing dynamic applications, I would highly recommend that you spend some time learning about SQL and its applications.
In the case of retrieving data, SQL enables you to specify limitations on the types of data that you want retrieved. For instance, a query that you might perform might ask the application to retrieve all the database fields from the tbInventory table where the Make field is equal to the value that has been submitted via the search form. After the query is executed, all the records that match the criteria are returned in the form of a recordset. Think of a recordset as a subset of the entire database that contains only the specific information that was requested.
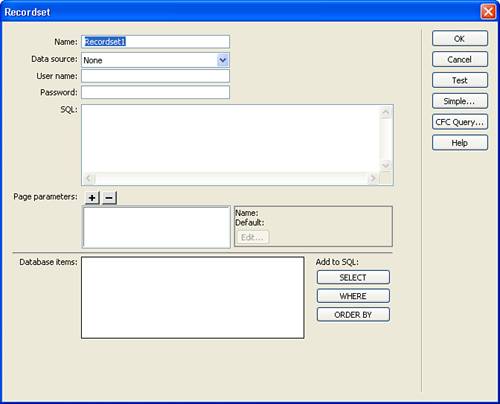
Luckily, Dreamweaver makes creating recordsets extremely easy. To build a new recordset, open the Server Behaviors tab on the Application panel by choosing Window, Server Behaviors. Click the plus sign and choose Recordset from the menu. As shown in Figure 29.8, the Recordset dialog box provides an easy-to-use interface for gathering data from the database.
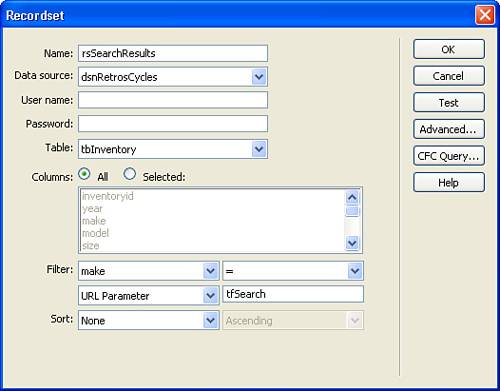
The first step in creating the recordset is to give it a name. As with other page objects that we have discussed, it’s a good idea to give your recordsets names that mean something. So a recordset that retrieves all the search results might be named rsSearchResults.
The next step is to choose the data source from which you want to extract data. This drop-down contains all the database connections found in the Databases panel. Because a successful connection was created to the Retro’s Cycles database, you could choose the dsnRetrosCycles database. If the database were secured with a username and password, they would need to be entered so that the recordset could access the data.
Next, you need to specify from which table the data should come. Because you want to search the inventory, the tbInventory table would be selected.
Finally, you can apply any filters to ensure that only the data you want is retrieved. In this case you would choose to select all the columns in the table, and set the Filter field so that Make is equal to the URL parameter tfSearch (see Figure 29.9). This tells the recordset to extract the value of tfSearch from the URL (also called the “querystring”) and compare it to the data stored in the Make field.
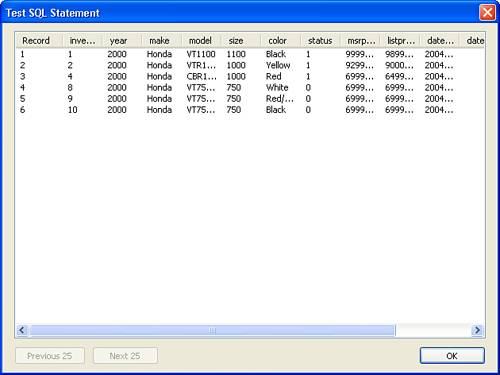
To see whether or not the recordset is retrieving only the data that you have asked for, click the Test button and Dreamweaver asks you to enter a test value. If you type Honda and click OK, you can see that Dreamweaver displays the first 25 records in the recordset that have the Make field set to Honda. As you can see in Figure 29.10, all the motorcycles in the results are Hondas.
If you are proficient in using SQL and want to expand on your SQL queries or use some of the advanced functions within SQL, you can click the Advanced button and customize the query to meet your needs by using the Advanced view (see Figure 29.11).

To finish building the recordset, click OK and the recordset is added to the Server Behaviors panel and the Bindings panel.
After you have created a recordset that contains the appropriate results, the next step is to add data bindings to your page. Data bindings are placeholder blocks of code that, when rendered in the browser, are replaced by the actual data from the database. The available data bindings are located in the Bindings panel, shown in Figure 29.12.
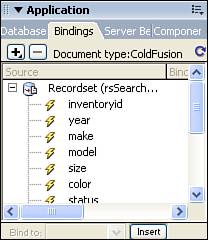
Figure 29.12. The Bindings panel shows all the available recordsets and their corresponding data bindings.
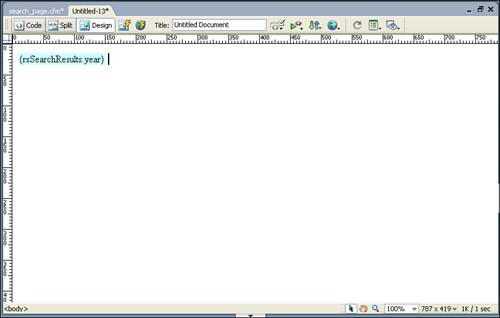
To add a data binding to your page, expand the recordset from which you want to choose data by clicking the plus sign and then dragging the placeholder you want from the panel to the page. After the placeholder is in place, Dreamweaver indicates that it is dynamic by highlighting it (see Figure 29.13).
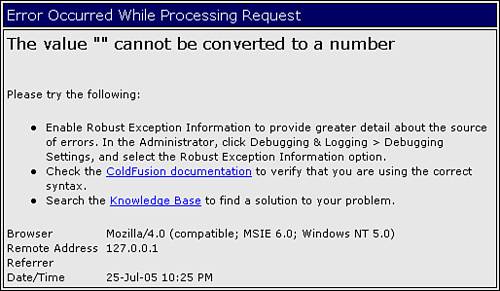
When using dynamic data, one of the most common mistakes developers make is to forget to account for the rare occurrence that a recordset does not contain any records. This might occur because of a typo in the SQL query, or because the type of data requested just doesn’t exist in the database.
For instance, suppose you were building an events calendar for your company. The calendar contained hyperlinked dates that, when clicked, displayed all events that were scheduled to occur on that date. Sounds great, right?
But what happens when a user clicks on a date when nothing is scheduled? You might automatically think that nothing would display, right? Unfortunately, that’s wrong. What happens, instead, is that the application server tries to display something that doesn’t exist and it gets confused. As a result, your browser throws a nasty error like the one shown in Figure 29.14.
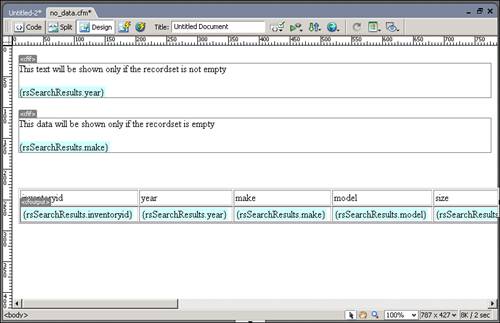
To avoid errors such as this one, the best thing to do is to define two regions in the page. The first region displays the contents of the recordset if it is not empty. The second region displays a block of text that lets the user know that there are no results.
Tip
A good way to accomplish this is to create a table in the area of your page that displays the content. The table should have one column and two rows. The top row displays the data if the recordset is not empty, and the bottom row displays your text alerting the user that no data matches the request.
The tools used to accomplish this are called server behaviors and are found on the Server Behaviors panel, shown in Figure 29.15.
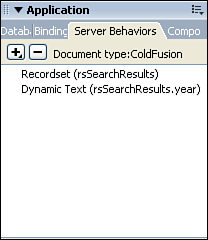
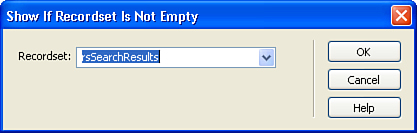
To display a region only when the recordset contains data, highlight the data or table region that you want displayed, and click the plus sign on the Server Behaviors panel. From the menu, choose Show Region, If Recordset Is Not Empty. From the Show Region If Recordset Is Not Empty dialog box (see Figure 29.16), choose the correct recordset and click OK.
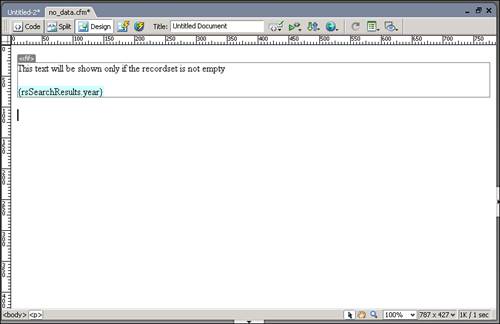
When the server behavior is applied, Dreamweaver places a border around it and an indicator tab to show which region is affected (see Figure 29.17).
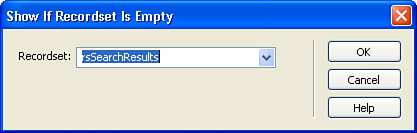
Next, you need to create the area of the page that displays only if the recordset contains no data. To do this, add the appropriate text to the page that lets the user know that no data was found and then select the text or table row. Next, click the plus sign on the Server Behaviors panel and choose Show Region, If Recordset Is Empty from the menu. From the Show Region If Recordset Is Empty dialog box (see Figure 29.18), choose the correct recordset and click OK.
With these regions in place, you can be sure that your visitors see only your message, as opposed to the messy browser error message.
After you have added your data bindings to the page, you can see what they would look like when rendered in the browser by clicking the Live Data View button on the Document toolbar (see Figure 29.19).
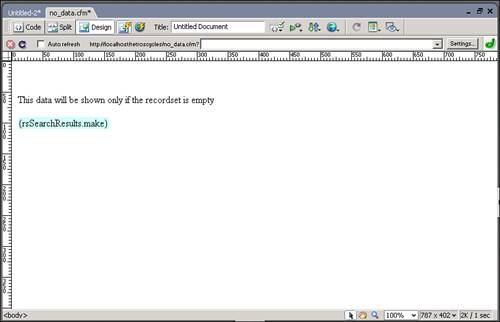
Figure 29.19. The Live Data View enables you to see what your data would look like when rendered. Because no search term was passed to the recordset, it is empty and the appropriate data is visible.
The data displayed in the Live Data View is the first record found in the recordset and is meant to give you an idea as to whether or not your design is functioning as expected. To fully test the page, be sure to preview it in your browser.
Now that you know how to extract data from the database, you’re ready to start building dynamic pages. Although there are endless uses to how you can use dynamic data, five page types are typically used across dynamic web sites:
Results Page—. Displays a list of records in the database that match certain criteria and typically links to a Details page.
Details Page—. Displays information pertaining to a specific record in the database.
Insert Record Page—. Inserts data into a new record in the database.
Update Page—. Updates an existing record in the database.
Delete Page—. Deletes a record from the database.
After the recordset has been tested, it’s likely that you’ll want to display the results somewhere. The easiest way to do this is to create a Results page that displays the contents of the recordset in a table. The easiest way to display the data is to create a dynamic data table that extracts the information from the recordset and displays it on the page.
To create a dynamic data table, click Insert, Application Objects, Dynamic Data from the menu bar. In the Dynamic Table dialog box, shown in Figure 29.20, choose the appropriate recordset and determine how many records should be displayed on the page at a time. For this example, we show 10 records at a time. You can also specify table settings by entering a value for the border, cell padding, and cell spacing.
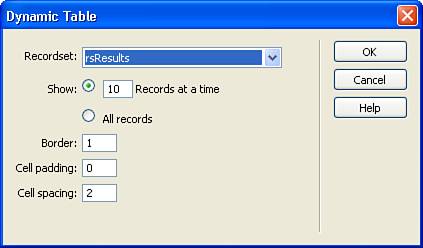
Figure 29.20. The Dynamic Table dialog box helps you extract data from your recordset to display on your page.
Clicking OK places a table in the page, complete with data bindings (see Figure 29.21). Note that Dreamweaver assumed that you wanted to display all the columns in your recordset, but you can remove any columns that you don’t want to display.
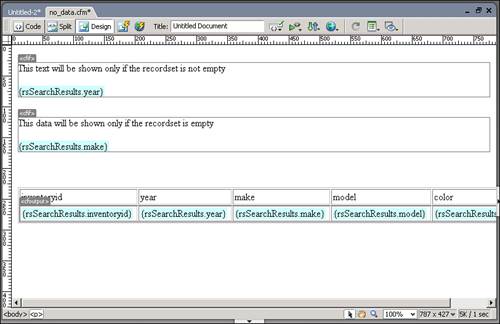
Because the user probably doesn’t want to review every detail of every record that meets the search criteria, you can delete all the columns from the data table except InventoryID, Year, Make, Model, and Color. This should give users enough information to choose which motorcycle they might want to look into further (see Figure 29.22).
After users determine which motorcycles they want to see more information about, they need to be able to click a link to open the Details page, which then displays the full informational record on that specific motorcycle. To create this link, select the InventoryID data binding and type details.cfm in the Link field of the Property inspector.
Next, you need to pass the InventoryID field through the URL so that the Details page will know which record to display. To set this up, click the folder icon next to the Link field in the Property inspector and click the Parameters button. In the Parameters dialog box, shown in Figure 29.23, type InventoryID as the name for the parameter.
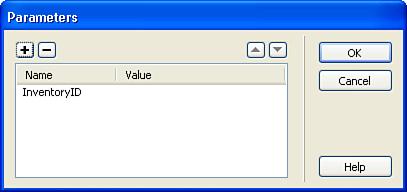
Figure 29.23. The Parameters dialog box enables you to pass custom parameters through the querystring.
Next, click the lightning bolt icon next to the Value field and choose inventoryid from the list of data bindings in the rsInventory recordset (see Figure 29.24).
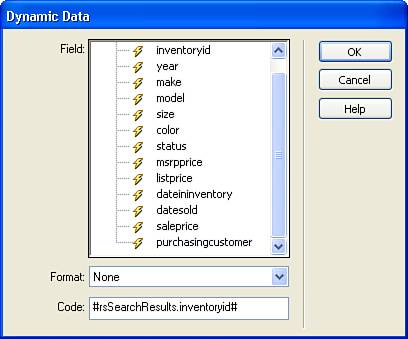
Click OK to close the Dynamic Data dialog box, click OK again to close the Parameters dialog box, and click OK a third time to close the Select File dialog box. After it is created, the inventoryid now becomes a hyperlink that, when clicked, passes the inventoryid of that specific record to the details.cfm page.
A Details page usually contains the information stored in the database that relates to a specific record. This page enables users to get detailed information about an item after they have determined from the Results page that it might meet their needs.
In the case of Retro’s Cycles, clicking the link on the Results page passes an inventoryid to the Details page, so you need to build a Details page that reads that value, extracts the appropriate record from the database, and displays it on the page. To do this, you need to create a new page and save it as details.cfm.
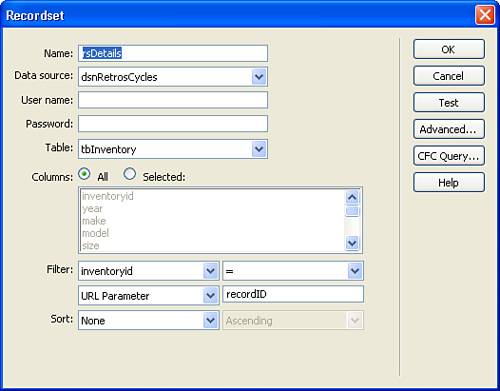
Next, a recordset needs to be built that looks for the URL parameter called inventoryid and finds the record whose inventoryid matches that value. The recordset would look like the one shown in Figure 29.25.
After the details recordset is completed, you can construct the page however you want to display the full details of a specific motorcycle. Figure 29.26 shows a sample configuration of the data bindings.

Because the database for the Retro’s Cycles site already had data stored in it, recordsets and data bindings could be used to extract information from it. But what if the database is empty and you need to populate it with data? Or what if we wanted to add additional records beyond those that are already stored in the database? The answer is to create a page that inserts new records into the database. Dreamweaver makes the creation of an insert page easy through the use of the Record Insertion Form Wizard.
To activate the wizard, choose Insert, Application Objects, Insert Record, Record Insertion Form Wizard. The wizard, shown in Figure 29.27, enables you to specify the data source that connects to the database, any username/password information required, the table to which you want to add, and a page to which the user is redirected after the record is added.
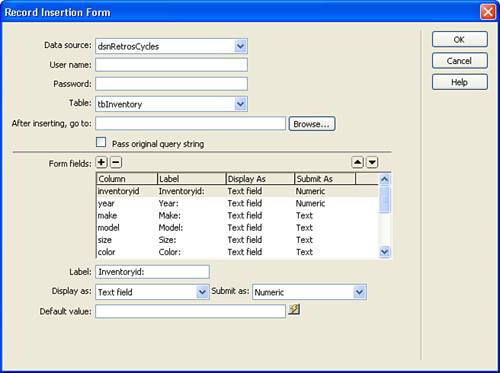
Figure 29.27. The Record Insertion Form dialog box enables you to add a form to your page that inserts data into the database.
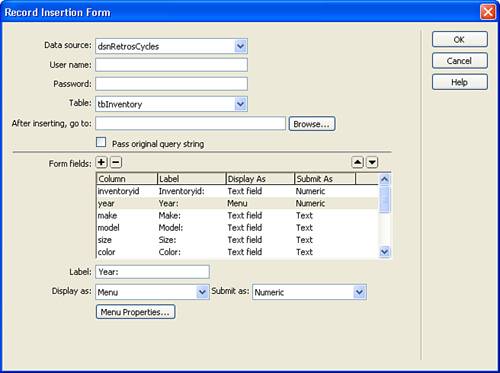
The really nice thing about this wizard is that it lets you set up your form and the form elements in one handy interface. For instance, suppose that you wanted the year field to be a menu instead of a text field. You could select the year field in the Form Fields panel and choose Menu in the Display As field (see Figure 29.28).
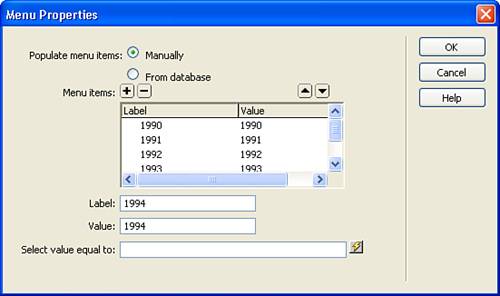
To give users values from which to choose in the menu, click the Menu Properties button to add the various years and values (see Figure 29.29).
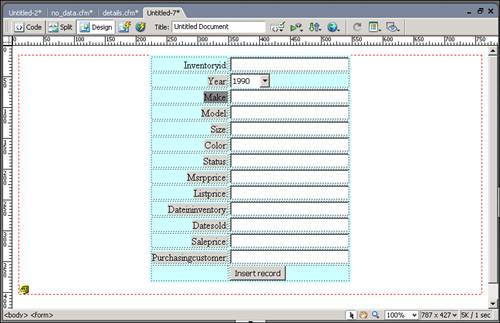
When the OK button is clicked, Dreamweaver does all the work and adds the records insertion form to your page (see Figure 29.30). You can then customize the form and the table layout to match your site’s design.
Updating information that is stored in the database is nearly as easy as inserting it. To update a record, you can create a page similar to the page that adds a record. The update page, however, requires a recordset that determines which records to update, and the existing data that matches that record is displayed in an editable form. Upon submission of the form, the content stored in the form replaces the content stored in the database record.
Note
The earlier Results page linked to a Details page and passed a URL parameter to indicate which record should be displayed in the Details page. Here, as well, a Results page needs to be created (or some other clickable link) that passes the variable to the update page, which indicates to the recordset which specific records should be edited.
To accommodate the creation of an update page, Dreamweaver has added another handy wizard called the Record Update Form Wizard, which you can access by choosing Insert, Application Objects, Update Record, Record Update Form Wizard from the menu bar.
The wizard, shown in Figure 29.31, is very similar to the Record Insertion Form Wizard and enables you to customize the form to meet your needs. This wizard does, however, have one additional field named Unique Key Column, which indicates which field in the database serves as the primary key and ensures that the record is unique.
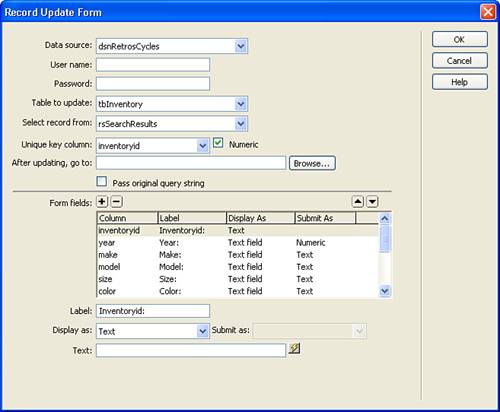
Figure 29.31. The Record Update Form Wizard helps you create a page that makes updates to existing records.
In the case of the tbInventory table, the autonumber inventoryid field serves this purpose, and choosing this field ensures that the form makes the update to the correct field.
After the wizard is completed, the table and editable fields are added to the page and are customizable to meet your page’s design.
The last of the common dynamic page types is the oh-so-dangerous Delete Record page. This page enables you to permanently remove a record from your database. Did I mention that the deletion of the record is permanent? If I didn’t mention that, let me state clearly that the deletion of the data done with a Delete Record form is permanent. If it sounds like I’m beating a dead horse, it’s because on numerous occasions I have heard the question “Can you get that back for me?” after a user deleted a record from the database. Although the Delete Record page can certainly be a valuable tool in the right hands, it can be just as dangerous in the wrong hands.
Unlike the Update Record page, this page type doesn’t rely on a recordset to identify which record should be deleted. Instead, the page traditionally accepts a variable via the URL or from a form that indicates the unique record ID that should be deleted. Then, when the page is loaded, the record with the corresponding record ID is deleted from the database.
To create a Delete Record page, simply create a new dynamic page and then apply the Delete Record Application behavior by choosing Insert, Application Objects, Delete Record from the menu bar. The Delete Record dialog box (see Figure 29.32) then asks you to specify the data source, authentication information, table, primary key column, and the source of the record ID that matches the primary key. In addition, you need to specify where the user should be redirected to after the record is successfully deleted.
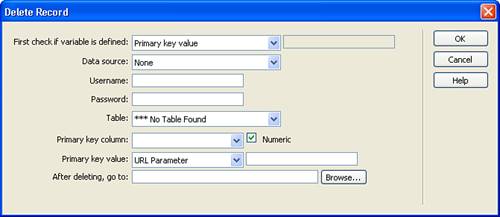
Figure 29.32. The Delete Record dialog box helps you create pages that remove data from your database.
Before you venture out into the world with your new found dynamic tools, let me suggest that you take a moment to read the Best Practices section of this chapter. As you have already probably guessed, I am not a huge proponent of putting delete capabilities into the hands of end users, so I have detailed another option in the Best Practices section.
After you have read that section, go forth, apply your new dynamic data skills, and build powerful, portable, productive websites that knock the socks off your friends and co-workers.
When I try to update my record, I get an error that tells me the operation must use an updateable query. What’s going on?
This error is probably the most common error experienced by those new to dynamic pages. The error is usually generated in conjunction with Access databases and the good news is, it’s an easy fix. In order for your database to be updated, you need to ensure that the folder where it is located gives the Internet Guest account for your server the rights to write to it. To resolve the issue, walk through the steps set forth by Macromedia in this TechNote:
http://www.macromedia.com/cfusion/knowledgebase/index.cfm?id=tn_14520
Now, when I try to add a record or update a record, I get an error stating that there is a syntax error in my INSERT INTO statement. What’s happening now?
Again, another common error that is easily fixed. The reason this usually occurs is because a field in your table is named with a special character like “date&time”. This is not an acceptable field name because the & character is a special character that is interpreted by the SQL INSERT INTO statement. This causes the syntax error and stops your page from functioning properly. To fix the problem, adjust your field names so that they all start with alpha characters, contain no special characters or spaces, and don’t use words reserved by your database. For additional information on this error, check out this TechNote:
http://www.macromedia.com/cfusion/knowledgebase/index.cfm?id=tn_14622
I uploaded my web pages and my database to my host and now I get an error that the include file Connections/yourfilename was not found. What did I do wrong?
It’s likely that you’re using a Custom Connection string and simply forgot to upload the Connections folder and its contents to your web server. Try uploading that folder and the error should be resolved.
As you can probably tell, I am not a big fan of deleting data. Because data deletion is permanent, it often poses more problems that if you had simply archived the data and hidden it away from the world. Back when storage was costly and the size of databases was a constant concern, deletion was a necessary evil and part of the cost of doing business. In today’s market, however, the cost of storage has dropped significantly and databases have become more efficient in the way they store data to ensure the optimal size of their tables. As a result, the cost of deleting data and losing the information has now outweighed the cost of storing the data and we, as web developers, should be looking at archiving data instead of deleting it.
The most common model I use to accommodate archiving is to create a field in each of my tables called “archived”. If this field is set to yes or 1 (depending on the database), I don’t ever display the data to anyone. If the field is set to no or 0, the data is visible to the end users. While this method is easy to implement, your tables will eventually become bloated with records that have been archived.
Another common model that alleviates the bloating problem is to set an expiration date for each record, review it prior to that expiration date, and then migrate those records that have expired to a secondary archive table. Following this model minimizes the number of records stored in your table and ensures that your dynamic web pages aren’t adversely affected by having to sift through lots of archived data.
These are just two of the common methods used to archive data instead of deleting it. Regardless of whether you choose to implement one of these methods or another archiving method, the value of this type of model becomes evident when you are asked to restore data. Rather than having to perform restore operations from tape backup and risk losing data that may have been written since the backup, you are able to go into the database and reset the archive value or migrate the record from the archive table to the active table and the data is now available again.