
In this chapter
This chapter explores how to prepare graphics for the web. As more Internet users have access to broadband connections, reducing the file size of graphics isn’t quite as important as it was a few years ago. However, dial-up connections and their slower counterparts are still quite prevalent and need to be taken into consideration when graphics are prepared for the web.
The process of reducing an image’s file size while preserving its quality is known as optimization. Several concepts are involved in the optimization process, and a basic understanding of each will help you decide the best method for preparing your graphics for the web.
In a nutshell, graphics optimization is the process of reducing the file size of your graphics so they can be downloaded faster when viewed on the web. Graphics optimization is an art where you attempt to balance image quality with file size.
Fireworks has a powerful set of optimization tools that can handle the entire optimization process or let you step in and tinker with settings. Before you begin optimizing graphics, it helps to have a basic understanding of what happens when a file is optimized.
Compression is the process of reducing the amount of information used to describe, or render, a digital file. Most types of computer files are fairly redundant in that they have the same information listed over and over again. Rather than list a piece of information repeatedly, a compressed file presents a redundant piece of information once and then refers back to it whenever it appears in the original file.
To better understand compression, look at the following sentence: “I left my heart in San Francisco.” Pretend that sentence is a bitmap graphic that Fireworks will compress. The sentence has 7 words, made up of 27 characters and 6 spaces. If each character and space takes up one unit of memory, the total file size is 33 units. To get the file size down, a good place to start is to look for redundancies. To keep this simple, we’ll look for redundancies in only the vowels:
The letter a appears 2 times.
The letter e appears 2 times.
The lowercase i appears 2 times.
The letter o appears once.
The letter u is not present.
After the first a appears, each consecutive a would be replaced with a number (“1” for example). The number would refer to the first a and would naturally begin to reduce the file size.
Now, take that line of thought to a real bitmap graphic such as a JPEG or GIF. To the computer, the image comprises X columns and Y rows of pixels and each pixel has a hexadecimal (six-digit) color value. An uncompressed image would describe the image one pixel at a time and specify the hexadecimal color for each pixel.
Lossless compression can be found in GIF, PNG, and TIFF file formats and ensures the most accurate representation of the image by not allowing any information to be discarded during the compression process. Lossless compression lists an entire group of the same-colored pixels as single unit, and by doing so, can reduce file size by accounting recurring patterns in a file. Because the patterns are treated as a single unit of data, the file can be reduced to a smaller form for transmission or storage and then put it back together when the file needs to be decompressed.
The term lossless indicates that the file size is reduced without any loss of image quality. If an image has only a few colors, such as a screenshot of a computer program or non-gradient “flat” artwork such as you might see in a comic illustration, lossless compression can dramatically reduce the file size. However, if the image is made up of hundreds of unique colors, as a color photograph is, lossless compression has a marginal effect on file size and can even produce a larger file than one that uses another type of compression.
Lossy compression takes a completely different approach to reducing file size. This type of compression simply eliminates “unnecessary” bits of information, tailoring the file so that it is smaller. Lossy compression is used for reducing the file size of bitmap pictures, such as photographs and complex drawings, which tend to be fairly bulky. Lossy compression can be found in the JPEG file format.
To see how this works, consider how your computer might compress a scanned photograph. A lossless compression program can’t do much with this type of file. Although large parts of the picture may look the same—the lawn is green, for example—most of the individual pixels are different. To make this picture smaller without compromising the resolution, the color value for certain pixels needs to be changed. If the picture had a lot of green grass, Fireworks picks a few colors of green that can be used for every color variation of a green pixel. Then, Fireworks rewrites the file so that the value for every grass pixel refers back to this information. If the compression scheme works well, you won’t notice the change in terms of quality, but the file size will be significantly reduced.
Unfortunately, you can’t get the original file back after it has been compressed. For this reason, you can’t use this sort of compression for anything that needs to be reproduced exactly. In that case, you would need to use lossless compression.
Dithering is most often used in GIFs to fake a color that is not in the file’s color palette. Two palette colors from the file are alternated one pixel at a time. The hope is that your eye is tricked into seeing a third color. Dithered images tend to increase file size, the effect doesn’t always work that well, and you end up with a grainy appearance to the image.
Tip
If you compress a GIF image by reducing the color depth, any gradients that you have created turn into bands of color that don’t blend together anymore. To regain the appearance of the blend, try adjusting the dithering settings. Keep in mind, however, that by adding dithering to your image, you are also increasing the file size.
Most file types have fairly distinct advantages and disadvantages. This section focuses only on web file formats, thus excluding any discussion on TIFF or BMP.
The top three file formats used on the web today for online graphics are GIF, JPEG, and PNG as a distant third.
Fireworks provides you with two ways to control the optimization of your graphics on export: the Image Preview dialog box and the Optimize panel.
Let’s take a look at the Optimize panel first. Because the core of image optimization is finding that magical balance between image quality and file size, it’s helpful to have a way of comparing images at different optimization settings.
Use the Preview buttons (see Figure 5.1) to preview your images in one, two, or four panes. You can then select each pane and apply a different type of optimization, testing lossless and lossy setting of various levels. Then you compare each pane’s results for size and quality.
When you first view your image in the Preview 4-Up mode of your document window, you see the original image in the top left, and the copies of the original in JPEG or GIF format in other views.
To change optimization settings, begin by opening the Optimize panel on the right. Then select a Preview pane and a black border appears around it. Enter the desired settings in the Optimize panel (see Figure 5.2) and the image preview changes its appearance and its size indication to reflect the settings.
File statistics appear in the bottom of the window (see Figure 5.3).
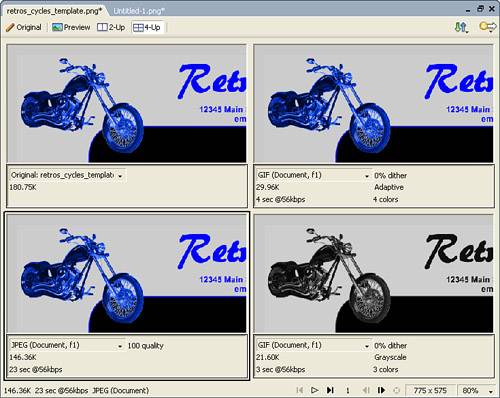
Figure 5.3. File statistics appear in each of the Preview panes to show you how your optimization settings will affect file properties.
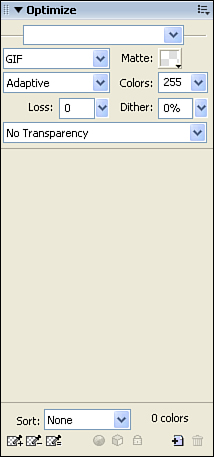
The Optimize panel (see Figure 5.4) has several sections that change, depending on the type of file that is chosen:
Title section—. This section comprises three components: the gripper, the panel name, and the Optimize Options menu.
Saved Settings section—. This section contains all the saved optimization settings. These settings are presets that are shipped with Fireworks. You can also add or remove your own settings.
File Type/Matte section—. This section contains a drop-down list for the file type, as well as an option that lets you select the matte color. The matte color refers to the background color of the file when it is exported.
File Type Options section—. The contents of this section change based on the file type selected.
Color Palette/Transparency section—. For files with 8-bit or lower color palettes, the entire color palette is displayed here. Also included are tools for adding indexed transparency (GIF and PNG-8 files only) and color palette manipulation.
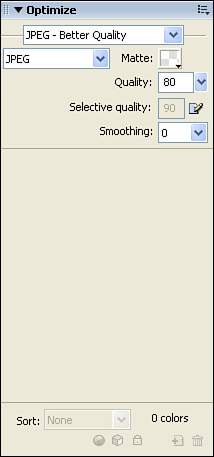
Figure 5.4. The Optimize panel contains different sections that enable you to adjust the export settings.
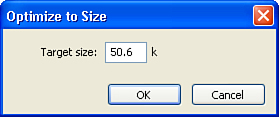
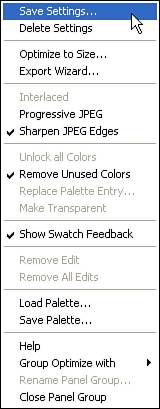
The Options menu in the Options panel contains several options for the optimization process. Many of these options are self-explanatory, or are only in support of specific settings. One option that is worth mentioning is the Optimize to Size command.
This command launches the Optimize to Size dialog box, where you can enter a specific file size for the optimized file (see Figure 5.5). This command is handy if you are restricted to a specific file size, such as those required for banner advertisements.
Fireworks 8 ships with seven predefined optimization settings. These settings represent common configurations and are often good to use “as is” for nearly every web project. To use one of the settings, simply select one from the Saved Settings drop-down menu at the top of the Optimize panel (see Figure 5.6).
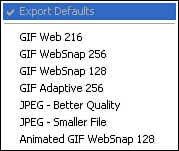
The seven settings are summarized as follows:
GIF Web 216—. All colors in the image are forced to the GIF 216-color Web Safe palette. Although image quality can be negatively affected, this is a good setting to use if you are concerned about staying within the Web Safe palette.
GIF WebSnap 256—. This setting is the same as the GIF Web Snap 128, except there are 256 colors instead of 128.
GIF WebSnap 128—. The optimized image contains 128 colors. Colors close to those of the Web Safe palette are changed, whereas colors outside the palette are converted to their closest Web Safe color.
GIF Adaptive 256—. The optimized image contains up to 256 colors that are selected to best represent the original colors. It ignores the Web Safe palette.
JPEG—Better Quality—. The optimized image is a JPEG with a quality setting of 80 and a Smoothing setting of 0.
JPEG—Smaller File—. The optimized image is a JPEG with a quality setting of 60 and a Smoothing setting of 2.
Animated GIF Websnap 128—. The optimized image is an Animated GIF that uses the Websnap 128 palette.
For vector art or text, GIF generally provides better compression. Use the Preview button for your document to determine the best of the saved GIF settings to use.
For photographs and gradients, JPEG is typically the best bet. Again, use the Preview button to view your document and test different export settings to select the best of the JPEG settings or even some of the GIF settings such as GIF Adaptive 256.
To create your own custom setting, use the Optimize panel to modify an image. Choose Save Settings from the Options menu (see Figure 5.7). Enter a name in the Preset Name dialog box and click OK. The new setting is now a part of the settings list.
Tip
If you are optimizing the same type of image over and over, you can save yourself time by creating the optimization settings and then saving them as custom settings. Once the settings are saved, you can apply the optimizations to any image by choosing the name of the customization from the drop-down menu.
To remove a setting, make sure it is selected in the Saved Settings drop-down menu. Choose Delete Settings from the Optimize panel’s Options menu and click OK in the warning dialog box.
Although the saved settings are convenient and can be used for most exported web graphics, sometimes you still need to tweak an image’s compression settings by hand. Fortunately, Fireworks enables you to manually create custom optimize settings for your images in the Optimize panel.
When manipulating JPEG compression settings, use the Quality setting to control the amount of compression applied to the image. Enter a number between 1 and 100 (or use the Quality slider). The higher the number, the better the quality and lower the compression. The lower the number, the more data will be thrown out.
In general, quality settings over 80 are pretty close to the original image. Settings between 60 and 80 are more compressed with generally acceptable quality. Settings below 60 are a gamble as quality begins to degrade quickly because a lot of information has been discarded (see Figure 5.8).
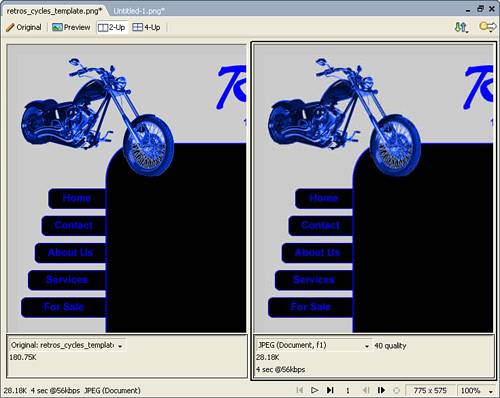
Figure 5.8. Differences in JPEG quality can be seen between the image on the left, set at 80% quality, and the image on the right, set at 40% quality.
Selective Quality enables you to optimize different regions of the image separately. This control is useful for images with distinct backgrounds and foregrounds. To use selective JPEG compression, identify one region in the image that will use a different compression setting from the rest of the image. Keep in mind that in any image, there can be only one selective JPEG mask.
Use any of the bitmap selection tools (Marquee, Oval Marquee, Lasso, Polygon Lasso, Magic Wand, and so on) to enclose a region (see Figure 5.9).
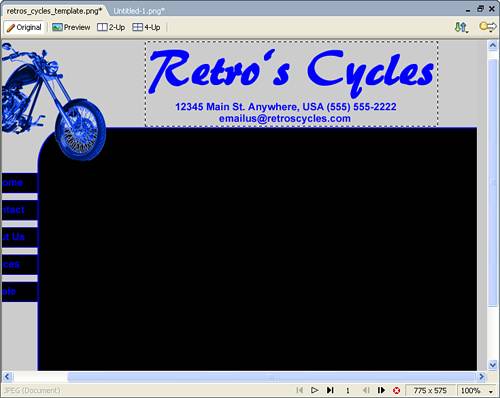
While the marquee area is selected, choose Modify, Selective JPEG, Save Selection as JPEG Mask. A translucent pink mask appears over the selected region. In the Optimize panel, double-check that JPEG is the selected file type and use the Quality slider to affect everything outside the mask. In Figure 5.10, everything but the main logo would be affected.
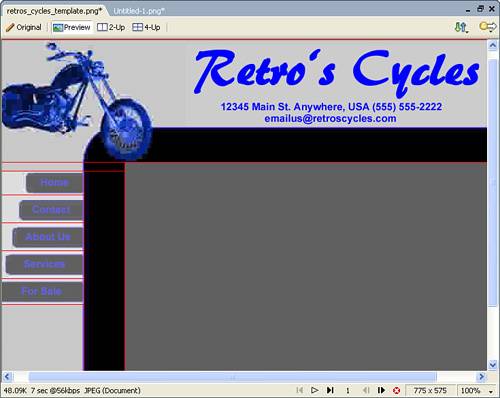
Figure 5.10. Use one of the Preview buttons to see how the Quality setting affects the area outside the selected region of the image.
When you have made your adjustments, look at your handiwork by selecting one of the Preview buttons.
Smoothing blurs the transitions between sharp edges in an image. Smoothing makes it easier for an image to be compressed, but also degrades the quality. Smoothing settings below 3 seems to strike the best balance between image quality and file size.
Sharpen Edges has the opposite effect of Smoothing. Edges are sharpened, often resulting in an improved image quality. File size, however, is increased. You cannot control the degree of sharpness. It is either on or off.
The Progressive setting affects the display of the JPEG in the browser, not image quality. There is typically a slight increase in file size, however. When the image is downloaded to the web browser, a low-resolution version appears first. The details are then gradually filled in. The faster the Internet connection, the more seamless this progression appears.
The GIF format uses 8-bit or lower indexed color, which means that it uses 256 or fewer colors and tracks each color separately. Accordingly, the trick to getting the best optimization with the GIF format lies with the color palette. To modify that palette, choose the palette type and the number of colors in that palette. Other choices include dithering and whether or not to apply lossy compression.
To choose a palette, use the Indexed Palette drop-down menu in the Optimize panel (or the Image Preview dialog box) (see Figure 5.11).
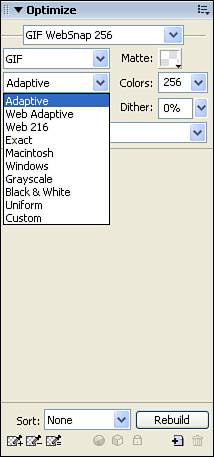
Select one of the following choices:
Adaptive—. Derived from the actual colors in the document and often produces the highest quality image.
Web Adaptive—. Converts colors that are close to the Web Safe palette colors to the appropriate Web Safe color.
Web 216—. A palette of the 216 colors common to both Windows and Macintosh computers.
Exact—. Contains only the colors used in the original image. If the image contains more than 256 colors, the palette automatically switches to Adaptive.
Macintosh—. Contains the 256 colors defined by Macintosh platform standards.
Windows—. Contains the 256 colors defined by the Windows platform standards.
Grayscale—. Contains a palette of 256 or fewer shades of gray.
Black and White—. Converts all pixels to either black or white.
Uniform—. Selects colors mathematically, based on RGB pixel values.
Custom—. Palettes are loaded from an external palette (ACT file) that you have previously created.
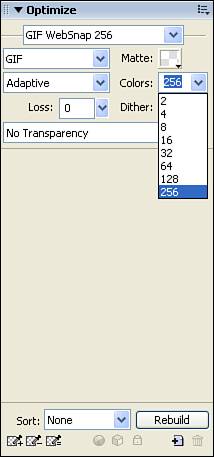
To choose the number of colors, or color depth, select a number from the Maximum Number of Colors drop-down menu. Select a color depth that best represents the color integrity of the original image (see Figure 5.12).
Although the GIF format uses lossless compression, you can still apply lossy compression by using the Lossy GIF Compression slider. To apply lossy compression to the GIF, drag the slider or enter a number in the field. The higher the number, the higher the compression and the lower the image quality.
Interlacing is similar to the Progressive setting for JPEG. When the image is downloaded to the web browser, a low-resolution version appears first. The details are then gradually filled in as the image continues to load and, after the image is completely loaded, the high-resolution version of the image is displayed. If there will be a lot of graphics on the web page, interlacing enables the images to appear onscreen faster, even though they are not the final images. Turn on interlacing by selecting Interlaced from the Options menu.
As I mentioned earlier, there is a second method for optimizing your images, which uses the Image Preview option. If you want to see what your image will look like and be able to adjust the various optimization settings prior to doing your final export, open the Image Preview dialog box (File, Image Preview). Using the Image Preview, you can make any adjustments to compression, file format, and color options to which you had access in the Optimize dialog box and be able to see what effect the various settings have in real time. After you adjust the preview to the desired settings, you can then export the image directly from the Image Preview dialog box.
After you’ve painstakingly planned, designed, and created your graphics, you need to export the images. There are a number of ways to export Fireworks graphics. You can export a document as a single image in JPEG, GIF, or another graphic file format. You can also export the entire document as an HTML file and associated image files. You can also integrate your Fireworks graphics with Flash and Director.
Note
After you export an image, Fireworks saves the optimization settings for the image within the PNG file. Then, when you go to export the image again, Fireworks automatically recalls those settings so you don’t have to reconfigure them.
After you have created your web graphic, you need to export it to a web-friendly format such as JPEG or GIF. Up to this point, we’ve explored the strengths and weaknesses of each file format. We’ve also covered the optimization process. All that’s left is to export the image.
Fireworks provides three ways of exporting a web graphic: the Export command, the Export Area tool, and the Export Wizard.
The Export command exports all the objects on the canvas and excludes objects in the work area. Use the Export command (File, Export) to launch the Export dialog box (see Figure 5.13).

Name the file and be sure that Images Only is selected in the Save As Type drop-down menu. You can choose from several types, depending on how the exported image is to be used. For the web, use Images Only. Press the Save button and you’re finished.
After you’ve optimized your image as a GIF or JPEG, that file format is selected automatically during the export process.
If you want to export only a selected portion of an object or the canvas, use the Export Area tool. Drag the tool to define the area for export (see Figure 5.14).
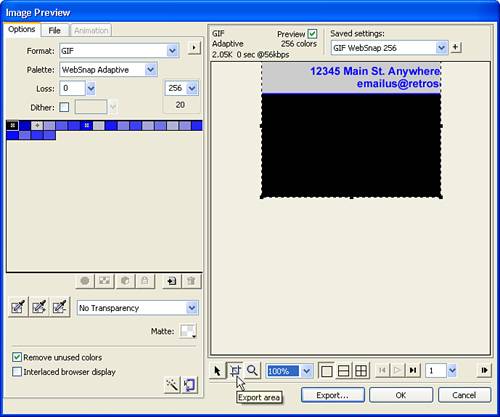
Press the Return/Enter key to launch the Image Preview dialog box (see Figure 5.15).
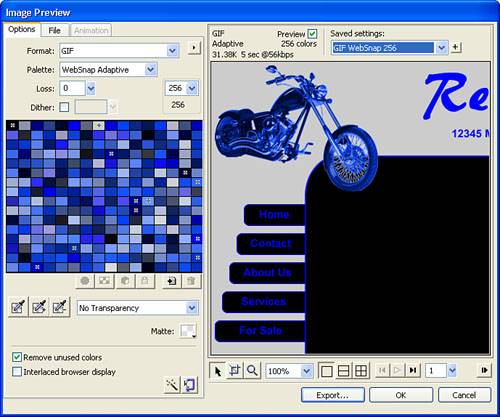
Figure 5.15. The Image Preview dialog box provides the same controls as the Optimize panel and the Preview buttons.
If you’ve already optimized your image, these controls will look familiar. The Image Preview dialog box enables you to select the export file type and adjust the optimization settings, as well as preview the effect of the optimization settings.
Using the Export Wizard gives you a way to have Fireworks determine the best way to configure the optimization of your graphic for export. To access it, select File, Export Wizard. You are prompted to answer a series of questions (see Figure 5.16). When you’re finished, you are presented with a GIF or JPEG (if you chose the web or Dreamweaver as your output preference) or TIFF (if you chose an image editing or desktop publishing application).

After you exit the wizard, you find yourself in the Image Preview dialog box, where you can once again select GIF or JPEG if you are exporting for the web. If you’ve read this far, you already know what file format you’re going to use, so you can skip the Export Wizard altogether.
Fireworks generates HTML that can be read by most web browsers and HTML editors. There are some issues, however, in taking your Fireworks page design and exporting it straight to HTML.
First, HTML is a text-based framework where objects are positioned relative to each other. Fireworks is an object-oriented program where all elements are precisely sized and positioned in pixels relative to the top-left corner of the canvas.
Fireworks elements are constrained to a specific canvas size. HTML is designed to flow to fill browser windows of varying sizes.
In addition, the two major browsers (Internet Explorer and Netscape Navigator) still don’t render elements exactly the same. They’re getting better about this, but differences that can affect your design still exist.
There are several ways to export Fireworks HTML:
Export an HTML file, which you can later modify in an HTML editor.
Copy HTML code to the Fireworks Clipboard, and then paste that code directly into an existing HTML document.
Export an HTML file, open it in an HTML editor, manually copy sections of code from the file, and paste that code into another HTML document.
Use the Update HTML command to make changes to an HTML file you’ve previously created.
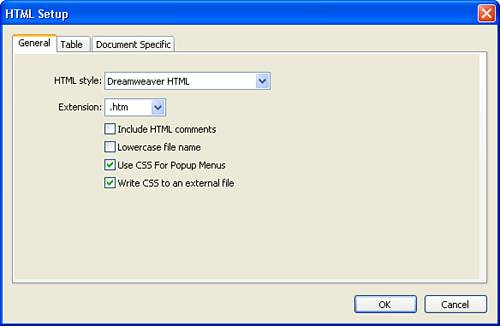
To define how HTML is exported in Fireworks, open the HTML Setup dialog box (see Figure 5.17) by choosing File, HTML Setup or clicking the Options button in the Export dialog box. These settings can be document specific or used as your default settings for all HTML that Fireworks exports.
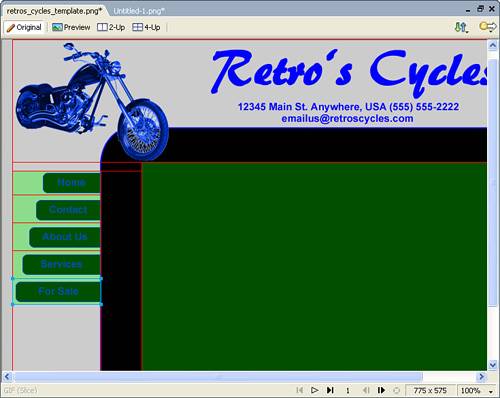
To export an entire page design, your best bet is to use the Slice tool to divide your design in regions (see Figure 5.18).
After the page is sliced up, export the page using the Export command (File, Export). The Export dialog box is launched. Rename the HTML file if necessary and adjust any of the settings to fit your file hierarchy (see Figure 5.19).
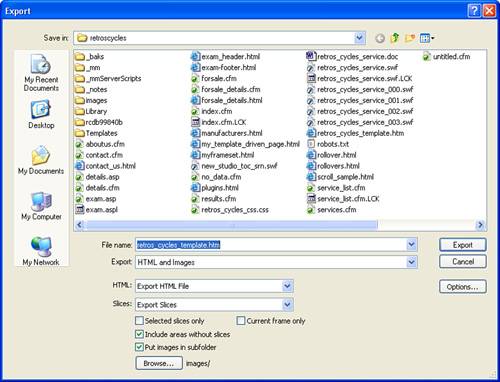
Press the Save button and all the HTML code necessary to reassemble sliced images, as well as the sliced images themselves, are created. Fireworks HTML contains links to the exported images and sets the web page background color to the canvas color.
You can then modify the page using an HTML editor of your choice.
Dreamweaver and Fireworks are two peas in a pod when it comes to integration. Both programs recognize and share many of the same file commands, including changes to links, rollovers, and table slices. Used together, the two programs provide a streamlined workflow for editing, optimizing, and placing web graphics files in HTML pages.
The first step in creating an integrated work environment is to define a local site in Dreamweaver and to make sure Design Notes are enabled. Design Notes contain information about the graphic files that Fireworks exports. When you launch and edit a Fireworks image from Dreamweaver, Dreamweaver uses this information to locate the source PNG. For example, suppose you created a graphic called 2002hondashadow.png. You then exported a JPEG image from that PNG document and placed the exported JPEG in your Dreamweaver document. Your source file is 2002hondashadow.png.
In Dreamweaver, select the JPEG image for which you want to edit the original PNG and click the Fireworks icon (see Figure 5.20) in the Property inspector to launch Fireworks. Edit the image, press the Done button, and the changes are automatically applied to the Dreamweaver file.

Figure 5.20. Use the Fireworks icon in the Dreamweaver Property inspector to launch Fireworks for image editing.
If planning is not your strong suit, you can build your page in Dreamweaver and add image placeholders if your graphics are not ready. An image placeholder is a graphic you use in your Dreamweaver document until final artwork is ready to be added to the page. Choose Insert, Image, Image Placeholder to insert it into the HTML document. You can set the placeholder’s size, color, and text label.
After the image placeholder is used in Dreamweaver, you can design the graphic at some later point in Fireworks. Then after the graphic is created, save it as a PNG for future editing and export it from the PNG to a web-ready graphic file format (GIF or JPEG). When you return to Dreamweaver, select the placeholder and in the Property inspector choose the source file to replace the placeholder by using the Src field to browse to the appropriate file. The replacement image now appears in the document.
Although Flash has robust drawing capabilities, you may want to create your complex graphics in Fireworks and export them to Flash. There are two ways to accomplish this.
First, you can copy vector objects from Fireworks and paste them directly into Flash. Select the objects you want to copy and then use the Copy command (Edit, Copy). In Flash, create a new document and then Paste (Edit, Paste). The Fireworks objects are pasted as a group. Ungroup the objects (Modify, Ungroup) and then manipulate as usual in Flash.
You can also import your Fireworks PNG document directly into Flash. For elaborate designs you want to use in Flash, this is often the easiest way to proceed. When you begin importing, a dialog box appears giving you the option to import as an image or to retain vector artwork and text. All frames in your document are retained as keyframes in the Flash document.
To send an animation to Flash, click the Quick Export button located at the top right of the document window. Select Macromedia Flash and Export to SWF (see Figure 5.21). Enter a filename, click Save, and you’re finished. Then you can import that SWF file with the animation from Fireworks directly into Flash.

Because Fireworks enables designers to create and export 32-bit PNG file formats, Fireworks is a popular image and vector artwork design tool for Director developers. Director, which is not covered in this book, is a Macromedia application that enables developers to create interactive content that integrates long video streams, photo-quality images, audio, animation, 3D models, text, and Macromedia Flash content. This content is often used in CDs, DVDs, kiosks, and even the web.
Exported layers and slices from Fireworks can be used in Director as individual cast members or as composite user interfaces that can be imported as entire entities onto the stage. Director developers can also use Fireworks to design and script rollovers and navigation interfaces.
Developers can use Fireworks to create cast libraries from a single Fireworks document by using layers in Fireworks and exporting the Fireworks layers to Director. Any Fireworks 8 document that contains layers can be exported as Director HTML with the Source pop-up menu in the Export dialog box set to Fireworks Layers. The 32-bit PNG format supports full Alpha transparency, and transparency in a Fireworks document is retained in the Director movie.
If different graphic elements are arranged in separate layers and the developer does not want to generate separate files for each layer, exporting the entire document as a single file, using the PNG32 setting in the Optimize panel, flattens all the layers.
Fireworks can also be used to create a navigational interface for Director projects. Developers can design the elements in Fireworks, draw slices, add behaviors to the slices, and export the slices to Director. Any Fireworks 8 document that contains slices can be exported as Director HTML with the Source pop-up menu in the Export dialog box set to Fireworks Slices. This setting enables the images as defined by the slices to be imported into the Director movie, along with the behaviors such as Simple Rollovers, Swap Image, Disjoint Rollovers, and Set Navbar Image behaviors.
When exporting an animated GIF from Fireworks for use in Director, you need to disable Auto Crop and Auto Difference in the Animation tab of the Image Preview. For some reason, Director does not correctly display animated GIFs if those settings are enabled.
When I draw vector curves, how come they still look like they’re bitmap graphics?
You’ll get the best curves in Fireworks if you use a Soft Rounded stroke (Basic, Soft Rounded). The Soft Rounded stroke adds more pixels to smooth the edge of a shape than does the anti-aliasing alone.
I set frame delay and looping settings on an animation I created in Fireworks. Will they be exported to Flash?
No. Frame delay and looping settings apply only if you are exporting your animation as an Animated GIF. These settings are discarded when you export to Flash SWF.
I keep trying to use the Smoothing optimization setting on a masked object, but it doesn’t seem to be doing anything.
Certain optimization settings such as Smoothing can be used only outside a masked area. Anything inside the masked area is off limits. Redraw your mask so the area you want to optimize with Smoothing is outside the mask.
One of the most important practices that you can develop when creating graphics in Fireworks (or any other program for that matter) is the saving and versioning of your native files (the PNG files you want to go back and edit later). I speak from experience when I tell you that it is immensely frustrating to go back and edit a graphic that you created only to find that you never saved the PNG file. Remember that when you export a file to the GIF or JPEG, your ability to edit those graphics down the road is extremely limited. That’s why saving the native PNG file is so important.
You might not save the PNG file for a number of reasons, ranging from computer crashes to just thinking that you’ll never have a need for the file again. Trust me when I say that the 30 seconds you take to save files along the way and save when you are finished with them is well worth it.
Just as with any complex document, your Fireworks creations usually involve a lot of steps, and Fireworks stores only so many undo actions along the way. For this reason, as you work on a project, take advantage of the Save As command and save progressive versions of your work. That way, you can always revert back to a previous version if something should go wrong.
Then when the project is complete, and you have that final version and are asked whether you want to save the changes when you close Fireworks, choose to save them.