
In this chapter
Style is all about the way something is presented. Whether it’s the style used by a runway model strutting down the catwalk or the style used by the latest Hollywood heartthrob in the latest blockbuster film, it’s all about presentation—and styles in web design are no different. The web would be a pretty drab place if every website was restricted to a white background, black text, and the Courier font. In fact, I dare predict that were the web that boring, it would be significantly less popular than it is today.
Fortunately, developing for the web goes far beyond black and white, and you have a wealth of tools at your disposal to ensure that each website is relatively unique from the others. Whether it’s colored text, stylized forms, rollover hyperlinks, or a host of other elements, each and every customization that you make to a site gives it its own style.
Today’s browsers operate according to a set of rules that set the guidelines for defining a site’s style. For instance, when you create a hyperlink, browsers underline them by default. In addition, the use of the <p></p> HTML tags defines that the text placed between the tags be formatted normally and that the browser should include a blank line after the text. These rules, and a host of others, establish the default framework that defines how a browser renders a web page, but they also provide options for customizations beyond that basic framework.
When you look at stepping beyond that default framework to add some zing to your site, you have a couple of choices. HTML provides tags that enable you to modify the appearance of your page, such as the <font> tag or the <body> tag. These tags, however, are relatively limited and focus more on rendering the site’s basic structure than on the presentation aspect. That’s where cascading style sheets (CSS) enter the picture.
Because the purpose of CSS is less focused on the layout of a page and more on the presentation, the language contains significantly more options for customizing the look and feel of a single web page or an entire site. In other words, HTML tags take care of the structural rendering of the site while CSS can supplement HTML by making the site more visually appealing.
The tool used to alter the presentation of the site is called a style. Styles can apply to specific instances of an object such as a single word or an image, or they can be applied to a group of objects. For instance, when you apply a style to a table column, each of the cells in that column is affected by the style.
Styles can be embedded individually into a web page, but more frequently they are grouped together and stored in an external style sheet. This is covered more deeply in a moment. First, it’s a good idea to take a look at the structure of an individual style.
The following style is named .bodyblueText. When applied, it modifies the text that is applied to use the Arial font, 12-point size, a bold style, and the color of blue.
.bodyblueText {
    font-family: Arial, Helvetica, sans-serif;
    font-size:12px;
    font-weight:bold;
    color: blue;
}
The .bodyblueText style consists of a single style rule, which in turn is made up of sets of matched pairs of properties and values that define elements such as the font face, size, weight, and color. Table 25.1 provides a list of the available matched pairs that can be modified when you create styles for text.
Table 25.1. Text Properties Controlled by Styles
Name | What It Does |
|---|---|
color | Sets the text’s color. |
font-family | Sets the font face and the default font family. |
font-size | Sets the font size in absolute or relative sizes. |
font-style | Sets the text italic or oblique. |
font-variant | Sets the text to small capital letters instead of lowercase letters. |
font-weight | Sets the text to bold, light, bolder, lighter, or a numeric value. |
line-height | Sets the text’s line spacing. |
text-transforms | Sets the text’s case. |
text-decoration | Applies effects to the text such as underline or blinking text. |
Note
When creating your style, be aware that you don’t have to set a value for every attribute. You can pick and choose those attributes that are necessary and set only those.
Although customizing the text within a web page is one of the most common uses of styles, it isn’t the only application for this useful tool. In fact, styles can be applied to the page as a whole as well as to tables, images, and just about any object that can be placed within a web page. So does that mean that you have to buy another book on how to write CSS styles? Absolutely not! One of the really nice things about Dreamweaver 8 is that you can build, modify, and apply styles without ever having to write a single line of code. Dreamweaver’s CSS panel provides an easy-to-use interface that lets you take care of your CSS needs from within the Dreamweaver environment.
Individual styles can be either embedded into a web page or grouped together and stored in an external text file called a style sheet. A style sheet can then be referenced by any web page via a link to the file. With the style sheet attached to the page, any of the styles that are part of the style sheet can then be applied to the referencing HTML page. Because the styles are stored in a single file, this makes site-wide updates extremely easy. If you want to change one property of a style, simply open the style sheet, make the adjustment, and save the sheet. When the save is applied, every reference to that style in each HTML page in the site automatically reflects the change.
Note
The cascade in Cascading Style Sheets comes from the fact that multiple styles can be applied to the same element within a page. The browser applies the most specific style to that element. For instance, imagine a piece of text located inside a cell within a table. You can apply one style to the row that contains the cell and yet another to the cell itself. When rendering the text, the browser applies the highest level style first and then replaces it with more specific styles if available. So in this case, the style that would take precedence and be displayed in the browser would be the style applied to the cell.
When working with style sheets, three specific tags control the style sheet functionality. The <link> tag is embedded in the head section of the web page and specifies the location of the external style sheet in relation to this HTML document. This tag essentially creates a connection between the referencing page and the style sheet so that the referencing page can apply the styles to its page objects. The link tag generally looks something like this:
<link href="mystylesheet.css" rel="stylesheet" type="text/css">
Note
If the location or spelling of the link to the style sheet is incorrect, it doesn’t break your web page. In that case, the browser just applies the default text styles to the page until the issue is resolved.
The <class> tag is used within a web page to apply a style to an HTML tag. For instance, you can apply the .blueText class to an entire paragraph of text by using the following code:
<p class="blueText">The rain from Spain falls mainly on the plains</p>
Note
When you define an individual style, be aware that each style must start with a period, such as .blueText. However, when applying the style within the page, the period is not used.
The third tag that is used to apply styles is the <span> tag, which applies style to a subelement of an HTML object. For instance, suppose that you wanted to italicize the word Spain in the previous example. You would do so by applying a span in the following manner:
<p class="blueText">The rain from <span class="bodyitalicText">Spain</span>
falls mainly on the plains</p>
Obviously, you would need to define a style called .bodyitalicText that would set the text to italic.
As you can see, styles and style sheets aren’t as complex as they might appear at first glance. And although they are relatively easy to create and manage, Dreamweaver makes the process even easier by providing a graphical interface to adjust the CSS code.
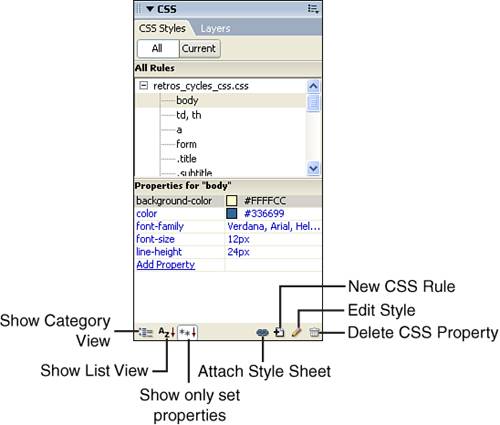
If your goal is to make the presentation of your site easy to manage, Dreamweaver’s Styles panel (see Figure 25.1) is your new best friend. From within the Styles panel you can create and manage style sheets, adjust the properties for individual styles, and easily apply styles to page content with a few clicks of your mouse.
The first step in managing your styles is to create an external style sheet. The style sheet can be stored in any location in your site and linked to by any of your HTML pages. When linked to, the styles included in the style sheet are available for application to objects within the page.
Tip
As you begin developing your site, you’ll likely use only one style sheet that contains all the styles for your entire site. It’s a good idea to keep that single style sheet in the root folder of your site. As the site grows, you might find a need to develop custom styles that apply to only certain sections of your site. In these cases, you can store these style sheets in the folder that corresponds to the specific section of the site, or you can create a folder named styles to store them—similar to the way you store images in the site’s images folder.
There are several ways to create a new style sheet from within Dreamweaver 8. If you’re new to creating styles, the easiest way is to start with the predefined style sheet templates that come with Dreamweaver. To access these templates, choose File, New from the menu bar and choose the CSS Style Sheets category in the New Document dialog box (see Figure 25.2).
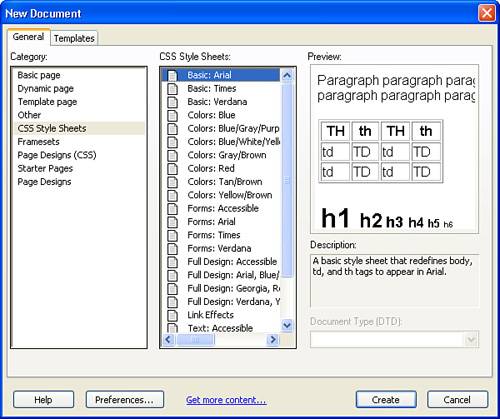
Each of the style sheet templates contains a variety of different font styles and colors for you to choose from. The templates are divided into categories ranging from Basic, which contains simple font styles, to Full Design, which includes styles for text, tables, and navigation bars.
Note
Remember that your pages can link to as many style sheets as you would like, so you aren’t limited to just one style sheet for your website.
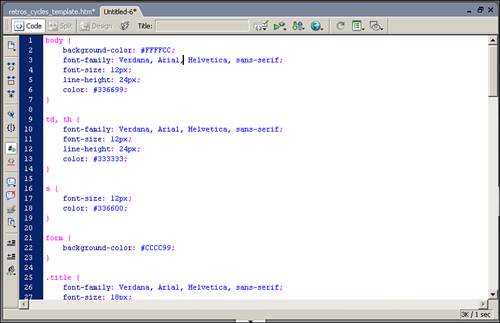
When you select a style sheet that you think will fit with your web page design, click OK and a new instance of the style sheet is created in the code view (see Figure 25.3). This new page must be saved within your site before you can apply any of the style rules to your documents.
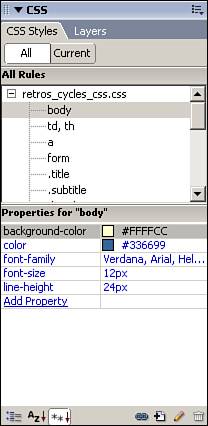
After you have saved the page to your site, you can access the styles contained in the style sheet by selecting the All button on the CSS Styles panel (see Figure 25.4).
If you don’t want to use the predefined styles, you can generate your own style sheet by simply defining a new individual style rule.
To start the process of creating a new style rule in Dreamweaver, click the New CSS Rule button at the bottom of the CSS Styles panel or click the CSS Styles panel menu and choose New. Regardless of which way you choose, the New CSS Rule dialog box, shown in Figure 25.5, enables you to choose what type of style rule you want to create, designate a name for the rule, and choose whether you want to create a new style sheet, add the rule to an existing style sheet, or embed the style in the current document.

Generally, the rules you will be creating are the Class rules because these rules can be applied to any tag placed in a web page. Tag rules can be used to define the presentation of a specific tag when it is added to your page. Advanced rules further define existing rules by enabling you to add additional properties to them. To create an advanced rule, you need to select the existing style that you want to enhance from the Name drop-down menu.
If you choose to create a class rule, the next step is to create a name for it. Each class name must start with a period, so an appropriate name for a style that sets text to green, Arial, 10pt might be .bodygreenTextA10.
Tip
Keep in mind that when naming a style, it’s a good idea to name it something that will remind you what the style is supposed to do. Generic names such as Style1 and Style2 are used by Dreamweaver when creating embedded styles, but good to get into the habit of providing custom names for your style rules.
Next, you need to define whether the rule will be embedded in the current document or stored in an external style sheet. Style rules that are embedded in the document are available to only that document, so if you plan on using the style in any other page in your site, be sure to either create a new external style sheet or embed the new style rule in an existing style sheet. When you have selected where Dreamweaver should define the rule, click OK.
With the type and location of the rule determined, the next step is to set the rule parameters. Elements such as font face, size, style, and a host of other properties can be selected via the CSS Rule Definition dialog box, as shown in Figure 25.6.
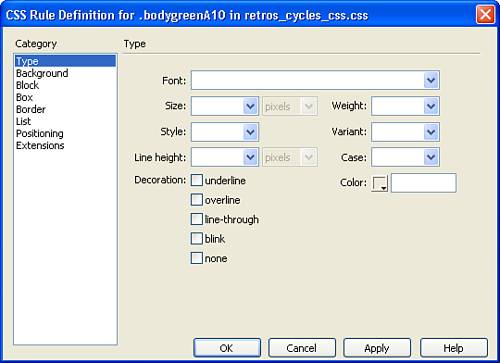
Figure 25.6. The CSS Rule Definition dialog box enables you to customize how the rule will modify the object to which it is applied.
Each category provides access to a list of parameters that define how the object will be presented when the style is applied. Table 25.2 provides some basic information about the various categories and the functionality they control.
Table 25.2. Style Property Categories
After you set the definitions for your new style, click OK and the style rule is either added to your style sheet or embedded within the page, depending on what you instructed Dreamweaver to do.
So far, so good...right? Now you know that creating style sheets and style rules in Dreamweaver is a pretty easy process. Just about the only thing easier than creating the styles, however, is applying them. In most cases, you can simply attach your style sheet to the HTML page, select the object to which you want to apply the style, and then select the style you want from either the Property inspector or the CSS Styles panel.
Attaching a style sheet to a page is done by clicking the Attach Style Sheet button at the bottom of the CSS Styles panel. When you click the button, the Attach External Style Sheet dialog box, shown in Figure 25.7, enables you to specify the location of the file, whether you want to link to the file or import the style rules into the current document, and to what type of media the style sheet is to be applied.
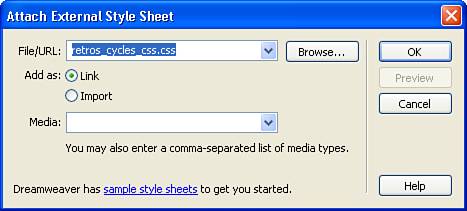
Figure 25.7. The Attach External Style Sheet dialog box enables you to link to or import an existing style sheet.
Although the file location and URL property is relatively straightforward, the link versus import option and the media type might be a little confusing. If you choose to link to the style sheet, a line of code is added to the header of your page, instructing the page to include the contents of the external style sheet. This ensures that when the page is rendered, the style rules are included so that they can be applied. Importing the style sheet, on the other hand, makes the style rules a permanent part of the code for the page. This option is generally used when you want to combine two style sheets into a single sheet. It is not recommended that you import styles on a regular basis because the capability to make updates to a style and have it applied site-wide is lost when the style is imported.
The capability to select a target media type is new within Dreamweaver 8. It enables you to specify to what types of media the styles should be applied. For instance, you can create two different style sheets and specify that one set of style rules should be applied when the page is rendered on the screen and another set of rules applies when the page is sent to a printer.
When you complete the information about the external style sheet, click OK and the rules located within the style sheet become available to you in the All category of the CSS Styles panel.
Using style rules to control the page properties is generally done through the application of style rules to the <body> tag. After attaching or embedding your style sheet, click the <body> tag in the tag selector and click the Current button in the CSS Styles panel. As shown in Figure 25.8, the panel displays a summary of the styles currently applied to the tag and enables you to adjust the existing properties or add a new property to the page.
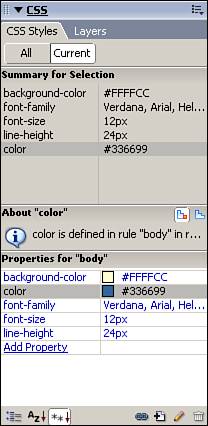
Modifying the page properties is as simple as clicking in the Value column (the right column) in the Properties section of the panel and selecting or typing a new value. When the value is a color, Dreamweaver provides access to a color picker. When the value is one that can be selected from a list of available options (such as font-family or font-size), the list is made available. If you want to add a new property, click the Add Property icon and choose from the list of available properties. You can then select from the available values for that property in the right column. To delete a property, right-click or Ctrl-click on it and choose Delete from the context menu.
Note
Whenever you make changes to any of the properties, the actual style rule is changed. This means that if you make a change to a rule that is in a linked style sheet, the actual style sheet is updated. If you make a mistake and change a color in the properties, you need to switch to the style sheet document that opens automatically when you edit properties and select Edit, Undo to undo the change.
To apply the changes to the page properties, save the style sheet. Note that the changes are applied to every page that links to the style sheet.
Tip
If you want to override a setting such as the background color in a linked style sheet, open the Page Properties dialog box by choosing Modify, Page Properties. All settings that you specify in this dialog box generate embedded styles in the document that override the styles in the linked style sheet.
Modifying the style of text can be done in a couple of ways. If the style that you want to apply already exists, select the text that you want to modify and then select the desired style from the Style drop-down menu in the Property Inspector. As shown in Figure 25.9, all styles that are embedded in the page or exist in any linked style sheets are visible in the Style drop-down.
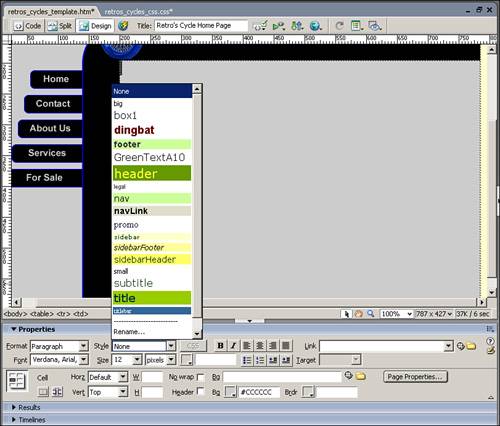
Figure 25.9. The Style drop-down menu provides easy access to the styles embedded in your page or linked to in an external style sheet.
If you want to create a new text style, you can either follow the process outlined in the previous section to add a new style to your style sheet or just highlight the text and apply font, size, and formatting changes. If Dreamweaver does not recognize the combination as one that exists in a style, it generates a new style and embeds it in your page. This style is then reusable throughout the page. It is not, however, accessible to any other pages, which is good justification for adding it to your style sheet.
Tip
It’s worth mentioning again that the cascade of styles dictates that the style that will be rendered is the style applied on the most specific level, so a style applied to a specific word overrides a style applied to a paragraph of text. If you run into problems with a style not displaying as you expected, the best place to start figuring it out is by selecting the text or the object and removing the style applied at that level.
Just as you can apply styles to the page and to text, you can also format tables with styles. The style can adjust more than just the text contained within the cells. Using properties such as background-color and background-image, you can specify the presentation of table rows and columns.
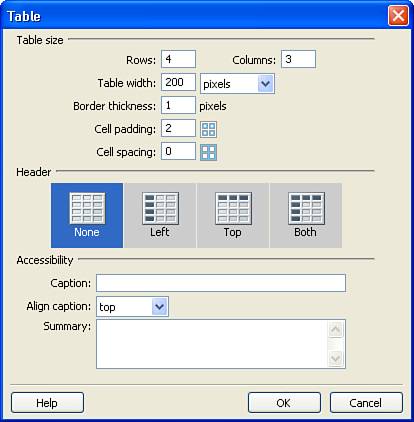
To apply a style to a table, insert the table into your page by choosing Insert, Table from the menu bar. In the Table dialog box, shown in Figure 25.10, select the desired number of columns and rows and then choose a table width, border thickness, cell padding value, and cell spacing value. Click OK to create the table.
With your table in place, you can apply styles on the row, column, cell, or cell contents level. To apply a style to a row, click on the leftmost border of the row or place your cursor in any cell within the row and click the rightmost <tr> tag in the Tag Selector. With the row selected, choose the appropriate style from the Style drop-down in the Property inspector.
Applying a style to a column is done in exactly the same manner, with the exception that you select the column by clicking on the topmost border of the desired column and then apply the style.
If you want to apply a style to a specific cell, place your cursor inside the cell and click the rightmost <td> tag in the Tag Selector. With the cell selected, apply the style.
Finally, you can apply a style to specific text within a cell by selecting the text and applying the style via the Property inspector.
HTML forms tend to be one of the more boring aspects of web design because they tend to look like every other form out there. Luckily, using styles, you can get rid of those generic gray buttons, blah text fields, and dull drop-down menus by applying custom styles to them. You can even get rid of that annoying extra space that occurs after a </form> tag is used in HTML by using the margin-bottom style property to set the margin to zero. Table 25.3 highlights some popular style options that can be applied to form elements.
Table 25.3. Form Properties That Can Be Controlled by Styles
As you have seen, it is relatively easy to apply styles to popular page elements such as the background color, text, tables, and forms. The great thing is that the power of CSS doesn’t stop there. Styles can be applied to just about any other visual object that you can place in a web page. Want to set the margins of an image or adjust the way text wraps around the image? CSS can do that. Want to ensure that all images displayed in a certain area are scaled to the appropriate size? CSS can do that, too. The process of applying styles to objects is the same as applying them to text, forms, or tables. Simply create the style, choose the attributes you would like to adjust, set values for them, and apply the style to the object. Just as it does with text or forms, Dreamweaver makes applying styles to any object a snap.
Just as other coding languages do, the CSS language enables you to add comments to your style sheets to make them easier to read and understand. Comments in CSS are surrounded by a /* opening tag and a */ closing tag. So the following code would be considered a comment and would not be rendered in the style sheet:
/* This is a comment within a style sheet */
Again, I cannot stress enough how important it is to fully document your code by using comments. Even if you plan to strictly use the Dreamweaver CSS panel to create and manage your styles, you might consider opening your style sheets and providing the appropriate comments throughout the page to indicate what each style is expected to do.
I adjusted the background color in my style sheet, but one of the pages in my site doesn’t seem to be using the style. What could be wrong?
Take a look at the page’s properties by choosing Modify, Page Properties. It’s likely that the background color for the page has been set, which would override the style rule in your style sheet. To resolve the issue, delete the hexadecimal value in the Background Color field.
I updated my style, but when I preview the pages in my browser, the old styles are still showing.
You need to save the style sheet before the changes propagate out to your pages. When you adjust a style, Dreamweaver opens the style sheet and makes the changes, just as you would with any other HTML page. For the changes to be applied, you need to save the style sheet.
I uploaded my website to my host and viewed it in my browser, but none of the styles are there. What did I do wrong?
Make sure you uploaded your style sheet as well as the HTML pages. If you don’t upload the style sheet, the browser will not include the styles in the page when it renders it. Additionally, there will be no error telling you that the browser experienced errors locating the style sheet.
On a continuing basis, the World Wide Web Consortium (W3C) reviews the standards that are in practice regarding the technical standards used to develop web pages. During these reviews, they work to identify elements that are no longer effective and deprecate them. A good example of a deprecated element is the <font> tag. In the past, applying styles to text required that a <font> tag be applied everywhere in the text that the font changed beyond the default settings. This meant that whenever you changed font face, a <font> tag was applied. When you changed font size, a <font> tag was applied. The end result was <font> tags being heavily used in pages, causing bloated code and slower download times. Luckily, CSS provides a much better method of adding style to text.
If, however, you built sites in the past that relied on the <font> tag rather than style sheets, it might be a good idea to schedule a code review and work toward migrating them to styles instead. Does this mean that your website will not continue to work or that the font styles will suddenly stop working? No. But it does mean that as newer versions of browsers are released, the support for the <font> tag will be removed and your pages might not render predictably.
Note
For more details on working with text in Dreamweaver, take a look at Chapter 22, “Introducing Dreamweaver 8.”