
In this chapter
The last piece of the puzzle of building a site for Retro’s Cycles is enabling the organization to manage certain aspects of their own site. As you saw in the Dreamweaver chapters, one way to do this would be to build the site using strictly database-driven content and then build an administrative section of the site to allow the client to log in and modify their page content.
Although this might make sense for a large company that has to maintain hundreds or thousands of pages, it’s probably not worth the time and development cost to create an online content management system in this situation.
In the past, the only other alternative was to turn over the keys to the entire site and then, when an accident happened and an employee compromised the page layout, the page would have to be restored from backup or the site creator would have to be re-engaged to fix the problem.
Contribute provides a happy medium between these two extremes by providing a low-cost solution that enables you to enforce template-based structures to allow content to be updated while avoiding alterations of the page layout.
The first step in setting up the content management system with Contribute is to create a site for Retro’s Cycles.
Note
Yes, yet another connection. Throughout the book you have seen the creation of several connections, including a ColdFusion connection to the database which, in turn, provided access to a Dreamweaver connection and now a Contribute connection. Be sure that you understand the differences between the connections and why each is important.
Open Contribute.
In the My Connections dialog box, shown in Figure 34.1, click the Create button.
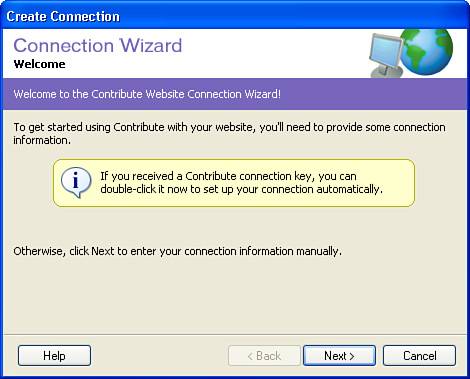
In the Create Connection dialog box (see Figure 34.2), click Next because you don’t have a connection key.
In the URL field for the website, type the URL to the site you have been creating for Retro’s Cycles. If you followed the defaults throughout the book, the URL is http://localhost/retroscycles (see Figure 34.3).
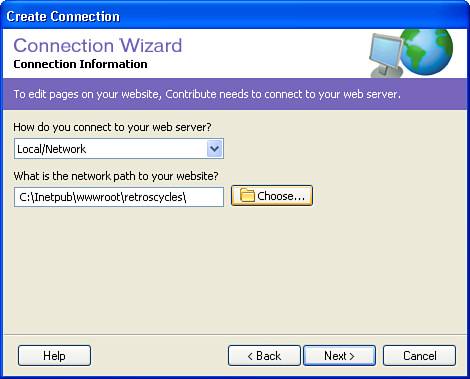
Because the site is located on your local hard drive, choose to connect to the site via Local/Network (see Figure 34.4). Click the Choose button and browse to the local folder that contains your pages. If you have been following the defaults, the path is c:InetPubwwwroot etroscycles.
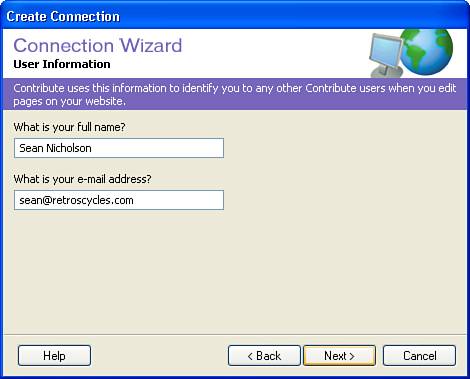
Next, Type your full name and email address. This information helps to identify who made changes to a page for review purposes (see Figure 34.5).
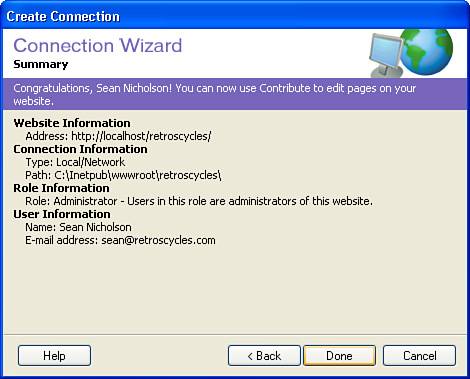
The last step in creating the connection is to review the information you just entered (see Figure 34.6). If corrections need to be made, click the Back button until you reach the page you want to correct. If the information is correct, click the Done button.
When the connection has been created, it is visible in the My Connections dialog box. From this dialog, you can edit the connection settings and administer the website settings.


Now that you have the connection created, the next step is to invite the appropriate people to become editors of the site. Do this by sending them a connection key, which they will install on their local machines. When clicked, this key automatically adds the site connection to Contribute on their local machines and sets the authorization level for their accounts. In the case of Retro’s Cycles, two people will be managing the content of the site. Nancy is the sales manager and has agreed to take responsibility for the website. But because she is busy at times, she has asked that Joe, one of the parts guys who is pretty knowledgeable about computers, be able to create pages that she can review and approve before publishing them to the site.
The roles that Nancy has described for herself and Joe are those of Publisher and Writer. Nancy needs to be able to edit content and publish changes to the site, whereas Joe needs to be able to edit content and save drafts for Nancy to review and publish. To create these permission levels, follow these steps:
In the My Connections dialog box, click the Administer button in the upper-right corner. Contribute opens a dialog box indicating that you can choose the environment in which you would like your users to edit.
Because the staff of Retro’s Cycles are comfortable with using a word processor, choose the standard word processing environment and click Yes to indicate that you want to become the Administrator for the site.
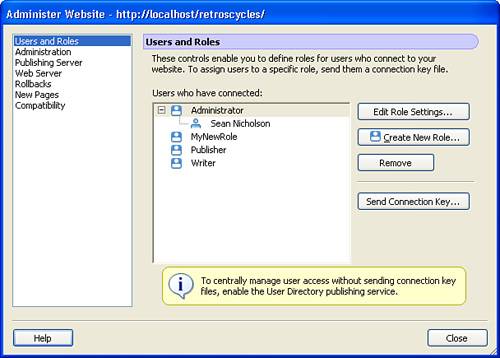
In the Administer Website dialog box, shown in Figure 34.7, select the User and Roles category. This dialog shows users who are part of the site and enables you to invite others to have a role in managing content. Click the Send Connection Key button to send a key to Nancy.
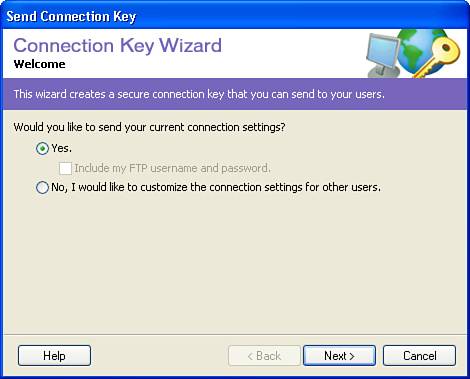
In the Send Connection Key dialog box (see Figure 34.8), choose Yes to send the current connection settings. Click Next.
Because Nancy will be a Publisher for the site, choose Publisher and click Next.
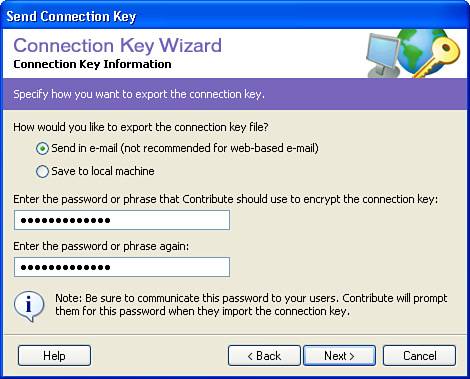
To communicate the connection key, you’ll be sending the key to Nancy via email, so choose the Send in Email radio button and then type a unique password for Contribute to use for the base of the encryption key (see Figure 34.9).
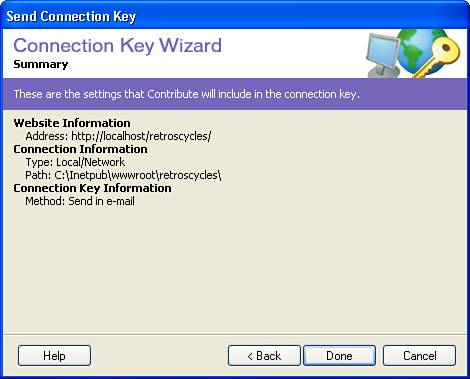
Finally, review the connection key settings shown in Figure 34.10 and click OK if everything appears to be correct.
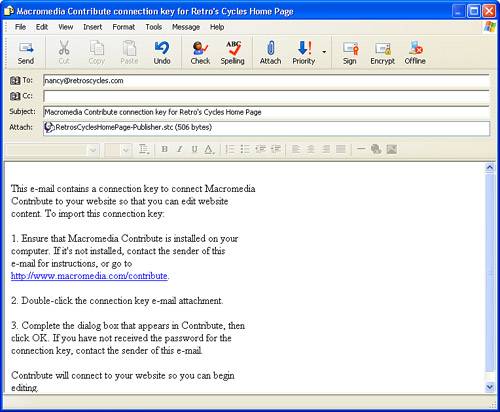
With the connection key settings configured, Contribute spawns an email in your default mail client that includes the encryption key as an attachment (see Figure 34.11). The recipient need only click on the attachment to install the key.
Next, follow through the same steps to create an encryption key for Joe, only set him up as a Writer rather than a Publisher.
When completed, close the My Connection dialog box by clicking Close.
Before you start adding content to the pages, you should take a look at how the Contribute browser works and examine the site’s current structure.
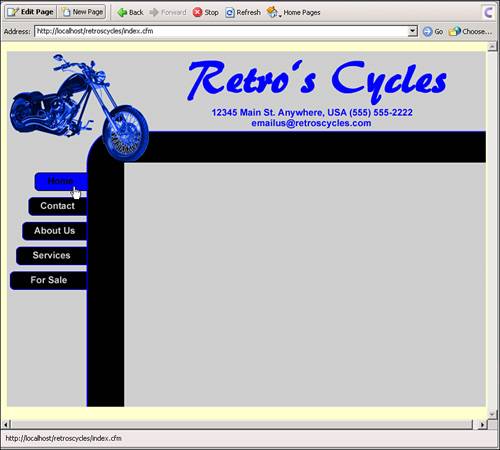
When the site was configured in Contribute, the home page of the site was opened in the Contribute browser (see Figure 34.12). Roll your mouse over the rollover links on the left side of the home page and notice that they change state as expected.
Next, click the Contact button and notice that the browser renders the
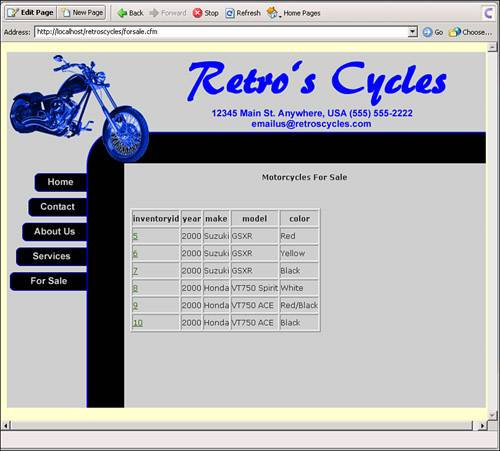
contact.cfmpage. Click through the About Us and Services links and they render the appropriate links as well.Click the For Sale button and notice that the database-driven table created in Dreamweaver is displaying correctly (see Figure 34.13).
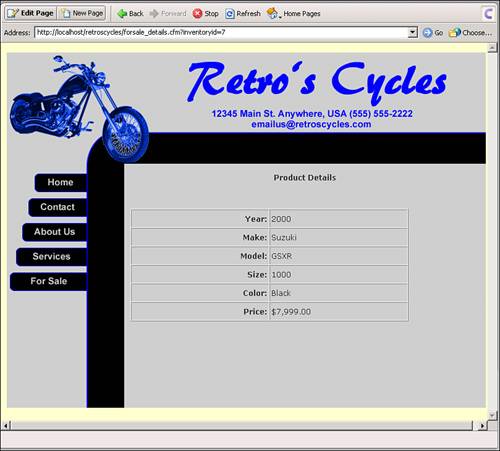
Click on any of the links in the inventoryid column and note that the Contribute browser loads the details for that record (see Figure 34.14).
Now that you know that the hyperlinks work as expected, you can start adding content to the blank pages.
With the site connection configured and the user encryption keys sent, the next step is to use Contribute to add the base content that the staff of Retro’s Cycles will use to build their site. At this point, you are adding placeholder text that indicates to Nancy and Joe what type of content they should be placing in the site. To create the placeholder text, follow these steps:
In the Contribute browser, click the link to the home page.
To edit the page, click the Edit Page button in the upper-left corner of the browser. Contribute switches to Edit mode and the Contribute toolbar changes, replacing the navigation buttons with editing buttons (see Figure 34.15).
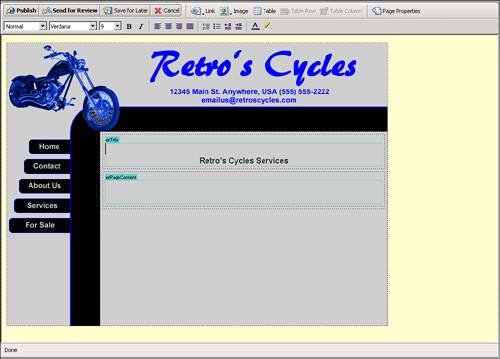
Because these pages are based on a Dreamweaver template, Contribute recognizes the markup and allows you to access only the
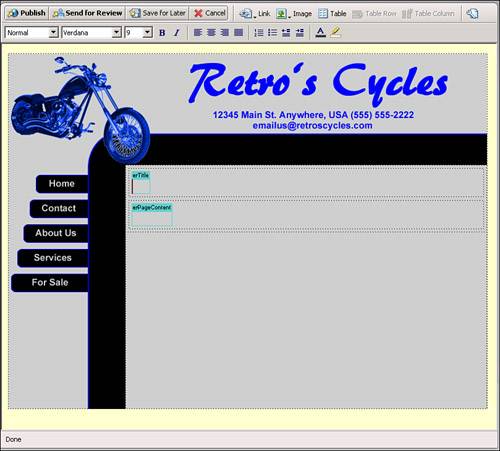
erTitleanderPageContenteditable regions. Place your cursor in theerTitleeditable region.In the editable region, type
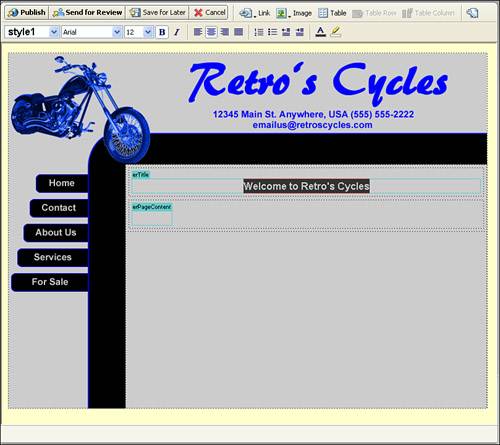
Welcome to Retro's Cycles. Highlight the text and click the Bold button on the button bar. Change the font style and size to Arial, 12. Note that Contribute automatically creates a style for you named Style1 that you can reuse throughout the page (see Figure 34.16).Next, place your cursor in the
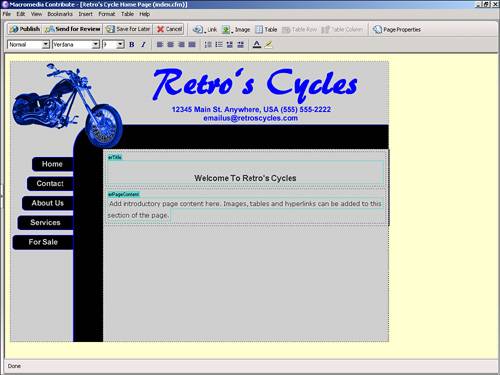
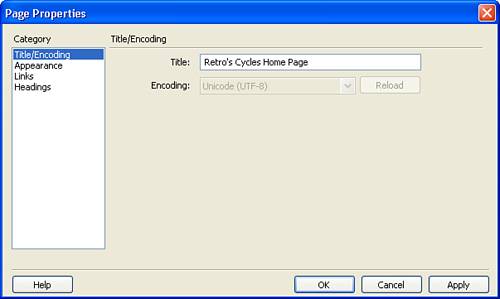
erPageContenteditable region and typeAdd introductory page content here(see Figure 34.17).Note in Figure 34.17 that the default font for the page has automatically been set to a sans serif typeface. In addition, notice that the title of the page—Retro’s Cycle Home Page—displays in the application bar of Contribute. You need to update this to read “Retro’s Cycles Home Page” instead. To do this, click the Page Properties icon in the browser’s upper-right corner.
In the Page Properties dialog box, you can select from the various page settings that are editable. Adjust the title so that it reads “Retro’s Cycles Home Page,” as shown in Figure 34.18. Click OK to close the dialog box.
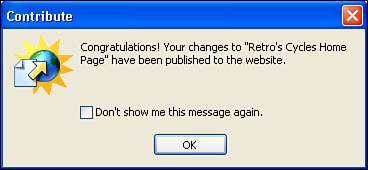
To apply the changes to the page, click the Publish button in the Contribute bar. Contribute displays a pop-up box (see Figure 34.19) letting you know that the content was published successfully.
Click OK to close the message and Contribute renders the new page in the browser.
Following the same steps, you can easily add placeholder text for each empty page in the site. This would provide Nancy and Joe with a starting point to determine what content they need to develop before publicizing the site to their customers.
One additional content element that Retro’s Cycles indicated they wanted on their site is a price list of the various services that they offer. They have the price list in a Microsoft Word document and, rather than retyping it into HTML, they want to place it on the site as a FlashPaper document.
To add the document to the site in Flashpaper, navigate to the Services page in the Contribute browser.
Click the Edit Page button to switch to Edit mode.
Place your cursor in the
erTitleeditable region and click the Align Center button on the Contribute toolbar.In the editable region, type
Retro's Cycles Services. Highlight the text and click the Bold button on the button bar. Change the font style and size to Arial, 12. Again, Contribute automatically creates a style for you named Style1 that you can reuse throughout the page (see Figure 34.20).Place your cursor in the
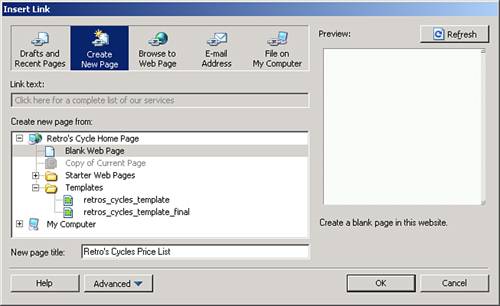
erPageContenteditable region and click the Align Center button on the Contribute bar. In the editable region, typeClick here for a complete list of our services.Because the Word document does not fit in the template of the site, you must create a link to a new page and insert the FlashPaper object into that file. Highlight the text and click the Link button on the Contribute bar. From the drop-down, choose Create New Page.
In the Insert Link dialog box, choose Blank Web Page and type
Retro's Cycles Price Listin the New Page Title field (see Figure 34.21). Click OK to create the new blank page.Click OK to create the new page.
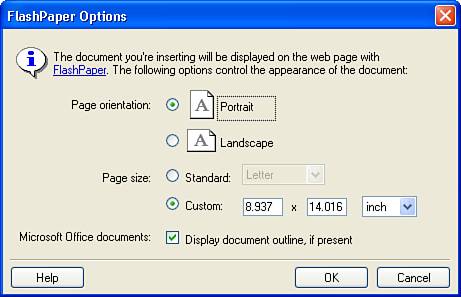
From the menu bar, choose Insert, Document with FlashPaper. Browse to the
retros_cycles_services.docdocument, located in the images folder of the site, and click Open.From the FlashPaper Options dialog box, shown in Figure 34.22, accept the default settings and click OK.
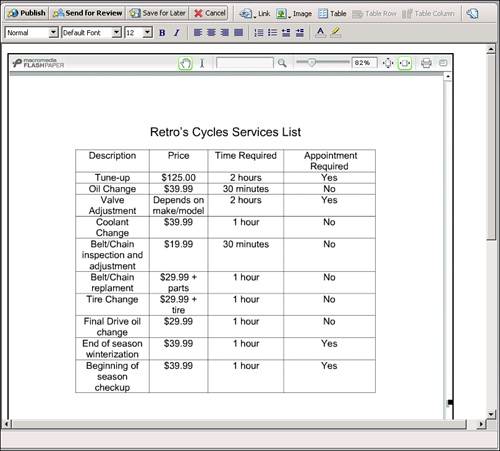
Wait a few seconds while FlashPaper converts the document and places it into the page (see Figure 34.23).
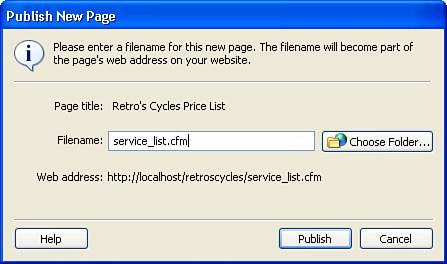
Click the Publish button. In the Publish New Page dialog box, shown in Figure 34.24, name the file
service_list.cfmand click Publish.To finalize the link to the page, click the Back button in the Contribute bar to switch to the Services page. Click the Edit Page button and then click Publish to apply the changes to the page.
As you can see, using Contribute to manage website content is easy and flexible. The wide range of editing tools offered by Contribute can help you enable clients and coworkers to manage their own content without having to worry about adversely affecting site design.
I can’t find the retros_cycles_services.doc document that you reference. Where can I find it?
If you worked through the Dreamweaver section of the book, the document is located in the images folder of the site that you created earlier. If you haven’t worked through that section of the book, you need to download the support files from the companion site.
When testing the rollover links. I don’t see where to roll over in the far left of the Contribute interface. Where should I look?
The rollover links are tested in the far left of the page, not in the far left of the Contribute interface.
When developing a website for a client or in an environment where others will be maintaining the content, there is always the question of which content management tool is appropriate. In many cases, Contribute provides the solution. However, a browser-based content management system is more appropriate in others.
When developing a site, one of the first questions you should ask yourself is whether your content will be embedded into the page or drawn from a database. If the answer is in a database, Contribute won’t do you much good. Contribute isn’t capable of editing database-driven content, so it would be more appropriate to look toward building a browser-based content management system. Browser-based systems usually must be homegrown and therefore take time to develop. In addition, a higher level of training must often be offered to end users before they are comfortable with the process of maintaining content.
Sites that feature static content, on the other hand, benefit from the features that Contribute has to offer. Contribute’s low cost and easy-to-use interface offer a quick way to get your end users up to speed quickly. In addition, inexpensive training on Contribute is offered in a variety of formats, ranging from web tutorials to print books.
So, when planning your next web project, be sure to think about the content maintenance aspect and which tool might be more beneficial to your client or your project in the long run. Both options have their pros and cons. Taking the time to perform the analysis prior to the development phase can help you determine which would be appropriate.