
In this chapter
To provide continuity between the development applications within Studio (except ColdFusion), Macromedia has created a set of common user-interface elements that are shared across each application. Familiarizing yourself with how these tools work and their distinctions across the individual programs can help you work faster and smarter.
Note
ColdFusion is not considered a development application, but rather a utility for managing the ColdFusion environment, so it does not share any common elements with the other programs in the Studio suite.
Studio’s common elements include
A central workspace for creating pages, movies, or images. In Flash, the workspace is called the Stage. In each of the other development applications, the workspace is called the document window.
A main menu bar at the top of the screen, with File, Edit, View, Insert, Modify, Commands, Window, and Help menus.
Panels that provide access to specific functionality. The panels all work the same in the way they are opened, closed, minimized, maximized, docked, and undocked.
A Property inspector that enables you to see and modify common attributes of the selected object.
A Tools panel (in Fireworks and Flash) located, by default, on the left side of the workspace.
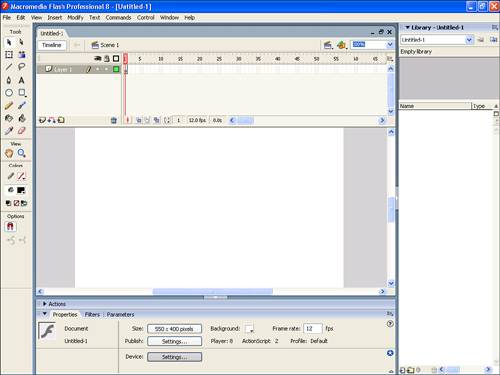
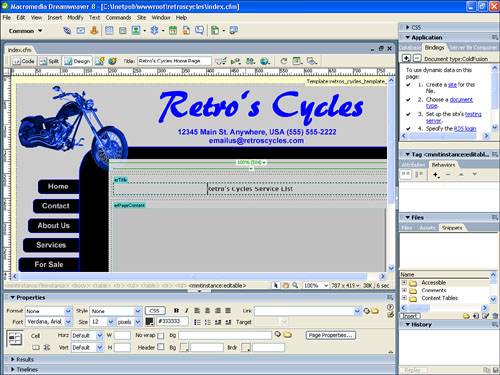
Figures 2.1–2.3 show the main interface features for Flash, Fireworks, and Dreamweaver, respectively.

In addition, many of the applications share common options within the various menus, common commands on the main toolbar, and common keyboard shortcut keys.
At the very top of each of the development programs within Studio, you can find a typical menu bar that allows you to create, open, close, and save documents, as well as perform activities such as cutting and pasting, printing, and finding help.
The main menus also indicate what shortcut keys can be used to accomplish the same task. For instance, when clicking on the File menu in any application, you also see that the Cmd-N or Ctrl+N shortcut allows you to create a new document in the same way that the File, New menu command does.
One of the unique elements within Studio is the use of panels to provide access to feature functionality. Each panel groups similar features together so they can be easily located. This also enables you to hide or display the panels at your convenience, which enables you to customize your workspace depending on your needs.
Any of the panels can also be docked and undocked, so you can arrange them any way you want or even allow them to float. As shown in Figure 2.4, undock a panel by positioning the cursor over the upper-left corner of the panel, and when the cursor has changed to a Move icon, drag the panel to the desired location.
After a panel has been undocked, you can move it around by clicking and dragging on the gradient bar at the top of the panel. Keep in mind, however, that you have to grab it by the upper-left corner again to redock it.
You can also resize panels by positioning the cursor at any edge or corner. When the cursor turns into a two-headed arrow, as shown in Figure 2.5, the panel is resizable and you can simply click and drag to resize.
Each of Studio’s development programs also includes a Property inspector that provides information regarding the attributes of any object that is selected. Using the Property inspector, you can examine and modify attributes such as size, location, and name.
Some objects also contain their own unique properties that can be adjusted with the Property inspector. In each of the programs, the Property inspector changes depending on the type of object that has been selected.
For instance, when a text object is selected, a wide variety of properties is visible including styles, alignment, font, size, and color. For the most part, the buttons that enable you to adjust these text properties look a lot like those found in today’s popular word processors. This means that you can apply bold formatting to a text object by simply selecting it and clicking the B button in the Property inspector, shown in Figure 2.6

Flash and Fireworks share a common group of editing tools that are displayed in the Tools panel. By default, this panel is located to the left of the workspace and is divided into subsections. These subsections include a View section, a Colors section, and one or more sections for editing tools. Flash also has an Options section where you can select options associated with the currently selected editing tool, such as the Round Rectangle Radius option shown in Figure 2.7 Fireworks also includes a Web section, with tools for preparing graphics for use on the Web.

The View section contains tools to manipulate the view of the workspace, as opposed to objects in the workspace. The Hand tool and the Zoom tool are common to Flash and Fireworks.
With the Hand tool you can move the workspace view by clicking anywhere in the workspace and moving the mouse. The Zoom tool, on the other hand, enables you to zoom in and out on specific areas of the workspace. You can also drag out a selection box around any area to zoom in on that specific area and in Flash, the Options section enables you to select Zoom In or Zoom Out modes.
In Fireworks, the View section also enables you to easily customize the workspace by viewing the workspace full-screen, with or without menus.
The broadest and deepest areas of overlap relate to the editing tools found in the Tools panel. Selection, Subselection, Line, Lasso, Pen, Pencil, Text, Rectangle, Ellipse, Eyedropper, and Eraser tools are all found in Flash and Fireworks.
Many of the basic concepts and techniques for using these tools are the same in all three programs. Common elements include the basics of strokes, fills, and gradients, as well as the workings of tools such as Selection, Subselection, Line, Lasso, Pen, Text, Rectangle, Ellipse, and Eyedropper. The Eraser, though it has the same basic function in all Studio programs—deleting objects or portions of objects—differs enough among programs to deserve separate treatment for each. The same is true of the Brush tool, common only to Flash and Fireworks.
With vector drawings, tools are used to create two elements: strokes and fills. Strokes consist of lines, whereas fills are areas (commonly found inside strokes). For instance, if you were to draw a circle in Flash, the outside line of the circle would be described as the stroke. The shaded, colored, or transparent area that fills the circle, on the other hand, would be the fill.
In shapes that contain both strokes and fills, each is independent of the other, so you could modify the fill color of the circle without changing the stroke color in any way.
Be aware, however, that Flash treats overlapping shapes differently than Fireworks. For instance, if you draw an object, such as a simple circle, on the stage in Flash and then draw a second object that overlaps it, the area of the first object that has been overlapped is replaced by the second overlapping object. This is different from Fireworks, where the second object merely covers the portion of the original object that it overlaps.
In Flash and Fireworks, setting the stroke or fill color can be achieved by either
Clicking in the Stroke or Fill box in the Colors section of the Tools panel.
Selecting the object and then clicking the Stroke or Fill box in the Property inspector.
After the Stroke or Fill box has been clicked, the color selection panel is displayed, as shown in Figure 2.8
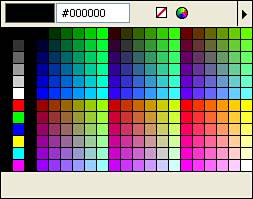
Within the color selection panel, there are several subpanels, the simplest of which is the web-safe color picker. This panel contains swatches for the 216 generic colors common to the two major operating systems, Macintosh and Windows. As shown in Figure 2.9, a color mixer enables you to go beyond the web-safe colors by mixing your own custom colors.
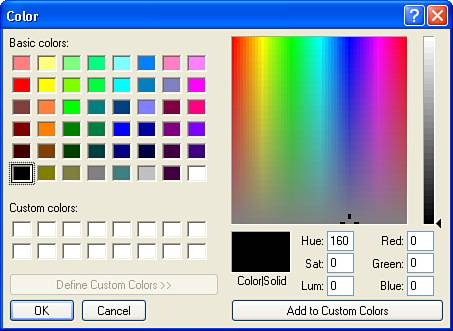
Although there are several options for mixing custom colors, all three programs support Red, Green, Blue (RGB), and Hue, Saturation, Brightness (HSB).
Note
RGB is the standard additive color model created for graphics viewed on computer monitors. Unless you are accustomed to using HSB color, stick to using RGB values.
In Flash and Fireworks, if you click on the upper-right corner of the colors mixer (as shown in Figure 2.10) you get a pop-up menu offering various color-related functions, including selecting a color mode (RGB or HSB) and saving a custom color as a swatch, which you can later retrieve from the swatches panel (see Figure 2.11).

Figure 2.10. Click on the upper-right corner of the colors mixer in Flash and Fireworks for a pop-up menu of color-related options.

Dreamweaver, not being a graphics editor, does not work with strokes and fills, but it has a color picker that enables you to control the color attribute of HTML objects.
When working with shapes, remember that you can apply a fill to any shape that is enclosed. In addition, the fill can be solid, gradient, or (in Flash and Fireworks) bitmaps.
Solid fills consist of colors from the traditional color palette, where gradient fills blend from one color to the next. Bitmap fills are graphics that are imported into the fill as a repeating background for the object.
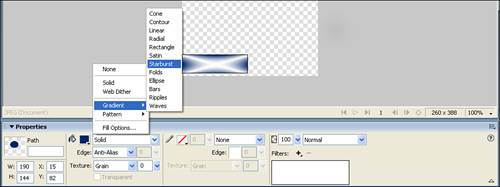
If you choose to work with a gradient fill, you can also select from different types of gradients. Linear gradients display colors in a striped pattern, whereas radial gradients display colors in a circular pattern from the center outward.
The programs do have a number of minor differences when it comes to working with fills. For instance:
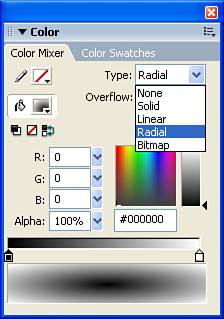
In all the programs, you select a gradient or solid fill by using a drop-down menu. In Flash, the drop-down menu and gradient definition bar are in the Color Mixer panel (see Figure 2.12) and you have to click on the Fill property to get to the drop-down. In Fireworks, they’re in the Property inspector (see Figure 2.13).
In Flash and Fireworks, shapes such as rectangles and circles are filled by default. In both applications you can also set the “no fill” option by clicking the white box with a diagonal red line through it.
In Flash and Fireworks you can edit a fill without first selecting the object by clicking any enclosed area with the Paint Bucket tool.
All the Studio 8 programs except Dreamweaver can create gradient fills. You can also create custom gradients specifying how many and which colors are used by using a gradient definition bar and gradient pointers.
When you create a custom gradient, each pointer marks the spot where a particular color occurs in its nonblended form. To change the colors in the gradient, click on gradient pointers and assign new colors to them. To move a pointer, click and drag it.
Again, the programs show some minor differences in the interface. For instance, to create new gradient pointers in Flash and Fireworks, you click just below the definition bar, between the two original pointers.
To change a gradient color, click on a pointer. In Fireworks, the web-safe color picker pops up automatically. In Flash, access the color picker by clicking the color box at the top left of the Colors Mixer.
The basic purpose of the Eyedropper tool is the same throughout all the Studio programs: It speeds up color selection by enabling you to copy colors from an existing object. Although the Eyedropper tools in Fireworks and Flash are limited to the stroke and fill of existing objects (including the toolbars themselves), Dreamweaver’s Eyedropper can pick up colors from anywhere on the screen—even outside its own windows. If you click on a bitmap with the Eyedropper tool, it picks up the color of the individual pixel on which you click.
Note
Although Dreamweaver’s Eyedropper tool can be used to select colors outside of its own windows, it cannot span multiple monitors. Therefore, it is limited to colors being displayed on the same monitor as that on which Dreamweaver is being displayed.
The Eyedropper is temporarily activated whenever you click on a color box. (This is the only way to activate the Eyedropper in Dreamweaver.) So throughout Studio 8, you can sample a color from another object by selecting the object or objects whose stroke or fill color you want to change, clicking a Stroke or Fill color box, and then clicking on a swatch or on an object to select the color you want.
The Line tool is the most basic of the drawing tools in the fact that it draws only straight lines. To draw a line, select the Line tool and then click and drag to create lines. Holding the Shift key while you drag creates lines that are vertical, horizontal, or at a 45° angle.
You can, of course, use the Line tool to draw closed shapes such as squares or rectangles that can have fills applied to them. However, you must manually add a fill, using the Paint Bucket tool, after you have closed a shape.
The Pencil tool enables you to draw freeform lines and shapes. Select the Pencil tool and then click and drag to sketch lines with the mouse. As with the Line tool, holding the Shift key while you drag constrains the angle to vertical, horizontal, and 45°. In Flash and Fireworks, after creating a closed shape, you can fill it manually by using the Paint Bucket tool.
Note
When I refer to a closed shape, I’m talking about a stroke that forms a shape such as a circle or polygon. A closed shape can be filled because Fireworks or Flash understand that they should fill only the area that is enclosed (for example, inside the circle).
Flash has a unique feature in the three pencil modes in the Options section of the Toolbox: Straighten, Smooth, and Ink (maintain rough shapes).
The Rectangle and Ellipse (“Oval” in Flash) tools enable you to draw these simple shapes by just clicking and dragging. Holding the Shift key while dragging results in drawing symmetric circles or squares.
In Fireworks, click and hold on the Rectangle to bring up a fly-out with the Ellipse tool, as well as a Polygon tool and a number of Auto Shapes such as a spiral, an arrow, a star, and a doughnut.
You can also draw rectangles with rounded corners. The interfaces are slightly different for each program, but the result is the same. In Flash, after selecting the Rectangle tool, select the Round Rectangle Radius modifier at the bottom of the Tools panel. Enter a number in the Corner Radius field; the higher the number, the rounder the corners. In Fireworks, click and hold on the Rectangle tool and select the Rounded Rectangle smart shape from the fly-out that appears (see Figure 2.14).
The Pen tool is an extremely powerful drawing tool. If you haven’t used an illustration program before, the Pen tool will take some getting used to, particularly the way it draws curves. After you have become comfortable with it, however, you will be rewarded with precisely drawn curves and irregular shapes that cannot be achieved with any other tool.
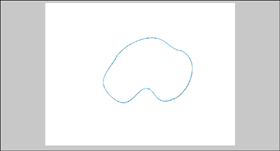
The Pen tool draws by connecting a series of anchor points. A straight line or curve connecting two anchor points is called a path. Your final shape is achieved by joining a series of anchor points and paths.
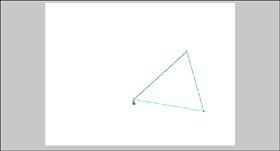
For instance, if you select the Pen tool and move your mouse pointer onto the workspace, a small x appears to the right of the pen, as shown in Figure 2.15, indicating where the first anchor point will be placed. When you click on that spot, the anchor point is created.

To draw a straight line segment, just click and release, move the mouse, and click again. As with the line tool, holding the Shift key while dragging draws vertical, horizontal, or diagonal lines. To end an open path, double-click the final anchor point or select a different tool.
You can also Cmd-click (Mac) or Ctrl+click (Windows) off the path. To end a closed path, hold the Pen over the first anchor point. A small dot appears to the right of the Pen, indicating that you can close the path, as shown in Figure 2.16. Then click just once.
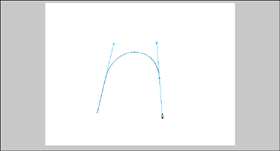
The Pen tool creates Bezier curves, controlled by control handles, as shown in Figure 2.17. The length and angle of the control handles determine the shape of the curve.
The easiest way to create a curve segment is to click and release at the point where you want the segment to start, move to the point where you want it to end, and click and drag. Whichever way you drag, the curve is created in the opposite direction. To create another curve on the same path, move again, and click and drag again. Or you could make the next segment a straight line by just clicking, rather than clicking and dragging. Points created by clicking are corner points and do not have control handles. Points created by clicking and dragging are curve points and do have control handles. To end the path, move off the path and Cmd-click (Mac) or Ctrl+click (Windows).
To convert a corner point to a curve point, and create curvature in the straight line segments, select the point with the Subselection tool and Option-click (Mac) or Alt+click (Windows) and drag. To convert a curve point to a corner point, click on the point with the Pen tool. Clicking on a corner point with the Pen tool deletes the point.
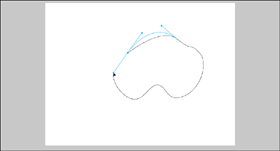
To close a curved path, just click on the initial anchor point, or else click on the initial anchor point and drag away from the curve, as shown in Figure 2.18.
The easiest way to work with the Pen tool is to complete a path and then move, add, and delete anchor points and adjust handles.
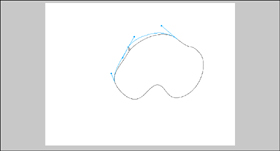
To adjust anchor points you must first select them. Use the Subselection tool and click on a path to reveal the anchor points, as shown in Figure 2.19.
If you click directly on an anchor, you both select that point and reveal all others in the path. If you click on a path but not directly on an anchor point, you simply reveal the anchor points in the path and must then click directly on one to select it. Shift+click additional anchor points to add them to the selection. You can then click directly on an anchor to reveal any control handles. Click and drag anchor points to move them, as shown in Figure 2.20. You can also select an anchor point and use the arrow keys to nudge it.
You can also add anchor points. Position the Pen tool on the path. A small plus sign appears next to the Pen tool. Click to create the anchor point.
You can delete anchor points by selecting them with the Subselection tool and pressing the Delete key.
To adjust the size and angle of a curve without moving anchor points, use the Subselection tool to select the path, select the anchor point, and click and drag its control handles. Where two curved segments intersect, two control handles extend away from a common anchor point. Each handle controls a curve on either side of a common anchor point. Dragging one end of a double control handle changes the curves on both sides of the anchor point, which stays in place as shown in Figure 2.21
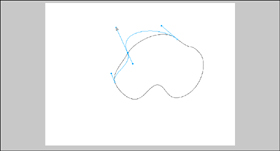
Figure 2.21. Dragging one end of a double control handle changes curves on both sides of the shared anchor point.
To adjust only the curved segment on just one side, rather than both, Option-drag (Mac) or Alt+drag (Windows) only one end of a double control handle.
If a curve segment intersects a straight segment, you see a control handle just on the curve side of the anchor. Click and drag this handle with the Subselection tool to change the arc, or click and drag the anchor point to move the curve.
In Flash, you can also click and drag with the Selection tool to move segments. In Fireworks, clicking on a segment with the Selection tool selects the whole path, and dragging moves it.
After you have created a curve, you can reduce the number of points that define it, keeping the same basic shape but smoothing it out. This is called optimizing the curve. To do this in Fireworks, use Modify, Alter Path, Simplify. In Flash, use Modify, Shape, Optimize. You can set a slider to maximize or minimize optimization. In Fireworks, you can also set the optimization amount numerically. Flash gives you the option of running several smoothing passes in one operation.
The Studio programs all share common methods of working with text, including basic functions such as adding, editing, and deleting text, as well as assigning character attributes such as bold and italic, and paragraph attributes such as indentation and justification. Many of these functions are also similar to those of widely used programs such as Microsoft Word.
Some functions, such as dynamic text (text loaded at runtime as opposed to authoring time) and user input fields (where the user can enter text), are restricted to Flash and Dreamweaver because only those programs have the means to control the runtime environment (that is, the Flash Player or the browser).
Note
As you develop with the various Studio applications, you’ll notice that for the most part, what you see in the development environment is exactly the same as the end result. There are times, however, when what you see at author-time (what you see when you’re working with the development tool) is different from what you see at runtime (what you see when you actually display the end result in a browser or by viewing the final product).
For example, in Dreamweaver, when you place a data binding in your web page, you don’t see the actual data that is drawn from the database because that occurs only at runtime. To see the data, you need to view the page in a web browser.
So be aware that although many of the applications are WYSIWYG (what you see is what you get), you may have to take a few extra steps in some cases to proof your work.
Fireworks offers special text effects, such as drop shadows, that make the text appear to stand out from the page.
In the Property inspector, Dreamweaver offers only text attributes that are supported in HTML, such as bold, italic, color, font, indentation, and justification. Other attributes, such as spacing between characters, are not supported in HTML or Dreamweaver.
Flash’s support for a subset of Cascading Style Sheet (CSS) tags, used to format text, provides standard-based integration with Dreamweaver, which has become more CSS-centric over the last few versions.
Adding text to Fireworks and Flash requires that you select the Text tool, click in the workspace where you want the text to be placed, and then type the text you want to display. Dreamweaver’s Text tool, however, is similar to a word processor, so you can simply drop your cursor anywhere in the document where you want to display the text and type away.
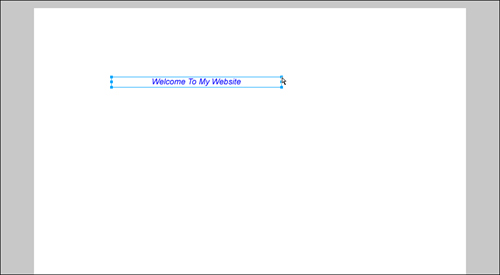
After you have created a text block, both Flash and Fireworks enable you to resize it by clicking on the appropriate handle, as shown in Figure 2.22 As you drag the handle, the block changes size and the text reflows to fit the box. You can also use the Width and Height fields in the Property inspector to resize text blocks, but doing so distorts the text vertically or horizontally, depending on which field you alter.
Caution
When working with text boxes, the only time you should ever use scaling tools to change the height or width of a text box is when you want to stretch the text to create a strange or funny effect. Using a scaling tool to change the height or width of a text box skews and stretches not only the box, but the text inside. If you need to change the size of your text box, be sure that you select the Text tool and then change the size by dragging on the text box handles. Using the Text tool maintains the integrity of your text and still allows you to make adjustments to the box.
Tip
In Flash and Fireworks, handles appear only when the Text tool is selected and the cursor is in the text block.
As you drag a handle, the block changes size and the spacing between characters and lines also changes, whereas the line breaks stay the same.
In Flash and Fireworks, you can set the default attributes of text by choosing the Text tool and making changes in the Property inspector. After these attributes are set, any instances of text that are placed on the page have those attributes until they are modified.
Some properties, such as text orientation (vertical, horizontal, left-to-right, right-to-left) in Flash and Fireworks, can be changed only globally. Such properties change for the whole text block, whether the Selection or Subselection tool has been used to select the text block as a whole, or whether the Text tool has been used to select particular characters or paragraphs.
Text attributes can be divided into those that affect paragraphs and those that affect individual characters. The most commonly used paragraph attribute is justification: aligned left, aligned right, centered, and justified (aligned left and right). Others include line spacing, first-line indent, and margins. Common character attributes, on the other hand, include font, point size, character position, character spacing, and kerning.
To make paragraph-level changes, select the Text tool. Then, to make changes to just one paragraph, click anywhere in that paragraph. Alternatively, you can select any part of one or more paragraphs. Any subsequent paragraph-level changes made in the Property inspector affect all the chosen paragraphs.
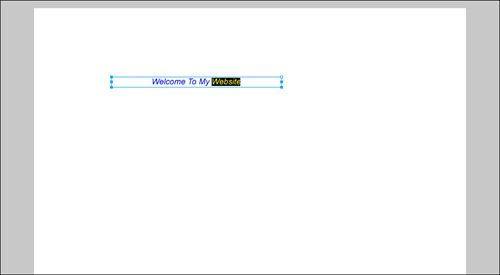
To make character-level changes, click and drag with the Text tool to select the text you want to change, as shown in Figure 2.23. Any subsequent character-level changes made in the Property inspector affect just the selected characters.
Different fonts can easily be selected from the drop-down menu in the Property inspector. In Flash and Dreamweaver, you can also type in the font name and it will be applied to the selected text.
Likewise, you can select a font size or you can type in a specific font size in each of the four programs. All four also offer alternative means to select the font size: a pop-up slider in Flash and Fireworks and a drop-down listing of just the most commonly used font sizes in Dreamweaver. Although typing the desired size is generally the quickest way to set the font size, using the sliders enables you to preview the text at many different sizes.
When working with text color, Flash and Fireworks assign the selected fill color to your text. Dreamweaver doesn’t distinguish between stroke and fill, so there’s just one color selection box.
You can also force font styles by using the Bold and Italic buttons. In Dreamweaver and Flash, consider creating and applying a CSS tag instead. That way, later on, you can make global changes to all bolded text just by changing the tag.
Tip
In Flash, when including the font in a movie, it may be preferable to use a bold or italic version of a font rather than the Bold and Italic buttons, because you can lose much of the subtlety of a typeface by forcing a bold or italic style that it wasn’t designed for. When working with text in Dreamweaver, however, you’re using system fonts (fonts provided by the user’s computer) and can’t be sure that the bold or italic versions will be available on all machines. Therefore, it’s common to just stick with standard fonts and use the Bold and Italic buttons in Dreamweaver.
Flash and Fireworks both enable you to control text direction: horizontal left-to-right, horizontal right-to-left (not available in Flash), vertical left-to-right, and vertical right-to-left. In Fireworks, you can also control text direction by attaching the text to a path.
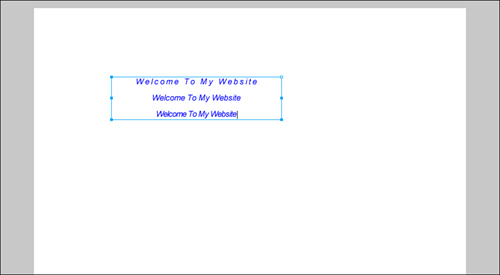
Kerning refers to the amount of space between two letters or characters, whereas character spacing applies to larger groups of characters or entire blocks of text. Both kerning and character spacing can be defined by positive or negative settings. Positive settings increase the amount of space between letters, and negative settings decrease space until letters eventually overlap, as shown in Figure 2.24 Zero is neutral.
For general legibility in blocks of copy, it’s best to work within a range of 0 to +5 or even less, depending on text size. The smaller the point size, the greater the effect of character spacing. Many fonts have desirable kerning built in. In Flash and Fireworks, you can use this kerning by selecting the Auto Kern option. As already mentioned, Dreamweaver does not support these options.
In Flash and Fireworks, select letters, words, or entire text blocks; then enter a positive or negative number in the character spacing field. In Flash and Fireworks, you can also drag a slider to select the amount of spacing. When used with vertical text, character spacing determines the amount of vertical space between characters. In Flash, you can also set a preference to turn off kerning of vertical text; then character spacing affects only horizontal text.
In all four programs, use Alignment buttons to specify left-aligned, centered, right-aligned, or full justification of paragraphs. Full justification creates newspaper-style paragraphs that are aligned on both the left and right sides. When using full justification, be sure to check the amount of space that is created by the justification so that large, distracting gaps do not appear between words. Do not use full justification with bitmap fonts, or they stretch and become blurry. These settings also apply to vertical text in the programs that support that.
One of my panels has disappeared. How do I turn it back on?
The easiest way to find a panel is to choose Window from the main menu. The Window menu contains all the panels and their subpanels. As you find yourself using specific panels more often than others, learn their shortcut keys so you can turn them on or off easily.
In Dreamweaver, can I turn off all the panels to maximize my space?
Sure, but there is a better way to keep the panels you find useful open but hidden. To do this, choose Window, Hide Panels from the main menu or simply press the F4 key. The panels located to the right of the workspace are now hidden. To restore them, choose Window, Show Panels or press F4 again. Note that when you restore the panels, they are arranged exactly as you left them.
At first glance, any of the Studio programs can be a bit overwhelming. In addition to the typical menus, there are panels on the left, panels on the right, and buttons, drop-downs, and boxes on every panel. The good news is that all these options are what make the Studio applications some of the most powerful on the market. The bad news is that you have to learn about every feature to take full advantage of what the programs have to offer.
Don’t worry, though. The panels really aren’t as intimidating as they might appear at first glance and after you get used to them, I think you’ll find them to be very intuitive. The best thing you can do to get started, however, is to open each panel and familiarize yourself with the functionality that exists. Make some notes and if you don’t think you’ll use the panel very often, minimize it or turn it off altogether. This enables you to customize your workspace to fit your needs, but still find features located in a hidden panel should you need them.