During Windows setup, a printer might have been detected and installed automatically, eliminating the need for you to install a printer manually. In this case, a default printer is already installed, and printing should be fairly effortless from your Windows applications. You can just print without worrying about anything more than turning on the printer, checking that it has paper, and choosing the File, Print command from whatever programs you use.
If you didn't have your printer on or connected during setup, or it isn't a Plug and Play printer, this process might not have happened successfully. Sometimes simply plugging in a new printer or having Windows do a scan for new hardware is enough to get things rolling. I'll talk about installation procedures later, but regardless of your current state of printer connectedness, as a user of Windows XP, you should know how to control your print jobs, print to network-based printers, and share your printer for others to use. This chapter covers these topics.
When you print from an application, the application passes the data stream off to Windows, which in turn spools the data to a specified printer. Spooling is the process of temporarily stuffing onto the hard disk the data to be transmitted to the printer, and then delivering it at the relatively slow pace with which that printer can receive it. Spooling lets you get back to work with your program sooner. Windows passes the stored information from the queue through a driver program, which sends the printer the specific codes and commands it needs to render, or draw, your document. Meanwhile, additional documents can be added to a printer's queue, either from the same computer or from users across the LAN.
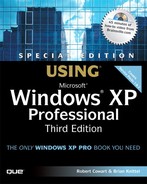
Windows gives you control over the printing system through the Printers and Faxes folder, shown in Figure 6.1. You can add printers, check the status of the queue, and manage print jobs by clicking Start, Control Panel, Printers and Other Hardware, Printers and Faxes.
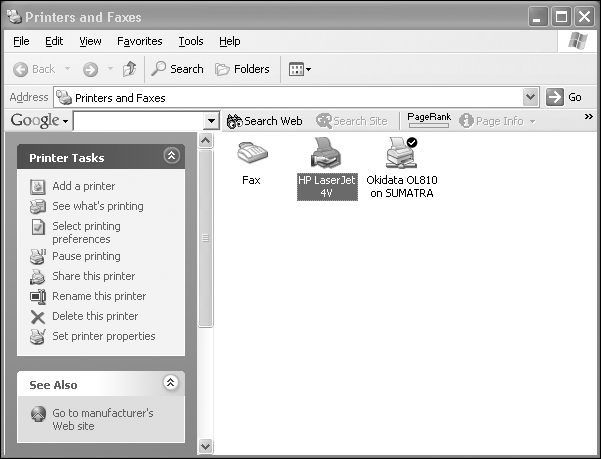
Figure 6.1. The Printers and Faxes folder is the starting point for printer setup and management. Open it from the Control Panel item Printers and Other Hardware.
TIP
If you use Printers and Faxes frequently, you can add it to your Start Menu. Right-click the Start button and select Properties. View the Start Menu tab and click Customize. Select the Advanced tab, and check Printers and Faxes under Start Menu Items. Customizing the Start Menu is discussed in more detail in Chapter 23, “Tweaking the GUI,” under “Start Menu Pizzazz!”
After you open the folder, you can view the Task menu for a particular printer by clicking that printer's icon.
The print spooler system takes control of all printing jobs, whether from Win32, Win16, OS/2, POSIX, or DOS applications. In cases of trouble (for example, ink or paper outage or paper jams), it also issues error or other appropriate messages to print job originators.
NOTE
I'll refer to the spooling and other printer management capabilities of Windows XP's GUI, taken as a whole, as Print Manager.
The Print Manager in Windows XP has the following features:
It lets you easily add, modify, and remove printers right from the Printers and Faxes folder by using the Add Printer Wizard.
The intuitive user interface uses simple icons to represent printers that are installed (available to print to) on the workstation, as well as network-based printers that have been identified. You don't need to worry about the relationships of printer drivers, connections, and physical printers. You can simply add a printer and set its properties. After it is added, it appears as a named printer in the Printers and Faxes folder.
Multiple applications can send print jobs to the same printer, whether local or across the LAN, at the same time. Additional documents are simply added to the queue and are printed in turn.
Default settings for such options as number of copies, paper tray, page orientation, and so forth can be automatically used during print jobs, so you don't have to manually set them each time.
You can easily view the document name, status, owner, page count, size, time of submission, paper source and orientation, number of copies, and destination port of jobs. You also can pause, resume, restart, and cancel jobs; plus, you can rearrange the order of the print queue. In addition, you can temporarily pause or resume printing without causing printer time-out problems.
You can set color profiles for color printers, ensuring accuracy of output color. Associating the correct color profile with all your publishing tools helps to ensure consistent color application throughout the publishing process.
LAN users can take advantage of the more advanced features:
Browsing for LAN-based printers to which to connect has been made very simple. On small workgroup-type networks, in fact, Windows will identify shared printers and add icons for them automatically.
You can easily share a printer over the LAN by modifying a few settings on the printer's Properties sheet. Your printer then acts as a print server for other computers. Shared printers can be given a meaningful name and comment, such as LaserJet in Ted's Office, which identifies them to LAN-based users surfing for a printer.
Groups of users (administrators, guests, and so forth) can be assigned rights for printing, sharing, and queue management.
The priority level of a print job can be increased or decreased.
You can set printer properties, such as times of day when a network printer is available for use.
In a busy LAN environment, you can attach a group (pool) of printers to one queue, so that output goes to the first available printer, and a notification is sent to you when the job is finished.
Note
→ To learn more about using a printer on the network, see “Using Printers on the Network,” p. 635.
The system can track the use of network print servers locally or remotely for later review or for billing purposes.
With the Web printer feature (Internet Printing Protocol, or IPP), printers can be used and shared securely over the Internet, without using Virtual Private Networking (VPN).
Note
→ To learn more about IPP, see “Traditional Versus Web Sharing,” p. 612.
If your printer is already installed and operational at this point, you can skip this section and skim ahead for others that may be of interest. However, if you need to install a new printer, modify or customize your current installation, or add additional printers to your setup, read on.
You might want to add a printer in a few different instances, not all of which are obvious:
You're connecting a new physical printer directly to your computer (obvious).
You're connecting a new physical printer to the network (obvious).
You want to print to formatted disk files that can later be sent to a particular type of printer (not so obvious).
You want to set up multiple printer configurations (preferences) for a single physical printer, so that you can switch among them without having to change your printer setup before each print job (obscure but useful timesaving idea).
TIP
As discussed in Chapter 2, “Getting Your Hardware and Software Ready for Windows XP,” and Chapter 3, “Installing Windows XP Professional,” before you buy a new piece of hardware, it's always a good idea to check the Microsoft Hardware Compatibility List (HCL) or Windows Catalog on the Web, or use the compatibility tool on the Windows XP CD. You should at least check with the manufacturer or check the printer's manual to ensure that it's compatible with Windows XP or Windows 2000.
You should know, though, that Windows XP comes with pre-installed drivers for more printers than are listed in the HCL. Before assuming that your old printer isn't supported, go through the manual installation procedure to see if your printer make and model is listed as an installation choice.
The basic game plan for installing and configuring a printer is as follows:
Read the printer's installation manual and follow the instructions for Windows XP or Windows 2000. Some printer manufacturers ask you to install their driver software before you plug in and turn on the printer for the first time. Heed their advice!
Plug it in. Many newer printers are detected when you simply plug them into the parallel or USB port. Your printer might be found and then configure itself fairly automatically. If it does, you can skip on down to “Printing from Windows Applications,” later in this chapter.
If the printer doesn't configure itself, you can run the Add New Printer Wizard (or use a setup program, if one is supplied with your printer). We'll go over this procedure in detail in the next section.
At this point, you should have a functioning printer. You might want to make alterations and customizations to the printer setup, though. For example, you can do the following:
If you have more than one printer installed, select the one you'll use most often as the “Default Printer.”
Set job defaults pertaining to paper tray, two-sided printing, scaling, type of paper feed, halftone imaging, printer setup information (such as a PostScript “preamble”), and paper orientation.
Check and possibly alter device-specific settings such as DPI (dots per inch), memory settings, and font substitution.
Share the printer, and specify its share name so that other network users can use your printer.
Declare a separator file, usually one page long, that prints between each print job with the user's name, date and so on. (These are handy on busy networked printers so users can find their own output among stacks of printouts.)
Arrange security for the printer by setting permissions (if you have Computer Administrator privileges).
NOTE
Printer security issues such as setting permission, conducting printer access auditing, and setting ownership are covered in Chapter 17, “Using a Windows XP Network.”
How you go about adding the printer depends on how you'll be connecting to it:
If your printer is connected directly to your computer with a USB, parallel, or serial printer cable, you are installing a local printer. Installing a local printer is covered in the next section.
To use a printer that's physically attached to another computer on your network, you still need to set up a printer icon on your own computer. This is called installing a network printer.
NOTE
On a Windows XP Workgroup-type network, Windows automatically locates and installs icons for all the shared printers on your LAN without you needing to do anything. (You can disable this behavior—open My Computer, select Tools, Folder Options, and select the View tab. You can check or uncheck Automatically search for network folders and printers.) You can also add icons for networked printers manually, as described in Chapter 17.
Note
→ For detailed instructions on installing a network printer, see “Using Printers on the Network,” p. 635.
A printer that's physically connected to the network wiring itself and not cabled to another computer is called a “local printer on a network port,” just to make things confusing. We'll cover the installation of these in Chapter 17 as well.
Installing a local printer is a bit more complex than connecting to an existing network printer. For starters, unless Windows finds the printer automatically (via Plug and Play), you have to specify the location where the printer is physically connected, what you want to name it, and a few other pieces of information.
The procedures vary, depending on how the printer is connected to your computer:
Parallel printer port
USB/FireWire (IEEE 1394)
Serial port
Infrared
Here's the basic game plan, which works with most printers. You must be logged on as a member of the Administrators group to add a local printer to a computer, so you must start by logging on as a Computer Administrator user. Then
Read the printer's installation instructions for specific Windows XP or Windows 2000 instructions. You may be instructed to install software before connecting the printer to your computer for the first time. This is especially important if your printer connects via USB.
Connect the printer to the appropriate port on your computer according to the printer manufacturer's instructions.
Read the description that applies to the kind of connection your printer uses and proceed as directed:
Parallel Port
Connect the printer to your computer (typically you don't have to shut down the computer to attach parallel devices, though doing so might be a good idea). Windows might detect and install the printer. If it doesn't, open the Printers and Faxes folder, and select Add New Printer to start the wizard. Now click Next. Click Local Printer, and turn on Automatically Detect My Printer. Then click Next again to start the Found New Hardware Wizard. Follow the instructions on the screen to finish installing the printer. The printer icon is then added to your Printers and Faxes folder.
USB or FireWire
Just connect the printer's cable to your computer. Windows will detect it and automatically start the Found New Hardware Wizard. Because USB and FireWire are hot-pluggable, you don't need to shut down or restart your computer. Simply follow the instructions on the screen to finish installing the printer. The printer icon is then added to your Printers and Faxes folder.
Infrared
Be sure your printer is turned on and within range of your computer's infrared eye. Also, make sure your infrared service is installed properly. Windows might detect the printer automatically and create an icon for it. If not, see Chapter 18, “Windows Unplugged: Remote and Mobile Networking,” for more information on infrared printers.
Serial Port
Some antique laser and daisywheel printers use a serial data connection. (If you're still using one of these, I like you already.) Follow the instructions in the next section.
If Windows can't detect the make and model of your printer, it will ask you to assist in selecting the appropriate type. If you can't find your printer's make and model in the list of choices, see step 5 in the next section.
If your printer isn't found using the options in the preceding section, or if the printer is connected via a COM port, you have to fake out Plug and Play and go the manual route. To do so, just follow these steps:
Open the Printers and Faxes folder, and run the Add New Printer Wizard.
Click Next.
Click Local Printer, make sure that Automatically Detect My Printer is not checked, and then click Next.
Select the port the printer is connected to in the resulting dialog. Figure 6.2 shows the port dialog box; the options and what they mean are as follows:
Options
Notes
LPT1:, LPT2:, LPT3:
The most common setting is LPT1 because most PC-type printers hook up to the LPT1 parallel port.
COM1:, COM2:, COM3:, COM4:
If you know your printer is of the serial variety, it's probably connected to the COM1 port. If COM1 is tied up for use with some other device, such as a modem, use COM2. If you choose a COM port, click Settings to check the communications settings in the resulting dialog box. Set the baud rate, data bits, parity, start and stop bits, and flow control to match those of the printer being attached. Refer to the printer's manual to determine what the settings should be.
File
This is for printing to a disk file instead of to the printer. Later, the file can be sent directly to the printer or sent to someone on floppy disk or over a modem. When you print to this printer name, you are prompted to enter a filename. (See the section “Printing to Disk Option.”)
Create a New Port
Create a New Port is used to make connections to printers that are directly connected to your LAN and are to be controlled by your computer. Its use is covered in Chapter 17.
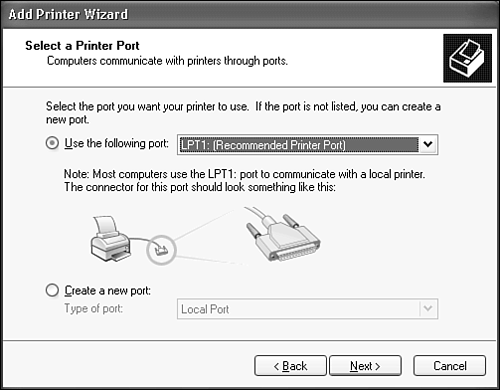
Select the manufacturer and model of your printer in the next dialog, as shown in Figure 6.3. You can quickly jump to a manufacturer's name by pressing the first letter of the name, such as E for Epson. Then use the up- and down-arrow keys to home in on the correct one.
If you can't find the appropriate model, you have two choices: You can choose a similar compatible model, and risk getting less-than-perfect output, or you can try to get the correct driver. If you have an Internet connection, click Windows Update to see if Microsoft has a driver available (don't hold your breath, though). Otherwise, get the manufacturer's driver on a floppy disk or CD-ROM or download it via the Internet, and then click Have Disk. Locate the driver (look for an INF file, the standard type for driver setup programs) and click OK.
Note
→ For more information on dealing with unlisted printers, see the next section, “What to Do If Your Printer Isn't Listed.”
If the wizard finds that the appropriate driver is already installed on your machine, you can elect to keep it or replace it. It's up to you. If you think the replacement will be better, go for it. By contrast, if no driver is listed on the machine, you may be prompted to install it or insert a disk, such as the Windows XP setup disk. On the whole, manufacturer-provided drivers tend to be better than the default ones provided with XP.
Name the printer. The name will appear in LAN-based users' browse boxes if you decide to share this printer. Some computers have trouble with names longer than 31 characters, so if you intend to share the printer, keep the name short and sweet.
Set whether you want this printer to be your default printer.
Click Next. Choose whether you want to share the printer on the LAN. If not, skip to step 10. If so, click Share As and enter a name for sharing—this name will also be visible to network users. If you're connected to any old DOS or 16-bit Windows computers, you might want to limit this name to 12 characters because that's the maximum length those users can see.
Note
→ To learn more about sharing your printer on a network, see “Sharing Printers,” p. 657.
Click Next. Now you can fill in additional information about the printer that people can see when browsing for a printer over the LAN. Something along the lines of
Joe's Laser Printer in Room 23might be helpful. Although these fields are optional, by filling in the location, you at least let users know where to pick up their documents.Click Next. You then are asked whether you want to print a test page. Doing so is a good way to confirm that the printer is now operational. Choose Yes or No, and then click Next.
Assuming that everything looks good, be sure your printer is turned on and ready to print and click Finish. Some files will be copied between directories. You might be asked to insert disks again.
If you chose to print a test page, your printer should start up and print a single page. You will be asked whether it printed okay. If it did, click Yes and you're finished. If it didn't print correctly, click Troubleshoot, and follow the wizard's instructions to identify the problem.
When you're finished, the icon for the printer appears in your Printers and Faxes folder.
TIP
If you're going to share the printer with LAN users running Windows 95, 98, Me, or NT 4 on Intel or Alpha platforms, they'll need different printer drivers than Windows XP and 2000 machines do. You can pre-install the drivers needed by other operating systems on your computer so that other users don't have to hunt around for the driver files, and so that they're not prompted to insert disks into their machines when they try to connect to your printer. To do this, open the Properties sheet for the printer, click the Sharing tab, and then click Additional Drivers.
Note
→ For more details about sharing printers for use by workstations running other operating systems, see “Installing Extra Printer Drivers,” p. 658.
If your printer isn't detected with Plug and Play, and isn't listed in the selection list, you'll have to find a driver elsewhere.
First of all, your printer probably came with a floppy disk or CD-ROM with driver software. On the printer manufacturer selection dialog (Figure 6.5, shown later), click Have Disk and then click Browse to find the Windows XP or Windows 2000 driver files for your printer. Select the appropriate INF file and click OK.
If you can't find the disk or it doesn't contain a Windows XP or 2000 compatible driver, don't worry; there's still hope. Windows XP has been out long enough that all currently manufactured printers have XP-compatible drivers. Even many older printers have Windows XP or 2000 driver support.
Your next step should be to visit the printer manufacturer's Web site. Check out their Product Support section, and look for a way to locate and download drivers. If you can find the appropriate driver, follow the manufacturer's instructions for downloading it. It will probably come as a compressed or executable file that has to be expanded or run, and this will put the installation files into a folder on your hard drive. You can then use the “Have Disk” feature discussed earlier to point Windows to this folder.
If this fails, check Microsoft's download site page at www.microsoft.com/downloads. Click Drivers in the left column, and search from there.
If neither Microsoft nor the manufacturer provides a driver, hope is fading. Still, some off-brand printers or models are designed to be compatible with one of the popular printer types, such as the Apple LaserWriters, Hewlett-Packard LaserJets, or one of the Epson series. Also, many printer models are very similar and can use the same driver. Check the product manual or manufacturer's Web site to see if your printer supports an emulation mode. This might help you identify an alternate printer model, and you can try its driver.
TIP
Use the Internet to see if other people have run into the same problem and have found a solution. For instance, you might use Google to search for Windows XP printer driver manufacturer model, substituting in the manufacturer's name and model number. However, don't download a driver from some random site: It could be infected with a virus. Download drivers only from a credible corporate Web site.
Assuming that you have obtained a printer driver, follow these instructions to install it:
Open the Printers and Faxes folder, and run the Add Printer Wizard.
Click Next, choose Local Printer, and then turn off the check box for autodetect.
Choose the correct port, and click Next.
Click the Have Disk button.
You're now prompted to insert a disk in drive A:. Insert the disk, or click Browse to get to a disk or network volume that contains the driver files. The wizard is looking for a file with an .INF extension, which is the standard file extension the installer setup file provided with all drivers.
Click OK. You might have to choose a printer model from a list if multiple options exist.
Continue through the wizard dialog boxes as explained previously.
Each printer driver has a Properties sheet of associated settings (typically enough to choke a horse). The basic settings are covered in this chapter, whereas you'll find those relating to network printer sharing in Chapter 17, “Using a Windows XP Network.”
Printer drivers dictate, among other things, the particular options available on their Properties sheet. Because of the variations possible, the following sections describe the gist of these options without necessarily going into detail about each printer type. (In other words, your fancy new printer may have options we've never even heard of.)
The settings pertaining to a printer are called properties. When you add a printer, the wizard pops the icon for it into the Printers and Faxes folder, and it's ready to go. At that point, you can alter its properties or accept the default properties. If you are logged on with Administrator privileges, or if the administrator has given you the correct privilege, you can then alter the properties as follows:
Open the Printers and Faxes folder by clicking Start, Control Panel, Printers and Other Hardware, View Installed Printers or Faxes.
Select the printer's icon and choose Set Printer Properties from the task list. Or, right-click the printer icon and select Properties. The printer's Properties dialog box then appears, as shown in Figure 6.4.
Change any of the text fields as you see fit. (Their significance was explained earlier in this chapter.)

Any printer's Properties sheet can have as many as eight tabs: General, Sharing, Ports, Advanced, Color Management, Security, Device Settings, and Utilities. Table 6.1 shows the general breakdown. Again, the tabs can vary depending on the capabilities of your printer.
Table 6.1. Properties Sheet Tabs
Tab | What It Controls |
|---|---|
General | This tab lists the name, location, model number, and features of the printer. From this tab, you can print a test page. You also can set default printing preferences, including the paper size, page orientation, paper source, pages per sheet (for brochure printing), affecting all print jobs. (You should rely on your application's Print Setup commands to control an individual print job's choice of paper orientation, paper source, and so on, which will override these settings.) Some color printers may have settings for paper quality, color control, and buttons for maintenance functions on this tab. |
Sharing | On this tab, you can alter whether the printer is shared and what the share name is. You also can provide drivers for users of other operating systems by clicking the Additional Drivers button. (See Chapter 17 for more). |
Ports | On this tab, you can add and delete ports; set time-out for LPT ports; and set baud rate, data bits, parity, stop bits, and flow control for serial ports. This tab also lets you set up additional ports for network-connected printers. |
Advanced | This tab controls time availability, printer priority, driver file changes, spooling options, and advanced printing features such as booklet printing and page ordering. The first two settings are pertinent to larger networks and should be handled by a server administrator. Additional Advanced settings vary from printer to printer, depending on its capabilities. Booklet printing is worth looking into if you do lots of desktop publishing. Using this option, you can print pages laid out for stapling together small pamphlets. Also, the New Driver button on the Advanced tab lets you replace the current driver with a better one, should this be necessary. |
Color Management | On this tab, you can set optional color profiles on color printers, if this capability is supported. (See “Color Management” later in this chapter.) |
Security | If you have disabled Simple File Sharing (discussed in Chapters 16 and 18), this tab will appear to let you set who has access to print, manage printers, or manage documents from this printer. |
Device Settings | The settings on this tab vary greatly between printers. For example, you can set paper size in each tray, tell Windows how much RAM is installed in the printer, and substitute fonts. |
Utilities | This tab, if present, will probably contain options for inkjet nozzle cleaning, head cleaning, head alignment, and so on. |
We'll discuss the most important of the settings in more detail in the next section.
TIP
Each time you add a printer, Windows creates an icon for it in the Printers and Faxes folder. Although each is called a printer, it is actually a “virtual” printer, much the way a shortcut represents a document or application in the GUI. A given physical printer can have multiple icons, each with different default settings. For example, one could be set to print in landscape orientation on legal-size paper, whereas another printer would default to portrait orientation with letter-size paper. Of course, you can always adjust these settings when you go to print a document, but that can get tedious. With multiple printer icons, you can choose a setup by just selecting the appropriate printer icon.
Note
→ For more details about printer sharing, printer pooling, port creation and deletion, and other server-related printing issues, see Chapter 17.
Table 6.2 describes the most common settings from the Properties dialog box for both PostScript and HP-compatible printers.
Table 6.2. The Options in the Basic Setup Dialog Box
Option | Description |
|---|---|
2 Sides | This option enables or disables double-sided printing for printers that support this feature. |
Configure Port, LPT Port Timeout | This option specifies the amount of time that will elapse before you are notified that the printer or plotter is not responding. If printing from your application regularly results in an error message about transmission problems, and retrying seems to work, you should increase the setting. The maximum is 999,999 seconds. |
Configure Port, Serial Port Settings | Settings here pertain to the serial port's communications settings, such as baud rate and parity. The serial port's baud rate, data bits, parity, stop bits, and flow control must match that of the printer's, or you're in for some garbage printouts. |
Default Datatype | This setting usually doesn't need changing. The default is RAW. A very specialized application might ask you to create a printer with another data type setting for use when printing its documents. The EMF data types can result in faster transmission over slow networks (for example, VPN by modem). |
Enable Advanced Printing Features | When this option is checked, metafile spooling is turned on, and options such as Page Order, Booklet Printing, and Pages Per Sheet may be available, depending on your printer. For normal printing, you should leave the advanced printing feature set to the default (Enabled). If compatibility problems occur, you can disable the feature. |
Enable Bidirectional Support | This option lets the computer query the printer for settings and status information. |
Font Cartridges | For this option, you choose the names of the cartridges that are physically installed in the printer. |
Font Substitution | TrueType Font Substitution Table: Used for PostScript printers to declare when internal fonts should be used in place of downloaded TrueType fonts to speed up printing. See Chapter 26, “Font Management,” for more details on font substitution. |
Form-to-Tray Assignment | For this option, you click a source, such as a lower tray, and then choose a form name to match with the source. When you choose a form name (such as A4 Small) at print time, the printer driver tells the printer which tray to switch to and you don't have to think about it. You can repeat the process for each form name you want to set up. |
Hold Mismatched Documents | This option is used mostly with dot-matrix forms printers, and directs the spooler to check the printer's form setup and match it to the document setup before sending documents to the print device. If the information does not match, the document is held in the queue. A mismatched document in the queue does not prevent correctly matched documents from printing. |
Keep Printed Documents | This option specifies that the spooler should not delete documents after they are printed. This way, a document can be resubmitted to the printer from the printer queue instead of from the program, which is faster. |
New Driver | Use this button to install an updated driver for the printer. It runs the Add Printer Driver Wizard. |
Orientation | This option sets the page orientation. Normal orientation is Portrait, which, like a portrait of the Mona Lisa, is taller than it is wide. Landscape, like a landscape painting, is the opposite. Rotated Landscape means a 90-degree counterclockwise rotation of the printout. |
Page Order | This option determines the order in which documents are printed. Front to Back prints the document so that page 1 is on top of the stack. Back to Front prints the document so that page 1 is on the bottom of the stack. |
Page Protect | If turned on, this option tells the printer to forcibly reserve enough memory to store a full page image; some intense graphics pages otherwise might not be able to print if the printer gives too much memory over to downloaded fonts and macros. |
Print Directly to the Printer | This option prevents documents sent to the printer from being spooled. Thus, printing doesn't happen in the background; instead, the computer is tied up until the print job is completed. There's virtually no practical reason for tying up your computer this way, unless your printer and Windows are having difficulty communicating or you find that printing performance (page per minute throughput) increases significantly when this option is enabled. When a printer is shared over the network, this option isn't available. |
Print Spooled Documents First | This option specifies that the spooler should favor documents that have completed spooling when deciding which document to print next, even if the completed documents are a lower priority than documents that are still spooling. |
Printer Memory | This option tells Windows how much memory is installed in the printer. |
Printing Defaults | You click this option to view or change the default document properties for all users of the selected printer. If you share your local printer, these settings are the default document properties for other users. |
Priority | Printers can have a priority setting from 1 to 99. The default setting is 1. Print jobs sent to a printer that has a priority level of 2 always print before a job sent to a printer with a level 1 setting if both setups use the same physical printer. |
Resolution | Some printers can render graphics and images in more than one resolution. The higher the resolution, the longer printing takes, so you can save time by choosing a lower resolution. For finished, high-quality work, you should choose the highest resolution. On some printers, this choice is limited by the amount of memory in the printer. |
Separator File | A preassigned file can be printed between jobs, usually to place an identification page listing the user, job ID, date, time, number of pages, and so forth. Files also can be used to switch a printer between PostScript and PCL (HP) mode for printers that can run in both modes. |
Use Printer Halftoning | Halftoning is a process that converts shades of gray or colors to patterns of black and white dots. A newspaper photo is an example of halftoning. When the arrangement of dots (pixels) on the page is varied, a photographic image can be simulated with only black and white dots. Because virtually no black-and-white printers and typesetters can print shades of gray, halftoning is the closest you get to realistic photographic effects. Normally, Windows processes the halftoning of graphics printouts. Only printers that can do halftoning offer halftone options. |
If you can't figure out what an option does, you can always click the Help button in the upper-right corner of the Properties dialog box and then click an option. A description of the option should appear.
TIP
You can access the Printing Defaults tab through two paths: one by choosing Printing Defaults from the Advanced tab and the other by choosing Printing Preferences from the General tab. What's the difference? Printing Defaults are the baseline settings offered to each user. Printing Preferences hold your own personal preferences, overriding the Printing Defaults (but are not forced on other users of that printer).
Another set of properties is available for shared printers. To locate it, right-click an empty spot within the Printers and Faxes folder, and choose Server Properties. The Server Properties list ports and show the collective list of all installed drivers in use. Here, you can define forms and set events and notifications. The last tab is covered in Chapter 17 because it's a network topic.
You might want to remove a printer setup for several reasons:
The physical printer has been removed from service.
You don't want to use a particular network printer anymore.
You had several definitions of a physical printer using different default settings, and you want to remove one of them.
You have a nonfunctioning or improperly functioning printer setup and want to remove it and start over by running the Add Printer Wizard.
In any of these cases, the approach is the same:
Be sure you are logged on with Administrator privileges.
Open the Printers and Faxes folder.
Be sure nothing is in the print queue. You have to clear the queue for the printer before deleting it. If you don't, Windows will try to delete all jobs in the queue for you, but it unfortunately isn't always successful.
Select the printer icon you want to kill, and choose File, Delete (or press the Del key).
Depending on whether the printer is local or remote, you see one of two different dialog boxes. One asks whether you want to delete the printer; the other asks whether you want to delete the connection to the printer. In either case, click Yes. The printer icon or window disappears from the Printers and Faxes folder.
TIP
The removal process removes only the virtual printer setup from the Registry for the currently logged-in user. The related driver file and font files are not deleted from the disk. Therefore, if you ever want to re-create the printer, you don't have to insert disks or respond to prompts for the location of driver files. On the other hand, if you are having problems with the driver, deleting the icon won't delete the bad driver. Use the New Driver tool on the Advanced properties tab to solve the problem in this case.
When you print from 16-bit or 32-bit Windows applications, the internal Print Manager kicks in and spools the print job for you, adding it to the queue for the selected printer. The spooler then feeds the file to the assigned printer(s), coordinating the flow of data and keeping you informed of the progress. Jobs are queued up and listed in the given printer's window, from which their status can be observed; they can be rearranged, deleted, and so forth. All the rights and privileges assigned to you, as the user, are applicable, potentially allowing you to alter the queue (as discussed later in this chapter), rearranging, deleting, pausing, or restarting print jobs.
If the application doesn't provide a way to select a specific printer (typically through a Print Setup dialog box), then the default printer is used. You can select the default printer from the Printers and Faxes folder by right-clicking a printer and choosing Set as Default Printer.
To print from Windows applications, follow these steps:
Check to see that the printer and page settings are correct and the right printer is chosen for your output. Some applications provide a Printer Setup or other option on their File menu for this task. Recall that settings you make from such a box override the default settings made from the printer's Properties sheet. If the application has a Print Preview command, use it to check that the formatting of the document is acceptable.
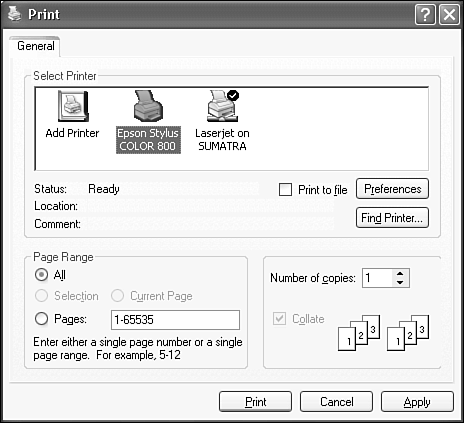
Select File, Print from the application's window, and fill in whatever information is asked of you. Figure 6.5 shows the Print dialog for WordPad. (Print dialogs for other applications may differ.) Notice that you can just click a printer's icon to choose it. When you do, its printer driver kicks in, changing the options on the tabs. You can also find a printer on the LAN or print to a file, using their respective buttons. Two other tabs, Layout and Paper/Quality, could be useful. For advanced options such as halftoning and color matching, select the Layout tab and click Advanced.
Click OK (or otherwise confirm printing). The data is sent to the spooler, which writes it in a file and then begins printing it. If an error occurs—a port conflict, the printer is out of paper, or whatever—Windows will display a message indicating what the problem is, as shown in Figure 6.6.
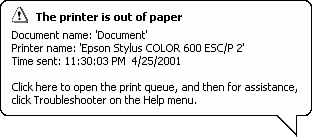
You can attempt to fix the problem by checking the cable connection, the paper supply, and so forth. Then click Retry. If you run into more serious trouble, you can run the Troubleshooting Wizard from the Help menu.
For most users, following these steps is all you'll ever need to do to print. The remainder of this chapter deals mostly with how to work with the printer queues of your own workstation printer or of network printers, and how to alter, pause, delete, or restart print jobs.
Note
→ If you receive printer errors when attempting to print a document, see “Printer Errors” in the “Troubleshooting” section at the end of this chapter.
Note
→ If nothing happens when you send a print job to the printer, see “Nothing Happens” in the “Troubleshooting” section at the end of this chapter.
As a shortcut to printing a document, you can simply drag the icon of the document you want to print either onto an icon of a printer or into the printer's open window (from the Printers and Faxes folder). You can drag the file from Explorer right onto the chosen printer's icon or open window to see it added to the print queue for that printer.
When you drop the document, Windows realizes you want to print it, and the file is loaded into the source application, the Print command is automatically executed, and the file is spooled to the Print Manager. Figure 6.7 shows an example of dropping a Word document on a PostScript printer.
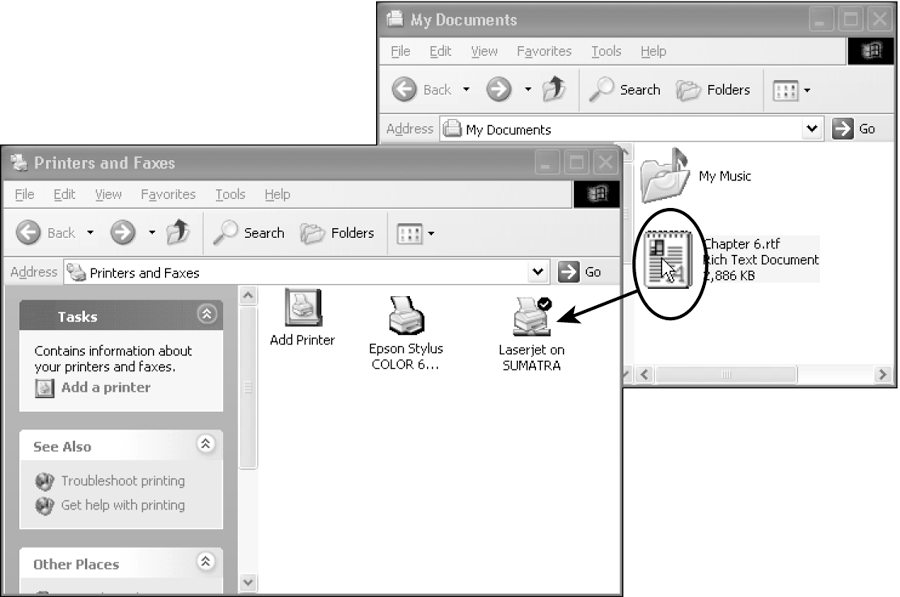
Figure 6.7. You can print a document or a number of documents by dragging them onto a destination printer in the Printers and Faxes folder. The files must have application associations.
TIP
Documents must have associations linking the filename extension (for example, .doc or .bmp) to the application that handles that file type; otherwise, printing by dragging them to Print Manager doesn't work. Also, you obviously don't have the option of setting printing options when you print this way. All the defaults are used.
Note
→ For more information about file associations, see “Setting Folder Options,” p. 891.
Note
→ If you're having trouble printing, you're getting “garbage” printouts, or you're getting only partial pages, see “Printer Produces Garbled Text” in the “Troubleshooting” section at the end of this chapter.
Note
→ If only half of the page prints correctly before the printer starts printing garbage text, see “Only Half of the Page Prints Correctly” in the “Troubleshooting” section at the end of this chapter.
If your printer is disconnected, you can still queue up documents for printing. You might want to do this while traveling, for instance, if you have a laptop and don't want to drag a 50-pound laser printer along in your carry-on luggage.
If you try this, however, you'll quickly find that the Print Manager will beep, pop up messages to tell you about the missing printer, and otherwise make your life miserable. You can silence it by right-clicking the printer's icon in the Printers and Faxes folder and selecting Use Printer Offline.
Windows will now quietly and compliantly queue up anything you “print.” (Just don't forget that you've done this or nothing will print even when you've reconnected your printer. You'll end up yelling at your unresponsive printer, when it's only doing what it was told).
When you've reconnected the printer, uncheck Use Printer Offline (with the same steps used above) and the output will flow forth. It's a nifty feature, but only available for local printers, not networked printers.
If you are still using MS-DOS applications, printing is one of the more problematic areas. Many modern inexpensive inkjet and laser printers don't even support output from DOS programs, as they don't have enough built-in smarts to form the character images by themselves. If you need laser or inkjet output from a DOS application, be sure that any new printer you buy uses a page-description language supported by your application, such as PostScript, Hewlett-Packard's PCL, or one of the Epson text formats.
Furthermore, most DOS applications can only print to LPT ports. If you want to use a printer that is on a USB port or is out there somewhere on a LAN, nothing will come out! To direct a DOS program's output to a USB or network printer, share the printer (even if it's attached to your own computer), issue the command
net use lpt2: \computernamesharename
from the Command Prompt window, and then direct your DOS program to use LPT2. (You should select an LPT port number that does not have an associated physical LPT port in your computer.)
Note
→ For more information about the net use command, see “Mapping Drives with net use,” p. 666.
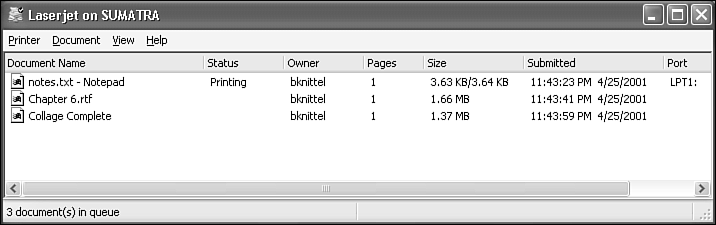
After you or other users on the network have sent print jobs to a given printer, anyone with rights to manage the queue can work with it. If nothing else, it's often useful to observe the queue to check its progress. This way, you can better choose which printer to print to, or whether some intervention is necessary, such as adding more paper. By simply opening the Printers and Faxes folder, you can see the basic state of each printer's queue, assuming you display the window contents in Details view.
For each printer, the window displays the status of the printer (in the title bar) and the documents that are queued up, including their sizes, status, owner, pages, date submitted, and so on.
TIP
You can drag a printer's icon from the Printers and Faxes window to your desktop, for easy access. Click Yes when Windows asks if you want to create a shortcut.
Figure 6.8 shows a sample printer's folder with a print queue and related information.
TIP
When print jobs are pending for a workstation, an icon appears in the system tray, near the clock. You can hover the mouse pointer over it to see the number of documents waiting to print. Right-click it to choose a printer's queue to examine in a window.
To keep network traffic down to a dull roar, Windows doesn't poll the network constantly to check the state of the queue. If you are printing to a network printer and want to check the current state of affairs on the network printer, choose View, Refresh or press F5 to immediately update the queue information.
TIP
By default, all users can pause, resume, restart, and cancel printing of their own documents. However, to manage documents printed by other users, your system administrator must give you the Manage Documents permission.
Note
→ To learn more details about managing print jobs as a system administrator, see “Tracking Printer Users,” p. 660.
After sending a document to the queue, you might reconsider printing it, or you might want to re-edit the file and print it again later. If so, you can simply remove the file from the queue. To do so, right-click the document and choose Cancel, or choose Document, Cancel from the menu. The document is then removed from the printer's window.
If you're trying to delete the job that's printing, you might have some trouble. At the very least, the system might take some time to respond. Sometimes canceling a laser printer's job while it's printing in graphics mode necessitates resetting the printer to clear its buffer. To reset, either turn the printer off and then on, or use the Reset option (if it's available).
Assuming you have been given the privilege, you can cancel all the print jobs on a printer. In the Printers and Faxes folder, right-click the printer, and choose Cancel All Documents. A confirmation dialog appears to confirm this action.
If you need to, you can pause the printing process for a particular printer or even just a single document print job. This capability can be useful in case you have second thoughts about a print job, want to give other jobs a chance to print first, or you just want to adjust or quiet the printer for some reason.
To pause a print job, right-click it and choose Pause. Pretty simple. The word Paused then appears on the document's line. The printing might not stop immediately because your printer might have a buffer that holds data in preparation for printing. The printing stops when the buffer is empty. When you're ready to resume printing, just right-click the job in question, and choose Resume.
TIP
Pausing a document lets other documents later in the queue proceed to print, essentially moving them ahead in line. You can achieve the same effect by rearranging the queue, as explained in the section titled “Rearranging the Queue Order.”
In some situations, you might need to pause all the jobs on your printer, such as to add paper to it, to alter the printer settings, or just to shut up the printer for a bit while you take a phone call. To pause all jobs, open the Printer's window and choose Printer, Pause Printing. You have to choose the command again to resume printing, and the check mark on the menu goes away.
Should you need to (due to a paper jam or other botch), you can restart a printing document from the beginning. Just right-click the document, and choose Restart.
When you have several items on the queue, you might want to rearrange the order in which they're slated for printing. Perhaps a print job's priority has increased because you need it for an urgent meeting, or you have to get a letter to the post office. Whatever the reason, as long as a given document hasn't yet started to print you can easily rearrange its position in the print queue like this:
Click the file you want to move, and keep the mouse button pressed.
Drag the file up or down to its new location. A solid line moves to indicate where the document will be inserted when you release the mouse button.
When you release the mouse button, your file is inserted in the queue, pushing the other files down a notch.
Like everything in Windows, each document in the printer queue has its own properties. For a more detailed view of information pertaining to each document, you can open the Properties sheet for it by right-clicking it and choosing Properties. You can change only two settings from the resulting dialog box (see Figure 6.9):
The print priority. Documents with higher priority numbers get printed ahead of documents with lower numbers.
The time of day when the document can be printed
Sometimes printing to a disk file rather than to a printer can be useful. What does printing to a disk file mean? It means that the same data that normally would be sent to the printer is shunted to a disk file, either locally or on the network. The file isn't a copy of the document you were printing; it contains all the special formatting codes that control the printer. Codes that change fonts, print graphics, set margins, break pages, and add attributes such as underline, bold, and so on are all included in this type of file. Print files destined for PostScript printers typically include a PostScript preamble, too.
The primary use of print-to-disk is to send formatted PostScript files to a service bureau for professional printing. You don't even need to own a PostScript printer to do this.
In some applications, this choice is available in the Print dialog box. If it isn't, you should modify the printer's configuration to print to a file rather than to a port. Then, whenever you use that printer, it will use all the usual settings for the driver but send the data to a file of your choice instead of to the printer port. Just follow these steps:
In the Printers and Faxes folder, right-click the printer's icon, and choose Properties.
Click Ports.
Set the port to File, and close the dialog box.
The next time you or another local or network user prints to that printer, you'll be prompted to enter a filename, as you can see in Figure 6.10. You should specify the full path with the filename. The file will be stored on the machine where the print job originated.
TIP
If you want to create an encapsulated PostScript file (.EPS), go through the Add New Printer procedure, selecting an appropriate PostScript printer model, such as the Apple LaserWriter or the QMS PS-810—your service bureau should suggest what model to use. You don't need to have such a printer attached to your computer. Then, modify the properties of the printer via the Properties, Details, Job Defaults, Options dialog box to set an encapsulated PostScript filename.
Color management is the process of producing accurate, consistent color among a variety of input and output devices. In Windows, the color management system (CMS) maps colors between devices such as scanners, monitors, and printers; transforms colors from one color space to another (for example, RGB to CMYK); and adjusts tints displayed or printed for correctness. For most of us, this kind of precision isn't very important, but for graphic artists and designers, it's an essential part of preparing proofs and professional output.
Just like a printer needs a printer driver or a scanner needs a TWAIN driver, each piece of hardware needs its own color profile. A profile is a file made by the hardware manufacturer (or Microsoft) specifically for the device, and it contains information about the color characteristics of the hardware. You simply associate the profile with the device via the device's Properties sheet, and the color system does the rest. Only if a device supports color management does its Properties sheet have a Color tab on it, however.
Even though some profiles are included with Windows XP, you might need to obtain a profile for your particular hardware. Check with the manufacturer. You can use the following procedure to add a color profile to a printer:
If you obtain a custom color-profile file from your manufacturer, copy it to %systemroot%system32spooldriverscolor where %systemroot% is your Windows folder.
Open the Printers and Faxes folder by selecting Start, Control Panel, Printers and Other Hardware, Printers and Faxes.
Right-click the printer that you want to associate with a color profile, click Properties, and then click the Color Management tab. Notice that the tab has two settings: Automatic and Manual. Normally, Windows uses the Automatic setting, in which case it assigns a color profile to the printer from those it has on hand. If you want to override the default, click Manual.
Click Add to open the Add Profile Association dialog box.
Locate the new color profile you want to associate with the printer. You can right-click a profile and choose Properties to read more about the profile. Because the filenames are cryptic, this is the only way to figure out what device a color profile is for.
Click the new profile, and then click Add. Keep in mind that you can associate any number of profiles with a given piece of gear. Only one can be active at a time, however. After you open the profile list, select Manual and click the one you want to activate. For sophisticated setups, you may have reason for multiple profiles, but it's not likely that many users who are not designers or artists will bother.
You can use the same approach to add profiles for other hardware pieces, such as displays and scanners. Just bring up the Color Management tab of each item through its Properties sheet.
If your computer has a modem installed, you can use it to send and receive faxes. Windows XP comes with fax software built in.
To send a fax from Windows XP, just write a document using your favorite application, choose the Fax icon from the printer folder, and print. Windows asks for the appropriate fax phone number and makes the call—no paper is involved. The fax service can even add a cover sheet to your document on the way out. To receive faxes, your modem can be set to answer calls. When a fax arrives, you can view its image on screen or print it, or even have it printed automatically.
Third-party Fax software such as Symantec's WinFax Pro has more bells and whistles, and can provide fax services for the whole network, but the basic version that comes with Windows will take care of most home and small office users' needs. Windows XP faxing can't be shared among a number of users on the LAN the same way you can share regular printers, though. If you want to provide a shared fax modem for your LAN, you should look for a third-party product. See the note below for some links.
NOTE
I should tell you that while computer-based faxing is great for documents you're typing up in your word processor, it's really not so great for hardcopy documents, which you need to scan and then “print.” There's still a lot to be said for inexpensive dedicated fax machines, at least for sending. If you frequently need to fax hardcopy, you might also consider getting an “all-in-one” printer/fax/scanner.
All you need to get started faxing is a fax device, such as a fax modem. (All modems sold in the last several years have fax capability, so the odds are slim that you'll have to buy a replacement). There also are some combination scanner/printer/faxing machines that can serve as a Windows Fax device.
In this day of Plug and Play, just installing a modem or attaching a fax device will probably induce Windows to install the modem software, fax service, and a fax printer icon automatically. If, for some reason, Windows doesn't sense that you've attached a fax modem even when you reboot, you can use the Add/Remove Hardware Wizard. (See Chapter 30, “Installing and Replacing Hardware,” for coverage of the Add/Remove Hardware applet and the Modem applet, both in the Control Panel.)
NOTE
For more information on modem compatibility with faxes, see the Microsoft Windows Hardware Compatibility List at the Microsoft Web site (http://www.microsoft.com/whdc/hcl).
When a functioning fax modem or multifunction printer has been installed, check to see if a Fax icon has appeared in your Printers and Faxes folder (you get there from Start, Control Panel, Printers and Other Hardware). If it's not there, you'll need to install the fax service by following these steps:
Log on as a Computer Administrator user.
Open the Printers and Faxes folder by clicking Start, Printers and Faxes. If this isn't on your Start menu, click Control Panel, Printers and Other Hardware, and then View Installed Printers or Fax Printers.
Click Install a Local Fax Printer in the Printer Tasks list.
You might need to insert your Windows XP installation disc if Windows needs to copy the Fax service files.
NOTE
If you have a functioning fax modem installed but the Fax icon doesn't appear in Printers and Faxes, or if you inadvertently delete the Fax icon from that folder later on, select Set Up Faxing or Add a Local Fax Printer from the Printer Tasks menu.
When the fax service has been installed, a Fax icon will appear in your Printers and Faxes folder, and a set of Fax management programs will be installed under Start, More Programs, Accessories, Communications, Fax. Table 6.3 lists these commands and their purposes.
Table 6.3. Fax-Related Commands
Command | Action |
|---|---|
Fax Console | Displays a queue of outgoing faxes and lists received faxes. |
Fax Cover Page Editor | Lets you design custom cover pages for your faxes. |
Send a Fax… | Used by itself, sends only a cover page; you can use this to send a short memo. It's mainly invoked by other applications to send whole documents. |
In addition, there is a Fax Configuration Wizard that asks you for setup information to be used in cover sheets and selects devices to be used for sending and receiving faxes, and a more sophisticated setup program called the Fax Service Manager. We'll discuss all of these programs in the following sections.
After you install your fax hardware, you can get started by entering your fax-related settings using the Fax Configuration Wizard (see Figure 6.11). Open it by clicking Start, More Programs, Accessories, Communications, Fax, Fax Configuration Wizard.
Enter the relevant information into the User Information tab. You can skip the stuff that is not relevant. This data will be printed on your cover pages. Click Next.
Select the modem(s) and/or other fax device(s) you wish to use. If there are more than one, you can prioritize them with the arrow buttons. Click Next when done.
Enter an identifying string (TSID) for your fax transmissions. This is displayed by receiving fax machines. Enter up to 20 characters and click Next.
If you'd like to receive faxes automatically, check the box corresponding to your fax modem. If you do, your modem will answer any incoming calls on its line (you can select the number of rings before it answers). If you leave the box unchecked, your computer won't be able to receive faxes. If you decide to receive faxes, enter a Called Station Identifier—this will be displayed on a sender's fax machine. Click Next.
If you chose to receive faxes, indicate what you'd like done with them as they arrive. You can choose to print them by checking “Print it on” and selecting a printer, and/or you can save a copy of the fax in a designated folder.
Finally, click Finish.
NOTE
There is one other configuration option you might want to set. By default, Windows will save its own copy of each fax it sends and receives. To alter this, open the Printers and Faxes folder, right-click the Fax icon, select Properties, and view the Archives tab. Here, you can select where and whether to store copies of incoming and outgoing faxes.
Note
→ If you can't get your fax printer installed, see “Fax Printer Can't Be Added” in the “Troubleshooting” section at the end of this chapter.
If you used Personal Fax for Windows in Windows 95, 98, or Me, and you want access to the archived faxes you sent and received with it, you can import these faxes into the new Fax service. Follow these steps:
Open the Printers and Faxes folder and double-click the Fax icon. This opens the Fax Console.
Select File, Import, and then select either Sent Faxes or Received Faxes.
In the Browse dialog, locate the folder containing your sent or received faxes. When you have selected the folder, click OK.
The imported faxes are not deleted from their original location. If the import is successful and you're happy with the new setup, you can delete the old archives later on to recover disk space.
The Fax service should now be running and your fax printer installed. You should now be ready to send a fax. To do so, just follow these steps:
Open the document you want to send.
Choose File, Print. In the standard Print dialog box, in the Name field, choose Fax. Set up the particulars as necessary (page range, and so on), and click OK.
The Send Fax Wizard then begins and walks you through the process of preparing the fax. (If you haven't run the Fax Configuration Wizard yet, you'll get the pleasure of going through it now.)
Fill in the recipient and dialing information as prompted, as shown in Figure 6.12. You can add multiple names to the list. If you have fax numbers in your address book, you can use it as a source for your list. If you set up your area code and Dialing Rules when you installed your modem, just enter the fax recipient's area code and number. If you didn't, uncheck Dialing Rules and enter the recipient's number including a 1 and area code if needed. Click the Add button to add the first recipient, and repeat the process for each additional recipient. (This way, you can do a bulk faxing if you need to. This feature is one of the true advantages of faxing with a computer rather than a hardware fax machine.) When you've entered all of the recipients, click Next.
Note
→ Windows can automatically manage area codes and special features like outside-line access by setting up Dialing Rules. This is really handy when you're on the road. For more information, see “Dialing Rules,” p. 928.
If you'd like to add a cover page to your fax, check Select a Cover Page and choose one of the predefined formats from the drop-down list. Enter the subject and any notes you want to appear on the cover page. If you'd like to alter your personal information, click Sender Info.
Click Next. Choose when you'd like to send the fax. Typically, it is Now, but the When Discount Rates Apply option is interesting. (See the description of Fax Service Management in the following section to see how to set the timing.) Alternatively, you can specify a time in the next 24 hours.
Click Next If you'd like to be notified if the fax is successfully sent or fails to go out, choose the desired notification method, then click Next.
Windows then will prepare the print job for faxing. You can follow its progress by watching the Fax Console, which I'll discuss in the next section.
For detailed control of how the Fax service sends and receives faxes, and to set up shared cover sheets that can be used by all of the computer's users, there's a management tool called Fax Console.
To run it, double-click the Fax icon in Printers and Faxes, or choose Start, More Programs, Accessories, Communications, Fax, Fax Console.
You then see the window shown in Figure 6.13.
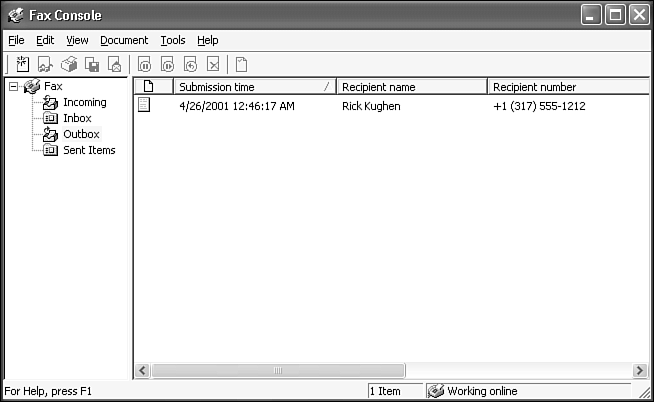
Poke around in this application to familiarize yourself with it. As you can see, you can browse through outgoing and received faxes by opening their Explorer folder views. The most important use of Fax Console is to delete outgoing faxes if you change your mind. To do this, just highlight the entry in the Outbox listing and press the Del key.
The Tools menu also offers several management options, as listed in Table 6.4.
Table 6.4. Fax Console Tools
Tools Menu Item | Lets You… |
|---|---|
Sender Information | |
Personal Cover Pages | Edit personal cover sheets not shared with other users of your computer |
Fax Printers Status | (Not terribly useful) |
Configure Fax | Run the Fax Configuration Wizard again |
Fax Printer Configuration | Edit Fax Printer Properties |
Fax Monitor |
Windows XP comes with several fax cover sheet forms predefined for typical business use: Generic, Confidential, Urgent, and so on. You can modify these cover sheets using the Fax Cover Page editor from the Fax menu or from Fax Console, as noted in Table 6.4. I can't go into much detail on this program, except to give you few hints:
From the Fax Console, select Tools, Personal Cover Pages to start the Cover Page Editor. You can select an existing cover sheet, or you can click New to create a new one.
It's easiest to start with one of the predefined cover sheets and modify it as desired. First, open Windows Explorer and click Tools, Folder Options, and select the View tab. Select Show Hidden Files and Folders. Now, back in the Cover Page Editor, click New to start the Cover Sheet Editor. Use File, Open and browse to one of the files in this spectacularly named folder: Documents and SettingsAll UsersApplication DataMicrosoftWindows NTMSFaxCommon Coverpages.
Use the text button (labeled “ab|”) and graphics button to draw items that never change, such as a confidentiality clause. Use the Insert menu to drop in information that is specified when each fax is sent, such as the recipient name.
When you've finished editing, use Save, or Save As to store the personalized cover sheet in My DocumentsFaxPersonal Coverpages.
When you configure the Fax system to receive faxes, it will answer incoming calls on your Fax modem.
Each fax is converted to a file using the TIF file format when it arrives. Because TIF is a nonproprietary format, you can view or edit it with almost any graphics program. However, using the Windows Picture and Fax is easy enough.
There are two ways to set up the fax service for receiving faxes: It can answer your modem's phone line whenever it rings, or you can do a one-time receive.
To set up auto-answering, follow these steps:
Log on as a Computer Administrator user.
Open the Printers and Faxes folder, right-click the Fax icon, and select Properties.
Select your fax modem on the Devices tab and click Properties.
View the Receive tab. Check Enable Device to Receive. You can enable auto-printing here as well, as I'll discuss later in this section.
If you don't want the fax modem to answer every call, you can enable a one-time receipt this way:
Note
→ If your system refuses to receive incoming faxes, see “Cannot Receive a Fax” in the “Troubleshooting” section at the end of this chapter.
TIP
As long as the fax service is running, and you have enabled your fax modem to receive faxes, the fax icon appears in the system tray. Double-clicking it brings up the Fax Monitor.
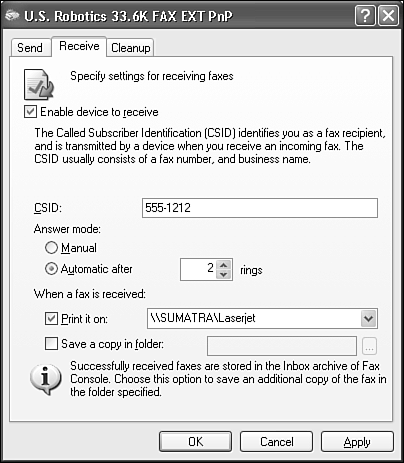
By default, incoming faxes are converted to TIF files and are dumped into the Fax Console's Inbox. But you can configure a fax setup to actually print your documents on paper as they come in. To shunt all incoming faxes to a physical printer for automatic printing, follow these steps:
Log on as a Computer Administrator user.
Open the Printers and Faxes folder, right-click the Fax icon, and select Properties.
Select your fax modem on the Devices tab and click Properties.
View the Receive tab. Check the Print and/or Save a copy options, as shown in Figure 6.14, and click OK. Use Save a Copy only to store an extra copy of received faxes, as they'll also be stored in the Fax console's inbox.
As I mentioned in the previous section, you can configure the fax service to automatically print incoming faxes. You can also view them on your monitor at any time.
There are two ways to view faxes. First, you can use the Fax Console, shown previously in Figure 6.13. There are three ways to open the Fax console:
If the Fax Monitor icon appears in the Notification area of your task bar, right-click it and select Fax Console
Select Start, All Programs, Accessories, Communications, Fax, Fax Console
Use a shortcut created by right-clicking and dragging the Fax Console menu item to your Start Menu or desktop
In the Fax Console window's left pane, select Incoming to view received faxes, or Sent Items to view faxes you've sent. Double-click any item in the right pane to display the fax with the Windows Picture and Fax viewer.
The Picture and Fax Viewer tool sports a toolbar across the bottom. Figure 6.15 shows the functions of the most important toolbar buttons. You can print the fax with the small Printer icon.
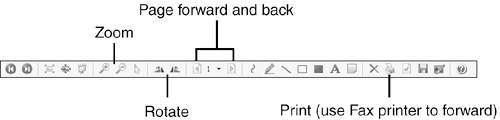
Figure 6.15. The Picture and Fax Viewer toolbar lets you flip through the pages of a received fax, as well as rotate, scale, and print it.
TIP
To forward a received or sent fax to another recipient, view the fax, click the Print button, and use the use the Photo Printing Wizard's instructions to print the fax images through your Fax printer.
Another way to view received faxes is to open the received fax folder directly. By default, the folder—get ready for this—is Documents and SettingsAll UsersApplication DataMicrosoftWindows NTMSFaxInbox. Double-click on any listed file to display the fax. If you receive a lot of faxes, you can create a shortcut to this folder.
(To see into the Application Data folder you have to tell Windows Explorer to show hidden files. To do this, open Windows Explorer and click Tools, Folder Options, and select the View tab. Select Show Hidden Files and Folders.)
I receive error messages when I try to print. What's wrong?
When an error occurs during a print job, Windows tries to determine the cause. If the printer is out of paper, you might see a Paper Out message in the status area. At other times, the message is ambiguous, and the word Error might appear in the status area. Add paper; make sure that the printer is turned on, online, and correctly connected; and make sure that the settings (particularly the driver) are correct for that printer.
I try to print, but nothing happens. How do I proceed?
If your print jobs never make it out the other end of the printer, work through this checklist:
First, ask yourself whether you printed to the correct printer. Check to see whether your default printer is the one from which you are expecting output. If you're on a LAN, you can easily switch default printers and then forget that you made the switch.
Check the settings in the Print dialog box carefully before you print. Is there something to print? Do you have to select some portion of your document first?
Next, check to see whether the printer you've chosen is actually powered up, online, and ready to roll.
If you're using a network printer, is the station serving the printer powered up and ready to serve print jobs?
Then check the cabling. Is it tight?
Does the printer need ink, toner, or paper? Are any error lights or other indicators on the printer itself flashing or otherwise indicating an error, such as a paper jam?
Are you printing from a DOS application? You may need to use the
net usecommand to redirect an LPT port to your Windows printer. See “Printing from DOS Applications” earlier in this chapter for more information.
When I print, the printout contains a lot of garbled text.
If you're getting garbage characters in your printouts, check the following:
You might have the wrong driver installed. Run the print test page and see whether it works. Open the Printers and Faxes folder (by choosing Start, Control Panel, Printers and Other Hardware, Printers and Faxes), open the printer's Properties sheet, and print a test page. If that works, then you're halfway home. If it doesn't, try removing the printer and reinstalling it. Right-click the printer icon in the Printers and Faxes folder, and choose Delete. Then add the printer again, and try printing.
If the printer uses plug-in font cartridges, you also might have the wrong font cartridge installed in the printer, or your text might be formatted with the wrong font.
Some printers have emulation modes that might conflict with one another. Check the manual. You may think you're printing to a PostScript printer, but the printer could be in an HP emulation mode; in this case, your driver is sending PostScript, and the printer is expecting PCL.
My printer prints about half of a page, and then it starts printing garbage.
This problem is a rare occurrence nowadays, but it's still possible if you're running a printer off a serial port. If your printer regularly prints about the same amount of text or graphics and then flips out, suspect a buffer-related problem. On serial printers, buffer problems can often be traced to cables that do not have all the serial-port conductors (wires), or they're not in the correct order. Make sure the cable is the correct kind for the printer.
I can't add a fax printer.
If you are unable to add a fax printer, you might not have sufficient user rights. See your system or fax server administrator. Also, be sure that your modem is fax-capable.
My system can't receive a fax. What's wrong with it?
Here's a quick checklist of common stumbling blocks:
Have you plugged in the phone line properly?
Is your modem installed and working properly?
Is it a true fax modem, not just a data modem?
Did you enable fax reception via the Fax Configuration Wizard (the default setting is off)?
Is another device (for example, an answering machine) picking up the phone before your fax modem is? Check the ring settings for the fax modem and/or answering machines. Consider using the option that lets you screen for a fax first and then activate it manually (see the Faxing section earlier in the chapter).
If your computer goes into standby mode and doesn't wake up to receive incoming faxes, you might need to turn on an option in the computer's BIOS to “wake on ring.” This option wakes up the computer any time it senses the ringer voltage on the phone line. If a fax is coming in, it takes the call. If it's not a fax, the computer goes back to sleep.
If you're shopping for or currently use one of those inexpensive color inkjet printers that are so popular these days, you might find that your pleasure over their low purchase price fades quickly when you find out how much the ink cartridges cost. It's the overall cost per page that matters, and this can range from $.05 to $.15 per page for black-and-white printing, and lots more for color. If you print, say, an average of 10 pages per day, a printer that costs $.05 per page less than a competing model will save you $180 a year. That can way more than make up for a higher initial purchase price. This same argument goes for laser printers too, by the way. There are monochrome laser printers on the market for not much more than $100 now, but the cost of the consumables—ouch!
My advice is, when you're shopping for any printer, check out online reviews and estimate your actual cost of operation before you buy. You can find reviews at www.pcmag.com, www.zdnet.com, www.consumersearch.com, www.consumerreports.com (which requires a subscription), and many other sites. An hour or two invested in research now can save you a bundle later.
But suppose you already have a printer and find that it's been rated as the biggest ink-sucking pig on the market. If you use it heavily, consider trading it for a less-thirsty model. Remember, you might recoup the cost in short order. You also can look into using recycled, refilled ink or toner cartridges, or even get one of those fill-your-own kits. (I would probably accidentally stick myself with the needle and end up with unintentional multicolored tattoos, but you might be braver than I.)
Finally, right-click the printer's icon in the Printers and Faxes folder, click Properties, and look at the various properties tabs. Most color inkjet printers have a special settings page that lets you choose to print everything in black and white only, or to print in a “thrifty” mode that saves ink. Use the color and letter- or photo-quality output modes only when you really care about what you're printing.