In this chapter
No matter how high the performance of your computer, sooner or later it will start to slow down as newer programs demanding faster and faster hardware show up on your desktop. And, chances are you'll run out of performance before you or your company is ready to pop for a replacement computer. This chapter will help you make the hardware changes—large or small—you need to get the most work and useful life out of your computer. We'll discuss how to upgrade and install hardware, how to add a second monitor, how to connect new and old hard drives, and how to add memory.
The single most helpful thing you can do to make your Windows XP computer run at peak speed is give it enough system memory (or RAM, short for Random Access Memory). Just as a reminder, there are two types of memory in your computer: hard disk space and RAM. RAM is used to hold Windows and the programs you're actually using, and Windows XP wants lots more than any previous version of Windows. As we discussed in the early chapters of this book, XP can run with as little as 64MB of RAM, but it will run very slowly and you'll find the experience unpleasant. Memory is very inexpensive these days, and boosting your RAM up to at least 256MB will make a huge difference. I'll discuss adding RAM later in this chapter.
Now, if you're already running Windows XP Professional on a full-bore, state-of-the-art system such as a 3 Gigahertz-plus Pentium 4 or AMD Athlon system, and your computer has a fast video accelerator, a gigabyte or more of fast memory, and fast SCSI disks, there isn't much more you can do in the way of actual hardware optimizing. You might just adjust the pagefile sizes, or convert as many partitions to NTFS as you can. Some of the settings you can make are discussed in Chapter 24, “Configuration via Control Panel Applets,” and Chapter 25, “Maintaining and Optimizing System Performance,” and the remainder are discussed in Chapter 27, “System Utilities.”
By the same token, if you're doing common, everyday tasks such as word processing, and you're already satisfied with the performance of your computer as a whole, you probably don't need to worry about performance boosters anyway. Your system is probably running just fine, and the time you'd spend trying to fine-tune it might be better spent doing whatever it is you use your computer for (like earning a living).
If you're anywhere between these two extremes, however, you may want to look at the tune-ups and hardware upgrades we'll discuss in this chapter.
TIP
This chapter just scratches the surface of the ins and outs of hardware installation and updates. If you want all the details, and I mean all the details, you should get a copy of the best-selling book Upgrading and Repairing PC's, 16th Edition, by Scott Mueller, published by Que.
Windows XP depends upon proper BIOS settings to enable it to detect and use hardware correctly. At a minimum, your drives should be properly configured in the system BIOS, and your CPU type and speed should be properly set (either in the BIOS or on the motherboard, depending upon the system). Thanks to some very clever work by Microsoft's engineers, Windows XP boots much faster than any other 32-bit version of Windows, but you can improve boot speed even more with these tips:
Set up your BIOS boot order to start with drive C: so that you can skip the floppy stepper motor test
Disable the floppy drive seek
Enable BIOS and video shadowing
One of the most effective improvements you can make to a system is to get a faster or larger hard drive, or add another drive. SCSI hard disks used to seriously one-up IDE drives, but the new breed of Ultra DMA EIDE drives (which I call Old MacDonald Disks—EIEIO!) and Serial ATA (SATA) drives are quite speedy and a whole lot cheaper than SCSI. An EIDE bus supports four drives (two each on the primary and secondary channels) and is almost always built in to your motherboard. Adding a CD-ROM (or CD-RW or DVD-ROM) drive claims one, leaving you with a maximum of three EIDE hard drives unless you install a separate add-on EIDE host adapter or have a motherboard with RAID support. Serial ATA (SATA) supports one drive per channel, but the latest SATA II connection system can reach top transfer speeds of 300MB/sec.
TIP
Many recent motherboards feature on-board IDE RAID, which can perform either mirroring (which makes an immediate backup copy of one drive to another) or striping (which treats both drives as part of a single drive for speed). While the RAID features on these motherboards don't support RAID 5, the safest (and most expensive!) form of RAID, they work well and are much less expensive than any SCSI form of RAID. Just remember that mirroring gives you extra reliability at the expense of speed, because everything has to be written twice, and striping with only two disks gives you extra speed at the expense of reliability—if one hard disk fails you lose everything.
The following are some essential considerations for upgrading your hard disk system:
Don't put a hard drive and a CD-ROM drive on the same channel unless necessary (put the hard drive on the primary IDE1 channel and the CD-ROM on the secondary IDE2 channel). On some computers, the IDE channel negotiates down to the slowest device on a channel, slowing down the hard disk's effective transfer rate. Make sure the hard drive containing Windows is designated as the Primary Master drive.
Defragment the hard disk with the Defragmenter utility, which you can reach through Start, Control Panel, Performance and Maintenance, Rearrange Items on your Hard Disk. Do this every week, and the process will take just a few minutes. But, if you wait months before you try this the first time, be prepared to wait a long time for your system to finish. You can also purchase third-party defragmenting programs that do a more thorough job. For more about defragmenting, see Chapter 29, “Managing the Hard Disk.”
Upgrade the disk controller (more properly called a host adapter). If you're using an Ultra Wide SCSI or later hard disk, for example, make sure you have a controller that takes maximum advantage of it. If you're using IDE, your host adapter is most likely built in to the motherboard on any Pentium-class or better system. If your drives support UDMA/66 (Ultra DMA) or faster UDMA modes but your motherboard supports only the slower PIO modes, install a replacement UDMA host adapter or upgrade your motherboard. Most modern motherboards, I should point out, do support UDMA, so you're probably okay on this score.
Get a faster disk drive: UDMA/66 or faster for IDE; Ultra2Wide or faster for SCSI (but remember, you need to match the drive to the SCSI host adapter you have or plan to buy). 7,200RPM IDE drives are now common, and the faster spin rate compared to the previous 5,400RPM standard makes most of them transfer data a bit quicker than their slower siblings. Some SCSI drives go up to 10,000 RPM, making for even faster transfer and lower latency (rotational delay).
Perhaps the most cost-effective upgrade you can make to any Windows-based system is to add RAM. This is one is a no-brainer: If your disk is pausing and thrashing each time you switch between running applications or documents, you need more RAM. While Microsoft says Windows XP can run with as little as 64MB of RAM, we've found that this results in intolerably slow performance. XP only really runs at a (barely) acceptable speed with 128MB, and 256MB is far better. If you run memory-intensive applications, get even more.
Windows automatically recognizes newly added RAM and adapts internal settings, such as when to swap to disk, to take best advantage of any RAM you throw its way. Upgrade beyond 128MB of RAM if you can afford it, especially if your system uses the economical SDRAM or DDR SDRAM DIMM modules. Memory prices fluctuate constantly, but these days 256MB memory modules are selling for under $40. This is a very cost-effective upgrade indeed. But be sure to get the right memory for your motherboard. There is a huge variety of memory technologies out there. At the time this was written, common technologies included SDRAM, DDR and RDRAM (RAMBus). Memory speeds range from 100MHz (labeled PC100) to 4400MHz (labeled PC4400). And, on top of that, there are error correcting (ECC) and non-error-correcting varieties.
To find out what type of memory you need, you should check with your computer manufacturer or the manual that came with your computer or motherboard. You should get the fastest compatible memory your CPU can use and that your motherboard supports. You can get RAM that's rated faster than you currently need, but you won't gain any speed advantage—just a greater likelihood of being able to reuse the memory if you later upgrade your motherboard.
TIP
If you run very disk and memory-intensive applications such as high-resolution scanning, image processing, video editing, or databases, consider adding memory well beyond 128MB. Windows XP isn't crippled by the 512MB limit found in Windows 9x and Me, and many systems on the market today can use more than 1GB of RAM. For most serious computer users, 512MB or 1GB should do the trick.
One of the tasks that is most common for anyone responsible for configuring and maintaining PCs is adding and removing hardware. The Control Panel contains an applet designed for that purpose; it's called the Add Hardware applet. You can use it in cases in which the operating system doesn't automatically recognize that you've swiped something or added something new, whether it's a peripheral such as a printer or an internal device such as a DVD-ROM, additional hard disk, or whatever.
If you're a hardware maven, you'll be visiting this applet a lot, especially if you're working with non–Plug and Play hardware. Plug and Play hardware installation is often completely effortless, because Windows XP Professional is good at detection and should install items fairly automatically, along with any necessary device drivers that tell Windows how to access the new hardware.
TIP
You use the System applet or the Computer Management “Device Manager” Console, not Add Hardware, for fine-tuning device settings, such as IRQ and port, updating devices and drivers, and removing hardware. You use Add Hardware only for adding or troubleshooting hardware.
A quick way to get to either utility is to click Start, and right-click My Computer. Select Properties, and then select the Hardware tab. From there you can open the Device Manager.
If you've purchased a board or other hardware add-in, you should first read the supplied manual for details about installation procedures. Installation tips and an install program may be supplied with the hardware.
NOTE
Always check the installation instructions before you install the new hardware. In some cases, the instructions will tell you to install some software before you install the new hardware. If they do, follow this advice!
However, if no instructions are included, you can physically install the hardware and keep reading.
If you're installing an internal device, you'll have to shut your computer down before you open the case. I suggest that you also unplug it, as most modern PCs actually keep part of the system powered up even when it appears to be off.
TIP
You might be tempted to move some of the adapter cards that are plugged into your motherboard from one slot to another, but don't do this unless you really have to. Each PCI adapter's configuration information is tied to the slot into which it's plugged. When you restart your computer, the Plug and Play system will interpret the move as your having removed an existing device and installed a new one, and this can cause headaches. In some cases you'll even be asked to re-insert the driver disks for the device you moved, and you may have to reconfigure its software settings. (From personal experience, I can tell you that moving a modem gives Symantec PCAnywhere fits.)
When the device is installed, power your PC back up and log on with a Computer Administrator account, and wait a minute or so. In most cases the New Hardware Wizard will automatically detect and set up the new device.
If you're adding a USB or FireWire device, you don't need to shut down before plugging the new device in, but you should close any programs you have running, just in case the installation process hangs the computer. The computer doesn't hang very often in NT-based systems like Windows XP Professional, but it can. Save your work, and close your applications before you plug in the new device.
For non-Plug and Play hardware, or for Plug and Play stuff that isn't detected or doesn't install automatically for some reason, you need to run the Add Hardware applet from the Control Panel while logged on as a Computer Administrator user. The wizard starts by searching for new Plug and Play hardware. If nothing is found, Windows asks whether the device is installed already. If you select “Yes, I have already connected the hardware,” Windows assumes you're having some trouble with a device or need to install it manually (see Figure 30.1). Your currently installed devices are listed with an option to troubleshoot or to add something new. For veterans, the combination option of adding new hardware or troubleshooting installed hardware seems a bit weird until you get used to it. I guess Microsoft wanted the wizard to perform double-duty. If you select “No, I have not added the hardware yet,” the wizard closes.
Figure 30.1. When a new Plug and Play device isn't found, you see this dialog box. Scroll down and choose Add a New Hardware Device.
Next, you're asked whether you want the wizard to attempt to detect and install the hardware automatically or specify the item yourself. (Legacy hardware interrogation is a science all its own, and I'm always amazed when some old job like an ISA sound card is detected properly.) If you select Search, you'll see a “gas gauge” apprising you of the progress for each category and the overall progress, and you'll hear lots of hard disk activity.
If a new device is found that doesn't require any user configuration, a help balloon appears onscreen near the system tray, supplying the details of what was located (see Figure 30.2). Windows displays the device at the end of the search process.

Figure 30.2. During the search process, any new hardware located is displayed near the system tray/clock.
In case the item isn't detected properly, click Next and a list of common hardware types is displayed (Figure 30.3). If you don't see a category that matches your hardware, select Show All Devices. Just choose the applicable category, and click Next.

Figure 30.3. Common hardware types are listed in alphabetical order. Select the type, or Show All Devices to install your device manually.
Be sure you choose the precise brand name and model number/name of the item you're installing. You might be prompted to insert your Windows XP CD-ROM so that the appropriate driver file(s) can be loaded. If your hardware came with a driver disk, use the Have Disk button to directly install the driver from the manufacturer's driver disk or downloaded file.
Early in the wizard's steps, you have the option of specifying the hardware yourself and skipping the legacy scan. Choosing this option can save you time and, in some cases, is the surer path to installing new hardware. It also lets you physically install the hardware later, should you want to. The wizard doesn't bother to authenticate the existence of the hardware; it simply installs the new driver.
If the device plugs into an external serial, parallel, or SCSI port, you might want to connect it, turn it on, and restart your system to install it. Some of these devices can't be installed via the Add Hardware Wizard if they're not present when the system is started.
TIP
In some cases, you are given the option of adjusting settings after the hardware is installed and possibly adjusting your hardware to match. (Some legacy cards have switches or software adjustments that can be made to them to control the I/O port, DMA address, and so forth.) You may be told which settings to use to avoid conflicts with other hardware in the system.
If, for some reason, you don't want to use the settings that the wizard suggests, you can use your own settings and manually configure them. You can do so from the Add Hardware Wizard or via the Device Manager (from the System applet). See “The Device Manager” later in this chapter.
CAUTION
In general, be cautious about configuring resource settings manually. When you change settings manually, the settings become fixed, and Windows XP's built-in device contention resolution is less likely to work. Also, if you install too many devices with manually configured settings, you might not be able to install new Plug and Play devices because none will be available. In the worst-case scenario, the system might not even boot if conflicts occur with primary hardware devices such as hard disk controllers or video cards. If you decide to use manual configuration, make sure you know what you're doing, and have the specs for the hardware in question at hand.
In cases in which the wizard detects a conflict, you are alerted when you finish walking through the wizard steps. You then have the option of bailing out or continuing despite the conflict. You can also back up and choose a different model of hardware, such as one you think is compatible with what you're attempting to install. Figure 30.4 shows a typical message when a conflict is detected.

Figure 30.4. When a hardware conflict is detected, it's reported by the wizard at the end of the installation process.
You now have the choice of setting the hardware resources for this device manually. Click View or change resources for this hardware (Advanced) to change the settings. On the next screen, click Set Configuration Manually. You'll see something similar to the dialog box in Figure 30.5, displaying the conflicting setting and the other device that uses the same setting.

Figure 30.5. Use caution when manually changing resources for a device. You may end up choosing an unavailable resource. In this dialog box, the I/O range is not available because of a conflict with another COM port.
Click Change Setting to change the settings; if the system displays an error message, use the Setting Based On scroll box to try a different Basic configuration, or change the manual settings you made to alternative values. Keep trying configurations until the conflicting device listing is clear. Then, click OK and restart your computer if prompted.
If you're unable to select a non-conflicting setting with the device you're installing, change the settings for the conflicting device with the Device Manager as discussed later in this chapter. In some cases, particularly with ISA cards, you may not be able to resolve a conflict and will need to remove one of the cards or disable the conflicting device on one of the cards with the Device Manager. PCI and AGP cards can share IRQ settings and fully support Windows XP's Plug and Play feature, making them a much better choice for installation in today's crowded systems.
When the hardware you're attempting to install isn't on the device list, the problem is one of the following:
The hardware is newer than Windows XP
The hardware is really old and Microsoft decided not to include support for it
The hardware must be configured with a special setup program, as with some removable-media drives such as the Iomega Zip drive
In these cases, you need to obtain the driver from the manufacturer's Web site. (or Microsoft's; check both) and get it ready on floppy disk, CD-ROM, or on the hard disk (either locally or across an available network). If the manufacturer supplies a setup disk, forget my advice, and follow the manufacturer's instructions. However, if the manufacturer supplies a driver disk and no instructions, follow along with these steps:
Run the Add Hardware applet and click Next.
Select Yes, I Have Already Connected the Hardware, and click Next.
Scroll to the bottom of the list and select Add a New Hardware Device. Click Next.
Select Install the Hardware that I Manually Select from a List and click Next.
Select the appropriate device category and click Next.
Click the Have Disk button. Enter the location of the driver (you can enter any path, such as a directory on the hard disk or network path). Typically, you insert a disk in your floppy or CD-ROM drive. If you downloaded the driver software from a Web site, locate it on your hard drive. In either case you can use the Browse button if you don't know the exact path or drive. If you do use the Browse option, look for a directory where an .INF file appears in the dialog box.
Assuming the wizard finds a suitable driver file, choose the correct hardware item from the resulting dialog box, and follow the onscreen directions.
Before unplugging a USB, FireWire, or PCMCIA device, tell Windows XP to stop using it. This prevents data loss caused by unplugging the device before XP has finished saving all of your data. You can stop these devices by clicking the PC Card icon in the system tray. Unplug the device or card only after Windows informs you that it is safe to do so.
For the most part, other hardware can be removed simply by shutting your computer off, unplugging it, and removing the unwanted hardware. When Windows restarts, it will recognize that the device is missing and will carry on without problems.
If you do want to completely delete the driver for an unneeded device, use the Device Manager computer management application. (One major change from Windows 2000 to Windows XP is that the Add Hardware wizard in Windows XP no longer doubles as the Remove Hardware wizard.) Delete the drivers before uninstalling the hardware; otherwise the device won't appear in the Device Manager's list.
Note
→ For details about the Device Manager, see “The Device Manager,” p. 1174.
One of the tools you're more than likely to rely on frequently for management of the computer's hardware is the Control Panel's System applet. Although there are a few others we'll mention here and in other chapters, the System applet's Hardware tab is most likely to be of use to you when managing hardware. To open the System applet, click Start, right-click the My Computer icon and choose Properties. You can also choose the Performance and Maintenance option in the Control Panel and click the System button.
The General tab tells you what version of the operating system is running, the number of the last service pack applied, the registered user's name, the type and speed of the processor, and the amount of RAM. Checking this tab is a relatively quick way to find out the amount of RAM Windows is detecting—which is particularly useful if you've just added some and you're wondering whether you installed it correctly. Also, if you're considering adding more RAM and don't recall how well the computer is currently endowed this is the place to look.
TIP
The addition of processor speed to Windows XP's General tab is a long-needed improvement to Windows. However, if you need more detailed technical information (such as the exact type of memory modules your system is using, the amount of RAM on your video card, and so forth), the best hardware reporting utility we know of is SiSoftware's Sandra. The Professional version with all the bells and whistles plus free updates is just $29. Get more than a taste of Sandra's power with the free Standard version, available from the SiSoftware Web site at www.sisoftware.demon.co.uk/sandra/
The other tabs and settings in this applet deal more with network and system repair issues and are discussed in other chapters. So, let's start with the Hardware tab. Figure 30.6 shows the Hardware tab of the Control Panel's System applet.
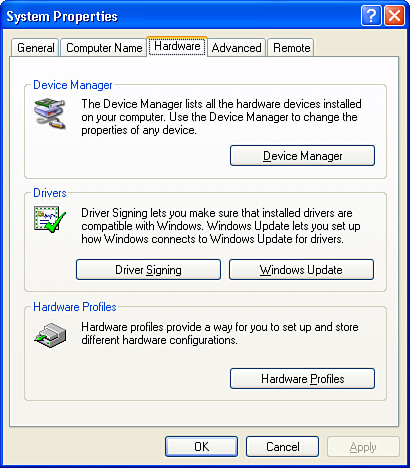
Figure 30.6. The Hardware tab of the System applet is a control center for examining and modifying hardware.
The Hardware tab's first option is the Add Hardware Wizard button. This button runs the same Add Hardware Wizard covered earlier in this chapter.
TIP
You must be logged on as a Computer Administrator to make alterations to the hardware devices, driver signing settings, and drivers. If your computer is connected to a domain-type network, network policy settings may also prevent you from completing this procedure.
When your hardware is installed, the other buttons on the Hardware tab (Driver Signing, Device Manager, and Hardware Profiles) are used to manage hardware and resolve problems.
The two buttons we're going to focus in the next two section are the Driver Signing and Device Manager buttons. The fact that these two buttons are grouped together on the Hardware tab is no accident. Drivers make hardware work with Windows, and Microsoft has gone to great lengths to make sure that Windows XP Professional users have reliable drivers for their hardware.
While you work with hardware and its drivers through the Device Manager, how well your hardware works with Windows depends on the settings in Driver Signing.
If you go to the hardware manufacturer's Web site for drivers, you might see both signed and unsigned drivers. If you want to block the use of any unsigned drivers, or turn off the warning that an attempt to install unsigned drivers will display, click the Driver Signing button and select the option you want to use.
The first button in this section, Driver Signing, a safety feature first developed by Microsoft for Windows 2000 and Windows Me, helps prevent bogus files and drivers from invading your operating system and potentially crashing it. Signed drivers are drivers which have passed testing standards established by the Windows Hardware Quality Labs (WHQL), and are the preferred drivers for use with Windows XP. All drivers supplied on the Windows XP CD-ROM and provided through Windows Update bear a digital signature indicating they've passed WHQL testing.
You or your administrator can configure three levels of protection on a computer. Clicking the Driver Signing button brings up a dialog for doing just that, as shown in Figure 30.7.
Figure 30.7. Setting the digital signature protection level for a machine can protect against the addition of bogus drivers and system files.
Based on the settings you choose, Windows XP either ignores device drivers that have no signature, warns you when it detects device drivers that are not digitally signed (the default), or prevents you from installing device drivers without digital signatures. Table 30.1 lists the options.
Table 30.1. Code Signing Options
Setting | Meaning |
|---|---|
Ignore | Any and all device drivers will be installed, without checking for a valid digital signature. |
Warn | If you try to install a driver that doesn't have a valid signature, you'll be alerted with a dialog box (see Figure 30.8) during the installation process. You can then cancel or continue. |
Block | Drivers are always checked for signature. If one valid signature is mising, the installation process stops dead in its tracks. |
Apply Setting as System Default | Only if you're logged in as a member of the Administrator group can you alter this setting, because it affects all users. When it is set on, it applies the settings above to all users who log on. |
You can use non-signed (non-WHQL approved) drivers with Windows XP, but the default Driver Signing setting listed in Table 30.1 will warn you if you do; see Figure 30.8 for a typical warning. Generally, you should use signed drivers for your hardware; use unsigned drivers only if signed drivers are unavailable or you need to fix an urgent hardware problem with a driver that hasn't had time to go through WHQL testing.
Leaving the default Warn setting for signature verification is probably the wisest choice for general usage. You should instruct users of the computer to check with you or the administrator if a warning pops up during installation of a program. Then a decision can be made on an ad hoc basis. Using the highest level of protection can be annoying because an installation will simply terminate mysteriously if the signature isn't found. Of course, in certain mission-critical settings, that result may be just what you want.
Note
→ An additional tool for verifying the signature of files, including all the system files, is called the File Signature Verification tool (sigverif). To learn more about it, see “Running the File Signature Verification Tool,” p. 1054.
The Device Manager provides a one-stop solution for checking device settings, reinstalling and updating drivers for existing drivers, and removing devices.
You can get to the Device Manager in two main ways:
Choose Start, Control Panel, Printers and Other Hardware, System, Hardware, Device Manager.
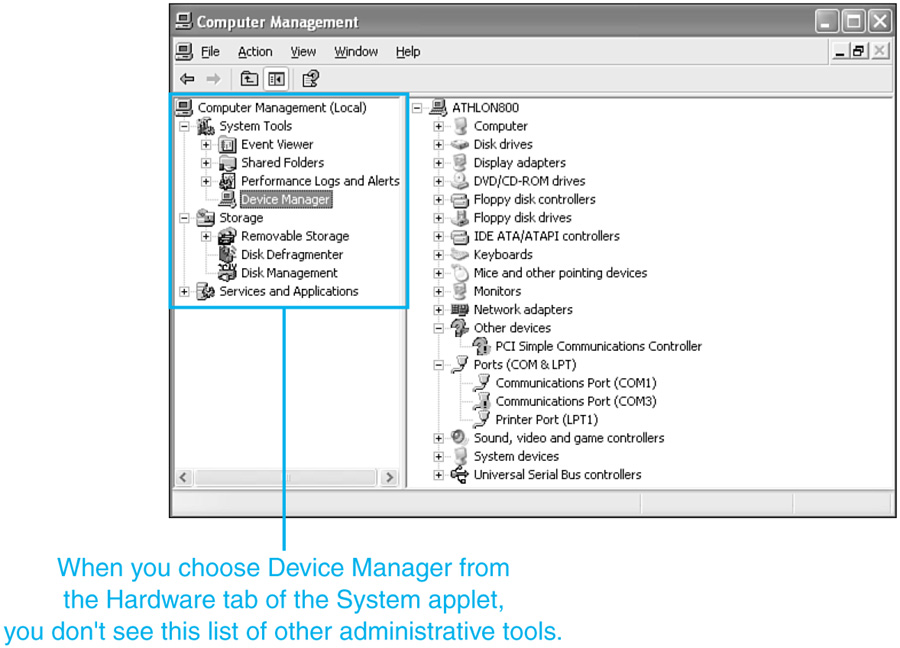
Choose Start, Control Panel, Performance and Maintenance, Administrative Tools, and then double-click Computer Management. Open the System Tools branch, and then click Device Manager. While more tedious to get to, you do get quicker access to the other administrative tools from this view (see Figure 30.9).
By default, the Device Manager displays Devices by Type, as seen in Figure 30.9. Click View to change to different views such as View Devices by Connection, by Resources (IRQ, I/O Port address, DMA channels, and memory addresses) by Type, Resources by Connection, and to view Hidden devices.
In the Device Manager listing, you can click a + (plus) sign to expand a device category to investigate the installed components in the category. Note that problematic items are marked with a yellow exclamation mark. You can check on any item's status by right-clicking it and choosing Properties.
Choosing this option opens a Properties dialog box, like the one shown in Figure 30.10. You can do some serious device tweaking from this dialog box.
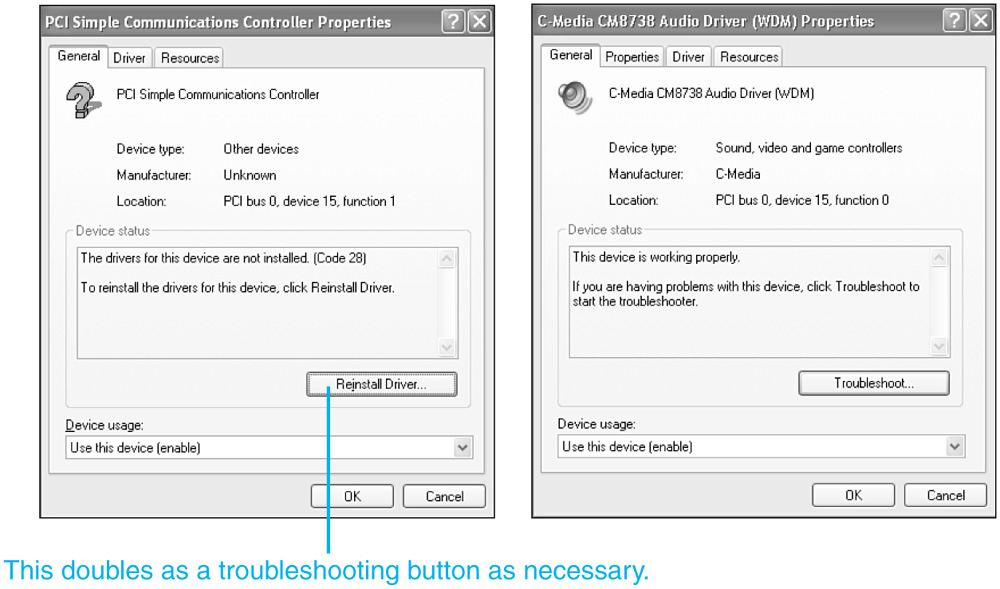
Figure 30.10. A Properties dialog box for a malfunctioning hardware device (left) and for a normally functioning device (right).
Choices on the dialog box vary from device to device, but almost all devices use the General, Driver, and Resources tabs as shown in Figure 30.10. The most important items are discussed in Table 30.2.
Table 30.2. Properties Dialog Box Tabs
Tab | Options and Notes |
|---|---|
General | Device Status: Displays whether the device is reported as working properly or indicates device problems. Troubleshoot: If the device is not working, you can click the troubleshooter to walk through a wizard. The drivers for the device must already be installed for this button to appear. Reinstall Driver: Click this button to reinstall the driver for the device; not shown if the device is working properly. Device Usage: You can check the hardware configurations that are available on your computer. You also can disable a device in a hardware configuration by selecting Disable from this scroll box. |
Settings | The options on this tab vary with the device. |
Driver | Driver Details: This section of the Driver tab displays the author of the driver, version, and location on the hard disk. It's worth checking. Most of the drivers will be from Microsoft, unless you installed one from another manufacturer. Update Driver: This button runs the Upgrade Device Driver Wizard, which walks you through the process of adding a driver. Refer to the “Adding Hardware” and :Removing Hardware” sections earlier in the chapter if you have questions about the process of changing a driver. Roll Back Driver: Restores the previously installed driver. Very useful if a new driver causes the system to fail. Uninstall: You can use this tab to remove the device drivers for this device. Removing the drivers effectively kills the device. You might have to reboot afterward, but in many cases, it's not required. You can add the device manually later if you change your mind. Sometimes removing and reinstalling a device can clear up problems you were having with it. |
Resources | Set Configuration Manually: If you suspect that the device is conflicting with other devices and this is why it's not working, you may be allowed to configure it manually. |
In the following sections we'll take a closer look at some of the functions found on the various tabs described in the preceding table.
The Windows XP troubleshooters have been mentioned several times in this book, beginning in Chapter 1, “Introducing Windows XP Professional.” The hardware-related troubleshooters included with Windows XP Professional include
Games and Multimedia Troubleshooter
Display Troubleshooter
Sound Troubleshooter
DVD Troubleshooter
Internet Connection Sharing Troubleshooter
Modem Troubleshooter
Home and Small Office Network Troubleshooter
Hardware Troubleshooter
Input Device Troubleshooter (keyboard, mouse, camera, scanner)
Drives and Network Adapters Troubleshooter
USB Troubleshooter
Printing Troubleshooter
Although these troubleshooters won't always solve your problems, they'll at least walk you through a logical train of investigation for your malady, possibly leading you to a conclusion or avenue of thought you hadn't previously tried.
You can start troubleshooters from various points within Windows, such as Display properties and Device Manager, but you can access most of them through the Help and Support Center:
Choose Start, Help and Support.
Type List of Troubleshooters into the search box and click the arrow to start the search.
You then see a list of troubleshooter wizards similar to the list above.
Run the troubleshooter that applies. You may be asked some questions that require running the Device Manager to determine the status of your hardware.
TIP
If a USB controller doesn't install properly, especially if the controller doesn't show up in the Device Manager, the problem might be in your system BIOS. Most BIOSes have a setting that can enable or disable the USB ports. Shut down and restart. Do whatever your computer requires for you to check the BIOS settings during system startup (usually hitting the Del or Esc keys on the initial boot screen). Then enter the BIOS setup and enable USB support.
When that is done, if the USB controller still doesn't appear in the Device Manager, it's possible that the computer's BIOS might be outdated. Check with the computer's or motherboard's manufacturer for a possible update to support USB under Windows XP Professional Edition.
Note that you can attempt to troubleshoot a specific installed device by running the Add Hardware applet from the Control Panel and highlighting the afflicted item. Also, the properties sheet for some devices offers a troubleshooter as well.
At some point, you'll need to get the latest driver for a device. You may have to do this if you encounter problems with the device, for example, if there are printing glitches or if Windows crashes with the famous “Blue Screen of Death.” If you encounter this sort of problem, you may find that the support pages on the manufacturer's Web site direct you to download and install an updated driver. They should give you clear instructions, but here is some additional advice.
Before you download and install the new driver, use this checklist:
Do you have permission to upgrade drivers? You need to be logged in as Administrator.
Is it really the latest driver? Check the manufacturer's site and the Microsoft site to see what you can find. The following sites are good places to start:
Does the “new” driver work with Windows XP? In a pinch, you might be able to use Windows 2000 drivers for some types of devices. Windows 95, 98, and Me drivers are not acceptable.
After you've downloaded the new driver, open the Device Manager using either of the methods described earlier in the section “The Device Manager.” You can install your new driver using these steps:
Open the Device Manager (if you're using the Computer Management approach, choose Device Manager in the left pane).
Click the device in question, and open its Properties dialog box.
In the Properties dialog box, select the Driver tab, and click Details if you want to see what version of the driver you are currently using, or just click Update Driver to proceed with updating the driver.
When the Update Wizard starts running, select Install from a List and click Next.
On the second page, choose the second option, Don't Search, and click Next.
Click Have Disk. Browse to the location of the driver. If the driver isn't found on the disk, you might have a problem. The .INF file on the disk and the accompanying driver files must meet the requirements of Windows XP to be deemed acceptable for installation. Return to the manufacturer's Web site and look for another driver.
TIP
Downloadable drivers are usually stored in compressed form on the manufacturer's Web site. If the file is an .EXE (executable) file, you will need to open it in Windows Explorer before you can use its contents; opening it might also install the driver for you. If the driver is in a .ZIP archive file, you will need to uncompress it. Fortunately, Windows Explorer in Windows XP Professional can uncompress .ZIP files for you. You won't need to download a separate unzipping utility.
Device driver rollback allows you to “roll back the clock” and use the previous driver you installed for a device if the newly installed driver doesn't work. When Windows XP installs a new driver for a device, it backs up the old driver, rather than simply replacing it as with previous versions of Windows.
To start the process, click the Roll Back Driver button on the Driver tab discussed in the previous section. If there are no previous driver versions, you are given the opportunity to run the Troubleshooter instead to help solve problems with your device.
If a previous driver version is available, click Yes to roll back to that driver. The Driver display changes to show the driver release date and information for the previous driver. Restart the computer if prompted.
If you decide to change the resources for a device using the Resource tab that appears when you view a device's properties in Device Manager, be cautious. Manually setting a device's resource assignment can result in conflicts with other installed devices, and doing so imposes restrictions on the Plug-and-Play system's capability to dynamically allocate resources in the future.
To reassign a resource, click the resource in question on the Resources tab, and choose Change Setting. In an attempt to prevent folks from inadvertently doing damage, the manual resource assignment dialog box keeps an eye on what you're doing. If you attempt to reassign to a resource that is already in use, you'll be warned about the conflict as you saw in Figure 30.5, earlier in this chapter.
Some drivers don't have resources that can be reassigned. Others have an option button called Reinstall Driver that's useful if the system thinks that would solve a nonfunctioning-device problem. Most PCI cards don't permit their resources to be reassigned, because they obtain their resource settings from Windows or from the system BIOS. Some systems allocate resources depending upon which slot you use for a particular card.
CAUTION
Notice the Setting Based On drop-down list on the Resources tab. It lists the hardware configurations in which the currently selected device is enabled. If you choose a hardware configuration other than the default, and you change any resource settings, resource conflicts may occur when you use the default hardware configuration. Resource conflicts can disable your hardware and cause your computer to malfunction or to be inoperable.
If you have multiple hardware configurations (see later in this chapter), the moral of the story is to try to keep the same configurations for hardware between them. It's okay to totally turn off specific pieces of hardware for a given saved hardware configuration, but when you start changing the resource allocations for each one, you could end up with a mess.
Windows, together with its Plug-and-Play technology, has grown far better at detecting and preventing hardware conflicts over the past few years. Still, system conflicts do arise, especially when you're using old ISA cards and other legacy hardware. (We suspect that there is little of this equipment still in use, and look forward to the day that we can delete this section from some future edition of this book. Until that day comes, we're stuck with it.)
More often than not, configuration and installation problems are due to incorrect settings on an ISA network, I/O, sound, modem, and SCSI cards. The result is cards that conflict with one another for the same IRQ (interrupt request line), base I/O port address, DMA, or base memory address. Usually, these settings are made by changing jumpers or DIP switches on the board.
NOTE
Some legacy cards can be configured via software settings rather than DIP switches and jumpers. For example, 3Com's popular 3C509B Ethernet adapter card uses its own utility program to set the IRQ and port address. You might have to run such a configuration program (typically using a DOS command prompt) to set up the card before it will run correctly under Windows XP.
Some ISA cards can also be switched into a true Plug-and-Play mode by flipping a switch or moving a jumper block on the actual card or running a software configuration program.
As I mentioned earlier, you can force Windows XP to use manually selected system resources, such as IRQ, for a given piece of gear. In the Device Manager, choose the item, open its Properties dialog box, click the Resources tab, turn off Use Automatic Settings, and enter the resource or resources you want to assign. If the card uses manual configuration, you will need to set the board to the settings you select in the Device Manager.
CAUTION
Don't manually assign resources unless you know what you're doing. The result can be an operating system that won't boot or a bunch of other components in your system that no longer work.
Hardware uses four major resources:
IRQ
DMA
I/O Port Addresses
DMA channel
If you install Plug-and-Play cards (which configure themselves automatically), you seldom need to be concerned about these settings, especially if the cards use the PCI expansion slot (virtually any current card does). If your system originally ran Windows 98 or newer versions, it probably supports a feature called IRQ steering or IRQ sharing, which eliminates the major cause for hardware conflicts when you use PCI cards.
However, if your system uses ISA cards, or you still use legacy ports such as serial (COM), parallel (LPT), and PS/2 mouse ports, IRQ and other resource conflicts can still be a problem.
PC architecture includes a means for a piece of hardware to quickly gain the attention of the CPU through a message called an interrupt request, or IRQ. Interrupts are sent over one of the 15 IRQ wires on the computer's bus. Such a request is a direct line to the CPU, which then services the request accordingly. A common example occurs when data comes in to your system's modem or LAN card. The modem or LAN card triggers the predetermined interrupt line (IRQ), and the CPU then begins to execute the program code that is appropriate for handling that interrupt. In fact, a part of the operating system called the interrupt handler is responsible for making it so.
Table 30.3 lists the common IRQs in an Intel-based computer. This information, in conjunction with the IRQ and the Conflicts/Sharing nodes of the Computer Management application, might help you to assign boards effectively. But remember, it's always best to let Windows make hardware assignments unless you are really stuck and something important just won't work. Also, remember that if hardware isn't on the Hardware Compatibility List (HCL), you're better off just going shopping than wasting a day tinkering with settings.
Table 30.3. Typical IRQ Assignments in 80286-Based or Later x86 Systems
(Modern PCI cards may use interrupt numbers higher than 15.)
Common add-on devices which use an IRQ include
Modern PCI and AGP video cards
SCSI host adapter cards
IDE host adapter cards
Fax/modem cards
Network interface cards
With only IRQ 9, 10, and 11 to choose from on many systems, it would be impossible to install all of these cards unless
An existing device is disabled
IRQ sharing is possible
If two ISA devices (or an ISA and a PCI device) try to share an IRQ, a system lockup will usually take place, or at best, neither device will work. A common cause of this a few years ago was when a serial mouse was attached to COM 1 and a fax/modem was assigned to COM 3. As you can see from the IRQ table, both of these ports use IRQ 4. The system worked until the user tried to operate the modem; then, the system locked up.
MS-DOS and old versions of Windows didn't always use the printer (LPT) ports' IRQs, enabling IRQ 7 (LPT1) and IRQ 5 (LPT2) to be used by other devices. However, Windows XP uses the IRQs assigned to a device, so that sharing can only take place under these circumstances:
Both devices using the IRQ are PCI devices; on most recent systems, this enables the PCI cards and any built-in PCI devices to share IRQs, as in Figure 30.11.
When two ISA cards or an ISA and a PCI card are set to the same IRQ, Windows XP shifts to a “polling” mode, wherein the CPU regularly checks for and services I/O requests rather than waits for IRQ lines to be activated. Obviously, this process can slow down overall system performance because it creates another software loop that the operating system has to service.
As shown Figure 30.11, IRQ steering is enabled automatically by Windows XP when the system supports it. In some cases, however, some motherboards might not permit IRQs to be shared, even by PCI devices.
If you find yourself short on IRQs or if you have two devices attempting to use the same IRQ and creating a conflict, you can try these possible solutions:
One solution with PCI cards causing conflicts is to try moving the PCI card to another slot. On some machines, each PCI slot's PCI Interrupt (A through D) is mapped to an ISA-type IRQ. By simply moving a card to a neighboring slot, you may be able to get your hardware working.
Another solution for IRQ cram is to set up multiple hardware profiles. You might not get all items to work under one profile, but you can have a couple of profiles and at least not have to throw anything away. You just reboot in another profile when you need access to a specific piece of gear.
Another workaround is to use USB, IEEE-1394, and SCSI devices. As you probably know, all of these port types support multiple devices on the same wire. No IRQs are required other than for the controller, which typically takes only one, and most recent systems already have USB ports onboard and enabled. Yet USB supports up to 127 devices, IEEE-1394 up to 63 devices, and SCSI typically 7 (or 15 if your card supports Wide SCSI). If you're struggling with where to put a scanner, printer, digital camera, or additional external hard drive, consider these buses. While you can daisy-chain devices from the parallel port, it's difficult to get more than two devices (printer and another one) working correctly. And, even the “high-speed” EPP and ECP parallel port modes are scarcely faster than USB, and are considerably slower than any form of SCSI or IEEE-1394.
A typical PC has eight DMA channels, labeled 0 to 7. DMA channels are used for rapidly transferring data between memory and peripherals without the help of the CPU. Some cards even use several of these channels at once. (For example, the SoundBlaster 16 WaveEffects sound card uses two DMA channels.) Typical users of DMA channels are
While recent EIDE hard drives use a variation of DMA called Ultra DMA (UDMA) for fast data transfer, DMA transfers performed by PCI-based devices don't use specific DMA channels. The only time a PCI device ever needs to use a DMA channel is if it's emulating an ISA device that uses one, such as a PCI-based sound card emulating an ISA-based sound card.
Sharing DMA channels is even worse than sharing IRQs. Because DMA channels are used to transfer data, not simply activate devices, you should never share DMA channels used by network cards, scanners, or SCSI host adapters, as a DMA conflict could result in data loss. Fortunately, with relatively few devices requiring DMA channels today, it's normally quite easy to avoid sharing a DMA channel.
Table 30.4 shows the typical assignments.
Table 30.4. Typical DMA Controller Assignments
Channel | Typical Assignment |
|---|---|
0 | |
1 | Available; may be used by ISA sound cards or by PCI sound cards emulating ISA sound cards |
2 | Floppy disk controller |
3 | ECP printer ports; some may use DMA 1 instead |
4 | DMA controller; used by system and not available |
5 | Available; may be used by ISA sound cards or by PCI sound cards emulating ISA sound cards |
6 | Available |
7 | Available |
TIP
Some devices are hidden from view in the Device Manager. Hidden devices include non–Plug and Play devices (devices with earlier Windows 2000 device drivers) and devices that have been physically removed from the computer but have not had their drivers uninstalled. To see hidden devices in the Device Manager list, choose View, Show Hidden Devices. A check mark should appear on the menu, indicating that hidden devices are showing. Click it again to hide them.
Using DMA is the fastest way to transfer data between components in the PC. However, an older technology called memory-mapped I/O is still in use today. (I/O means input/output.) In PC architecture, I/O ports are mapped into system memory and therefore are accessed by the CPU using memory addresses. As you might expect, each device that uses an I/O port must have a different port address, or data intended for one device will end up at another.
Check out the I/O folder off the Hardware Resources node in Computer Management, as shown in Figure 30.12, to see a sample list of I/O addresses and assignments. As you can see, this folder contains quite a few assignments. Note that the addresses are in standard memory-mapping parlance—hexadecimal.
Similar to the I/O port address, the base memory address is the beginning memory address that some cards or motherboard hardware use to communicate with the CPU. Sometimes this setting is called the RAM starting address (or start address).
Some older cards (you'll notice this often with network adapters or SCSI cards which have an onboard BIOS) must have their base memory address set by a jumper or software. Then the device driver for that component needs its software setting to match the jumper. A typical base memory address reads like this: 0xA0000 or just A0000. Sometimes the last digit is dropped, like this: A000.
If you open Computer Management and go to System Information, Hardware Resources, Memory, you'll see Memory Addresses such as the following:
0xA0000-0xBFFFF PCI bus
This address means the memory area between A0000 and BFFFF is assigned to the PCI bus. (The 0x indicates that it is a hexadecimal address.) So, when setting memory addressing, you need to consider not only the base addresses, but also the amount of RAM space the addresses will occupy. Some cards use 16KB of space, and others use 32KB or more. Check the card's manual for options. Using more memory can, in some cases, improve the operation of the card, but it decreases your system's memory availability because that space will be occupied. The end result depends on the type of card.
When you specify a memory address for a card, the operating system reserves that memory area for it. Regular RAM in that area is not used by the CPU, to prevent conflicts that could result from trying to write data or program code into system RAM at that address. Instead, the reserved area is used only by the device driver for your piece of hardware.
Most older ISA cards use an upper memory address that falls somewhere between A000 and FFFF. However, many VL-Bus, PCI, and some ISA cards can use address space above 1MB, or even above 16MB in the case of 32-bit cards. If your card can utilize a high address, it's better to do so because it minimizes the chances of conflicting with the operating system.
Windows XP Professional supports multiple monitors, a great feature first developed for Windows 98. You can run up to ten monitors with Windows XP, but most commonly, you will probably run just two or three. By using multiple monitors, you can place a large amount of information on your screens at once. Use one screen for working on video editing, Web design, or graphics and the other for toolbars. Leave a Web or email display on at all times while you use the other monitor for current tasks. Display huge spreadsheets across both screens.
The following are some rules and tips to know about using multiple monitors:
Some laptops support attaching an external monitor and can display different views on the internal LCD screen and on the external monitor. This feature is called DualView, and if your laptop supports it, your user's manual will show you how to enable the feature. You can ignore this section's instructions on installing a device adapter and just follow the instructions for setting the Display properties to use the second monitor.
Because most computers don't have more than one or two PCI slots open, if you want to max out your video system, look into the new breed of multimonitor video cards available from Matrox, ATI, and various other vendors. In a single slot, you can drive two or four monitors with these cards. With only two slots, you can drive four to eight monitors. Multimonitor video cards are available for either AGP or PCI slots.
Many multimonitor situations consist of two cards: either two PCIs or a mix of one PCI and one AGP.
If you mix AGP and PCI, older BIOSes sometimes have a strange habit of forcing one or the other to become the “primary” display. This is the display that Windows first boots on and the one you use for logging on. You might be annoyed if your better monitor or better card isn't the primary display because most programs are initially displayed on the primary monitor when you launch them. Therefore, you might want to flash-upgrade your BIOS if the maker of your computer or motherboard indicates that such an upgrade will improve the multiple-monitor support for your computer by letting you choose which monitor or card you want to make the primary display.
If you're unhappy with your system's choice of the primary display, you can adjust it with Display properties once both displays are running.
The operating system always needs a VGA device, which becomes the primary display. The BIOS detects the VGA device based on slot order, unless the BIOS offers an option for choosing which device is to be treated as the VGA device. Check your BIOS settings to see whether any special settings might affect multimonitor display, such as whether the AGP or PCI card will default to primary display, or the PCI slot order. Slot 1 is typically the slot nearest the power supply connector.
The design of the card itself is what makes it capable of operating on multiple monitors with Windows XP, not the driver. Don't expect any vendors to be able to add multiple monitor support simply by implementing a driver update. Either the card can support multimonitoring, or it can't. Some cards should technically be able to do so but are not stable enough to handle the capability at this time.
Some motherboards with onboard I/O such as sound, modem, and LAN may have difficulties with multiple monitor configurations, especially if the devices share an IRQ with a particular PCI slot. You might want to disable any onboard devices you're not using to free up resources that can be used for additional video cards.
Just because a set of cards supports multimonitoring under Windows 98 doesn't mean it can under Windows XP. These two operating systems have completely different video architectures.
TIP
Microsoft doesn't provide much specific information on which video cards/chipsets work in multimonitor mode, perhaps because BIOS and motherboard issues can affect the results different users will have with the same video cards. The RealTimeSoft Web site contains a searchable database of thousands of working combinations as well as links to other multiple monitor resources, including RealTimeSoft's own UltraMon multi-monitor utility. Check it out at www.realtimesoft.com
Follow these steps to install a secondary display adapter for use with multiple monitors:
Boot up your system into Windows XP Professional, and right-click a blank area of your desktop. From the resulting pop-up menu, select Properties.
Go to the Settings tab. Confirm that your primary display adapter is listed correctly (that is, if you have an ATI Rage Pro, then ATI Rage Pro should be listed under Display). Your display adapter should not be listed as plain-old “VGA,” or multimonitoring will not work. If this is the case, you need to find and install correct Windows XP drivers, or consult your display manufacturer's Web site.
Be sure you are using at least Medium (16-bit) color quality. Then click OK, and when prompted, select Apply Without Restarting.
After you've confirmed that you have drivers loaded for your display adapter and that you are in a compatible color depth, shut down and then power off your system.
Disconnect the power cable leading to the back of your system, and remove the case cover. Confirm that you have an available PCI slot. Before inserting your secondary display adapter, disable its VGA mode if possible by adjusting a jumper block or DIP switch on the card. Newer cards use the software driver or BIOS settings to enable or disable VGA mode.
Insert your secondary display adapter, secure it properly with a screw, reassemble your system, and reconnect the power. Next, connect a second monitor to the secondary display adapter.
Turn on both the monitors, and power up the system. Allow the system to boot into Windows XP.
After you log in, Windows XP detects your new display adapter and brings up the Hardware Wizard. Confirm that it detects the correct display adapter and, when prompted, tell Windows XP to search for a suitable driver. Then click Next.
Windows XP then finds information on the display adapter. When you are prompted, insert your Windows XP installation CD or the driver disk that came with your adapter, and click OK.
Windows XP then copies files. When the process is completed, click Finish. Windows XP then also detects your secondary monitor (if it is a PnP monitor). When you are prompted, click Finish again.
Now that all appropriate drivers are installed, right-click a blank portion of your desktop, and select Properties again. Next, go to the Settings tab. You will notice that two Monitor icons now appear in the center window of the display applet representing your two monitors (look ahead to Figure 30.13). Left-click the Monitor icon labeled 2, and it is highlighted in blue.
Under Display, your secondary adapter should be displayed. In the lower-left corner below the Colors section, check the box labeled Extend My Windows Desktop into This Monitor.
When Windows XP gives you a warning concerning compatibility, click Yes.
While the Monitor icon labeled 2 is highlighted, adjust the color depth and resolution for the new monitor.
You might want to change the way your monitors are positioned by left-clicking and holding down the mouse button while you drag the Monitor icons. (Note that the displays must touch along one edge.) When you find a desirable position, just release the mouse button, and the Monitor icon is aligned adjacent to the first Monitor icon. Also note that wherever the two displays meet is the location your mouse will be able to pass from one display to the next, so a horizontal alignment is preferred for a standard desktop monitor arrangement (see Figure 30.13).
Click OK. Windows XP then asks whether you want to restart or apply your changes. Select Restart to allow Windows XP to reboot your system.
After the system is rebooted and you log on to your system, multimonitoring should be functional, and you should have an extended desktop displayed on your second monitor. You also should be able to move your mouse into this extended desktop.
NOTE
You can set up Windows XP with more than one secondary display adapter, up to a maximum of nine additional displays. To do so, just select another supported secondary display adapter with VGA disabled, and repeat the preceding steps with another monitor attached to the additional secondary adapter.
After you finish these steps, you can drag items across your screen onto alternate monitors. Better yet, you can resize a window to stretch it across more than one monitor. Things get a little weird at the gap, though. You have to get used to the idea of the mouse cursor jumping from one screen into the next, too.
TIP
If you're not sure which monitor is which, click the Identify button shown in Figure 30.13 to display a large number across each monitor for a few seconds.
Blackouts and power outages (and the data loss they can cause) can happen anywhere. While Windows XP Professional contains a backup utility that can be used to protect your data, and you may use a network drive that's backed up every night for your data, you should also be concerned about keeping power going to your PC during its normal operation between backups.
A battery backup unit (also called a UPS, which is short for Uninterruptible Power Supply) can provide battery power to your system for as much as ten to fifteen minutes, which is long enough for you to save your data and shut down your system. The UPS plugs into the wall (and can act as a surge suppressor) and your computer and monitor plug into outlets on the rear of the UPS.
Electronic circuitry in the UPS continually monitors the AC line voltages, and should the voltage rise above or dip below predefined limits or fail entirely, the UPS takes over, powering the computer with its built-in battery and cutting off the computer from the AC wall outlet.
As you might imagine, to prevent data loss, the system's response time has to be very fast. As soon as the AC power gets flaky, the UPS has to take over within a few milliseconds, at most. Many (but not all) UPS models feature a serial (COM) or USB cable, which attaches to the appropriate port on your system. The cable sends signals to your computer to inform it when the battery backup has taken over and to start the shutdown process; some units may also broadcast a warning message over the network to other computers. UPS units with this feature are often called intelligent UPS units.
TIP
If the UPS you purchase (or already own) doesn't come with Windows XP-specific drivers for the shutdown and warning features, contact the vendor of the UPS for a software update.
The Power Options applet in Control Panel can be found by clicking Start, Control Panel, Performance and Maintenance, Power Options. Figure 30.14 shows the UPS tab, which enables you to select the model of UPS that's connected to your system, set up signaling for models which support automatic shutdown, and inform you of the battery's condition and how long you can expect the system to work from battery (a factor often called the UPS runtime).
Figure 30.14. The UPS tab in Power Options after a UPS model has been selected, but before the UPS has been connected.
If your UPS doesn't have provisions for automatic shutdown, its alarm will notify you when the power has failed. Shut down the computer yourself after saving any open files, grab a flashlight, and relax until the power comes back on.
Ideally, all your workstations assigned to serious tasks (what work isn't serious?) should have UPS protection of some sort. Although it's true that well-designed programs such as Microsoft Office have auto-backup options that help to restore files in progress if the power goes out, they are not always reliable. Crashes and weird performance of applications and operating systems are enough to worry about, without adding power loss on top. And if the power fails during a disk write, you might have a rude awakening because the hard disk's filesystem could be corrupted, which is far worse than having a lost file or two.
My advice is that you guard against the ravages of power outages at all reasonable costs. With the ever-increasing power and plummeting cost of notebook computers, one of the most economically sensible solutions is to purchase notebook computers instead of desktop computers, especially for users who change locations frequently. They take up little space, they are easier to configure because the hardware complement cannot be easily altered, and they have UPSs built in. When the power fails, the battery takes over.
TIP
When you're using laptops, be sure your batteries are still working, though. With time, they can lose their capacity to hold a charge. You should cycle them once in a while to check out how long they will run. If necessary, replace them. Also, you should set up the power options on a laptop to save to disk (hibernate) in case of impending power loss. You'll typically want to set hibernation to kick in when 5 to 10 percent of battery power is remaining, just to ensure that the hard disk can start up (if sleeping) and write out the system state onto disk.
If you are using Windows XP Professional systems as servers, you'll certainly want UPS support, as discussed in the networking section of this book. Windows XP Professional can alert any connected workstation users of impending system shutdown as the UPS battery begins to drain if their UPS units are equipped with suitable software drivers. Users are warned to save their work and shut down (assuming they are running on a power source that is also functional, of course).
Before shelling out your hard-earned dough for UPS systems, you should check to see which ones are supported by Windows XP Professional. Consult the Hardware Compatibility List on the Microsoft site. Also, consider this checklist of questions:
Do you want to purchase a separate UPS for every workstation or one larger UPS that can power a number of computers from a single location?
What UPS capacity do you need for each computer? The answer depends on the power draw of the computer box, the size of the monitor, and whether you want peripherals to work on battery, too. To fully protect your network, you should also install a UPS on network devices such as routers, hubs, bridges, modems, telephones, printers, and any other network equipment. Check the real-world specs for the UPS. The capacity is also determined by how long you want the UPS to be able to operate after a complete power outage. If you just want enough time for you or another user to save work, a relatively small UPS will do. If you want to be able to get through a day's work doing stock trades, you'll need a hefty unit.
TIP
Network hardware and modems should be powered by the UPS, but printers should not be. Laser printers, in particular, have such high power requirements that your actual runtime for a given UPS unit will be just a fraction of what it would be if the laser printer were left off the UPS circuit. Because systems can store print jobs as temporary files until a printer is available to take them, there's no need to waste precious battery power to keep any type of printer running through a blackout.
What software support do you want? Do you need to keep a log of UPS activity during the day for later analysis? What about utilities that test the UPS on a regular basis to ensure it's working?
As I mentioned previously, Windows XP Professional has services built in for responding to a UPS's signal that an outage has occurred. They can be configured to alert users, automatically shut down the system, and/or execute a program of your choice. Automatic and graceful shutdown of the system is important in case a power failure lasts long enough to deplete the UPS batteries. In addition to connected users being warned of an impending shutdown, new users can be prevented from connecting to such a server.
If you are going to use a UPS that doesn't support signaling to the computer via a data cable, you don't have to worry about installing or configuring the Windows XP UPS service. It won't make any difference and isn't needed.
You can install the UPS according the manufacturer's instructions or, if it's a Plug-and-Play device, follow standard procedures for installing new hardware. Typically, you connect the UPS to the power source, the computer to the UPS, and the serial cable between the UPS and the computer.
CAUTION
Be aware that normal serial cables do not cut the mustard for connecting a UPS to a Windows XP Professional machine. UPS serial cables, even between models from the same manufacturer, use different pin assignments. You're best off using the cable supplied by the maker of the UPS.
Another way to install the driver for a particular UPS model is to go to the Control Panel and run the Power Options applet, as shown in Figure 30.14. Click Select, and choose the UPS make and model you have and the COM port the UPS data cable is on, if any. The COM port is used to receive signals from the UPS about its charge level and the state of the AC power source.
If your UPS isn't listed, choose Generic Make, select Custom, and make sure to check the signal polarity settings in Table 30.6. For listed UPS devices, the polarities are preset for you.
After you select the type of UPS, return to the UPS tab of the Power Options Properties dialog, and click Configure to set up what you want Windows XP Professional to do in the event of a power interruption. The UPS Configuration dialog is shown in Figure 30.15.
Editable items on the tab differ, depending on what UPS you have installed, but they fall into the following categories:
The conditions that trigger the UPS device to send a signal, such as regular power supply failure, low battery power, and remote shutdown by the UPS device
The time intervals for maintaining battery power, recharging the battery, and sending warning messages after power failure
An optional executable program specified to run when power outage is sensed
Final behavior of Windows in case of complete discharge of the UPS backup battery (typically a graceful shutdown)
You can use Table 30.5 when you're considering the settings.
Table 30.5. The UPS Configuration Dialog Box
For a smart UPS, serial data lines are used to communicate with the UPS. For a generic UPS, though, the data lines are ignored, and Windows uses the COM port's modem-status signaling lines. AC and battery status are received from the UPS using two of these lines, and a third line, the DTR signal, goes from the computer to the UPS. This signal can tell the UPS to turn itself off when Windows XP Professional has finished shutting down. This capability helps extend the life of the UPS batteries by avoiding a full discharge.
If your UPS isn't listed among those supported and you don't have Windows XP-compatible drivers you can install, Windows XP Professional doesn't know what your UPS is capable of and how it sends signals to the computer, if at all. When you choose Generic and then choose Custom, you see a Next button. Clicking it brings up the dialog box shown in Figure 30.16.
Figure 30.16. Here, you can set custom polarities for a UPS that Windows XP Professional doesn't know how to preconfigure.
Assuming the UPS has a serial link to the computer, you can set the port and fill in the blanks as necessary. Turn off all the options if the UPS has no serial link to a COM port. As the dialog box warns, you should consult the manufacturer or manual to ensure the settings are correct.
Table 30.6 describes the salient settings in the UPS polarities.
Table 30.6. UPS Polarities
The UPS Configuration dialog box has an option for running an executable file when a power failure is detected. It is an option only. Warning messages are sent out (assuming those options are supported and turned on) regardless of whether you choose this option. However, you might want to run a specific executable before the computer is shut down.
If you use this option, make sure the program or script you choose can execute in 30 seconds or less. Failure to complete execution in 30 seconds jeopardizes the safe shutdown of your Windows computer.
Do the following to declare and set up the executable file:
In the UPS Configuration dialog box, select the When the Alarm Occurs, Run This Program check box, and then click Configure.
In the resulting UPS System Shutdown Program dialog box, select the Task tab.
Type the name of the file in the Run field.
If you want the scheduled task to run at a specified time, select the Enabled (Scheduled Task Runs at Specified Time) check box, and continue this procedure.
Select the Schedule tab, and then select the frequency and start time of the task.
You can make additional schedule settings by clicking the Settings tab.
Set any additional options you want in the Scheduled Task Completed, Idle Time, and Power Management areas of the Settings tab; then click OK.
In the Set Account Information dialog box, type the Run As and password information, and then click OK.
TIP
The command file must reside in your %SystemRoot%System32 folder and have a filename extension, such as .EXE, .COM, .BAT, or .CMD.
Note
→ To learn more details about the Run As setting, see “Guest and Administrator Accounts,” p. 1065.
Testing your UPS configuration from time to time is wise, just to make sure you aren't let down when a real emergency occurs. Follow these steps to do so:
Close any open documents or programs.
Simulate a power failure by disconnecting the power to the UPS device. Check to see that, after disconnecting the power to the UPS device, the computer and peripherals connected to the UPS device continue operating and that a warning message appears on the screen.
Wait until the UPS battery reaches a low level, at which point a system shutdown should occur.
If the UPS service is configured to run a command file, check to see that it executes in under 30 seconds.
Restore power to the UPS device.
Check the system log in the Event Viewer to ensure that all actions were logged and that no errors occurred.
Windows has a feature called Hardware Profiles that lets you boot up Windows with different sets of hardware devices enabled. Profiles grew out of the need for docking laptops to be able to boot with a different set of driver settings based on whether the laptop was on the road or connected to a docking station with its own external monitor, additional CD-ROM drive, and so on. Profiles have become more capable with Plug and Play, sensing when the computer is “hot-docked” and kicking in the appropriate profile when needed. Also, for complex arrangements such as on a desktop computer stuffed to the gills with devices, it is sometimes necessary to disable some devices so that others can have access to certain limited resources such as interrupt requests (IRQs). I should add that hot-dockable ports such as USB, IEEE-1394, and PC Cards have reduced the need for hardware profiles somewhat, since their hardware can be attached and removed on-the-fly without rebooting.
In addition to allowing different combinations of hardware, Hardware Profiles allow the same hardware to be configured with different resource settings. In essence, you can have almost a different computer with each hardware profile.
Hardware profiles are set up on the System applet, which you can view by clicking Start, right-clicking My Computer, and selecting Properties. View the Hardware tab and click the Hardware Profiles to bring up the Hardware Profile manager.
NOTE
Windows enables or disables devices by simply installing or not installing their drivers at boot time.
Windows XP creates one hardware profile called Profile 1 automatically whenever it's installed on any type of computer. As additional devices are installed, they're automatically added to Profile 1.
To create an additional hardware profile, open the System properties sheet, click the Hardware tab, click Hardware Profiles, and copy Profile 1 to another profile (see Figure 30.17).
To change the hardware in any profile, select that profile when you reboot and disable or change the settings for devices through the Device Manager. The Properties button on the Hardware Profiles screen lets you adjust profiles for portable computer use and select whether the profile is displayed as a startup option. Table 30.7 shows a typical laptop scenario after creating two profiles and enabling and disabling some devices.
Table 30.7. Typical Laptop Hardware Profiles
Example | Description |
|---|---|
Profile 1: “On the Road” | Use when traveling. Contains enabled modem and printer. |
Profile 2: “At the Office” | Use when docked to the docking station or port replicator. Enables LAN card, external monitor, and CD-ROM drive. |
To switch between hardware profiles, reboot your computer and select the hardware profile you want to use at boot time.
After you've copied a profile, you can begin to modify it to meet your needs. Click the profile, and then click Properties. You can declare some aspects of the profile at this stage. You can indicate, for example, whether it's a profile on a laptop computer. Table 30.8 lists some of the options and their meanings.
Table 30.8. Hardware Profile Options
Windows XP Professional is pretty good about detecting and setting up separate hardware profiles for popular docking stations and port replicators. However, if yours isn't detected, you can use the technique presented here to alter what drivers will load with each profile.
You can use this technique for personalizing profiles on any kind of computer, be it desktop or portable, for that matter.
The way you differentiate hardware profiles is to first create multiple copies of the same profile, then turn off or on devices in each to suit your needs, and resave them. After settings are made, you reboot. During bootup, you are prompted to choose between them.
TIP
You should use different hardware profiles for any computer where you alter the physical setup regularly in a predictable manner, such as switching between two monitors.
The following is the basic game plan for modifying existing profiles:
Get your system running with a superset of the hardware you're going to want to use. That is, use as much external stuff—such as hard drives—as possible. This step may require your using the Control Panel's Add/Remove Hardware applet as well (see earlier in this chapter).
Choose Control Panel, System. Then click the Hardware Profiles button on the Hardware tab.
Select the profile you want to use as a basis for your scaled-down (undocked) profile, and click Copy.
Name the new profile something meaningful, such as
Undocked Laptop.Click the Properties button, and look at the options there. If you're modifying a portable computer, check the appropriate box, and indicate the current state (docked or undocked) and whether you want the new hardware profile to be presented as an option for the user to choose when Windows boots. (Normally, you would want it to show, but you could disable this option if you, for example, were loaning the computer to someone and didn't want to confuse him or her with boot options.) Click OK to close that dialog box.
Now comes the tricky part. You have to boot up in a specific profile before you can modify the settings therein. Do so, and pick the profile you want to modify.
Choose Control Panel, System, and click the Device Manager button on the Hardware tab.
In the Device Manager window, click the + (plus) sign next to any piece of hardware whose inclusion/exclusion in one of your profiles you want to alter. Highlight the specific item, and click Properties.
At the bottom of the resulting Properties dialog, use the Device Usage drop-down list to choose whether you want to enable or disable the specific piece of hardware in your current profile.
Repeat for each device whose usage will be affected by a given profile.
Repeat steps 6 through 10 for each profile you want to adjust.
I can't get my multimonitor system to choose the primary display properly.
As discussed in the section about multimonitor arrangements earlier in the chapter, it can be tricky to force Windows XP to use a particular video display card as the secondary display. If a display card isn't disabled from running in VGA mode, the computer runs the card's Power-On Self Test (POST). When that happens, Windows XP assigns it primary display status; if the other card's VGA mode can't be disabled, you will not be able to use the secondary card. Most users will want to keep their first video card as the primary display, so they need to know how to prevent the POST from happening.
Generally, dual-display works best when one video card is AGP and one is PCI. However, this doesn't guarantee that the faster AGP video card will wind up being your primary display. You may need to set the system BIOS option for default video to PCI to enable an AGP+PCI dual display to work properly.
If your video card has a jumper block or switch that can be used to disable VGA mode, this option will make it easier to use the card as a secondary card, since only the primary card needs VGA mode. VGA mode is used for the system's power-on self-test (POST) and to display startup options before the Windows GUI is initialized.
Many desktop systems with onboard video automatically disable the on-board video when you install a PCI or AGP video card, making it necessary to install two video cards (or a multi-monitor video card) if you want multiple monitor support.
Generally, you can't tell if a secondary card will work until after you boot Windows XP with the secondary card in place, the system detects it and installs the drivers, and the system tries to initialize the card. If the card is initialized successfully, you should see the Windows desktop on both screens. If the secondary monitor's screen stays black, check the Device Manager listing for the video card. If the card is listed with a yellow exclamation mark, it's not working properly. A Code 10 error on the card's properties sheet's General tab indicates the card was unable to start. Restart the system and change the default display setting in the BIOS and retry it. If necessary, try a different slot for the card.
I've altered my BIOS settings, and now the computer won't start.
Today's computer BIOSes have so many arcane settings that it's quite possible to alter one that will prevent proper booting. Before you futz with the advanced CMOS settings (not just the simple stuff like time, date, boot order, power settings, ports, and such), read the manual that came with the computer or motherboard. If you decide to change something, write down the old value before doing so. When in doubt, don't alter advanced CMOS settings that affect how the chip set works, whether and where the BIOS and video shadowing is done, and so on. The default settings are designed by the motherboard maker to work under most situations and operating systems. Because Windows is the most popular operating system, you can bet it was already tested and configured for Windows 9x, NT, 2000 or XP (unless you have a very old motherboard).
That said, what do you do if you've changed something in the CMOS and now the computer won't boot? You can try the computer's or motherboard's manual or Web site for information about settings for Windows XP. If you find nothing, then you should wind back the settings to the factory defaults.
TIP
Most CMOS setups have a “Set to Default” or similar command you can issue. This should get you out of most any jam.
The Set to Default option might also be a good course to take if you make CMOS settings that prevent your computer from booting and you can't remember how to undo the changes. The Default settings are usually conservative enough to work under most circumstances. The BIOS in some systems may also have a “Fail-Safe Defaults” option that sets your BIOS to its most conservative settings.
If what you've done has changed the hard disk “Type,” or if you manually entered the number of sectors, tracks, platters, and so on, and now it won't boot, use the Auto Detect Hard Disk BIOS setting to discover and enter those numbers automatically (this is known as drive autotyping).
I've added some hardware, but it doesn't work.
Try these steps, in this order:
Try the troubleshooters included in the Help system, assuming the hardware fits into one of the neatly packaged categories. Open them through the Help and Support page as described previously.
Try rebooting Windows XP.
Use the Computer Management Console and the Device Manager to check resources assigned to the hardware to be sure that it's not conflicting. Check the hardware's manual to determine whether you should be setting some DIP switches or jumpers on it to avoid conflicts if the device isn't a Plug-and-Play device.
Open the Device Manager, locate the device's entry, and hit the Delete key to delete the entry. Then, power down, remove the device, and restart Windows.
Power down again, add the hardware back again (running the Add Hardware applet if the hardware isn't detected at bootup), and configure as necessary.
Check Google; search to see if anyone else has written about the problem and its solution.
Check the manufacturer's Web site. If it has a “Knowledge Base” feature, search that.
If you purchased the hardware from a local store, contact them for assistance.
Following are several tips I've learned over the years that will help save you hours of headaches.
Even if your system still has one or more ISA slots and you have cards to match, it's time to retire this 1984-vintage technology and switch to PCI cards. Here are a few of the reasons why:
Most recent systems support PCI IRQ steering, which enables multiple PCI devices to share a single IRQ without conflicts. However, if an ISA card uses an IRQ, it usually can't be shared with any other card, ISA or PCI. A single ISA sound card, for example, might use two IRQs, preventing any other device from using those IRQs. The ISA cards in your system could literally prevent you from installing other cards, no matter how many free slots you have.
ISA cards are much slower than PCI cards, and require much more CPU attention. The result? Your system is a lot slower than it needs to be.
ISA cards don't support recent technologies that are now common with PCI cards. Here are just a couple of examples: If you want Fast Ethernet's 100Mbps network speed, you can't achieve it with an ISA card. Want Dolby Digital 5.1 sound for your DVD movies? Forget that old ISA sound card; only some top-of-the-line PCI sound cards support it.
Use the Device Manager to uninstall your old card, shut down your machine, and remove it before you install a PCI card to replace it. If you're changing motherboards, keep in mind that many recent motherboards have on-board sound, and many also have a built-in modem, Ethernet, FireWire, and USB ports as well.
If you've been accustomed to thumbing your nose at Microsoft's Hardware Compatibility Listing because you've been using Windows 9x, it's time to reform your behavior. In a pinch, Windows 9x could use older Windows drivers and could even load MS-DOS device drivers to make older hardware work correctly. Windows XP, like other NT-based versions of Windows, has done away with AUTOEXEC.BAT and CONFIG.SYS, so you can't use DOS-based drivers anymore. And, while Windows XP can use some Windows 2000 drivers in an emergency, you're much better off with drivers made especially for Windows XP. You can view the online version of the HCL by setting your browser to
The HCL also offers links to let you download drivers from either Microsoft or the manufacturer's Web site.
NOTE
There is a difference between the “Windows Catalog” and “Windows Hardware Compatibility List.” Check the Hardware Compatibility List (www.microsoft.com/hcl) first, as it contains just unbiased, straightforward lists of compatible hardware—”just the facts, ma'am.” Yes, it only lists compatibility with Windows 2000, but if a device works with Windows 2000, it will work with XP. Unfortunately, Windows Catalog adds sales pitches and “featured products,” whose manufacturers have paid for them to be listed. The URL windowsmarketplace.com says it all—it's more of a sales channel than an objective reference source.
TIP
Hardware failures, power failures, and human errors can prevent Windows XP from starting successfully. Recovery is easier if you know the configuration of each computer and its history and if you back up critical system files when making changes to your Windows XP configuration.
A good hedge against this problem is to create a technical reference library for all your hardware and software documentation. Your reference library should include the history of software changes and upgrades for each machine, as well as hardware settings such as those described here.
Lest this all sound too dire, remember that Windows XP has been the personal computer industry's mainstream operating system for over two years now, so virtually all newly manufactured hardware has XP support. It may not have been tested and approved by Microsoft, but at least the motivation to make it work is there.
When you're hunting down potential IRQ, memory, and I/O conflicts, try using the Device Manager to help out. Yes, Computer Management, System Information, Hardware Resources, Conflicts Sharing will show you potential conflicts, so that's a good place to look, too. But let me share a trick with the Device Manager that isn't readily apparent.
Normally, a class of devices called Hidden Devices isn't shown. To show them, open the Device Manager (either via Control Panel, System or from Computer Management). Then, on the View menu, click Show Hidden Devices. A check mark next to Show Hidden Devices indicates that hidden devices are showing. Click it again to clear the check mark. Hidden devices include non–Plug and Play devices (devices with earlier Windows 2000 device drivers) and devices that have been physically removed from the computer but have not had their drivers uninstalled.
Finally, here's my biggest tip…
Optimizing your computer for Windows XP is actually pretty easy. I'm very impressed with this operating system's capability to keep on chugging. It doesn't cough or die easily if you mind your manners.
If you're buying new stuff for an upgrade, consider only hardware that's on the HCL.
When you're buying a new machine, get it with Windows XP Professional preinstalled and from a reputable maker with decent technical support, not just a reputable dealer. The dealer might not be able to solve complex technical problems. Brand-name manufacturers such as Dell, Compaq, Gateway, IBM, and so on have teams of engineers devoted to testing new operating systems and ironing out kinks in their hardware, with help from engineers at Microsoft.
If you love to upgrade and experiment, more power to you. I used to build PCs from scratch, even soldering them together from parts. Then again, you can also build your own car. (I used to just about do that myself, too.) Or you can buy it preassembled from some company in Detroit. It really isn't worth spending much time fiddling with PC hardware unless you are putting together systems for a specific purpose. With the amazingly low price of computers these days, don't waste your time. And don't cut corners in configuring a new machine. For an extra 50 bucks, you can get goodies such as a modem, network card, and faster video card thrown in. Do it up front, and save the hassle down the road.
Run Windows Update frequently.
Keep the hard disks defragmented (see Chapter 29), and make sure you have a decent amount of free space on your drives, especially your boot drive.
NOTE
Chapter 2 contains a lot of discussion about computer upgrades. This is a good starting point whenever you are considering a computer hardware or software upgrade.