Implementation Notes
The process of static transformation is similar to the process of compiling program source code into executable format. An initial version of the XSLT stylesheet is developed. It is then applied to the source document to produce the transformed output. This output is then checked for errors and display quality, and the stylesheet is modified accordingly.
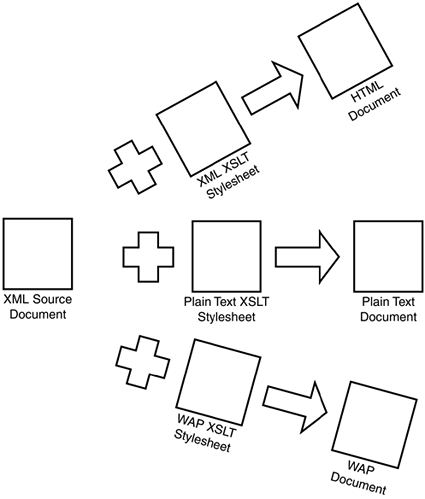
Because presentation logic is encoded in the stylesheet, a single XML document can be transformed into multiple target formats. This separation enables rapid deployment of fresh content via a large number of delivery channels. Figure 12.1 shows how a single XML document can be rendered in multiple formats using different stylesheets.
Figure 12.1. A single XML document can be transformed into multiple output formats.

For the sake of simplicity, we will transform the source document into a single monolithic output file.
Page Development Process
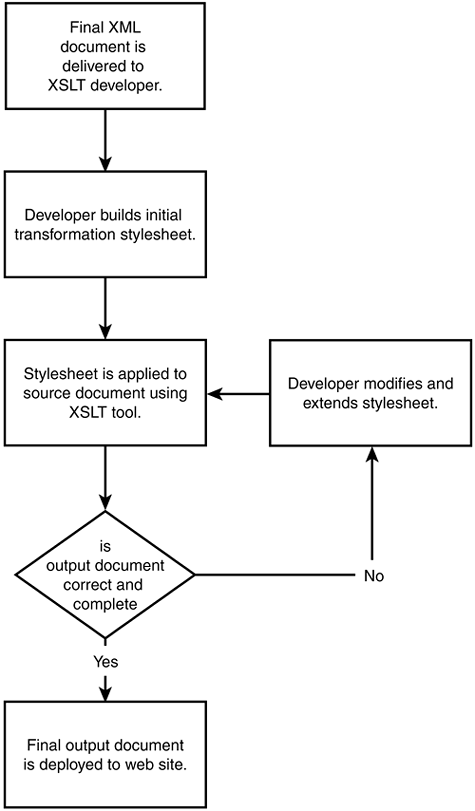
The process of developing an XSLT stylesheet is similar to that of developing a program using a language compiler, as shown in Figure 12.2.
Figure 12.2. Stylesheet development cycle.

The tool used to develop this example is the Saxon processor, which was developed by Michael Kay. See this book's Web site ![]() for instructions about where to download this tool and how to configure it on your system.
for instructions about where to download this tool and how to configure it on your system.
Basic Stylesheet Usage
Here's a very simple XSLT stylesheet:
<?xml version="1.0" encoding="UTF-8"?>
<xsl:stylesheet version="1.1" xmlns:xsl="http://www.w3.org/1999/XSL/Transform">
  <xsl:template match="/">
    <xsl:apply-templates/>
  </xsl:template>
</xsl:stylesheet>
Because every XSLT stylesheet is a valid XML document, it must have a single top-level element. The top-level element of an XSLT stylesheet must be the <xsl:stylesheet> element. This element is a good place to declare any namespaces needed within the body of the stylesheet.
Although it is not required, the stylesheet should include an XML declaration. The XML declaration can be used by an XML parser on a foreign system to automatically detect the character encoding that was used to create the document. Also, it is conceivable (although unlikely) that a new version of XML may be released. These concerns may not seem important now, but in the real world, systems frequently spread far beyond their initial environments.
When a stylesheet is applied to a source document, any character data or element tag that isn't interpreted by the XSLT processor will be echoed verbatim to the output stream. Depending on which type of output is being generated (XML, HTML, or plain text), the XSLT processor will slightly modify how it outputs certain elements. For instance, in the stylesheet the HTML <br> tag must obey XML well-formedness rules (for example, <br/> or <br></br>). However, many HTML browsers don't recognize this syntax, so the XSLT processor will emit a regular HTML <br> tag.
The top-level <xsl:stylesheet> element includes a single <xsl:template> element. Templates are used to match elements in the source document and emit the desired transformed text into the output document. Think of templates as subroutines that are executed when an element from the source document matches the XPath expression in its match="..." attribute.
In this particular template, the / string indicates that this template matches the special root element in the XML source file. The root element is officially the parent of the single top-most element, which is called the XML document element.
The <xsl:apply-templates/> tag inside the template tag instructs the processor to recursively invoke any other matching templates on the current element's children, including the built-in templates. Using apply-templates without any attributes causes every child element to be emitted. It is also possible to limit which elements will be processed by using the select attribute with an XPath test expression.
An XSLT processor will apply one of several built-in templates if no explicit rule applies. These templates basically dictate that all character data and attribute values will be echoed to the output document. The contents of comment, processing instruction, and namespace nodes will not be echoed.
Basic XPath Usage
XSLT is heavily dependent on the XPath specification for selecting nodes, retrieving values, and matching elements. Most XSLT elements define at least one attribute that accepts an XPath expression. XPath expressions are used in two distinct capacities: for filtering and for locating document nodes.
The full XPath specification is very involved, and it permits sophisticated selection of any part of a source document from any position within the document. Elements, attributes, comments, and processing instructions are all node types that can be accessed through the full XPath syntax. For a complete reference to XPath expressions, see the Saxon documentation and other resources ![]() available on this book's Web site.
available on this book's Web site.
The abbreviated syntax is much simpler to use, and it closely resembles the path/file syntax of operating systems such as UNIX or the hierarchical syntax of URLs. Element tags are the “directories” that are separated by the / character. Special names such as . and .. allow relative references to be used. Table 12.2 shows the most frequently used XPath syntax elements.
Making a Quick-and-Dirty Stylesheet
To produce a high-quality output document, it will be necessary to exercise a fine level of control over the output of the stylesheet processor. Whenever possible, the default rules should be used to emit text into the output document. But because the default rules don't deal properly with attribute values, for instance, it is necessary to provide template rules for most of the elements that are found in the source document.
Rather than identify every element tag name in the source document and manually create a template rule, you can use an automated tool to do a faster (and better) job. To generate the basic skeleton stylesheet for this project, I developed the ![]() MakeXSLT tool. There are also commercial XML editors (such as XMetal and XMLSpy) that provide some XSLT authoring support. Sites such as xml.com contain very comprehensive lists of currently available tools and products.
MakeXSLT tool. There are also commercial XML editors (such as XMetal and XMLSpy) that provide some XSLT authoring support. Sites such as xml.com contain very comprehensive lists of currently available tools and products.
This tool is written in Java. It parses an XML document, then emits a basic <xsl:template> rule for each tag type encountered in the source document. The simple rule that is generated by the tool for each element simply invokes the <xsl:apply-templates/> directive. This allows templates to be implemented one at a time while still displaying some reasonable default output.
Sharing Stylesheet Templates
Because XSLT stylesheets are actually XML documents, the normal external parsed entity facilities are available to share templates between stylesheets. The insertion of tags into the stylesheet happens transparently to the XSLT processor, and any conflicts between included elements and elements in the main document are resolved as if the included elements were in the original document all along.
There is another, XSLT-only option for including templates from an external source: the <xsl:import> element. This element expects a single attribute, href, that sets the URI of the external stylesheet to be imported. Unlike including an external parsed entity, the external stylesheet must be a well-formed standalone XML document. It must have a top-level <xsl:stylsheet> element. When it encounters an import element, the XSLT processor parses the external stylesheet and adds its template rules to the current set of active templates.
If an external stylesheet includes a template that conflicts with a template in the main stylesheet, the main template will be used. This behavior can be overridden by using the special variation of the <xsl:apply-templates> element, <xsl:apply-imports>. When this element is used, only rules from imported stylesheets are applied.
Output Document Structure
Before you begin to populate the stylesheet, it is important to determine what the final HTML document will look like. HTML page design is beyond the scope of this discussion, but in most cases the output document will resemble the structure of the input document.
Unless you are well versed in writing raw HTML, in most cases it is easier to build a mock-up of a portion of the desired output page using a WYSIWYG Web page editor. Tools like DreamWeaver and Microsoft FrontPage are useful for developing the desired look and layout of the final HTML document. Then the underlying HTML code can be grafted onto the XSLT stylesheet as necessary.
The source document represents a single product manual that is broken down into separate sections. To simplify navigation, the HTML version should consist of a table of contents with hyperlinks to the start of each individual section. It would also be desirable to create next and previous links between adjacent sections. These links will use the bookmark capabilities of the HTML <a> tag.
One of the primary tenets of XML design is that a document does not contain redundant information. Rather than containing a hard-coded list of sections in the document itself, it is assumed that the transformation script will generate any summary information (such as the table of contents) dynamically. To do this, you will need to use two new XSLT features: modes and iteration.
Template Modes
Ordinarily, the entire tree structure of the source document is traversed a single time by the XSLT processor, and each matching template is evaluated in turn. If an element would match more than one template, the last one appearing in the stylesheet would be used. However, in some cases it is useful to have the same element match different templates at different times. This is accomplished by use of the mode attribute.
Besides the match="..." attribute, the <xsl:template> tag also supports the mode attribute. The mode attribute can be used to distinguish between two templates with the same match value. The following XSLT fragment illustrates how one template can cause a different template to be executed based on the provided mode attribute:
<xsl:template match="manual">
. . .
  <xsl:apply-templates select="." mode="TOC"/>
. . .
</xsl:template>

<xsl:template match="manual" mode="TOC">
. . .
</xsl:template>
Whenever a <manual> element is encountered in the source document, the first rule is evaluated. During the evaluation of the first rule, the <xsl:apply-templates...> tag with a select attribute of . and mode of TOC causes the XSLT processor to locate another rule with match="manual" and mode="TOC". The second rule is evaluated, and then control returns to the first rule. Using modes, the same source element can be processed differently at different times.
Iteration
The rule that creates the table of contents also shows off another interesting XSLT feature: iteration. The following fragment uses iteration to generate the table of contents for the source document:
<ul>
  <xsl:for-each select="//section">
    <li><a href="#{ @id}"><xsl:value-of select="title"/></a></li>
  </xsl:for-each>
</ul>
The <xsl:for-each> tag creates a list of every element that matches the expression in the select attribute ("//section"). Then it processes the nested tags in order once for each element in the list. Any XPath expressions inside the for-each element is relative to the current element being processed.
Notice that several elements in this fragment do not belong to the : namespace. These elements are the actual output elements that will be written to the newly generated document. The default XSLT rule is to echo any non-XSL elements directly to the output file. In this case, the <ul> and <li> elements are HTML tags that will create an unordered list in the resulting HTML page.
Working with Attribute Values
The line that emits a single <li> tag also illustrates how attribute values are referenced:
<li><a href="#{ @id}"><xsl:value-of select="title"/></a></li>
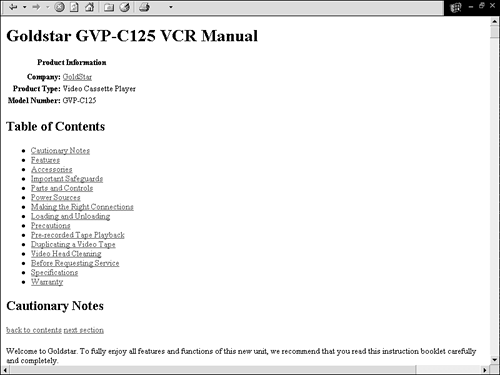
Attribute values are retrieved by prefixing the desired attribute name with the @ character. This syntax is valid anywhere an XPath expression is accepted (in this case, the select attribute of an xsl:value-of element). Figure 12.3 shows the HTML page resulting from the table of contents template.
Figure 12.3. Table of contents as generated by XSLT iteration.

Notice that in the output document, the <a> tag's href attribute contains a bookmark with the value of the current element's id attribute rather than the string "#{ @id} ". The { } characters have a special meaning whenever they appear in an attribute value in XSLT. The expression inside the curly braces is evaluated, and the resulting value is inserted in the output document.
Automatic Numbering
There are several ways to automatically number elements in an output document. The easiest technique is to use the <xsl:number> element, as in the following example:
<xsl:template match="safeguard">
  <tr>
    <td valign="top" rowspan="2"><b><xsl:number/>)</b></td>
    <td><font size="+2"><b><xsl:value-of select="@desc"/></b></td>
  </tr>
  <tr>
    <td><blockquote><xsl:apply-templates/></blockquote></td>
  </tr>
</xsl:template>
The <xsl:number> element generates sequential numbers. The Saxon documentation ![]() provides a very good explanation of the behavior of the <xsl:number> element and its parameters. This instance numbers each <safeguard> sequentially, based on its position relative to its immediate siblings. The <xsl:number> element can also be used to generate outline numbers, figure numbers, roman numerals, and even numbering in other languages (such as Japanese).
provides a very good explanation of the behavior of the <xsl:number> element and its parameters. This instance numbers each <safeguard> sequentially, based on its position relative to its immediate siblings. The <xsl:number> element can also be used to generate outline numbers, figure numbers, roman numerals, and even numbering in other languages (such as Japanese).
An alternative method for numbering elements involves using the <xsl:value-of> tag and the position() XPath function. This method is much less flexible and not as reliable as the <xsl:number> tag. The following code fragment shows how this could be done:
<td valign="top" rowspan="2"><b><xsl:value-of select="position()"/>)</b></td>
The problem with this approach is that the position() function returns the context node's position “in the context node set.” The value returned is not always intuitively obvious, because whitespace nodes such as carriage returns may be counted.
Conditional Sections
To generate the next-section and previous-section hyperlinks, it is necessary to tap some of the more sophisticated features of XSLT and XPath. For obvious reasons, the first section shouldn't have a previous link, and the last section shouldn't have a next link.
In many cases, portions of an output document need to be included only when certain conditions are met. XSLT provides two basic mechanisms for conditional inclusion: <xsl:choose> and <xsl:if>. The first problem we need to solve is this: how do we include a previous section link for every section after the first section?
The <xsl:if> element evaluates the XPath expression provided in its test attribute. If the expression is true, the template code contained in the <xsl:if> element will be included. Now the only thing that remains is to build an XPath Boolean expression that returns true for every <section> element in the source document except for the first one. Table 12.3 lists the Boolean operators that are provided by XPath.
The following template emits a previous-section hyperlink only if the position of the current section is greater than one:
<xsl:if test="position() > 1">
<xsl:text disable-output-escaping="yes">&nbsp;</xsl:text>
<a href="#{ preceding-sibling::*[position()=1]/@id}">previous section</a>
</xsl:if>
The output of one instance of this template in the resulting HTML document looks like this:
<a href="#SEC1">previous section</a>
Outputting Raw Markup
Note the usage of the <xsl:text> element to emit the HTML entity. Emitting entity references into the output document is complicated by the fact that the XSLT stylesheet itself is an XML document. If the raw entity reference was included directly in the template, the XML parser used by the XSLT processor would try to expand it just like any other XML entity. We could try to escape the ampersand, using the built in & entity reference, like so:
&nbsp;
Unfortunately, this doesn't produce the desired result in the output document. When the stylesheet itself is parsed, the string " " is passed to the XSLT processor. The XSLT processor then automatically escapes the & character in the output document. The resulting HTML code would look like this:
&nbsp;
This would cause the string " " to be displayed in the user's Web browser, which was not the desired effect at all. To prevent this automatic character-escaping functionality, XSLT provides the <xsl:text> element. Logically, this element behaves like the XML CDATA tag. It treats its contents as nothing more than text to be echoed to the output document. The crucial feature for producing the entity required by our application is the disable-output-escaping attribute.
When disable-output-escaping is set to yes, the character data inside the <xsl:text> element is reproduced verbatim in the output document. Therefore, the markup
<xsl:text disable-output-escaping="yes">&nbsp;</xsl:text>
instructs the XSLT processor to emit the string " " directly into the output document. Note that it is still necessary to escape the initial ampersand character in the " " string. Otherwise, the XML parser used to parse the stylesheet would treat it as a live entity reference.
Referencing Other Nodes
The markup that actually generates the hyperlink uses some advanced features of the XPath language. The value of the <a> tag's href attribute includes the following XPath expression:
preceding-sibling::*[position()=1]/@id
This is an example of a full XPath expression, one that includes an XPath axis and node test. The term axis comes from the tree-oriented nature of XPath. The entire XML document that is referenced by an XPath expression is treated as a tree, and the various types of XML content are encoded as different XPath node types. The axis indicates in which direction to search for the node to be located, and the node test portion determines which nodes are to be included in the result set. The following very simple XML document can be used to better understand the various node axes available:
<?xml version="1.0" encoding="UTF-8"?>
<A>
  <B>
    <C/>
    <D>
      <F/>
      <G>
        <I>
          <J/>
        </I>
      </G>
      <H/>
    </D>
    <E/>
  </B>
</A>
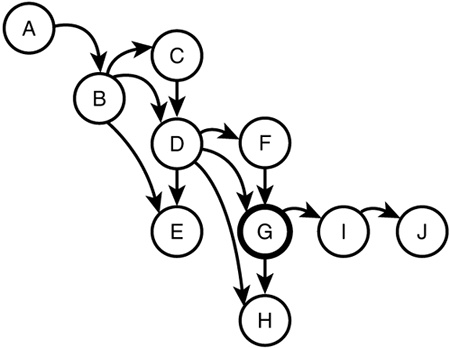
Figure 12.4 visually displays the relationships between the various document elements.
Figure 12.4. A simple tree structure to illustrate node axes.

The highlighted node (labeled G) is the current context node. Table 12.4 lists the axes available in an unabbreviated location path, a brief explanation, and the node set that would be returned in each case given the tree in Figure 12.4. Note that the sequence of the nodes in the set matches the order in which they would be visited by an inorder traversal of the document tree.
Note
The XML document and stylesheet that produced the node sets in Table 12.4 are available on the book's Web site as ![]() Listing12-2.xml and ShowAxis.xsl.
Listing12-2.xml and ShowAxis.xsl.
The concept of the result set can be somewhat confusing at first. Unlike a directory and filename string, an XPath expression can actually point to more than one node at the same time. Whenever a single node is called for, XPath silently returns the first node in the result set to the application. When the first node in the set is not the correct node, it becomes necessary to make the XPath expression more precise through the use of XPath predicates. In this respect, an XPath expression is somewhat like a SQL query.
An XPath predicate is nothing more than a Boolean expression that further qualifies which nodes will be returned as a result of an XPath selection path. In the expression used to generate the preceding-section hyperlink, the base path preceding-sibling::* would return a set containing all preceding-section elements. To make sure that only the section that immediately precedes the current section is selected, it is necessary to append the predicate [position()=1]. This will include only the first element in the preceding sibling's set. Then the /@id path selects the value of the id attribute from the selected <section> tag.
