There are almost half a dozen radically different methods to do anything in TYPO3, and CSS is no exception. TYPO3 has exactly four documented methods for including stylesheet links in templates:
- Adding headers from the HTML template during the TemplaVoila Wizard
page.stylesheetpage.includeCSSPage.headerData
Now, before you get too worried, let me ask you to go ahead and set your mind at ease. We are only going to end up using one method for our main template. In fact, I will cut the suspense and tell you right now that, like all good step-by-step books, we're going to use the fourth and final option. However, it's still important that you are aware of how the others work for a few reasons.
First, we'll hear all about these methods in TYPO3 documentation, forums, and other discussions. If we don't have at least a basic understanding of all four functions, each one will seem like a brand new technique when somebody mentions them online or at a conference. We won't know why we're using page.headerData in our code, and we'll have to spend time trying each one out as it comes up.
Second, learning the stylesheet methods is a step-by-step process. Each of these methods is successively more powerful or cleaner, and we'll appreciate headerData so much more after we see how all of the methods work.
We have different needs for all of our templates and websites. Just because including the CSS in our TemplaVoila headers is not the most dynamic approach for our main template, doesn't mean that we don't want to use it for a subtemplate or specialized section of one of our websites.
Finally, some of this is subjective. Just because we're going to use the headerData function for the rest of this book doesn't mean you won't decide later on that I was wrong. If you decide to use page.includeCSS for all of your sites one day, this will still be a good reference.
Before we look at the four options for including CSS, we need to define what we need when we include the main stylesheet for our website:
- Multiple CSS files: We need to be able to include multiple CSS files in the same page. At the very least, we will need the ability to include our main stylesheet and a print stylesheet.
- Conditional CSS: We will need to be able to target browsers or mobile devices with specific CSS. If you have ever made a complex design work in multiple browsers, you know that we sometimes need to create a special stylesheet for Internet Explorer or Opera.
- Order: When we are using multiple CSS files, it is very important for us to be able to define the order in which they are included because it is common that one file may override some styles in another file. Managing these overrides is an essential part of CSS development.
- Extensibility: We need the ability to include a different stylesheet on a page or section of pages without remapping our template or creating a new HTML file. If we want to change the look of one page, we don't have to go through all the steps of creating a new TemplaVoila template.
- Stability: We need a solution that will be stable for the rest of our site. This means that it obviously can't be fragile enough to break on its own, but it also means that it shouldn't add any extra steps to the normal maintenance of our site that makes it more prone to breaking.
When we mapped our template in TemplaVoila, we were given the option to include any headers that we required while including stylesheet and JavaScript declarations. Including the CSS in our TemplaVoila mapping can be a quick way to include our CSS by using the headers from our HTML template, but it does not fulfill our needs.
We can include multiple CSS files and set their order in the HTML header, but here are some disadvantages:
- We don't have very powerful options to conditionally include CSS for specific browsers.
- It's not extensible because we can't include a different CSS file on one page without mapping a new TemplaVoila template.
- Finally, it is our least stable option because we have added a new step to the mapping process anytime that a TemplaVoila template is created or edited. We will need to update the mapping of our TemplaVoila template at some point, and we don't want to lose all of our styling because we forgot to check one box in the wizard. I did this when we were first using TYPO3 on a live site, and trying to figure out why half my site was completely broken was one of the most panicked moments I've had as developer.
The second method is using the TypoScript object page.stylesheet to dynamically include one CSS file in our TypoScript template. Our TypoScript template can use the basic conditional statements and logic of TypoScript to give us more flexible and dynamic templating functions. We were introduced to the TypoScript template in the first chapter when we looked at the TypoScript code that the TemplaVoila Wizard was creating for our menus, but now we're going to start editing it ourselves without a wizard. Every site that you create in TYPO3 has a TypoScript template, and it is always on the root page of your page tree. In the last chapter we looked at the page tree a little, so you'll remember that the page Awesome Site is our current root page. Just like our TemplaVoila template defines the layout of HTML and content elements on our page, our TypoScript template will configure the dynamic output including menus, other languages, and more for the root page and all pages underneath it. Right now, we're going to use the TypoScript template to include our CSS file:
- To update the TypoScript template, click the Web | Template button in the far-left menu bar.
- Select the root page of our site, Awesome Site, in our page tree.
- Select Info/Modify from the drop-down list at the top of the Template tools frame.
- We are going to include
page.stylesheetin the TypoScript template setup, so click on the edit icon next to the Setup label.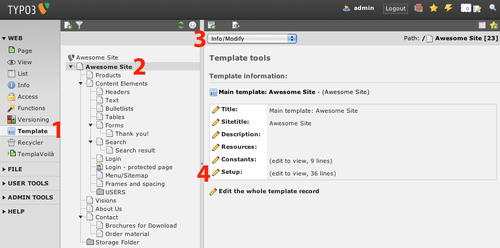
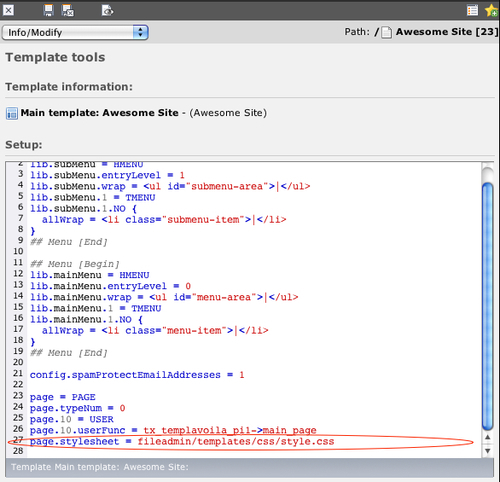
- Scroll down in our TypoScript editor past the code that was generated by the TemplaVoila Wizard to where the page is defined, and add the following line to our TypoScript page definition to include our CSS:
page.stylesheet = fileadmin/templates/css/style.css
- Once we've added our TypoScript line as shown in the following screenshot, click on the save icon at the top of the frame:
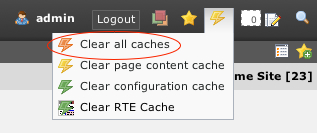
To see our changes on the frontend, we need to clear the TYPO3 cache. By default, TYPO3 uses intelligent caching to save our template information so it doesn't have to be rebuilt for every visitor. If we make a change to the template that might have been cached, we will have to clear the cache and let TYPO3 cache the updated version of our template. To clear the cache, click on the Clear cache menu in the top-right corner of the backend window, and select Clear all caches as shown in the following screenshot:
This is more dynamic than mapping our CSS as part of the TemplaVoila Wizard, but it has a drawback: it only works for one stylesheet. This code can be used to declare exactly one stylesheet for the TypoScript template; we can overwrite it later with another stylesheet, but we can't call two consecutive stylesheets with this method. We already decided that we need the ability to include multiple CSS files for print and browser-compatibility stylesheets, so we can't use page.stylesheet.
Now that we've discussed and eliminated the methods that are objectively not correct choices for our main template, we can look at two equivalent methods that are both powerful enough to be used to include our stylesheets in the main template. The first function is includeCSS, and this is what it looks like in our TypoScript template setup with multiple CSS files:
page.includeCSS {
file1 = fileadmin/templates/css/style.css
file1.media = screen
file2 = fileadmin/templates/css/print.css
file2.media = print
}
As you can see, this allows us to declare multiple stylesheets in our TypoScript, and they are included in the exact order that they are listed. Additionally, we can update the values or add a CSS file easily on a specific page or section of pages by using a TypoScript extension template.
A TypoScript extension template can be created on any page, and it will include all of the values of the TypoScript templates above it in the page tree followed by any specific configuration in the extension template. For example, we could create a TypoScript extension template on a page with the following lines in the setup to include another CSS file to that page and the pages below it in the page tree:
page.includeCSS {
file3 = fileadmin/templates/css/style_special.css
file3.media = screen
}
Unfortunately, includeCSS does not fulfill one of our requirements for a good solution: conditional CSS. Because we don't have direct control over the HTML headers that are being generated, we cannot use conditional comments like<!--[if IE]> to target specific browsers.
An advantage of the includeCSS function is that it implements the link rel and type attributes completely in TypoScript, and this may be easier for developers who haven't already learned how to declare stylesheets in normal HTML headers. Readers of this book are smart developers, so we're comfortable trading a little convenience of not typing full HTML headers for the control conditional CSS.
The final method we are going to look at is the headerData function in TypoScript, and this is what it looks like when we include multiple CSS files:
page {
headerData.10 = TEXT
headerData.10.value = <link rel="stylesheet" type="text/css" href="fileadmin/templates/css/style.css" />
headerData.20 = TEXT
headerData.20.value = <link rel="stylesheet" type="text/css" href="fileadmin/templates/css/more_style.css" />
}
The headerData function in TypoScript adds arbitrary headers directly to the template when it is output in the TYPO3 frontend. This works almost exactly like the includeCSS function, but it has two advantages: flexibility and conditional CSS. Because the data we assign is completely arbitrary, we can use the same function to declare stylesheet links, JavaScript file links, and even hardcoded CSS and JavaScript. This is like learning a suite of functions for the price of one! We can also take advantage of this flexibility to use standard header logic from an advanced template without translating it into TypoScript:
//Include IE Hacks CSS
page.headerData.30 =TEXT
page.headerData.30.value (
<!--[if IE]>
<style type="text/css" media="screen">
@import "fileadmin/templates/css/common_ie.css";
</style>
<![endif]-->
)
Personally, I also prefer the way that headerData handles the ordering of the CSS files. By using the numeric values 10 and 20 in the declaration (headerData.10, headerData.20, and so on), we can guarantee the order that the links will appear in the header in the main TypoScript template and any extension templates; TYPO3 will always add them to the template in ascending order.
Go ahead and copy this code into the main TypoScript template setup of our example site and replace any of the other functions we tried:
page {
headerData.10 = TEXT
headerData.10.value = <link rel="stylesheet" type="text/css" href="fileadmin/templates/css/style.css" />
}
If you need help editing the TypoScript template, you can look at the steps at the beginning of this section again. We will be editing the TypoScript template setup a lot, so you will be very comfortable getting in and out of the Template tools pages soon enough. Remember to clear the cache after you've made the changes. Our frontend site should now look something like this: