
Going down the list from our requirements, wireframe, and HTML, we can start creating new elements for this template. A lot of this is review, so we won't spend too much time on techniques we've already learned. For the first field, though, we will review the process of creating a data element one time.
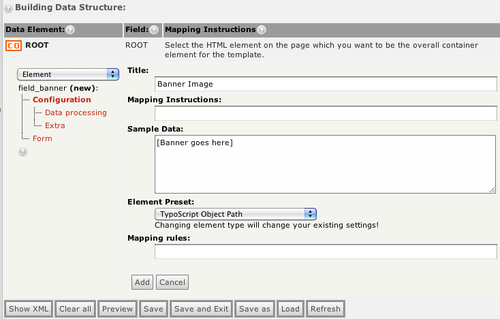
We'll start at the top with the banner image. We will make the banner image a TypoScript object so that it can be set in the TypoScript template setup. Like we've done before, this is helpful so that editors do not have to set it for each newsletter, but it can still be changed through the TypoScript template if necessary. We are calling it an image, but it will be a plain TypoScript object so we can always assign text or HTML values to it as well in the future.
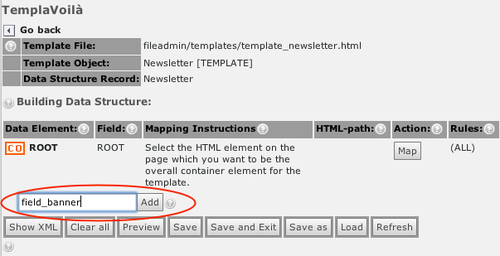
Remember, we create a new element by filling in a field name at the bottom of our editing page and clicking on Add:
Go ahead and fill out the form with the following settings:
- Field:
field_banner - Title:
Banner Image - Sample Data:
[Banner goes here] - Element Preset:
TypoScript Object Path
If your screen looks like the following screenshot, click on Add to create the element:
When the page refreshes, click on Typoscript in the left menu and set the Object path to lib.bannerImage:
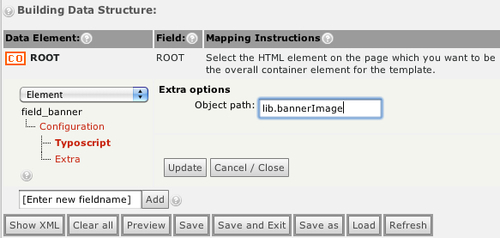
Click on Update to save our changes.
Next, we can create the date field. The date needs to set by the editors for every newsletter, but it does not need to be a dynamic container for content elements like most of the dynamic elements we have made before. We can set the date to be a Plain input field, which means that editors will only need to input plain text through the page properties, and the template will take care of any styling. Our goal in this template is to standardize as much as possible, so using a basic input field makes the editors' jobs easier and cuts down on styling mistakes compared to using a rich text editor. We can create the date element with the following settings:
- Field:
field_date - Title:
Date - Sample Data:
[Date goes here] - Element Preset:
Plain input field
Next, we can create the Main Article element. Like the Main Content area in the main template, this element will display content elements of any type and be edited through the Page view. This element is the mostly like what we have been using this whole time, so we can go ahead and create it in the backend:
- Field:
field_main_article - Title:
Main Article - Sample Data:
[Article goes here] - Element Preset:
Page-Content Elements
Next, we can create the news elements. We could leave the news title hardcoded as part of the template, but let's make it editable through TypoScript instead so we can change it easier in the future or translate it for different languages someday. Go ahead create this new element as a TypoScript object before we create the news section:
- Field:
field_news_title - Title:
News Title - Sample Data:
[News title goes here] - Element Preset:
TypoScript Object Path - Object path:
lib.newsTitle
Now we can create the news section. Like the main article section for the newsletter, we'll just allow content elements to be added to it in the Page view. Later on, we can restrict what the editors add a little more, but we'll just create a basic content element section for now:
- Field:
field_news - Title:
News - Sample Data:
[News goes here] - Element Preset:
Page-Content Elements
Go ahead create a new element as a TypoScript object for the title of the upcoming events section:
- Field:
field_event_list_title - Title:
Event List Title - Sample Data:
[Event list title goes here] - Element Preset:
TypoScript Object Path - Object path:
lib.eventListTitle
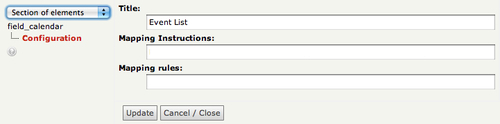
Our next element, the list of upcoming events, will be different than what we've done before. Because we need to create a section for repeating elements (agenda items, in this case) we are going to introduce the Section of elements and Container of elements DS (Data Structure) elements. A section element is used to map a series of repeating elements inside of our data structure. For our example, we need to have one agenda section with an unknown number of events. By using a section element, we do not have to set the number of events while we are creating the template. To add the new section, we can create a new element with the fieldname field_event_list, and change the drop-down from Element to Section of elements (shown in the following screenshot):
- Field:
field_event_list - Section of elements
- Title:
Event List
After we've added the section element, you can see that we can now add elements inside of it as well as to the ROOT container.
Now we are going to add a container element inside of the Event List section. The container element, like our ROOT container, can hold different data elements inside of it. In our case, we are going to create a container element for the events in the upcoming events list that includes the date and city as separate elements. The reason we're going to build it like this is so that we can actually create a single container for each event that can then be repeated multiple times inside of the calendar. If we just added the event date and city elements to the Event List section without enclosing them in a container, they would not be grouped accurately and we would just have a series of dates and unconnected cities. Now that we understand the purpose of the container, we can go ahead and build it to see it in action. Under the Event List section, go ahead and create a new element:
- Field:
field_event - Container for elements
- Title:
Event - Mapping Instructions:
Pick the HTML container element where you want the event to be placed.
When we save the new container, we can then add elements inside of it. Go ahead and create the event date element inside of the new Event container:
- Field:
field_event_date - Title:
Event Date - Mapping Instructions:
Pick the HTML container element where you want an event date to be placed. - Sample Data:
[Event date goes here] - Element Preset:
Plain input field
After we've saved the event date field, we can create the event city field right below it:
- Field:
field_event_city - Title:
Event City - Mapping Instructions:
Pick the HTML container element where you want an event city to be placed - Sample Data:
[Event city goes here] - Element Preset:
Plain input field
Now that we've created the section and the content elements, the hardest part is behind us. We just need to create the rest of the data elements for our new template. Like the News Title element, we'll create a Products Title element so that we can map the title to a TypoScript object. We know how to do this pretty well now, so we'll just create a new element under the ROOT container with the following settings:
- Field:
field_product_title - Title:
Product Title - Mapping Instructions:
Pick the HTML container element where you want the product title to be placed - Sample Data:
[Product title goes here] - Element Preset:
TypoScript Object Path - Object path: lib.productTitle
For now, we'll allow the editors to add any content elements they need to into the products section of our newsletter, so we'll just make a basic content element section like the news section:
- Field: field_products
- Title: Products
- Mapping Instructions: Pick the HTML container element where you want the products to be placed
- Sample Data: [Products go here]
- Element Preset: Page-Content Elements
We need to create an element for the contact information section. We need to create an element for the contact information section. We could combine the title and contact information into one TypoScript object, but that might make it harder for the editors if they need to customize the contact information (like preferred email address) for different types of newsletters in the future. We're already planning on having a few different newsletters for different departments, and we'll need to list different contact e-mails and phone numbers on the different ones. First, we'll make the title element:
- Field:
field_contact_title - Title:
Contact Info Title - Mapping Instructions:
Pick the HTML container element where you want the contact info title to be placed - Sample Data:
[Contact info title goes here] - Element Preset:
TypoScript Object Path - Object path:
lib.contactTitle
Next, we'll create a TypoScript object element for the contact information:
- Field:
field_contact_info - Title:
Contact Info - Mapping Instructions:
Pick the HTML container element where you want the contact info to be placed - Sample Data:
[Contact info goes here] - Element Preset:
TypoScript Object Path - Object path:
lib.contactInfo
Finally, we'll create a data element for the footer section of our page. This will also stay the same across groups of newsletters, but will need to be changed in the TypoScript for some folders. We'll create a TypoScript object for the footer as well:
- Field:
field_footer - Title:
Footer - Mapping Instructions:
Pick the HTML container element where you want the footer to be placed - Sample Data:
[Footer goes here] - Element Preset:
TypoScript Object Path - Object path:
lib.footer
That may seem like a lot of data elements, but the point of this template is to spend the extra time upfront to save editors' time and prevent layout inconsistency in the future. As we broke everything down to small sections and used a lot of TypoScript options, the editors will only have three blank sections to edit in the Page view: Main Article, News, and Products.
If we've added everything correctly, our data structure should look like the following screenshot and we can use the Save as button to save our changes to the Newsletter [Template] template object and data structure.
